最新Spring Security实战教程(十六)微服务间安全通信 - JWT令牌传递与校验机制_spring security 6 微服务

🌷 古之立大事者,不惟有超世之才,亦必有坚忍不拔之志
🎐 个人CSND主页——Micro麦可乐的博客
🐥《Docker实操教程》专栏以最新的Centos版本为基础进行Docker实操教程,入门到实战
🌺《RabbitMQ》专栏19年编写主要介绍使用JAVA开发RabbitMQ的系列教程,从基础知识到项目实战
🌸《设计模式》专栏以实际的生活场景为案例进行讲解,让大家对设计模式有一个更清晰的理解
🌛《开源项目》本专栏主要介绍目前热门的开源项目,带大家快速了解并轻松上手使用
✨《开发技巧》本专栏包含了各种系统的设计原理以及注意事项,并分享一些日常开发的功能小技巧
💕《Jenkins实战》专栏主要介绍Jenkins+Docker的实战教程,让你快速掌握项目CI/CD,是2024年最新的实战教程
🌞《Spring Boot》专栏主要介绍我们日常工作项目中经常应用到的功能以及技巧,代码样例完整
🌞《Spring Security》专栏中我们将逐步深入Spring Security的各个技术细节,带你从入门到精通,全面掌握这一安全技术
如果文章能够给大家带来一定的帮助!欢迎关注、评论互动~
最新Spring Security实战教程(十六)微服务间安全通信 - JWT令牌传递与校验机制
- 1. 前言
- 2. 配置 Spring Security 6 与 Nimbus-JOSE-JWT
-
- 2.1 引入依赖
- 2.2 配置公钥和私钥
-
- 2.2.1 生成公私钥对
- 2.2.1 将密钥加载到 Spring Boot
- 3. JWT 生成和验证
-
- 3.1 生成 JWT 令牌
- 3.2 验证 JWT 令牌
- 4. 配置 Spring Security 资源服务器
- 5. 服务间的 JWT 令牌传递与校验
-
- 5.1 服务 A 生成 JWT
- 5.2 客户端发送 JWT
- 5.3 服务 B 校验 JWT
- 6. 结语
回顾链接:
最新Spring Security实战教程(一)初识Spring Security安全框架
最新Spring Security实战教程(二)表单登录定制到处理逻辑的深度改造
最新Spring Security实战教程(三)Spring Security 的底层原理解析
最新Spring Security实战教程(四)基于内存的用户认证
最新Spring Security实战教程(五)基于数据库的动态用户认证传统RBAC角色模型实战开发
最新Spring Security实战教程(六)最新Spring Security实战教程(六)基于数据库的ABAC属性权限模型实战开发
最新Spring Security实战教程(七)方法级安全控制@PreAuthorize注解的灵活运用
最新Spring Security实战教程(八)Remember-Me实现原理 - 持久化令牌与安全存储方案
最新Spring Security实战教程(九)前后端分离认证实战 - JWT+SpringSecurity无缝整合
最新Spring Security实战教程(十)权限表达式进阶 - 在SpEL在安全控制中的高阶魔法
最新Spring Security实战教程(十一)CSRF攻防实战 - 从原理到防护的最佳实践
最新Spring Security实战教程(十二)CORS安全配置 - 跨域请求的安全边界设定
最新Spring Security实战教程(十三)会话管理机制 - 并发控制与会话固定攻击防护
最新Spring Security实战教程(十四)OAuth2.0精讲 - 四种授权模式与资源服务器搭建
最新Spring Security实战教程(十五)快速集成 GitHub 与 Gitee 的社交登录
1. 前言
在目前微服务架构中,服务间的安全通信至关重要。为了解决不同服务之间的认证与授权问题,常常使用 JSON Web Token (JWT) 作为令牌传递机制。JWT 是一种轻量级的令牌格式,包含了丰富的用户身份信息,并且可以被服务端验证。利用 Spring Security 6 和 JWT,我们可以很容易地实现服务间的安全通信,确保服务间的请求只有经过授权的客户端才能发起。
在前面的第9个章节中,博主详细介绍了 JWT+SpringSecurity 的整合,这里将简单对JWT简单介绍带过,更多详细介绍感兴趣的小伙伴可以回顾 【最新Spring Security实战教程(九)前后端分离认证实战 - JWT+SpringSecurity无缝整合】
本文博主将带着小伙伴快速了解如何使用 Spring Security 6 配合 JWT 实现服务间的安全通信。
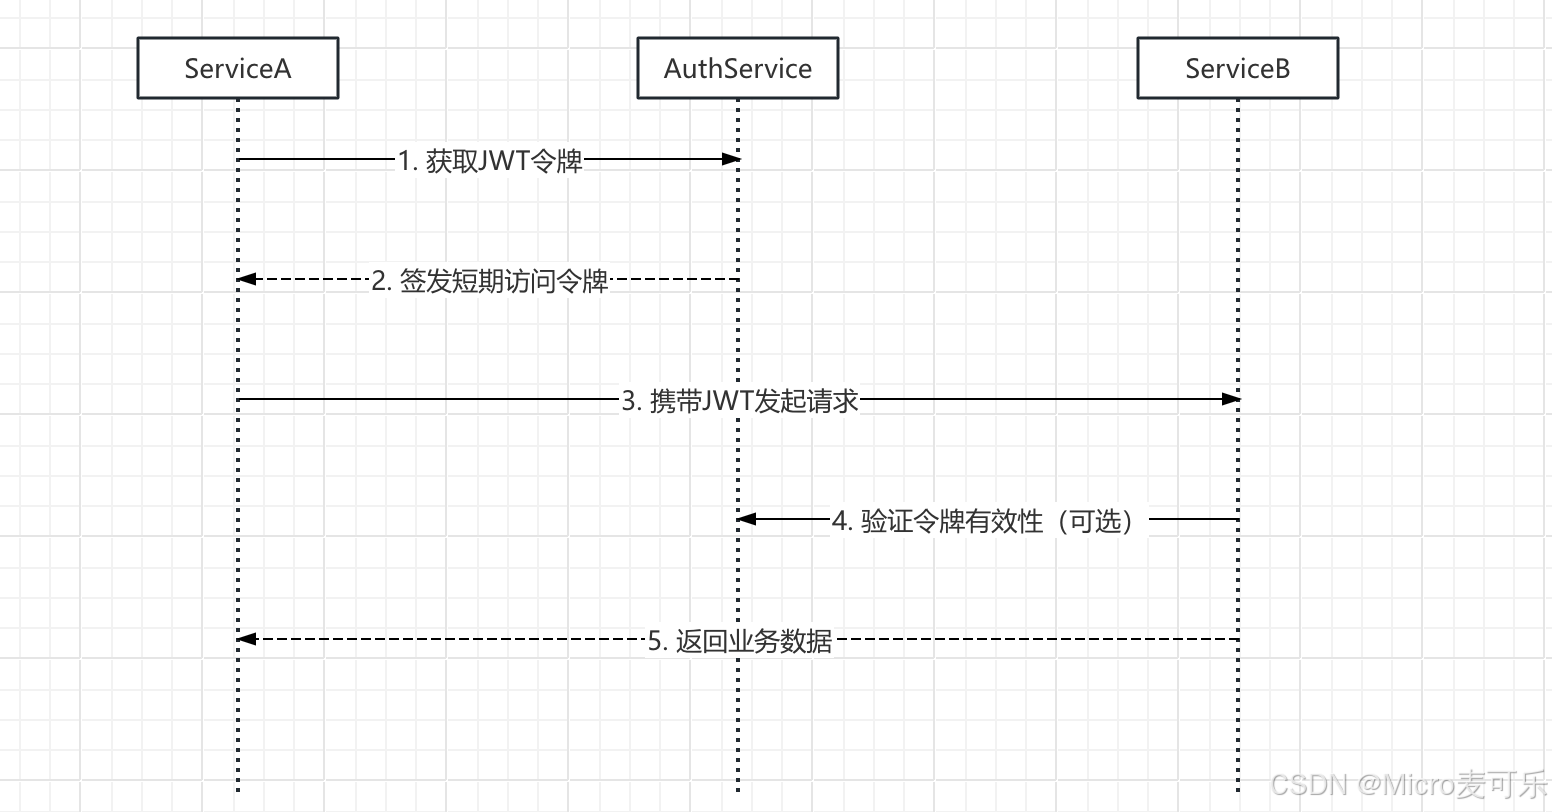
微服务间 JWT通信核心流程
2. 配置 Spring Security 6 与 Nimbus-JOSE-JWT
本章节博主使用的是 Nimbus-JOSE-JWT
2.1 引入依赖
<dependency> <groupId>org.springframework.boot</groupId> <artifactId>spring-boot-starter-oauth2-resource-server</artifactId></dependency><dependency> <groupId>com.nimbusds</groupId> <artifactId>nimbus-jose-jwt</artifactId> <version>9.37</version></dependency>spring-boot-starter-oauth2-resource-server 提供了 Spring Security 中用于资源服务器的支持,nimbus-jose-jwt 则提供了生成和验证 JWT 的功能。
关键依赖说明:
2.2 配置公钥和私钥
为了使用 RSA 进行 JWT 签名和验证,我们需要配置私钥(用于签名)和公钥(用于验证)。可以将密钥存储为 PEM 格式的文件,并在 Spring Boot 配置中加载这些密钥。
2.2.1 生成公私钥对
首先,我们生成一个 RSA 公私钥对:
# 生成私钥(private.pem)openssl genpkey -algorithm RSA -out private.pem -pkeyopt rsa_keygen_bits:2048# 提取公钥(public.pem)openssl rsa -pubout -in private.pem -out public.pem2.2.1 将密钥加载到 Spring Boot
将私钥和公钥存储为文件,并在配置中加载它们:
# application.yml 配置公钥和私钥路径spring: security: oauth2: resourceserver: jwt: public-key-location: classpath:public.pem private-key-location: classpath:private.pem目前我们将密钥文件放在 resources 目录下,并通过配置 public-key-location 和 private-key-location 来加载它们。
也可以指定系统上其它目录
3. JWT 生成和验证
3.1 生成 JWT 令牌
我们需要创建一个方法,通过 RSA 私钥签名 JWT 令牌。使用 Nimbus-JOSE-JWT 来生成带有签名的 JWT
import com.nimbusds.jose.*;import com.nimbusds.jose.crypto.RSASSASigner;import com.nimbusds.jwt.JWTClaimsSet;import com.nimbusds.jwt.SignedJWT;import java.security.PrivateKey;import java.util.Date;public class JwtUtils { private final PrivateKey privateKey; public JwtUtils(PrivateKey privateKey) { this.privateKey = privateKey; } public String createJWT(String subject) throws Exception { JWTClaimsSet claimsSet = new JWTClaimsSet.Builder() .subject(subject) .issueTime(new Date()) .expirationTime(new Date(System.currentTimeMillis() + 3600000)) // 1 hour expiration .build(); SignedJWT signedJWT = new SignedJWT( new JWSHeader(JWSAlgorithm.RS256), claimsSet ); RSASSASigner signer = new RSASSASigner(privateKey); signedJWT.sign(signer); return signedJWT.serialize(); }}此方法会根据传入的用户名(subject)生成一个 JWT 令牌,并使用 RSA 私钥进行签名。生成的 JWT 将包含基本的声明 (如 subject、issueTime 和 expirationTime)
3.2 验证 JWT 令牌
为了验证 JWT 令牌,我们需要使用 RSA 公钥来验证其签名。以下是使用 Nimbus-JOSE-JWT 库验证 JWT 的代码:
import com.nimbusds.jose.*;import com.nimbusds.jose.crypto.RSASSAVerifier;import com.nimbusds.jwt.SignedJWT;import java.security.PublicKey;public class JwtUtils { private final PublicKey publicKey; public JwtUtils(PublicKey publicKey) { this.publicKey = publicKey; } public boolean validateJWT(String token) throws Exception { SignedJWT signedJWT = SignedJWT.parse(token); RSASSAVerifier verifier = new RSASSAVerifier(publicKey); return signedJWT.verify(verifier); }}此方法会解析并验证传入的 JWT 令牌,使用 RSA 公钥验证签名的合法性。如果签名有效,它将返回 true,否则返回 false
4. 配置 Spring Security 资源服务器
这里我们将使用 Spring Security 配置资源服务器,确保每个请求都携带有效的 JWT 令牌,并使用 RSA 公钥验证令牌
@Configurationpublic class SecurityConfig { @Bean public SecurityFilterChain securityFilterChain(HttpSecurity http) throws Exception { http .authorizeRequests(auth -> auth .requestMatchers(\"/public/**\").permitAll() .anyRequest().authenticated() ) .oauth2ResourceServer(oauth2 -> oauth2.jwt(jwt -> jwt.decoder(jwtDecoder()))); return http.build(); } @Bean public JwtDecoder jwtDecoder() throws Exception { RSAPublicKey publicKey = (RSAPublicKey) KeyFactory.getInstance(\"RSA\") .generatePublic(new X509EncodedKeySpec(Files.readAllBytes(Paths.get(\"classpath:public.pem\")))); return NimbusJwtDecoder.withPublicKey(publicKey).build(); }}在上面的配置中,我们指定了 JwtDecoder,并且使用 NimbusJwtDecoder 来加载 RSA 公钥,并为每个请求验证 JWT 令牌。通过 oauth2ResourceServer(oauth2 -> oauth2.jwt()) 配置,Spring Security 会自动处理 JWT 校验
5. 服务间的 JWT 令牌传递与校验
5.1 服务 A 生成 JWT
服务 A 会在用户登录后生成 JWT,并将其返回给客户端:
@RestControllerpublic class AuthController { private final JwtUtils jwtUtils; public AuthController(JwtUtils jwtUtils) { this.jwtUtils = jwtUtils; } @PostMapping(\"/login\") public String login(@RequestBody LoginRequest loginRequest) throws Exception { if (\"user\".equals(loginRequest.getUsername()) && \"password\".equals(loginRequest.getPassword())) { return jwtUtils.createJWT(loginRequest.getUsername()); } throw new UnauthorizedException(\"Invalid credentials\"); }}5.2 客户端发送 JWT
客户端将 JWT 令牌放入请求的 Authorization 头部:
public class RestClient { public static String getProtectedResource(String token) { HttpHeaders headers = new HttpHeaders(); headers.set(\"Authorization\", \"Bearer \" + token); HttpEntity<String> entity = new HttpEntity<>(headers); RestTemplate restTemplate = new RestTemplate(); ResponseEntity<String> response = restTemplate.exchange( \"http://localhost:8081/api/protected\", HttpMethod.GET, entity, String.class ); return response.getBody(); }}5.3 服务 B 校验 JWT
服务 B 会验证 JWT 令牌,确保请求是来自合法的客户端:
@RestController@RequestMapping(\"/api\")public class ProtectedResourceController { @GetMapping(\"/protected\") public ResponseEntity<String> getProtectedData() { return ResponseEntity.ok(\"This is a protected resource!\"); }}6. 结语
通过本章节的介绍,相信小伙伴们已经掌握了如何使用 JWT 与 RSA 非对称加密在 Spring Security 6 中实现 JWT 令牌传递与校验机制。非对称加密的优势在于公钥可以公开分发,而私钥只由服务端持有,从而增加了系统的安全性。
当然本章节未引入 openfeign 作为服务间的调用,仅仅使用了最原始的 RestTemplate 进行其它服务的测试请求, 小伙伴们可以根据自己的需求调整并完善,进一步提升系统的安全性。
如果你在实践过程中有任何疑问或更好的扩展思路,欢迎在评论区留言,最后希望大家 一键三连 给博主一点点鼓励!


