【Spring AI 0基础教程】1、基础篇 | 环境搭建 - 智能天气预报助手_spring ai教程
基础篇 | 环境搭建 - 智能天气预报助手
一、什么是 Spring AI
Spring AI (https://spring.io/projects/spring-ai)]是 Spring 官方于 2023 年推出的 AI 应用开发框架,它如同 AI 世界的\"Spring 生态连接器\",致力于简化开发集成了 AI 功能的应用程序。它主要解决两大核心问题:
- 统一接口:消除不同 AI 服务(如 OpenAI、智谱 AI、DeepSeek 等)的 API 差异,允许用户灵活地在多个模型之间切换。
- 生态整合:将 AI 能力无缝融入 Spring 技术栈(如 Spring Boot、Spring MVC)。
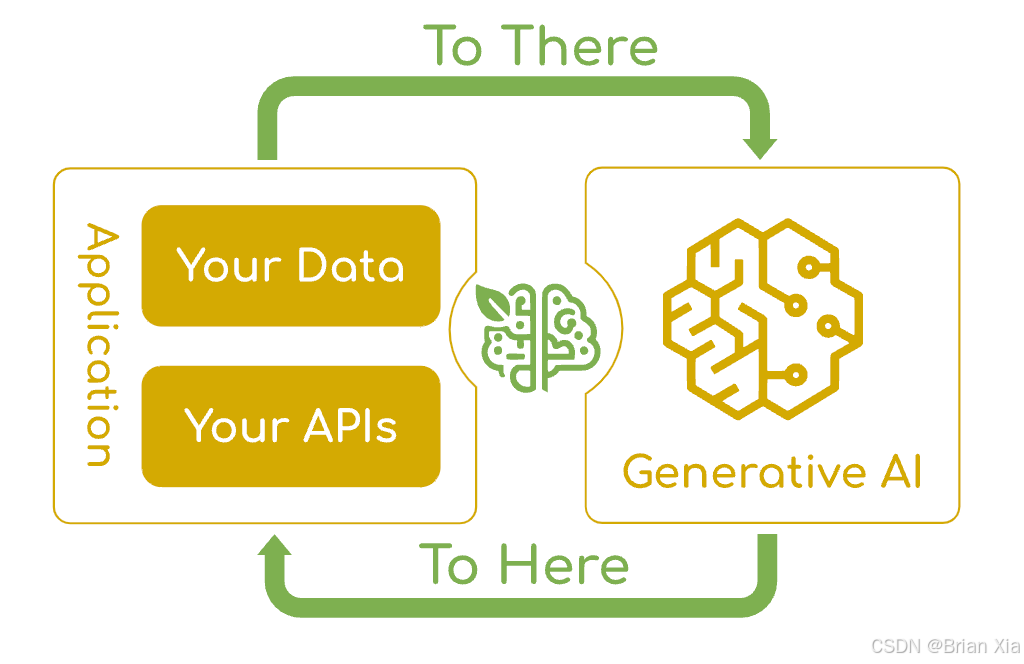
如上图所示,Spring AI 成为了连接企业数据以及 API 和生成式 AI 的桥梁。
🛠️ 核心功能矩阵
Spring AI 具备的能力如下:
它具备以下特点:
- 即插即用:通过更换
application.yml配置即可切换大模型供应商。 - 响应式支持:原生集成
Reactor Streams,支持背压控制的流式响应。 - 扩展性强:自定义
ChatClient实现可接入任意 AI 服务。
😎Spring AI 能做什么?
那么 Spring AI 到底能做什么呢?这里我给出几个常见案例,在咱们这套课程中也会带着大家完成这些案例:
案例 1:智能客服系统
-
场景:集成自然语言处理的客服机器人,处理用户咨询、订单查询和售后问题。
-
AI 价值:
- 减少人工客服成本,24/7 响应客户需求。
- 通过意图识别提升问题解决效率(准确率可达 85%+)。
-
Spring AI 实现:
使用 Spring AI 的对话模型接口(如 OpenAI 或 智谱 AI),快速构建企业级对话流。
案例 2:智能数据分析平台
-
场景:自动分析企业销售数据、用户行为日志,生成可视化报告和预测建议。
-
AI 价值:
- 通过时间序列预测优化库存管理(降低 20%-30% 滞销风险)。
- 实时异常检测(如金融反欺诈)。
-
Spring AI 实现:
结合 Spring AI 和 MCP 组件,对数据库进行访问,实现数据预处理与预测 API。
案例 3:自动化文档处理
-
场景:合同、发票的自动分类、关键词提取和合规性审查。
-
AI 价值:
- 节省 90% 人工文档处理时间。
- 通过 OCR 实现非结构化数据标准化。
-
Spring AI 实现:
调用 Spring AI 的多模态接口,实现文档解析流水线。
案例 4:智能营销内容生成
-
场景:自动化生成广告文案、社交媒体推文、邮件营销内容,支持多语言适配。
-
AI 价值:
- 缩短 70% 的创意内容生产周期。
- 通过 A/B 测试数据反馈优化生成策略(点击率提升 15%-25%)。
-
Spring AI 实现:
调用 大模型接口,结合企业品牌风格指南定制生成规则。
案例 5:语音客服系统
-
场景:通过语音交互处理用户来电(如银行催收、快递查询、政务热线),支持多语言、方言识别和情感分析。
-
AI 价值:
- 成本降低:替代 60% 以上重复性语音服务(如账单查询)。
- 效率提升:语音响应速度 <1 秒(传统 IVR 需 5-10 秒菜单导航)。
-
Spring AI 实现:
- 语音识别
- 集成 Whisper 模型,将用户语音转为文本。
- 支持实时流式传输(降低延迟)。
- 自然语言处理(NLP)
- 使用 Spring AI 的对话模型解析用户意图,生成响应文本。
- 情感分析:识别用户情绪(愤怒/焦虑),触发人工坐席接管。
- 语音合成(TTS)
- 调用 AI 模型生成拟人化语音反馈。
- 语音识别
📚 学习资源指引
以下是 Spring AI 相关的学习资源:
同学们,了解了以上内容,我们就可以开始准备学习 Spring AI 啦,先别急着埋头苦干,下面这几个重点得拿小本本记好咯!
其一,Spring AI 不是大模型的 “替身” !它自己没有那种直接生成智能内容的超能力,但别小瞧它,它可是个超厉害的 “连接大师”,专门负责牵线搭桥,把咱们手头现有的各种牛哄哄的模型给串起来,让它们一起为咱的项目服务,超给力!
其二,Spring AI 特别 “随性”,绝不绑死在一家厂商身上。现在市面上云供应商那么多,它倒好,直接搞出个统一 API,就像一把万能钥匙,不管哪家云供应商的门都能开。咱用它的时候,完全可以根据心情、项目需求,自由切换不同厂商的资源,根本不用担心被 “套牢”。比如最近超火的 DeepSeek,符合 OpenAI 接口规范的话我们可以实现秒级接入,如果不符合我们自己编写一个接入模块,也能实现快速接入。
最后,学习 Spring AI 有个小门槛,得有点 Java 和 Spring 基础。虽说它已经帮咱们把 AI 集成的路给铺平了不少,让整个过程简单了许多,但基础不牢,地动山摇!Spring 的那些核心概念,咱们还是得稳稳拿捏住,这样才能在后续玩 Spring AI 的时候,一路开挂,轻松应对各种难题,做出超炫的成果!
二、快速入门
效果展示
先来看一下本章要完成的案例:智能天气预报助手。该助手借助 Spring AI 的特性结合人工智能技术,为用户提供准确、便捷且个性化的天气信息服务,可广泛应用于日常生活提醒、出行规划、农业生产参考等多个场景。

环境搭建
我们一起来体验一下 Spring AI 的魅力,首先来创建项目:
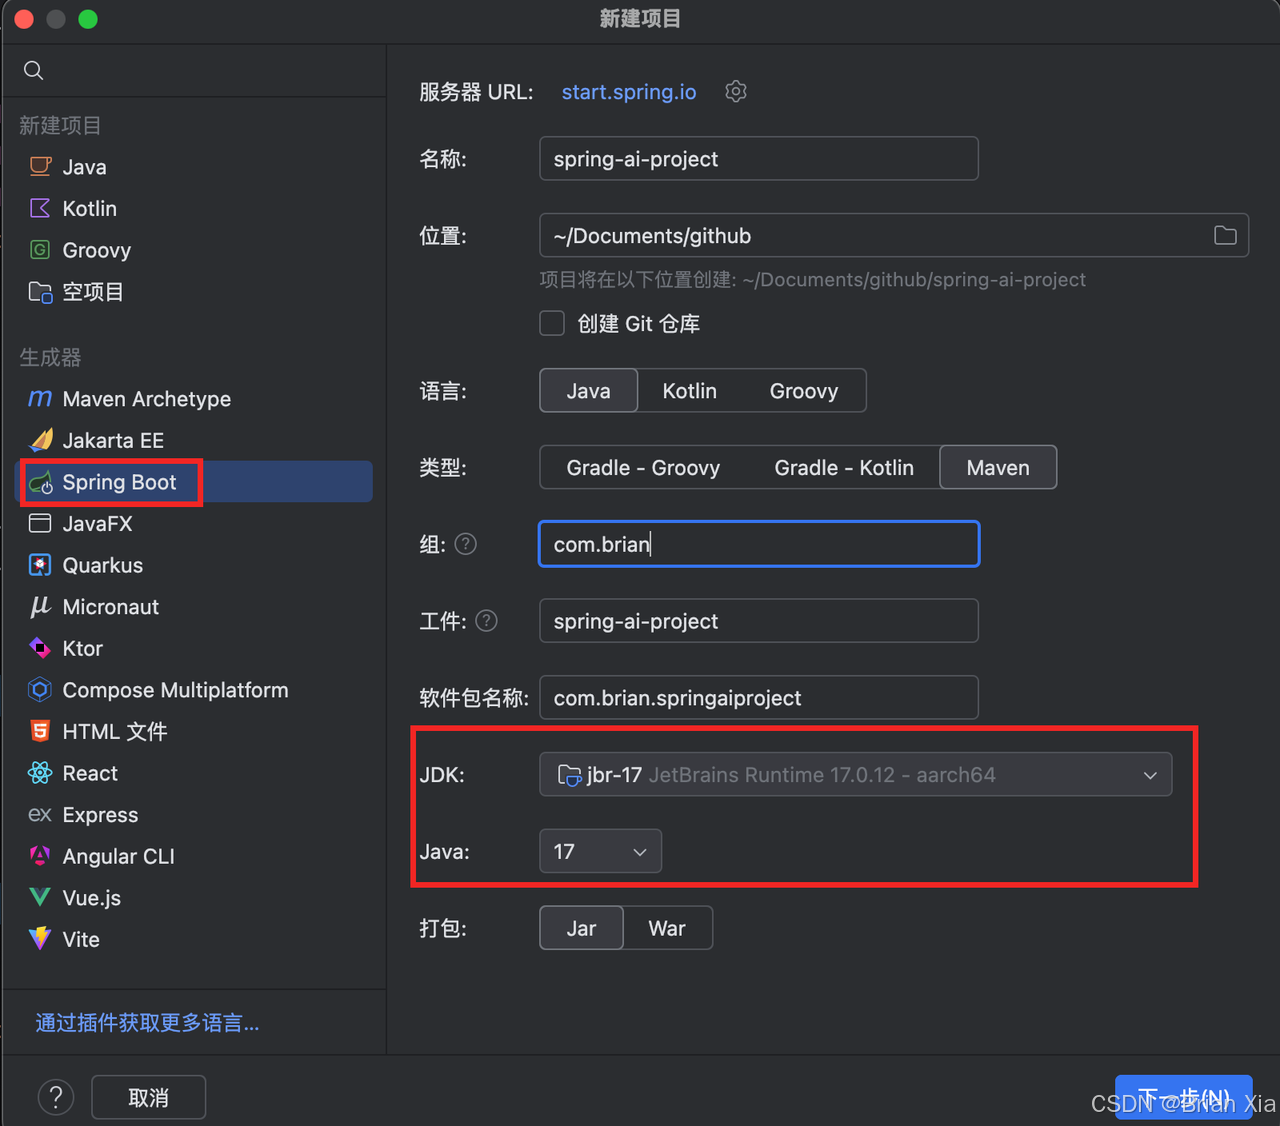
使用 IDEA 创建 spring 项目,注意官方要求版本号为 3.2.x 和 3.3.x。本教程中我们使用 maven 来作为项目管理工具。
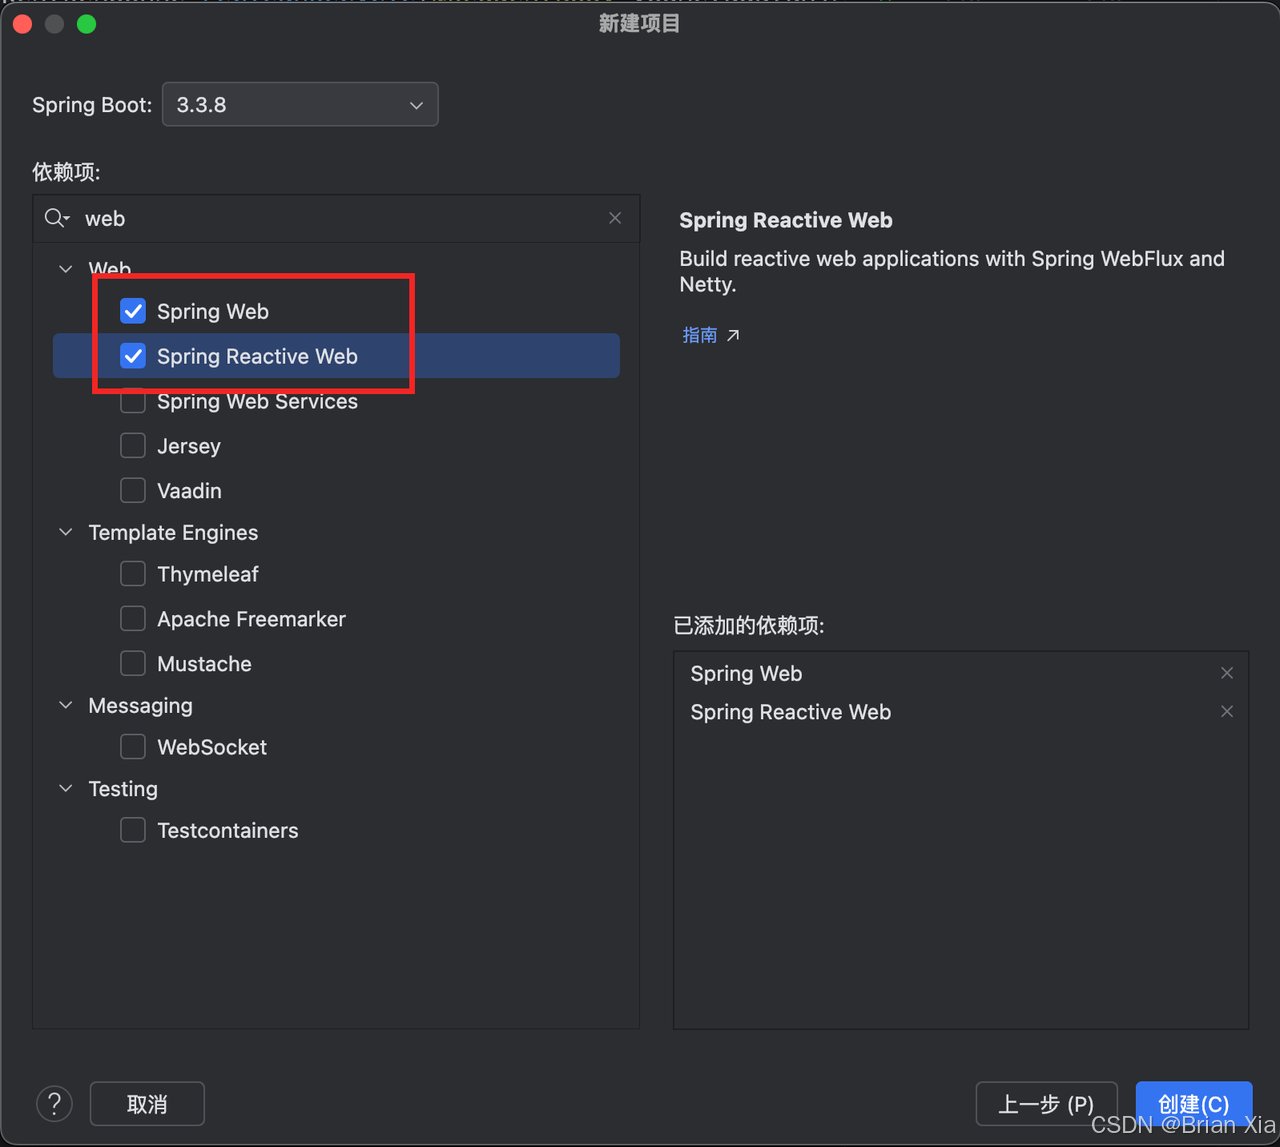
勾选 spring web 和 spring reactive web 选项,分别支持 mvc模式 和 webflux模式 访问:
创建完项目之后,我们来添加依赖。首先添加 snapshot 需要的依赖库,如果已经发布正式版则不需要此步骤:
<repositories> <repository> <id>spring-milestones</id> <name>Spring Milestones</name> <url>https://repo.spring.io/milestone</url> <snapshots> <enabled>false</enabled> </snapshots> </repository> <repository> <id>spring-snapshots</id> <name>Spring Snapshots</name> <url>https://repo.spring.io/snapshot</url> <releases> <enabled>false</enabled> </releases> </repository></repositories>接下来添加 spring-ai 所有的 bom,用来锁定依赖版本,目前可选版本有 1.0.0-SNAPSHOT 和 1.0.0-M6。1.0.0-M6 中包含一些未正式发布的特性,这里我们先使用 spring-ai-bom:
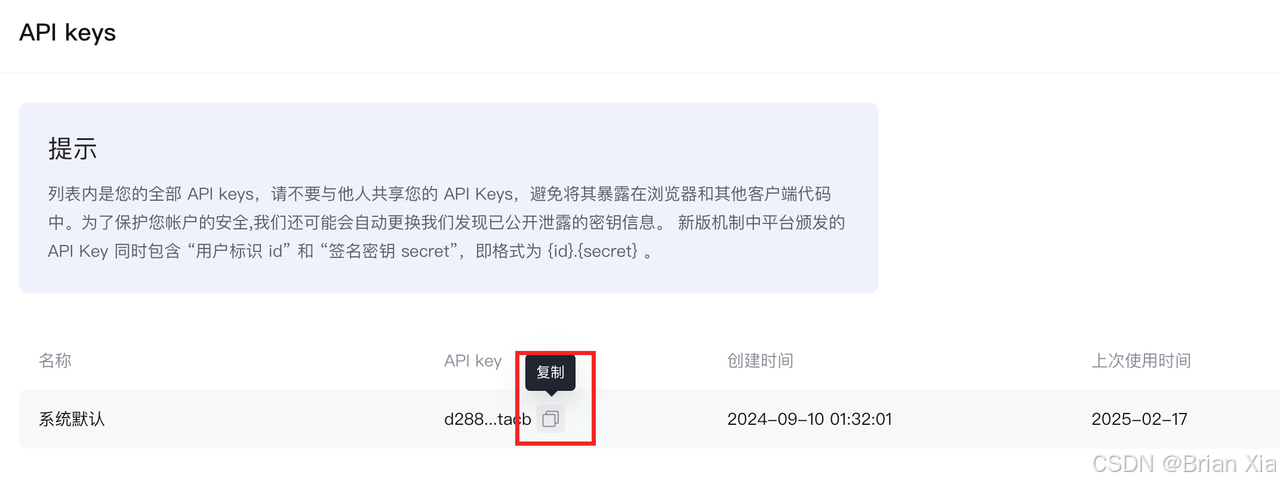
<dependencyManagement> <dependencies> <dependency> <groupId>org.springframework.ai</groupId> <artifactId>spring-ai-bom</artifactId> <version>1.0.0-SNAPSHOT</version> <type>pom</type> <scope>import</scope> </dependency> </dependencies></dependencyManagement>最后添加对应大模型的依赖,Spring AI 支持的大模型有很多,在官网上有详细的对比,有兴趣的同学们可以详细去看下。今天我们选择的是国产的智谱大模型,不需要科学上网就可以使用。首先去智谱的官网进行注册,然后申请一个 API KEY。将这个 Key 复制一下,一会儿需要配置到项目中。
接下来我们引入对应的依赖:
<dependency> <groupId>org.springframework.ai</groupId> <artifactId>spring-ai-zhipuai-spring-boot-starter</artifactId></dependency>我们将刚才智谱 AI 的 API KEY 配置到配置文件 src\\main\\resources 中,默认的配置文件为 properties 文件,可读性和可配置性都不加,将它删除,重新创建一个 application.yml 文件。将如下内容配置到文件中:
spring: ai: zhipuai: api-key: ${ZHIPU_API_KEY}这里千万不要把 API KEY 直接写入到配置文件中,如果后续提交到 github 等 git 仓库中,API KEY 相当于就暴露出去了,非常不安全。所以这里我们使用占位符,在启动命令的环境变量中去配置内容:
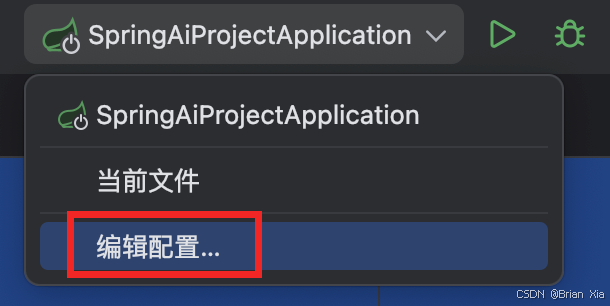
如果没有这选项,就先运行一下 SpringBoot Application。点击修改选项:
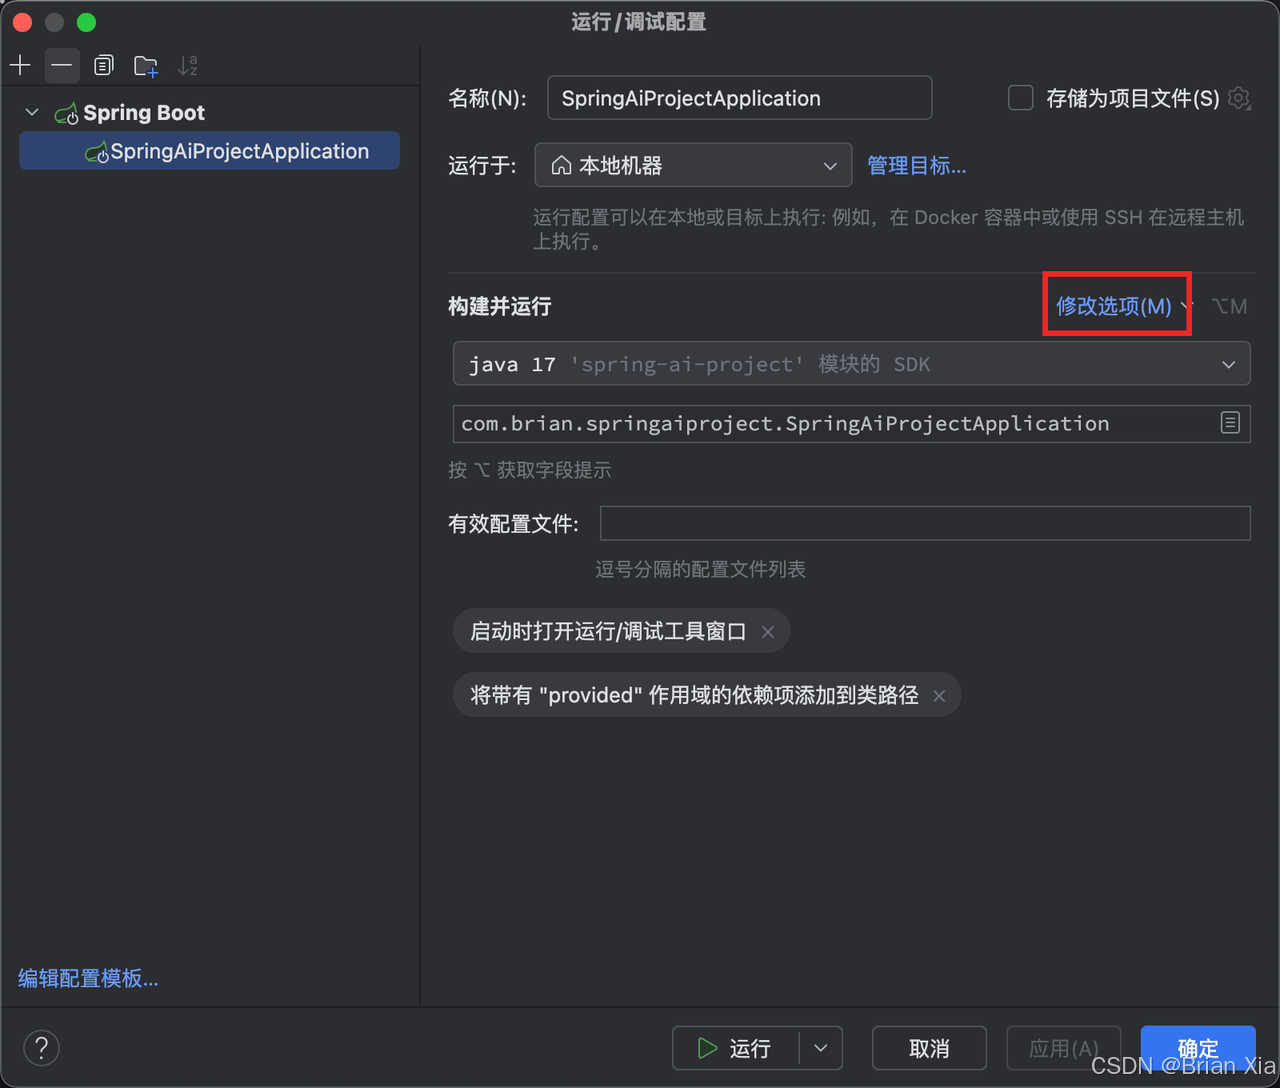
选择环境变量:
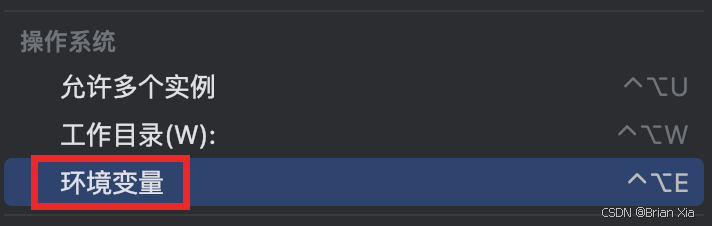
填入如下内容:
ZHIPU_API_KEY=你的API KEY
点击保存。
后端代码编写
好了,前置工作都已经完成了,接下来我们来编写后端代码。创建 WeatherController 用来处理前端发送的请求:
@RestController@RequestMapping(\"/weather\")public class WeatherController { // 注入智谱AI聊天模型 private final ZhiPuAiChatModel chatModel; // 系统提示词,定义机器人的角色和行为 private static final String _SYSTEM_PROMPT _= \"\"\" 你是一个专业的天气预报机器人,擅长: 1. 解答天气相关的问题 2. 提供天气预报建议 3. 解释天气现象 4. 提供合适的穿衣建议 5. 分析天气对出行的影响 请始终以专业、友好的口吻回答问题。如果问题与天气无关,请礼貌地提醒用户你是一个天气预报助手。 \"\"\"; public WeatherController(ZhiPuAiChatModel chatModel) { this.chatModel = chatModel; } _/**__ * 生成单次天气相关回复__ *__ * @param message 用户输入的消息__ * @return 包含AI回复的Map__ */__ _@GetMapping(\"/generate\") public String generate(@RequestParam(value = \"message\") String message) { // 构建提示词,加入系统角色定义 String prompt = _SYSTEM_PROMPT _+ \"\\n用户问题:\" + message; return this.chatModel.call(prompt); }}我们来解读一下代码:
- 类定义与注解
@RestControllerpublic class WeatherController {@RestController:- Spring MVC 注解,表示该类是一个 RESTful 控制器,所有方法默认返回 JSON/XML 数据而非视图页面。
- 等价于
@Controller+@ResponseBody的组合。
- 依赖注入
private final ZhiPuAiChatModel chatModel;public WeatherController(ZhiPuAiChatModel chatModel) {this.chatModel = chatModel;}- 构造函数注入:Spring 推荐的方式,保证依赖不可变(
final修饰符),避免空指针异常。 ZhiPuAiChatModel:Spring AI 的组件,封装了与智谱 AI 模型的交互逻辑(如 API 调用、参数处理)。
- 系统提示词定义
private static final String SYSTEM_PROMPT = \"\"\" 你是一个专业的天气预报机器人,擅长: 1. 解答天气相关的问题 2. 提供天气预报建议 // ... 其他提示 ... \"\"\";- 关键作用:
- 角色定义:明确 AI 的领域边界(只处理天气问题)。
- 安全控制:当用户提问非天气问题时,触发礼貌拒绝逻辑。
- 风格控制:确保回复的专业性和友好性。
- 接口实现
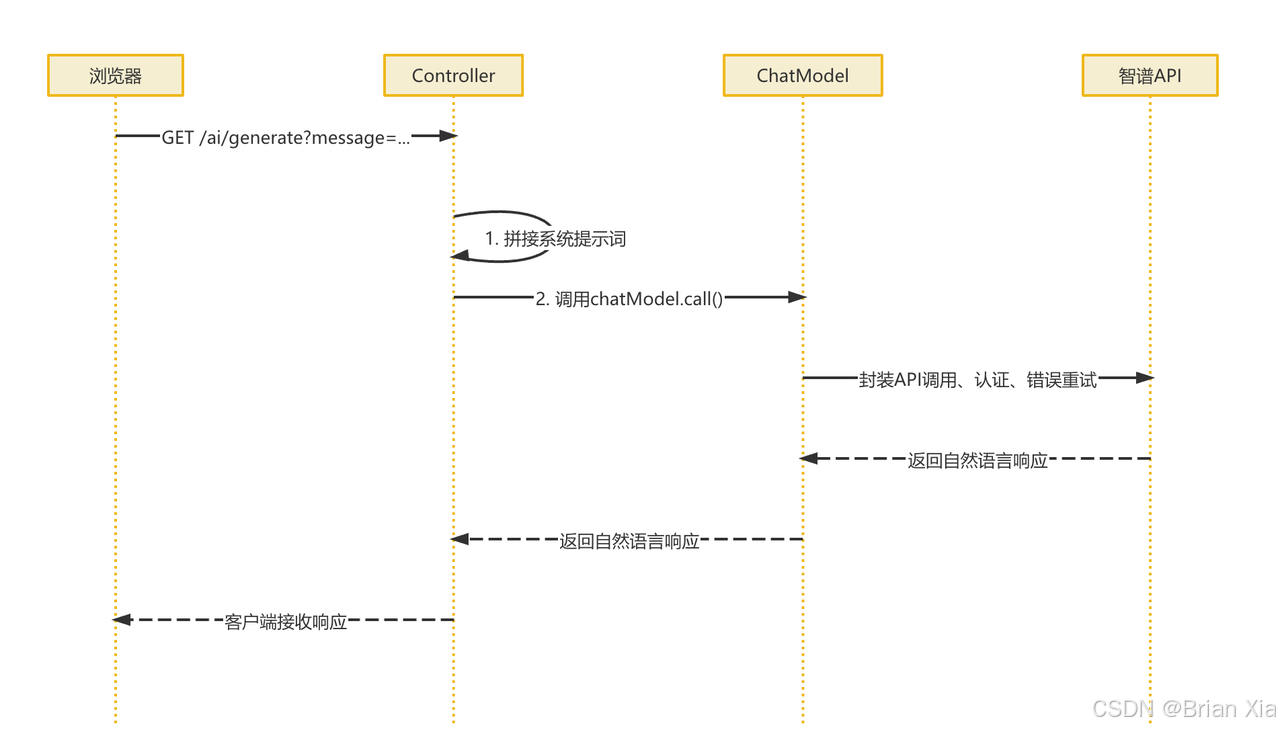
return this.chatModel.call(prompt);chatModel.call()内部机制:- 认证:自动添加智谱 API 密钥(通常通过
ZhiPuAiChatModel配置类设置)。 - HTTP 调用:向智谱 API 端点(如
https://api.zhipu.ai/v4/chat/completions)发送 POST 请求。 - 参数封装:将
prompt包装为模型所需的 JSON 格式,例如:
- 认证:自动添加智谱 API 密钥(通常通过
{\"model\": \"glm-4\",\"messages\": [{\"role\": \"user\", \"content\": \"北京今天天气...\"}],\"temperature\": 0.7}1. 响应解析:提取智谱 API 返回结果中的 `content` 字段。整体流程示意图
]
后端代码测试
运行spring boot服务之后,调用接口进行测试:
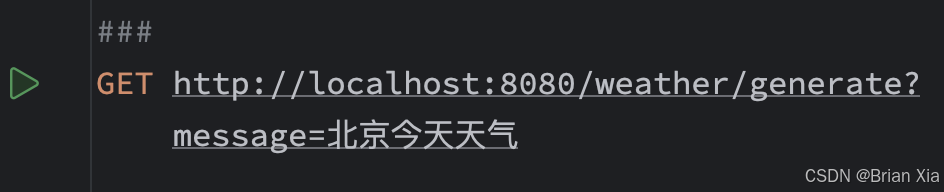
这个时候我们会遇到一个错误:
{\"timestamp\":\"2025-02-05T07:25:47.090+00:00\",\"status\":500,\"error\":\"Internal Server Error\",\"path\":\"/ai/generate\"}这说明我们已经将请求发送给了智谱大模型,但是由于 Spring AI 配置的默认大模型是收费的,同时 api-key 绑定的账户没有充值,所以无法成功调用。我们可以选择使用免费的模型进行测试:
修改一下配置
spring: ai: zhipuai: api-key: ${ZHIPU_API_KEY} chat: options: model: GLM-4-Flash使用 GLM-4-Flash 这个免费模型,再次进行测试:

成功返回了结果,恭喜你完成了后端代码的编写,是不是非常简单?当然这里如果我们使用的是免费模型,可能数据方面会有一定的准确性问题,后续我们可以使用 Tool Functions 进行优化,也可以替换为付费模型。
前端代码编写
前端代码我这里给出一个案例,同学们可以直接拿去使用:
<!DOCTYPE html><html lang=\"zh-CN\"><head> <meta charset=\"UTF-8\"> <meta name=\"viewport\" content=\"width=device-width, initial-scale=1.0\"> <title>智能天气预报助手</title> <style> _/* 全局样式 */_ * { margin: 0; padding: 0; box-sizing: border-box; } body { font-family: -apple-system, BlinkMacSystemFont, \"Segoe UI\", Roboto, \"Helvetica Neue\", Arial, sans-serif; line-height: 1.6; color: #333; background: linear-gradient(120deg, #89f7fe 0%, #66a6ff 100%); } _/* 聊天容器 */_ .chat-container { max-width: 800px; margin: 20px auto; padding: 20px; height: calc(100vh - 40px); display: flex; flex-direction: column; background-color: rgba(255, 255, 255, 0.95); border-radius: 12px; box-shadow: 0 8px 32px rgba(31, 38, 135, 0.15); } _/* 头部标题 */_ .chat-header { text-align: center; padding: 20px 0; margin-bottom: 20px; border-bottom: 1px solid #eee; position: relative; } .chat-header h1 { color: #1a73e8; font-size: 24px; margin-bottom: 10px; } .chat-header p { color: #666; font-size: 14px; } _/* 切换按钮 */_ .switch-mode { position: absolute; right: 20px; top: 20px; padding: 8px 16px; background-color: #1a73e8; color: white; border: none; border-radius: 20px; cursor: pointer; font-size: 14px; transition: all 0.3s; } .switch-mode:hover { background-color: #1557b0; transform: translateY(-2px); } _/* 消息区域 */_ .messages-container { flex: 1; overflow-y: auto; margin-bottom: 20px; padding: 20px; background-color: rgba(255, 255, 255, 0.8); border-radius: 8px; } _/* 消息样式 */_ .message { margin-bottom: 20px; padding: 15px; border-radius: 8px; max-width: 80%; } .user-message { background-color: #e3f2fd; margin-left: auto; color: #1565c0; } .assistant-message { background-color: #f5f5f5; margin-right: auto; color: #333; } _/* 输入区域 */_ .input-container { position: relative; padding: 20px; background-color: rgba(255, 255, 255, 0.9); border-radius: 8px; box-shadow: 0 2px 10px rgba(0, 0, 0, 0.1); } #message-input { width: 100%; padding: 12px; border: 2px solid #e0e0e0; border-radius: 8px; resize: none; height: 50px; font-size: 16px; transition: border-color 0.3s; } #message-input:focus { border-color: #1a73e8; outline: none; } #send-button { position: absolute; right: 30px; bottom: 30px; padding: 8px 20px; background-color: #1a73e8; color: white; border: none; border-radius: 20px; cursor: pointer; transition: all 0.3s; } #send-button:hover { background-color: #1557b0; transform: translateY(-2px); } #send-button:disabled { background-color: #cccccc; cursor: not-allowed; transform: none; } _/* 示例问题区域 */_ .example-questions { margin-top: 10px; padding: 10px; display: flex; flex-wrap: wrap; gap: 10px; } .example-question { background-color: #e3f2fd; color: #1565c0; padding: 8px 16px; border-radius: 16px; font-size: 14px; cursor: pointer; transition: all 0.3s; } .example-question:hover { background-color: #1a73e8; color: white; } _/* 打字动画 */_ .typing { display: inline-block; margin-left: 4px; } .typing span { display: inline-block; width: 6px; height: 6px; background-color: #666; border-radius: 50%; margin: 0 2px; animation: typing 1s infinite; } .typing span:nth-child(2) { animation-delay: 0.2s; } .typing span:nth-child(3) { animation-delay: 0.4s; } @keyframes _typing_ { 0%, 100% { transform: translateY(0); } 50% { transform: translateY(-4px); } } </style></head><body> <div class=\"chat-container\"> <div class=\"chat-header\"> <h1>🌤️ 智能天气预报助手</h1> <p>我可以为您提供天气预报、穿衣建议和出行建议</p> <button class=\"switch-mode\" onclick=\"window.location.href=\'stream.html\'\">切换到流式版</button> </div> <div class=\"messages-container\" id=\"messages\"> __ <div class=\"message assistant-message\"> 您好!我是您的智能天气预报助手。您可以询问我任何关于天气的问题,比如: </div> </div> <div class=\"example-questions\"> <div class=\"example-question\" onclick=\"askExample(this)\">北京今天天气怎么样?</div> <div class=\"example-question\" onclick=\"askExample(this)\">今天适合户外运动吗?</div> <div class=\"example-question\" onclick=\"askExample(this)\">明天要出门,需要带伞吗?</div> <div class=\"example-question\" onclick=\"askExample(this)\">最近三天的天气预报</div> </div> <div class=\"input-container\"> <textarea id=\"message-input\" placeholder=\"请输入您的天气相关问题...\" rows=\"1\" onkeydown=\"if(event.keyCode === 13 && !event.shiftKey) { event.preventDefault(); sendMessage(); }\"></textarea> <button id=\"send-button\" onclick=\"sendMessage()\">发送</button> </div> </div> <script> _// DOM 元素_ const messagesContainer = document.getElementById(\'messages\'); const messageInput = document.getElementById(\'message-input\'); const sendButton = document.getElementById(\'send-button\'); _// 示例问题点击处理_ function **askExample**(_element_) { messageInput.value = _element_.textContent; sendMessage(); } _// 工具函数:创建消息元素_ function **createMessageElement**(_content_, _isUser_) { const messageDiv = document.createElement(\'div\'); messageDiv.className = `message ${_isUser_ ? \'user-message\' : \'assistant-message\'}`; messageDiv.textContent = _content_; return messageDiv; } _// 创建打字动画元素_ function **createTypingIndicator**() { const typingDiv = document.createElement(\'div\'); typingDiv.className = \'message assistant-message\'; typingDiv.innerHTML = \'正在查询天气信息\'; return typingDiv; } _// 发送消息_ async function **sendMessage**() { const message = messageInput.value.trim(); if (!message) return; _// 禁用输入和发送按钮_ messageInput.disabled = true; sendButton.disabled = true; _// 显示用户消息_ messagesContainer.appendChild(createMessageElement(message, true)); messageInput.value = \'\'; _// 显示打字动画_ const typingIndicator = createTypingIndicator(); messagesContainer.appendChild(typingIndicator); messagesContainer.scrollTop = messagesContainer.scrollHeight; try { _// 修改API调用地址_ const response = await fetch(`/weather/generate?message=${encodeURIComponent(message)}`); const data = await response.text(); _// 移除打字动画_ typingIndicator.remove(); _// 创建并添加助手消息_ const assistantMessage = createMessageElement(data, false); messagesContainer.appendChild(assistantMessage); messagesContainer.scrollTop = messagesContainer.scrollHeight; } catch (error) { console.error(\'API调用错误:\', error); const errorMessage = document.createElement(\'div\'); errorMessage.className = \'message assistant-message\'; errorMessage.textContent = \'抱歉,发生了一些错误,请稍后重试。\'; messagesContainer.appendChild(errorMessage); } finally { _// 重新启用输入和发送按钮_ messageInput.disabled = false; sendButton.disabled = false; messageInput.focus(); } } _// 页面加载完成后聚焦到输入框_ window.onload = () => { messageInput.focus(); }; </script></body></html>这里边最关键的代码如下,我们逐行添加注释让大家更容易理解:
/** * 核心消息发送处理函数 * 实现了以下核心功能: * 1. 用户消息的发送和显示 * 2. 输入控件的状态管理 * 3. 加载动画的显示和隐藏 * 4. 与后端API的通信 * 5. 响应消息的展示 * 6. 错误处理机制 */async function sendMessage() { // 获取并清理用户输入 const message = messageInput.value.trim(); if (!message) return; // 空消息直接返回 // 【第一步:UI状态管理】 // 禁用输入控件,防止重复发送 messageInput.disabled = true; sendButton.disabled = true; // 【第二步:显示用户消息】 // 创建并添加用户消息到消息容器 messagesContainer.appendChild(createMessageElement(message, true)); messageInput.value = \'\'; // 清空输入框 // 【第三步:显示加载状态】 // 添加打字动画,提供视觉反馈 const typingIndicator = createTypingIndicator(); messagesContainer.appendChild(typingIndicator); // 自动滚动到底部 messagesContainer.scrollTop = messagesContainer.scrollHeight; try { // 【第四步:API通信】 // 调用后端API获取天气响应 const response = await fetch(`/weather/generate?message=${encodeURIComponent(message)}`); const data = await response.text(); // 【第五步:更新UI】 // 移除加载动画 typingIndicator.remove(); // 显示AI助手的响应消息 const assistantMessage = createMessageElement(data, false); messagesContainer.appendChild(assistantMessage); // 确保新消息可见 messagesContainer.scrollTop = messagesContainer.scrollHeight; } catch (error) { // 【第六步:错误处理】 console.error(\'API调用错误:\', error); // 显示友好的错误提示 const errorMessage = document.createElement(\'div\'); errorMessage.className = \'message assistant-message\'; errorMessage.textContent = \'抱歉,发生了一些错误,请稍后重试。\'; messagesContainer.appendChild(errorMessage); } finally { // 【第七步:状态恢复】 // 重新启用输入控件 messageInput.disabled = false; sendButton.disabled = false; messageInput.focus(); // 将焦点返回到输入框 }}/** * 辅助函数:创建消息元素 * @param {string} content - 消息内容 * @param {boolean} isUser - 是否为用户消息 * @returns {HTMLElement} 返回格式化的消息DOM元素 */function createMessageElement(content, isUser) { const messageDiv = document.createElement(\'div\'); // 根据消息类型设置不同的样式 messageDiv.className = `message ${isUser ? \'user-message\' : \'assistant-message\'}`; messageDiv.textContent = content; return messageDiv;}/** * 辅助函数:创建加载动画 * @returns {HTMLElement} 返回包含加载动画的DOM元素 */function createTypingIndicator() { const typingDiv = document.createElement(\'div\'); typingDiv.className = \'message assistant-message\'; // 使用三个点实现打字动画效果 typingDiv.innerHTML = \'正在查询天气信息\'; return typingDiv;}最后我们访问一下页面地址:
http://localhost:8080/weather.html同学们会发现一个问题,这个页面中 AI 返回的结果,好像没有一开始打字机的效果啊?其实这里是因为我们使用的是 MVC 机制,后端会将数据完整的返回到前端,接下来我们就改在已有代码,使用 WebFlux 方式将数据以流式响应返回,实现打字机的效果。
三、打字机效果实现
使用传统 Spring MVC 同步阻塞式的处理方式,只能在后端处理完请求之后返回整个响应,而使用 Spring WebFlux 这种异步非阻塞数据处理方式,可以将数据逐步返回前端避免前端处于长期等待的状态。我们来看下他们在浏览器上的区别。
传统 Spring MVC:

可以看到数据是整个返回的,浏览器只能等到数据返回之后,才能显示对应的数据。
Spring WebFlux:
图片过大,无法展示抱歉
这里通过 HTTP EventSource(也称为 Server-Sent Events,SSE)技术实现了逐步的数据返回。这是一种在 Web 应用中实现服务器向客户端推送实时数据的技术。它基于 HTTP 协议,允许服务器将更新发送到客户端,而无需客户端频繁地轮询服务器来获取新数据。
协议特征
- MIME 类型:
text/event-stream - 消息格式:
data: 消息内容\\n\\n(注意双换行符结尾) - 断线处理:客户端自动尝试重新连接(默认 3 秒重试间隔)
为什么要使用 Spring Webflux 呢?这是因为传统 Spring MVC 架构在处理流式响应时存在以下局限:
- 同步阻塞模型导致资源利用率低,每个请求会独占一个线程直至响应完成(通常需要 3-5 秒),当并发量达到 Tomcat 默认的 200 线程上限时,后续请求将进入等待队列,而此时 CPU 利用率往往不足 30%。
- 难以实现真正的实时数据推送,传统 MVC 基于 HTTP1.1 的请求-响应模式,要实现类似 ChatGPT 的字词逐句返回,只能通过定时轮询(Polling)或长轮询(Long-Polling)等非实时方案,造成至少 300-500ms 的延迟。
- 高并发场景下性能瓶颈明显,在 10,000 QPS 的高并发场景下,同步模型会产生超过 16GB 的线程堆内存开销,而 WebFlux 的响应式模型仅需 4 个 EventLoop 线程即可处理相同负载,内存消耗降低 80%。
Spring WebFlux 核心概念
- 与传统 Spring MVC 对比
- 非阻塞 I/O:使用少量线程处理高并发请求(Tomcat 默认约 200 线程 vs Netty 约 2-4 个 EventLoop 线程)
- 响应式 Endpoints:支持返回 Mono/Flux 类型,自动处理响应式流式输出
- 响应式编程,基于 Reactive Streams 规范
- 异步非阻塞数据处理:无需等待单个操作完成即可处理其他任务(对比传统同步阻塞式处理)
- 背压(Backpressure):消费者控制数据流速的机制,防止生产者发送数据过快导致内存溢出
- 事件驱动:通过事件回调(而非轮询)实现数据流处理,适合高并发场景
- Reactor 核心类型
Mono<T> // 表示包含0或1个元素的异步序列(例如单个HTTP请求响应)Flux<T> // 表示包含0到N个元素的异步序列(例如实时数据流、SSE推送)后端具体写法:
@GetMapping(value = \"/typing\", produces = MediaType._TEXT_EVENT_STREAM_VALUE_)public Flux<String> typingEffect(@RequestParam String content) { return Flux._fromStream_(Arrays._stream_(content.split(\"\"))) // 将字符串拆分为字符流 .delayElements(Duration._ofMillis_(50)) // 每个元素延迟50ms(控制打字速度) .scan(new StringBuilder(), StringBuilder::append) // 累积字符 .map(StringBuilder::toString); // 转换为字符串序列}produces = MediaType.TEXT_EVENT_STREAM_VALUE 表示该方法返回的响应内容类型是 text/event-stream,这是一种服务器端事件流(Server-Sent Events, SSE)的格式,允许服务器持续向客户端发送更新,非常适合实现实时数据的推送,在这个场景中用于模拟逐字显示的打字效果。
前端核心代码:
_// 建立新的 SSE 连接_ eventSource = new EventSource(`/weather/typing?content=${encodeURIComponent(message)}`); _// 处理消息事件_ eventSource.onmessage = function (_event_) { //添加数据 responseText += _event_.data; }; _// 处理错误_ eventSource.onerror = function (_error_) { console.error(\'SSE错误:\', _error_); //关闭连接 eventSource.close(); };实现打字机效果
学会 Spring Flux 基础用法之后,在这个案例中实现打字机效果就不难了,我们增加一个接口:
_/**__ * 生成流式天气相关回复__ *__ * @param message 用户输入的消息__ * @return AI回复的流式响应__ */_@GetMapping(value = \"/generateStream\",produces = MediaType._TEXT_EVENT_STREAM_VALUE_)public Flux<String> generateStream( @RequestParam(value = \"message\") String message) { // 构建提示词,加入系统角色定义 String promptText = _SYSTEM_PROMPT _+ \"\\n用户问题:\" + message; var prompt = new Prompt(new UserMessage(promptText)); Flux<ChatResponse> stream = this.chatModel.stream(prompt); return stream.map(e -> e.getResult().getOutput().getText());}然后修改下前端页面:
<!DOCTYPE html><html lang=\"zh-CN\"><head> <meta charset=\"UTF-8\"> <meta name=\"viewport\" content=\"width=device-width, initial-scale=1.0\"> <title>智能天气预报助手 - 流式响应版</title> <style> _/* 全局样式 */_ * { margin: 0; padding: 0; box-sizing: border-box; } body { font-family: -apple-system, BlinkMacSystemFont, \"Segoe UI\", Roboto, \"Helvetica Neue\", Arial, sans-serif; line-height: 1.6; color: #333; background: linear-gradient(120deg, #89f7fe 0%, #66a6ff 100%); } _/* 聊天容器 */_ .chat-container { max-width: 800px; margin: 20px auto; padding: 20px; height: calc(100vh - 40px); display: flex; flex-direction: column; background-color: rgba(255, 255, 255, 0.95); border-radius: 12px; box-shadow: 0 8px 32px rgba(31, 38, 135, 0.15); } _/* 头部标题 */_ .chat-header { text-align: center; padding: 20px 0; margin-bottom: 20px; border-bottom: 1px solid #eee; position: relative; } .chat-header h1 { color: #1a73e8; font-size: 24px; margin-bottom: 10px; } .chat-header p { color: #666; font-size: 14px; } _/* 切换按钮 */_ .switch-mode { position: absolute; right: 20px; top: 20px; padding: 8px 16px; background-color: #1a73e8; color: white; border: none; border-radius: 20px; cursor: pointer; font-size: 14px; transition: all 0.3s; } .switch-mode:hover { background-color: #1557b0; transform: translateY(-2px); } _/* 消息区域 */_ .messages-container { flex: 1; overflow-y: auto; margin-bottom: 20px; padding: 20px; background-color: rgba(255, 255, 255, 0.8); border-radius: 8px; } _/* 消息样式 */_ .message { margin-bottom: 20px; padding: 15px; border-radius: 8px; max-width: 80%; white-space: pre-wrap; word-wrap: break-word; } .user-message { background-color: #e3f2fd; margin-left: auto; color: #1565c0; } .assistant-message { background-color: #f5f5f5; margin-right: auto; color: #333; } _/* 输入区域 */_ .input-container { position: relative; padding: 20px; background-color: rgba(255, 255, 255, 0.9); border-radius: 8px; box-shadow: 0 2px 10px rgba(0, 0, 0, 0.1); } #message-input { width: 100%; padding: 12px; border: 2px solid #e0e0e0; border-radius: 8px; resize: none; height: 50px; font-size: 16px; transition: border-color 0.3s; } #message-input:focus { border-color: #1a73e8; outline: none; } #send-button { position: absolute; right: 30px; bottom: 30px; padding: 8px 20px; background-color: #1a73e8; color: white; border: none; border-radius: 20px; cursor: pointer; transition: all 0.3s; } #send-button:hover { background-color: #1557b0; transform: translateY(-2px); } #send-button:disabled { background-color: #cccccc; cursor: not-allowed; transform: none; } _/* 示例问题区域 */_ .example-questions { margin-top: 10px; padding: 10px; display: flex; flex-wrap: wrap; gap: 10px; } .example-question { background-color: #e3f2fd; color: #1565c0; padding: 8px 16px; border-radius: 16px; font-size: 14px; cursor: pointer; transition: all 0.3s; } .example-question:hover { background-color: #1a73e8; color: white; } _/* 打字动画 */_ .typing { display: inline-block; margin-left: 4px; } .typing span { display: inline-block; width: 6px; height: 6px; background-color: #666; border-radius: 50%; margin: 0 2px; animation: typing 1s infinite; } .typing span:nth-child(2) { animation-delay: 0.2s; } .typing span:nth-child(3) { animation-delay: 0.4s; } @keyframes _typing_ { 0%, 100% { transform: translateY(0); } 50% { transform: translateY(-4px); } } </style></head><body> <div class=\"chat-container\"> <div class=\"chat-header\"> <h1>🌤️ 智能天气预报助手</h1> <p>我可以为您提供天气预报、穿衣建议和出行建议</p> <button class=\"switch-mode\" onclick=\"window.location.href=\'weather.html\'\">切换到普通版</button> </div> <div class=\"messages-container\" id=\"messages\"> __ <div class=\"message assistant-message\"> 您好!我是您的智能天气预报助手(流式响应版)。您可以询问我任何关于天气的问题,比如: </div> </div> <div class=\"example-questions\"> <div class=\"example-question\" onclick=\"askExample(this)\">北京今天天气怎么样?</div> <div class=\"example-question\" onclick=\"askExample(this)\">今天适合户外运动吗?</div> <div class=\"example-question\" onclick=\"askExample(this)\">明天要出门,需要带伞吗?</div> <div class=\"example-question\" onclick=\"askExample(this)\">最近三天的天气预报</div> </div> <div class=\"input-container\"> <textarea id=\"message-input\" placeholder=\"请输入您的天气相关问题...\" rows=\"1\" onkeydown=\"if(event.keyCode === 13 && !event.shiftKey) { event.preventDefault(); sendMessage(); }\"></textarea> <button id=\"send-button\" onclick=\"sendMessage()\">发送</button> </div> </div> <script> _// DOM 元素_ const messagesContainer = document.getElementById(\'messages\'); const messageInput = document.getElementById(\'message-input\'); const sendButton = document.getElementById(\'send-button\'); _// 示例问题点击处理_ function **askExample**(_element_) { messageInput.value = _element_.textContent; sendMessage(); } _// 工具函数:创建消息元素_ function **createMessageElement**(_content_, _isUser_) { const messageDiv = document.createElement(\'div\'); messageDiv.className = `message ${_isUser_ ? \'user-message\' : \'assistant-message\'}`; messageDiv.textContent = _content_; return messageDiv; } _// 创建打字动画元素_ function **createTypingIndicator**() { const typingDiv = document.createElement(\'div\'); typingDiv.className = \'message assistant-message\'; typingDiv.innerHTML = \'正在查询天气信息\'; return typingDiv; } _// 发送消息_ async function **sendMessage**() { const message = messageInput.value.trim(); if (!message) return; _// 禁用输入和发送按钮_ messageInput.disabled = true; sendButton.disabled = true; _// 显示用户消息_ messagesContainer.appendChild(createMessageElement(message, true)); messageInput.value = \'\'; _// 显示打字动画_ const typingIndicator = createTypingIndicator(); messagesContainer.appendChild(typingIndicator); messagesContainer.scrollTop = messagesContainer.scrollHeight; try { _// 创建新的助手消息容器_ const assistantMessage = document.createElement(\'div\'); assistantMessage.className = \'message assistant-message\'; _// 创建 EventSource_ const eventSource = new EventSource(`/weather/generateStream?message=${encodeURIComponent(message)}`); _// 移除打字动画并添加消息容器_ typingIndicator.remove(); messagesContainer.appendChild(assistantMessage); _// 处理消息事件_ eventSource.onmessage = function (_event_) { assistantMessage.textContent += _event_.data; messagesContainer.scrollTop = messagesContainer.scrollHeight; }; _// 处理错误_ eventSource.onerror = function (_error_) { console.error(\'EventSource错误:\', _error_); eventSource.close(); if (!assistantMessage.textContent) { assistantMessage.textContent = \'抱歉,发生了一些错误,请稍后重试。\'; } _// 重新启用输入和发送按钮_ messageInput.disabled = false; sendButton.disabled = false; messageInput.focus(); }; _// 处理完成_ eventSource.addEventListener(\'complete\', function (_event_) { eventSource.close(); messageInput.disabled = false; sendButton.disabled = false; messageInput.focus(); }); } catch (error) { console.error(\'API调用错误:\', error); const errorMessage = document.createElement(\'div\'); errorMessage.className = \'message assistant-message\'; errorMessage.textContent = \'抱歉,发生了一些错误,请稍后重试。\'; messagesContainer.appendChild(errorMessage); _// 重新启用输入和发送按钮_ messageInput.disabled = false; sendButton.disabled = false; messageInput.focus(); } } _// 页面加载完成后聚焦到输入框_ window.onload = () => { messageInput.focus(); }; </script></body></html>可以看到核心代码中,使用了 EventSource 将每次收到的数据进行拼接,展示到页面上。
四、常用参数说明
Spring AI 针对 智谱AI 提供了许多实用的参数对大模型的使用进行灵活的配置,所有的参数列表可以通过
官方网站获取。这里我们列举几个较为常用的配置:
温度低 = \"严谨模式\" 温度高 = \"创意模式\"
温度和 topP 到底有什么区别?
举例子来对比一下温度和 topP。
温度:
当温度=0.5 时,AI 写诗只会用经典押韵格式;
当温度=2.0 时,AI 可能把\"月亮\"写成\"会飞的咸蛋黄\"
这个参数本质是在\"稳定性\"和\"创造性\"之间找平衡,温度越低越像教科书,温度越高越像科幻小说。
topP:
想象你在点外卖,模型要推荐菜品:
此时就算温度很高,只要 topP 压得低(比如 0.9),模型实际只能从\"前三热门\"里选,不会跳出厨房小白的常规选项。
差异对比
为什么同时用这两个参数?
就像开车时既要控制油门(温度)又要控制方向盘(topP):
实际应用场景
- 客服机器人:
- 设置
topP=0.9+温度=0.8 - 确保回答专业(不跳出预设话术),同时带点自然感
- 设置
- AI 写小说:
- 设置
topP=0.95+温度=1.2 - 允许较多创意组合,但剔除完全不符合逻辑的段落
- 设置
总结:温度决定\"敢不敢想\",topP 决定\"能不能选\"。两者配合使用,才能在稳定性和创造性间找到平衡点。
参考写法:
spring: ai: zhipuai: chat: enabled: true # 是否启用智谱AI聊天模型 base-url: open.bigmodel.cn/api/paas # 接口基础地址(按需修改) api-key: your_api_key_here # 🔐 必须替换为你自己的API密钥 options: model: GLM-3-Turbo # 模型名称(固定使用智谱指定模型) maxTokens: 2048 # ⚠️ 建议显式设置最大token数(例如2048) temperature: 0.7 # 温度值(严谨模式) topP: 1 # topP值(高频词筛选阈值)五、总结
通过简洁的流式 API 无缝对接大语言模型,将 AI 生成的长文本自动转换为响应式数据流,配合 WebFlux 实现从模型推理到浏览器逐字输出的端到端非阻塞传输,既避免了传统同步请求的内存压力,又天然支持高并发场景下的实时交互,使开发者无需关注复杂的数据流控制,即可快速构建具备\"人类思考节奏感\"的智能应用。


