Uniapp 自定义TabBar + 动态菜单实现教程(Vuex状态管理详解)_uniapp动态设置tabbar
大家好,我是一诺。今天跟大家分享一下uniapp 封装自定义底部导航栏(TabBar) 过程中的思考和实践。通过本文,你将学会如何打造一个功能完善、可自由定制的TabBar组件!
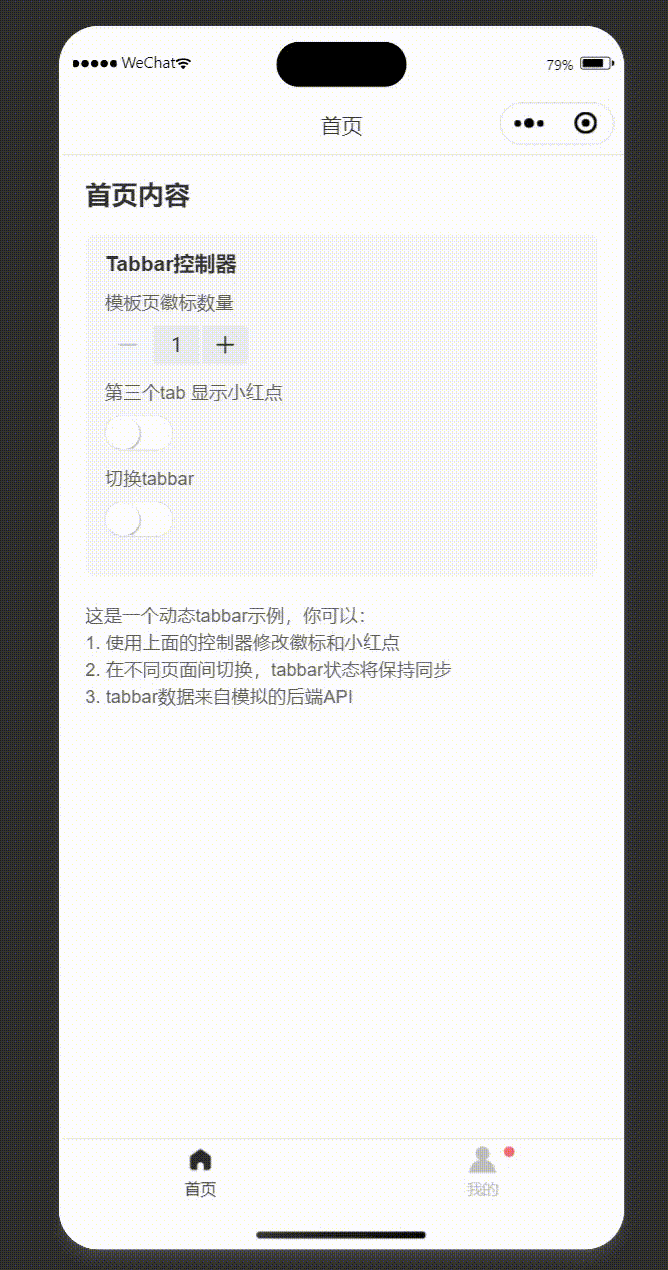
先看效果:
- 支持自定义图标和样式
- 动态显示徽标和小红点
- 自动隐藏(单菜单模式)
- 从后端动态获取菜单配置
一、为什么要自定义 TabBar?
在开发 uniapp 应用时,框架自带的 TabBar 往往难以满足定制化需求:
- 原生 TabBar 样式受限,难以实现复杂的视觉效果
- 无法动态控制 TabBar 的显示与隐藏
- 难以实现小红点、徽标等交互元素
- 不支持动态配置(如从后端获取菜单配置)
于是,我决定封装一个功能完善、易于使用、可扩展的自定义 TabBar 组件。
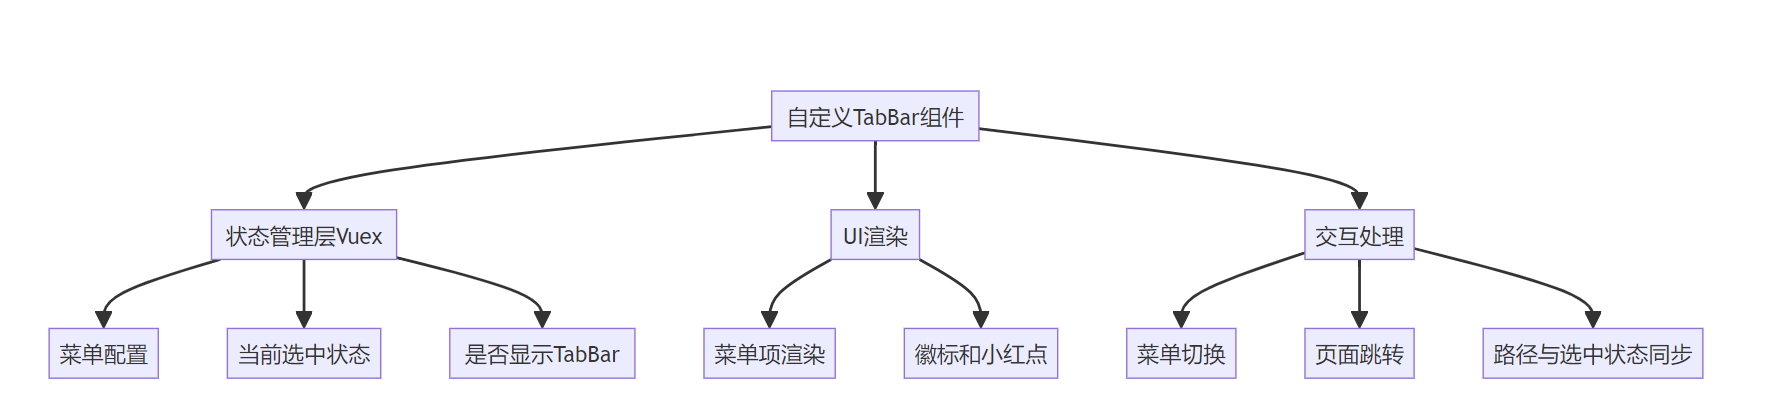
二、设计思路
设计这个组件时,我首先梳理了几个核心需求:
整体设计思路如下图所示:
三、实现效果展示
下面是我们要实现的几种效果:
- 基础TabBar
- 带徽标的TabBar
- 带小红点的TabBar
现在,让我们来看看如何实现这些效果。
四、核心实现
1. 组件结构
我们的自定义 TabBar 主要包含三个部分:
- store/tabbar.js // Vuex状态管理- 各页面集成 // 页面中引入组件下面是完整的文件结构:
project/├── components/│ └── common/│ └── CustomTabbar.vue├── store/│ └── tabbar.js└── pages/ ├── home/ │ └── index.vue ├── my/ │ └── index.vue └── ... 其他页面2. 状态管理设计
状态管理是整个组件的核心,我采用了 Vuex 进行集中管理:
// store/tabbar.jsexport default { state: { // 底部导航栏配置 tabbarList: [ { pagePath: \'/pages/home/index\', iconPath: \'/static/tabbar/shouye.png\', selectedIconPath: \'/static/tabbar/shouye_select.png\', text: \'首页\', count: 0, isDot: false, customIcon: true }, // 更多菜单项... ], // 当前激活的tabbar索引 activeTabIndex: 0, // 是否已初始化了首页跳转 initialJumpCompleted: false }, // getters, mutations, actions...}这种设计的优势在于:
- 所有页面共享同一个状态,保证了一致性
- 便于实现复杂的业务逻辑(如从后端获取配置、动态更新徽标等)
- 可以方便地持久化菜单状态
3. 组件核心逻辑
组件的核心逻辑包含以下几个方面:
路径与选中状态同步:
// 根据当前路径更新激活的tabbar索引updateActiveIndexByPath(path) { if (!path) return // 查找匹配的tabbar项 const index = this.tabbarList.findIndex(item => { const itemPath = item.pagePath.startsWith(\'/\') ? item.pagePath : \'/\' + item.pagePath return itemPath === path }) if (index !== -1 && this.activeIndex !== index) { this.activeIndex = index }}处理菜单切换与页面跳转:
// 切换tabbaronChange(index) { // 如果点击当前已选中的选项,不做任何操作 if (this.activeIndex === index) return // 更新当前选中的索引 this.activeIndex = index // 获取目标路径 const path = this.tabbarList[index].pagePath if (path) { // 避免重复跳转 const targetPath = path.startsWith(\'/\') ? path : \'/\' + path if (this.currentPath === targetPath) return // 执行页面跳转 this.navigateTo() }}4. 页面自动跳转设计
我们需要在应用启动时,将用户从首页跳转到配置的第一个菜单页面。这个逻辑设计如下: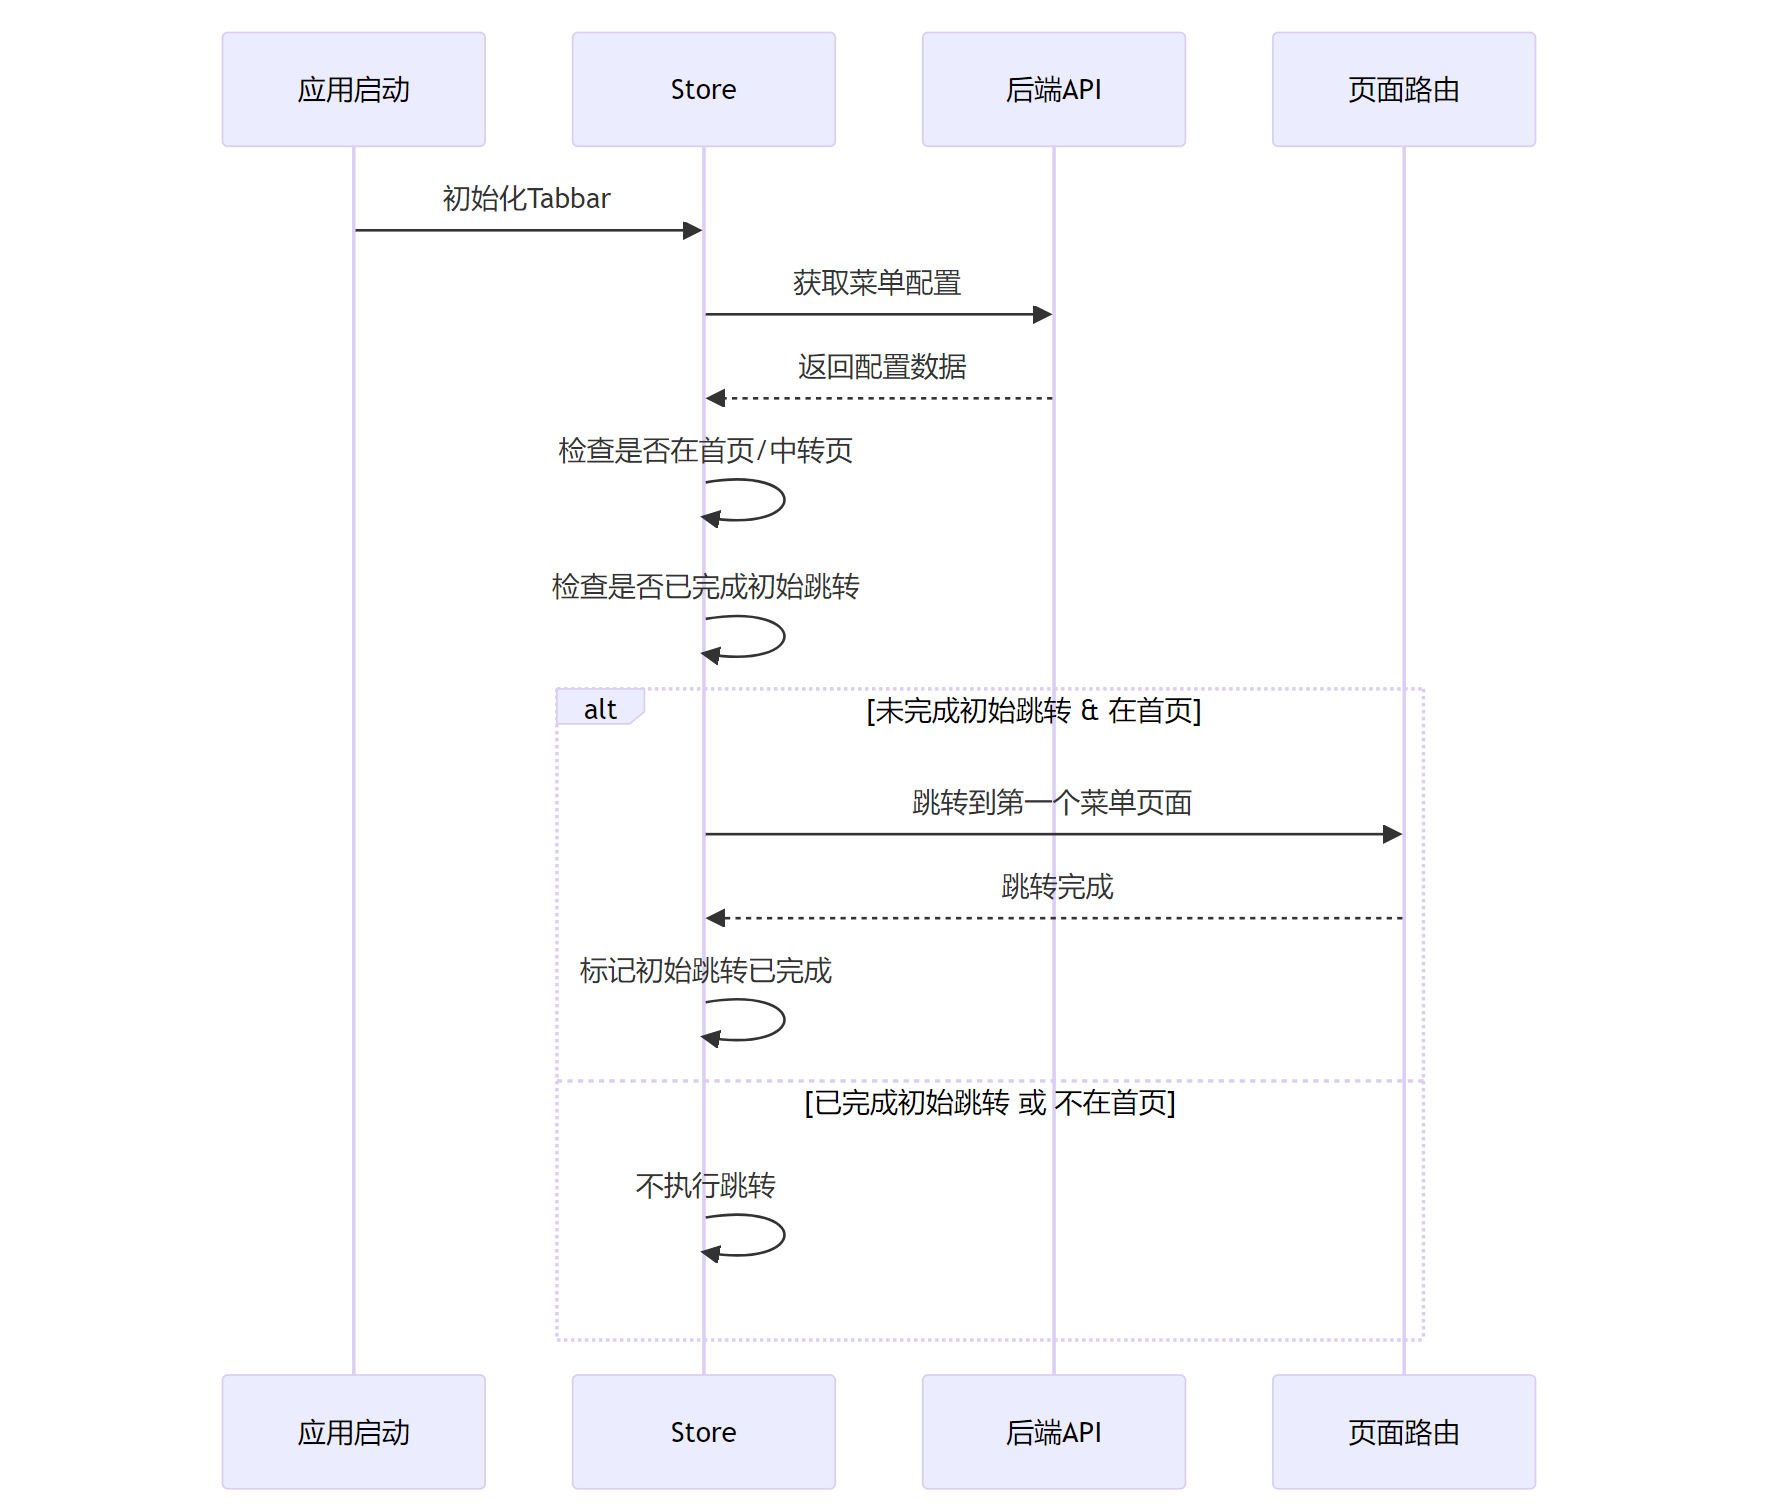
这种设计确保了用户只在首次进入应用时自动跳转,避免了在其他情况下的干扰。
五、完整组件代码
CustomTabbar.vue 代码:
import { mapGetters, mapMutations } from \'vuex\'export default {name: \'CustomTabbar\',data() {return {// tabbar样式配置activeColor: \'#2c2c2c\',inactiveColor: \'#bfbfbf\',backgroundColor: \'#ffffff\',borderTop: true,currentPath: \'\', // 存储当前路径}},computed: {...mapGetters([\'tabbarList\', \'activeTabIndex\', \'shouldShowTabbar\']),activeIndex: {get() {return this.activeTabIndex},set(val) {this.setActiveTabIndex(val)}}},created() {// 获取当前路径this.getCurrentPath()// 页面加载时获取tabbar配置this.fetchTabbarData()},mounted() {// 不再需要单独的事件监听// 但仍保留此方法用于兼容性,避免现有页面出错uni.$on(\'tabbarPageShow\', this.handlePageShow)},beforeDestroy() {// 移除页面显示监听uni.$off(\'tabbarPageShow\', this.handlePageShow)},// 添加页面生命周期钩子onShow() {// 页面显示时自动更新路径this.getCurrentPath()console.log(\'Tabbar onShow 自动触发路径更新\')},onLoad() {// 页面加载时获取初始路径this.getCurrentPath()console.log(\'Tabbar onLoad 自动触发路径更新\')},watch: {// 监听页面路径变化currentPath(newPath) {if (newPath) {this.updateActiveIndexByPath(newPath)}}},methods: {...mapMutations([\'setActiveTabIndex\']),// 处理页面显示事件 (为了兼容性保留)handlePageShow() {console.log(\'通过事件触发路径更新 (旧方式)\')this.getCurrentPath()},// 切换tabbaronChange(index) {// 如果点击当前已选中的选项,不做任何操作if (this.activeIndex === index) return// 更新当前选中的索引this.activeIndex = index// 获取目标路径const path = this.tabbarList[index].pagePathif (path) {// 如果当前已经在该路径,不进行跳转const targetPath = path.startsWith(\'/\') ? path : \'/\' + pathif (this.currentPath === targetPath) {console.log(\'当前已在目标页面,不重复跳转\')return}// 执行页面跳转this.navigateTo(path)}},// 统一处理页面跳转navigateTo(path) {console.log(\'执行页面跳转到:\', path)// 使用redirectTo跳转uni.redirectTo({url: path,success: () => {console.log(\'跳转成功:\', path)// 跳转成功后更新当前路径setTimeout(() => {this.getCurrentPath()}, 100)},fail: (err) => {console.error(\'redirectTo跳转失败\', err)// 如果redirectTo失败,尝试使用switchTabuni.switchTab({url: path,success: () => {console.log(\'switchTab跳转成功:\', path)// 跳转成功后更新当前路径setTimeout(() => {this.getCurrentPath()}, 100)},fail: (switchErr) => {console.error(\'switchTab也失败了\', switchErr)}})}})},// 获取当前路径getCurrentPath() {const pages = getCurrentPages()if (pages.length > 0) {const newPath = \'/\' + pages[pages.length - 1].routeconsole.log(\'当前路径:\', newPath)if (this.currentPath !== newPath) {this.currentPath = newPath}}},// 根据当前路径更新激活的tabbar索引updateActiveIndexByPath(path) {if (!path) return// 查找匹配的tabbar项const index = this.tabbarList.findIndex(item => {// 移除开头的斜杠以进行比较const itemPath = item.pagePath.startsWith(\'/\') ? item.pagePath: \'/\' + item.pagePathreturn itemPath === path})if (index !== -1) {// 只有当索引不同时才更新,避免不必要的重渲染if (this.activeIndex !== index) {console.log(\'根据路径更新选中索引:\', index, \'路径:\', path)this.activeIndex = index}}},// 从后端获取tabbar配置数据async fetchTabbarData() {try {// 调用store中的action获取tabbar数据await this.$store.dispatch(\'fetchTabbarConfig\',{type:1})// 数据获取后,根据当前路径更新选中项if (this.currentPath) {console.log(\'根据路径更新选中索引:\', this.currentPath)this.updateActiveIndexByPath(this.currentPath)}} catch (error) {console.error(\'获取tabbar数据失败\', error)}}}}.custom-tabbar {.tab-icon {width: 20px;height: 20px;margin-bottom: 5px;}} vuex/tabbar.js 状态管理代码
/* * @Description: 底部导航栏状态管理 */import { getTabbarConfig, updateTabbarBadge, updateTabbarDot } from \'@/api/tabbar\'export default { state: { // 底部导航栏配置 tabbarList: [], // 当前激活的tabbar索引 activeTabIndex: 0, // 是否已初始化了首页跳转 initialJumpCompleted: false, // 是否正在进行跳转(防止重复跳转) isRedirecting: false }, getters: { tabbarList: state => state.tabbarList, activeTabIndex: state => state.activeTabIndex, // 获取默认首页路径(接口返回的第一个菜单项) defaultHomePath: state => { if (state.tabbarList && state.tabbarList.length > 0) { return state.tabbarList[0].pagePath } return \'/pages/home/index\' // 默认首页路径 }, // 是否应该显示tabbar(至少有2个菜单项) shouldShowTabbar: state => state.tabbarList && state.tabbarList.length >= 2 }, mutations: { // 设置tabbar列表 setTabbarList(state, list) { if (Array.isArray(list) && list.length > 0) { state.tabbarList = list } }, // 设置当前激活的tabbar索引 setActiveTabIndex(state, index) { state.activeTabIndex = index }, // 更新某个tabbar项的徽标数量 updateTabbarBadge(state, { index, count }) { if (state.tabbarList[index]) { console.log(\' { index, count }\', { index, count }) console.log(`更新tabbar ${index} 的徽标数量为 ${count}`) state.tabbarList[index].count = count } }, // 更新某个tabbar项的小红点 updateTabbarDot(state, { index, isDot }) { if (state.tabbarList[index]) { state.tabbarList[index].isDot = isDot } }, // 标记初始跳转已完成 setInitialJumpCompleted(state, status) { state.initialJumpCompleted = status }, // 设置是否正在跳转 setIsRedirecting(state, status) { state.isRedirecting = status } }, actions: { // 从后端获取tabbar配置 async fetchTabbarConfig({ commit, dispatch, getters, state },data) { console.log(\'开始获取tabbar配置\',data) const tabbarData = await getTabbarConfig(data) try { // 如果已经获取过数据且有内容,则不重复获取 if (state.tabbarList && state.tabbarList.length > 0) { console.log(\'已有菜单数据,无需重新获取\') // 检查是否需要跳转(针对index页面) const currentPages = getCurrentPages() const currentRoute = currentPages.length > 0 ? \'/\' + currentPages[currentPages.length - 1].route : \'\' if (currentRoute === \'/pages/index/index\') { dispatch(\'redirectToFirstMenu\', currentRoute) } return tabbarData } console.log(\'开始获取菜单数据\') // 如果没有获取到数据,返回空数组 if (!tabbarData || !Array.isArray(tabbarData) || tabbarData.length === 0) { console.warn(\'获取到的菜单数据为空\') return [] } console.log(\'获取到菜单数据:\', tabbarData) commit(\'setTabbarList\', tabbarData) // 获取当前页面路径 const currentPages = getCurrentPages() const currentRoute = currentPages.length > 0 ? \'/\' + currentPages[currentPages.length - 1].route : \'\' console.log(\'当前页面路径:\', currentRoute) // 需要自动跳转的页面(首页或中转页) const autoRedirectPages = [\'/pages/index/index\', \'/pages/home/index\'] // 检查是否在需要跳转的页面 if (autoRedirectPages.includes(currentRoute)) { console.log(\'当前在首页或中转页,准备跳转到第一个菜单\') await dispatch(\'redirectToFirstMenu\', currentRoute) } return tabbarData } catch (error) { console.error(\'获取tabbar配置失败:\', error) return [] } }, // 重定向到第一个菜单页面 redirectToFirstMenu({ commit, getters, state }, currentRoute) { // 避免重复跳转 if (state.isRedirecting) { console.log(\'正在跳转中,不重复触发\') return Promise.resolve() } commit(\'setIsRedirecting\', true) return new Promise((resolve) => { const firstMenuPath = getters.defaultHomePath // 如果没有有效的菜单路径,不执行跳转 if (!firstMenuPath) { console.warn(\'没有有效的菜单路径,取消跳转\') commit(\'setIsRedirecting\', false) resolve() return } // 如果当前已经在第一个菜单页面,则不需要跳转 if (currentRoute === firstMenuPath) { console.log(\'当前已在第一个菜单页面,无需跳转\') commit(\'setIsRedirecting\', false) resolve() return } console.log(\'准备跳转到第一个菜单页面:\', firstMenuPath) uni.redirectTo({ url: firstMenuPath, success: () => { console.log(\'已跳转到第一个菜单页面:\', firstMenuPath) // 标记为已完成跳转 commit(\'setInitialJumpCompleted\', true) commit(\'setIsRedirecting\', false) resolve() }, fail: (error) => { console.error(\'redirectTo跳转失败,尝试switchTab:\', error) // 尝试使用switchTab跳转 uni.switchTab({ url: firstMenuPath, success: () => { console.log(\'switchTab跳转成功:\', firstMenuPath) commit(\'setInitialJumpCompleted\', true) commit(\'setIsRedirecting\', false) resolve() }, fail: (switchErr) => { console.error(\'所有跳转方式都失败:\', switchErr) commit(\'setIsRedirecting\', false) resolve() // 即使失败也要解析promise } }) } }) }) }, // 更新tabbar徽标数量 async updateBadge({ commit }, { index, count }) { try { commit(\'updateTabbarBadge\', { index, count }) await updateTabbarBadge(index, count) return true } catch (error) { console.error(\'更新tabbar徽标失败:\', error) return false } }, // 更新tabbar小红点 async updateDot({ commit }, { index, isDot }) { try { await updateTabbarDot(index, isDot) commit(\'updateTabbarDot\', { index, isDot }) return true } catch (error) { console.error(\'更新tabbar小红点失败:\', error) return false } } }} 模拟接口请求代码示例
/* * @Description: Tabbar API服务 */ // 获取tabbar配置export function getTabbarConfig(data) { // 这里模拟异步请求获取tabbar配置 // 实际项目中应该替换为真实的API请求 console.log(\'getTabbarConfig\',data) // 控制返回的菜单模式// 0: 返回3个菜单项,标准模式// 1: 返回顺序颠倒的3个菜单项// 2: 只返回1个菜单项(我的) return new Promise((resolve) => { setTimeout(() => { // 模拟后端返回的数据 let tabbarData; switch (data.type) { case 1: // 菜单顺序:我的 -> 模板 -> 首页 tabbarData = [ { pagePath: \'/pages/home/index\', iconPath: \'/static/tabbar/shouye.png\', selectedIconPath: \'/static/tabbar/shouye_select.png\', text: \'首页\', count: 0, isDot: false, customIcon: true },{ pagePath: \'/pages/template/index\', iconPath: \'/static/tabbar/moban.png\', selectedIconPath: \'/static/tabbar/moban_select.png\', text: \'模板\', count: 2, isDot: false, customIcon: true }, { pagePath: \'/pages/my/index\', iconPath: \'/static/tabbar/wodedangxuan.png\', selectedIconPath: \'/static/tabbar/wodedangxuan_select.png\', text: \'我的\', count: 0, isDot: true, customIcon: true }, ]; break; case 2: // 只返回1个菜单项 tabbarData = [ { pagePath: \'/pages/my/index\', iconPath: \'/static/tabbar/wodedangxuan.png\', selectedIconPath: \'/static/tabbar/wodedangxuan_select.png\', text: \'我的\', count: 0, isDot: false, customIcon: true } ]; break; case 3: default: // 标准顺序:首页 -> 模板 -> 我的 tabbarData = [ { pagePath: \'/pages/home/index\', iconPath: \'/static/tabbar/shouye.png\', selectedIconPath: \'/static/tabbar/shouye_select.png\', text: \'首页\', count: 0, isDot: false, customIcon: true }, { pagePath: \'/pages/my/index\', iconPath: \'/static/tabbar/wodedangxuan.png\', selectedIconPath: \'/static/tabbar/wodedangxuan_select.png\', text: \'我的\', count: 0, isDot: true, customIcon: true } ]; break; } resolve(tabbarData); }, 500); });}// 更新tabbar徽标数量export function updateTabbarBadge(index, count) { // 实际项目中可能需要调用API通知后端更新 return Promise.resolve({ success: true });}// 更新tabbar小红点状态export function updateTabbarDot(index, isDot) { // 实际项目中可能需要调用API通知后端更新 return Promise.resolve({ success: true });} 六、我踩过的坑及解决方案
坑1: 重复跳转导致的死循环
问题: 点击其他菜单项后,应用会自动跳回第一个菜单项,形成死循环。
原因: 每次获取菜单配置后都执行了首页跳转逻辑,没有区分首次加载和后续操作。
解决方案:
// 添加一个状态标记是否已完成初始跳转state: { initialJumpCompleted: false},// 只在未完成初始跳转时执行if (!state.initialJumpCompleted) { // 跳转逻辑... commit(\'setInitialJumpCompleted\', true)}坑2: 页面返回时TabBar状态不同步
问题: 从非TabBar页面返回时,TabBar选中状态没有正确更新。
最初解决方案:
// 在每个页面的onShow生命周期中手动发送事件onShow() { uni.$emit(\'tabbarPageShow\')}// 在组件中监听该事件mounted() { uni.$on(\'tabbarPageShow\', this.handlePageShow)}优化解决方案:
// 直接使用组件的页面生命周期钩子onShow() { // 页面显示时自动更新路径 this.getCurrentPath()}这种方式不再需要在每个页面手动发送事件,降低了耦合性,提高了维护性。
坑3: 页面跳转后路径未更新
问题: 页面跳转后,组件的当前路径没有及时更新。
解决方案: 在跳转成功后添加延时获取路径
uni.redirectTo({ url: path, success: () => { // 跳转成功后更新当前路径 setTimeout(() => { this.getCurrentPath() }, 100) }, // ...})七、设计模式与最佳实践
在这个组件的设计中,我应用了几个常见的设计模式:
1. 观察者模式
Vuex的状态管理本质上是一种观察者模式。组件订阅(观察)Vuex中的状态变化,当状态发生变化时,相关组件会自动更新。
// 在组件中观察Vuex状态computed: { ...mapGetters([\'tabbarList\', \'activeTabIndex\', \'shouldShowTabbar\'])}2. 单一职责原则
每个部分都有明确的职责:
- Vuex模块负责状态管理和业务逻辑
- 组件负责UI渲染和用户交互
- 页面负责集成和提供上下文
3. 适配器模式
为了处理不同页面跳转方式的兼容性问题,我们实现了一个统一的导航方法:
// 统一处理页面跳转navigateTo(path) { // 使用redirectTo跳转 uni.redirectTo({ url: path, fail: (err) => { // 如果redirectTo失败,尝试使用switchTab uni.switchTab({ url: path, // ... }) } })}八、代码优化与性能考量
在组件的迭代过程中,我进行了一系列优化:
1. 减少不必要的计算和渲染
// 只有当索引不同时才更新,避免不必要的重渲染if (this.activeIndex !== index) { this.activeIndex = index}2. 精简事件流
最初版本中,每个页面需要手动触发事件来更新TabBar状态:
// 页面中onShow() { uni.$emit(\'tabbarPageShow\')}优化后,利用组件的生命周期钩子自动处理,不再需要外部触发:
// 组件中直接使用生命周期钩子onShow() { this.getCurrentPath()}九、使用方式与示例
1. 在页面中使用组件
页面内容 import CustomTabbar from \'@/components/common/CustomTabbar.vue\'export default { components: { CustomTabbar }}2. 配置菜单项
// 方式1: 直接在Vuex中配置tabbarList: [ { pagePath: \'/pages/home/index\', text: \'首页\', // ... }, // ...]// 方式2: 从API获取配置async fetchTabbarConfig({ commit }) { const tabbarData = await getTabbarConfig() commit(\'setTabbarList\', tabbarData)}3. 动态控制徽标和小红点
// 在任何页面中调用this.$store.dispatch(\'updateBadge\', { index: 1, // 第二个菜单项 count: 5 // 显示数字5})this.$store.dispatch(\'updateDot\', { index: 2, // 第三个菜单项 isDot: true // 显示小红点})十、个人思考与总结
通过这次自定义TabBar组件的开发,我有以下几点思考和收获:
- 组件设计要考虑扩展性最初我只考虑了静态配置的TabBar,后来需求变成了从后端获取配置。幸好我使用了Vuex状态管理,使这个改动变得相对容易。
- 生命周期的重要性合理利用框架提供的生命周期钩子,可以减少很多手动代码。最开始我让每个页面手动发送事件,后来发现直接用onShow钩子更合理。
- 状态管理的价值Vuex不仅仅是存储数据,更重要的是提供了一套状态管理机制。它让菜单状态的同步、持久化变得简单可靠。
- 避免过度设计最初版本有很多\"可能用到\"的功能,但后来证明是不必要的复杂性。我学会了先满足核心需求,再考虑扩展。
- 调试与日志的重要性添加足够的日志信息对排查复杂交互问题至关重要。特别是在处理页面跳转和状态同步时,日志帮我找出了很多隐藏问题。
最后,我想说的是,一个看似简单的底部导航栏,要做好其实并不容易。它涉及到路由管理、状态同步、用户交互等多方面的知识。希望我分享的这些经验和思考能对你有所帮助。
如果你有任何问题或建议,欢迎在评论区留言交流!
管一诺
追求简单高效的代码,分享有温度的技术


