使用 JavaScript、Mastra 和 Elasticsearch 构建一个具备代理能力的 RAG 助手
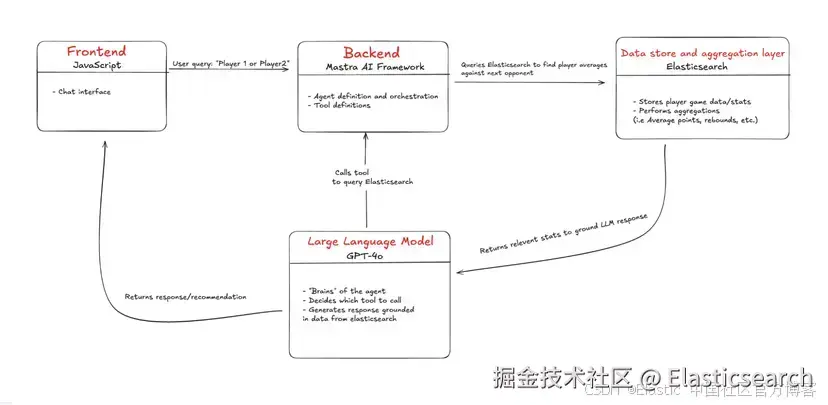
架构概览
系统的核心是一种大型语言模型(LLM),它充当代理的推理引擎(大脑)。它负责解释用户输入,决定调用哪些工具,并协调生成相关响应所需的步骤。
代理本身是由 Mastra 搭建的,它是 JavaScript 生态中的一个代理框架。Mastra 将 LLM 封装进后端基础架构,作为一个 API 端点暴露出来,并提供一个界面,用于定义工具、系统提示词和代理行为。
在前端,我们使用 Vite 快速搭建一个 React Web 应用,为用户提供一个聊天界面,用于发送查询给代理并接收其响应。
最后,我们有 Elasticsearch,用于存储球员统计和对阵数据,供代理查询和聚合使用。
背景
让我们先了解一些基本概念:
什么是 agentic RAG?
AI 代理可以与其他系统交互,独立运行,并根据其定义的参数执行操作。Agentic RAG 将 AI 代理的自主性与检索增强生成(retrieval augmented generation - RAG)的原理相结合,使 LLM 能够选择调用哪些工具、使用哪些数据作为上下文来生成响应。你可以在这里阅读更多关于 RAG 的内容。
选择框架,为什么要超越 AI-SDK?
目前市面上有许多 AI 代理框架,你可能听说过比较流行的,比如 CrewAI、AutoGen 和 LangGraph。这些框架大多具有一套通用功能,包括对不同模型的支持、工具使用和记忆管理等。
以下是 LangChain CEO Harrison Chase 提供的一份框架对比表。
我之所以对 Mastra 感兴趣,是因为它是一个面向 JavaScript 的框架,为全栈开发者设计,可以轻松将代理集成进他们的开发生态。Vercel 的 AI-SDK 也能完成大部分工作,但 Mastra 的优势在于处理更复杂的代理工作流时更胜一筹。Mastra 在 AI-SDK 提供的基础模式上进行了增强,在这个项目中,我们将二者结合使用。
关于框架和模型选择的考量
虽然这些框架可以帮助你快速构建 AI 代理,但也存在一些缺点。例如,当你使用这些抽象层而不是自己动手实现时,会失去一些控制权。如果 LLM 没有正确调用工具或做出不符合预期的行为,由于抽象层的存在,调试会更加困难。尽管如此,我认为这种权衡是值得的,因为这些框架开发速度快,生态正在快速发展。
此外,这些框架都是模型无关的,也就是说你可以自由切换不同的模型,但要记住,各个模型训练的数据集不同,因此响应表现也会不同。有些模型甚至不支持调用工具。所以你可以尝试多个模型,看看哪个效果最好,不过你很可能需要为每个模型重新编写系统提示词。例如,如果你想用 Llama3.3 替代 GPT-4o,就需要提供更多提示词和具体指令才能获得理想结果。
NBA 幻想篮球
幻想篮球是和一群朋友组成联盟(提醒:如果你的朋友们非常好胜,可能会影响你们的友情),通常还会涉及一些金钱下注。你们每人选出 10 名球员组成自己的队伍,每周与别人的队伍进行对战。你每周的得分取决于你的球员在现实比赛中的表现。
如果你队伍中的某个球员受伤、被禁赛等,可以从自由球员列表中添加新球员。这也是幻想体育中思考最多的环节,因为你的增援次数有限,而其他人也都在寻找最有潜力的球员。
这正是我们的 NBA AI 助手大放异彩的时刻,尤其是在你需要快速决定该选哪位球员时。你无需再手动查找某个球员对某个对手的历史表现,助手可以快速获取数据并对比平均值,为你提供有根据的推荐。
现在你已经了解了 agentic RAG 和 NBA 幻想篮球的一些基础知识,让我们看看它是如何实际运作的。
构建项目
如果你在构建过程中遇到问题,或者不想从零开始搭建,请参考项目仓库。
我们将涵盖以下内容:
搭建项目结构
后端(Mastra):使用 npx create mastra@latest 搭建后端并定义代理逻辑。
前端(Vite + React):使用 npm create vite@latest 创建前端聊天界面,用于与代理交互。
设置环境变量
-
安装
dotenv来管理环境变量。 -
创建
.env文件并提供所需变量。
设置 Elasticsearch
-
启动一个 Elasticsearch 集群(本地或云端均可)。
-
安装官方 Elasticsearch 客户端。
-
确保环境变量可被访问。
-
建立与客户端的连接。
将 NBA 数据批量导入 Elasticsearch
-
创建索引并定义适当的 mapping,以支持聚合操作。
-
从 CSV 文件中批量导入球员比赛统计数据到 Elasticsearch 索引中。
定义 Elasticsearch 聚合
-
查询某球员对特定对手的历史平均值。
-
查询某球员对特定对手的赛季平均值。
玩家比较工具文件
- 整合辅助函数和 Elasticsearch 聚合逻辑。
构建代理
-
添加代理定义和系统提示词。
-
安装
zod并定义工具。 -
添加中间件以处理 CORS。
集成前端
-
使用 AI-SDK 的
useChat与代理交互。 -
创建 UI 界面以支持格式化的对话显示。
运行应用
-
启动后端(Mastra 服务器)和前端(React 应用)。
-
尝试示例查询,体验应用使用方式。
下一步:让代理更智能
-
添加语义搜索(semantic search)功能,以实现更有洞察力的推荐。
-
通过将搜索逻辑转移到 Elasticsearch MCP(模型上下文协议)服务器,实现动态查询。
前置条件
-
Node.js 和 npm:后端和前端均基于 Node 运行。请确保你安装了 Node 18+ 和 npm v9+(Node 18+ 已自带 npm)。
-
Elasticsearch 集群:本地或云端运行的 Elasticsearch 集群。
-
OpenAI API 密钥:在 OpenAI 开发者门户的 API 密钥页面生成。
项目结构
`npx create-mastra@latest`AI写代码
第 1 步:搭建项目框架
首先,创建目录 nba-ai-assistant-js 并使用以下命令进入该目录:
`mkdir nba-ai-assistant-js && cd nba-ai-assistant-js`AI写代码
后端:
1)使用 Mastra 创建工具,命令如下:
`npx create-mastra@latest`AI写代码
2)你会在终端看到一些提示,第一个提示中,我们将项目命名为 backend:

3)接下来,我们保持默认的 Mastra 文件存储结构,所以输入 src/。

4)然后,我们选择 OpenAI 作为默认的 LLM 提供商。

5)最后,它会询问你的 OpenAI API 密钥。现在,我们选择跳过,稍后在 .env 文件中提供。

前端:
1)返回到根目录,运行 Vite 创建工具,命令如下:
`npm create vite@latest frontend -- --template react`AI写代码
这会创建一个名为 frontend 的轻量级 React 应用,使用专门的 React 模板。
如果一切顺利,你的项目目录下应该有一个存放 Mastra 代码的 backend 目录和一个包含 React 应用的 frontend 目录。
第 2 步:设置环境变量
1)为了管理敏感密钥,我们将使用 dotenv 包从 .env 文件加载环境变量。进入 backend 目录并安装 dotenv:
` 1. cd backend 2. npm install dotenv --save `AI写代码
2)在 backend 目录中,有一个 example.env 文件,里面包含需要填写的变量。如果你自己创建 .env 文件,请确保包含以下变量:
` 1. # OpenAI Configuration 2. OPENAI_API_KEY=your_openai_api_key_here 4. # Elasticsearch Configuration 5. ELASTIC_ENDPOINT=your_elasticsearch_endpoint_here 6. ELASTIC_API_KEY=your_elasticsearch_api_key_here `AI写代码
注意:确保将该文件从版本控制中排除,在 .gitignore 中添加 .env。
第 3 步:设置 Elasticsearch
首先,你需要一个活动的 Elasticsearch 集群,有两个选项:
- 选项 A:使用 Elasticsearch Cloud
-
注册 Elastic Cloud
-
创建一个新部署
-
获取你的端点 URL 和 API 密钥(已编码)
-
- 选项 B:本地运行 Elasticsearch
-
安装并本地运行 Elasticsearch
-
使用 http://localhost:9200 作为端点
-
生成 API 密钥
-
在后端安装 Elasticsearch 客户端:
1)首先,在 backend 目录安装官方 Elasticsearch 客户端:
`npm install @elastic/elasticsearch`AI写代码
2)然后创建一个名为 lib 的目录来存放可复用函数,并进入该目录:
`mkdir lib && cd lib`AI写代码
3)在里面创建一个名为 elasticClient.js 的新文件。这个文件将初始化 Elasticsearch 客户端,并供项目中各处使用。
4)由于我们使用的是 ECMAScript 模块(ESM),所以 __dirname 和 __filename 不可用。为了确保环境变量能正确从 backend 文件夹的 .env 文件加载,请在文件顶部添加以下配置:
` 1. import { config } from \'dotenv\'; 2. import { fileURLToPath } from \'url\'; 3. import { dirname, join } from \'path\'; 4. import { Client } from \'@elastic/elasticsearch\'; 6. // Grab current directory and load .env from backend folder 7. const __filename = fileURLToPath(import.meta.url); 8. const __dirname = dirname(__filename); 9. const envPath = join(__dirname, \'../.env\'); 11. // Load environment variables from the correct path 12. config({ path: envPath }); `AI写代码
5)现在,使用你的环境变量初始化 Elasticsearch 客户端,并检查连接:
`` 1. //Elastic client Initialization, make sure environment variables are being loaded in correctly 2. const config= { 3. node: `${process.env.ELASTIC_ENDPOINT}`, 4. auth: { 5. apiKey: `${process.env.ELASTIC_API_KEY}`, 6. }, 7. }; 9. export const elasticClient = new Client(config); 11. //Check if the client is connected 12. async function checkConnection() { 13. try { 14. const info = await elasticClient.info(); 15. console.log(\'Elasticsearch is connected:\', info); 16. } catch (error) { 17. console.error(\'Elasticsearch connection error:\', error); 18. } 19. } 21. checkConnection(); ``AI写代码
现在,我们可以在任何需要与 Elasticsearch 集群交互的文件中导入这个客户端实例。
第 4 步:将 NBA 数据批量导入 Elasticsearch
数据集:
本项目将使用仓库中 backend/data 目录下的数据集。我们的 NBA 助手将利用这些数据作为知识库,进行统计比较和生成推荐。
-
sample_player_game_stats.csv — 示例球员比赛统计数据(例如每场比赛的得分、篮板、抢断等,涵盖球员整个 NBA 职业生涯)。我们将使用该数据集进行聚合。(注意:这是模拟数据,预先生成用于演示,不来源于官方 NBA 数据。)
-
playerAndTeamInfo.js — 用作球员和球队元数据的替代,通常这些数据会通过 API 调用获得,代理需要它来匹配球员和球队名称与 ID。因为我们用的是示例数据,所以避免从外部 API 获取的开销,代理可以参考这里硬编码的值。
实现步骤:
1)在 backend/lib 目录下创建名为 playerDataIngestion.js 的文件。
2)设置导入内容,解析 CSV 文件路径并配置解析。由于使用 ESM,我们需要重构 __dirname 来解析示例 CSV 文件路径。同时,我们将导入 Node.js 内置模块 fs 和 readline,逐行解析 CSV 文件。
` 1. import fs from \'fs\'; 2. import readline from \'readline\'; 3. import path from \'path\'; 4. import { fileURLToPath } from \'url\'; 5. import { elasticClient } from \'./elasticClient.js\'; 7. const indexName = \'sample-nba-player-data\'; //Replace with your preferred index name 9. //Since we are using ES modules __dirname and __filename don\'t exist, so this is a workaround that allows us to use the absolute file path for our sample data. 10. const __filename = fileURLToPath(import.meta.url); 11. const __dirname = path.dirname(__filename); 12. const filePath = path.resolve(__dirname, \'../data/sample_nba_data.csv\'); `AI写代码
这为我们后续进行批量导入时高效读取和解析 CSV 文件做好了准备。
3)创建一个带有合适 mapping 的索引。虽然 Elasticsearch 支持动态映射自动推断字段类型,但这里我们希望明确指定,以确保每个统计字段都被视为数值型字段。这很重要,因为我们后续会用这些字段进行聚合计算。对于得分、篮板等统计数据,我们使用 float 类型,以确保包含小数值。最后,我们添加 mapping 属性 dynamic: \'strict\',防止 Elasticsearch 对未识别字段进行动态映射。
`` 1. // Function to create an index with mappings 2. async function createIndex() { 3. try { 4. // Check if the index already exists 5. const exists = await elasticClient.indices.exists({ index: indexName }); 7. if (exists) { 8. console.log(`Index \"${indexName}\" already exists, deleting it now.`); 9. await elasticClient.indices.delete({ index: indexName }); 10. console.log(`Deleted index \"${indexName}\".`); 11. } 12. // Create the index with mappings 13. const response = await elasticClient.indices.create({ 14. index: indexName, 15. body: { 16. mappings: { 17. dynamic: \'strict\', // Prevent dynamic mapping 18. properties: { 19. game_id: { type: \'integer\' }, 20. game_date: { type: \'date\' }, 21. player_id: { type: \'integer\' }, 22. player_full_name: { type: \'text\' }, 23. player_team_id: { type: \'integer\' }, 24. player_team_name: { type: \'text\' }, 25. home_team: { type: \'boolean\' }, 26. opponent_team_id: { type: \'integer\' }, 27. opponent_team_name: { type: \'text\' }, 28. points: { type: \'float\' }, 29. rebounds: { type: \'float\' }, 30. assists: { type: \'float\' }, 31. steals: { type: \'float\' }, 32. blocks: { type: \'float\' }, 33. fg_percentage: { type: \'float\' }, 34. minutes_played: { type: \'float\' }, 35. }, 36. }, 37. }, 38. }); 40. console.log(\'Index created:\', response); 41. return true; 42. } catch (error) { 43. console.error(\'Error creating index:\', error); 44. return false; 45. } 46. } ``AI写代码
4)添加一个函数,将 CSV 数据批量导入到 Elasticsearch 索引中。在代码中,我们跳过表头行,然后用逗号分割每行数据,并将其放入文档对象中。此步骤还会清理数据,确保它们的类型正确。接着,我们将这些文档和索引信息一起推入 bulkBody 数组,作为批量导入 Elasticsearch 的请求载荷。
`` 1. async function bulkIngestCsv(filePath) { 2. const readStream = fs.createReadStream(filePath); 3. const rl = readline.createInterface({ 4. input: readStream, 5. crlfDelay: Infinity, 6. }); 8. const bulkBody = []; 9. let lineNum = 0; 11. //Skip the header line 12. let headerLine = true; 13. for await (const line of rl) { 14. if (headerLine) { 15. headerLine = false; 16. continue; 17. } 18. lineNum++; 20. // Split the line by comma and remove whitespace 21. const [ 22. game_id, 23. game_date, 24. player_id, 25. player_full_name, 26. player_team_id, 27. player_team_name, 28. home_team, 29. opponent_team_id, 30. opponent_team_name, 31. points, 32. rebounds, 33. assists, 34. steals, 35. blocks, 36. fg_percentage, 37. minutes_played, 38. ] = line.split(\',\'); 40. // Create a document object 41. const document = { 42. game_id: parseInt(game_id), 43. game_date: game_date.trim(), 44. player_id: parseInt(player_id), 45. player_full_name: player_full_name.trim(), 46. player_team_id: parseInt(player_team_id), 47. player_team_name: player_team_name.trim(), 48. home_team: home_team.trim() === \'True\', // Converts True/False into a boolean 49. opponent_team_id: parseInt(opponent_team_id), 50. opponent_team_name: opponent_team_name.trim(), 51. points: parseFloat(points), 52. rebounds: parseFloat(rebounds), 53. assists: parseFloat(assists), 54. steals: parseFloat(steals), 55. blocks: parseFloat(blocks), 56. fg_percentage: parseFloat(fg_percentage), 57. minutes_played: parseFloat(minutes_played), 58. }; 60. // Prepare the bulk operation format 61. bulkBody.push({ index: { _index: indexName } }); 62. bulkBody.push(document); 63. } 65. console.log(`Parsed ${lineNum} lines from CSV`); ``AI写代码
5)然后,我们可以使用 Elasticsearch 的 Bulk API,通过 elasticClient.bulk() 在一次请求中导入多条文档。下面的错误处理逻辑会统计有多少文档导入失败,以及有多少成功。
`` 1. try { 2. // Perform the bulk request 3. const response = await elasticClient.bulk({ body: bulkBody }); 5. if (response.errors) { 6. console.log(\'Bulk Ingestion had some hiccups:\'); 8. // Count successful vs failed operations 9. let successCount = 0; 10. let errorCount = 0; 11. const errorDetails = []; 13. response.items.forEach((item, index) => { 14. const operation = item.index || item.create || item.update || item.delete; 15. if (operation.error) { 16. errorCount++; 17. errorDetails.push({ 18. document: index + 1, 19. error: operation.error, 20. }); 21. } else { 22. successCount++; 23. } 24. }); 26. console.log(`Successfully indexed: ${successCount} documents`); 27. console.log(`Failed to index: ${errorCount} documents, here are the details`, errorDetails); 29. } else { 30. console.log(`Bulk Ingestion fully successful!`); 31. } 33. } catch (error) { 34. console.error(\'Error performing bulk ingestion:\', error); 35. } 36. } ``AI写代码
6)运行下面的 main() 函数,依次执行 createIndex() 和 bulkIngestCsv() 两个函数。
` 1. // Run this function 2. async function main() { 3. const result = await createIndex(); 4. if (!result) { 5. console.error(\'Index setup failed. Aborting.\'); 6. return; 7. } 9. await bulkIngestCsv(filePath); 10. console.log(\'Bulk ingestion completed!\'); 11. } 13. main(); `AI写代码
如果你看到控制台日志显示批量导入成功,可以快速检查一下 Elasticsearch 索引,确认文档是否真的成功导入。
第 5 步:定义 Elasticsearch 聚合并整合函数
这些将是我们为 AI 代理定义工具时使用的主要函数,用于比较球员之间的统计数据。
1)进入 backend/lib 目录,创建一个名为 elasticAggs.js 的文件。
2)添加下面的查询,用于计算某球员对特定对手的历史平均数据。该查询使用一个包含两个条件的 bool 过滤器:一个匹配 player_id,另一个匹配 opponent_team_id,确保只检索相关比赛。我们不需要返回具体文档,只关心聚合结果,所以设置 size: 0。在 aggs 块中,同时对 points、rebounds、assists、steals、blocks 和 fg_percentage 等字段进行多个指标聚合,计算它们的平均值。LLM 在计算方面可能不准确,这样做将计算任务交给 Elasticsearch,确保我们的 NBA AI 助手能获得准确的数据。
` 1. export async function getHistoricalAveragesAgainstOpponent(player_id, opponent_team_id) { 2. try { 3. //Query for Historical Averages 4. const historicalQuery = await elasticClient.search({ 5. index: \'sample-nba-player-data\', 6. size: 0, 7. query: { 8. bool: { 9. must: [ 10. { 11. term: { 12. player_id: { 13. value: player_id, 14. }, 15. }, 16. }, 17. { 18. term: { 19. opponent_team_id: { 20. value: opponent_team_id, 21. }, 22. }, 23. }, 24. ], 25. }, 26. }, 27. aggs: { 28. avg_points: { avg: { field: \'points\' } }, 29. avg_rebounds: { avg: { field: \'rebounds\' } }, 30. avg_assists: { avg: { field: \'assists\' } }, 31. avg_steals: { avg: { field: \'steals\' } }, 32. avg_blocks: { avg: { field: \'blocks\' } }, 33. avg_fg_percentage: { avg: { field: \'fg_percentage\' } }, 34. }, 35. }); 37. return { 38. points: historicalQuery.aggregations.avg_points.value || 0, 39. rebounds: historicalQuery.aggregations.avg_rebounds.value || 0, 40. assists: historicalQuery.aggregations.avg_assists.value || 0, 41. steals: historicalQuery.aggregations.avg_steals.value || 0, 42. blocks: historicalQuery.aggregations.avg_blocks.value || 0, 43. fgPercentage: historicalQuery.aggregations.avg_fg_percentage.value || 0, 44. }; 45. } catch (error) { 46. console.error(\'Query error from getHistoricalAveragesAgainstOpponent function:\', error); 47. return { error: \'Queries failed in getting historical averages against opponent.\' }; 48. } 49. } `AI写代码
3)要计算某球员对特定对手的赛季平均数据,我们使用与历史平均几乎相同的查询。唯一的区别是 bool 过滤器中增加了对 game_date 的条件,game_date 必须在当前 NBA 赛季范围内,这里是 2024-10-01 到 2025-06-30。这个额外条件确保后续的聚合只统计本赛季的比赛数据。
`1. { 2. range: { 3. //Range for this season, change to match current season 4. game_date: { 5. gte: \'2024-10-01\', 6. lte: \'2025-06-30\', 7. }, 8. },`AI写代码
第 6 步:球员比较工具
为了保持代码的模块化和易维护性,我们将创建一个工具文件,整合元数据辅助函数和 Elasticsearch 聚合逻辑。这将支持代理使用的主要工具。稍后会详细介绍:
1)在 backend/lib 目录下新建一个文件 comparePlayers.js。
2)添加以下函数,将元数据辅助和 Elasticsearch 聚合逻辑整合到一个函数中,支持代理使用的主要工具。
` 1. import { playersByName } from \'../data/playerAndTeamInfo.js\'; 2. import { teamsByName } from \'../data/playerAndTeamInfo.js\'; 3. import { upcomingMatchups } from \'../data/playerAndTeamInfo.js\'; 4. import { getHistoricalAveragesAgainstOpponent } from \'./elasticAggs.js\'; 5. import { getSeasonAveragesAgainstOpponent } from \'./elasticAggs.js\'; 7. //Simple helper functions to simulate API calls for player and team metadata. These reference the hardcoded values from playerAndTeamInfo.js in the data directory 8. export function getPlayerInfo(playerFullName) { 9. return playersByName[playerFullName]; 10. } 12. export function getTeamID(teamFullName) { 13. return teamsByName[teamFullName]; 14. } 16. export function getUpcomingMatchups(teamId) { 17. return upcomingMatchups[teamId]; 18. } 20. //Main function used by the \'playerComparisonTool\' agent tool 21. export async function comparePlayersForNextMatchup(player1Name, player2Name) { 22. //Get Player Info 23. const player1Info = getPlayerInfo(player1Name); 24. const player2Info = getPlayerInfo(player2Name); 26. //Get upcoming matchups 27. const player1NextGame = getUpcomingMatchups(player1Info.team_id)[0]; 28. const player2NextGame = getUpcomingMatchups(player2Info.team_id)[0]; 30. //Get season and historical averages against next opponent for player 1 31. const player1SeasonAverages = await getSeasonAveragesAgainstOpponent( 32. player1Info.player_id, 33. player1NextGame.opponent_team_id 34. ); 35. const player1HistoricalAverages = await getHistoricalAveragesAgainstOpponent( 36. player1Info.player_id, 37. player1NextGame.opponent_team_id 38. ); 40. //Get season and historical averages against next opponent for player 2 41. const player2SeasonAverages = await getSeasonAveragesAgainstOpponent( 42. player2Info.player_id, 43. player2NextGame.opponent_team_id 44. ); 45. const player2HistoricalAverages = await getHistoricalAveragesAgainstOpponent( 46. player2Info.player_id, 47. player2NextGame.opponent_team_id 48. ); 50. const player1 = { 51. name: player1Name, 52. playerId: player1Info.player_id, 53. teamId: player1Info.team_id, 54. nextOpponent: { 55. teamId: player1NextGame.opponent_team_id, 56. teamName: player1NextGame.opponent_team_name, 57. home: player1NextGame.home, 58. }, 59. stats: { 60. seasonAverages: player1SeasonAverages, 61. historicalAverages: player1HistoricalAverages, 62. }, 63. }; 65. const player2 = { 66. name: player2Name, 67. playerId: player2Info.player_id, 68. teamId: player2Info.team_id, 69. nextOpponent: { 70. teamId: player2NextGame.opponent_team_id, 71. teamName: player2NextGame.opponent_team_name, 72. home: player2NextGame.home, 73. }, 74. stats: { 75. seasonAverages: player2SeasonAverages, 76. historicalAverages: player2HistoricalAverages, 77. }, 78. }; 80. return [player1, player2]; 81. } `AI写代码
第 7 步:构建代理
现在你已经搭建了前后端框架,导入了 NBA 比赛数据,并建立了与 Elasticsearch 的连接,我们可以开始把各部分组合起来,构建代理。
定义代理
进入 backend/src/mastra/agents 目录下的 index.ts 文件,添加代理定义。你可以指定以下字段:
-
名称:给代理起个名字,前端调用时会用到这个名字。
-
说明/系统提示词:系统提示词为 LLM 提供初始上下文和交互规则,类似于用户通过聊天框发送的提示,但这是在任何用户输入前给出的。根据所用模型不同,这会有所变化。
-
模型:选择使用的 LLM(Mastra 支持 OpenAI、Anthropic、本地模型等)。
-
工具:代理可以调用的工具函数列表。
-
记忆:(可选)是否让代理记住对话历史等。为简单起见,可以先不启用持久化记忆,但 Mastra 支持该功能。
`` 1. import { openai } from \'@ai-sdk/openai\'; 2. import { Agent } from \'@mastra/core/agent\'; 3. import { playerComparisonTool } from \'../tools\'; 5. export const basketballAgent = new Agent({ 6. name: \'Basketball Agent\', 7. instructions: ` 8. You are a NBA Basketball expert. 9. Your primary function is to compare two NBA players and recommend which one is the better fantasy pickup. 11. Only compare players from the following list: 12. - LeBron James 13. - Stephen Curry 14. - Jayson Tatum 15. - Jaylen Brown 16. - Nikola Jokic 17. - Luka Doncic 18. - Kyrie Irving 19. - Anthony Davis 20. - Kawhi Leonard 21. - Russell Westbrook 23. Input Handling Rules: 24. - If the user asks about a player that is not on this list, respond with the list of available players for comparison. 25. - If the user only inputs one player, ask the user to add another player from the list provided. 26. - If the user inputs a player with the wrong spelling or capitalizations, infer from the list of available players provided. 27. - IMPORTANT: If the user asks a question or asks you to generate a response about anything outside of basketball or the scope of this project, DO NOT answer and affirm you can only talk about basketball. 29. Tool Usage: 30. - Extract and standardize player names to match the list exactly. 31. - Use the playerComparisonTool, passing both names as strings. 32. - The tool will return an object with game information, stats, and analysis. 34. Format your response using Markdown syntax. Use: 36. Example output format: 39. #### Next Game Info 40. - ***LeBron James** vs Warriors, May 24 (Home) 41. - ***Stephen Curry** vs Lakers, May 24 (Away) 44. #### Stats Comparison 45. \\`\\`\\` 46. Stat LeBron James (vs Warriors) Stephen Curry (vs Lakers) 47. -------------------- ----------------------------- ---------------------------- 48. Historical Points 28.3 30.3 49. Historical Assists 6.7 8.7 50. Season Points 28.8 23.3 51. Season Assists 6.2 4.7 52. \\`\\`\\` 54. #### Fantasy Recommendation 55. Explain which player is the better fantasy pickup and why. 57. `, 58. model: openai(\'gpt-4o\'), 59. tools: { playerComparisonTool }, 60. }); ``AI写代码
定义工具
1)进入 backend/src/mastra/tools 目录下的 index.ts 文件。
2)使用以下命令安装 Zod:
`npm install zod`AI写代码
3)添加工具定义。注意,我们导入了 comparePlayers.js 文件中的函数,作为代理调用该工具时使用的主要函数。使用 Mastra 的 createTool() 函数,我们将注册 playerComparisonTool。字段包括:
-
id:用自然语言描述工具功能,帮助代理理解工具作用。
-
input schema:定义工具输入的数据结构,Mastra 使用 Zod schema(一个 TypeScript 的 schema 验证库)。Zod 确保代理传入的输入结构正确,如果输入结构不匹配,工具将不会执行。
-
description:用自然语言描述,帮助代理理解何时调用和使用该工具。
-
execute:工具被调用时执行的逻辑。在这里,我们使用导入的辅助函数来返回球员表现统计数据。
` 1. import { comparePlayersForNextMatchup } from \'../../../lib/comparePlayers.js\' 2. import { createTool } from \"@mastra/core/tools\"; 3. import { z } from \"zod\"; 5. export const playerComparisonTool = createTool({ 6. id: \"Compare two NBA players\", 7. inputSchema: z.object({ 8. player1:z.string(), 9. player2:z.string() 10. }), 11. description: \"Use this tool to compare two players given in the user prompt.\", 12. execute: async ({ context: { player1, player2 } }) => { 13. return await comparePlayersForNextMatchup(player1, player2); 14. }, 15. }) `AI写代码
添加处理中间件以支持 CORS
在 Mastra 服务器中添加中间件来处理 CORS。他们说人生中有三件事不可避免:死亡、税收,还有对前端开发来说的 CORS。简单来说,跨域资源共享(CORS)是浏览器的一种安全机制,阻止前端向运行在不同域名或端口的后端发请求。即使我们前后端都运行在 localhost,但它们端口不同,会触发 CORS 策略。我们需要按照 Mastra 文档添加中间件,使后端允许来自前端的请求。
进入 backend/src/mastra 目录下的index.ts 文件,添加 CORS 配置:
-
origin: [\'http://localhost:5173\']
只允许来自这个地址的请求(Vite 默认地址) -
allowMethods: [\"GET\", \"POST\"]
允许的 HTTP 方法,大多数情况下使用 POST -
allowHeaders: [\"Content-Type\", \"Authorization\", \"x-mastra-client-type\", \"x-highlight-request\", \"traceparent\"]
允许请求中使用的自定义头部字段
` 1. import { Mastra } from \'@mastra/core/mastra\'; 2. import { basketballAgent } from \'./agents\'; 4. console.log(\'Starting Mastra server...\'); 6. export const mastra = new Mastra({ 7. agents: { basketballAgent }, 8. server:{ 9. timeout: 10 * 60 * 1000, // 10 minutes 10. cors: { 11. origin: [\'http://localhost:5173\'], 12. allowMethods: [\"GET\", \"POST\"], 13. allowHeaders: [ 14. \"Content-Type\", 15. \"Authorization\", 16. \"x-mastra-client-type\", 17. \"x-highlight-request\", 18. \"traceparent\", 19. ], 20. exposeHeaders: [\"Content-Length\", \"X-Requested-With\"], 21. credentials: false, 22. }, 23. }, 25. }); 27. console.log(\'Mastra server configured.\'); // Log after server configuration `AI写代码
第 8 步:集成前端
这个 React 组件提供了一个简单的聊天界面,使用 @ai-sdk/react 中的 [useChat()](https://mastra.ai/en/docs/frameworks/ai-sdk \"useChat()\") hook 连接到 Mastra AI 代理。我们还会用这个 hook 显示 token 使用情况、工具调用,并渲染对话内容。在系统提示词中,我们要求代理以 markdown 格式输出响应,所以会使用 react-markdown 来正确格式化响应。
- 在 frontend 目录下,安装 @ai-sdk/react 包以使用
useChat()hook。
`npm install @ai-sdk/react`AI写代码
2)在同一目录下,安装 React Markdown,以便我们能够正确格式化代理生成的响应内容。
`npm install react-markdown`AI写代码
3)实现 useChat()。这个 hook 将管理前端与 AI 代理后端之间的交互。它负责处理消息状态、用户输入、交互状态,并提供生命周期钩子用于可观测性。我们传入的选项包括:
-
api:定义 Mastra AI 代理的接口地址。默认使用 4111 端口,并添加支持流式响应的路由。 -
onToolCall:每当代理调用某个工具时执行;我们用它来追踪代理调用了哪些工具。 -
onFinish:代理完整响应完成后执行。尽管启用了流式响应,onFinish仍会在完整消息接收后执行,而不是每个 chunk 后执行。我们在这里用它来统计 token 使用量,这对监控 LLM 成本和优化非常有帮助。
4)最后,进入 frontend/components 目录下的 [ChatUI.jsx](https://github.com/jdarmada/nba-ai-assistant-js/blob/main/frontend/components/ChatUI.jsx \"ChatUI.jsx\") 组件,创建用于显示对话的界面。然后使用 ReactMarkdown 组件包裹响应内容,以便正确格式化代理的 markdown 响应。
` 1. import React, { useState } from \'react\'; 2. import { useChat } from \'@ai-sdk/react\'; 3. import ReactMarkdown from \'react-markdown\'; 5. export default function ChatUI() { 6. const [totalTokenUsage, setTotalTokenUsage] = useState(0); 7. const [promptTokenUsage, setPromptTokenUsage] = useState(0); 8. const [completionTokenUsage, setCompletionTokenUsage] = useState(0); 9. const [toolsCalled, setToolsCalled] = useState([]); 11. const { messages, input, handleInputChange, handleSubmit, status } = useChat({ 12. api: \'http://localhost:4111/api/agents/basketballAgent/stream\', //Replace with your own endpoint for your agent 13. id: \'my-chat-session\', 15. //Optional parameter to check agent tool calls 16. onToolCall: ({ toolCall }) => { 17. setToolsCalled((prev) => [...prev, toolCall.toolName]); 18. }, 20. //Optional parameter to check token usages 21. onFinish: (message, { usage }) => { 22. setTotalTokenUsage((prev) => prev + usage.totalTokens); 23. setPromptTokenUsage((prev) => prev + usage.promptTokens); 24. setCompletionTokenUsage((prev) => prev + usage.completionTokens); 25. }, 27. //Optional parameter for error handling 28. onError: (error) => { 29. console.error(\'Agent error:\', error); 30. }, 31. }); 33. return ( 34.
What\'s My Agent Doing?
38.
- 41. {toolsCalled.map((tool, idx) => ( 42.
- {tool}
- No tools called yet.
43. ))} 44. {toolsCalled.length === 0 &&
} 45.
47.
Prompt Token Usage: {promptTokenUsage}
49.
Completion Token Usage: {completionTokenUsage}
50.
Total Token Usage: {totalTokenUsage}
51.
52.
53.
55. Conversation: 56.
62. ))} 63.
65. 66. 73. 76. 77.
78. ); 79. } `AI写代码
第 9 步:运行应用程序
恭喜!现在你已经可以运行整个应用程序了。按照以下步骤同时启动后端和前端:
1)在终端窗口中,从项目根目录开始,进入 backend 目录并启动 Mastra 服务器:
` 1. cd backend 3. npm run dev `AI写代码
2)在另一个终端窗口中,从项目根目录开始,进入 frontend 目录并启动 React 应用:
` 1. cd frontend 3. npm run dev `AI写代码
3)打开浏览器,访问:
http://localhost:5173
你应该能看到聊天界面。试试以下示例提示:
- \"Compare LeBron James and Stephen Curry\"
- \"Who should I pick between Jayson Tatum and Luka Doncic?\"
下一步:让代理更智能
为了让助手更加智能化、推荐更具洞察力,我将在下一个迭代中添加几个关键升级。
对 NBA 新闻进行语义搜索
影响球员表现的因素有很多,其中很多并不会体现在原始统计数据中。例如伤病报告、首发阵容变动、甚至赛后分析,这些只能通过新闻报道获取。为了捕捉这些额外的上下文信息,我将添加语义搜索功能,让代理能够检索相关的 NBA 文章,并将这些叙事信息纳入推荐逻辑中。
使用 Elasticsearch MCP 服务器进行动态搜索
MCP(Model Context Protocol)正快速成为代理连接数据源的标准方式。我会将搜索逻辑迁移到 Elasticsearch MCP 服务器中,这样代理就能动态构建查询,而不再依赖我们手动定义的搜索函数。这使得我们可以使用更自然的语言工作流,也减少了手动编写每一个查询语句的需求。
在这里了解更多关于 Elasticsearch MCP 服务器和当前生态的内容。


