Unity寻路插件(A* Pathfinding)学习记录_unity a*path
文章目录
- 0.写在前面的话
- 1.从零开始搭建简易A*寻路工程
-
- 1.1 下载
- 1.2 常用脚本概览
- 1.3 场景搭建
- 1.4 添加AI
- 1.5 运行
- 2.A*(AstarPath) 面板
-
- 2.1 视图(Graphs)
-
- 2.1.1 Graph类型
-
- 2.1.1.1 Grid Graph
- 2.1.1.2 Navmesh Graph
- 2.1.1.3 Point Graph
- 2.1.1.4 Recast Graph (Pro版本专属)**
- 2.1.1.5 Layered Grid Graph (Pro版本专属)
- 2.1.2 单个Graph操作
- 2.2 设置(Setting)
- 2.3 保存和加载(Save & Load)
- 3.插件自带的移动脚本
- 4.创建自定义的寻路脚本
- 5.错误信息处理
- 6.高阶教程
-
- 6.1 保存和加载Graphs
- 6.2 小型Graph更新(GraphUpdateScene)
- 6.3 访问graph数据
- 6.4 Navmesh Cut
- 6.5 使用tags工作
- 6.6 RVOController(动态避障)
- 6.7 NodeLink/NodeLink2 连接两个非连续区域(例如跳跃、传送、爬梯等)
- 6.8 RandomPath 和 FleePath
0.写在前面的话
我创建的Unity、C#交流群,有兴趣可加入大家一起学习(人还很少,现在加入就是元老🙀,群里面聊天不限于技术话题):952914223
本篇博客大量借鉴了该用户文章:https://www.zhihu.com/column/c_1127597546046042112
1.从零开始搭建简易A*寻路工程
1.1 下载
https://www.arongranberg.com/astar/download
1.2 常用脚本概览
- AstarPath:扮演者中央舞台,展示和提供所有概览功能(Components–>Pathfinding–>Pathfinder)
- Seeker:Seeker组件应该绑定在每一个需要寻路的GameObject上(Components–>Pathfinding–>Seek)
- AIPath、RichAI、AIlerp:官方提供的AI控制移动的脚本
- Simple Smooth:路径平滑(Components–>Pathfinding–>Modifiers–>Simple Smooth)
- AIDestinationSetter:让你的角色跟随某个目标单移动,它会在后台简单的将目标属性每帧设置到目标位置。
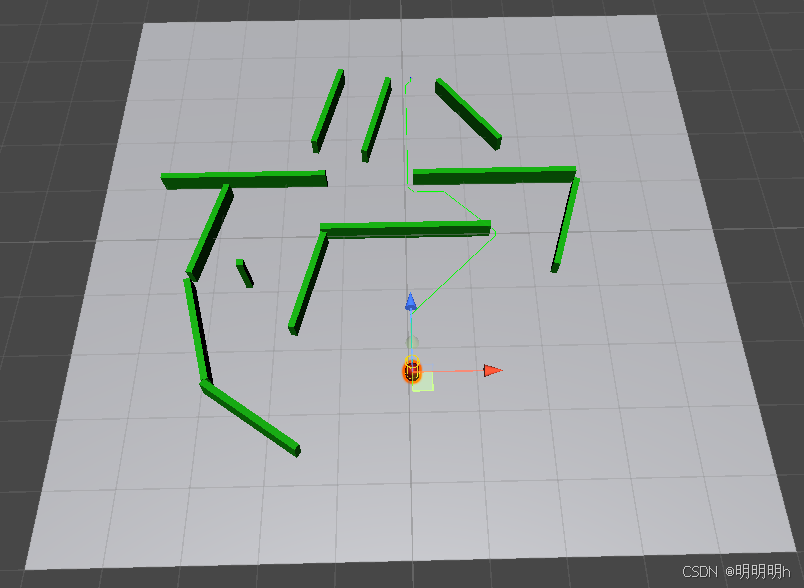
1.3 场景搭建
- 搭建地形
创建Plane并设置Layer

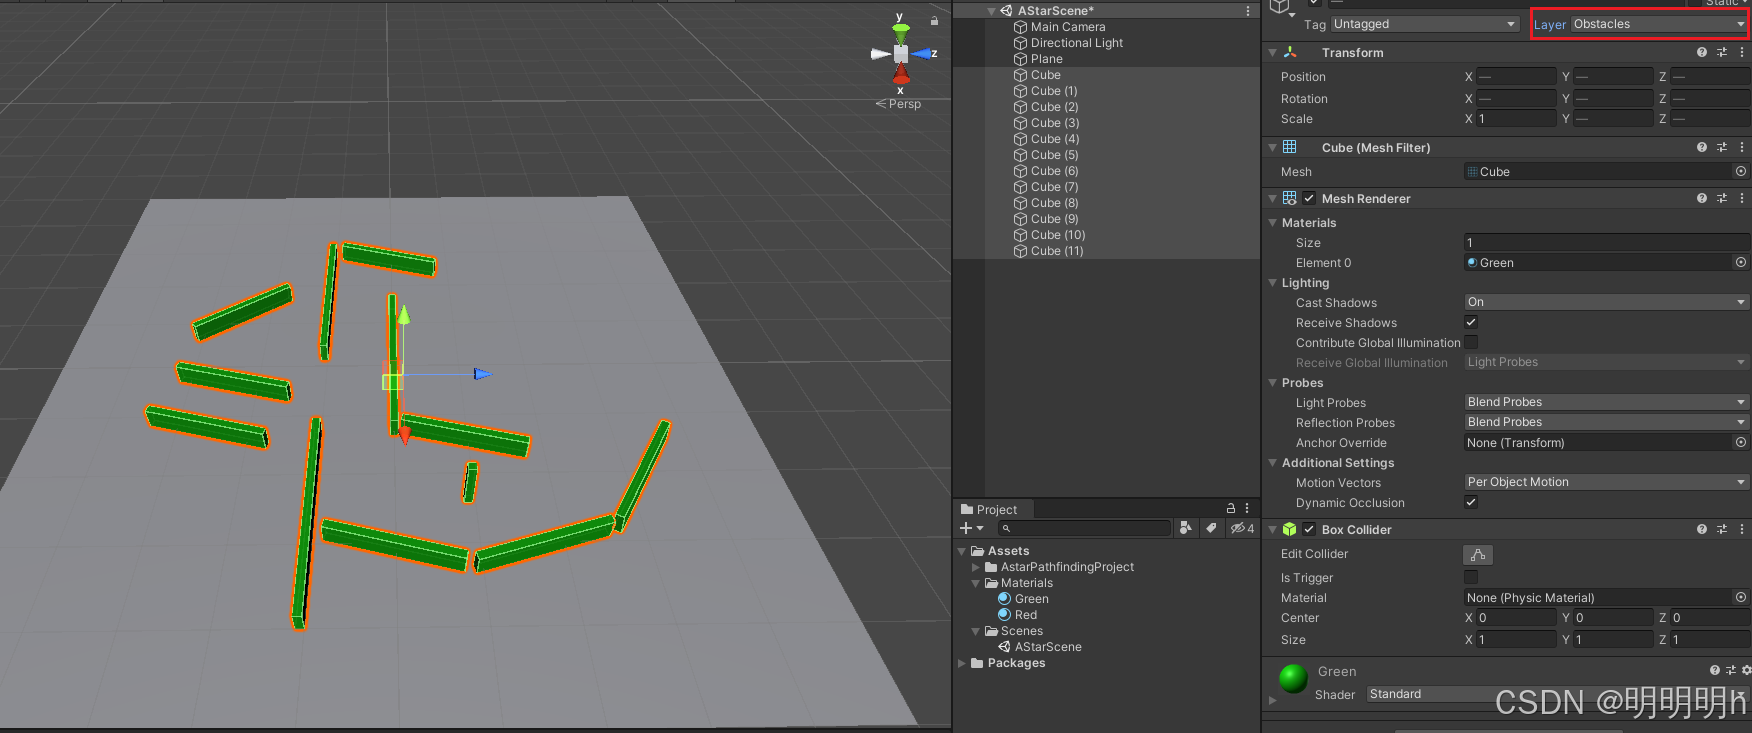
- 增加障碍物
创建Cube搭建成障碍物并设置Layer
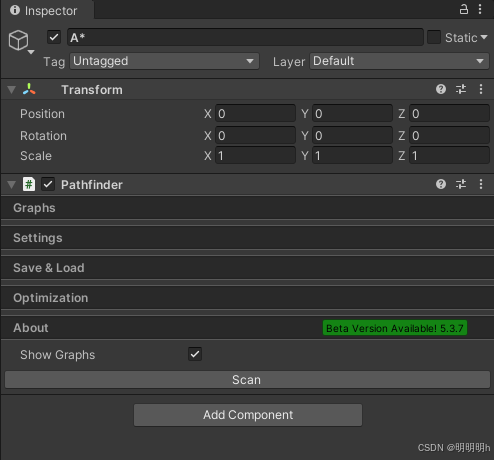
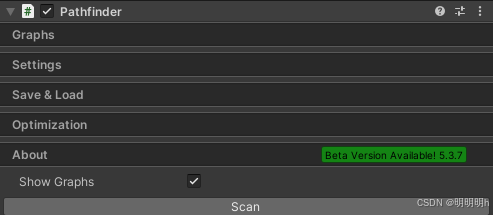
- 添加AstarPath组件
创建GameObject命名为A*,添加 AstarPath组件(Components–>Pathfinding–>Pathfinder),并进行参数设置

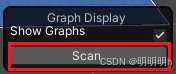
- 烘培
1.4 添加AI
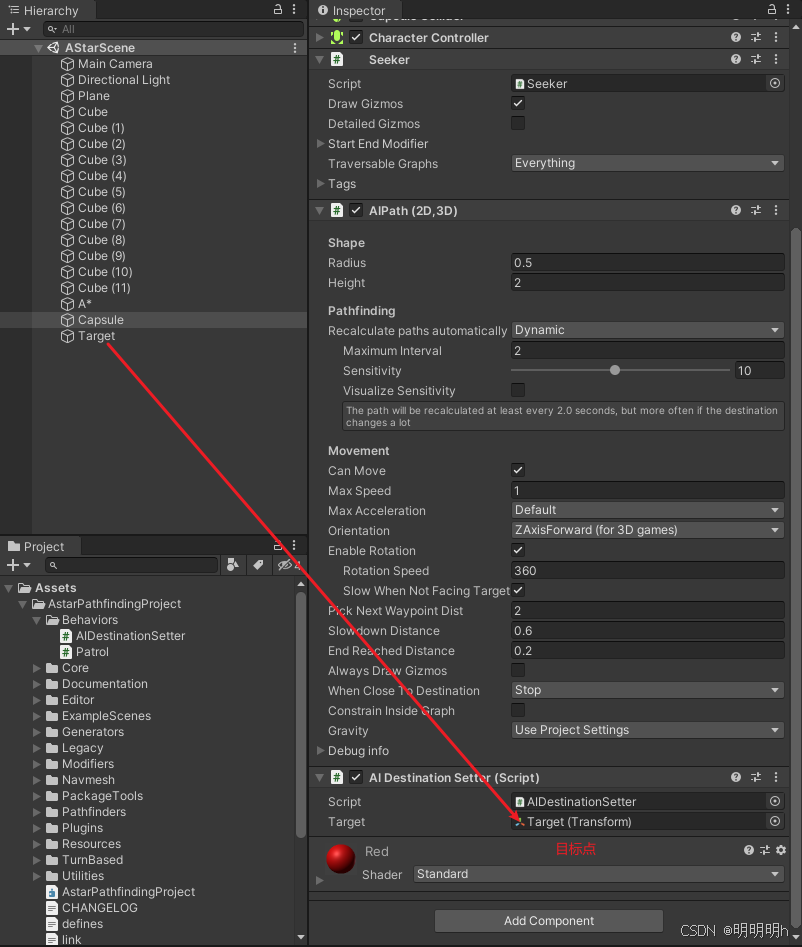
- 创建一个胶囊体,然后增加一个
Character Controller组件。将它放置在Plane上。再绑一个Seeker组件和AIDestinationSetter组件,以及AIPath组件。 - 创建一个空的物体,命名为Target作为目标点,并赋值给AIDestinationSetter
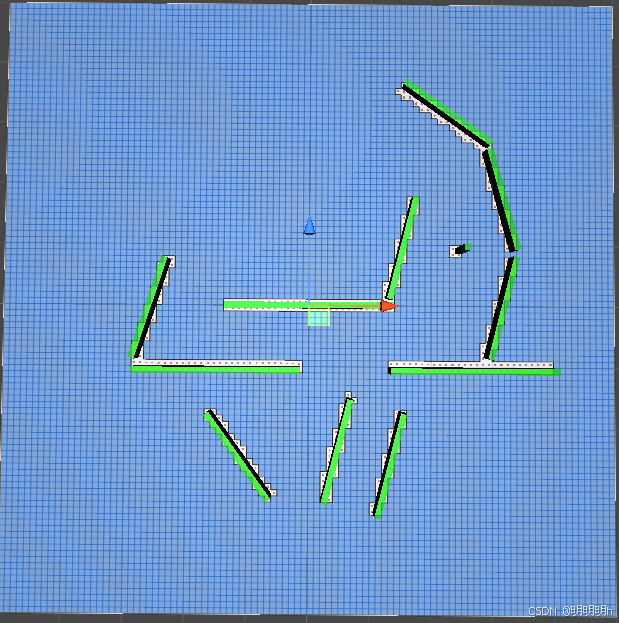
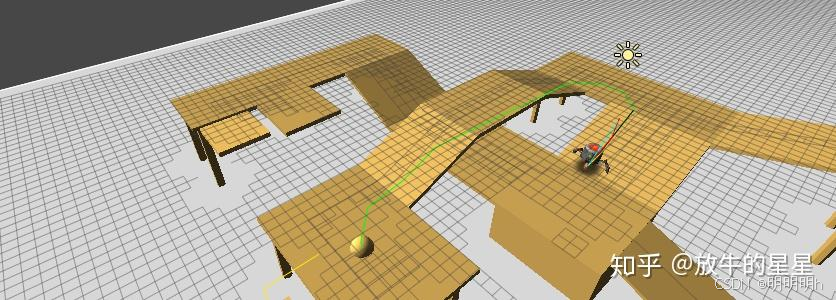
1.5 运行
Scene下可看到路径
2.A*(AstarPath) 面板
2.1 视图(Graphs)

视图区域可以看到本场景里所有的视图信息。你可能会用到多个视图,那么这些都保存在A*面板里面。(你不需要创建多个A*面板,即不用绑定多个 AstarPath组件)如果你点击 Add New Graph 你就可以看到一个包含所有可创建的graphs的列表。
2.1.1 Graph类型
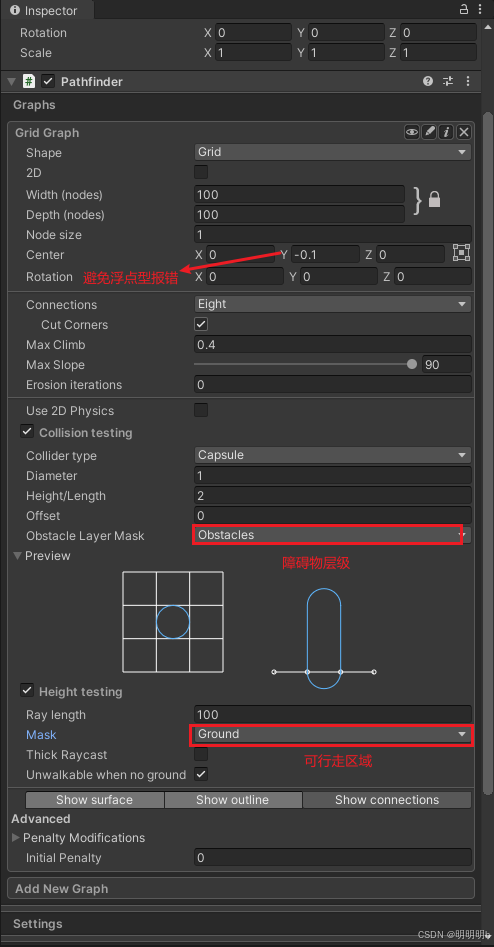
2.1.1.1 Grid Graph
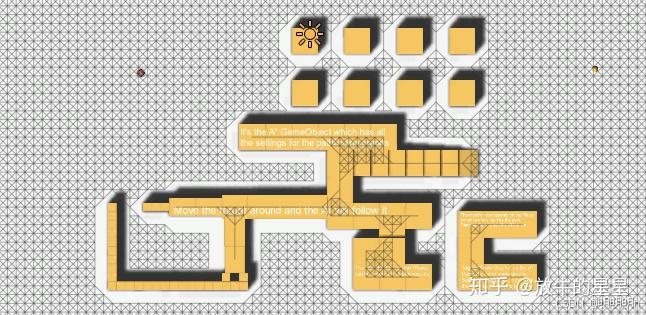
这是最直接的一种Graph,和名字一样,他生成的是栅格类型的Graph。它在大多数的场景下表现都是良好的,并且如果你需要在运行时动态更新graph数据也十分的容易和方便。(比如RTS或者塔防游戏)
但它对于拥有巨量空间的大型世界表现乏力,因为栅格的特性,它会在所有的地方生成相同格式的数据,即使那些地方是大片的空白地区,因此它会消耗过多的内存和使用更长的寻路时间。
2.1.1.2 Navmesh Graph
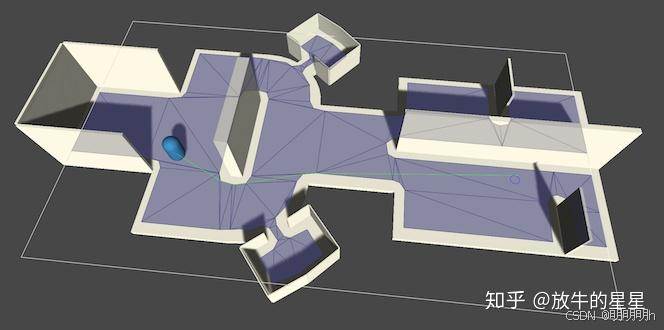
这个是另外一个常用的graph类型,他用三角形替代了gird graph里的栅格形态,以及point graph里的路点。
这个寻路方式在大多数静态场景下(即不会在运行时动态调整障碍和阻挡点)是完美的。他通常来说性能要优于 grid graph,因为他搜索的节点少,并且也不怎么需要平滑处理。它返回的路径一般来说可以直接使用,但是还是强力建议使用funnel modifier的修饰符。
2.1.1.3 Point Graph
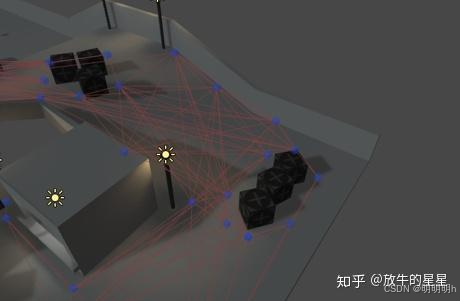
point graph 通过一个Root Transform 来扫描它们,然后把每一个点当做一个子节点。然后它用射线检测一下不同节点之间是不是真的能够联通起来。如果你想要让路线平滑起来就有一些困难了,因为它必须要经过哪些已经设定好的路点,就不能像上面两种类型一样自动进行平滑优化。不过这里可以使用 raycast modifier修饰符来进行适当优化。
但是,这里有一个问题就是,当我们到达一个路点的时候,距离它最近的那个路点有可能在墙的后面。所以当你放置路点的时候最好能规避这个问题。
2.1.1.4 Recast Graph (Pro版本专属)**
这是目前为止最先进的graph生成器。它是基于Recasts,一个用C++写的开源的导航网格和导航系统。
recast graph生成器,主要是将场景的Mesh都体素化,然后模拟建立一个可以用 navmesh graph处理的导航网格。他可以用几秒钟就自动生成一个,正常情况下可能几个小时才能手动生成的网格。
面板属性:
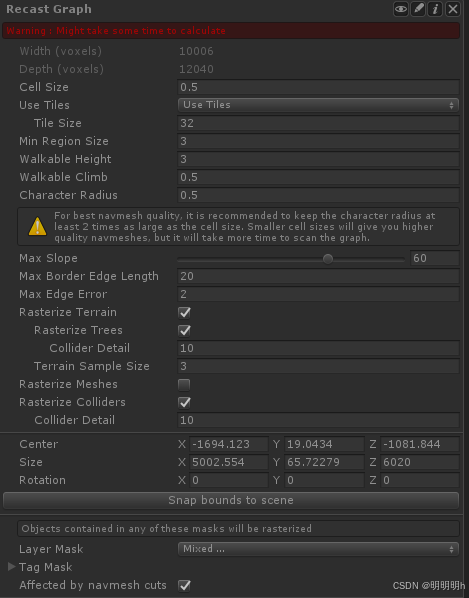
Pathfinding.Seeker seeker;seeker.traversableTags = (1 << 0) | (1 << 2); // 允许通过 tag 为 0 和 2 的区域// 定义构建区域为 200x20x200 大小,中心在 (0, 0, 0)recastGraph.forcedBoundsCenter = new Vector3(0, 0, 0);recastGraph.forcedBoundsSize = new Vector3(200, 20, 200);2.1.1.5 Layered Grid Graph (Pro版本专属)
GridGraph的表现一般来说已经比较完美了。但是如果有一些场景有一些重叠的区域,比如移动建筑有很多层,他就不能很完美的处理这些情况了。所以这个graph就用来处理这种情况了。这里有点局限的地方就是目前只支持4方向的寻路,8方向的暂时不能支持。另外还有一些额外的内存开销,但是当你需要进行分层寻路的时候,你可能不得不去使用它……
2.1.2 单个Graph操作

- 眼睛:显示和隐藏场景视窗里的graph,当隐藏的时候,眼睛会变为红色
- 笔:重命名这个graph,这个在你拥有多个graph的时候比较有用,可以帮你搞清楚哪个是哪个
- i:一些简略信息告诉你现在有多少个nodes在graph里面。注意编辑器下你是必须先扫描了之后才有信息
- x:删除graph
2.2 设置(Setting)
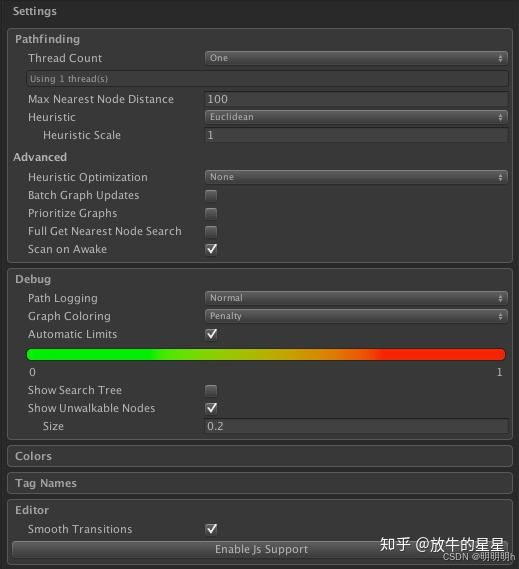
- Pathfinding
- Thread Count:寻路可以使用几个线程
- Max Nearest Node Distance:搜索节点的最大距离
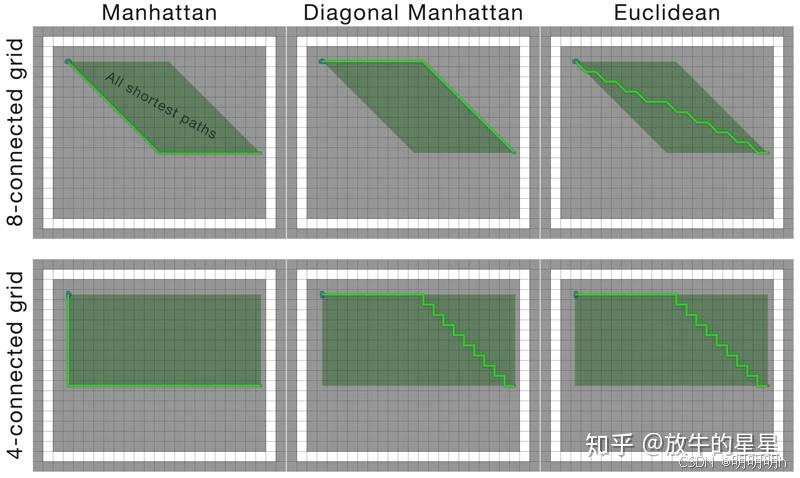
当你进行最近节点搜索的时候,这里会限定最大的搜索范围。主要用于寻找一个不可到达的点的时候,在它周围选取替代点的范围。如果仍然搜索不到,寻路就会返回失败。 - heuristic:启发函数
启发函数其实就是A*里 的H值,它表明了一个节点到目标点的成本。不同的启发函数会决定如何选择路径。
- Heuristic Scale:启发函数的使用规模
- Advanced
- Debug
- Colors
设定场景视窗里各种绘制的颜色值。 - Tag Names
快捷设定各种tag值。 - Editor
打开或者关闭时候的动画
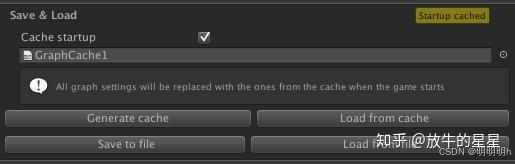
2.3 保存和加载(Save & Load)

这个区域让你可以保存缓存数据,或者加载缓存数据。你可以生成一个cache文件来减少启动时候的长时间计算。
3.插件自带的移动脚本
-
AIPath:
- 适配所有的 graph类型。
- 遵循物理,寻路平滑。
- 适用于局部回避(local avoidance)
- 3D和2D的游戏都能支持。
-
RichAI:
- 专门给namesh/recast graphs设计的,不能在其他类型上使用。
- navmesh类型的路径跟随比AIPath上表现更好,它能更好的处理路径的Push问题,以及更平稳的跟随路径。
- 对非网格(off-mesh)的支持程度比AIPath好。
- 局部回避(local avoidance)支持度也挺好。
- 支持在3D游戏(XZ平面移动),不支持2D。
-
AILerp:
- 使用线性插值的方式跟随路径。(这就是为什么Lerp在名字中的原因,要线性插值),不会使用物理相关。
- 完全沿着路径走 不会有任何偏差。
- 基于上述两点,它完全没必要使用局部回避,所以理所当然的不支持它。
- 三个里面性能最好的,因为它足够的简单。但是要记住,如果你要支持物理相关的特性,就需要选择其他2个中的一个。
- 支持2D和3D游戏。
简而言之,如果你要使用基于导航网格的寻路,就要使用RichAI,不然就根据你的游戏是否要使用物理和局部回避等功能来选择使用AIPath或者是AILerp。可以从插件提供的示例里查看他们运动表现之间的区别。
4.创建自定义的寻路脚本
Seeker组件里的StartPath方法:
public Path StartPath (Vector3 start, Vecyor3 end, OnPathDelegate callback)路径信息:
- List Path.vectorPath:如果使用了修饰符的话,这个路径点的数据可能会在后处理的时候被修改,当然这个是推荐拿数据的方式
- List Path.path:这里存的是GraphNode的元素,他保存了路径访问过的所有节点,这对于获取更多的附加信息来说是比较有用的
基本逻辑:
这个脚本需要保持朝着路径列表最近的路点移动,并在接近的时候快速切换至下一个路点。所以,每帧都需要做如下事情:
1.首先是要确认路径是否已经生成了。因为路径请求是异步的,所以得到计算结果可能会需要几帧的时间(通常会在一帧内的)。
2.然后我们要检查移动的AI是否已经接近了我们正在靠近的路点,如果是的话,就要切换到下一个路点,然后重复这个动作直到接近目标点。
3.为了让移动准确,我们需要用当前接近的路点坐标减掉我们现在的坐标来得到一个向量,将向量的单位归整到1,然后用这个向量来确定目标的移动方向,若不然你可能反而离目标路点越来越远。
4.用向量乘以移动速度值,得到一个带方向的速度。
5.最后使用CharacterController.SimpleMove(3D)或者修改transform.position(2D)的方法来移动AI。
- 示例1:
using UnityEngine;// Note this line, if it is left out, the script won\'t know that the class \'Path\' exists and it will throw compiler errors// This line should always be present at the top of scripts which use pathfindingusing Pathfinding;public class AstarAI : MonoBehaviour { public Transform targetPosition; private Seeker seeker; private CharacterController controller; public Path path; public float speed = 2; public float nextWaypointDistance = 3; private int currentWaypoint = 0; public bool reachedEndOfPath; public void Start () { seeker = GetComponent<Seeker>(); // If you are writing a 2D game you can remove this line // and use the alternative way to move sugggested further below. controller = GetComponent<CharacterController>(); // Start a new path to the targetPosition, call the the OnPathComplete function // when the path has been calculated (which may take a few frames depending on the complexity) seeker.StartPath(transform.position, targetPosition.position, OnPathComplete); } public void OnPathComplete (Path p) { Debug.Log(\"A path was calculated. Did it fail with an error? \" + p.error); if (!p.error) { path = p; // Reset the waypoint counter so that we start to move towards the first point in the path currentWaypoint = 0; } } public void Update () { if (path == null) return; // Check in a loop if we are close enough to the current waypoint to switch to the next one. // We do this in a loop because many waypoints might be close to each other and we may reach // several of them in the same frame. reachedEndOfPath = false; // The distance to the next waypoint in the path float distanceToWaypoint; while (true) { // If you want maximum performance you can check the squared distance instead to get rid of a // square root calculation. But that is outside the scope of this tutorial. distanceToWaypoint = Vector3.Distance(transform.position, path.vectorPath[currentWaypoint]); if (distanceToWaypoint < nextWaypointDistance) { // Check if there is another waypoint or if we have reached the end of the path if (currentWaypoint + 1 < path.vectorPath.Count) currentWaypoint++; else { // Set a status variable to indicate that the agent has reached the end of the path. // You can use this to trigger some special code if your game requires that. reachedEndOfPath = true; break; } } else break; } // Slow down smoothly upon approaching the end of the path // This value will smoothly go from 1 to 0 as the agent approaches the last waypoint in the path. var speedFactor = reachedEndOfPath ? Mathf.Sqrt(distanceToWaypoint/nextWaypointDistance) : 1f; // Direction to the next waypoint // Normalize it so that it has a length of 1 world unit Vector3 dir = (path.vectorPath[currentWaypoint] - transform.position).normalized; // Multiply the direction by our desired speed to get a velocity Vector3 velocity = dir * speed * speedFactor; // Move the agent using the CharacterController component // Note that SimpleMove takes a velocity in meters/second, so we should not multiply by Time.deltaTime controller.SimpleMove(velocity); // If you are writing a 2D game you may want to remove the CharacterController and instead use e.g transform.Translate // transform.position += velocity * Time.deltaTime; }}- 示例2:
using UnityEngine;using Pathfinding;public class MyAIMove : MonoBehaviour{ private Seeker mSeeker; // 寻路组件 private List<Vector3> mPathPointList; // 路径点列表 private int mCurrentIndex = 0; // 当前路径点索引 void Start() { mSeeker = GetComponent<Seeker>(); // 获取Seeker组件 } void Update() { // 当鼠标左键点击时 if (Input.GetMouseButtonDown(0)) { // 获取鼠标点击位置,并转换为世界坐标 Vector3 target = Camera.main.ScreenToWorldPoint(Input.mousePosition); target.z = 0; // 保证z轴为0(2D场景) // 创建路径 CreatePath(target); // 移动角色 Move(); } } private void Move() { // 如果路径点列表为空或者当前索引超出范围,直接返回 if (mPathPointList == null || mCurrentIndex >= mPathPointList.Count) return; // 如果当前位置与目标路径点的距离大于0.2f,则继续移动 if (Vector2.Distance(transform.position, mPathPointList[mCurrentIndex]) > 0.2f) { // 计算移动方向 Vector3 dir = (mPathPointList[mCurrentIndex] - transform.position).normalized; // 根据方向移动角色,这里的20是移动速度,Time.deltaTime是每帧的时间间隔 transform.position += dir * Time.deltaTime * 20; } else { // 如果已经到达当前路径点,则切换到下一个路径点 if (mCurrentIndex == mPathPointList.Count - 1) return; mCurrentIndex++; } } private void CreatePath(Vector3 target) { mCurrentIndex = 0; // 重置当前路径点索引为0 // 开始寻路,从当前位置到目标位置 mSeeker.StartPath(transform.position, target, path => { // 寻路完成后,将路径点存入路径点列表 mPathPointList = path.vectorPath; }); }}5.错误信息处理
https://zhuanlan.zhihu.com/p/71122559
6.高阶教程
6.1 保存和加载Graphs
所有的graphs都可以从文件存储和加载。这其实也是编辑器下一直做的事情。几乎没有使用Unity的序列化操作,而是把所有的graphs的设置都转成了二进制存在文件里。它不仅仅只存储设置,还可以通过一次计算,把所有的graph节点数据也打成二进制数据包,存放在某个地方。
A* inspector里有一个Save & Load页签,两个按钮分别叫Save to file和Load from file。他们可以用来存储或者加载缓存文件。
- 缓存Graph计算结果
每次启动都重新结算graphs可能是你想要的一种方式。但是,尤其是对于RecastGraph或者移动端开发,重计算所导致的延迟是不能被接受的。也可能因为某些原因导致你在启动的时候没法计算数据。
这个时候,cache就很有用了,它允许你在编辑器下扫描graph数据,然后将它存储到一个外部文件,启动时候只需要加载文件就好,大部分情况下这都会比重新计算要快很多。
创建缓存的话,只要在Save & Load页签上点击Generate Cache。它会询问你是否要在存储在前再扫描一次。OK,现在你每次启动的时候就直接从缓存读取,而不需要再计算啦。
- 保存Graphs到文件然后加载它们
除此之外,你可能还会想把graphs保存到文件,并在运行时从服务器上读取。同样的在Save & Load页签上点击Save to file按钮。你可以选择只存储设定还是连数据一起。如果你只存储了设定,那么其实你还是需要在任何agent使用数据之前重计算一遍。重计算数据使用的接口如下:
// 重新计算所有图表AstarPath.active.Scan();// 仅重新计算第一个网格图表var graphToScan = AstarPath.active.data.gridGraph;AstarPath.active.Scan(graphToScan);// 仅重新计算第一个和第三个图表var graphsToScan = new[] { AstarPath.active.data.graphs[0], AstarPath.active.data.graphs[2] };AstarPath.active.Scan(graphsToScan);- 用代码的方式加载和保存
如果你想在运行时加载或者保存graph,编辑器下的接口就不能使用了。当然我们会提供一些简单的方式来完成。它会直接将graph序列化为二进制数组:
byte[] bytes = AstarPath.active.data.SerializeGraphs();如果你想要更多的控制前,你可以增加一些设置:
var settings = new Pathfinding.Serialization.SerializeSettings();// 只保存设置settings.nodes = false;byte[] bytes = AstarPath.active.data.SerializeGraphs(settings);加载数据可以这样:
AstarPath.active.data.DeserializeGraphs(bytes);如果你仅仅是加载了settings,你需要加载完成之后调用Scan:
AstarPath.active.data.DeserializeGraphs(bytes);AstarPath.active.Scan();- 卸载数据
// 单个var data = AstarPath.active.data;var myGraph = data.gridGraph;data.RemoveGraph(myGraph);// 所有for (int i = 0; i < data.graphs.Length; i++){if (data.graphs[i] != null){data.RemoveGraph(data.graphs[i]);}}6.2 小型Graph更新(GraphUpdateScene)
- 方法一:使用 GraphUpdateScene 组件,该组件可以在Unity Inspector中编辑。
GraphUpdateScene 组件:这是一个可视化工具,允许你在Unity Inspector中指定哪些区域需要更新。它非常适合在编辑器中设置静态或半静态的更新区域。 - 方法二:使用脚本编程,通过调用 AstarPath 类中的方法,并传入一个 Bounds 对象或 Pathfinding.GraphUpdateObject(实际上,GraphUpdateScene 组件在后台也是这样做的)。
// 获取了附加到当前游戏对象的碰撞体的边界框//并将其传递给 AstarPath.active.UpdateGraphs() 方法,以仅更新该边界框范围内的路径查找图表。Bounds bounds = GetComponent<Collider>().bounds;AstarPath.active.UpdateGraphs(bounds);6.3 访问graph数据
- 获取Graph
// 访问不同类型GraphGridGraph gridGraph = AstarPath.active.data.gridGraph;PointGraph pointGraph = AstarPath.active.data.pointGraph;NavMeshGraph navmeshGraph = AstarPath.active.data.navmesh;RecastGraph recastGraph = AstarPath.active.data.recastGraph;LayerGridGraph layerGridGraph = AstarPath.active.data.layerGridGraph;// 访问所有GraphNavGraph[] allGraphs = AstarPath.active.data.graphs;// 通过面板名查找Graphvar graph = AstarPath.active.data.FindGraph(g => g.name == \"My Custom Graph Name\")- 获取Graph节点
var gg = AstarPath.active.data.gridGraph;gg.GetNodes(node => { // Here is a node Debug.Log(\"I found a node at position \" + (Vector3)node.position);});6.4 Navmesh Cut
Navmesh cutting从名字上来看就是对Navmesh 进行裁切。主要的行为也是如此,从一个已经生成好的navmesh上 剔除一个矩形、圆形或者其他自定义形状。当然这个navmesh可以是通过recast或者navmesh的graph生成的。
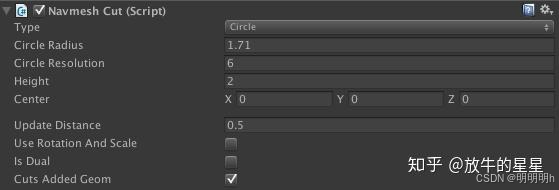
Is Dual:想象你在一块导航网格上切一个 “甜甜圈”:
- 如果 Is Dual 关闭,NavmeshCut 会简单地“切”出一个洞,整个区域不可行走。
- 如果 Is Dual 开启,它会挖出一个“环形”的洞,中间的小岛仍然是可走区域。
6.5 使用tags工作
要让tagging功能正常,首先你要用tag标识一些节点。在Seeker组件上,有一个设置选项Tags ,这里你可以设置这个单位可以你可以通过哪些tag。第一个(通常是 Basic Ground)在所有节点是默认勾选的。然后寻路的过程中,seeker就会根据你设置可通行的tag上找到路径。设置最近节点的时候也是要确保节点是可以通行的。下面的图展示的就是这个单位不能在restricted area的节点通行。
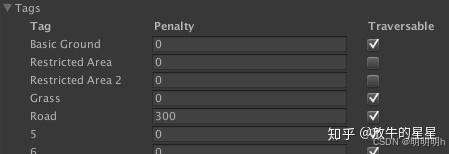
这个组件一般搭配GraphUpdateScene组件使用,它有一个设置叫Modify Tags,它设置了是否需要修改多边形节点的Tags,如果Modify Tags勾选的时候,还有另外一个属性Set Tag,用来标识哪些tag可以标记。
6.6 RVOController(动态避障)
🚦 使用说明
-
添加到角色上
- 在角色 GameObject 上添加 RVOController 组件
- 通常还需同时挂载 AIPath 或 RichAI(用来提供路径点)。
-
设置 RVO 模拟器
- 在场景中创建一个 RVO Simulator(通常由 AstarPath 组件创建)。
- 这个模拟器负责全局的避障计算。
-
启用避障
- 在 AIPath 或 RichAI 中勾选 Use RVO。
- 确保目标角色的移动是通过这些组件控制的,而不是手动移动 transform。
💡 使用建议
- 用于 RTS、群体移动、交通模拟 等需要单位之间相互避让的场景;
- 避障行为效果取决于:路径速度(AIPath)、邻居配置、优先级等多个参数;
- 如果单位靠得很近,建议调整 Radius 和 Time Horizon,否则可能出现卡住、震荡。
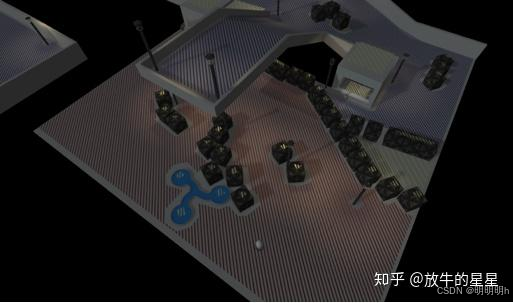
6.7 NodeLink/NodeLink2 连接两个非连续区域(例如跳跃、传送、爬梯等)

代码控制:
// 创建起点(挂载 NodeLink2 的对象)GameObject linkObj = new GameObject(\"NodeLink2\");linkObj.transform.position = new Vector3(0, 0, 0); // 起点位置// 创建终点GameObject endObj = new GameObject(\"LinkEnd\");endObj.transform.position = new Vector3(5, 0, 0); // 终点位置// 添加 NodeLink2 脚本var link = linkObj.AddComponent<Pathfinding.NodeLink2>();link.end = endObj.transform;link.oneWay = false; // 是否单向// 激活链接(必须调用)link.Apply(true);✅ 小提示:
- NodeLink2 只适用于 GridGraph 和 RecastGraph(也就是类似 Unity NavMesh 的图类型)。
- NodeLink(不是 NodeLink2)是旧版的,不推荐使用。
- AI 控制器要用 RichAI 或 AIPath,它们才支持路径中走 NodeLink。
6.8 RandomPath 和 FleePath
- RandomPath
RandomPath 是 Path 类的一个子类,用于寻找从起点出发、长度在一定范围内的“随机”路径。这类路径不是直达某个目标点,而是用于生成探索型或巡逻型路径。
// start:路径起点// searchLength:搜索的节点数量限制,间接影响路径“长度”// callback:路径计算完成后的回调函数(可选)public static RandomPath Construct(Vector3 start, int searchLength, OnPathDelegate callback = null)- FleePath
FleePath.Construct 是 A* Pathfinding Project 插件中用来构造“逃离路径”的方法,属于 FleePath 类。它的作用是:
生成一个从某个目标点“远离”的路径,AI 会试图逃到远离指定点的一条路径上,而不是靠近某个目标点(与普通的寻路相反)。
// startVector3起点(AI 当前所在位置)// avoidVector3要远离的点(威胁源)// searchLengthint搜索深度(越大可能逃得越远)// callbackOnPathDelegate路径完成时的回调(可选)public static FleePath Construct(Vector3 start, Vector3 avoid, int searchLength, OnPathDelegate callback = null)
