【详细教程】如何使用YOLOv11进行图像与视频的目标检测_yolov11 obb检测
《博主简介》
小伙伴们好,我是阿旭。专注于人工智能、AIGC、python、计算机视觉相关分享研究。
✌更多学习资源,可关注公-仲-hao:【阿旭算法与机器学习】,共同学习交流~
👍感谢小伙伴们点赞、关注!
《------往期经典推荐------》
一、AI应用软件开发实战专栏【链接】
二、机器学习实战专栏【链接】,已更新31期,欢迎关注,持续更新中~~
三、深度学习【Pytorch】专栏【链接】
四、【Stable Diffusion绘画系列】专栏【链接】
五、YOLOv8改进专栏【链接】,持续更新中~~
六、YOLO性能对比专栏【链接】,持续更新中~
《------正文------》
目录
- 如何使用YOLOv11进行目标检测
- 介绍
- YOLOv11关键创新
- 如何将YOLOv 11用于图像检测
-
- 步骤1:安装必要的库
- 步骤2:导入库
- 步骤3:选择模型型号
- 步骤4:编写一个函数来预测和检测图像中的对象
- 步骤5:使用YOLOv11检测图像中的对象
- 步骤6:保存并绘制结果图像
- 完整代码:
- 如何将YOLOv11用于视频检测
-
- 步骤1:安装必要的库
- 步骤2和3:导入库与模型
- 步骤4:创建Videowriter以保存视频的结果
- 步骤5:使用YOLOv 11检测视频中的对象
- 完整代码
- 结论
如何使用YOLOv11进行目标检测
介绍
继YOLOv 8、YOLOv 9和YOLOv10之后,最近刚发布了最新的YOLOv11!这一新的迭代不仅建立在其版本的优势之上,而且还引入了几个突破性的增强功能,为目标检测和计算机视觉设定了新的基准。
与以前的版本一样,YOLOv 11擅长检测、分类和定位图像和视频中的对象。然而,它更进一步,通过整合显著的增强功能,提高了跨多个用例的性能和适应性。让我们来看看使YOLOv 11在该系列中脱颖而出的关键增强功能。
YOLOv11关键创新
- 增强的特征提取:
YOLOv11使用改进的主干和颈部架构,显著提高了特征提取能力。这导致更准确的物体检测和更轻松地处理复杂视觉任务的能力。 - 针对效率和速度进行了优化:
凭借精致的架构设计和优化的训练管道,YOLOv11在保持高精度的同时提供更快的处理速度。这种平衡确保了YOLOv11是实时和大规模应用的理想选择。 - 更高的精度,更少的参数:
YOLOv11m是YOLOv11的一个中等大小的变体,在COCO数据集上实现了更高的平均精度(mAP),同时使用的参数比YOLOv8m少22%。这种改进使其在不影响性能的情况下提高了计算效率。 - 跨环境的适应性:
无论是部署在边缘设备、云平台还是由NVIDIA GPU驱动的系统上,YOLOv11都能为各种部署场景提供最大的灵活性。 - 广泛的支持任务:
YOLOv 11将其功能扩展到传统的对象检测之外,以支持实例分割,图像分类,姿态估计和面向对象检测(OBB)。这种多功能性使其成为应对各种计算机视觉挑战的强大工具。
这些增强功能的集成使YOLOv 11成为尖端计算机视觉应用的强大引擎。请继续关注,我们将探索YOLOv 11如何突破这个动态领域的可能界限!
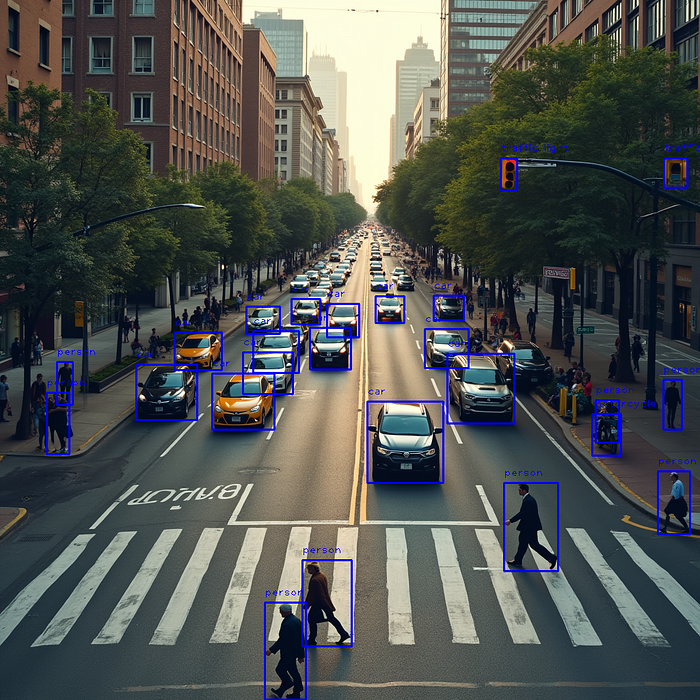
如何将YOLOv 11用于图像检测
步骤1:安装必要的库
pip install opencv-python ultralytics步骤2:导入库
import cv2from ultralytics import YOLO步骤3:选择模型型号
model = YOLO(\"yolo11x.pt\")在这个网站上,您可以比较不同的模型,并权衡各自的优点和缺点。在这种情况下,我们选择yolov11x.pt。
步骤4:编写一个函数来预测和检测图像中的对象
def predict(chosen_model, img, classes=[], conf=0.5): if classes: results = chosen_model.predict(img, classes=classes, conf=conf) else: results = chosen_model.predict(img, conf=conf) return resultsdef predict_and_detect(chosen_model, img, classes=[], conf=0.5, rectangle_thickness=2, text_thickness=1): results = predict(chosen_model, img, classes, conf=conf) for result in results: for box in result.boxes: cv2.rectangle(img, (int(box.xyxy[0][0]), int(box.xyxy[0][1])), (int(box.xyxy[0][2]), int(box.xyxy[0][3])), (255, 0, 0), rectangle_thickness) cv2.putText(img, f\"{result.names[int(box.cls[0])]}\", (int(box.xyxy[0][0]), int(box.xyxy[0][1]) - 10), cv2.FONT_HERSHEY_PLAIN, 1, (255, 0, 0), text_thickness) return img, results步骤5:使用YOLOv11检测图像中的对象
# read the imageimage = cv2.imread(\"YourImagePath\")result_img, _ = predict_and_detect(model, image, conf=0.5)步骤6:保存并绘制结果图像
cv2.imshow(\"Image\", result_img)cv2.imwrite(\"YourSavePath\", result_img)cv2.waitKey(0)完整代码:
from ultralytics import YOLOimport cv2def predict(chosen_model, img, classes=[], conf=0.5): if classes: results = chosen_model.predict(img, classes=classes, conf=conf) else: results = chosen_model.predict(img, conf=conf) return resultsdef predict_and_detect(chosen_model, img, classes=[], conf=0.5, rectangle_thickness=2, text_thickness=1): results = predict(chosen_model, img, classes, conf=conf) for result in results: for box in result.boxes: cv2.rectangle(img, (int(box.xyxy[0][0]), int(box.xyxy[0][1])), (int(box.xyxy[0][2]), int(box.xyxy[0][3])), (255, 0, 0), rectangle_thickness) cv2.putText(img, f\"{result.names[int(box.cls[0])]}\", (int(box.xyxy[0][0]), int(box.xyxy[0][1]) - 10), cv2.FONT_HERSHEY_PLAIN, 1, (255, 0, 0), text_thickness) return img, resultsmodel = YOLO(\"yolo11x.pt\")# read the imageimage = cv2.imread(\"YourImagePath.png\")result_img, _ = predict_and_detect(model, image, classes=[], conf=0.5)cv2.imshow(\"Image\", result_img)cv2.imwrite(\"YourSavePath.png\", result_img)cv2.waitKey(0)如何将YOLOv11用于视频检测
步骤1:安装必要的库
pip install opencv-python ultralytics步骤2和3:导入库与模型
import cv2from ultralytics import YOLOmodel = YOLO(\"yolo11x.pt\")步骤4:创建Videowriter以保存视频的结果
# defining function for creating a writer (for mp4 videos)def create_video_writer(video_cap, output_filename): # grab the width, height, and fps of the frames in the video stream. frame_width = int(video_cap.get(cv2.CAP_PROP_FRAME_WIDTH)) frame_height = int(video_cap.get(cv2.CAP_PROP_FRAME_HEIGHT)) fps = int(video_cap.get(cv2.CAP_PROP_FPS)) # initialize the FourCC and a video writer object fourcc = cv2.VideoWriter_fourcc(*\'MP4V\') writer = cv2.VideoWriter(output_filename, fourcc, fps, (frame_width, frame_height)) return writer步骤5:使用YOLOv 11检测视频中的对象
output_filename = \"YourFilename.mp4\"video_path = r\"YourVideoPath.mp4\"cap = cv2.VideoCapture(video_path)writer = create_video_writer(cap, output_filename)while True: success, img = cap.read() if not success: break result_img, _ = predict_and_detect(model, img, classes=[], conf=0.5) writer.write(result_img) cv2.imshow(\"Image\", result_img) cv2.waitKey(1)writer.release()完整代码
import cv2from ultralytics import YOLOdef predict(chosen_model, img, classes=[], conf=0.5): if classes: results = chosen_model.predict(img, classes=classes, conf=conf) else: results = chosen_model.predict(img, conf=conf) return resultsdef predict_and_detect(chosen_model, img, classes=[], conf=0.5, rectangle_thickness=2, text_thickness=1): results = predict(chosen_model, img, classes, conf=conf) for result in results: for box in result.boxes: cv2.rectangle(img, (int(box.xyxy[0][0]), int(box.xyxy[0][1])), (int(box.xyxy[0][2]), int(box.xyxy[0][3])), (255, 0, 0), rectangle_thickness) cv2.putText(img, f\"{result.names[int(box.cls[0])]}\", (int(box.xyxy[0][0]), int(box.xyxy[0][1]) - 10), cv2.FONT_HERSHEY_PLAIN, 1, (255, 0, 0), text_thickness) return img, results# defining function for creating a writer (for mp4 videos)def create_video_writer(video_cap, output_filename): # grab the width, height, and fps of the frames in the video stream. frame_width = int(video_cap.get(cv2.CAP_PROP_FRAME_WIDTH)) frame_height = int(video_cap.get(cv2.CAP_PROP_FRAME_HEIGHT)) fps = int(video_cap.get(cv2.CAP_PROP_FPS)) # initialize the FourCC and a video writer object fourcc = cv2.VideoWriter_fourcc(*\'MP4V\') writer = cv2.VideoWriter(output_filename, fourcc, fps, (frame_width, frame_height)) return writermodel = YOLO(\"yolo11x.pt\")output_filename = \"YourFilename.mp4\"video_path = r\"YourVideoPath.mp4\"cap = cv2.VideoCapture(video_path)writer = create_video_writer(cap, output_filename)while True: success, img = cap.read() if not success: break result_img, _ = predict_and_detect(model, img, classes=[], conf=0.5) writer.write(result_img) cv2.imshow(\"Image\", result_img) cv2.waitKey(1)writer.release()结论
在本教程中,我们学习了如何使用YOLOv 11检测图像和视频中的对象。如果你觉得这段代码很有帮助,感谢点赞关注!
关注文末名片G-Z-H:【阿旭算法与机器学习】,发送【开源】可获取更多学习资源
好了,这篇文章就介绍到这里,喜欢的小伙伴感谢给点个赞和关注,更多精彩内容持续更新~~
关于本篇文章大家有任何建议或意见,欢迎在评论区留言交流!


