4*4矩阵按键(STM32)超!超!超!详细分析_stm32 矩阵键盘
矩阵键盘的基本结构
-
定义:
-
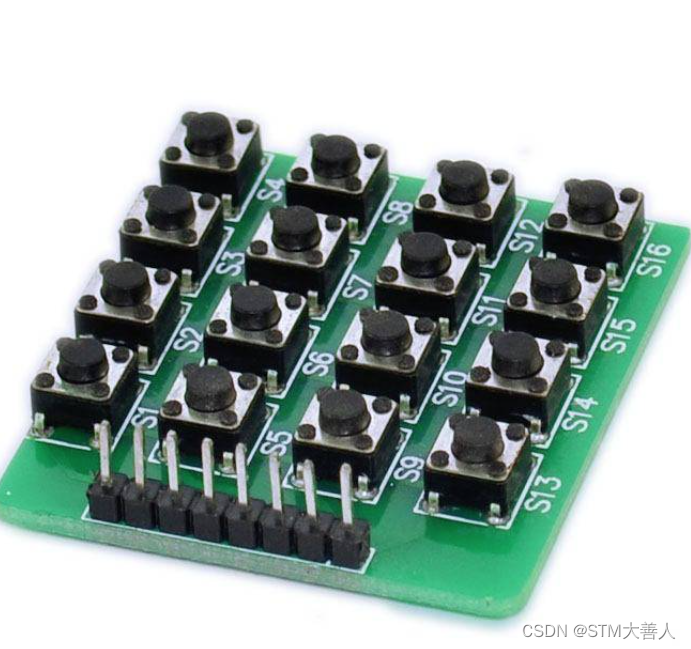
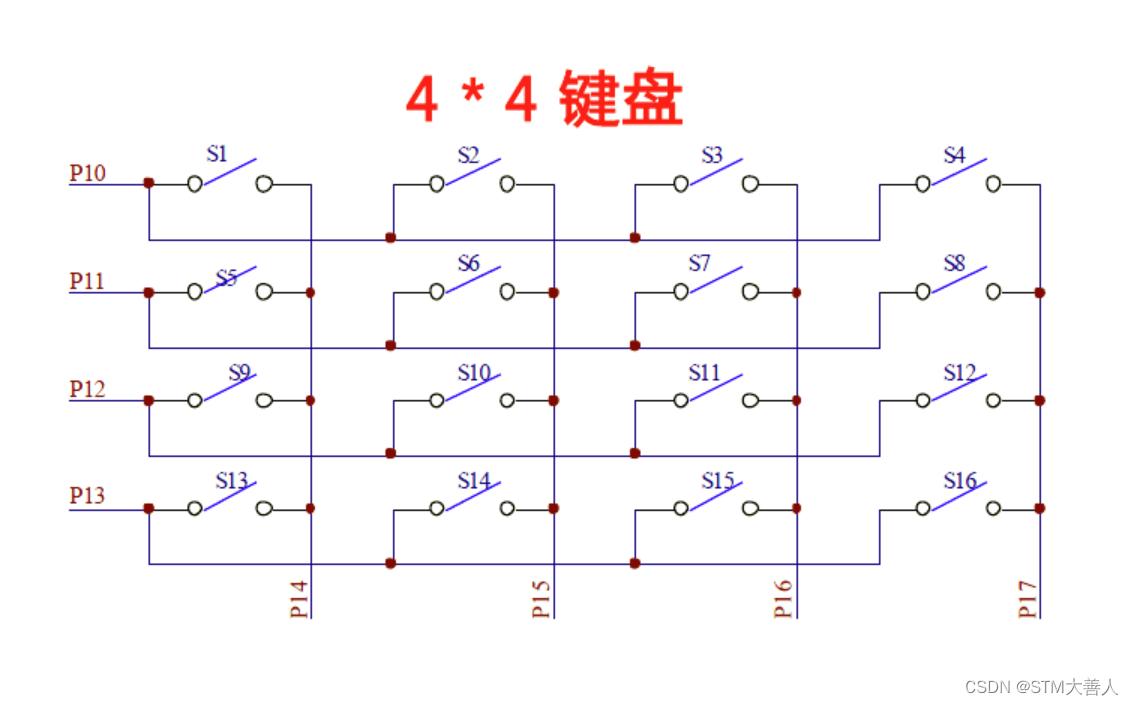
矩阵键盘,又称为行列式键盘,是用4条I/O线作为行线,4条I/O线作为列线组成的键盘。在行线和列线的每一个交叉点上设置一个按键,因此键盘中按键的个数是4×4个。
-
优势:
-
这种行列式键盘结构能够有效地提高单片机系统中I/O口的利用率,节约单片机的资源。(8引脚控制16按键)

硬件连接
- 行线与列线:在硬件上,4条行线连接到微控制器的输出引脚,而4条列线连接到微控制器的输入引脚。
- 按键位置:每个按键位于行线和列线的交叉点上。

GPIO初始化
行
行线
通常设置为输出模式,用于向列线发送扫描信号。
扫描信号
行线的主要功能是向列线发送扫描信号。当某一行线被设置为低电平时,与之相交的列线会被检测(若相对应的按键被按下,列线被检测为低电平)以判断是否有按键被按下。
确定按键行
通过依次将每一行线设置为低电平(可以逐行扫描键盘)。当检测到列线上有低电平时,可以确定被按下的按键位于当前选中的行上。若列线上无低电平,那么将此行线设置为高电平,下一行设置为低电平,进行新一轮按键检测。
列
列线
设置为输入模式,用于读取按键状态。
读取按键状态
列线的主要功能是读取按键状态。(STM32就靠列线来确认按键状态)当某一行线被选中(设置为低电平)时,微控制器会读取所有列线的电平状态,以判断是否有按键被按下。
注意事项
在实际应用中,还需要考虑去抖处理、中断处理等因素,以确保按键检测的准确性和稳定性。
代码详解
初始化
void KEY_4x4_Init(void) //键盘IO口配置及初始化{ GPIO_InitTypeDef GPIO_InitStructure; RCC_APB2PeriphClockCmd(RCC_APB2Periph_GPIOA,ENABLE); //使用GPIOA的0,1,2,3引脚为行 R1~R4对应矩形按钮的5,6,7,8引脚GPIO_InitStructure.GPIO_Pin = GPIO_Pin_0|GPIO_Pin_1|GPIO_Pin_2|GPIO_Pin_3; //行 0123GPIO_InitStructure.GPIO_Speed = GPIO_Speed_50MHz;GPIO_InitStructure.GPIO_Mode = GPIO_Mode_Out_PP; //使用推挽输出 GPIO_Init(GPIOA, &GPIO_InitStructure);GPIO_SetBits(GPIOA,GPIO_Pin_0|GPIO_Pin_1|GPIO_Pin_2|GPIO_Pin_3); //令GPIO的0,1,2,3引脚输出为1/********************************************************************//********************************************************************//********************************************************************/GPIO_InitStructure.GPIO_Pin = GPIO_Pin_4|GPIO_Pin_5|GPIO_Pin_6|GPIO_Pin_7; //使用GPIOA的4,5,6,7引脚为列 GPIO_InitStructure.GPIO_Mode = GPIO_Mode_IPU; //使用上拉输入GPIO_Init(GPIOA, &GPIO_InitStructure);GPIO_SetBits(GPIOA, GPIO_Pin_4|GPIO_Pin_5|GPIO_Pin_6|GPIO_Pin_7);//令GPIO的4,5,6,7引脚输出为1}这里比较重要的是,我们需要将0-7的I/O口全部拉成高电平!我们后面检测的是低电平,所以你不设置,全部都是低电平。直接让自己的按键默认全部按下(成为一个导线(手动滑稽一下))。
按键检测
首先讲一讲我们都部分参数,方便接下来的理解。
u8 anxian = 0; //anxian这个变量为1时,证明有按钮正在被按下*key = 1; //输出key的值为1传递到主函数,当值为x时,则说明按钮Sx被按下,在变量前增加*,为c语言中的指针操作,使用指针进行地址传递,在子函数中修改的值在主函数中可以利用地址读取,而不需要利用子函数返回值,然后主函数在增加一个变量进行接收。开始吧!
void KEY_Scan(u8 *key) { GPIO_Write(GPIOA,0x00fe); if((GPIO_ReadInputDataBit(GPIOA,GPIO_Pin_4)==0)||(GPIO_ReadInputDataBit(GPIOA,GPIO_Pin_5)==0)||(GPIO_ReadInputDataBit(GPIOA,GPIO_Pin_6)==0)||(GPIO_ReadInputDataBit(GPIOA,GPIO_Pin_7)==0)) {Delay_ms(10); if(GPIO_ReadInputDataBit(GPIOA,GPIO_Pin_4)==0) {anxian = 1; *key = 1; while(!GPIO_ReadInputDataBit(GPIOA,GPIO_Pin_4)); //当按钮处于被按下的状态的时候,程序一直卡在循环读取按钮的状态,避免多按钮同时按下时读取错误}else if(GPIO_ReadInputDataBit(GPIOA,GPIO_Pin_5)==0){anxian = 1;*key = 2;while(!GPIO_ReadInputDataBit(GPIOA,GPIO_Pin_5));}else if(GPIO_ReadInputDataBit(GPIOA,GPIO_Pin_6)==0){anxian = 1;*key = 3;while(!GPIO_ReadInputDataBit(GPIOA,GPIO_Pin_6));}else if(GPIO_ReadInputDataBit(GPIOA,GPIO_Pin_7)==0){ anxian = 1;*key = 4;while(!GPIO_ReadInputDataBit(GPIOA,GPIO_Pin_7));}else //如果第一行四列中没有按钮被按下{anxian = 0;GPIO_Write(GPIOA,0x00ff);}}//第一行判断完成,这是我们判断第二行GPIO_Write(GPIOA,0x00fd); //第二行 if((GPIO_ReadInputDataBit(GPIOA,GPIO_Pin_4)==0)||(GPIO_ReadInputDataBit(GPIOA,GPIO_Pin_5)==0)||(GPIO_ReadInputDataBit(GPIOA,GPIO_Pin_6)==0)||(GPIO_ReadInputDataBit(GPIOA,GPIO_Pin_7)==0)){Delay_ms(10);if(GPIO_ReadInputDataBit(GPIOA,GPIO_Pin_4)==0){anxian = 1;*key = 5;while(!GPIO_ReadInputDataBit(GPIOA,GPIO_Pin_4));}else if(GPIO_ReadInputDataBit(GPIOA,GPIO_Pin_5)==0){ anxian = 1;*key = 6;while(!GPIO_ReadInputDataBit(GPIOA,GPIO_Pin_5));}else if(GPIO_ReadInputDataBit(GPIOA,GPIO_Pin_6)==0){ anxian = 1;*key = 7;while(!GPIO_ReadInputDataBit(GPIOA,GPIO_Pin_6));}else if(GPIO_ReadInputDataBit(GPIOA,GPIO_Pin_7)==0){ anxian = 1;*key = 8;while(!GPIO_ReadInputDataBit(GPIOA,GPIO_Pin_7));}else {anxian = 0;GPIO_Write(GPIOA,0x00ff);}}GPIO_Write(GPIOA,0x00fb);//第三行if((GPIO_ReadInputDataBit(GPIOA,GPIO_Pin_4)==0)||(GPIO_ReadInputDataBit(GPIOA,GPIO_Pin_5)==0)||(GPIO_ReadInputDataBit(GPIOA,GPIO_Pin_6)==0)||(GPIO_ReadInputDataBit(GPIOA,GPIO_Pin_7)==0)){Delay_ms(10);if(GPIO_ReadInputDataBit(GPIOA,GPIO_Pin_4)==0){anxian = 1;*key = 9;while(!GPIO_ReadInputDataBit(GPIOA,GPIO_Pin_4));}else if(GPIO_ReadInputDataBit(GPIOA,GPIO_Pin_5)==0){ anxian = 1;*key = 10;while(!GPIO_ReadInputDataBit(GPIOA,GPIO_Pin_5));}else if(GPIO_ReadInputDataBit(GPIOA,GPIO_Pin_6)==0){ anxian = 1;*key = 11;while(!GPIO_ReadInputDataBit(GPIOA,GPIO_Pin_6));}else if(GPIO_ReadInputDataBit(GPIOA,GPIO_Pin_7)==0){ anxian = 1;*key = 12;while(!GPIO_ReadInputDataBit(GPIOA,GPIO_Pin_7));}else {anxian = 0;GPIO_Write(GPIOA,0x00ff);}}GPIO_Write(GPIOA,0x00f7);//第四行if((GPIO_ReadInputDataBit(GPIOA,GPIO_Pin_4)==0)||(GPIO_ReadInputDataBit(GPIOA,GPIO_Pin_5)==0)||(GPIO_ReadInputDataBit(GPIOA,GPIO_Pin_6)==0)||(GPIO_ReadInputDataBit(GPIOA,GPIO_Pin_7)==0)){Delay_ms(10);if(GPIO_ReadInputDataBit(GPIOA,GPIO_Pin_4)==0){anxian = 1;*key = 13;while(!GPIO_ReadInputDataBit(GPIOA,GPIO_Pin_4));}else if(GPIO_ReadInputDataBit(GPIOA,GPIO_Pin_5)==0){ anxian = 1;*key = 14;while(!GPIO_ReadInputDataBit(GPIOA,GPIO_Pin_5));}else if(GPIO_ReadInputDataBit(GPIOA,GPIO_Pin_6)==0){ anxian = 1;*key = 15;while(!GPIO_ReadInputDataBit(GPIOA,GPIO_Pin_6));}else if(GPIO_ReadInputDataBit(GPIOA,GPIO_Pin_7)==0){ anxian = 1;*key = 16;while(!GPIO_ReadInputDataBit(GPIOA,GPIO_Pin_7));}else {anxian = 0;GPIO_Write(GPIOA,0x00ff);}}}我们拉出来讲一个(第一行)。
GPIO_Write(GPIOA,0x00fe);(0000 0000 1111 1110)
根据我们打开串口的位置可知——>低四位为行,所以1110可得将第一行的电位设置为0,即低电平,高四位为列,所以11111可得前四列全部保持高电平,等待我们按下按键。
这里属于炫技了,其实你可以手都复位GPIO_Pin_0使其为低电平。其他不改变!
if((GPIO_ReadInputDataBit(GPIOA,GPIO_Pin_4)==0)||(GPIO_ReadInputDataBit(GPIOA,GPIO_Pin_5)==0)||(GPIO_ReadInputDataBit(GPIOA,GPIO_Pin_6)==0)||(GPIO_ReadInputDataBit(GPIOA,GPIO_Pin_7)==0))
判断四列中是否有是否为电平拉低(||或语句)
Delay_ms(10);
进行延时,模拟真实案件情况:消除按键抖动
if(GPIO_ReadInputDataBit(GPIOA,GPIO_Pin_4)==0)
//如果第一列处于低电平则表示第一列被按下
{
anxian = 1;
*key = 1;
while(!GPIO_ReadInputDataBit(GPIOA,GPIO_Pin_4));
当按钮处于被按下的状态的时候,程序一直卡在循环读取按钮的状态,避免多按钮同时按下时读取错误(必须有这个否则代码运行顺序会混乱)
}
else if(GPIO_ReadInputDataBit(GPIOA,GPIO_Pin_5)==0)
{
anxian = 1;
*key = 2;
while(!GPIO_ReadInputDataBit(GPIOA,GPIO_Pin_5));
}
else if(GPIO_ReadInputDataBit(GPIOA,GPIO_Pin_6)==0)
{
anxian = 1;
*key = 3;
while(!GPIO_ReadInputDataBit(GPIOA,GPIO_Pin_6));
}
else if(GPIO_ReadInputDataBit(GPIOA,GPIO_Pin_7)==0)
{
anxian = 1;
*key = 4;
while(!GPIO_ReadInputDataBit(GPIOA,GPIO_Pin_7));
}
到这里都是一列一列的判断,掌握一个就行
else //如果第一行四列中没有按钮被按下
{
anxian = 0;
GPIO_Write(GPIOA,0x00ff);
(0000 0000 1111 1111)
再次全部拉高,按键程序中断!
}
}
第一行判断完成,判断第二行
主函数使用
KEY_Scan (&key);if(FLAG == 1) {FLAG = 0;if(key==1) {//运行我需要的代码。}在主函数时因为Key是一个指针所以在调用时使用&key
当按键被按下时:FLAG置1——判断按键FLAG为1进入if函数内部——再将FLAG置零用于下次判断——如果我们接受到key指针的返回值为1——运行我们的程序!!!!


