物联网解决微服务之AI工作流示例指南(1)
这些说明将指导您在 Qualcomm 评估套件 (EVK) 上下载和运行示例 AI 推理容器。
准备工作
- 硬件准备
- Qualcomm Dragonwing™ RB3 Gen 2 或 Qualcomm IQ-9075 EVK 设置,具有所需的软件构建和配置
- 按照入门指南中的说明设置和配置您的 EVK。
官方网站
- 软件配置:
按照官方入门指南完成基本设置
确保设备已连接互联网
设置好SSH访问
连接好HDMI显示器
- USB摄像头识别(如使用)
# 连接摄像头前检查ls -l /dev/video*# 连接摄像头后检查ls -l /dev/video*记录新增的视频节点(如/dev/video2)
- Docker设置:
mkdir -p /etc/dockerecho \'{\"data-root\": \"/mnt/overlay/docker\"}\' > /etc/docker/daemon.jsonsystemctl restart dockerrm -rf /var/lib/docker从 Qualcomm 的注册表中获取预构建的 docker 镜像
- 从以下位置下载 docker run 脚本:
- Docker 运行 Qualcomm Dragonwing™ RB3 Gen 2 的 shell 脚本:qcs6490_docker_run.sh
- Docker run shell script for Qualcomm IQ-9075: qcs9100_docker_run.sh
!!注意
如果您正在运行带有 USB 摄像头的用例并找到设备节点,例如 /dev/video2,如先决条件中所述,请将设备节点添加到_docker_run.sh文件中。
docker run -it -d --net host --device /dev/video2 --device /dev/dri/card0
运行修改后的 docker run 脚本后,检查 USB 摄像头节点是否正确映射。
ls -l /dev/video*
输出应显示 /dev/video2
- 从 Qualcomm 的设备上 docker 注册表中提取 Qualcomm IM SDK docker 镜像。使用设备外壳,运行:
docker pull --platform=arm64 softwarecenter.qualcomm.com/download/depot/services/iot-microservices/linux/qimsdk:1.0.3docker tag softwarecenter.qualcomm.com/download/depot/services/iot-microservices/linux/qimsdk:1.0.3 qimsdk:latest- 将 docker run 脚本复制到开发工具包。
- 在设备 shell 中,运行:
mkdir -p /etc/mediachmod -R 777 /etc/media- 在主机上,运行:
scp <target>_docker_run.sh root@<device-ip>:/etc/media- 在设备 shell 中,运行:
chmod 755 /etc/media/<target>_docker_run.sh- 验证映像是否存在于设备的 docker 注册表中。
docker image ls上述命令应在注册表中显示拉取的映像。
- 运行 docker 容器。在设备 shell 中,运行:
sh /etc/media/<target>_docker_run.shdocker exec -it qimsdk bash现在,在 docker 容器内有一个交互式 shell。
如果在运行 _docker_run.sh 后看到以下错误,请使用 systemctl restart docker 重新启动 docker 守护进程
docker: Error response from daemon: failed to create shim task: OCI runtime create failed: runc create failed: invalid rootfs: not an absolute path, or a symlink: unknown.运行示例 AI 容器
您的 Qualcomm EVK 能够进行不同类型的视频输入和输出。demo_setup_wizard.sh 脚本有助于配置以下内容:
- 输入视频:USB 摄像头、RTSP 摄像头或文件输入。
- 输出视频:HDMI/DP 监视器(推荐)、RTSP 输出或 file 输出。
它还会根据您的输入构造相应的 GST 启动命令。您必须通过交互式命令行为输入数据源、示例 AI 模型和输出数据源选择选项,如下所示。
# Input data source:1) Video file - The file should be MP4 with H264 video. Pipeline will decode the video to YUV frames.2) USB camera - USB camera should support YUY2 format and 720p resolution.3) RTSP Source - Device should have access to RTSP camera network.# Sample AI model:1) Detection - FootTrackNet Quantized2) Classification - ResNet101 Quantized3) Segmentation - FFNet-40S Quantized# Output data source:1) HDMI - Display2) Video file - Output will be encoded in h264 video3) RTSP out - Output will be streamed to RTSP- Run the
demo_setup_wizard.shscript from the device shell.
demo_setup_wizard.sh选择视频文件输入、 检测 AI 模型和 HDMI 输出。
将看到以下输出。
Pipeline built:export XDG_RUNTIME_DIR=/dev/socket/weston && export WAYLAND_DISPLAY=wayland-1 && gst-launch-1.0 -e --gst-debug=2 filesrc location=/opt/sample-videos/person_sample_video.mp4 ! qtdemux ! h264parse config-interval=1 ! v4l2h264dec capture-io-mode=4 output-io-mode=4 ! video/x-raw,format=NV12 ! tee name=t_split_0 t_split_0. ! qtimetamux name=metamux t_split_0. ! qtimlvconverter ! queue ! qtimltflite delegate=external external-delegate-path=libQnnTFLiteDelegate.so external-delegate-options=\"QNNExternalDelegate,backend_type=htp;\" model=/etc/models/foot_track_net_quantized.tflite ! queue ! qtimlvdetection threshold=90.0 results=10 module=qpd constants=\"qpd,q-offsets=,q-scales=;\" labels=/opt/labels/foot_track_net.labels ! text/x-raw ! queue ! metamux. metamux. ! qtivoverlay engine=gles ! queue ! waylandsink sync=true async=false fullscreen=trueThe pipeline built is saved at /etc/media/gst_wizard_pipeline.shNote:Below Sample video files are pre-packaged at location:/opt/sample-videos/person_sample_video.mp4 for detection/opt/sample-videos/classification_sample_video.mp4 for classification/opt/sample-videos/street_car_view_sample_video.mp4 for segmentationPlease download the model from here: https://aihub.qualcomm.com/models/foot_track_netMake sure to select your device and set TorchScript -> TFLite before downloading!Push the Model file on the device at \'/etc/models/\' and name it \'foot_track_net_quantized.tflite\'The label file is present at \'/opt/labels/foot_track_net.labels\'In order for the display to work, please make sure HDMI display is connected during the device boot!If you have booted the device and connected the display afterwards, please reboot the device while the display is connected!The pipeline can be run using \"bash /etc/media/gst_wizard_pipeline.sh\"If you want to run AI pipeline with your own video files, AI model and labels, then push them to location \'/etc/media\',\'/etc/models\',\'/etc/labels\' respectively and update GST launch command accordingly with the name/path of the Model file, label file and sample video file此脚本生成一个启动命令并将其保存到 /etc/media/gst_wizard_pipeline.sh
注意
示例视频和标签文件预打包在 Qualcomm IM SDK 容器中。
- 如上面输出中的说明,从 Qualcomm AI Hub 下载用例的模型并将其复制到 EVK 上的
/etc/models
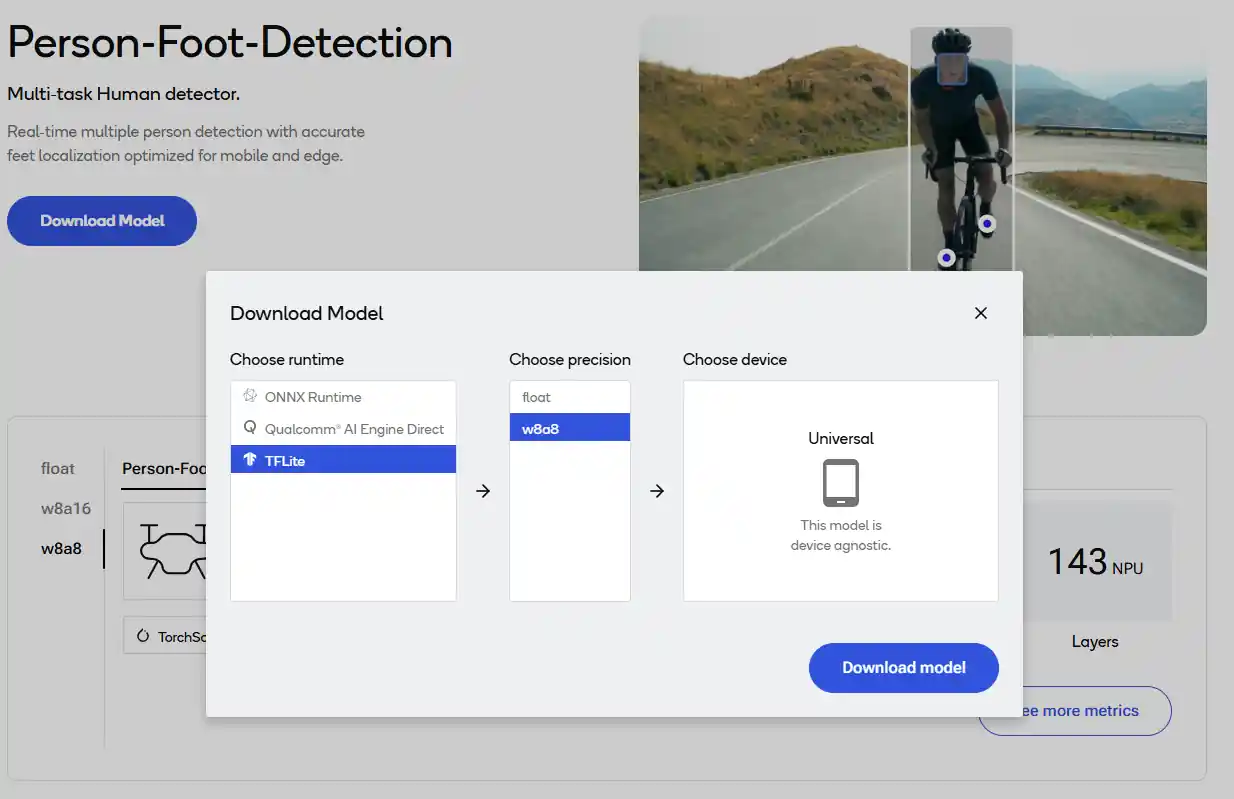
a. Click Download model.
b. 选择 TFLite 作为运行时。
c. 选择 w8a8 作为精度。
d. Click Download model.
- 使用以下选项之一运行生成的管道。
- 复制并粘贴生成的 GST 命令。
- 运行生成的脚本。
bash /etc/media/gst_wizard_pipeline.sh可以在 HDMI 显示屏上查看结果。AI 结果叠加在视频帧之上。
如果您在步骤 1 中选择了不同的选项。您将看到要从 AI 中心下载的不同模型,并且需要在 RTSP 流中查看结果,或者通过将输出文件 (/etc/media/output.mp4) 复制到主机并在视频播放器中播放(文件输出选项)。
scp /etc/media/output.mp4 @:


