【QT】QComboBox设置样式;常见问题(已解决):下拉框箭头样式、下拉列表item样式、下拉框阴影如何去除、下拉列表增加间隔2px、下拉列表设置item内边距、滚动条样式_qt下拉框箭头样式
目录
1.先说遇到几个难解决的问题
1)下拉框的下箭头设置
2)下拉列表item样式设置
3)下拉框自带阴影去除
4)下拉列表与QComboBox本身间隔2px
5)下拉列表设置item内间距
2.完整代码
1)qtDesigner中用【改变样式表】中的代码
2)构造函数中增加QComboBox的相关样式
项目需要,一个带样式的下拉控件(QComboBox,我给的objectName名字为 cb_connectionPort),找了很多参考资料才做出来,最终整理一下,供大家学习参考
我的环境:qt5.12 + windows + qtcreator
设置样式主要通过qtdesigner界面 + 代码设置
先看下我最终的实现样式
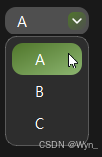
1.先说遇到几个难解决的问题
1)下拉框的下箭头设置
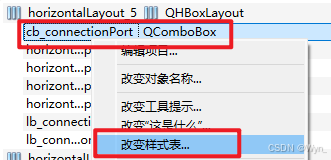
思路:主要通过qtdesigner界面的【改变样式表】修改对应的样式和图片
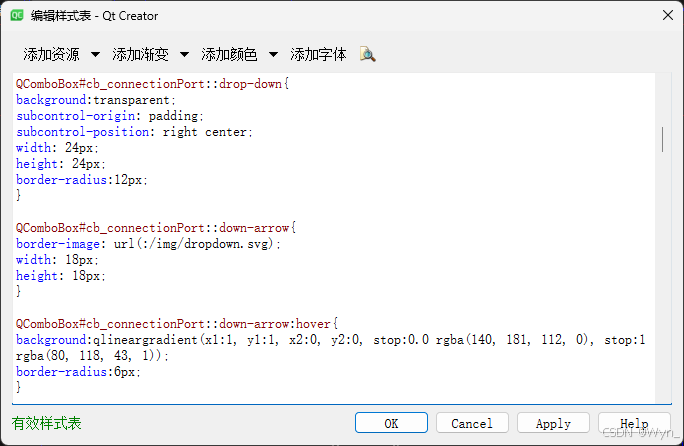
关键代码:
/* 针对 ID 为 cb_connectionPort 的 QComboBox 的下拉按钮样式 */QComboBox#cb_connectionPort::drop-down { background: transparent; /* 设置下拉按钮背景透明 */ subcontrol-origin: padding; /* 定位基准使用 padding 区域 */ subcontrol-position: right center; /* 按钮位于右侧垂直居中 */ width: 24px; /* 按钮宽度 */ height: 24px; /* 按钮高度 */ border-radius: 12px; /* 圆角半径 */}/* 下拉按钮中的箭头图标样式 */QComboBox#cb_connectionPort::down-arrow { border-image: url(:/img/dropdown.svg); /* 使用 SVG 图像作为箭头 */ width: 18px; /* 图标宽度 */ height: 18px; /* 图标高度 */}/* 鼠标悬停时箭头图标的样式 */QComboBox#cb_connectionPort::down-arrow:hover { /* 设置渐变背景(从透明到深绿色)*/ background: qlineargradient(x1:1, y1:1, x2:0, y2:0, stop:0.0 rgba(140, 181, 112, 0), stop:1 rgba(80, 118, 43, 1)); border-radius: 6px; /* 圆角半径 */}2)下拉列表item样式设置
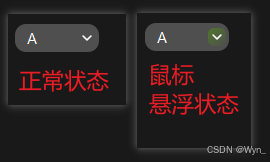
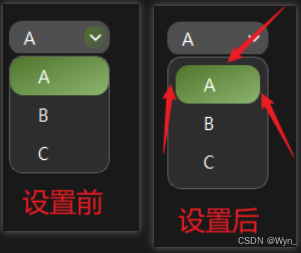
生效前后对比下实际效果
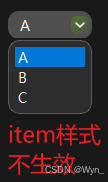

我用两种方式都设置了样式(在代码中用setStyleSheet,或在qtdesigner直接写样式)都不生效,查资料后发现是没设置QComboBox的setView所致(1行代码导致的),加了这行代码之后就生效了
关键代码
ui->cb_connectionPort->setView(new QListView(this));//使item的样式生效item相关样式代码(在代码中用setStyleSheet设置的),红框内的是item样式相关的
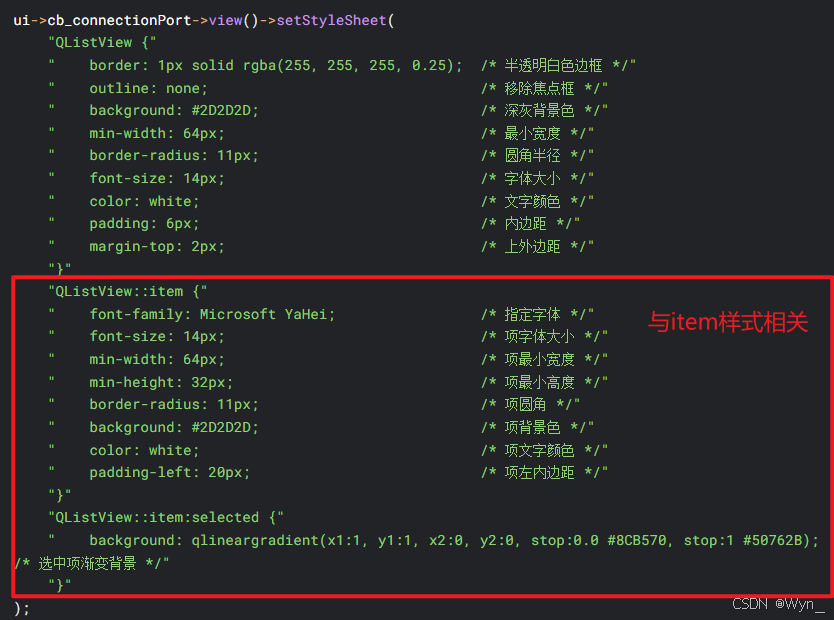
\"QListView::item {\" \" font-family: Microsoft YaHei;\" \" font-size: 14px;\" \" min-width: 64px;\" \" min-height: 32px;\" \" border-radius: 11px;\" \" background: #2D2D2D;\" \" color: white;\" \" padding-left: 20px;\" \"}\" \"QListView::item:selected {\" \" background: qlineargradient(x1:1, y1:1, x2:0, y2:0, stop:0.0 #8CB570, stop:1 #50762B);\" \"}\"3)下拉框自带阴影去除
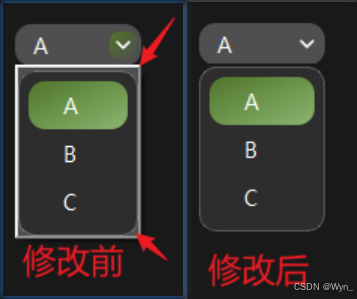
原因:是因为下拉框存在于一个名为【QComboBoxPrivateContainer】的容器内,需要把这个容器的样式设置为“border:none;”
看下修改前后对比图
修改前就是会有一个边框还有一个灰色的背景图,很丑!
修改思路:获取QComboBox控件view模型的父对象widget,然后去掉这个widget的边框,以及设置它的Flags为:containerObj->windowFlags() | Qt::FramelessWindowHint | Qt::NoDropShadowWindowHint;
设置它的属性为:Qt::WA_TranslucentBackground
关键代码:
//去除下拉框的外阴影 操作QComboBoxPrivateContainer QWidget* containerObj = ui->cb_connectionPort->view()->parentWidget(); if (containerObj) { containerObj->setWindowFlags(containerObj->windowFlags() | Qt::FramelessWindowHint | Qt::NoDropShadowWindowHint); containerObj->setAttribute(Qt::WA_TranslucentBackground); containerObj->setStyleSheet(\"background-color: transparent; border: none;border-radius: 11px;\");原理解析:
1.
setWindowFlags(Qt::FramelessWindowHint|Qt::NoDropShadowWindowHint)
Qt::FramelessWindowHint
移除了窗口系统的原生边框(包括 Windows/macOS 可能强制添加的直角边框)。这是最关键的一步,因为它阻止了操作系统级别的窗口装饰。
Qt::NoDropShadowWindowHint
禁用窗口阴影(某些系统会为弹出菜单添加默认阴影,可能间接影响边框视觉表现)。2.
setAttribute(Qt::WA_TranslucentBackground)
声明窗口背景透明,强制 Qt 不填充默认背景色。
如果不设置此属性,即使边框去除了,Qt 仍可能用默认颜色(如白色或灰色)填充背景,导致直角背景区域可见。
3.
setStyleSheet(\"background-color: transparent; border: none; border-radius: 11px;\")
background-color: transparent
确保容器内部背景透明,避免残留背景色破坏圆角效果。
border: none
显式覆盖任何可能的内部样式表边框(如QFrame的默认边框)。
border-radius: 11px
虽然容器本身是透明的,但这一步可以确保其子控件(如QListView)的圆角不会被直角容器裁剪。
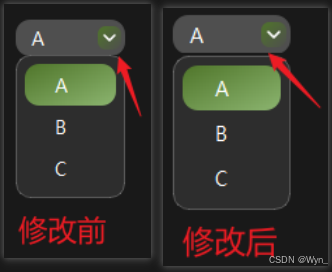
4)下拉列表与QComboBox本身间隔2px
QComboBox的默认样式是下拉列表紧贴着QComboBox本身,也挺丑,所以一般会给2px的间距
看一下修改前后的实现差距
关键代码
其实就1行,在QListView的样式中设置【margin-top: 2px;】
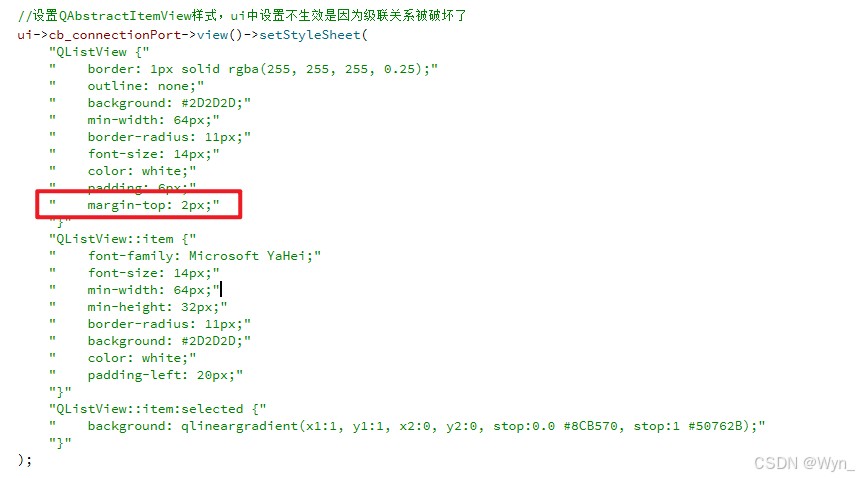
\"QListView {\" \" border: 1px solid rgba(255, 255, 255, 0.25); /* 半透明白色边框 */\" \" outline: none; /* 移除焦点框 */\" \" background: #2D2D2D; /* 深灰背景色 */\" \" min-width: 64px; /* 最小宽度 */\" \" border-radius: 11px; /* 圆角半径 */\" \" font-size: 14px; /* 字体大小 */\" \" color: white; /* 文字颜色 */\" \" padding: 6px; /* 内边距 */\" \" margin-top: 2px; /* 上外边距 */\" \"}\"5)下拉列表设置item内间距
就是item与下拉列表之间的padding,思路是设置QListView的padding;
看下设置前后对比图
关键代码
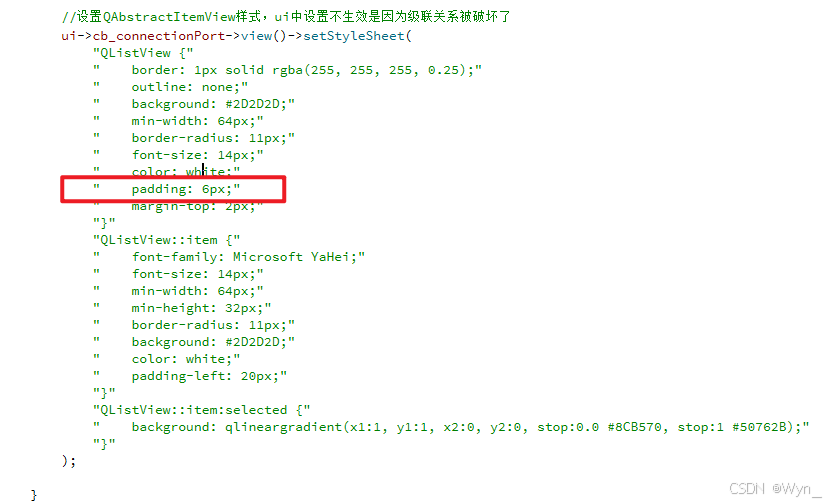
\"QListView {\" \" border: 1px solid rgba(255, 255, 255, 0.25);\" \" outline: none;\" \" background: #2D2D2D;\" \" min-width: 64px;\" \" border-radius: 11px;\" \" font-size: 14px;\" \" color: white;\" \" padding: 6px;\" \" margin-top: 2px;\" \"}\"我觉得以上几个问题就是很常见的QComboBox问题了,也是费了我一番精力,不过好歹都解决了
2.完整代码
首先我的样式分为两部分:
1)QComboBox本身和下拉箭头的样式我是在qtDesigner中用【改变样式表】去写的;
2)下拉列表样式以及去除阴影部分的操作我是在构造函数中用代码写的;
为什么分开呢:因为想要第二部分的样式生效,就需要设置这句代码:
ui->cb_connectionPort->setView(new QListView(this));但是设置了这句代码后,可能会与qtDesigner中用样式表有冲突,会破坏级联关系,所以我就分开设置样式了,不过还好最终结果是好的。
1)qtDesigner中用【改变样式表】中的代码
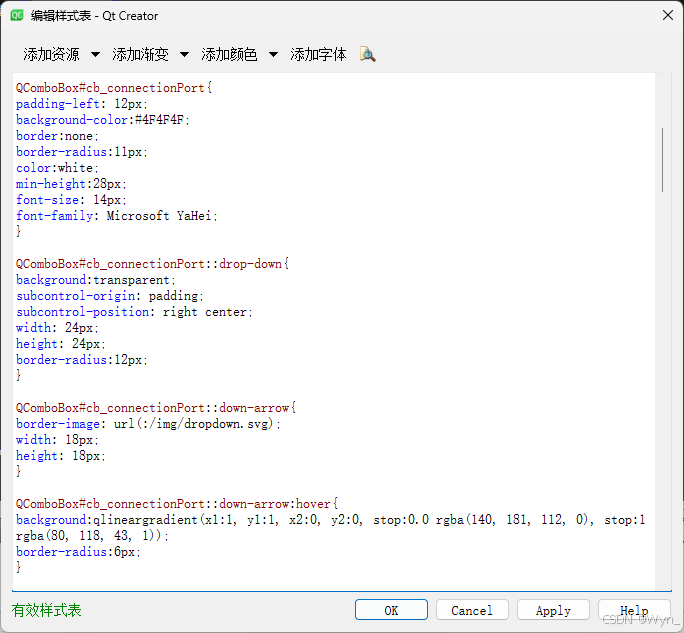
QComboBox#cb_connectionPort{padding-left: 12px;background-color:#4F4F4F;border:none;border-radius:11px;color:white;min-height:28px;font-size: 14px;font-family: Microsoft YaHei;}QComboBox#cb_connectionPort::drop-down{background:transparent;subcontrol-origin: padding;subcontrol-position: right center;width: 24px;height: 24px;border-radius:12px;}QComboBox#cb_connectionPort::down-arrow{border-image: url(:/img/dropdown.svg);width: 18px;height: 18px;}QComboBox#cb_connectionPort::down-arrow:hover{background:qlineargradient(x1:1, y1:1, x2:0, y2:0, stop:0.0 rgba(140, 181, 112, 0), stop:1 rgba(80, 118, 43, 1));border-radius:6px;}2)构造函数中增加QComboBox的相关样式
我的QComboBox是用qtDesigner拖的控件,它的父类是一个QWidget,代码部分我是直接在父类的构造函数中设置的;
(如果你不想,可以不在构造函数中设置)
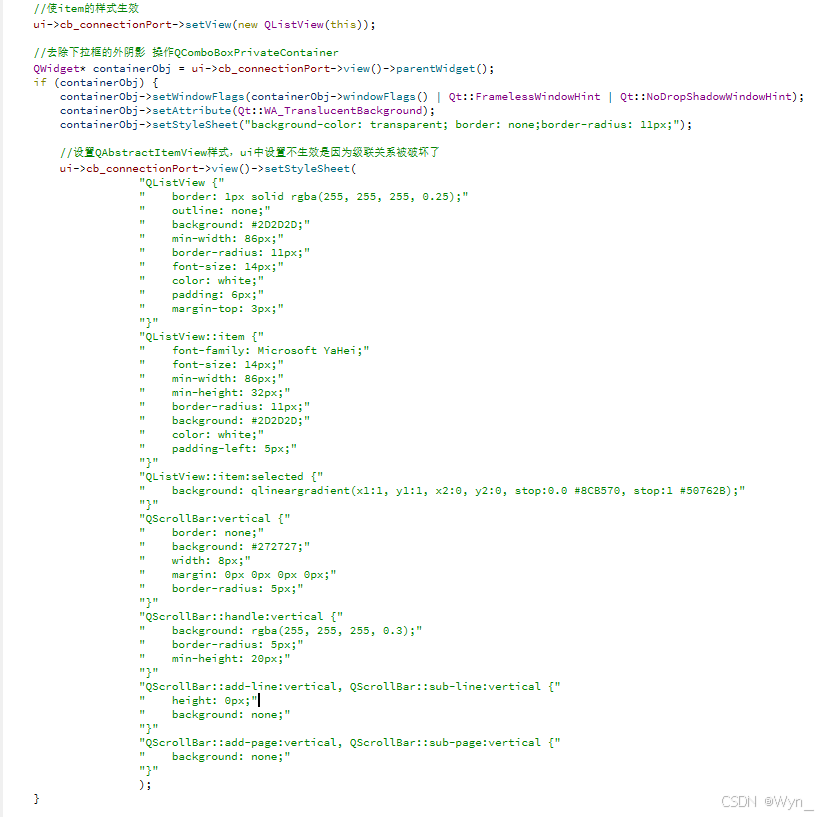
//test 给下拉框增加3个选项:ABC QStringList test; test << \"A\" << \"B\" <cb_connectionPort->addItems(test); //使item的样式生效 ui->cb_connectionPort->setView(new QListView(this)); //去除下拉框的外阴影 操作QComboBoxPrivateContainer QWidget* containerObj = ui->cb_connectionPort->view()->parentWidget(); if (containerObj) { containerObj->setWindowFlags(containerObj->windowFlags() | Qt::FramelessWindowHint | Qt::NoDropShadowWindowHint); containerObj->setAttribute(Qt::WA_TranslucentBackground); containerObj->setStyleSheet(\"background-color: transparent; border: none;border-radius: 11px;\"); //设置QAbstractItemView样式,ui中设置不生效是因为级联关系被破坏了 ui->cb_connectionPort->view()->setStyleSheet( \"QListView {\" \" border: 1px solid rgba(255, 255, 255, 0.25);\" \" outline: none;\" \" background: #2D2D2D;\" \" min-width: 86px;\" \" border-radius: 11px;\" \" font-size: 14px;\" \" color: white;\" \" padding: 6px;\" \" margin-top: 3px;\" \"}\" \"QListView::item {\" \" font-family: Microsoft YaHei;\" \" font-size: 14px;\" \" min-width: 86px;\" \" min-height: 32px;\" \" border-radius: 11px;\" \" background: #2D2D2D;\" \" color: white;\" \" padding-left: 5px;\" \"}\" \"QListView::item:selected {\" \" background: qlineargradient(x1:1, y1:1, x2:0, y2:0, stop:0.0 #8CB570, stop:1 #50762B);\" \"}\" \"QScrollBar:vertical {\" \" border: none;\" \" background: #272727;\" \" width: 8px;\" \" margin: 0px 0px 0px 0px;\" \" border-radius: 5px;\" \"}\" \"QScrollBar::handle:vertical {\" \" background: rgba(255, 255, 255, 0.3);\" \" border-radius: 5px;\" \" min-height: 20px;\" \"}\" \"QScrollBar::add-line:vertical, QScrollBar::sub-line:vertical {\" \" height: 0px;\" \" background: none;\" \"}\" \"QScrollBar::add-page:vertical, QScrollBar::sub-page:vertical {\" \" background: none;\" \"}\" ); }我在网上看到很多人问相关的问题,但是没有看到特别全面且详细的解决办法或者前后对比,因此作为参考整理本篇内容,也供以后的自己复习用
有什么问题可以评论或私信,看到都会回
码字不易,点个赞
--END--


