语音识别——语音转文字_语音转文字模型
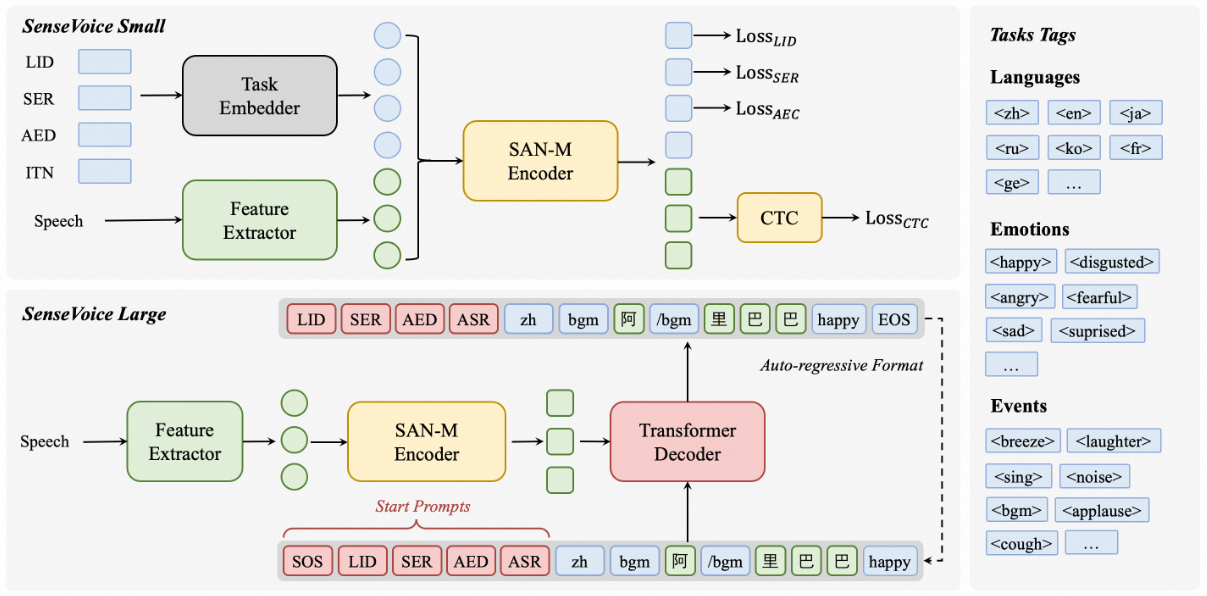
SenseVoiceSmall阿里开源大模型,SenseVoice 是具有音频理解能力的音频基础模型,包括语音识别(ASR)、语种识别(LID)、语音情感识别(SER)和声学事件分类(AEC)或声学事件检测(AED)。经过超过40万小时的数据训练,支持50多种语言
SenseVoice 专注于高精度多语言语音识别、情感辨识和音频事件检测
- 多语言识别: 采用超过 40 万小时数据训练,支持超过 50 种语言,识别效果上优于 Whisper 模型。
- 富文本识别:
- 具备优秀的情感识别,能够在测试数据上达到和超过目前最佳情感识别模型的效果。
- 支持声音事件检测能力,支持音乐、掌声、笑声、哭声、咳嗽、喷嚏等多种常见人机交互事件进行检测。
- 高效推理: SenseVoice-Small 模型采用非自回归端到端框架,推理延迟极低,10s 音频推理仅耗时 70ms,15 倍优于 Whisper-Large。
- 微调定制: 具备便捷的微调脚本与策略,方便用户根据业务场景修复长尾样本问题。
- 服务部署: 具有完整的服务部署链路,支持多并发请求,支持客户端语言有,python、c++、html、java 与 c# 等。
项目地址:https://github.com/FunAudioLLM/SenseVoice
以下为模型调用方法,输出的文字可能会包括一些表情,可以通过正则化的方式移除这些表情:
import pyaudioimport numpy as npimport waveimport osfrom funasr import AutoModelfrom funasr.utils.postprocess_utils import rich_transcription_postprocessmodel = AutoModel( model=r\"D:\\Downloads\\SenseVoiceSmall\", trust_remote_code=True, remote_code=\"./model.py\", vad_model=\"fsmn-vad\", vad_kwargs={\"max_single_segment_time\": 30000}, device=\"cpu\", use_itn=True, disable_update=True, disable_pbar = True, disable_log = True)# 利用语音识别模型将音频数据转换为文本def sound2text(audio_file): \"\"\" 利用语音识别模型将音频数据转换为文本 \"\"\" # en res = model.generate( input=audio_file, cache={}, language=\"zh\", # \"zh\", \"en\", \"yue\", \"ja\", \"ko\", \"nospeech\" use_itn=True, batch_size_s=60, merge_vad=True, # merge_length_s=15, ) text = rich_transcription_postprocess(res[0][\"text\"]) return textif __name__ == \"__main__\": # 读取音频文件 audio_file = r\"C:\\Users\\lvkong\\Desktop\\temp_wave\\waving_20250513_135512_嗯鹅.wav\" # 如果音频文件存在,直接读取 if os.path.exists(audio_file): with wave.open(audio_file, \'rb\') as wf: audio_data = wf.readframes(wf.getnframes()) else: # 否则录制一段音频 print(\"请开始说话(录音5秒钟)...\") CHUNK = 1024 FORMAT = pyaudio.paInt16 CHANNELS = 1 RATE = 16000 RECORD_SECONDS = 5 p = pyaudio.PyAudio() stream = p.open(format=FORMAT, channels=CHANNELS, rate=RATE, input=True, frames_per_buffer=CHUNK) frames = [] for i in range(0, int(RATE / CHUNK * RECORD_SECONDS)): data = stream.read(CHUNK) frames.append(data) stream.stop_stream() stream.close() p.terminate() # 保存录音 with wave.open(audio_file, \'wb\') as wf: wf.setnchannels(CHANNELS) wf.setsampwidth(p.get_sample_size(FORMAT)) wf.setframerate(RATE) wf.writeframes(b\'\'.join(frames)) audio_data = b\'\'.join(frames) print(f\"录音已保存为 {audio_file}\") # 利用语音识别模型将音频数据转换为文本 text = sound2text(audio_file) # 输出文本 print(\"识别结果:\") print(text)正则化移除除中文外的其他内容:
# 提取字符串中的汉字def extract_chinese(input_string): \"\"\" 提取字符串中的汉字 :param input_string: 原始字符串 :return: 转换后的中文字符串 \"\"\" # 使用正则表达式提取所有汉字 chinese_characters = re.findall(r\'[\\u4e00-\\u9fa5]\', input_string) # 将汉字列表合并为字符串 chinese_text = \'\'.join(chinese_characters) # 返回中文字符串 return chinese_text此外,SenseVoiceSmall模型还支持pipeline的方式加载调用
from modelscope.pipelines import pipelinefrom modelscope.utils.constant import Tasksinference_pipeline = pipeline( task=Tasks.auto_speech_recognition, model=r\'D:\\Downloads\\SenseVoiceSmall\', model_revision=\"master\", device=\"cuda:0\", use_itn=True, disable_update=True)rec_result = inference_pipeline(r\"D:\\Project\\Chat_Project\\output_5.wav\")print(rec_result)之前的代码有bug,存在录制的音频速度过快的问题,及音频每帧会丢失部分的问题,这代码修复了以上的bug,具体修改如下:
1. 增加了循环缓冲区:
- 添加了collections.deque作为音频缓冲区,存储最近约15秒的音频
- 确保每个音频块都被保存,而不只是被检测为语音的部分
2. 优化了语音检测算法:
- 降低了VAD判断条件的严格性,使用\"或\"操作而不是\"与\"操作
- 这样即使VAD或频谱分析其中一个未检测到语音,也能保留有效帧
3. 改进了process_chunk函数:
- 每个音频块无条件添加到循环缓冲区
- 当检测到语音开始时,添加前300ms的音频(避免丢失起始部分)
- 即使在非语音状态下也保存音频数据,确保连续性
4. 完善了音频处理流程:
- 添加了语音开始和结束的提示信息
- 使用AUDIO_RATE常量替代硬编码的采样率
- 统一了音频数据的处理方式
import pyaudioimport webrtcvadimport numpy as npfrom pypinyin import pinyin, Style # 如果后续需要用,可按需使用import reimport pyttsx3import datetimeimport osimport waveimport collectionsfrom funasr import AutoModelfrom funasr.utils.postprocess_utils import rich_transcription_postprocessfrom modelscope.pipelines import pipeline# from deepseek_api_reply_once import get_deepseek_response # 非流式输出from deepseek_api_connect_internet import get_deepseek_response# 确保临时音频目录存在os.makedirs(\"temp_wave\", exist_ok=True)# 参数配置AUDIO_RATE = 48000 # 采样率(支持8000, 16000, 32000或48000)CHUNK_SIZE = 1440 # 每块大小(30ms,保证为10/20/30ms的倍数)VAD_MODE = 1 # VAD 模式(0-3,数值越小越保守)# 初始化 VADvad = webrtcvad.Vad(VAD_MODE)# 初始化 ASR 模型sound_recongnition_model = AutoModel( model=r\"D:\\Downloads\\SenseVoiceSmall\", trust_remote_code=False , remote_code=\"./model.py\", vad_model=\"fsmn-vad\", vad_kwargs={\"max_single_segment_time\": 30000}, # device=\"cuda:0\", device=\"cuda:0\", use_itn=True, disable_update = True, disable_pbar = True, disable_log = True )# 初始化说话人验证模型sound_verifier_model = pipeline( task=\'speaker-verification\', model=r\'D:\\Downloads\\speech_campplus_sv_zh-cn_3dspeaker_16k\')# 把deepseek大模型输出的文字通过语音合成输出def talkContent(content): \"\"\"使用系统文字转语音朗读内容,提高运行效率\"\"\" # 初始化引擎一次,后续复用 engine = pyttsx3.init() # 设置朗读速度 engine.setProperty(\'rate\', 160) # 朗读内容 engine.say(content) # 只调用一次 runAndWait() 处理完所有加入队列的内容 engine.runAndWait()# 用于匹配关键词的拼音def extract_chinese_and_convert_to_pinyin(input_string): \"\"\" 提取字符串中的汉字,并将其转换为拼音。 :param input_string: 原始字符串 :return: 转换后的拼音字符串 \"\"\" # 使用正则表达式提取所有汉字 chinese_characters = re.findall(r\'[\\u4e00-\\u9fa5]\', input_string) # 将汉字列表合并为字符串 chinese_text = \'\'.join(chinese_characters) # 转换为拼音 pinyin_result = pinyin(chinese_text, style=Style.NORMAL) # 将拼音列表拼接为字符串 pinyin_text = \' \'.join([item[0] for item in pinyin_result]) return pinyin_textdef calibrate(stream, calibration_seconds=2, chunk_duration_ms=30): \"\"\" 校准背景噪音:录制指定时长的音频,计算平均幅值与标准差,从而设置自适应阈值 参数: calibration_seconds: 校准时间(秒) chunk_duration_ms: 每块时长(毫秒) 返回: amplitude_threshold: 设定的音频幅值阈值 \"\"\" print(\"开始校准背景噪音,请保持安静...\") amplitudes = [] num_frames = int(calibration_seconds * (1000 / chunk_duration_ms)) for _ in range(num_frames): audio_chunk = stream.read(CHUNK_SIZE, exception_on_overflow=False) audio_data = np.frombuffer(audio_chunk, dtype=np.int16) amplitudes.append(np.abs(audio_data).mean()) mean_noise = np.mean(amplitudes) std_noise = np.std(amplitudes) amplitude_threshold = mean_noise + 2 * std_noise print(f\"校准完成:噪音均值={mean_noise:.2f},标准差={std_noise:.2f},设置阈值={amplitude_threshold:.2f}\") return amplitude_threshold# 保存音频数据为WAV文件 def save_audio_to_wav(audio_data, sample_rate, channels, filename): \"\"\" 将音频数据保存为WAV文件 参数: audio_data: 字节数组格式的音频数据 sample_rate: 采样率 channels: 通道数 filename: 要保存的文件名 \"\"\" if not audio_data: return # 确保目录存在 os.makedirs(os.path.dirname(filename), exist_ok=True) # 直接保存 with wave.open(filename, \'wb\') as wf: wf.setnchannels(channels) wf.setsampwidth(2) # 16位采样宽度 2*8=16 wf.setframerate(sample_rate) wf.writeframes(audio_data) print(f\"已保存音频文件: {filename}\")class SpeechDetector: \"\"\" SpeechDetector 负责处理音频块,结合能量预处理、VAD 和频谱分析进行语音检测, 并在检测到语音结束后调用 ASR 模型进行转写,返回识别结果文本。 \"\"\" def __init__(self, amplitude_threshold): self.amplitude_threshold = amplitude_threshold # 音频缓冲区,用于存储所有音频数据,包括非语音部分 self.speech_buffer = bytearray() # 使用循环缓冲区存储最近的所有音频数据 self.audio_buffer = collections.deque(maxlen=500) # 存储约15秒的音频 # 连续帧状态,用于平滑判断语音是否开始/结束 self.speech_state = False # True:正在录入语音;False:非语音状态 self.consecutive_speech = 0 # 连续语音帧计数 self.consecutive_silence = 0 # 连续静音帧计数 self.required_speech_frames = 2 # 连续语音帧达到此值后确认进入语音状态(例如 2 帧大约 60ms) self.required_silence_frames = 34*1 # 连续静音帧达到此值后确认语音结束(例如 15 帧大约 450ms) self.long_silence_frames = 34*5 # 连续静音帧达到此值后确认语音结束(例如 34 帧大约 1s) def analyze_spectrum(self, audio_chunk): \"\"\" 通过频谱分析检测语音特性: 1. 对音频块应用汉宁窗后计算 FFT 2. 统计局部峰值数量(峰值必须超过均值的1.5倍) 3. 当峰值数量大于等于3时,认为该块具有语音特征 \"\"\" audio_data = np.frombuffer(audio_chunk, dtype=np.int16) if len(audio_data) == 0: return False # 应用汉宁窗减少 FFT 泄露 window = np.hanning(len(audio_data)) windowed_data = audio_data * window # 计算 FFT 并取正频率部分 spectrum = np.abs(np.fft.rfft(windowed_data)) spectral_mean = np.mean(spectrum) peak_count = 0 for i in range(1, len(spectrum) - 1): if (spectrum[i] > spectrum[i - 1] and spectrum[i] > spectrum[i + 1] and spectrum[i] > spectral_mean * 1.5): peak_count += 1 return peak_count >= 3 def is_speech(self, audio_chunk): \"\"\" 判断当前音频块是否包含语音: 1. 先通过能量阈值预过滤低幅值数据 2. 再结合 VAD 检测与频谱分析判断 \"\"\" threshold = self.amplitude_threshold if self.amplitude_threshold is not None else 11540.82 audio_data = np.frombuffer(audio_chunk, dtype=np.int16) amplitude = np.abs(audio_data).mean() if amplitude = self.required_speech_frames: # 检测到语音开始,初始化speech_buffer self.speech_state = True self.speech_buffer = bytearray() # 将最近缓冲区中的数据(包括语音前部分)加入到speech_buffer for chunk in list(self.audio_buffer)[-10:]: # 添加前300ms的音频 self.speech_buffer.extend(chunk) print(\"检测到语音开始\") # 在语音状态下,继续添加音频块 if self.speech_state: self.speech_buffer.extend(audio_chunk) else: # 当前块不是语音 self.consecutive_silence += 1 self.consecutive_speech = 0 # 在语音状态下,继续添加非语音块(保证完整性) if self.speech_state: self.speech_buffer.extend(audio_chunk) # 长时间无语音处理 if self.consecutive_silence >= self.long_silence_frames and not self.speech_state: recognized_text = \"长时间无语音\" self.consecutive_silence = 0 return recognized_text, None # 语音结束判断 if self.speech_state and self.consecutive_silence >= self.required_silence_frames: if len(self.speech_buffer) > CHUNK_SIZE * 5: print(f\"\\n======采集到的语音数据长度:{len(self.speech_buffer)}\") # 临时保存当前语音段 temp_speech_buffer = bytes(self.speech_buffer) # 保存音频数据到WAV文件 timestamp = datetime.datetime.now().strftime(\"%Y%m%d_%H%M%S\") wav_filename = f\"temp_wave/waving_{timestamp}.wav\" try: save_audio_to_wav(temp_speech_buffer, AUDIO_RATE, 1, wav_filename) recognized_text = self.sound2text(wav_filename) os.remove(wav_filename) # 使用os.remove删除单个文件 except Exception as e: print(f\"保存音频文件时出错或者删除临时文件时出错: {e}\") # 重置状态,准备下一段语音录入 self.speech_state = False self.speech_buffer = bytearray() return recognized_text, temp_speech_buffer def sound2text(self, audio_data): \"\"\" 利用语音识别模型将音频数据转换为文本 \"\"\" res = sound_recongnition_model.generate( input=audio_data, cache={}, language=\"zh\", # 支持 \"zh\", \"en\", 等 use_itn=True, batch_size_s=60, merge_vad=True, merge_length_s=15, ) text_string = rich_transcription_postprocess(res[0][\"text\"]) return text_string def ASR_API(stream, detector): \"\"\" ASR_API 函数:打开音频流,校准背景噪音,并持续监听语音。 每次处理音频块后,如果识别到结果,则实时输出文本识别结果。 \"\"\" while True: # 从流中准确读取一个音频块 audio_chunk = stream.read(CHUNK_SIZE, exception_on_overflow=False) # 处理音频块 chinese_string, wave_data = detector.process_chunk(audio_chunk) # 若识别到结果,则输出(无结果时不输出) if chinese_string: yield chinese_string, wave_dataif __name__ == \"__main__\": import time p = pyaudio.PyAudio() stream = p.open( format=pyaudio.paInt16, channels=1, rate=AUDIO_RATE, input=True, frames_per_buffer=CHUNK_SIZE, input_device_index=1 ) # 校准背景噪音,获取幅值阈值 amplitude_threshold = calibrate(stream) detector = SpeechDetector(amplitude_threshold=amplitude_threshold) key_word_pinyin = \"ni hao xiao pang\" print(\"开始监听,请开始说话...(按 Ctrl+C 停止)\") while True: #============================================================================================================# for recognized_text, _ in ASR_API(stream, detector): print(\"识别结果:\", recognized_text) #============================================================================================================# # 回收资源,当需要把音频流资源分配给其他的程序时,需要调用\"stream.stop_stream()和stream.close()\" stream.stop_stream() stream.close() p.terminate()
