LangGraph 2 - 智能体开发、流式传输、模型调用、工具、MCP、上下文、内存、人机协同、部署、UI
文章目录
- 使用LangGraph进行智能体开发
-
- 什么是智能体?
- 核心特性
- 高层构建模块
- 包生态系统
- 运行代理
-
- 基础用法
- 输入与输出
- 输入格式
-
- 使用自定义 Agent 状态
- 输出格式
- 流式输出
- 最大迭代次数
- 其他资源
- 流式传输
-
- 代理进度监控
- LLM 令牌
- 工具更新
- 流式多模态传输
- 禁用流式传输
- 其他资源
- LangGraph 代理模型文档
- 模型
-
- 工具调用支持
- 通过名称指定模型
- 使用 `init_chat_model` 工具
- 使用特定供应商的大语言模型
- 禁用流式传输
- 添加模型回退机制
- 其他资源
- 工具
-
- 定义简单工具
- 自定义工具
- 对模型隐藏参数
- 禁用并行工具调用
- 直接返回工具结果
- 强制使用工具
- 处理工具错误
- 内存操作
- 预构建工具
- MCP 集成
-
- 使用 MCP 工具
- 自定义 MCP 服务器
- 其他资源
- 上下文
-
- 提供运行时上下文
-
- 配置(静态上下文)
- 状态(可变上下文)
- 长期记忆(跨对话上下文)
- 基于上下文定制提示词
- 工具中访问上下文
-
- 从工具更新上下文
- 内存机制
-
-
- 术语说明
- 短期记忆
-
- 管理消息历史记录
-
- 汇总消息历史记录
- 修剪消息历史记录
- 工具内读取状态
- 从工具写入
- 长期记忆
-
- 读取
- 写入
- 语义搜索
- 预构建记忆工具
- 其他资源
-
- 人机协同机制
-
- 工具调用审核机制
- 与Agent Inbox 配合使用
- 其他资源
- 多智能体系统
-
- 监督者
- 集群
- 交接机制
- 评估
-
- 创建评估器
-
- LLM 作为评判者
- 运行评估器
- 部署指南
-
- 创建LangGraph应用
-
- 安装依赖
- 创建 `.env` 文件
- 本地启动LangGraph服务器
- LangGraph Studio 网页界面
- 部署
- UI 用户界面
-
- 在 UI 中运行代理
- 添加人工介入循环
- 生成式 UI
使用LangGraph进行智能体开发
https://langchain-ai.github.io/langgraph/agents/overview/
LangGraph为构建基于智能体的应用程序 提供了底层原语和高级预制组件。
本节重点介绍预制、可复用的组件,旨在帮助您快速可靠地构建智能体系统——无需从头实现编排、记忆或人工反馈处理功能。
什么是智能体?
一个智能体由三个核心组件构成:大语言模型(LLM)、可调用的工具集,以及提供指令的提示词。
LLM 以循环方式运作。每次迭代时,它会选择要调用的工具,提供输入参数,接收执行结果(即观察值),并利用该观察值决定下一步行动。
此循环将持续进行,直到满足终止条件——通常是当智能体已收集足够信息来响应用户请求时。
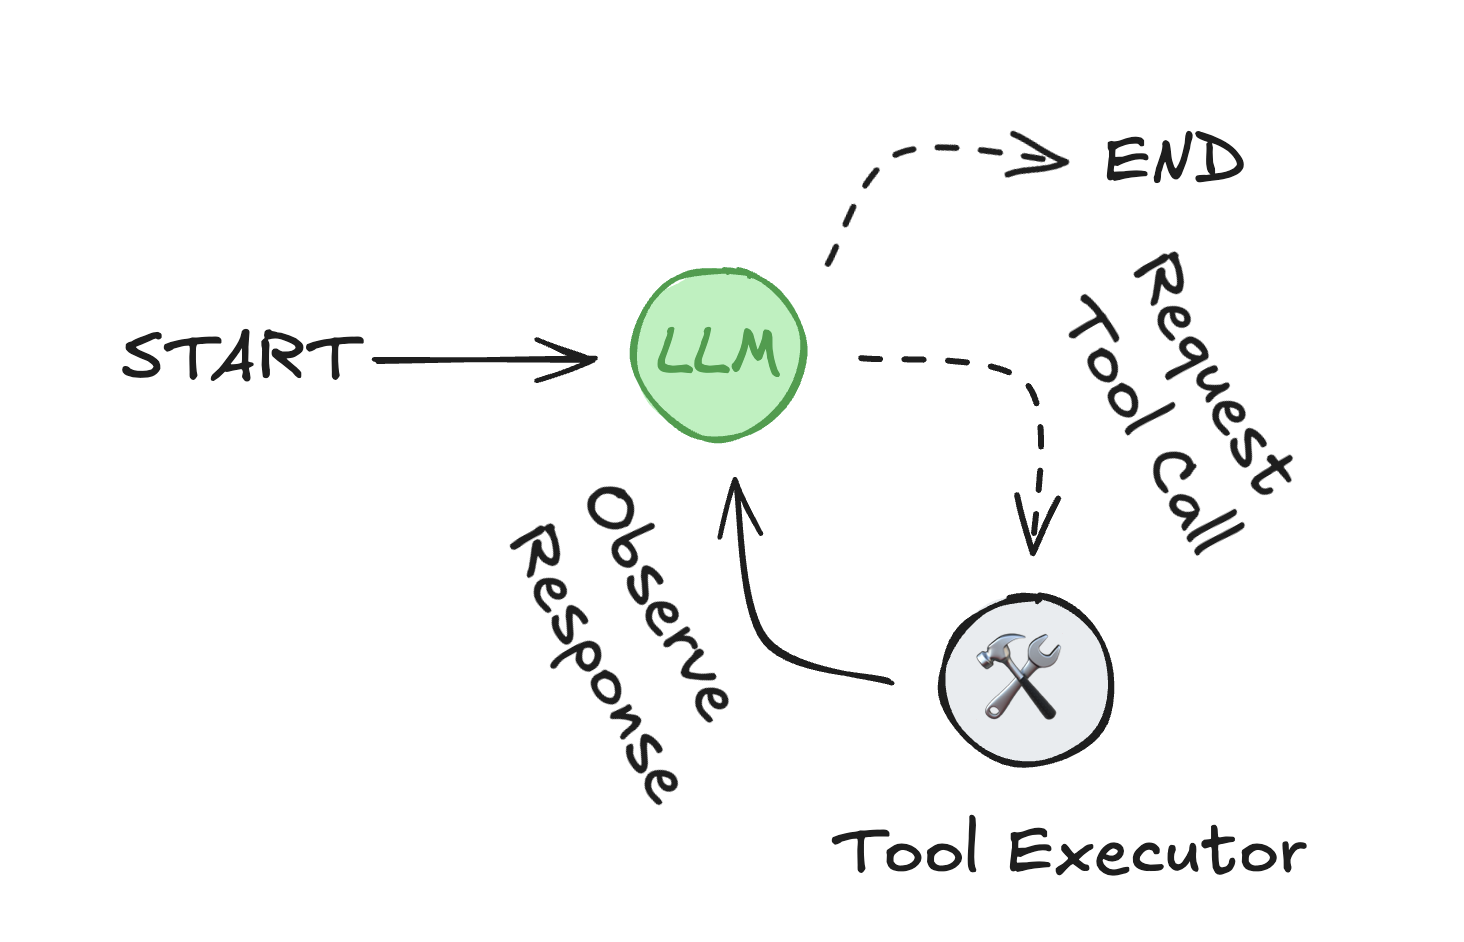
智能体循环流程:LLM通过选择工具 并利用其输出 来完成用户请求。
核心特性
LangGraph 提供了一系列构建健壮、生产级智能代理系统的关键能力:
- 记忆集成:原生支持短期(基于会话)和长期(跨会话持久化)记忆,使聊天机器人和助手具备状态保持能力。
- 人工介入控制:执行过程可无限期暂停以等待人工反馈——不同于受限于实时交互的 WebSocket 方案。该特性支持在工作流 任意节点 进行异步审批、修正或干预。
- 流式支持:实时流式传输代理状态、模型令牌、工具输出或组合流。
- 部署工具链:包含无基础设施依赖的部署工具。LangGraph平台支持测试、调试和部署。
- Studio:可视化IDE,用于检查和调试工作流。
- 支持多种生产级部署方案。
高层构建模块
LangGraph 提供了一系列预构建组件,用于实现常见的智能体行为和工作流。
这些抽象构建在 LangGraph 框架之上,既能加速生产部署,又能保持高级定制的灵活性。
使用 LangGraph 开发智能体时,您可以专注于应用程序的逻辑和行为,而无需构建和维护状态管理、记忆存储以及人工反馈等底层基础设施。
包生态系统
高层级组件被组织成多个功能聚焦的独立包。
langgraph-prebuilt (属于langgraph)pip install -U langgraph langchainlanggraph-supervisorpip install -U langgraph-supervisorlanggraph-swarmpip install -U langgraph-swarmlangchain-mcp-adapterspip install -U langchain-mcp-adapterslangmempip install -U langmemagentevalspip install -U agentevals(注:严格保留所有代码块、链接格式及专有名词,被动语态转换为主动表述,合并了重复的致谢段落,删除多余空行)
运行代理
https://langchain-ai.github.io/langgraph/agents/run_agents/
代理支持同步和异步两种执行方式:
- 使用
.invoke()或await .invoke()获取完整响应 - 使用
.stream()或.astream()获取增量式的流式输出
本节将说明如何提供输入、解析输出、启用流式传输以及控制执行限制。
基础用法
代理(Agents)可以通过两种主要模式执行:
- 同步模式:使用
.invoke()或.stream()方法 - 异步模式:使用
await .invoke()或配合.astream()的async for语法
同步调用
from langgraph.prebuilt import create_react_agentagent = create_react_agent(...)response = agent.invoke({\"messages\": [{\"role\": \"user\", \"content\": \"what is the weather in sf\"}]})异步调用
from langgraph.prebuilt import create_react_agentagent = create_react_agent(...)response = await agent.ainvoke({\"messages\": [{\"role\": \"user\", \"content\": \"what is the weather in sf\"}]})输入与输出
智能体使用一个语言模型,该模型期望接收messages列表作为输入。
因此,智能体的输入和输出 都以messages列表的形式 存储在状态中的messages键下。
输入格式
Agent 的输入必须是一个 包含 messages 键的字典。支持的格式如下:
{\"messages\": \"Hello\"} — 将被解析为 HumanMessage{\"messages\": {\"role\": \"user\", \"content\": \"Hello\"}}{\"messages\": [{\"role\": \"user\", \"content\": \"Hello\"}]}{\"messages\": [{\"role\": \"user\", \"content\": \"Hello\"}], \"user_name\": \"Alice\"} — 需配合自定义的 state_schema 使用消息会自动转换为 LangChain 的内部消息格式。您可以在 LangChain 消息文档 中了解更多信息。
使用自定义 Agent 状态
您可以直接在输入字典中添加 Agent 状态模式中定义的额外字段。这允许基于运行时数据或先前工具输出来实现动态行为。
完整说明请参阅 上下文指南。
注意:当 messages 接收字符串输入时,会转换为 HumanMessage。
此行为与 create_react_agent 中的 prompt 参数不同——后者在接收字符串时会解析为 SystemMessage。
输出格式
代理输出是一个包含以下内容的字典:
messages:执行过程中交换的所有消息列表(用户输入、助手回复、工具调用)。- 可选字段
structured_response,前提是已配置结构化输出。 - 如果使用自定义的
state_schema,输出中可能还包含与您定义字段对应的额外键。这些键可以保存来自工具执行或提示逻辑的更新状态值。
有关处理自定义状态模式及访问上下文的更多细节,请参阅上下文指南。
流式输出
智能代理支持流式响应,以实现更灵敏的应用程序交互。具体功能包括:
- 进度更新 - 每个步骤执行后实时推送
- LLM令牌流 - 生成过程中逐令牌输出
- 自定义工具消息 - 任务执行期间动态发送
流式传输同时支持同步和异步两种模式:
同步流式传输
for chunk in agent.stream( {\"messages\": [{\"role\": \"user\", \"content\": \"what is the weather in sf\"}]}, stream_mode=\"updates\"): print(chunk)异步流式传输
async for chunk in agent.astream( {\"messages\": [{\"role\": \"user\", \"content\": \"what is the weather in sf\"}]}, stream_mode=\"updates\"): print(chunk)提示: 有关完整详情,请参阅流式处理指南。
最大迭代次数
为了控制代理执行并避免无限循环,可以设置递归限制。
该参数定义了代理在抛出GraphRecursionError之前能够执行的最大步骤数。
您可以在运行时或通过.with_config()定义代理时配置recursion_limit参数:
运行时
from langgraph.errors import GraphRecursionErrorfrom langgraph.prebuilt import create_react_agentmax_iterations = 3recursion_limit = 2 * max_iterations + 1agent = create_react_agent( model=\"anthropic:claude-3-5-haiku-latest\", tools=[get_weather])try: response = agent.invoke( {\"messages\": [{\"role\": \"user\", \"content\": \"what\'s the weather in sf\"}]}, {\"recursion_limit\": recursion_limit}, )except GraphRecursionError: print(\"Agent stopped due to max iterations.\").with_config()
from langgraph.errors import GraphRecursionErrorfrom langgraph.prebuilt import create_react_agentmax_iterations = 3recursion_limit = 2 * max_iterations + 1agent = create_react_agent( model=\"anthropic:claude-3-5-haiku-latest\", tools=[get_weather])agent_with_recursion_limit = agent.with_config(recursion_limit=recursion_limit)try: response = agent_with_recursion_limit.invoke( {\"messages\": [{\"role\": \"user\", \"content\": \"what\'s the weather in sf\"}]}, )except GraphRecursionError: print(\"Agent stopped due to max iterations.\")其他资源
- LangChain 中的异步编程
流式传输
https://langchain-ai.github.io/langgraph/agents/streaming/
流式传输是构建响应式应用程序的关键。您通常会需要传输以下几种类型的数据:
1、智能体进度 —— 在智能体图中每个节点执行后获取更新。
2、大语言模型词元 —— 当语言模型生成词元时实时传输。
3、自定义更新 —— 在执行过程中从工具发出自定义数据(例如\"已获取10/100条记录\")。
您可以同时传输多种类型的数据。

等待是留给鸽子的。
代理进度监控
要实时获取代理的执行进度,可以使用 stream() 或 astream() 方法,并设置参数 stream_mode=\"updates\"。这种方式会在每个代理步骤完成后触发事件通知。
例如,假设某个代理需要调用工具一次,您将观察到以下更新序列:
- LLM节点:包含工具调用请求的AI消息
- 工具节点:包含执行结果的工具消息
- LLM节点:最终的AI响应
Sync
agent = create_react_agent( model=\"anthropic:claude-3-7-sonnet-latest\", tools=[get_weather],)for chunk in agent.stream( {\"messages\": [{\"role\": \"user\", \"content\": \"what is the weather in sf\"}]}, stream_mode=\"updates\"): print(chunk) print(\"\\n\")Async
agent = create_react_agent( model=\"anthropic:claude-3-7-sonnet-latest\", tools=[get_weather],)async for chunk in agent.astream( {\"messages\": [{\"role\": \"user\", \"content\": \"what is the weather in sf\"}]}, stream_mode=\"updates\"): print(chunk) print(\"\\n\")LLM 令牌
要实时获取大语言模型(LLM)生成的令牌流,请使用 stream_mode=\"messages\":
Sync
agent = create_react_agent( model=\"anthropic:claude-3-7-sonnet-latest\", tools=[get_weather],)for token, metadata in agent.stream( {\"messages\": [{\"role\": \"user\", \"content\": \"what is the weather in sf\"}]}, stream_mode=\"messages\"): print(\"Token\", token) print(\"Metadata\", metadata) print(\"\\n\")Async
agent = create_react_agent( model=\"anthropic:claude-3-7-sonnet-latest\", tools=[get_weather],)async for token, metadata in agent.astream( {\"messages\": [{\"role\": \"user\", \"content\": \"what is the weather in sf\"}]}, stream_mode=\"messages\"): print(\"Token\", token) print(\"Metadata\", metadata) print(\"\\n\")工具更新
要实时获取工具执行时的更新流,可以使用 get_stream_writer.
Sync
from langgraph.config import get_stream_writerdef get_weather(city: str) -> str: \"\"\"Get weather for a given city.\"\"\" writer = get_stream_writer() # stream any arbitrary data writer(f\"Looking up data for city: {city}\") return f\"It\'s always sunny in {city}!\"agent = create_react_agent( model=\"anthropic:claude-3-7-sonnet-latest\", tools=[get_weather],)for chunk in agent.stream( {\"messages\": [{\"role\": \"user\", \"content\": \"what is the weather in sf\"}]}, stream_mode=\"custom\"): print(chunk) print(\"\\n\")Async
from langgraph.config import get_stream_writerdef get_weather(city: str) -> str: \"\"\"Get weather for a given city.\"\"\" writer = get_stream_writer() # stream any arbitrary data writer(f\"Looking up data for city: {city}\") return f\"It\'s always sunny in {city}!\"agent = create_react_agent( model=\"anthropic:claude-3-7-sonnet-latest\", tools=[get_weather],)async for chunk in agent.astream( {\"messages\": [{\"role\": \"user\", \"content\": \"what is the weather in sf\"}]}, stream_mode=\"custom\"): print(chunk) print(\"\\n\")注意:如果在工具中添加 get_stream_writer,将无法在 LangGraph 执行上下文之外调用该工具。
流式多模态传输
您可以通过将流模式以列表形式传递来指定多种流式传输模式:stream_mode=[\"updates\", \"messages\", \"custom\"]:
Sync
agent = create_react_agent( model=\"anthropic:claude-3-7-sonnet-latest\", tools=[get_weather],)for stream_mode, chunk in agent.stream( {\"messages\": [{\"role\": \"user\", \"content\": \"what is the weather in sf\"}]}, stream_mode=[\"updates\", \"messages\", \"custom\"]): print(chunk) print(\"\\n\")Async
agent = create_react_agent( model=\"anthropic:claude-3-7-sonnet-latest\", tools=[get_weather],)async for stream_mode, chunk in agent.astream( {\"messages\": [{\"role\": \"user\", \"content\": \"what is the weather in sf\"}]}, stream_mode=[\"updates\", \"messages\", \"custom\"]): print(chunk) print(\"\\n\")禁用流式传输
在某些应用场景中,您可能需要针对特定模型禁用单个令牌的流式传输功能。这在多智能体系统中尤为实用,可用于控制哪些智能体输出流式数据。
具体操作方法请参阅模型指南中关于禁用流式传输的章节。
其他资源
- LangGraph 中的流式处理
LangGraph 代理模型文档
官方文档链接 : https://langchain-ai.github.io/langgraph/agents/models/
代理模型支持:
- Anthropic
- OpenAI
模型
本页介绍如何配置智能体所使用的聊天模型。
工具调用支持
要启用工具调用代理功能,底层大语言模型(LLM)必须支持工具调用。
兼容模型列表可在LangChain集成目录中查阅。
通过名称指定模型
您可以通过模型名称字符串来配置代理:
OpenAI
import osfrom langgraph.prebuilt import create_react_agentos.environ[\"OPENAI_API_KEY\"] = \"sk-...\"agent = create_react_agent( model=\"openai:gpt-4.1\", # other parameters)Anthropic
import osfrom langgraph.prebuilt import create_react_agentos.environ[\"ANTHROPIC_API_KEY\"] = \"sk-...\"agent = create_react_agent( model=\"anthropic:claude-3-7-sonnet-latest\", # other parameters)Azure
import osfrom langgraph.prebuilt import create_react_agentos.environ[\"AZURE_OPENAI_API_KEY\"] = \"...\"os.environ[\"AZURE_OPENAI_ENDPOINT\"] = \"...\"os.environ[\"OPENAI_API_VERSION\"] = \"2025-03-01-preview\"agent = create_react_agent( model=\"azure_openai:gpt-4.1\", # other parameters)Google Gemini
import osfrom langgraph.prebuilt import create_react_agentos.environ[\"GOOGLE_API_KEY\"] = \"...\"agent = create_react_agent( model=\"google_genai:gemini-2.0-flash\", # other parameters)AWS Bedrock
from langgraph.prebuilt import create_react_agent# Follow the steps here to configure your credentials:# https://docs.aws.amazon.com/bedrock/latest/userguide/getting-started.htmlagent = create_react_agent( model=\"bedrock_converse:anthropic.claude-3-5-sonnet-20240620-v1:0\", # other parameters)使用 init_chat_model 工具
参考:https://blog.csdn.net/lovechris00/article/details/148014663?spm=1001.2014.3001.5501#3_381
来配置 OpenAI、Anthropic、Azure、Google Gemini、AWS Bedrock 模型
使用特定供应商的大语言模型
如果某个模型供应商未通过 init_chat_model 提供支持,您可以直接实例化该供应商的模型类。该模型必须实现 BaseChatModel 接口 并支持工具调用功能:
API参考文档: ChatAnthropic | create_react_agent
from langchain_anthropic import ChatAnthropicfrom langgraph.prebuilt import create_react_agentmodel = ChatAnthropic( model=\"claude-3-7-sonnet-latest\", temperature=0, max_tokens=2048)agent = create_react_agent( model=model, # other parameters)示例说明
上面的例子使用了 ChatAnthropic,该模型已被 init_chat_model 支持。此处展示该模式是为了说明如何手动实例化一个无法通过 init_chat_model 获取的模型。
禁用流式传输
要禁用单个LLM令牌的流式传输,在初始化模型时设置disable_streaming=True:
init_chat_model
from langchain.chat_models import init_chat_modelmodel = init_chat_model( \"anthropic:claude-3-7-sonnet-latest\", disable_streaming=True)ChatModel
from langchain_anthropic import ChatAnthropicmodel = ChatAnthropic( model=\"claude-3-7-sonnet-latest\", disable_streaming=True)请参考 API 参考文档 获取关于 disable_streaming 的更多Info :
添加模型回退机制
您可以使用 model.with_fallbacks([...]) 方法为不同模型或不同LLM提供商添加回退方案:
init_chat_model
from langchain.chat_models import init_chat_modelmodel_with_fallbacks = ( init_chat_model(\"anthropic:claude-3-5-haiku-latest\") .with_fallbacks([ init_chat_model(\"openai:gpt-4.1-mini\"), ]))ChatModel
from langchain_anthropic import ChatAnthropicfrom langchain_openai import ChatOpenAImodel_with_fallbacks = ( ChatAnthropic(model=\"claude-3-5-haiku-latest\") .with_fallbacks([ ChatOpenAI(model=\"gpt-4.1-mini\"), ]))请参考此指南获取更多关于模型回退机制的信息。
其他资源
- 模型集成目录
- 使用
init_chat_model进行通用初始化
工具
https://langchain-ai.github.io/langgraph/agents/tools/
工具是一种封装函数及其输入模式的方法,可以传递给支持工具调用的聊天模型。这使得模型能够请求执行该函数并传入特定输入。
您既可以自定义工具,也可以使用LangChain提供的预置集成工具。
定义简单工具
你可以将一个普通函数传递给 create_react_agent 作为工具使用:
API参考文档:create_react_agent
create_react_agent 会自动将普通函数转换为 LangChain 工具。
from langgraph.prebuilt import create_react_agentdef multiply(a: int, b: int) -> int: \"\"\"Multiply two numbers.\"\"\" return a * bcreate_react_agent( model=\"anthropic:claude-3-7-sonnet\", tools=[multiply])自定义工具
如需更精细地控制工具行为,可使用 @tool 装饰器:
API参考文档:tool
from langchain_core.tools import tool@tool(\"multiply_tool\", parse_docstring=True)def multiply(a: int, b: int) -> int: \"\"\"Multiply two numbers.Args: a: First operand b: Second operand \"\"\" return a * b你也可以使用 Pydantic 定义自定义输入模式:
from pydantic import BaseModel, Fieldclass MultiplyInputSchema(BaseModel): \"\"\"Multiply two numbers\"\"\" a: int = Field(description=\"First operand\") b: int = Field(description=\"Second operand\")@tool(\"multiply_tool\", args_schema=MultiplyInputSchema)def multiply(a: int, b: int) -> int: return a * b如需更多自定义选项,请参阅自定义工具指南。
对模型隐藏参数
某些工具需要仅在运行时才能确定的参数(例如用户ID或会话上下文),这些参数不应由模型控制。
您可以将这些参数放入智能体的state或config中,并通过工具内部访问这些信息:
API参考文档:InjectedState | AgentState | RunnableConfig
from langgraph.prebuilt import InjectedStatefrom langgraph.prebuilt.chat_agent_executor import AgentStatefrom langchain_core.runnables import RunnableConfigdef my_tool( # This will be populated by an LLM tool_arg: str, # access information that\'s dynamically updated inside the agent state: Annotated[AgentState, InjectedState], # access static data that is passed at agent invocation config: RunnableConfig,) -> str: \"\"\"My tool.\"\"\" do_something_with_state(state[\"messages\"]) do_something_with_config(config) ...禁用并行工具调用
部分模型提供商支持并行执行多个工具,但也允许用户禁用此功能。
对于支持的提供商,您可以通过在model.bind_tools()方法中设置parallel_tool_calls=False来禁用并行工具调用:
API参考文档:init_chat_model
from langchain.chat_models import init_chat_modeldef add(a: int, b: int) -> int: \"\"\"Add two numbers\"\"\" return a + bdef multiply(a: int, b: int) -> int: \"\"\"Multiply two numbers.\"\"\" return a * bmodel = init_chat_model(\"anthropic:claude-3-5-sonnet-latest\", temperature=0)tools = [add, multiply]agent = create_react_agent( # disable parallel tool calls model=model.bind_tools(tools, parallel_tool_calls=False), tools=tools)agent.invoke( {\"messages\": [{\"role\": \"user\", \"content\": \"what\'s 3 + 5 and 4 * 7?\"}]})直接返回工具结果
使用 return_direct=True 可以立即返回工具结果并终止代理循环:
API参考文档:tool
from langchain_core.tools import tool@tool(return_direct=True)def add(a: int, b: int) -> int: \"\"\"Add two numbers\"\"\" return a + bagent = create_react_agent( model=\"anthropic:claude-3-7-sonnet-latest\", tools=[add])agent.invoke( {\"messages\": [{\"role\": \"user\", \"content\": \"what\'s 3 + 5?\"}]})强制使用工具
要强制代理使用特定工具,可以在 model.bind_tools() 中设置 tool_choice 选项:
API参考:tool
from langchain_core.tools import tool@tool(return_direct=True)def greet(user_name: str) -> int: \"\"\"Greet user.\"\"\" return f\"Hello {user_name}!\"tools = [greet]agent = create_react_agent( model=model.bind_tools(tools, tool_choice={\"type\": \"tool\", \"name\": \"greet\"}), tools=tools)agent.invoke( {\"messages\": [{\"role\": \"user\", \"content\": \"Hi, I am Bob\"}]})避免无限循环
强制使用工具而不设置停止条件可能导致无限循环。请采用以下任一防护措施:
- 为工具标记
return_direct=True,使其在执行后终止循环。 - 设置
recursion_limit来限制执行步骤的数量。
处理工具错误
默认情况下,代理会捕获工具调用期间抛出的所有异常,并将这些异常作为工具消息传递给大语言模型(LLM)。要控制错误处理方式,可以通过预构建的 ToolNode 节点(该节点在 create_react_agent 中执行工具)的 handle_tool_errors 参数进行配置:
启用错误处理(默认)
from langgraph.prebuilt import create_react_agentdef multiply(a: int, b: int) -> int: \"\"\"Multiply two numbers.\"\"\" if a == 42: raise ValueError(\"The ultimate error\") return a * b# Run with error handling (default)agent = create_react_agent( model=\"anthropic:claude-3-7-sonnet-latest\", tools=[multiply])agent.invoke( {\"messages\": [{\"role\": \"user\", \"content\": \"what\'s 42 x 7?\"}]})禁用错误处理
from langgraph.prebuilt import create_react_agent, ToolNodedef multiply(a: int, b: int) -> int: \"\"\"Multiply two numbers.\"\"\" if a == 42: raise ValueError(\"The ultimate error\") return a * btool_node = ToolNode( [multiply], handle_tool_errors=False # (1)!)agent_no_error_handling = create_react_agent( model=\"anthropic:claude-3-7-sonnet-latest\", tools=tool_node)agent_no_error_handling.invoke( {\"messages\": [{\"role\": \"user\", \"content\": \"what\'s 42 x 7?\"}]})自定义错误处理
from langgraph.prebuilt import create_react_agent, ToolNodedef multiply(a: int, b: int) -> int: \"\"\"Multiply two numbers.\"\"\" if a == 42: raise ValueError(\"The ultimate error\") return a * btool_node = ToolNode( [multiply], handle_tool_errors=( \"Can\'t use 42 as a first operand, you must switch operands!\" # (1)! ))agent_custom_error_handling = create_react_agent( model=\"anthropic:claude-3-7-sonnet-latest\", tools=tool_node)agent_custom_error_handling.invoke( {\"messages\": [{\"role\": \"user\", \"content\": \"what\'s 42 x 7?\"}]})关于不同工具错误处理选项的更多信息,请参见API参考。
内存操作
LangGraph 允许从工具访问短期和长期内存。有关详细信息,请参阅内存指南,了解以下内容:
- 如何从短期内存读取和写入数据
- 如何从长期内存读取和写入数据
预构建工具
LangChain 支持多种预构建工具集成,可用于与 API、数据库、文件系统、网络数据等进行交互。
这些工具扩展了智能代理的功能,并支持快速开发。
您可以在 LangChain 集成目录 中浏览完整的可用集成列表。
一些常用的工具类别包括:
- 搜索:Bing、SerpAPI、Tavily
- 代码解释器:Python REPL、Node.js REPL
- 数据库:SQL、MongoDB、Redis
- 网络数据:网页抓取与浏览
- API:OpenWeatherMap、NewsAPI 等
这些集成可以通过上文示例中展示的相同 tools 参数进行配置并添加到您的智能代理中。
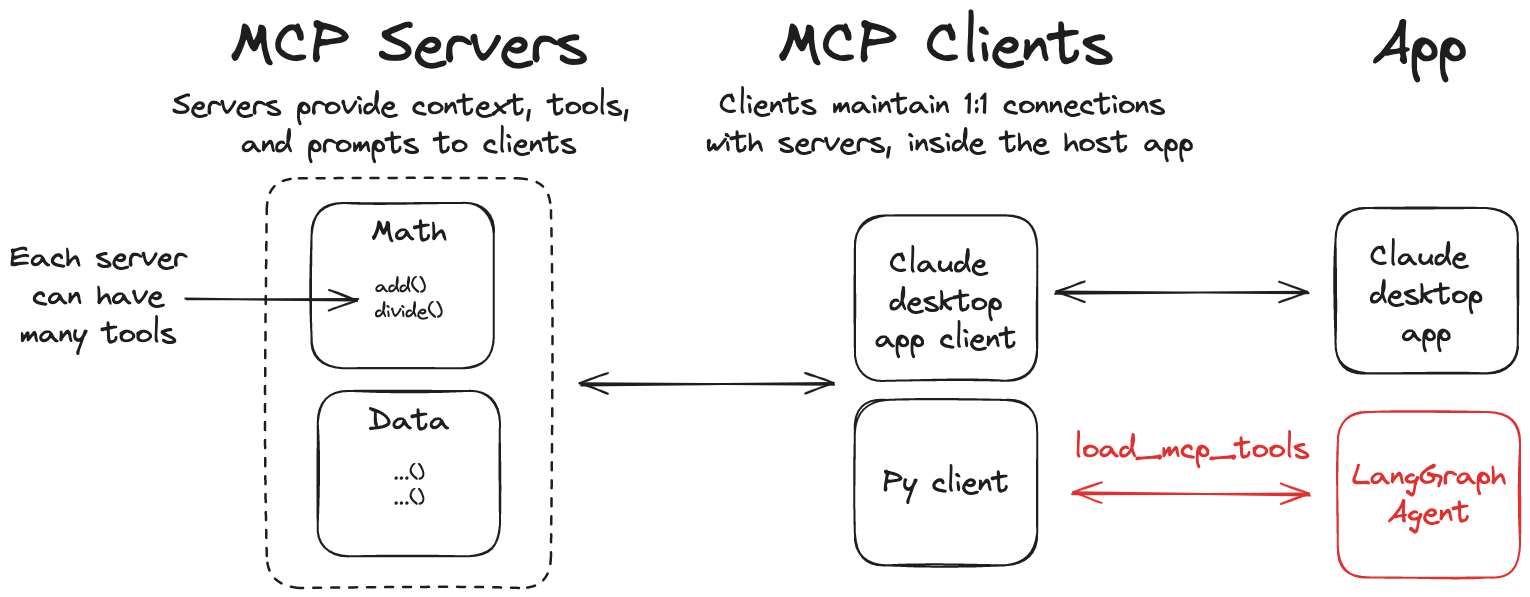
MCP 集成
https://langchain-ai.github.io/langgraph/agents/mcp/
模型上下文协议(MCP) 是一个开放协议,它标准化了应用程序如何向语言模型提供工具和上下文。LangGraph 代理可以通过 langchain-mcp-adapters 库使用 MCP 服务器上定义的工具。
安装 langchain-mcp-adapters 库以在 LangGraph 中使用 MCP 工具:
pip install langchain-mcp-adapters使用 MCP 工具
langchain-mcp-adapters 包支持代理程序使用定义在一个或多个 MCP 服务器上的工具。
代理程序可使用定义在 MCP 服务器上的工具
from langchain_mcp_adapters.client import MultiServerMCPClientfrom langgraph.prebuilt import create_react_agentasync with MultiServerMCPClient( { \"math\": { \"command\": \"python\", # Replace with absolute path to your math_server.py file \"args\": [\"/path/to/math_server.py\"], \"transport\": \"stdio\", }, \"weather\": { # Ensure your start your weather server on port 8000 \"url\": \"http://localhost:8000/sse\", \"transport\": \"sse\", } }) as client: agent = create_react_agent( \"anthropic:claude-3-7-sonnet-latest\", client.get_tools() ) math_response = await agent.ainvoke( {\"messages\": [{\"role\": \"user\", \"content\": \"what\'s (3 + 5) x 12?\"}]} ) weather_response = await agent.ainvoke( {\"messages\": [{\"role\": \"user\", \"content\": \"what is the weather in nyc?\"}]} )自定义 MCP 服务器
要创建自己的 MCP 服务器,可以使用 mcp 库。该库提供了一种简单的方式来定义工具并将其作为服务器运行。
安装 MCP 库:
pip install mcp请使用以下参考实现来通过MCP工具服务器测试您的代理。
示例数学服务器(标准输入输出传输)
from mcp.server.fastmcp import FastMCPmcp = FastMCP(\"Math\")@mcp.tool()def add(a: int, b: int) -> int: \"\"\"Add two numbers\"\"\" return a + b@mcp.tool()def multiply(a: int, b: int) -> int: \"\"\"Multiply two numbers\"\"\" return a * bif __name__ == \"__main__\": mcp.run(transport=\"stdio\")示例天气服务器(SSE传输)
from mcp.server.fastmcp import FastMCPmcp = FastMCP(\"Weather\")@mcp.tool()async def get_weather(location: str) -> str: \"\"\"Get weather for location.\"\"\" return \"It\'s always sunny in New York\"if __name__ == \"__main__\": mcp.run(transport=\"sse\")其他资源
- MCP 文档
- MCP 传输协议文档
上下文
https://langchain-ai.github.io/langgraph/agents/context/
智能体要有效运作,通常不仅需要消息列表,还需要上下文。
上下文包含消息列表之外的任何能影响智能体行为或工具执行的数据,例如:
- 运行时传递的信息,如
user_id或API凭证 - 在多步推理过程中更新的内部状态
- 来自先前交互的持久化记忆或事实
LangGraph提供三种主要方式来提供上下文:
上下文可用于:
- 调整模型看到的系统提示
- 为工具提供必要输入
- 在持续对话中跟踪事实
提供运行时上下文
当您需要在运行时向代理注入数据时使用此功能。
配置(静态上下文)
Config 用于存储不可变数据,例如用户元数据或 API 密钥。当您需要在程序运行期间保持不变的数值时使用此功能。
通过名为 “configurable” 的专用键来指定配置(该键名为此功能保留):
agent.invoke( {\"messages\": [{\"role\": \"user\", \"content\": \"hi!\"}]}, config={\"configurable\": {\"user_id\": \"user_123\"}})状态(可变上下文)
状态在运行过程中充当短期记忆。它保存着执行期间可能变化的动态数据,例如从工具或LLM输出中派生的值。
class CustomState(AgentState): user_name: stragent = create_react_agent( # Other agent parameters... state_schema=CustomState,)agent.invoke({ \"messages\": \"hi!\", \"user_name\": \"Jane\"})启用记忆功能
有关如何启用记忆功能的更多详情,请参阅记忆指南。这是一项强大特性,可让您在多次调用间持久化智能体的状态。
若不启用该功能,状态将仅限单次智能体运行期间有效。
长期记忆(跨对话上下文)
对于跨越多个对话或会话的上下文,LangGraph 通过 store 提供了访问长期记忆的能力。这可用于读取或更新持久性信息(例如用户资料、偏好设置、历史交互记录)。更多详情请参阅记忆指南。
基于上下文定制提示词
提示词决定了智能体的行为方式。为了融入运行时上下文,您可以根据智能体的状态或配置动态生成提示词。
常见应用场景:
- 个性化定制
- 角色或目标定制
- 条件行为(例如用户是管理员时)
使用配置
from langchain_core.messages import AnyMessagefrom langchain_core.runnables import RunnableConfigfrom langgraph.prebuilt import create_react_agentfrom langgraph.prebuilt.chat_agent_executor import AgentStatedef prompt( state: AgentState, config: RunnableConfig,) -> list[AnyMessage]: user_name = config[\"configurable\"].get(\"user_name\") system_msg = f\"You are a helpful assistant. User\'s name is {user_name}\" return [{\"role\": \"system\", \"content\": system_msg}] + state[\"messages\"]agent = create_react_agent( model=\"anthropic:claude-3-7-sonnet-latest\", tools=[get_weather], prompt=prompt)agent.invoke( ..., config={\"configurable\": {\"user_name\": \"John Smith\"}})使用状态
from langchain_core.messages import AnyMessagefrom langchain_core.runnables import RunnableConfigfrom langgraph.prebuilt import create_react_agentfrom langgraph.prebuilt.chat_agent_executor import AgentStateclass CustomState(AgentState): user_name: strdef prompt( state: CustomState) -> list[AnyMessage]: user_name = state[\"user_name\"] system_msg = f\"You are a helpful assistant. User\'s name is {user_name}\" return [{\"role\": \"system\", \"content\": system_msg}] + state[\"messages\"]agent = create_react_agent( model=\"anthropic:claude-3-7-sonnet-latest\", tools=[...], state_schema=CustomState, prompt=prompt)agent.invoke({ \"messages\": \"hi!\", \"user_name\": \"John Smith\"})工具中访问上下文
工具可以通过特殊的参数注解来访问上下文:
- 使用
RunnableConfig获取配置信息 - 使用
Annotated[StateSchema, InjectedState]访问智能体状态
提示:
这些注解会阻止大语言模型(LLM)尝试填充这些值。这些参数将对LLM隐藏。
使用配置 | 使用状态
def get_user_info( config: RunnableConfig,) -> str: \"\"\"Look up user info.\"\"\" user_id = config[\"configurable\"].get(\"user_id\") return \"User is John Smith\" if user_id == \"user_123\" else \"Unknown user\"agent = create_react_agent( model=\"anthropic:claude-3-7-sonnet-latest\", tools=[get_user_info],)agent.invoke( {\"messages\": [{\"role\": \"user\", \"content\": \"look up user information\"}]}, config={\"configurable\": {\"user_id\": \"user_123\"}})from typing import Annotatedfrom langgraph.prebuilt import InjectedStateclass CustomState(AgentState): user_id: strdef get_user_info( state: Annotated[CustomState, InjectedState]) -> str: \"\"\"Look up user info.\"\"\" user_id = state[\"user_id\"] return \"User is John Smith\" if user_id == \"user_123\" else \"Unknown user\"agent = create_react_agent( model=\"anthropic:claude-3-7-sonnet-latest\", tools=[get_user_info], state_schema=CustomState,)agent.invoke({ \"messages\": \"look up user information\", \"user_id\": \"user_123\"})从工具更新上下文
工具可以在执行过程中更新代理的上下文(状态和长期记忆)。这一功能对于持久化中间结果或使信息可供后续工具或提示访问非常有用。更多信息请参阅记忆指南。
内存机制
https://langchain-ai.github.io/langgraph/agents/memory/
LangGraph 支持两种对构建对话代理至关重要的内存类型:
- 短期记忆:通过维护会话内的消息历史记录来跟踪当前对话。
- 长期记忆:跨会话存储用户特定数据或应用级数据。
本指南展示如何在 LangGraph 中使用这两种内存类型与代理交互。如需深入理解内存概念,请参阅 LangGraph 内存文档。
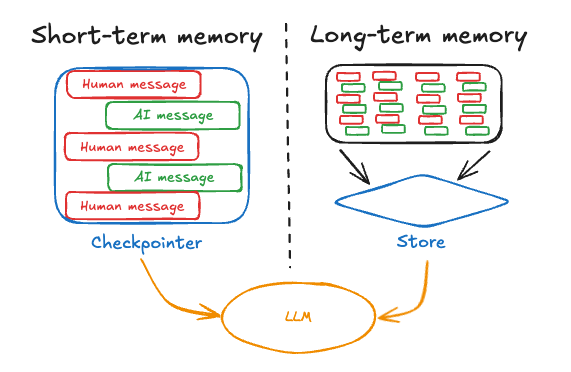
短期记忆和长期记忆都需要持久化存储,以保持大语言模型(LLM)交互间的连续性。在生产环境中,这些数据通常存储在数据库中。
术语说明
在 LangGraph 中:
- 短期记忆 也被称为 线程级内存
- 长期记忆 也被称作 跨线程内存
线程是指通过相同 thread_id 分组的一组相关运行序列。
短期记忆
短期记忆功能使智能体能够追踪多轮对话。要使用该功能,您需要:
1、在创建智能体时提供一个checkpointer。该检查点器用于持久化智能体的状态。
2、在运行智能体时,配置中需包含thread_id参数。该线程ID是对话会话的唯一标识符。
API参考:create_react_agent | InMemorySaver
from langgraph.prebuilt import create_react_agentfrom langgraph.checkpoint.memory import InMemorySavercheckpointer = InMemorySaver() # (1)!def get_weather(city: str) -> str: \"\"\"Get weather for a given city.\"\"\" return f\"It\'s always sunny in {city}!\"agent = create_react_agent( model=\"anthropic:claude-3-7-sonnet-latest\", tools=[get_weather], checkpointer=checkpointer # (2)!)# Run the agentconfig = { \"configurable\": { \"thread_id\": \"1\" # (3)! }}sf_response = agent.invoke( {\"messages\": [{\"role\": \"user\", \"content\": \"what is the weather in sf\"}]}, config)# Continue the conversation using the same thread_idny_response = agent.invoke( {\"messages\": [{\"role\": \"user\", \"content\": \"what about new york?\"}]}, config # (4)!)1、InMemorySaver 是一个检查点工具,它将智能体的状态存储在内存中。在生产环境中,通常需要使用数据库或其他持久化存储方案。更多选项请查阅检查点文档。如果通过 LangGraph Platform 进行部署,该平台会为您提供生产就绪的检查点工具。
2、检查点工具会被传递给智能体。这使得智能体能够在多次调用间保持状态持久化。请注意:
- 配置中需要提供唯一的
thread_id。该ID用于标识会话对话,其值由用户控制,可以是任意字符串。 - 智能体会继续使用相同的
thread_id进行对话。这将使智能体能够识别出用户正在专门询问纽约的天气情况。
当智能体第二次通过相同 thread_id 被调用时,首次对话的原始消息历史会自动包含在内,使得智能体能够推断出用户正在专门询问纽约的天气。
LangGraph Platform 提供生产就绪的检查点工具
如果使用 LangGraph Platform 进行部署,系统会自动将检查点工具配置为使用生产级数据库。
管理消息历史记录
长对话可能会超出LLM的上下文窗口限制。常见的解决方案包括:
- 对话摘要:维护对话的持续摘要
- 消息裁剪:删除历史记录中最早或最近的N条消息
这样可以让智能体在不超出LLM上下文窗口的情况下持续跟踪对话。
要管理消息历史记录,需要指定pre_model_hook——这是一个在调用语言模型前始终运行的函数(节点)。
汇总消息历史记录
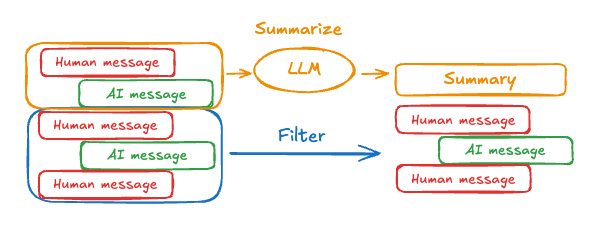
长对话可能会超出LLM的上下文窗口限制。常见的解决方案是维护对话的持续摘要。这样可以让智能体在不超出LLM上下文窗口的情况下跟踪对话进度。
要汇总消息历史记录,您可以使用pre_model_hook配合预构建的SummarizationNode:
API参考文档:ChatAnthropic | count_tokens_approximately | create_react_agent | AgentState | InMemorySaver
from langchain_anthropic import ChatAnthropicfrom langmem.short_term import SummarizationNodefrom langchain_core.messages.utils import count_tokens_approximatelyfrom langgraph.prebuilt import create_react_agentfrom langgraph.prebuilt.chat_agent_executor import AgentStatefrom langgraph.checkpoint.memory import InMemorySaverfrom typing import Anymodel = ChatAnthropic(model=\"claude-3-7-sonnet-latest\")summarization_node = SummarizationNode( # (1)! token_counter=count_tokens_approximately, model=model, max_tokens=384, max_summary_tokens=128, output_messages_key=\"llm_input_messages\",)class State(AgentState): # NOTE: we\'re adding this key to keep track of previous summary information # to make sure we\'re not summarizing on every LLM call context: dict[str, Any] # (2)!checkpointer = InMemorySaver() # (3)!agent = create_react_agent( model=model, tools=tools, pre_model_hook=summarization_node, # (4)! state_schema=State, # (5)! checkpointer=checkpointer,)1、InMemorySaver 是一个检查点工具,它将代理的状态存储在内存中。
在生产环境中,通常会使用数据库或其他持久化存储方案。更多选项请查阅 检查点文档。
若通过LangGraph平台部署,该平台会为您提供生产级检查点工具。
2、context键被添加到代理状态中。该键包含摘要节点的簿记信息,用于追踪最近的摘要信息,确保代理不会在每次调用LLM时都执行摘要操作(这种操作可能效率低下)。
3、检查点工具被传递给代理,这使得代理能在多次调用间持久化其状态。
4、pre_model_hook被设置为SummarizationNode。
该节点会在消息历史记录发送给LLM前进行摘要处理,自动处理摘要流程并用新摘要更新代理状态。
如需自定义实现可替换此节点,详见 create_react_agent API参考文档。
5、state_schema被设置为自定义的State类,该类包含额外的context键。
修剪消息历史记录
要修剪消息历史记录,可以使用 pre_model_hook 配合 trim_messages 函数:
API参考文档: trim_messages | count_tokens_approximately | create_react_agent
from langchain_core.messages.utils import ( trim_messages, count_tokens_approximately)from langgraph.prebuilt import create_react_agent# This function will be called every time before the node that calls LLMdef pre_model_hook(state): trimmed_messages = trim_messages( state[\"messages\"], strategy=\"last\", token_counter=count_tokens_approximately, max_tokens=384, start_on=\"human\", end_on=(\"human\", \"tool\"), ) return {\"llm_input_messages\": trimmed_messages}checkpointer = InMemorySaver()agent = create_react_agent( model, tools, pre_model_hook=pre_model_hook, checkpointer=checkpointer,)要了解更多关于使用 pre_model_hook 管理消息历史的信息,请参阅这篇操作指南。
工具内读取状态
LangGraph 允许智能体在工具内部访问其短期记忆(状态)。
API参考文档:InjectedState | create_react_agent
from typing import Annotatedfrom langgraph.prebuilt import InjectedState, create_react_agentclass CustomState(AgentState): user_id: strdef get_user_info( state: Annotated[CustomState, InjectedState]) -> str: \"\"\"Look up user info.\"\"\" user_id = state[\"user_id\"] return \"User is John Smith\" if user_id == \"user_123\" else \"Unknown user\"agent = create_react_agent( model=\"anthropic:claude-3-7-sonnet-latest\", tools=[get_user_info], state_schema=CustomState,)agent.invoke({ \"messages\": \"look up user information\", \"user_id\": \"user_123\"})请参阅Context指南获取更多信息。
从工具写入
要在执行过程中修改代理的短期记忆(状态),你可以直接从工具返回状态更新。这对于持久化中间结果或使信息可供后续工具或提示访问非常有用。
API 参考:InjectedToolCallId | RunnableConfig | ToolMessage | InjectedState | create_react_agent | AgentState | Command
from typing import Annotatedfrom langchain_core.tools import InjectedToolCallIdfrom langchain_core.runnables import RunnableConfigfrom langchain_core.messages import ToolMessagefrom langgraph.prebuilt import InjectedState, create_react_agentfrom langgraph.prebuilt.chat_agent_executor import AgentStatefrom langgraph.types import Commandclass CustomState(AgentState): user_name: strdef update_user_info( tool_call_id: Annotated[str, InjectedToolCallId], config: RunnableConfig) -> Command: \"\"\"Look up and update user info.\"\"\" user_id = config[\"configurable\"].get(\"user_id\") name = \"John Smith\" if user_id == \"user_123\" else \"Unknown user\" return Command(update={ \"user_name\": name, # update the message history \"messages\": [ ToolMessage( \"Successfully looked up user information\", tool_call_id=tool_call_id ) ] })def greet( state: Annotated[CustomState, InjectedState]) -> str: \"\"\"Use this to greet the user once you found their info.\"\"\" user_name = state[\"user_name\"] return f\"Hello {user_name}!\"agent = create_react_agent( model=\"anthropic:claude-3-7-sonnet-latest\", tools=[update_user_info, greet], state_schema=CustomState)agent.invoke( {\"messages\": [{\"role\": \"user\", \"content\": \"greet the user\"}]}, config={\"configurable\": {\"user_id\": \"user_123\"}})更多详情,请参阅如何从工具更新状态。
长期记忆
利用长期记忆功能可以跨对话存储用户特定或应用特定的数据。这对于聊天机器人等应用场景非常有用,例如需要记住用户偏好或其他信息的情况。
要使用长期记忆功能,您需要:
1、配置存储以实现跨调用数据持久化
2、通过get_store函数在工具或提示中访问存储
读取
一个供代理用来查询用户信息的工具
from langchain_core.runnables import RunnableConfigfrom langgraph.config import get_storefrom langgraph.prebuilt import create_react_agentfrom langgraph.store.memory import InMemoryStorestore = InMemoryStore() # (1)!store.put( # (2)! (\"users\",), # (3)! \"user_123\", # (4)! { \"name\": \"John Smith\", \"language\": \"English\", } # (5)!)def get_user_info(config: RunnableConfig) -> str: \"\"\"Look up user info.\"\"\" # Same as that provided to `create_react_agent` store = get_store() # (6)! user_id = config[\"configurable\"].get(\"user_id\") user_info = store.get((\"users\",), user_id) # (7)! return str(user_info.value) if user_info else \"Unknown user\"agent = create_react_agent( model=\"anthropic:claude-3-7-sonnet-latest\", tools=[get_user_info], store=store # (8)!)# Run the agentagent.invoke( {\"messages\": [{\"role\": \"user\", \"content\": \"look up user information\"}]}, config={\"configurable\": {\"user_id\": \"user_123\"}})1、InMemoryStore 是一种将数据存储在内存中的存储方式。
在生产环境中,通常建议使用数据库或其他持久化存储方案。
更多选项请查阅存储文档。
若通过 LangGraph 平台 部署,平台将自动提供生产级存储方案。
2、本示例中,我们使用 put 方法向存储写入样本数据。
具体参数说明请参阅 BaseStore.put API 文档。
3、第一个参数是命名空间,用于对关联数据进行分组。
本例使用 users 命名空间来归类用户数据。
4、命名空间内的键值。本示例采用用户ID作为键名。
5、需要为指定用户存储的数据内容。
6、get_store 函数用于访问存储。您可以在代码任意位置(包括工具和提示中)调用该函数,它将返回代理创建时传入的存储实例。
7、get 方法用于从存储检索数据。首个参数为命名空间,次参数为键名,返回值为包含数据值及其元数据的 StoreValue 对象。
8、存储实例会传递给代理,使代理在执行工具时可访问存储。您也可通过 get_store 函数在代码任意位置访问该存储。
写入
更新用户信息的工具示例
from typing_extensions import TypedDictfrom langgraph.config import get_storefrom langgraph.prebuilt import create_react_agentfrom langgraph.store.memory import InMemoryStorestore = InMemoryStore() # (1)!class UserInfo(TypedDict): # (2)! name: strdef save_user_info(user_info: UserInfo, config: RunnableConfig) -> str: # (3)! \"\"\"Save user info.\"\"\" # Same as that provided to `create_react_agent` store = get_store() # (4)! user_id = config[\"configurable\"].get(\"user_id\") store.put((\"users\",), user_id, user_info) # (5)! return \"Successfully saved user info.\"agent = create_react_agent( model=\"anthropic:claude-3-7-sonnet-latest\", tools=[save_user_info], store=store)# Run the agentagent.invoke( {\"messages\": [{\"role\": \"user\", \"content\": \"My name is John Smith\"}]}, config={\"configurable\": {\"user_id\": \"user_123\"}} # (6)!)# You can access the store directly to get the valuestore.get((\"users\",), \"user_123\").value1、InMemoryStore 是一种将数据存储在内存中的存储方式。
在生产环境中,通常建议使用数据库或其他持久化存储方案。更多选项请查阅存储文档。
如果通过 LangGraph 平台 部署,该平台会为您提供生产环境就绪的存储方案。
2、UserInfo 类是一个 TypedDict,用于定义用户信息的结构。大语言模型(LLM)将根据此模式格式化响应内容。
3、save_user_info 函数是一个工具函数,允许代理(agent)更新用户信息。这在聊天应用中非常实用,例如用户需要更新个人资料信息时。
4、get_store 函数用于访问存储。您可以在代码的任何位置调用它,包括工具函数和提示语中。该函数会返回代理创建时传入的存储实例。
5、put 方法用于向存储中写入数据。第一个参数是命名空间,第二个参数是键名。该方法会将用户信息存入存储系统。
6、user_id 通过配置参数传入,用于标识需要更新信息的对应用户。
语义搜索
LangGraph 还支持通过语义相似度在长期记忆中进行搜索。
预构建记忆工具
LangMem 是由 LangChain 维护的库,提供用于管理智能体长期记忆的工具。具体使用示例请参阅 LangMem 文档。
其他资源
- LangGraph中的内存管理
人机协同机制
https://langchain-ai.github.io/langgraph/agents/human-in-the-loop/
要审查、编辑和批准智能体中的工具调用,您可以使用LangGraph内置的 人机协同(HIL) 功能,特别是interrupt() 原语。
LangGraph允许您无限期暂停执行——无论是几分钟、几小时还是几天——直到接收到人工输入。
这一机制之所以可行,是因为智能体状态会被检查点保存到数据库中,这使得系统能够持久化执行上下文,并在之后恢复工作流,从中断处继续执行。
如需深入了解人机协同概念,请参阅概念指南。

在继续执行前,人工可以审查并编辑智能体的输出。这对于工具调用可能涉及敏感操作或需要人工监督的应用场景尤为重要。
工具调用审核机制
要为工具添加人工审批环节,请按以下步骤操作:
1、在工具中使用 interrupt() 方法暂停执行流程
2、通过发送 Command(resume=...) 指令,根据人工输入决定是否继续执行
API参考文档:InMemorySaver | interrupt | create_react_agent
from langgraph.checkpoint.memory import InMemorySaverfrom langgraph.types import interruptfrom langgraph.prebuilt import create_react_agent# An example of a sensitive tool that requires human review / approvaldef book_hotel(hotel_name: str): \"\"\"Book a hotel\"\"\" response = interrupt( # (1)! f\"Trying to call `book_hotel` with args {{\'hotel_name\': {hotel_name}}}. \" \"Please approve or suggest edits.\" ) if response[\"type\"] == \"accept\": pass elif response[\"type\"] == \"edit\": hotel_name = response[\"args\"][\"hotel_name\"] else: raise ValueError(f\"Unknown response type: {response[\'type\']}\") return f\"Successfully booked a stay at {hotel_name}.\"checkpointer = InMemorySaver() # (2)!agent = create_react_agent( model=\"anthropic:claude-3-5-sonnet-latest\", tools=[book_hotel], checkpointer=checkpointer, # (3)!)1、interrupt函数用于在特定节点暂停智能体图。
在本例中,我们在工具函数开头调用interrupt(),这会使图在执行工具的节点处暂停。
interrupt()内的信息(如工具调用)可以呈现给人类操作员,随后通过用户输入(工具调用批准、编辑或反馈)来恢复图的执行。
2、InMemorySaver用于在工具调用循环的每一步存储智能体状态。这实现了 短期记忆 和 人机协同 功能。
本示例中,我们使用InMemorySaver将智能体状态存储在内存中。在生产环境中,智能体状态应存储在数据库中。
3、使用checkpointer初始化智能体。
通过stream()方法运行智能体,并传入config对象指定线程ID。这使得智能体在后续调用中可以恢复同一会话。
config = { \"configurable\": { \"thread_id\": \"1\" }}for chunk in agent.stream( {\"messages\": [{\"role\": \"user\", \"content\": \"book a stay at McKittrick hotel\"}]}, config): print(chunk) print(\"\\n\")你会看到代理程序一直运行,直到遇到 interrupt() 调用时暂停,等待人工输入。
通过发送 Command(resume=...) 指令可基于人工输入恢复代理程序的运行。
API 参考文档:Command
from langgraph.types import Commandfor chunk in agent.stream( Command(resume={\"type\": \"accept\"}), # (1)! # Command(resume={\"type\": \"edit\", \"args\": {\"hotel_name\": \"McKittrick Hotel\"}}), config): print(chunk) print(\"\\n\")1、interrupt函数与Command对象配合使用,用于在人工提供值后恢复图的执行。
注意:
- 保留了所有代码块和链接的原始格式
- 移除了HTML标签及属性
- 将被动语态转换为主动语态
- 保持了技术术语的一致性
- 压缩了多余的空白行
与Agent Inbox 配合使用
你可以创建一个包装器来为任何工具添加中断功能。
以下示例提供了一个兼容 Agent Inbox UI和 Agent Chat UI的参考实现。
该包装器能为任何工具添加人工干预功能
from typing import Callablefrom langchain_core.tools import BaseTool, tool as create_toolfrom langchain_core.runnables import RunnableConfigfrom langgraph.types import interrupt from langgraph.prebuilt.interrupt import HumanInterruptConfig, HumanInterruptdef add_human_in_the_loop( tool: Callable | BaseTool, *, interrupt_config: HumanInterruptConfig = None,) -> BaseTool: \"\"\"Wrap a tool to support human-in-the-loop review.\"\"\" if not isinstance(tool, BaseTool): tool = create_tool(tool) if interrupt_config is None: interrupt_config = { \"allow_accept\": True, \"allow_edit\": True, \"allow_respond\": True, } @create_tool( # (1)! tool.name, description=tool.description, args_schema=tool.args_schema ) def call_tool_with_interrupt(config: RunnableConfig, **tool_input): request: HumanInterrupt = { \"action_request\": { \"action\": tool.name, \"args\": tool_input }, \"config\": interrupt_config, \"description\": \"Please review the tool call\" } response = interrupt([request])[0] # (2)! # approve the tool call if response[\"type\"] == \"accept\": tool_response = tool.invoke(tool_input, config) # update tool call args elif response[\"type\"] == \"edit\": tool_input = response[\"args\"][\"args\"] tool_response = tool.invoke(tool_input, config) # respond to the LLM with user feedback elif response[\"type\"] == \"response\": user_feedback = response[\"args\"] tool_response = user_feedback else: raise ValueError(f\"Unsupported interrupt response type: {response[\'type\']}\") return tool_responsereturn call_tool_with_interrupt1、该包装器会创建一个新工具,在执行被包装的工具之前调用 interrupt()。
2、interrupt() 使用了 Agent Inbox UI 预期的特殊输入输出格式:
- 会向
AgentInbox发送一个HumanInterrupt对象列表,用于向终端用户渲染中断Info : * 恢复值由AgentInbox以列表形式提供(即Command(resume=[...]))
您可以使用 add_human_in_the_loop 包装器将 interrupt() 添加到任何工具中,而无需将其添加到工具内部:
API 参考:InMemorySaver | create_react_agent
from langgraph.checkpoint.memory import InMemorySaverfrom langgraph.prebuilt import create_react_agentcheckpointer = InMemorySaver()def book_hotel(hotel_name: str): \"\"\"Book a hotel\"\"\" return f\"Successfully booked a stay at {hotel_name}.\"agent = create_react_agent( model=\"anthropic:claude-3-5-sonnet-latest\", tools=[ add_human_in_the_loop(book_hotel), # (1)! ], checkpointer=checkpointer,)config = {\"configurable\": {\"thread_id\": \"1\"}}# Run the agentfor chunk in agent.stream( {\"messages\": [{\"role\": \"user\", \"content\": \"book a stay at McKittrick hotel\"}]}, config): print(chunk) print(\"\\n\")1、add_human_in_the_loop 包装器用于为工具添加 interrupt() 功能。这使得智能体能够暂停执行,在继续工具调用前等待人工输入。
你会看到智能体运行至 interrupt() 调用点时暂停,
此时它将等待人工输入。
通过发送 Command(resume=...) 指令来根据人工输入恢复智能体运行。
API参考文档:Command
from langgraph.types import Command for chunk in agent.stream( Command(resume=[{\"type\": \"accept\"}]), # Command(resume=[{\"type\": \"edit\", \"args\": {\"args\": {\"hotel_name\": \"McKittrick Hotel\"}}}]), config): print(chunk) print(\"\\n\")其他资源
- LangGraph 中的人机交互
多智能体系统
https://langchain-ai.github.io/langgraph/agents/multi-agent/
当单个智能体需要专注于多个领域或管理大量工具时,可能会力不从心。
为解决这个问题,您可以将智能体拆分为多个独立的小型智能体,并将它们组合成一个多智能体系统。
在多智能体系统中,智能体之间需要进行通信。它们通过 控制权移交机制 实现交互 —— 这是一种基础协议,用于指定将控制权 移交给哪个智能体 以及传递给该智能体的数据负载。
目前最流行的两种多智能体架构是:
- 监督者模式 —— 由中央监督者智能体协调各个子智能体。监督者控制所有通信流和任务分配,根据当前上下文和任务需求决定调用哪个智能体。
- 群体模式 —— 智能体根据各自专长动态地将控制权移交给其他智能体。系统会记忆最后活跃的智能体,确保在后续交互中能继续与该智能体对话。
监督者
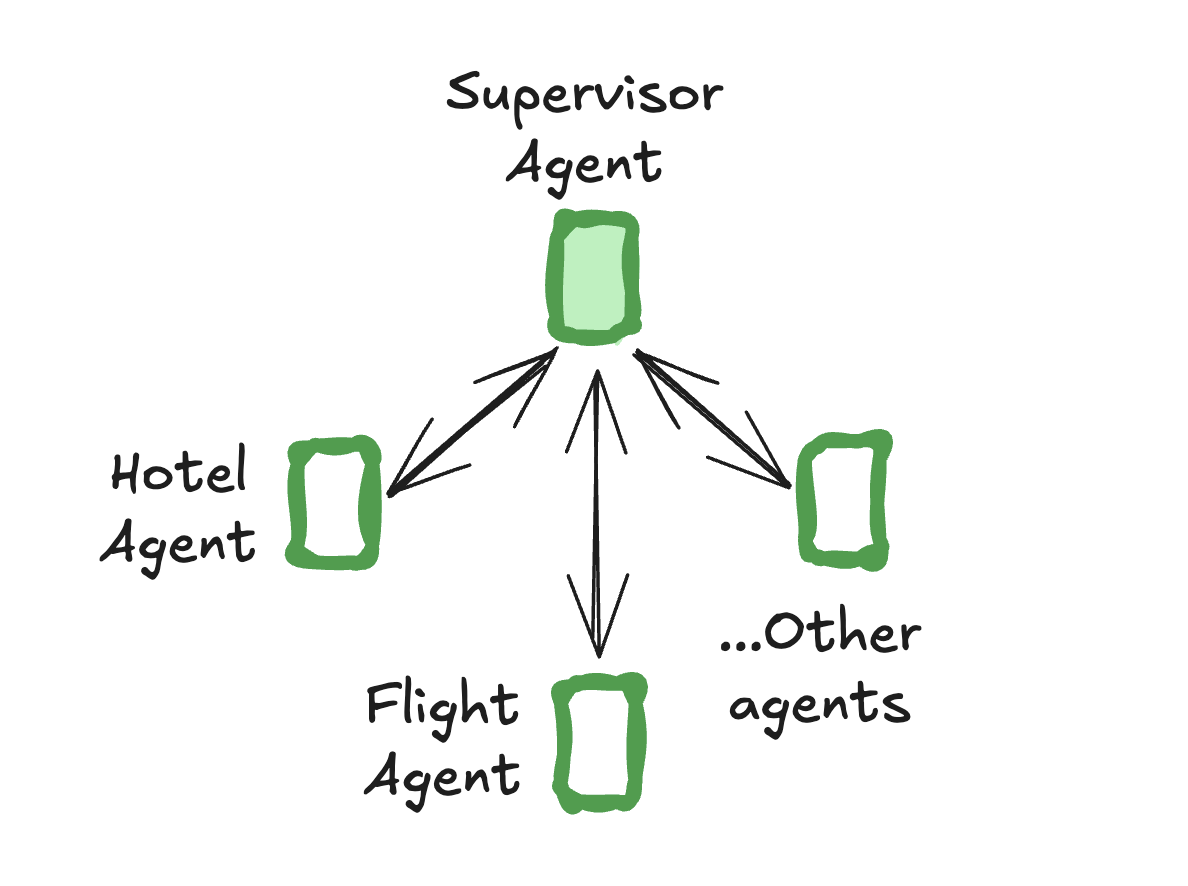
使用 langgraph-supervisor 库来创建一个监督者多智能体系统:
pip install langgraph-supervisorAPI 参考文档: ChatOpenAI | create_react_agent | create_supervisor
from langchain_openai import ChatOpenAIfrom langgraph.prebuilt import create_react_agentfrom langgraph_supervisor import create_supervisordef book_hotel(hotel_name: str): \"\"\"Book a hotel\"\"\" return f\"Successfully booked a stay at {hotel_name}.\"def book_flight(from_airport: str, to_airport: str): \"\"\"Book a flight\"\"\" return f\"Successfully booked a flight from {from_airport} to {to_airport}.\"flight_assistant = create_react_agent( model=\"openai:gpt-4o\", tools=[book_flight], prompt=\"You are a flight booking assistant\", name=\"flight_assistant\")hotel_assistant = create_react_agent( model=\"openai:gpt-4o\", tools=[book_hotel], prompt=\"You are a hotel booking assistant\", name=\"hotel_assistant\")supervisor = create_supervisor( agents=[flight_assistant, hotel_assistant], model=ChatOpenAI(model=\"gpt-4o\"), prompt=( \"You manage a hotel booking assistant and a\" \"flight booking assistant. Assign work to them.\" )).compile()for chunk in supervisor.stream( { \"messages\": [ { \"role\": \"user\", \"content\": \"book a flight from BOS to JFK and a stay at McKittrick Hotel\" } ] }): print(chunk) print(\"\\n\")集群
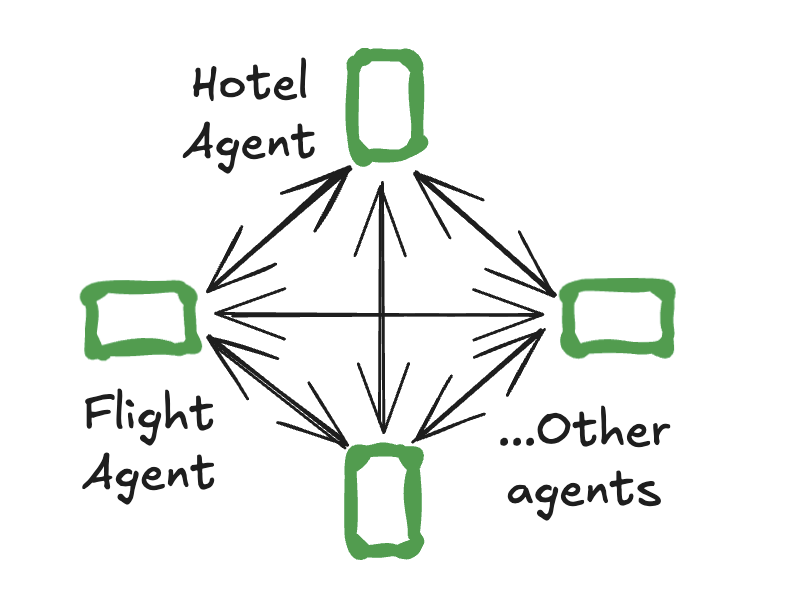
使用 langgraph-swarm 库来创建一个集群多智能体系统:
pip install langgraph-swarmAPI参考文档:create_react_agent | create_swarm | create_handoff_tool
from langgraph.prebuilt import create_react_agentfrom langgraph_swarm import create_swarm, create_handoff_tooltransfer_to_hotel_assistant = create_handoff_tool( agent_name=\"hotel_assistant\", description=\"Transfer user to the hotel-booking assistant.\",)transfer_to_flight_assistant = create_handoff_tool( agent_name=\"flight_assistant\", description=\"Transfer user to the flight-booking assistant.\",)flight_assistant = create_react_agent( model=\"anthropic:claude-3-5-sonnet-latest\", tools=[book_flight, transfer_to_hotel_assistant], prompt=\"You are a flight booking assistant\", name=\"flight_assistant\")hotel_assistant = create_react_agent( model=\"anthropic:claude-3-5-sonnet-latest\", tools=[book_hotel, transfer_to_flight_assistant], prompt=\"You are a hotel booking assistant\", name=\"hotel_assistant\")swarm = create_swarm( agents=[flight_assistant, hotel_assistant], default_active_agent=\"flight_assistant\").compile()for chunk in swarm.stream( { \"messages\": [ { \"role\": \"user\", \"content\": \"book a flight from BOS to JFK and a stay at McKittrick Hotel\" } ] }): print(chunk) print(\"\\n\")交接机制
在多智能体交互中,交接是一种常见模式,即一个智能体将控制权移交给另一个智能体。通过交接机制可以指定:
- 目标对象:要交接的目标智能体
- 传递内容:需要传递给该智能体的Info : 该机制既被
langgraph-supervisor使用(监督者将控制权移交给单个智能体),也被langgraph-swarm使用(单个智能体可将控制权移交给其他智能体)。
要在create_react_agent中实现交接机制,你需要:
1、创建一个能将控制权转移给其他智能体的特殊工具
def transfer_to_bob(): \"\"\"Transfer to bob.\"\"\" return Command( # name of the agent (node) to go to goto=\"bob\", # data to send to the agent update={\"messages\": [...]}, # indicate to LangGraph that we need to navigate to # agent node in a parent graph graph=Command.PARENT, )2、创建可访问交接工具的独立代理:
flight_assistant = create_react_agent( ..., tools=[book_flight, transfer_to_hotel_assistant])hotel_assistant = create_react_agent( ..., tools=[book_hotel, transfer_to_flight_assistant])3、定义一个包含独立智能体作为节点的父图:
from langgraph.graph import StateGraph, MessagesStatemulti_agent_graph = ( StateGraph(MessagesState) .add_node(flight_assistant) .add_node(hotel_assistant) ...)综合以上内容,以下是实现一个简单多代理系统的方法,该系统包含两个代理——航班预订助手和酒店预订助手:
API参考文档:tool | InjectedToolCallId | create_react_agent | InjectedState | StateGraph | START | Command
from typing import Annotatedfrom langchain_core.tools import tool, InjectedToolCallIdfrom langgraph.prebuilt import create_react_agent, InjectedStatefrom langgraph.graph import StateGraph, START, MessagesStatefrom langgraph.types import Commanddef create_handoff_tool(*, agent_name: str, description: str | None = None): name = f\"transfer_to_{agent_name}\" description = description or f\"Transfer to {agent_name}\"@tool(name, description=description) def handoff_tool( state: Annotated[MessagesState, InjectedState], # (1)! tool_call_id: Annotated[str, InjectedToolCallId], ) -> Command: tool_message = { \"role\": \"tool\", \"content\": f\"Successfully transferred to {agent_name}\", \"name\": name, \"tool_call_id\": tool_call_id, } return Command( # (2)! goto=agent_name, # (3)! update={\"messages\": state[\"messages\"] + [tool_message]}, # (4)! graph=Command.PARENT, # (5)! ) return handoff_tool# Handoffstransfer_to_hotel_assistant = create_handoff_tool( agent_name=\"hotel_assistant\", description=\"Transfer user to the hotel-booking assistant.\",)transfer_to_flight_assistant = create_handoff_tool( agent_name=\"flight_assistant\", description=\"Transfer user to the flight-booking assistant.\",)# Simple agent toolsdef book_hotel(hotel_name: str): \"\"\"Book a hotel\"\"\" return f\"Successfully booked a stay at {hotel_name}.\"def book_flight(from_airport: str, to_airport: str): \"\"\"Book a flight\"\"\" return f\"Successfully booked a flight from {from_airport} to {to_airport}.\"# Define agentsflight_assistant = create_react_agent( model=\"anthropic:claude-3-5-sonnet-latest\", tools=[book_flight, transfer_to_hotel_assistant], prompt=\"You are a flight booking assistant\", name=\"flight_assistant\")hotel_assistant = create_react_agent( model=\"anthropic:claude-3-5-sonnet-latest\", tools=[book_hotel, transfer_to_flight_assistant], prompt=\"You are a hotel booking assistant\", name=\"hotel_assistant\")# Define multi-agent graphmulti_agent_graph = ( StateGraph(MessagesState) .add_node(flight_assistant) .add_node(hotel_assistant) .add_edge(START, \"flight_assistant\") .compile())# Run the multi-agent graphfor chunk in multi_agent_graph.stream( { \"messages\": [ { \"role\": \"user\", \"content\": \"book a flight from BOS to JFK and a stay at McKittrick Hotel\" } ] }): print(chunk) print(\"\\n\")1、访问代理状态
2、Command原语允许将状态更新和节点转移作为单一操作指定,非常适合实现交接功能。
3、要交接的目标代理或节点名称。
4、在交接过程中,获取代理的消息并将其添加到父级状态中。下一个代理将看到父级状态。
5、向LangGraph表明我们需要导航到父级多代理图中的代理节点。
注意:此交接实现基于以下假设:
- 多代理系统中每个代理接收全局消息历史记录(跨所有代理)作为输入
- 每个代理将其内部消息历史记录输出到多代理系统的全局消息历史中
查看LangGraph的监督器和集群文档,了解如何自定义交接功能。
评估
https://langchain-ai.github.io/langgraph/agents/evals/
要评估智能体的性能,你可以使用LangSmith的评估功能。
首先需要定义一个评估函数来评判智能体的结果,例如最终输出或执行轨迹。
根据评估技术的不同,这个过程可能涉及也可能不涉及参考输出:
def evaluator(*, outputs: dict, reference_outputs: dict): # compare agent outputs against reference outputs output_messages = outputs[\"messages\"] reference_messages = reference[\"messages\"] score = compare_messages(output_messages, reference_messages) return {\"key\": \"evaluator_score\", \"score\": score}要开始使用,你可以使用 AgentEvals 包中预置的评估器:
pip install -U agentevals创建评估器
评估智能体性能的常见方法是通过将其轨迹(调用工具的顺序)与参考轨迹进行对比来实现。
import jsonfrom agentevals.trajectory.match import create_trajectory_match_evaluatoroutputs = [ { \"role\": \"assistant\", \"tool_calls\": [ { \"function\": { \"name\": \"get_weather\", \"arguments\": json.dumps({\"city\": \"san francisco\"}), } }, { \"function\": { \"name\": \"get_directions\", \"arguments\": json.dumps({\"destination\": \"presidio\"}), } } ], }]reference_outputs = [ { \"role\": \"assistant\", \"tool_calls\": [ { \"function\": { \"name\": \"get_weather\", \"arguments\": json.dumps({\"city\": \"san francisco\"}), } }, ], }]# Create the evaluatorevaluator = create_trajectory_match_evaluator( trajectory_match_mode=\"superset\", # (1)!)# Run the evaluatorresult = evaluator( outputs=outputs, reference_outputs=reference_outputs)1、指定轨迹比较方式。superset模式会接受输出轨迹作为有效结果,只要它是参考轨迹的超集。
其他可选模式包括:strict(严格匹配)、unordered(无序匹配)以及subset(子集匹配)。
下一步,了解更多关于如何自定义轨迹匹配评估器的信息。
LLM 作为评判者
你可以使用 LLM 作为评判者的评估器,它利用大语言模型(LLM)将实际轨迹与参考输出进行对比,并输出一个评分:
import jsonfrom agentevals.trajectory.llm import ( create_trajectory_llm_as_judge, TRAJECTORY_ACCURACY_PROMPT_WITH_REFERENCE)evaluator = create_trajectory_llm_as_judge( prompt=TRAJECTORY_ACCURACY_PROMPT_WITH_REFERENCE, model=\"openai:o3-mini\")运行评估器
要运行评估器,首先需要创建一个 LangSmith 数据集。若使用预构建的 AgentEvals 评估器,数据集需符合以下结构:
- input:
{\"messages\": [...]}调用 agent 时输入的 messages 数组 - output:
{\"messages\": [...]}agent 输出中预期的 message 历史记录。进行轨迹评估时,可仅保留 assistant 类型的 messages
API 参考文档: create_react_agent
from langsmith import Clientfrom langgraph.prebuilt import create_react_agentfrom agentevals.trajectory.match import create_trajectory_match_evaluatorclient = Client()agent = create_react_agent(...)evaluator = create_trajectory_match_evaluator(...)experiment_results = client.evaluate( lambda inputs: agent.invoke(inputs), # replace with your dataset name data=\"\", evaluators=[evaluator])部署指南
https://langchain-ai.github.io/langgraph/agents/deployment/
要部署您的LangGraph智能体,需要创建并配置一个LangGraph应用。该设置同时支持本地开发环境和生产环境部署。
主要功能:
- 🖥️ 本地开发服务器
- 🧩 Studio可视化调试Web界面
- ☁️ 云端部署与🔧自主托管两种选项
- 📊 LangSmith集成(用于调用链追踪和可观测性)
系统要求:
- ✅ 必须拥有LangSmith账户。您可以免费注册并使用基础免费套餐。
创建LangGraph应用
pip install -U \"langgraph-cli[inmem]\"langgraph new path/to/your/app --template new-langgraph-project-python这将创建一个空的LangGraph项目。您可以通过将src/agent/graph.py中的代码替换为您的智能体代码来进行修改。例如:
API参考文档:create_react_agent
from langgraph.prebuilt import create_react_agentdef get_weather(city: str) -> str: \"\"\"Get weather for a given city.\"\"\" return f\"It\'s always sunny in {city}!\"graph = create_react_agent( model=\"anthropic:claude-3-7-sonnet-latest\", tools=[get_weather], prompt=\"You are a helpful assistant\")安装依赖
在新建的LangGraph应用根目录下,以edit模式安装依赖项,这样服务器就会使用你的本地修改:
pip install -e .创建 .env 文件
你会在新建的 LangGraph 应用根目录下找到一个 .env.example 文件。
请在应用根目录下创建一个 .env 文件,并将 .env.example 文件的内容复制到其中,填写必要的 API 密钥:
LANGSMITH_API_KEY=lsv2...ANTHROPIC_API_KEY=sk-本地启动LangGraph服务器
langgraph dev这将在本地启动LangGraph API服务器。如果运行成功,你会看到类似以下输出:
准备就绪!
- API地址: http://localhost:2024
- 文档: http://localhost:2024/docs
- LangGraph Studio网页界面: https://smith.langchain.com/studio/?baseUrl=http://127.0.0.1:2024
查看这篇教程了解更多关于本地运行LangGraph应用的信息。
LangGraph Studio 网页界面
LangGraph Studio Web 是一个专用用户界面,可连接至 LangGraph API 服务器,实现本地应用程序的可视化、交互和调试功能。通过在 langgraph dev 命令输出中提供的 URL 访问 LangGraph Studio 网页界面,即可测试您的流程图。
- LangGraph Studio 网页界面:https://smith.langchain.com/studio/?baseUrl=http://127.0.0.1:2024
部署
当您的 LangGraph 应用在本地运行后,即可通过 LangGraph 平台进行部署。有关所有支持部署模式的详细说明,请参阅部署选项指南。
UI 用户界面
https://langchain-ai.github.io/langgraph/agents/ui/
您可以使用预构建的聊天界面Agent Chat UI来与任何LangGraph智能体进行交互。通过已部署版本是最快捷的入门方式,该界面支持您与本地和已部署的图结构进行交互。
在 UI 中运行代理
首先,在本地设置 LangGraph API 服务器,或将您的代理部署到 LangGraph 平台。
然后,访问 Agent Chat UI,或克隆仓库并在本地运行开发服务器:
提示:该 UI 开箱即用支持渲染工具调用和工具结果消息。如需自定义显示哪些消息,请参阅 Agent Chat UI 文档中的隐藏聊天消息部分。
添加人工介入循环
Agent Chat UI 全面支持人工介入循环工作流。要体验该功能,请将src/agent/graph.py中的代理代码(来自部署指南)替换为这个代理实现:
重要提示:当您的LangGraph代理使用HumanInterrupt模式 进行中断时,Agent Chat UI能发挥最佳效果。
如果不使用该模式,虽然Agent Chat UI仍能渲染传递给interrupt函数的输入,但将无法完整支持恢复执行图的功能。
生成式 UI
您也可以在 Agent Chat UI 中使用生成式 UI。
生成式 UI 允许您定义 React 组件,并通过 LangGraph 服务器将其推送到用户界面。有关构建生成式 UI LangGraph 代理的更多文档,请阅读 这些文档。
2025-05-18(日)


