实战使用Docker compose搭建Redis哨兵(Sentinel)模式集群_docker compose sentinel
文章目录
前言
Redis 是一个高性能的键值存储系统,常用于缓存、消息队列等场景。为了保证高可用性,Redis 提供了哨兵模式(Sentinel)来实现主从切换和故障转移。本文将介绍如何使用 docker-compose 快速搭建 Redis 主从 + 哨兵集群环境。

技术积累
什么是Redis的哨兵模式
Redis的哨兵模式,就是在主从模式的基础上,额外部署若干独立的哨兵进程,通过哨兵进程去监视者Redis主从节点的状态,一旦发现主节点宕机,则哨兵可以重新从剩余slave节点中推选一个新的节点并将其升级为master节点,以此保证整个系统功能可以正常使用。
哨兵的三个任务
哨兵负责三个任务:监控,选主和通知。
- 监控:监控是指哨兵进程运行时,周期性(默认1秒)给所有主从节点发送 PING 命令,当主从节点收到 PING 命令后,会发送一个响应命令给哨兵,这样就可以检测他们是否仍然在线运行。
- 从库没有在规定时间内响应哨兵的PING命令,哨兵就会把它标记为\"下线状态\";
- 主库没有在规定时间呢响应哨兵的PING命令,哨兵就会判定主库下线启动选主流程。
- 选主:哨兵在主库挂了以后,按照一定规则从从库中选出作为新的主库。
- 通知:哨兵将选出的新主库连接信息发给其他从库,从库和新主库建立连接,执行replicaof命令,复制数据。同时,哨兵会把新主库的连接信息通知给客户端,让它们将操作请求发送给新主库上。
哨兵选主流程
哨兵机制具体步骤如下:
1、哨兵集群第一轮投票:判断主节点客观下线;
2、哨兵集群第二轮投票:选出哨兵leader,决定由哪个哨兵执行主从切换;
3、由哨兵 leader 进行选主;
4、由哨兵 leader 进行通知,实现主从故障转移。
哨兵模式存在的问题
在主从复制的基础上,哨兵引入了主节点的自动故障转移,进一步提高了Redis的高可用性;但是哨兵的缺陷同样很明显:
1、哨兵无法对从节点进行自动故障转移,在读写分离场景下,从节点故障会导致读服务不可用;
2、哨兵仍然没有解决写操作无法负载均衡、存储能力受到单机限制的问题,如果需要解决这些问题就是使用Redis Cluster集群。
实战演示
部署环境
Redis哨兵模式,一主二从三哨兵
Redis主节点(6379)
Redis从节点1(6380)
Redis从节点2(6381)
Redis哨兵1(26379)
Redis哨兵2(26380)
Redis哨兵3(26381)
创建目录

编写Redis配置文件
- redis-master
# 主节点配置# 绑定的主机地址bind 0.0.0.0# 允许外网访问protected-mode no# 启用守护进程后,Redis会把pid写到一个pidfile中,在/var/run/redis.piddaemonize no# 当Redis以守护进程方式运行时,Redis默认会把pid写入/var/run/redis.pid文件,可以通过pidfile指定pidfile /var/run/redis.pid# 指定Redis监听端口,默认端口为6379# 如果指定0端口,表示Redis不监听TCP连接port 6379# 当客户端闲置多长时间后关闭连接,如果指定为0,表示关闭该功能timeout 0# 指定日志记录级别,Redis总共支持四个级别:debug、verbose、notice、warning,默认为verbose# debug (很多信息, 对开发/测试比较有用)# verbose (many rarely useful info, but not a mess like the debug level)# notice (moderately verbose, what you want in production probably)# warning (only very important / critical messages are logged)loglevel verbose# 日志记录方式,默认为标准输出,如果配置为redis为守护进程方式运行,而这里又配置为标准输出,则日志将会发送给/dev/nulllogfile redis.log################################ SNAPSHOTTING ################################## RDB存储配置# 指定在多长时间内,有多少次更新操作,就将数据同步到数据文件,可以多个条件配合# Save the DB on disk:## save ## Will save the DB if both the given number of seconds and the given# number of write operations against the DB occurred.## 满足以下条件将会同步数据:# 900秒(15分钟)内有1个更改# 300秒(5分钟)内有10个更改# 60秒内有10000个更改# Note: 可以把所有“save”行注释掉,这样就取消同步操作了save 900 1save 300 10save 60 10000# 指定存储至本地数据库时是否压缩数据,默认为yes,Redis采用LZF压缩,如果为了节省CPU时间,可以关闭该选项,但会导致数据库文件变的巨大rdbcompression yes# 指定本地数据库文件名,默认值为dump.rdbdbfilename dump.rdb# 指定本地数据库存放目录,文件名由上一个dbfilename配置项指定dir /data################################# REPLICATION ################################################################### SECURITY #################################### 设置密码requirepass 123456789############################## APPEND ONLY MODE ################################ 开启aof配置appendonly yes# 指定更新日志条件,共有3个可选值:# no:表示等操作系统进行数据缓存同步到磁盘(快)# always:表示每次更新操作后手动调用fsync()将数据写到磁盘(慢,安全)# everysec:表示每秒同步一次(折衷,默认值)appendfsync everysec# 指定更新日志文件名,默认为appendonly.aofappendfilename \"appendonly.aof\"- redis-slave1
# 从节点配置# 绑定的主机地址bind 0.0.0.0# 允许外网访问protected-mode no# 启用守护进程后,Redis会把pid写到一个pidfile中,在/var/run/redis.piddaemonize no# 当Redis以守护进程方式运行时,Redis默认会把pid写入/var/run/redis.pid文件,可以通过pidfile指定pidfile /var/run/redis.pid# 指定Redis监听端口,默认端口为6379# 如果指定0端口,表示Redis不监听TCP连接port 6379# 当客户端闲置多长时间后关闭连接,如果指定为0,表示关闭该功能timeout 0# 指定日志记录级别,Redis总共支持四个级别:debug、verbose、notice、warning,默认为verbose# debug (很多信息, 对开发/测试比较有用)# verbose (many rarely useful info, but not a mess like the debug level)# notice (moderately verbose, what you want in production probably)# warning (only very important / critical messages are logged)loglevel verbose# 日志记录方式,默认为标准输出,如果配置为redis为守护进程方式运行,而这里又配置为标准输出,则日志将会发送给/dev/nulllogfile redis.log################################ SNAPSHOTTING ################################## RDB存储配置# 指定在多长时间内,有多少次更新操作,就将数据同步到数据文件,可以多个条件配合# Save the DB on disk:## save ## Will save the DB if both the given number of seconds and the given# number of write operations against the DB occurred.## 满足以下条件将会同步数据:# 900秒(15分钟)内有1个更改# 300秒(5分钟)内有10个更改# 60秒内有10000个更改# Note: 可以把所有“save”行注释掉,这样就取消同步操作了save 900 1save 300 10save 60 10000# 指定存储至本地数据库时是否压缩数据,默认为yes,Redis采用LZF压缩,如果为了节省CPU时间,可以关闭该选项,但会导致数据库文件变的巨大rdbcompression yes# 指定本地数据库文件名,默认值为dump.rdbdbfilename dump.rdb# 指定本地数据库存放目录,文件名由上一个dbfilename配置项指定dir /data################################# REPLICATION ################################## 设置当本机为slav服务时,设置master服务的ip地址及端口,在Redis启动时,它会自动从master进行数据同步replicaof redis-master 6379# 开启只读模式replica-read-only yes# 当master服务设置了密码保护时,slav服务连接master的密码masterauth 123456789repl-diskless-load on-empty-db################################## SECURITY #################################### 设置密码requirepass 123456789############################## APPEND ONLY MODE ################################ 开启aof配置appendonly yes# 指定更新日志条件,共有3个可选值:# no:表示等操作系统进行数据缓存同步到磁盘(快)# always:表示每次更新操作后手动调用fsync()将数据写到磁盘(慢,安全)# everysec:表示每秒同步一次(折衷,默认值)appendfsync everysec# 指定更新日志文件名,默认为appendonly.aofappendfilename \"appendonly.aof\"- redis-slave2 与slave1一致即可
编写哨兵配置文件
- reids-sentinel1.conf
# 服务端口port 26379# 可访问IPbind 0.0.0.0# By default Redis Sentinel does not run as a daemon. Use \'yes\' if you need it.daemonize no# When running daemonized, Redis Sentinel writes a pid file in# /var/run/redis-sentinel.pid by default. You can specify a custom pid file# location here.pidfile /var/run/redis-sentinel.pid# Specify the log file name. Also the empty string can be used to force# Sentinel to log on the standard output. Note that if you use standardlogfile \"sentinel.log\"# dir dir /tmp# 监控的主机(格式为 sentinel monitor 主机名 主机ip 主机端口 多少个哨兵节点都认为主节点不可达时才会进行故障转移的数量)sentinel monitor redis-master 172.16.8.212 6379 2# 监控的主机密码(格式为 sentinel auth-pass 主机名 主机连接密码)sentinel auth-pass redis-master 123456789# 指定在多少毫秒内,哨兵节点没有收到主节点的响应时,就会将主节点判定为下线状态(格式为 sentinel down-after-milliseconds >主机名 超时毫秒数)sentinel down-after-milliseconds redis-master 30000# ACL LOGacllog-max-len 128# 指定在进行故障转移时可以同时同步的从节点数量(格式为 sentinel parallel-syncs 主机名 主机连接密码)sentinel parallel-syncs redis-master 1# 指定进行故障转移的超时时间,即在多少毫秒内完成故障转移操作(格式为 sentinel failover-timeout 主机名 主机连接密码)sentinel failover-timeout redis-master 180000# SECURITY# By default SENTINEL SET will not be able to change the notification-script# and client-reconfig-script at runtime. This avoids a trivial security issue# where clients can set the script to anything and trigger a failover in order# to get the program executed.sentinel deny-scripts-reconfig yes# You may enable hostnames support by enabling resolve-hostnames. Note# that you must make sure your DNS is configured properly and that DNS# resolution does not introduce very long delays.SENTINEL resolve-hostnames no# When resolve-hostnames is enabled, Sentinel still uses IP addresses# when exposing instances to users, configuration files, etc. If you want# to retain the hostnames when announced, enable announce-hostnames below.SENTINEL announce-hostnames no- redis-sentinel2.conf 复制一份sentinel1
- redis-sentinel3.conf 复制一份sentinel1
编写Docker-Compose.yml
version: \'3.8\'services: redis-master: image: redis:6-alpine container_name: redis-master environment: - \"TZ=Asia/Shanghai\" ports: - \"6379:6379\" volumes: - ./redis-master/conf/redis.conf:/usr/local/etc/redis/redis.conf - ./redis-master/data:/data - ./redis-master/logs:/logs command: redis-server /usr/local/etc/redis/redis.conf networks: - redis-sentinel redis-slave1: image: redis:6-alpine container_name: redis-slave1 environment: - \"TZ=Asia/Shanghai\" ports: - \"6380:6379\" volumes: - ./redis-slave1/conf/redis.conf:/usr/local/etc/redis/redis.conf - ./redis-slave1/data:/data - ./redis-slave1/logs:/logs command: redis-server /usr/local/etc/redis/redis.conf depends_on: - redis-master networks: - redis-sentinel redis-slave2: image: redis:6-alpine container_name: redis-slave2 environment: - \"TZ=Asia/Shanghai\" ports: - \"6381:6379\" volumes: - ./redis-slave2/conf/redis.conf:/usr/local/etc/redis/redis.conf - ./redis-slave2/data:/data - ./redis-slave2/logs:/logs command: redis-server /usr/local/etc/redis/redis.conf depends_on: - redis-master networks: - redis-sentinel redis-sentinel1: image: redis:6-alpine container_name: redis-sentinel1 environment: - \"TZ=Asia/Shanghai\" ports: - \'26379:26379\' volumes: - ./redis-sentinel1/data:/data - ./redis-sentinel1/conf/sentinel.conf:/usr/local/etc/redis/sentinel.conf - ./redis-sentinel1/logs:/logs command: redis-sentinel /usr/local/etc/redis/sentinel.conf depends_on: - redis-master - redis-slave1 - redis-slave2 networks: - redis-sentinel redis-sentinel2: image: redis:6-alpine container_name: redis-sentinel2 environment: - \"TZ=Asia/Shanghai\" ports: - \'26380:26379\' volumes: - ./redis-sentinel2/data:/data - ./redis-sentinel2/conf/sentinel.conf:/usr/local/etc/redis/sentinel.conf - ./redis-sentinel2/logs:/logs command: redis-sentinel /usr/local/etc/redis/sentinel.conf depends_on: - redis-master - redis-slave1 - redis-slave2 networks: - redis-sentinel redis-sentinel3: image: redis:6-alpine container_name: redis-sentinel3 environment: - \"TZ=Asia/Shanghai\" ports: - \'26381:26379\' volumes: - ./redis-sentinel3/data:/data - ./redis-sentinel3/conf/sentinel.conf:/usr/local/etc/redis/sentinel.conf - ./redis-sentinel3/logs:/logs command: redis-sentinel /usr/local/etc/redis/sentinel.conf depends_on: - redis-master - redis-slave1 - redis-slave2 networks: - redis-sentinel networks: redis-sentinel: driver: bridge启动Redis Sentinel容器
执行yml文件
docker-compose -f docker-compose.yaml up -d
查看容器状态
docker ps -a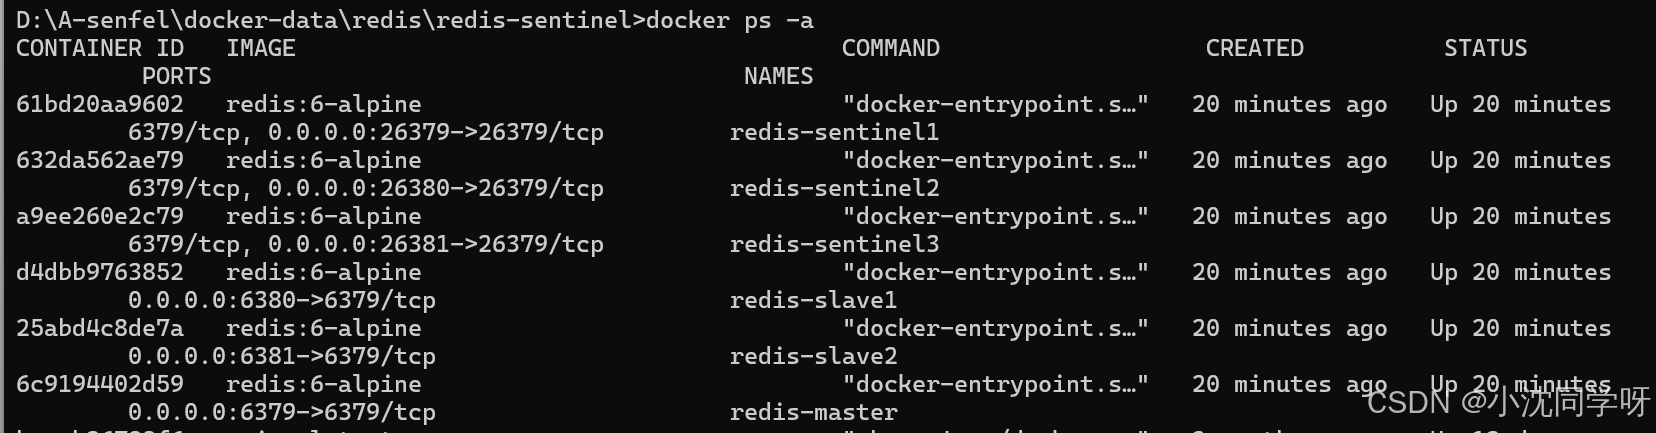
可以看到所有容器都已经成功启动了
查看Redis各个角色状态
- info replication 查看Redis节点信息
- info sentinel 查看Redis哨兵信息
查看主节点信息
docker exec -it redis-master redis-cli -h 127.0.0.1 -p 6379 -a 123456789 info replication
列出了其两个从节点信息
查看从节点信息
docker exec -it redis-slave1 redis-cli -h 127.0.0.1 -p 6379 -a 123456789 info replication
可以看到当前从节点信息
查看哨兵的信息
进入sentinel容器查看
docker exec -it redis-sentinel1 redis-cli -h 127.0.0.1 -p 26379 info sentinel
可以看到主节点信息、状态和Redis的配置详情(两个从节点,三个哨兵)
主从复制验证
写入数据到主节点
docker exec -it redis-master redis-cli -h 127.0.0.1 -p 6379 -a 123456789 SET name \"test_senfel_data\"主节点读取数据查看是否设置成功
docker exec -it redis-master redis-cli -h 127.0.0.1 -p 6379 -a 123456789 GET name从节点1读取数据,查看是否同步
docker exec -it redis-slave1 redis-cli -h 127.0.0.1 -p 6379 -a 123456789 GET name从节点2读取数据,查看是否同步
docker exec -it redis-slave2 redis-cli -h 127.0.0.1 -p 6379 -a 123456789 GET name
验证sentinel自动故障转移
1、查看当前主节点
docker exec -it redis-sentinel1 redis-cli -h 127.0.0.1 -p 26379 info sentinel# Sentinelsentinel_masters:1sentinel_tilt:0sentinel_running_scripts:0sentinel_scripts_queue_length:0sentinel_simulate_failure_flags:0master0:name=redis-master,status=ok,address=172.16.8.212:6379,slaves=2,sentinels=3主节点是 redis-master
2、停止主节点
docker stop redis-master D:\\A-senfel\\docker-data\\redis\\redis-sentinel>docker stop redis-masterredis-master3、查看是否故障转移,是否选除了主节点
docker exec -it redis-sentinel1 redis-cli -h 127.0.0.1 -p 26379 info sentinel# Sentinelsentinel_masters:1sentinel_tilt:0sentinel_running_scripts:0sentinel_scripts_queue_length:0sentinel_simulate_failure_flags:0master0:name=redis-master,status=ok,address=172.20.0.3:6379,slaves=2,sentinels=3发现master地址已经变为了slave2的内网地址。
4、继续验证slave2角色
docker exec -it redis-slave2 redis-cli -h 127.0.0.1 -p 6379 -a 123456789 info replication
可以确定已经自动故障转移成功,master切换到slave2节点。
5、启动redis-master
docker start redis-masterD:\\A-senfel\\docker-data\\redis\\redis-sentinel>docker start redis-masterredis-master6、查看主节点是否加入集群且为从库角色
docker exec -it redis-master redis-cli -h 127.0.0.1 -p 6379 -a 123456789 info replication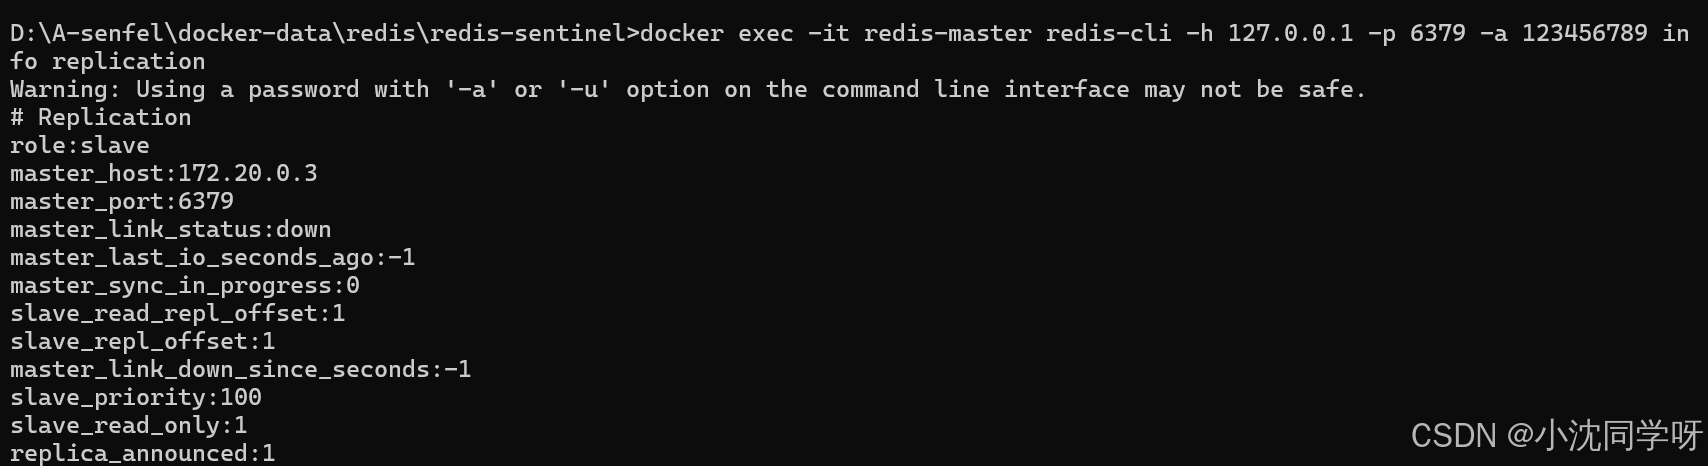
如上所述,重启后的库已将加入集群。
总结
通过 docker-compose 可以快速搭建 Redis 哨兵模式,适用于开发、测试及轻量级生产环境。该方案具备的优点是易于部署和维护、支持自动故障转移、数据多副本,提高可用性。但是哨兵无法对从节点进行自动故障转移,在读写分离场景下,从节点故障会导致读服务不可用,这就需要对从节点做额外的监控、切换操作。另外,哨兵仍然没有解决写操作无法负载均衡、存储能力受到单机限制的问题。如需进一步提升性能与稳定性,需要考虑使用 Redis Cluster 模式,这个我们下回分享,敬请鉴赏。


