Python 虚拟环境终极(含PyCharm图文教程)_pycharm虚拟环境
一、为什么需要虚拟环境?
二、虚拟环境创建方式对比
三、命令行创建虚拟环境(venv)
3.1 基础命令
# 创建环境, 当前目录路径创建python -m venv myenv# 激活环境# Windowsmyenv\\Scripts\\activate# macOS/Linuxsource myenv/bin/activate# 安装包pip install django==3.2# 退出环境deactivate3.2 环境管理
# 导出依赖pip freeze > requirements.txt# 复现环境pip install -r requirements.txt# 删除环境rm -rf myenv # 直接删除文件夹四、PyCharm创建虚拟环境流程
4.1 图文操作指南
#mermaid-svg-E357ViEKA8biGHge {font-family:\"trebuchet ms\",verdana,arial,sans-serif;font-size:16px;fill:#333;}#mermaid-svg-E357ViEKA8biGHge .error-icon{fill:#552222;}#mermaid-svg-E357ViEKA8biGHge .error-text{fill:#552222;stroke:#552222;}#mermaid-svg-E357ViEKA8biGHge .edge-thickness-normal{stroke-width:2px;}#mermaid-svg-E357ViEKA8biGHge .edge-thickness-thick{stroke-width:3.5px;}#mermaid-svg-E357ViEKA8biGHge .edge-pattern-solid{stroke-dasharray:0;}#mermaid-svg-E357ViEKA8biGHge .edge-pattern-dashed{stroke-dasharray:3;}#mermaid-svg-E357ViEKA8biGHge .edge-pattern-dotted{stroke-dasharray:2;}#mermaid-svg-E357ViEKA8biGHge .marker{fill:#333333;stroke:#333333;}#mermaid-svg-E357ViEKA8biGHge .marker.cross{stroke:#333333;}#mermaid-svg-E357ViEKA8biGHge svg{font-family:\"trebuchet ms\",verdana,arial,sans-serif;font-size:16px;}#mermaid-svg-E357ViEKA8biGHge .label{font-family:\"trebuchet ms\",verdana,arial,sans-serif;color:#333;}#mermaid-svg-E357ViEKA8biGHge .cluster-label text{fill:#333;}#mermaid-svg-E357ViEKA8biGHge .cluster-label span{color:#333;}#mermaid-svg-E357ViEKA8biGHge .label text,#mermaid-svg-E357ViEKA8biGHge span{fill:#333;color:#333;}#mermaid-svg-E357ViEKA8biGHge .node rect,#mermaid-svg-E357ViEKA8biGHge .node circle,#mermaid-svg-E357ViEKA8biGHge .node ellipse,#mermaid-svg-E357ViEKA8biGHge .node polygon,#mermaid-svg-E357ViEKA8biGHge .node path{fill:#ECECFF;stroke:#9370DB;stroke-width:1px;}#mermaid-svg-E357ViEKA8biGHge .node .label{text-align:center;}#mermaid-svg-E357ViEKA8biGHge .node.clickable{cursor:pointer;}#mermaid-svg-E357ViEKA8biGHge .arrowheadPath{fill:#333333;}#mermaid-svg-E357ViEKA8biGHge .edgePath .path{stroke:#333333;stroke-width:2.0px;}#mermaid-svg-E357ViEKA8biGHge .flowchart-link{stroke:#333333;fill:none;}#mermaid-svg-E357ViEKA8biGHge .edgeLabel{background-color:#e8e8e8;text-align:center;}#mermaid-svg-E357ViEKA8biGHge .edgeLabel rect{opacity:0.5;background-color:#e8e8e8;fill:#e8e8e8;}#mermaid-svg-E357ViEKA8biGHge .cluster rect{fill:#ffffde;stroke:#aaaa33;stroke-width:1px;}#mermaid-svg-E357ViEKA8biGHge .cluster text{fill:#333;}#mermaid-svg-E357ViEKA8biGHge .cluster span{color:#333;}#mermaid-svg-E357ViEKA8biGHge div.mermaidTooltip{position:absolute;text-align:center;max-width:200px;padding:2px;font-family:\"trebuchet ms\",verdana,arial,sans-serif;font-size:12px;background:hsl(80, 100%, 96.2745098039%);border:1px solid #aaaa33;border-radius:2px;pointer-events:none;z-index:100;}#mermaid-svg-E357ViEKA8biGHge :root{--mermaid-font-family:\"trebuchet ms\",verdana,arial,sans-serif;}打开PyCharmFile > SettingsProject: 项目名 > Python Interpreter点击齿轮图标 > Add选择Virtualenv Environment配置参数确定创建
4.2 详细步骤说明
-
打开设置界面
Windows/Linux: File > Settings
macOS: PyCharm > Preferences -
定位解释器设置
导航至:Project: > Python Interpreter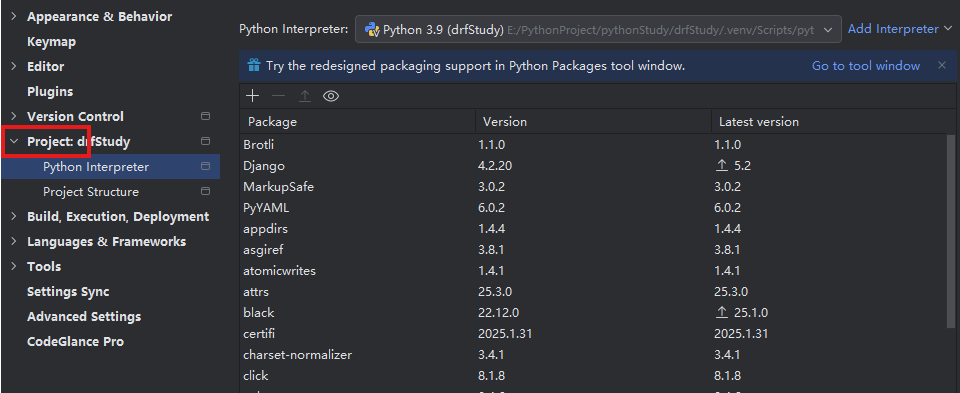
-
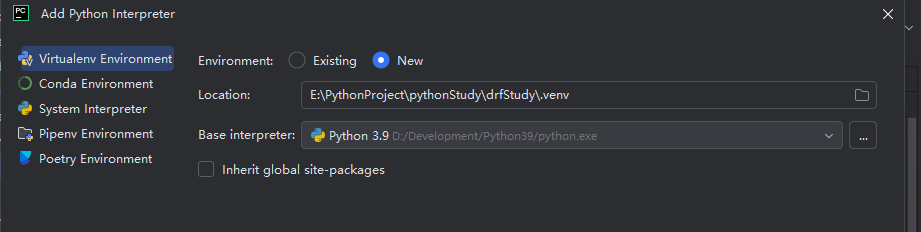
添加新解释器
-
配置虚拟环境
Location: 项目根目录/.venv # 推荐路径Base interpreter: Python 3.9Inherit global packages: 不勾选(避免污染)Make available to all projects: 不勾选(项目独占) -
完成创建
等待进度条完成,新环境即生效
五、PyCharm环境管理技巧
六、常见问题解决方案
6.1 环境激活失败
# Windows报错处理Set-ExecutionPolicy RemoteSigned -Scope CurrentUser6.2 依赖冲突处理
# 查看依赖树pipdeptree# 强制解决冲突pip install --force-reinstall package==version七、最佳实践建议
- 命名规范
.venv(项目内隐藏目录)或 venv_项目名 - 版本控制
# 在.gitignore中添加.venv/venv*/ - 依赖维护
# 定期更新pip list --outdatedpip install -U package - 文档化
## 环境配置说明- Python版本: 3.9.12- 激活命令: source .venv/bin/activate- 依赖安装: pip install -r requirements.txt


