从入门到精通:Selenium UI自动化测试工具全面解析
文章目录
- 前言
- 一、Selenium简介
-
- 1.1 Selenium 是什么
- 1.2 工具组成
- 1.3 核心特性
- 1.4 通信机制
- 二、Selenium 基础使用
- 三、Selenium 高级使用
-
- 3.1 智能等待机制
-
- 3.1.1 隐式等待
- 3.1.2 显式等待
- 3.1.3 流畅等待
- 3.2 复杂元素定位方案
-
- 3.2.1 嵌套框架(iframe)操作
- 3.2.2 Shadow DOM操作
- 3.2.3 动态表格操作
- 3.2.4 动态加载的下拉菜单操作
- 3.2.5 悬浮菜单操作
- 3.2.6 弹窗/模态框操作
- 3.3 性能优化
-
- 3.3.1 作用域限定:优先在父元素内查找
- 3.3.2 索引优化:当类名重复时指定索引
- 3.3.3 缓存机制:对高频访问元素进行缓存
- 四、总结
前言
在之前发布的文章中,我们提到接口自动化测试是自动化测试的核心战场,那UI自动化测试呢?确实,由于UI变更更为频繁、UI自动化测试速度慢等诸多因素,导致UI自动化测试的投入成本更高,所以我们在自动化测试中推荐金字塔模式:即数量最多的单元自动化测试用例,数量较多的接口自动化测试用例,数量较少的UI自动化测试用例。
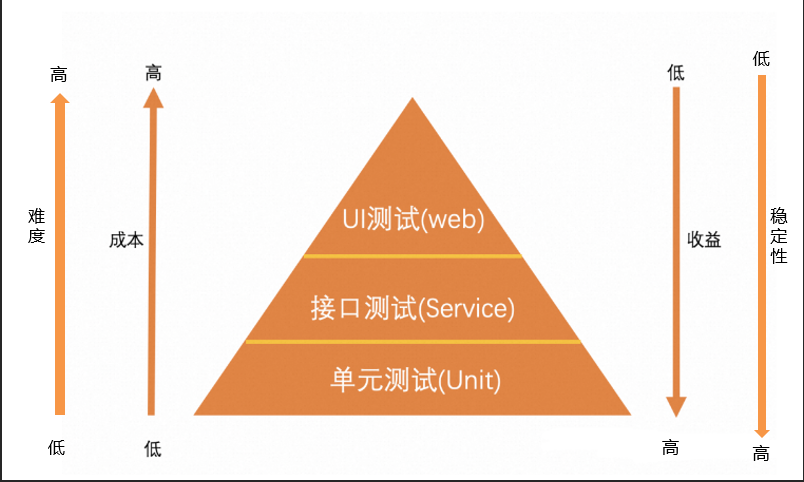
那么,什么类型的功能适合做UI自动化测试呢?我们通常对已经稳定的不易变更的功能做UI自动化测试。虽然这部分不会是全部的功能,但能够稳定运行的UI自动化测试用例也能为软件测试人员减少很多工作量,所以建设部分UI自动化测试用例也是有必要的。今天就来为大家介绍WebUI自动化测试利器:Selenium。Selenium作为UI自动化测试领域的标杆工具,凭借其跨平台、多语言支持、开源生态等特性,在全球自动化测试领域占据超过60%的市场份额(2023年测试工具调研报告),成为Web应用自动化测试的首选方案。
一、Selenium简介
1.1 Selenium 是什么
Selenium 是一个用于 Web 应用程序自动化测试的工具集,它支持在不同的浏览器上执行自动化测试,并且可以与多种编程语言(如 Java、Python、C# 等)结合使用,实现对 Web 应用的功能测试、回归测试等。它可以模拟用户在浏览器中的操作,如点击、输入、滚动等,从而验证 Web 应用的各项功能是否符合预期。
1.2 工具组成
- Selenium IDE: 这是一个基于浏览器插件的集成开发环境,无需编写代码,通过录制和回放功能即可创建简单的自动化测试用例。它适合初学者快速入门,了解自动化测试的基本流程。
- Selenium WebDriver: 是 Selenium 的核心组件,它提供了一系列的 API,允许开发者通过编写代码来控制浏览器的行为。与传统的 Selenium RC 相比,WebDriver 更加简洁、高效,直接与浏览器进行交互,支持更多的浏览器和功能。
- Selenium Grid: 用于分布式测试,可以将测试用例分配到不同的机器和浏览器上并行执行,大大提高测试的执行效率,尤其适合大规模的测试场景。
1.3 核心特性
- 多浏览器支持: 支持市面上主流的浏览器,包括但不限于 Chrome、Firefox、Safari、Edge、Internet Explorer 等。
- 多语言绑定: 提供了丰富的语言绑定,如 Java、Python、C#、Ruby、JavaScript 等。
- 多种元素定位方式: 多种元素定位方式如: ID、Name、Class Name、Tag Name、Link Text、Partial Link Text、XPath 和 CSS Selector等,能让你精准地定位到 Web 页面上的各种元素。
- 强大的交互操作能力: 可以模拟用户在浏览器中的各种操作,如点击、输入文本、下拉选择、滚动页面、鼠标悬停等。
- 支持分布式测试: Selenium Grid 允许你在多台机器和多个浏览器上并行执行测试用例,从而大大提高测试效率。
- 完善的等待机制: 由于 Web 页面可能存在动态加载的内容,Selenium 提供了隐式等待和显式等待机制,确保在操作元素之前元素已经加载完成。
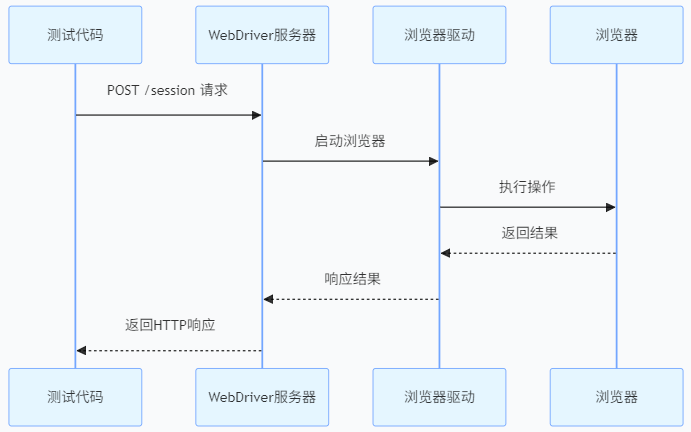
1.4 通信机制
- 测试脚本通过WebDriver API发送HTTP请求
- 浏览器驱动(如chromedriver)解析JSON Wire Protocol指令
- 驱动通过浏览器私有协议(如Chrome DevTools Protocol)操作真实浏览器
- 操作结果沿原路径返回给测试脚本
二、Selenium 基础使用
2.1 浏览器操作
2.2 元素定位
2.2.1 元素定位方法
在 Web 页面中,每个元素都可以通过不同的方式进行定位,下面结合一个简单的 HTML 源码示例来介绍常见的元素定位方法。
示例 HTML 代码:
<html> <body> <form id=\"loginForm\"> <input type=\"text\" id=\"username\" name=\"user\" class=\"input-text\" placeholder=\"用户名\"> <input type=\"password\" id=\"password\" name=\"pass\" class=\"input-text\" placeholder=\"密码\"> <a href=\"/home\" class=\"login-btn btn-primary btn-large\">登录</a> <p class=\"error-message\">用户名或密码错误</p> </form> </body></html>-
id 定位: 通过元素的 id 属性进行定位,id 属性在页面中通常是唯一的,因此这是一种非常高效和准确的定位方法。
示例:driver.find_element(By.id, \"username\"); -
name 定位: 通过元素的 name 属性进行定位 。name 属性可能在多个元素中重复,因此可能会返回多个元素,需要结合其他方法进行筛选。
示例:driver.find_elements(By.name, \"user\");name 属性可能在多个元素中重复,需要结合索引进行元素定位,示例:
// 获取所有 name 为指定值的元素 List<WebElement> elements = driver.findElements(By.NAME(\"your_name_attribute\")); // 选取第一个元素(索引为 0) if (!elements.isEmpty()) { WebElement firstElement = elements.get(0); firstElement.click(); }-
class name 定位: 通过元素的 class 属性进行定位。
示例:driver.find_element(By.className, \"input-text\"); -
tag name 定位: 通过元素的标签名进行定位,如 input、a、p 等,这种定位方法通常会返回多个元素,定位精度较低。
示例:driver.find_elements(By.tagName, \"input\"); -
link text 定位: 用于定位超链接元素,通过完全匹配链接的文本内容进行定位。
示例:driver.find_element(By.linkText, \"登录\"); -
partial link text 定位: 与 link text 定位类似,但只需匹配链接文本的部分内容即可。
示例:driver.find_element(By.partialLinkText, \"登\"); -
xpath 定位: 是一种基于 XML 路径语言的定位方法,可以通过元素的属性、层级关系等进行复杂的定位,具有很高的灵活性。
用户名输入框定位示例:
//绝对路径定位,不推荐使用,原因是若页面结构发生任何变化,路径会立即失效 driver.find_element(By.XPATH, \"/html/body/form/input[1]\"); //相对路径定位:通过 id 属性定位 driver.find_element(By.XPATH, \"//input[@id=\'username\']\"); //相对路径定位:通过层级关系和索引定位 driver.find_element(By.XPATH, \"//form[@id=\'loginForm\']/input[1]\");-
css selector 定位: 通过 CSS 选择器语法进行定位,同样具有很强的灵活性,定位速度通常较快。
示例:driver.find_element(By.cssSelector, \"#username\")(通过 id 选择器) driver.find_element(By.cssSelector, \"input[name=\'pass\']\")(通过属性选择器)
2.2.2 相对定位
-
above() - 位于指定元素上方
-
below() - 位于指定元素下方
-
toLeftOf() - 位于指定元素左侧
-
toRightOf() - 位于指定元素右侧
-
near() - 邻近元素(50px范围内)
示例:
WebElement passwordField = driver.findElement(By.id(\"password\"));// 定位密码输入框上方的用户名输入框WebElement username = driver.findElement( RelativeLocator.with(By.tagName(\"input\")) .above(passwordField));2.2.3 定位策略对比表
2.3 元素操作
2.4 鼠标和键盘操作
2.4.1 鼠标操作
2.4.2 键盘操作
常用键盘键值
三、Selenium 高级使用
3.1 智能等待机制
3.1.1 隐式等待
隐式等待是设置一个全局的等待时间,在这个时间内,WebDriver 会不断地查找元素,直到元素出现或者超时。
设置示例:
import org.openqa.selenium.By;import org.openqa.selenium.WebDriver;import org.openqa.selenium.WebElement;import org.openqa.selenium.chrome.ChromeDriver;import org.openqa.selenium.support.ui.WebDriverWait;public class ImplicitWaitExample { public static void main(String[] args) { System.setProperty(\"webdriver.chrome.driver\", \"path/to/chromedriver\"); WebDriver driver = new ChromeDriver(); //设置隐式等待 driver.manage().timeouts().implicitlyWait(10, java.util.concurrent.TimeUnit.SECONDS); driver.get(\"file:///path/to/your/html/file.html\"); WebElement loginButton = driver.findElement(By.id(\"login-button\")); loginButton.click(); driver.quit(); }}3.1.2 显式等待
显式等待是针对某个特定的元素设置等待条件,当元素满足指定的条件时,才会继续执行后续的操作。
等待条件如下:
设置示例:
import org.openqa.selenium.By;import org.openqa.selenium.WebDriver;import org.openqa.selenium.WebElement;import org.openqa.selenium.chrome.ChromeDriver;import org.openqa.selenium.support.ui.ExpectedConditions;import org.openqa.selenium.support.ui.WebDriverWait;public class ExplicitWaitExample { public static void main(String[] args) { System.setProperty(\"webdriver.chrome.driver\", \"path/to/chromedriver\"); WebDriver driver = new ChromeDriver(); driver.get(\"file:///path/to/your/html/file.html\"); // 等待元素可见(最多10秒,默认轮询500ms) WebDriverWait wait = new WebDriverWait(driver, 10); WebElement loginButton = wait.until(ExpectedConditions.elementToBeClickable(By.id(\"login-button\"))); loginButton.click(); driver.quit(); }}3.1.3 流畅等待
可配置超时时间、轮询频率、忽略的异常类型,自定义等待条件,非常灵活,适用于需要精细控制等待策略的复杂场景
设置示例:
Wait<WebDriver> wait = new FluentWait<>(driver) .withTimeout(Duration.ofSeconds(30)) // 总超时时间 .pollingEvery(Duration.ofSeconds(2)) // 轮询间隔 .ignoring(NoSuchElementException.class) // 忽略的异常 .ignoring(StaleElementReferenceException.class);// 自定义条件:等待元素文本包含\"成功\"WebElement result = wait.until(driver -> { WebElement element = driver.findElement(By.id(\"status\")); return element.getText().contains(\"成功\") ? element : null;});3.2 复杂元素定位方案
3.2.1 嵌套框架(iframe)操作
需要先切换到对应的框架中,再进行元素定位。
定位示例:
import org.openqa.selenium.By;import org.openqa.selenium.WebDriver;import org.openqa.selenium.WebElement;import org.openqa.selenium.chrome.ChromeDriver;public class IframeExample { public static void main(String[] args) { System.setProperty(\"webdriver.chrome.driver\", \"path/to/chromedriver\"); WebDriver driver = new ChromeDriver(); driver.get(\"file:///path/to/your/html/file.html\"); // 切换到iframe中 WebElement iframe = driver.findElement(By.id(\"my-iframe\")); driver.switchTo().frame(iframe); // 在iframe中定位元素 WebElement elementInIframe = driver.findElement(By.id(\"element-in-iframe\")); elementInIframe.click(); // 切换回主页面 driver.switchTo().defaultContent(); driver.quit(); }}3.2.2 Shadow DOM操作
HTML结构:
<div id=\"hostElement\"> #shadow-root (open) <input type=\"text\" id=\"shadowInput\"></div>穿透Shadow DOM:
// 通过JavaScript访问Shadow DOMWebElement shadowHost = driver.findElement(By.id(\"hostElement\"));WebElement shadowRoot = (WebElement) ((JavascriptExecutor)driver) .executeScript(\"return arguments[0].shadowRoot\", shadowHost);// 定位Shadow DOM内部元素WebElement input = shadowRoot.findElement(By.cssSelector(\"#shadowInput\"));3.2.3 动态表格操作
HTML表格:
<table id=\"dataTable\"> <tr> <td>张三</td> <td><button class=\"edit\">编辑</button></td> </tr> <tr> <td>李四</td> <td><button class=\"edit\">编辑</button></td> </tr></table>定位特定行:
// 找到包含\"李四\"的行并点击编辑按钮List<WebElement> rows = driver.findElements(By.cssSelector(\"#dataTable tr\"));for(WebElement row : rows) { if(row.findElement(By.xpath(\"./td[1]\")).getText().equals(\"李四\")) { row.findElement(By.className(\"edit\")).click(); break; }}// 使用XPath轴定位driver.findElement(By.xpath(\"//td[text()=\'李四\']/following-sibling::td/button\"))3.2.4 动态加载的下拉菜单操作
HTML结构:
<div class=\"select-box\"> <div class=\"selected-item\">请选择</div> <ul class=\"options\" style=\"display: none;\"> <li data-value=\"1\">选项A</li> <li data-value=\"2\">选项B</li> </ul></div>操作步骤:
// 展开下拉框driver.findElement(By.cssSelector(\".selected-item\")).click();// 等待选项可见WebElement option = new WebDriverWait(driver, Duration.ofSeconds(5)) .until(ExpectedConditions.visibilityOfElementLocated( By.xpath(\"//li[text()=\'选项B\']\")) );option.click();3.2.5 悬浮菜单操作
HTML结构:
<div class=\"menu-container\"> <div class=\"main-menu\">主菜单</div> <div class=\"sub-menu\" style=\"display: none;\"> <a href=\"/item1\">子项1</a> <a href=\"/item2\">子项2</a> </div></div>触发悬浮显示:
// 创建Actions对象Actions actions = new Actions(driver);// 鼠标悬停操作WebElement mainMenu = driver.findElement(By.cssSelector(\".main-menu\"));actions.moveToElement(mainMenu).perform();// 定位显示的子菜单WebElement subItem = new WebDriverWait(driver, Duration.ofSeconds(3)) .until(ExpectedConditions.elementToBeClickable( By.xpath(\"//a[contains(text(),\'子项2\')\")) );subItem.click();3.2.6 弹窗/模态框操作
HTML结构:
<div class=\"modal\" style=\"display: block;\"> <div class=\"modal-content\"> <span class=\"close\">×</span> <p>确定要删除吗?</p> <button class=\"confirm-btn\">确定</button> </div></div>定位策略:
// 切换到模态框WebElement modal = driver.findElement(By.cssSelector(\".modal.modal-active\"));// 定位内部元素modal.findElement(By.cssSelector(\".confirm-btn\")).click();// 使用相对定位(Selenium 4+)WebElement confirmBtn = driver.findElement( RelativeLocator.with(By.tagName(\"button\")) .below(By.xpath(\"//p[contains(text(),\'确定要删除吗\')]\")));3.3 性能优化
3.3.1 作用域限定:优先在父元素内查找
WebElement authWrapper = driver.findElement(By.className(\"auth-wrapper\"));WebElement localEmailInput = authWrapper.findElement(By.className(\"email-input\"));3.3.2 索引优化:当类名重复时指定索引
List<WebElement> buttons = driver.findElements(By.className(\"btn\"));buttons.get(1).click(); // 点击第二个按钮3.3.3 缓存机制:对高频访问元素进行缓存
private WebElement cachedSubmitButton;public WebElement getSubmitButton() { if (cachedSubmitButton == null) { cachedSubmitButton = driver.findElement(By.className(\"submit-btn\")); } return cachedSubmitButton;}四、总结
Selenium 是一款功能强大的 UI 接口自动化测试工具,通过其丰富的 API 和灵活的定位方式,能够满足各种复杂的测试需求。在使用 Selenium 进行自动化测试时,需要根据不同的场景选择合适的定位方法。同时,要合理运用等待机制和高级用法,处理动态元素和难定位的元素,以提高测试的稳定性和可靠性。希望本文能够帮助你更好地理解和使用 Selenium 进行 UI 接口自动化测试。最后祝大家高效测试,开心生活!


