ElasticSearch之使用elasticdump备份恢复数据_elasticsearch-dump 每次迁移的数量只有100
1.背景
对于数据量较小的数据进行备份还原,可以使用elasticdump工具。
数据量较小的情况:由于Elasticdump的工作方式是每次导入导出100条数据,因此它更适合数据量不是特别大的情况。对于大批量数据迁移,可能需要考虑其他的工具或方法。
迁移索引个数不多的情况:Elasticdump适合迁移索引个数不多的场景。每个索引的分片数量和副本数量需要单独进行迁移,或者在目标集群中提前创建好索引,然后再进行数据迁移。
无需跨集群配置的情况:相比于reindex跨集群操作,Elasticdump无需在ES集群的配置文件elasticsearch.yml中设置授权迁移访问地址(白名单)。
2.基本用法
支持的使用功能 可以一次性备份所有索引下的所有文档数据(--type=data) 且可以还原所有文档数据且支持重复还原,备份数据的时候会碰到:scroll context达到最大值500导致备份失败。 因此大数据量的备份不建议用该工具; 还原的时候耗时也比较久。 可以一次性备份所有索引(--type=index),但不支持通过一个命令还原所有索引 可以通过通配符备份所有索引下的所有文档数据(--type=data),并一次性还原 可以通过通配符备份符合要求的索引(--type=index),但不支持通过通配符命令还原备份下的所有索引 可以备份单个索引下的所有文档数据(--type=data)并进行还原 且支持重复还原 可以备份单个索引(--type=index),但是还原的时候必须将该索引删除才能还原弊端 不支持一次性备份索引的所有数据,包括 index、data。 对于一个索引只能分开备份 index 和 data; 索引index的数据(settting\\mapping)要想还原,则必须先删除已经存在的索引,否则还原失败。目前单个mapping类型的数据还原也存在问题; 通过通配符备份下来的索引数据index,必须要一个一个指定索引进行还原,无法再次通过通配符的形式进行还原; 通配符和全量备份下来的index 或 data,只能放在一个文件中,不能按照索引单个文件存储; 全量文档数据备份的时候,会碰到scroll context达到最大值500导致备份失败的问题; 如果想同时备份索引A和索引B的index或者data,目前通过一个命令无法同时备份A和B;语法elasticdump --input SOURCE --output DESTINATION [OPTIONS]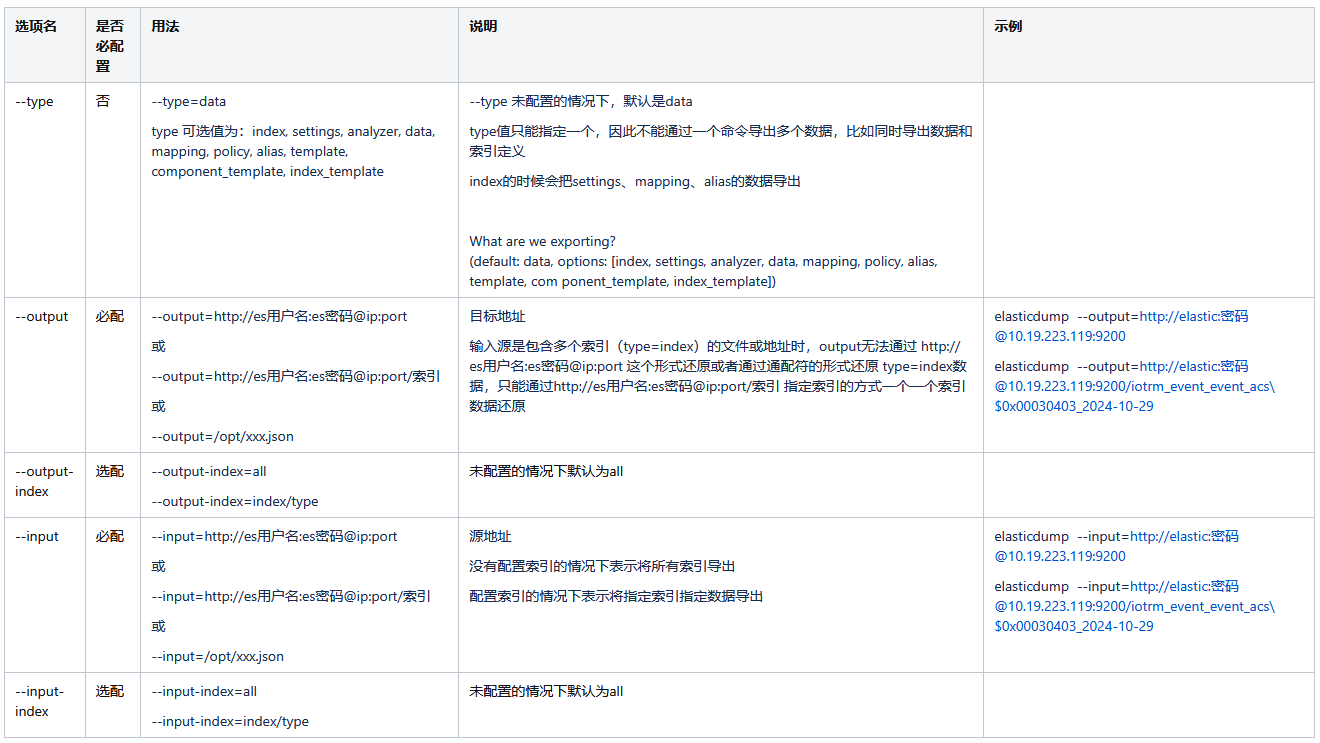
简单示例
备份并压缩 elasticdump \\ --input=http://production.es.com:9200/my_index \\ --output=$ \\ | gzip > /data/my_index.json.gz 将查询的结果备份到文件中 elasticdump \\ --input=http://production.es.com:9200/my_index \\ --output=query.json \\ --searchBody \"{\\\"query\\\":{\\\"term\\\":{\\\"username\\\": \\\"admin\\\"}}}\" 将数据从S3导入es elasticdump \\ --s3AccessKeyId \"${access_key_id}\" \\ --s3SecretAccessKey \"${access_key_secret}\" \\ --input \"s3://${bucket_name}/${file_name}.json\" \\ --output=http://production.es.com:9200/my_index 导出数据到s3 elasticdump \\ --s3AccessKeyId \"${access_key_id}\" \\ --s3SecretAccessKey \"${access_key_secret}\" \\ --input=http://production.es.com:9200/my_index \\ --output \"s3://${bucket_name}/${file_name}.json\"不同情况下的使用示例 对所有索引下的数据进行备份 elasticdump --overwrite --input=http://elastic:密码@10.19.223.119:9200/ --output=/opt/tmp/wf/data/es_dump_all/data_all.json --limit=10000 --- --type参数未指定的时候,默认是data 对所有索引下的数据进行还原 elasticdump --overwrite --output=http://elastic:密码@10.19.214.13:9200/ --input=/opt/tmp/wf/data/es_dump_all/data_all.json --limit=10000 -----type参数未指定的时候,默认是data 指定索引下的数据进行备份(注意如果索引本身存在特殊字符,例如这里$可以通过\\$来进行转义下) elasticdump --overwrite --input=http://elastic:密码@10.19.223.119:9200/iotrm_event_event_acs\\$0x00030403_2024-10-29 --output=/opt/tmp/wf/data/data_iotrm_event_event_acs\\$0x00030403_2024-10-29.json --limit=10000 指定索引下的数据进行还原 elasticdump --input=/opt/tmp/wf/data/data_iotrm_event_event_acs\\$0x00030403_2024-10-29.json --output=http://elastic:密码@10.19.214.13:9200/data_iotrm_event_event_acs\\$0x00030403_2024-10-29 --limit=10000 ---- 将iotrm_event_event_acs\\$0x00030403_2024-10-29索引下的数据还原到另外一个不存在的索引data_iotrm_event_event_acs\\$0x00030403_2024-10-29,此时会自动创建这个不存在的索引 备份指定索引 elasticdump --overwrite --input=http://elastic:密码@10.19.223.119:9200/iotrm_event_event_acs\\$0x00030403_2024-10-29 --output=/opt/tmp/wf/data/data_iotrm_event_event_acs\\$0x00030403_2024-10-29_index.json --limit=10000 --type=index 还原指定索引 elasticdump --input=/opt/tmp/wf/data/data_iotrm_event_event_acs\\$0x00030403_2024-10-29_index.json --output=http://elastic:密码@10.19.214.13:9200/data_iotrm_event_event_acs\\$0x00030403_2024-10-29 --limit=10000 --type=index 指定多个索引数据以及所有进行备份(通配符*,操作同类型名的索引) elasticdump --overwrite --input=http://elastic:密码@10.19.223.119:9200/iotrm_event_event_acs* --output=/opt/tmp/wf/data/data_iotrm_event_event_acs_all_data.json --limit=10000 --type=data elasticdump --overwrite --input=http://elastic:密码@10.19.223.119:9200/iotrm_event_event_acs* --output=/opt/tmp/wf/data/data_iotrm_event_event_acs_all.json --limit=10000 --type=index 还原多个索引数据以及索引 elasticdump --output=http://elastic:密码@10.19.214.13:9200 --input=/opt/tmp/wf/data/data_iotrm_event_event_acs_all.json --limit=10000 --type=index elasticdump --output=http://elastic:密码@10.19.214.13:9200 --input=/opt/tmp/wf/data/data_iotrm_event_event_acs_all_data.json --limit=10000 --type=data3.实战操作
3.1.安装部署elasticdump工具
登录机器1xx.2x.24x.161获取elasticdump离线安装包和nodejs包cd /optwget http://1xx.1x.3.1xx:61/cxh/elasticdump-6.111.0.tgzwget http://1xx.1x.3.1xx:61/cxh/node-v10.24.1-linux-x64.tar解压node安装包tar xvf node-v10.24.1-linux-x64.tar -C /usr/local配置node环境变量否则env环境识别异常vim /etc/profile#最下面增加#node pathexport PATH=$PATH:/usr/local/node-v10.24.1-linux-x64/bin#保存并退出,是配置生效source /etc/profile#检查是否生效echo $PATHnpm -v利用npm安装离线包elasticdump-6.111.0.tgz,全局安装npm install elasticdump-6.111.0.tgz -g等待安装完毕即可
此时因为我们开启了es的https和X-Pack验证,需要设置一下环境变量NODE_TLS_REJECT_UNAUTHORIZED的值为0,忽略证书验证失败的问题,默认是开启的1
vim /etc/profile
export NODE_TLS_REJECT_UNAUTHORIZED=‘0’
source /etc/profile
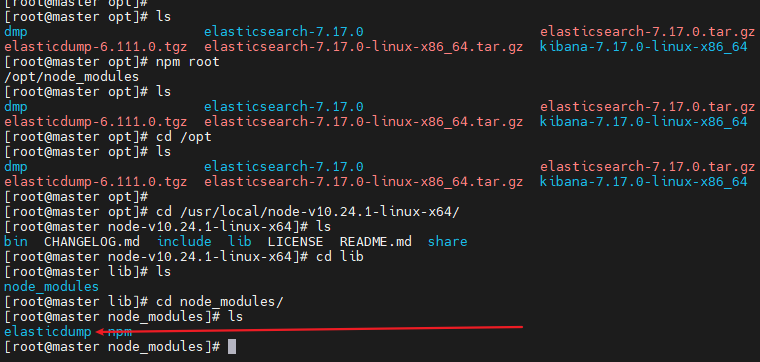
查看离线安装包的安装位置
一般来说node_moudles 就是在 /usr/local/node-v10.24.1-linux-x64/lib 下面,但是有的时候可能不在那么可以使用npm root查看一下node_moudles,反正就在这两个地方其中一个,进入node_moudles 文件夹,可以看到elasticdump程序所在路径
设置elasticdump工具的环境变量
vim /etc/profile
export PATH=$PATH:/usr/local/node-v10.24.1-linux-x64/bin:/usr/local/node-v10.24.1-linux-x64/lib/node_moudles/elasticdump/bin
source /etc/profile
测试是否成功elasticdump --help3.2.执行备份还原
执行还原恢复:这里我们将测试数据dump下来,然后在其他机器进行恢复
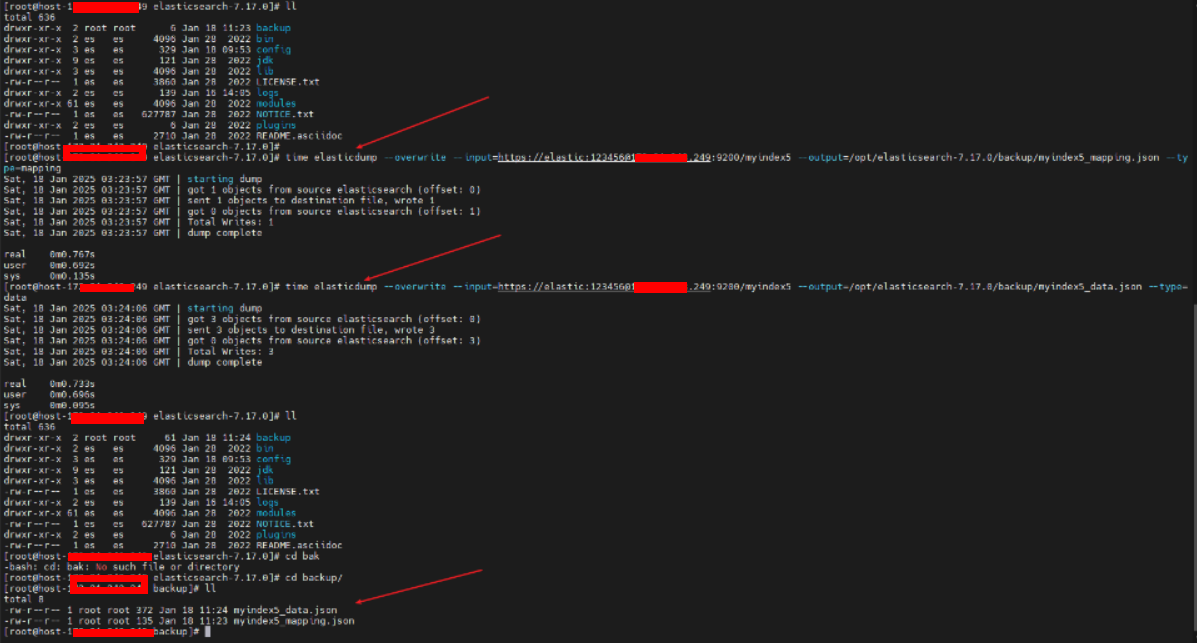
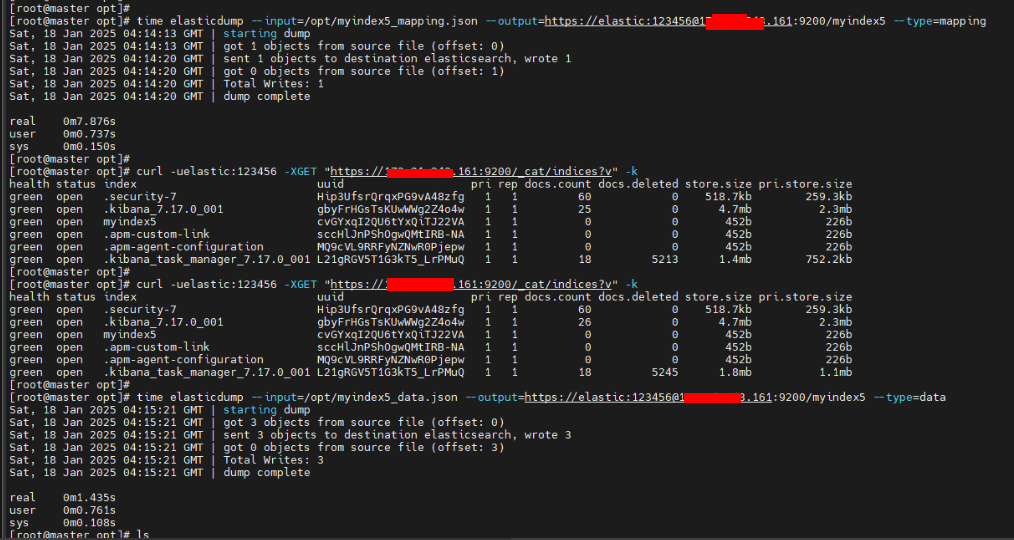
#在机器1xx.2x.24x.249中dump索引myindex5的mapping和data
time elasticdump --overwrite --input=https://elastic:123456@1xx.2x.24x.249:9200/myindex5 --output=/opt/elasticsearch-7.17.0/backup/myindex5_mapping.json --type=mapping
time elasticdump --overwrite --input=https://elastic:123456@1xx.2x.24x.249:9200/myindex5 --output=/opt/elasticsearch-7.17.0/backup/myindex5_data.json --type=data
然后在161中进行还原
#将备份文件拷贝到161中
scp ./myindex5_mapping.json root@1xx.2x.24x.161:/opt
scp ./myindex5_data.json root@1xx.2x.24x.161:/opt

检查是否上传成功,并查看此时161中的索引和数据
#检查是否有myindex5的两个备份文件
cd /opt
ll
#先不还原查看161这套中的索引和数据
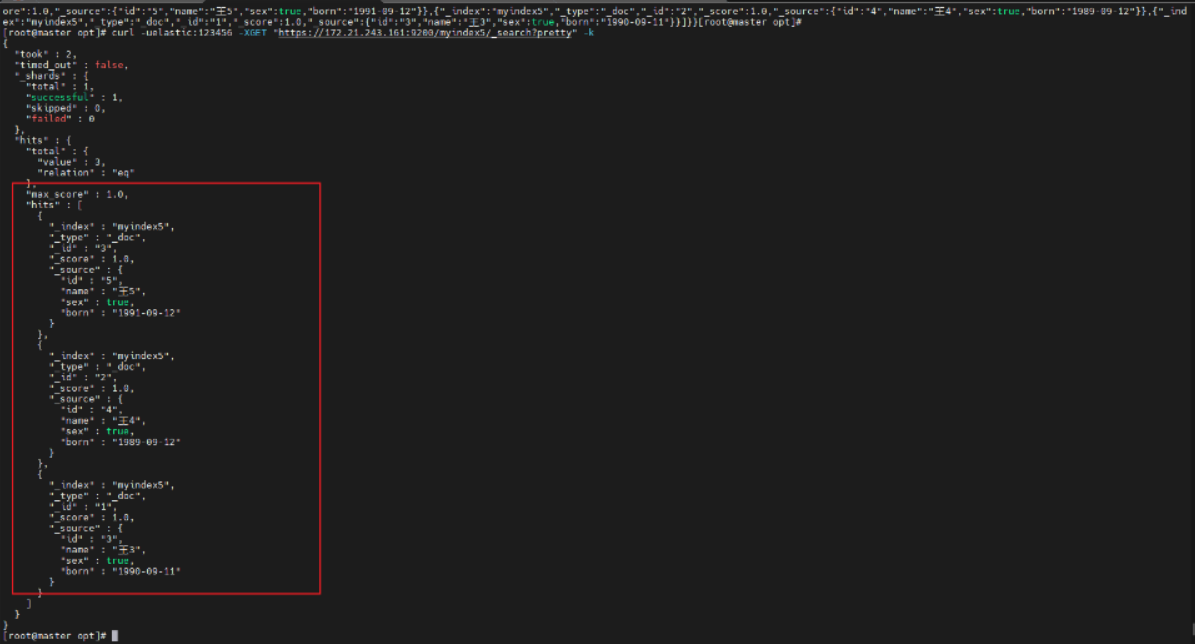
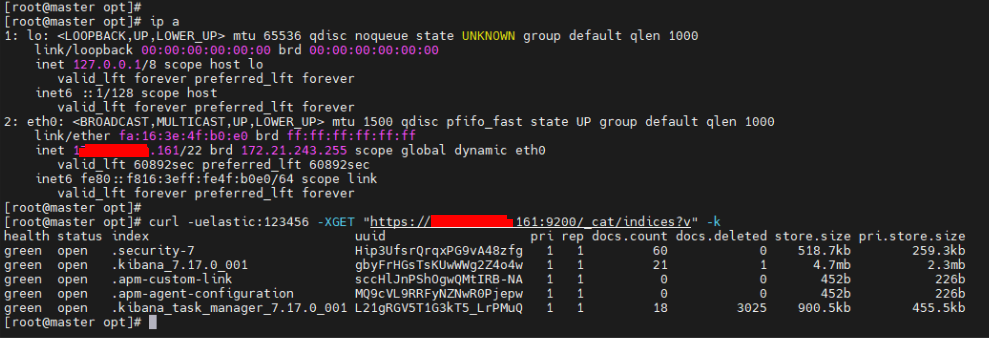
curl -uelastic:123456 -XGET “https://1xx.2x.24x.161:9200/_cat/indices?v” -k
可以看到此时没有索引和数据,都是些系统默认的索引
执行还原操作
time elasticdump --input=/opt/elasticsearch-7.17.0/backup/myindex5_mapping.json --output=https://elastic:123456@1xx.2x.24x.161:9200/myindex5 --type=mapping
time elasticdump --input=/opt/elasticsearch-7.17.0/backup/myindex5_data.json --output=https://elastic:123456@1xx.2x.24x.161:9200/myindex5 --type=data
检查是否有数据了