【fitz+OpenCV】去除PDF图片中的水印_pymupdf 去除 水印是用的矢量图形
文章目录
0 引言
事情的经过是这样的,女友从网上下载了一份考研笔记PDF,如下图[^图1]所示。打开后发现每页都有水印(蓝色标记位置),对于①、②处的水印其实问题不大,但是③处的水印与文字重叠,非常影响阅读体验。根据扉页提示,扫码关注公众号,得知无水印版本要7月底才上传。囿于时间紧迫,为了更方便阅读,决定对pdf进行水印去除。叠个甲,首先我非常尊重笔记作者的努力,支持正版!本文方法仅为学习交流和经验分享,禁止一切形式商用,谢谢。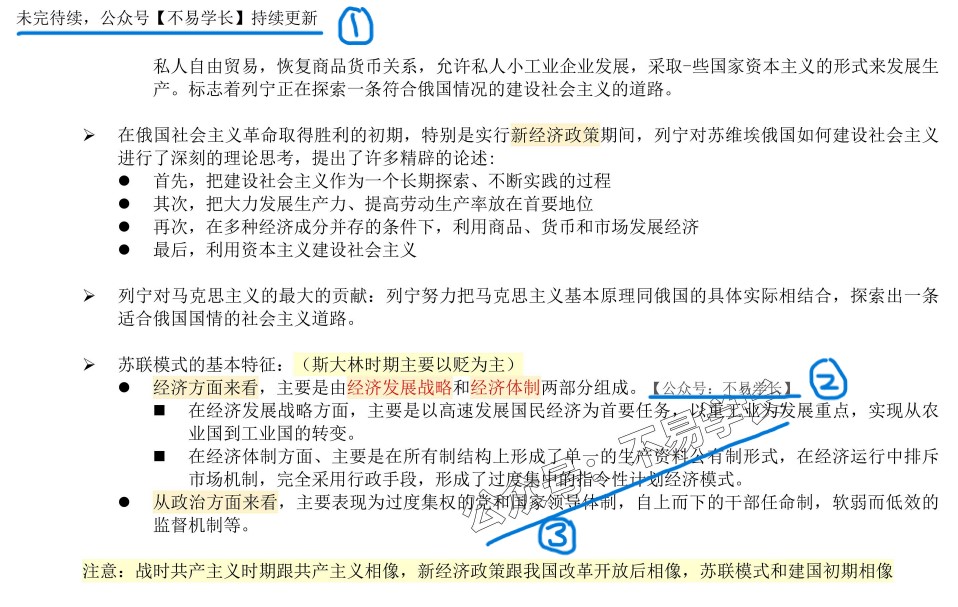
问题分析:
首先,这个pdf中的水印不在文本层,也并不是单独的水印图片嵌入。这份pdf笔记初步判断为,先用word进行撰写,在word中加入水印文本,最后打印成图片,做成pdf文件。所以想要去除水印,需要从图片入手,即进行图像处理。初步解决思路如下:
#mermaid-svg-I0gc9ZaUrn1dIhPk {font-family:\"trebuchet ms\",verdana,arial,sans-serif;font-size:16px;fill:#333;}#mermaid-svg-I0gc9ZaUrn1dIhPk .error-icon{fill:#552222;}#mermaid-svg-I0gc9ZaUrn1dIhPk .error-text{fill:#552222;stroke:#552222;}#mermaid-svg-I0gc9ZaUrn1dIhPk .edge-thickness-normal{stroke-width:2px;}#mermaid-svg-I0gc9ZaUrn1dIhPk .edge-thickness-thick{stroke-width:3.5px;}#mermaid-svg-I0gc9ZaUrn1dIhPk .edge-pattern-solid{stroke-dasharray:0;}#mermaid-svg-I0gc9ZaUrn1dIhPk .edge-pattern-dashed{stroke-dasharray:3;}#mermaid-svg-I0gc9ZaUrn1dIhPk .edge-pattern-dotted{stroke-dasharray:2;}#mermaid-svg-I0gc9ZaUrn1dIhPk .marker{fill:#333333;stroke:#333333;}#mermaid-svg-I0gc9ZaUrn1dIhPk .marker.cross{stroke:#333333;}#mermaid-svg-I0gc9ZaUrn1dIhPk svg{font-family:\"trebuchet ms\",verdana,arial,sans-serif;font-size:16px;}#mermaid-svg-I0gc9ZaUrn1dIhPk .label{font-family:\"trebuchet ms\",verdana,arial,sans-serif;color:#333;}#mermaid-svg-I0gc9ZaUrn1dIhPk .cluster-label text{fill:#333;}#mermaid-svg-I0gc9ZaUrn1dIhPk .cluster-label span{color:#333;}#mermaid-svg-I0gc9ZaUrn1dIhPk .label text,#mermaid-svg-I0gc9ZaUrn1dIhPk span{fill:#333;color:#333;}#mermaid-svg-I0gc9ZaUrn1dIhPk .node rect,#mermaid-svg-I0gc9ZaUrn1dIhPk .node circle,#mermaid-svg-I0gc9ZaUrn1dIhPk .node ellipse,#mermaid-svg-I0gc9ZaUrn1dIhPk .node polygon,#mermaid-svg-I0gc9ZaUrn1dIhPk .node path{fill:#ECECFF;stroke:#9370DB;stroke-width:1px;}#mermaid-svg-I0gc9ZaUrn1dIhPk .node .label{text-align:center;}#mermaid-svg-I0gc9ZaUrn1dIhPk .node.clickable{cursor:pointer;}#mermaid-svg-I0gc9ZaUrn1dIhPk .arrowheadPath{fill:#333333;}#mermaid-svg-I0gc9ZaUrn1dIhPk .edgePath .path{stroke:#333333;stroke-width:2.0px;}#mermaid-svg-I0gc9ZaUrn1dIhPk .flowchart-link{stroke:#333333;fill:none;}#mermaid-svg-I0gc9ZaUrn1dIhPk .edgeLabel{background-color:#e8e8e8;text-align:center;}#mermaid-svg-I0gc9ZaUrn1dIhPk .edgeLabel rect{opacity:0.5;background-color:#e8e8e8;fill:#e8e8e8;}#mermaid-svg-I0gc9ZaUrn1dIhPk .cluster rect{fill:#ffffde;stroke:#aaaa33;stroke-width:1px;}#mermaid-svg-I0gc9ZaUrn1dIhPk .cluster text{fill:#333;}#mermaid-svg-I0gc9ZaUrn1dIhPk .cluster span{color:#333;}#mermaid-svg-I0gc9ZaUrn1dIhPk div.mermaidTooltip{position:absolute;text-align:center;max-width:200px;padding:2px;font-family:\"trebuchet ms\",verdana,arial,sans-serif;font-size:12px;background:hsl(80, 100%, 96.2745098039%);border:1px solid #aaaa33;border-radius:2px;pointer-events:none;z-index:100;}#mermaid-svg-I0gc9ZaUrn1dIhPk :root{--mermaid-font-family:\"trebuchet ms\",verdana,arial,sans-serif;} PDF转图片 图像处理 图片转PDF
1 解决方法
对问题进行分析后,我们得到一个初步的解决思路,首先我们先编写大框架的代码,主要实现PDF转图片,图片转PDF。这里我们用到的PDF处理库为fitz(pip install PyMuPDF),图像对象基于图像库OpenCV(pip install opencv-python)的Mat类创建。
1.1 PDF与图片互转
这里有个细节,便是如果使用page.get_pixmap()将PDF页面直接转成图片,默认dpi是96,效果很糊,如果想要提高分辨率只能将dpi设置大点,但是这样将导致最终生成的PDF体量巨大(好几百M)。所以,后来决定舍弃这一方法,阅读这篇文章1得到启发,可以不用将页面转为图片,而是将页面中的图片提取出来(doc.extract_image)(正好要处理的PDF每页都是一张图片),这样不会损失清晰度,也不用自己指定dpi什么的。
于是乎,原方案改为:遍历pdf每一页,将页面中的图片提取出来,对图片进行处理,比如去水印操作,再用处理后的图片替换原页面中的图片,最后将所有图片都完成替换后的PDF保存即可。代码如下:
import ioimport cv2import fitz # PyMuPDFimport numpy as npdef remove_watermark(source_img): processed_img = source_img.copy() return processed_imgdef main(input_path, output_path): doc = fitz.open(input_pdf) # 打开原PDF for page_num in range(len(doc)): page = doc.load_page(page_num) # 加载页面 page_imgs = page.get_images() # 获取页面图片 for page_img in page_imgs: # 提取图片 xref = page_img[0] img_info = doc.extract_image(xref) img = cv2.imdecode(np.frombuffer(io.BytesIO(img_info[\"image\"]).getvalue(), np.uint8), cv2.IMREAD_COLOR) # 图像处理:去水印 # TODO:processed_img = remove_watermark(img) # 替换原图片 _, img_encode = cv2.imencode(f\'.{img_info[\"ext\"]}\', processed_img) page.replace_image(xref, stream=img_encode.tobytes()) print(f\"已处理第 {page_num + 1}/{len(doc)} 页\") # 保存PDF doc.save(output_pdf) doc.close() print(f\"PDF处理完成!输出文件: {output_pdf}\")if __name__ == \"__main__\": input_pdf = \'example.pdf\' output_pdf = \'output.pdf\' main(input_pdf, output_pdf)1.2 OpenCV模版匹配去水印
经观察,页面图片中的水印有三种,如图[^图1]所示,并且每页中的同类型的水印尺寸、样式一致,只是位置不确定。初步想法是:首先,截取pdf页面中的水印图片作为模版,然后通过模版匹配的方法对每页中的水印进行定位,接着对水印覆盖的位置进行像素级处理,实现水印去除,处理细节详见下文。理论介绍完毕,实践开始。
1.2.1 模版图片获取
编写一个opencv交互脚本,读取pdf文件,打开最后一页(至于为什么是最后一页,因为这页的水印最完整,类型③水印未与笔记文字重叠,作为模版图片泛化性最好【bushi】),然后通过鼠标交互将三种水印框选截取保存。脚本代码如下:
import ioimport cv2import numpy as npimport fitz # PyMuPDF# --- 全局变量 ---template_coords = []selecting = Falsescaled_img = None# --- 鼠标回调函数(用于框选水印) ---def select_watermark(event, x, y, flags, param): global template_coords, selecting, scaled_img if event == cv2.EVENT_LBUTTONDOWN: selecting = True template_coords = [(x, y)] elif event == cv2.EVENT_MOUSEMOVE: if selecting: # 实时显示框选区域(缩放后的坐标) rectangle_img = scaled_img.copy() cv2.rectangle(rectangle_img, (int(template_coords[0][0]), int(template_coords[0][1])), (x, y), (0, 255, 0), 2) cv2.imshow(\"Select Watermark (Drag Mouse)\", rectangle_img) elif event == cv2.EVENT_LBUTTONUP: selecting = False template_coords.append((x, y))# --- 主函数 ---def main(pdf_path): global scaled_img doc = fitz.open(pdf_path) page = doc.load_page(-1) # 加载最后一页 page_imgs = page.get_images() # 获取页面图片 img_info = doc.extract_image(page_imgs[0][0]) original_img = cv2.imdecode(np.frombuffer(io.BytesIO(img_info[\"image\"]).getvalue(), np.uint8), cv2.IMREAD_COLOR) scaled_img = cv2.resize(original_img, None, fx=0.3, fy=0.3) # 缩放显示图像方便截取 # 交互式提取水印模板 cv2.namedWindow(\"Select Watermark (Drag Mouse)\") cv2.setMouseCallback(\"Select Watermark (Drag Mouse)\", select_watermark) cv2.imshow(\"Select Watermark (Drag Mouse)\", scaled_img) cv2.waitKey(0) cv2.destroyAllWindows() (x1_scaled, y1_scaled), (x2_scaled, y2_scaled) = template_coords x1 = int(x1_scaled / 0.3) y1 = int(y1_scaled / 0.3) x2 = int(x2_scaled / 0.3) y2 = int(y2_scaled / 0.3) template_img = original_img[min(y1, y2):max(y1, y2), min(x1, x2):max(x1, x2)] cv2.imwrite(\"templates/template1.jpg\", template_img) print(f\"模版图片已保存,尺寸: {template_img.shape[:2]} (HxW)\")if __name__ == \"__main__\": pdf_path = \"example.pdf\" # 输入PDF路径 main(pdf_path)该脚本一次只能截取保存一张水印图片,多次调用并修改保存路径
cv2.imwrite(\"templates/template1.jpg\", template_img)。
截取得到三种水印图片如下图所示。


1.2.2 模版匹配定位水印位置
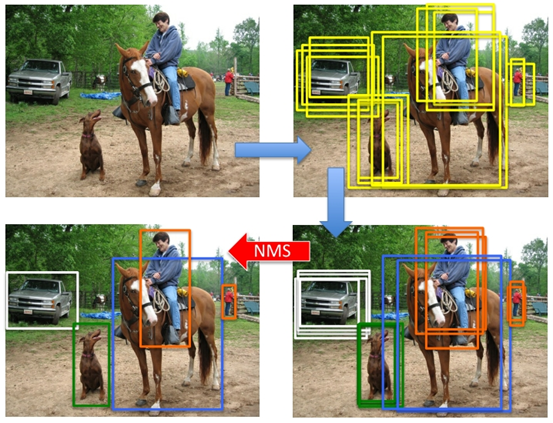
最开始将页面图片与模版图片都转灰度,再进行匹配,发现匹配效果较差,有些类型③水印根本识别不出来,后采用三通道原图进行匹配,解决了该问题(当然,视具体情况具体分析)。其次,由于类型③水印在一些位置与文本重叠得过于严重,设置非常低的匹配阈值才得以识别,但也伴随着单个水印位置多个匹配框重叠的现象,为此使用目标检测领域的非极大值抑制 (NMS)算法,从堆叠的边框中挑出最好的那个,效果如下图所示。
当然,本文写的很简单,就是检查匹配分数高的区域其他已选区域重叠。综上,该部分代码如下:
def find_top_matches(source_img, template_img, threshold, num): \"\"\" 找到源图中与模板最相似的num个区域(非重叠) 参数: source_img: 源图像 template_img: 模板图像 threshold: 匹配阈值(0~1) num: 区域个数 返回: top_locations: 前两个匹配区域的左上角坐标 [(x1, y1), (x2, y2)] top_scores: 对应的匹配分数 [score1, score2] \"\"\" h, w = template_img.shape[:2] # 模板匹配(使用归一化相关系数匹配),获取水印位置 result = cv2.matchTemplate(source_img, template_img, cv2.TM_CCOEFF_NORMED) # 1. 获取所有高于阈值的匹配位置 loc = np.where(result >= threshold) locations = list(zip(*loc[::-1])) # 转换为(x, y)坐标列表 scores = result[loc] # 对应的匹配分数 if len(locations) == 0: return [], [] # 2. 按分数降序排序 sorted_indices = np.argsort(scores)[::-1] sorted_locations = [locations[i] for i in sorted_indices] sorted_scores = [scores[i] for i in sorted_indices] top_locations = [] top_scores = [] # 3. 非极大值抑制 (NMS) for (x, y), score in zip(sorted_locations, sorted_scores): # 检查是否与已选区域重叠 conflict = False for (cx, cy) in top_locations: if cx - w <= x <= cx + w and cy - h <= y <= cy + h: conflict = True break if not conflict: top_locations.append((x, y)) top_scores.append(score) if len(top_locations) >= num: break return top_locations, top_scores# --- 去水印函数 ---def remove_watermark(source_img, template_img, method, threshold, num): h, w = template_img.shape[:2] gray_source = cv2.cvtColor(source_img, cv2.COLOR_RGB2GRAY) gray_template = cv2.cvtColor(template_img, cv2.COLOR_RGB2GRAY) top_locs, top_scores = find_top_matches(source_img, template_img, threshold=threshold, num=num) # 彩色图进行模板匹配 # TODO: 水印区域处理 return source_img1.2.3 重叠水印区域像素处理
处理思路为:将①、②处的水印覆盖区域像素值修改为白色(255,255,255)。③处的水印处理起来稍微麻烦一点,这里给一个待优化的方法:首先,遍历局部区域的所有像素位置,如果模版像素值template_pixel大于250(颜色偏白色,这个阈值根据自己情况调节),说明该位置没有水印,像素值保持不变;若某一位置的模版像素值小于250,我们便认为该位置可能存在水印像素,需要处理。对于存在被判定为水印的像素位置,我们也不能无脑变为白色,否则便会将有效文本的像素去除,导致去除后观感不佳。所以,如何才能去除水印像素的同时,保留有效文本与水印文本重叠位置的像素。本文给出的方法比较原始,以下图为例,左边是带水印的图片,右边是水印模版图片,在带水印的图片中重叠位置的像素值会比模版位置像素值更小(颜色更深),于是我们只需要设置一个阈值,来保留重叠像素即可。

 实现代码如下:
for (x, y) in top_locs: # 注意坐标顺序是 (x, y) # 修复原图 if method == 0: # ①、②处水印去除 source_img[y:y + h, x:x + w] = 255 else: # ③处水印去除 roi = source_img[y:y + h, x:x + w] for i in range(h): for j in range(w): # 获取原图和模板的像素值(灰度) source_pixel = gray_source[y + i, x + j] template_pixel = gray_template[i, j] # TODO: 待优化 if template_pixel > 250: continue # 判断条件:原图像素更黑 → 保留 if source_pixel < template_pixel - 60: # 更黑则保留(不操作) pass else: roi[i, j] = [255, 255, 255] # 其他情况删除 source_img[y:y + h, x:x + w] = roi # 将处理后的ROI放回原图2 完整代码及效果展示
完整代码如下:
import ioimport cv2import fitz # PyMuPDFimport numpy as npdef find_top_matches(source_img, template_img, threshold, num): \"\"\" 找到源图中与模板最相似的num个区域(非重叠) 参数: source_img: 源图像 template_img: 模板图像 threshold: 匹配阈值(0~1) num: 区域个数 返回: top_locations: 前两个匹配区域的左上角坐标 [(x1, y1), (x2, y2)] top_scores: 对应的匹配分数 [score1, score2] \"\"\" h, w = template_img.shape[:2] # 模板匹配(使用归一化相关系数匹配),获取水印位置 result = cv2.matchTemplate(source_img, template_img, cv2.TM_CCOEFF_NORMED) # 1. 获取所有高于阈值的匹配位置 loc = np.where(result >= threshold) locations = list(zip(*loc[::-1])) # 转换为(x, y)坐标列表 scores = result[loc] # 对应的匹配分数 if len(locations) == 0: return [], [] # 2. 按分数降序排序 sorted_indices = np.argsort(scores)[::-1] sorted_locations = [locations[i] for i in sorted_indices] sorted_scores = [scores[i] for i in sorted_indices] top_locations = [] top_scores = [] # 3. 非极大值抑制 (NMS) for (x, y), score in zip(sorted_locations, sorted_scores): # 检查是否与已选区域重叠 conflict = False for (cx, cy) in top_locations: if cx - w <= x <= cx + w and cy - h <= y <= cy + h: conflict = True break if not conflict: top_locations.append((x, y)) top_scores.append(score) if len(top_locations) >= num: break return top_locations, top_scores# --- 去水印函数 ---def remove_watermark(source_img, template_img, method, threshold, num): h, w = template_img.shape[:2] gray_source = cv2.cvtColor(source_img, cv2.COLOR_RGB2GRAY) gray_template = cv2.cvtColor(template_img, cv2.COLOR_RGB2GRAY) top_locs, top_scores = find_top_matches(source_img, template_img, threshold=threshold, num=num) # 彩色图进行模板匹配 for (x, y) in top_locs: # 注意坐标顺序是 (x, y) # 修复原图 if method == 0: source_img[y:y + h, x:x + w] = 255 else: roi = source_img[y:y + h, x:x + w] for i in range(h): for j in range(w): # 获取原图和模板的像素值(灰度) source_pixel = gray_source[y + i, x + j] template_pixel = gray_template[i, j] # TODO: 待优化 if template_pixel > 250: continue # 判断条件:原图像素更黑 → 保留 if source_pixel < template_pixel - 60: # 更黑则保留(不操作) pass else: roi[i, j] = [255, 255, 255] # 其他情况删除 source_img[y:y + h, x:x + w] = roi # 将处理后的ROI放回原图 return source_imgdef main(input_path, output_path): doc = fitz.open(input_pdf) # 打开原PDF for page_num in range(len(doc)): page = doc.load_page(page_num) # 加载页面 page_imgs = page.get_images() # 获取页面图片 for page_img in page_imgs: # 提取图片 xref = page_img[0] img_info = doc.extract_image(xref) img = cv2.imdecode(np.frombuffer(io.BytesIO(img_info[\"image\"]).getvalue(), np.uint8), cv2.IMREAD_COLOR) # 图像处理:去水印 processed_img = img.copy() for i in range(3): template_img = cv2.imread(f\'templates/template{i + 1}.jpg\') if i == 2: processed_img = remove_watermark(processed_img, template_img, method=1, threshold=0.2, num=2) else: processed_img = remove_watermark(processed_img, template_img, method=0, threshold=0.8, num=2) # 替换原图片 encode_param = [int(cv2.IMWRITE_JPEG_QUALITY), 90] _, img_encode = cv2.imencode(f\'.{img_info[\"ext\"]}\', processed_img, params=encode_param) page.replace_image(xref, stream=img_encode.tobytes()) print(f\"已处理第 {page_num + 1}/{len(doc)} 页\") # 保存PDF doc.save(output_pdf) doc.close() print(f\"PDF处理完成!输出文件: {output_pdf}\")if __name__ == \"__main__\": input_pdf = \'example.pdf\' output_pdf = \'output.pdf\' main(input_pdf, output_pdf)水印去除效果对比:


放大细节:

3 总结与优化
-
速度优化
目前处理速度5s左右一页
-
重叠水印像素处理优化
如果有更高的要求,待优化
-
生成PDF大小优化
测试下来,生成的PDF都比较大。
目前本方法对于我的问题够用了,也就没继续优化了。
参考文献
-
https://zhuanlan.zhihu.com/p/381152041 ↩︎


