vue3 vux ui table 可以编辑的表格,增删改查
背景:
在vue3中需要table展示一些数据,并且需要对表格的数据进行编辑、添加、输入等操作。可以编辑的表格的某一行、某一个单元格。
通过npm下载插件:【版本可自定义】
\"vxe-pc-ui\": \"^4.7.13\",
\"vxe-table\": \"^4.14.4\"
实现效果:
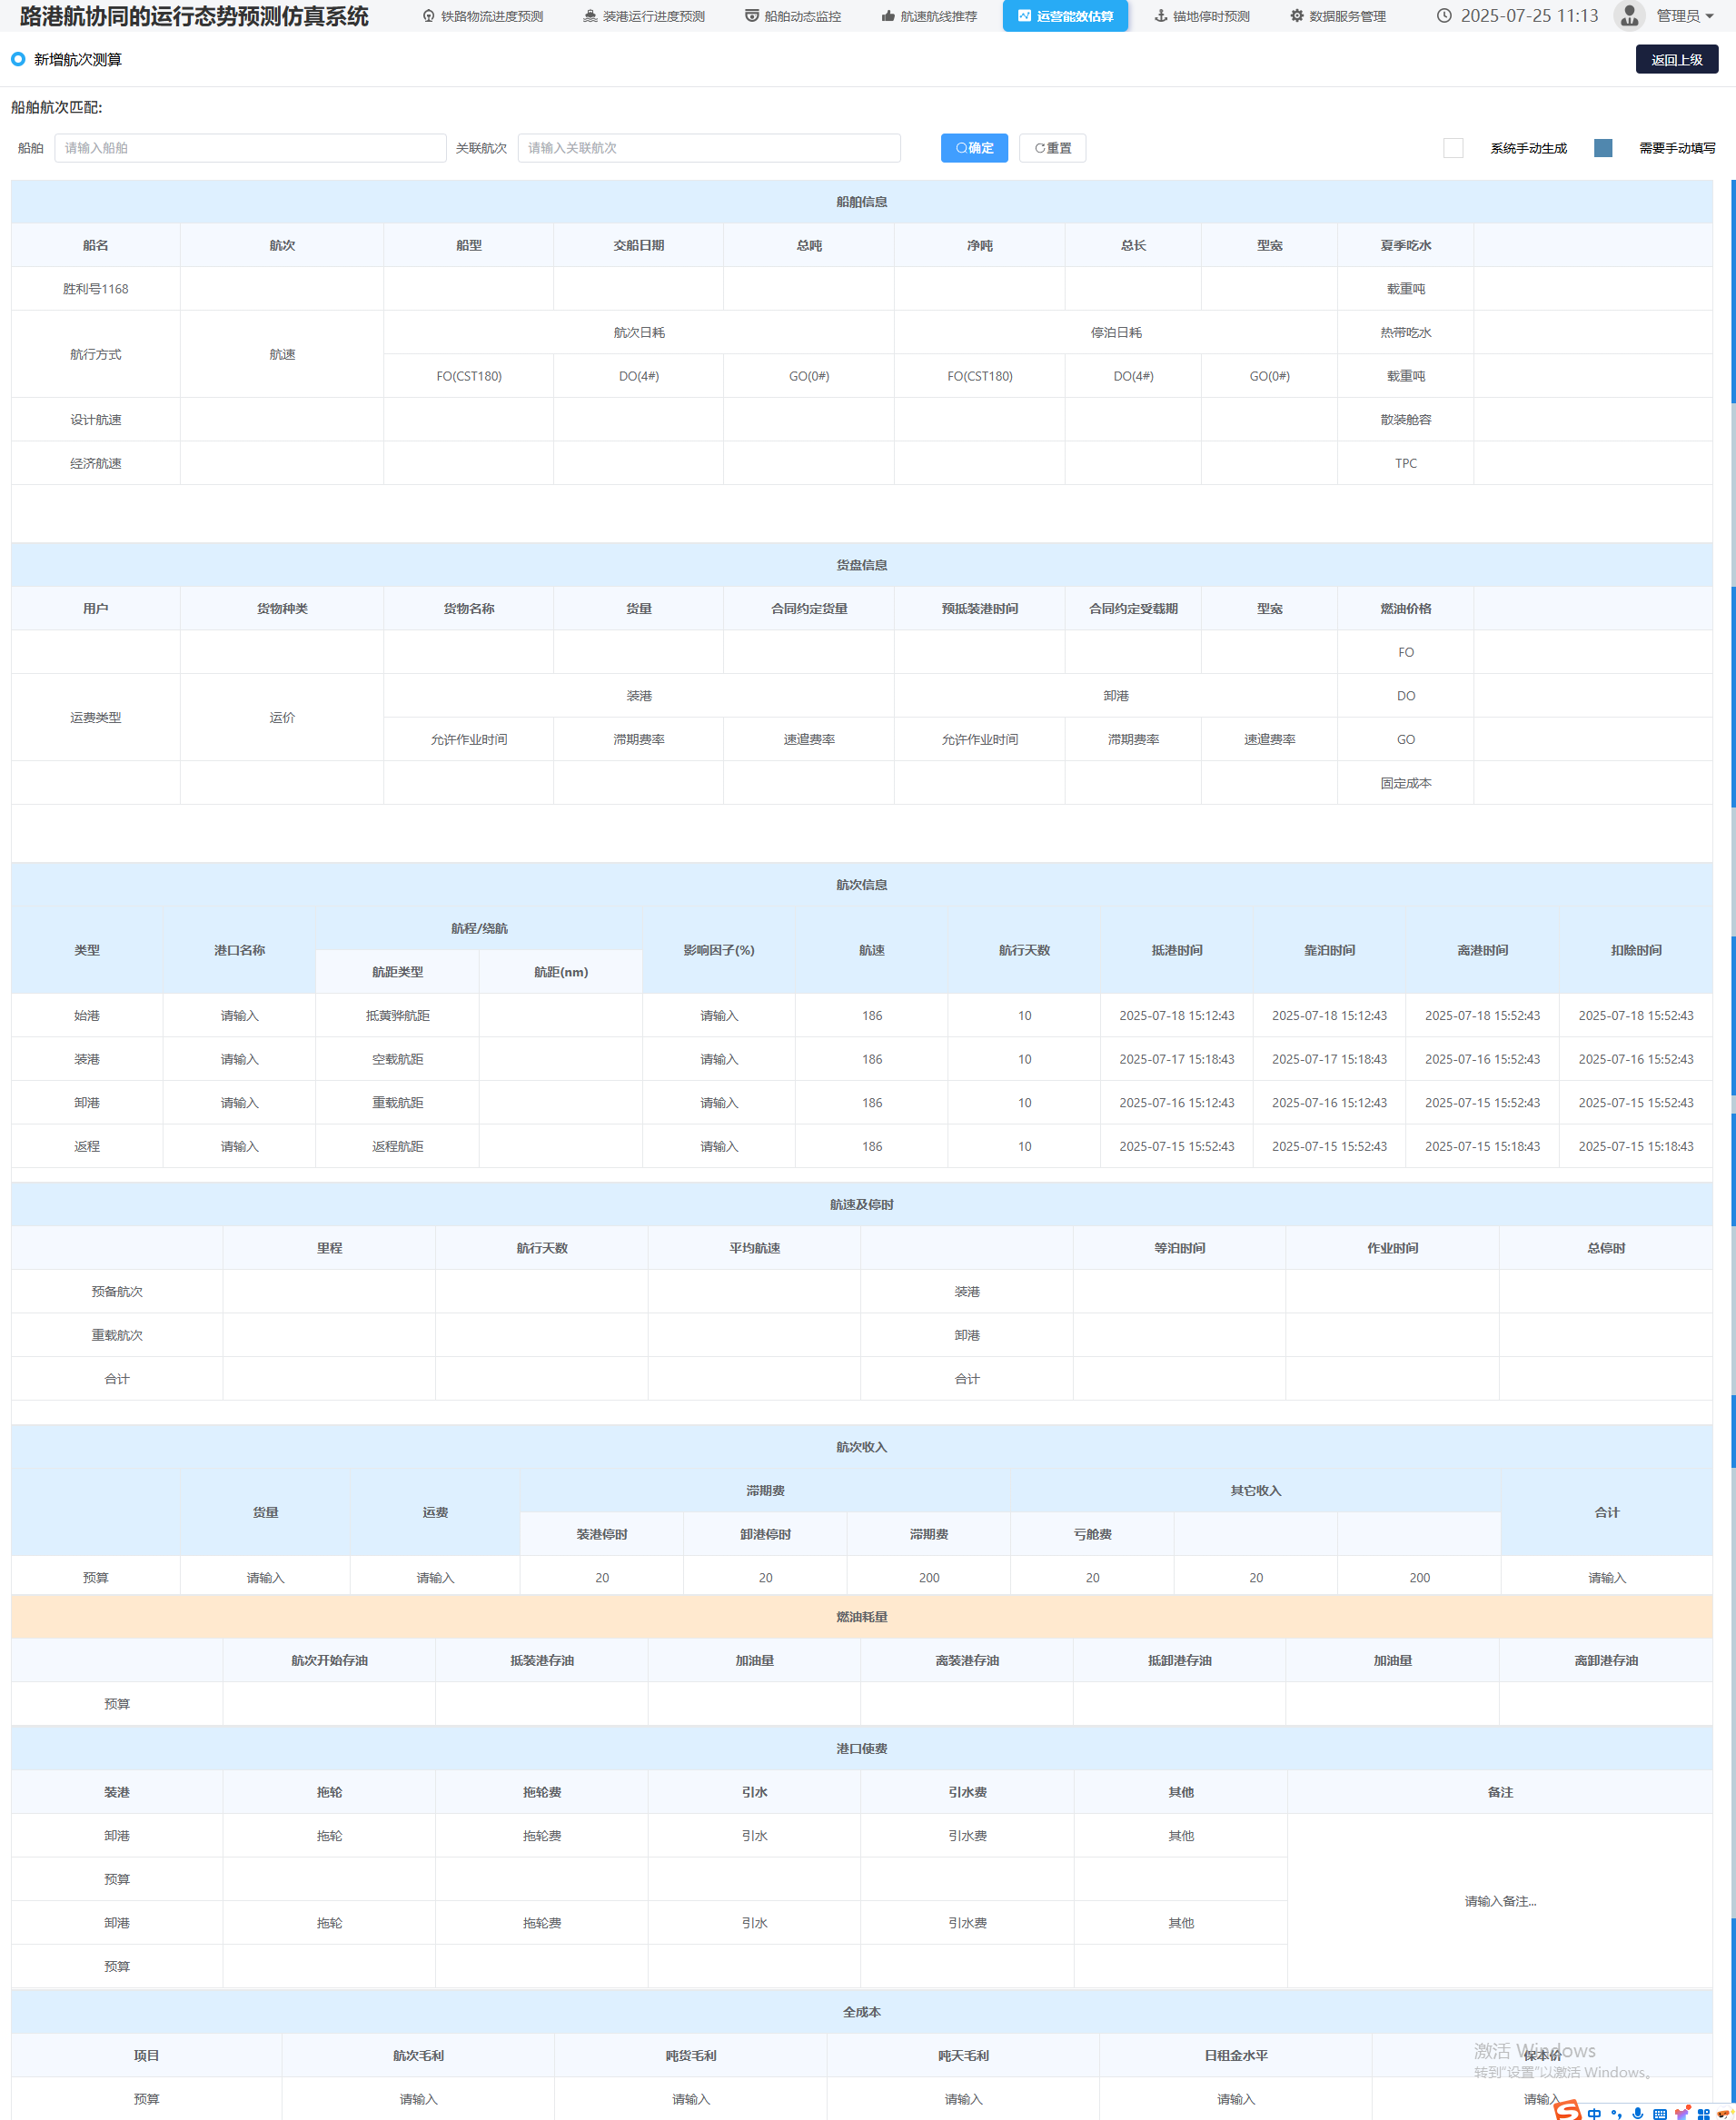
理论知识:
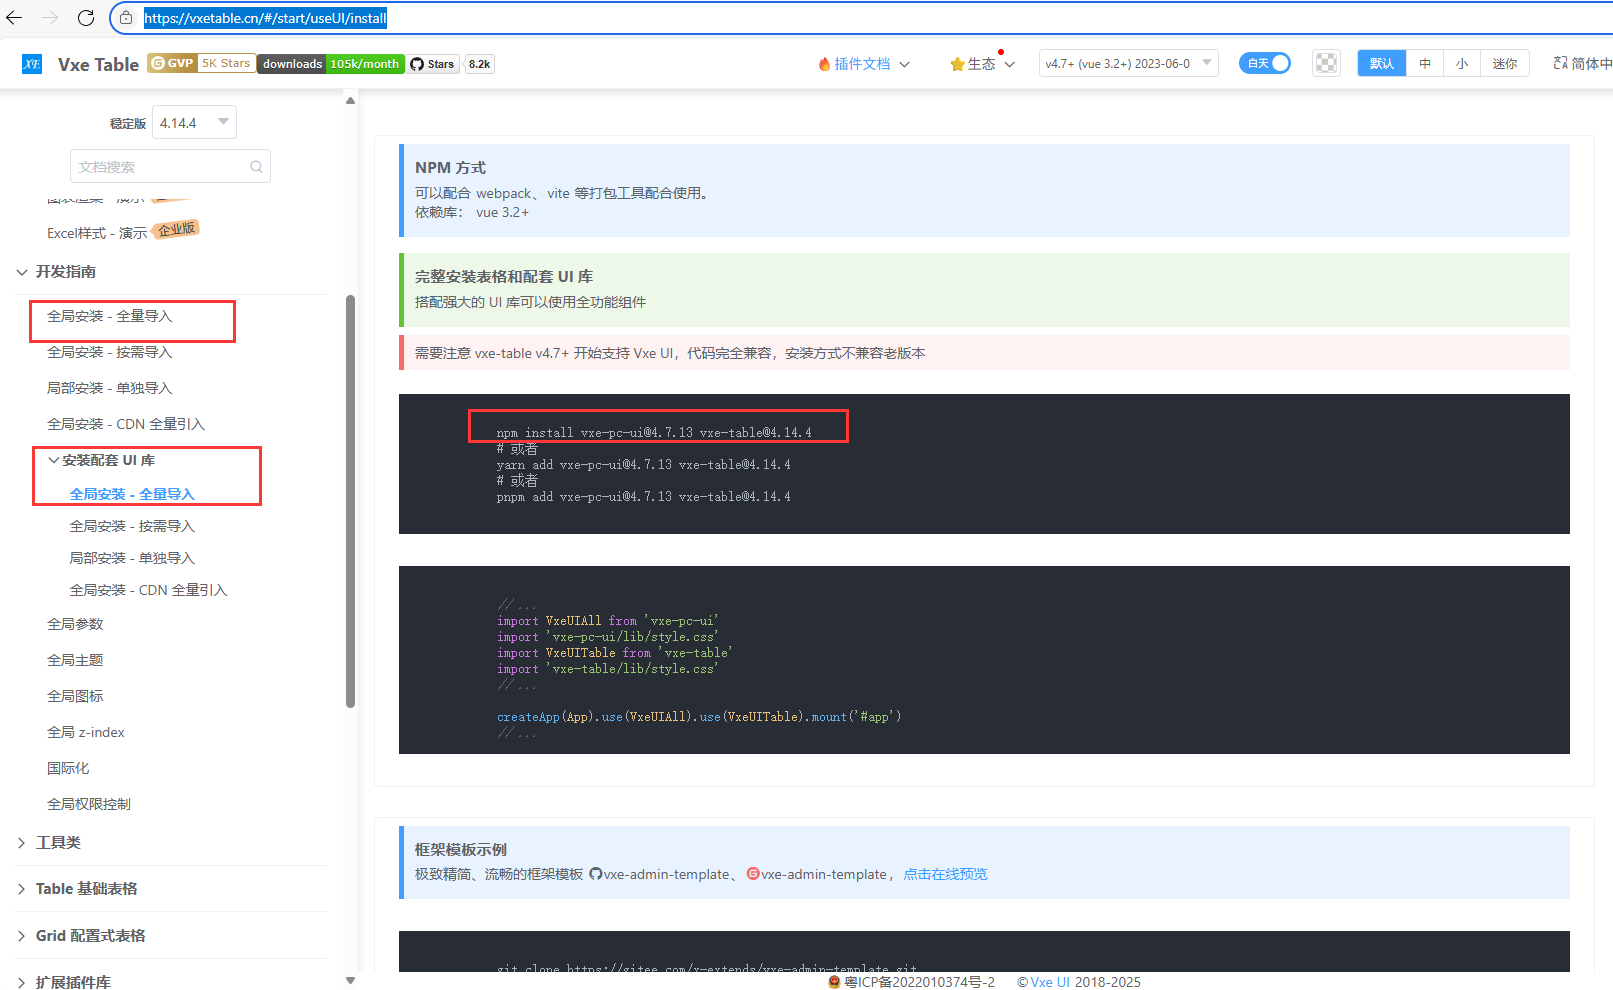
一、插件安装
npm install vxe-pc-ui@4.7.13 vxe-table@4.14.4
官网链接:点击跳转官网
全局引入挂载,在main.js文件:
import VxeUIAll from \'vxe-pc-ui\'
import \'vxe-pc-ui/lib/style.css\'
import VxeUITable from \'vxe-table\' import \'vxe-table/lib/style.css\'
createApp(App).use(VxeUIAll).use(VxeUITable).mount(\'#app\')
二、插件理论知识
(1)、插件使用示例
示例:官方基础表格
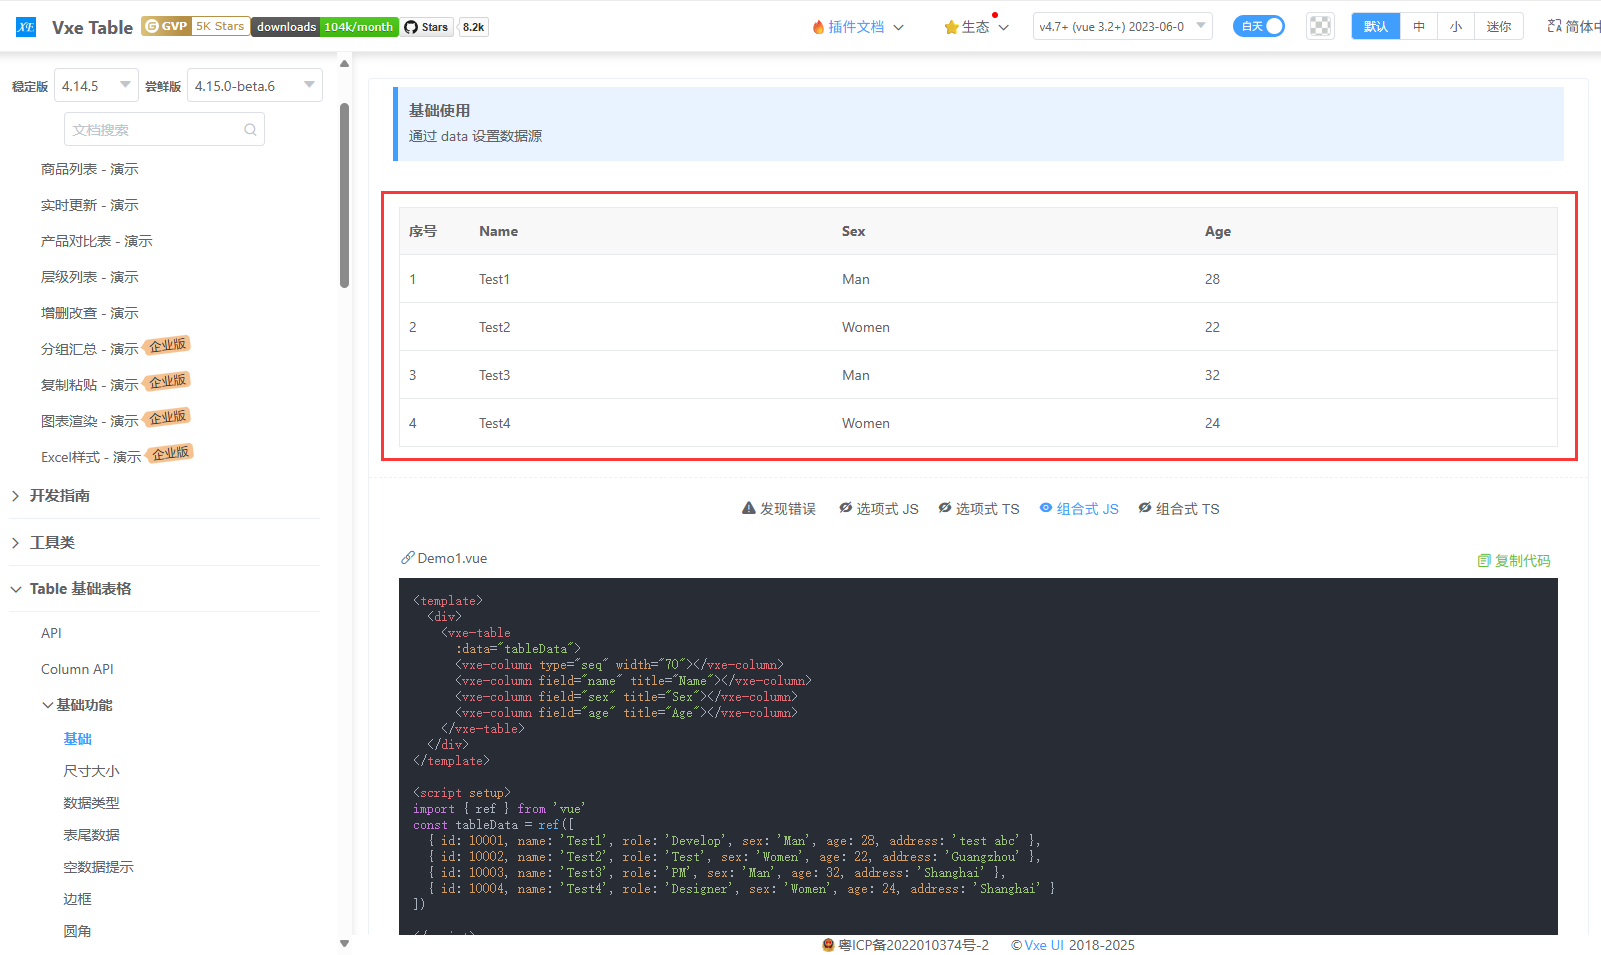
代码:
import { ref } from \'vue\'const tableData = ref([ { id: 10001, name: \'Test1\', role: \'Develop\', sex: \'Man\', age: 28, address: \'test abc\' }, { id: 10002, name: \'Test2\', role: \'Test\', sex: \'Women\', age: 22, address: \'Guangzhou\' }, { id: 10003, name: \'Test3\', role: \'PM\', sex: \'Man\', age: 32, address: \'Shanghai\' }, { id: 10004, name: \'Test4\', role: \'Designer\', sex: \'Women\', age: 24, address: \'Shanghai\' }])(2)、实际使用实例
示例一:简单的表头+表格标题
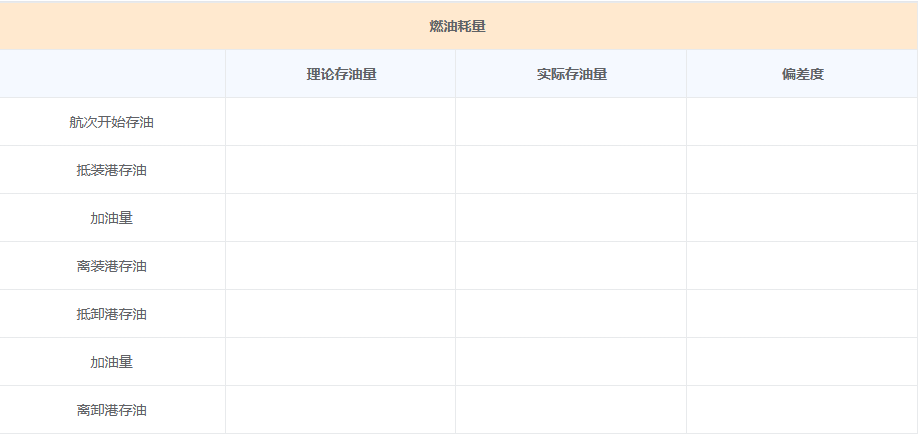
实现效果:
 实现思路:
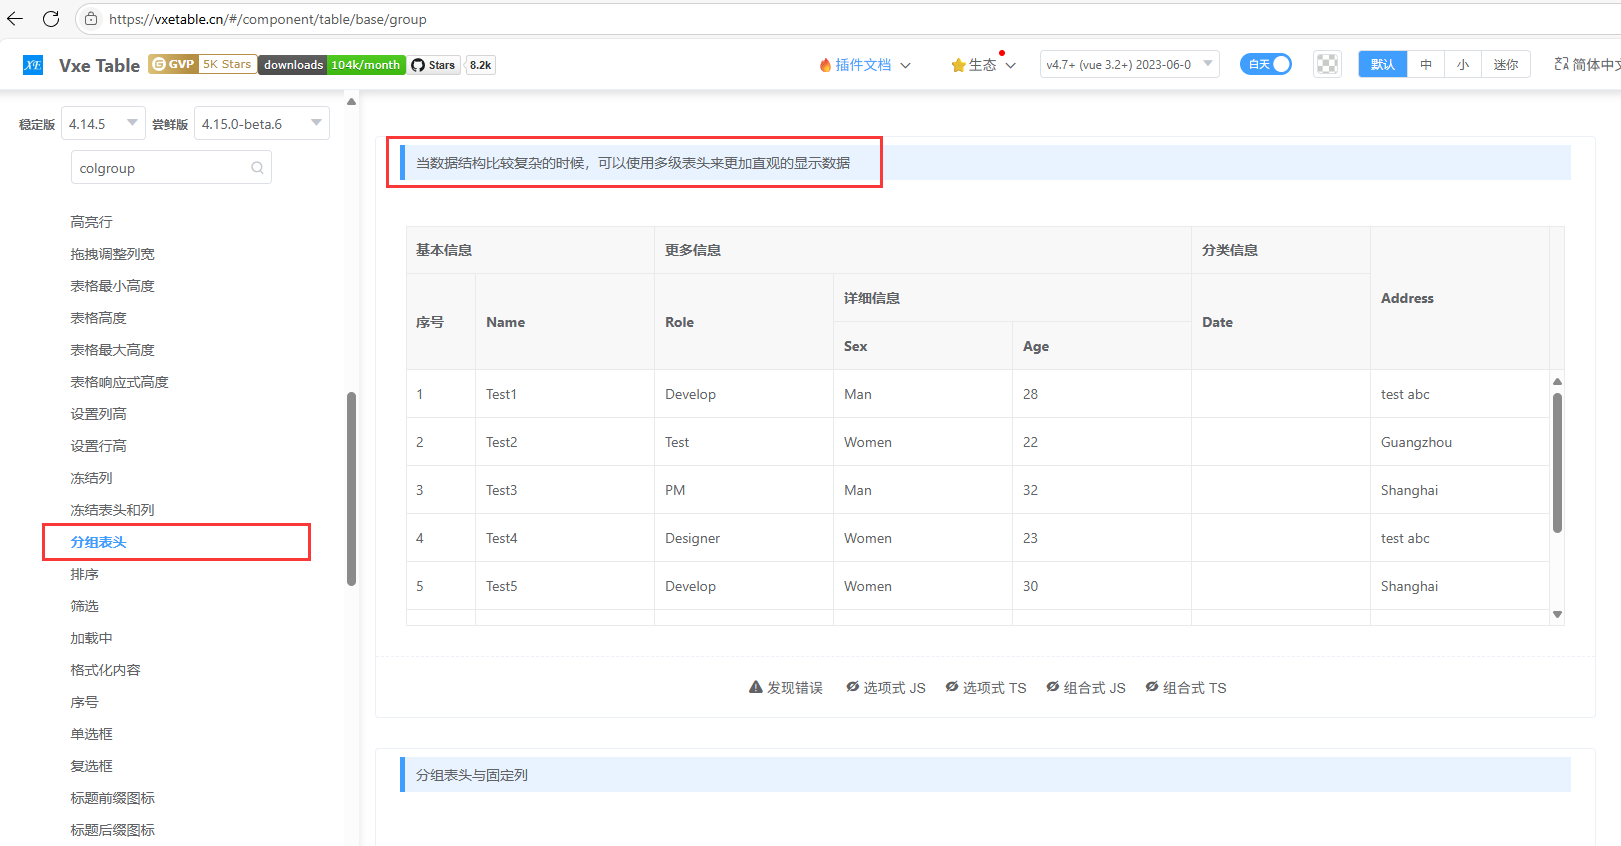
实现思路:
设置多级表头,用一个大表头包住其它二级等表头。
官网链接:点击跳转
核心代码:
实际代码:
布局代码:
//html 逻辑代码:
//jsconst fuelConsumptionState = reactive({ loading: false, tableData: [ { id: 10001, weikong: \"预算\", startOil: \"Man\", arrivalLoadingOil: \"Man\", pushOil: \"Man\", departureLoadingOil: \"Man\", arrivalDischargeOil: \"Man\", dischargeBunkering: \"Man\", departureDischargeOil: \"Man\", }, ], tableList: [ { label: \"\", prop: \"weikong\", width: \"12.5%\", }, { label: \"航次开始存油\", prop: \"startOil\", width: \"12.5%\", }, { label: \"抵装港存油\", prop: \"arrivalLoadingOil\", width: \"12.5%\", }, { label: \"加油量\", prop: \"pushOil\", width: \"12.5%\", }, { label: \"离装港存油\", prop: \"departureLoadingOil\", width: \"12.5%\", }, { label: \"抵卸港存油\", prop: \"arrivalDischargeOil\", width: \"12.5%\", }, { label: \"加油量\", prop: \"dischargeBunkering\", width: \"12.5%\", }, { label: \"离卸港存油\", prop: \"departureDischargeOil\", width: \"12.5%\", }, ],});样式代码:
//css.fuelConsumptionState { :deep(.vxe-header--row) { background-color: #ffe9cf; }}示例二: 多级表头
实现效果:
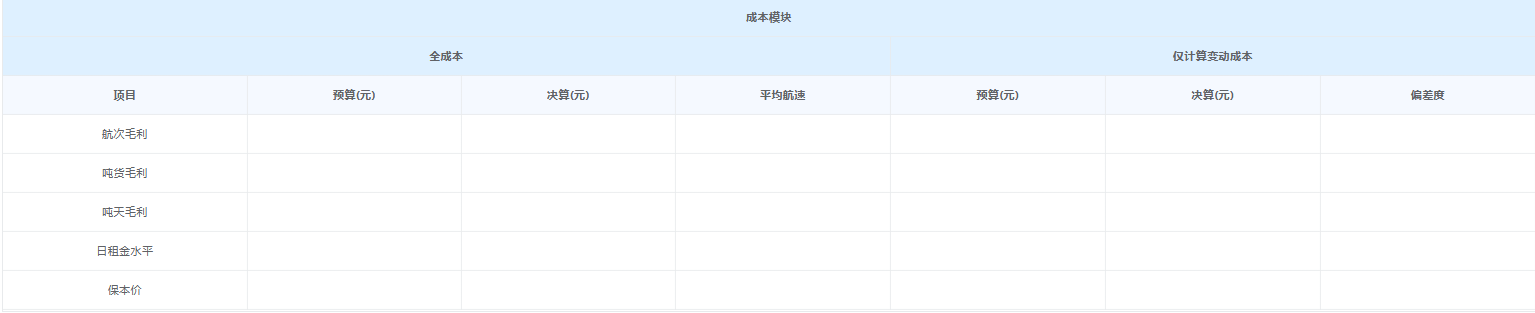
实现思路:
多级表头。除了一个表头,还有二级表头、三级表头,以至于多级表头。
核心代码:
实际代码:
//html //jsconst fullCostState= reactive({ loading: false, tableData: [ { id: 10001, myType: \'航次毛利\', myMeter: \'装港\', prepDistance: \'\', prepSailingDays: \'\', prepAvgSpeed: \'\', loadWaitingTime: \'\', dischargOperationTime: \'\', totalDowntime: \'\', }, { id: 10002, myType: \'吨货毛利\', myMeter: \'卸港\', prepDistance: \'\', prepSailingDays: \'\', prepAvgSpeed: \'\', loadWaitingTime: \'\', dischargOperationTime: \'\', totalDowntime: \'\', }, ], tableList: [ { label: \"全成本\", prop: \"hcrh\", width: \'58%\', children: [ { label: \"项目\", prop: \"myType\", width: \'16%\', }, { label: \"预算(元)\", prop: \"prepDistance\", width: \'14%\', }, { label: \"决算(元)\", prop: \"prepSailingDays\", width: \'14%\', }, { label: \"平均航速\", prop: \"prepAvgSpeed\", width: \'14%\', }, ] }, { label: \"仅计算变动成本\", prop: \"hcrh\", width: \'42%\', children: [ { label: \"预算(元)\", prop: \"prepDistance\", width: \'14%\', }, { label: \"决算(元)\", prop: \"prepSailingDays\", width: \'14%\', }, { label: \"偏差度\", prop: \"prepAvgSpeed\", width: \'14%\', }, ] }, ]})示例三:左边第一列当作表头
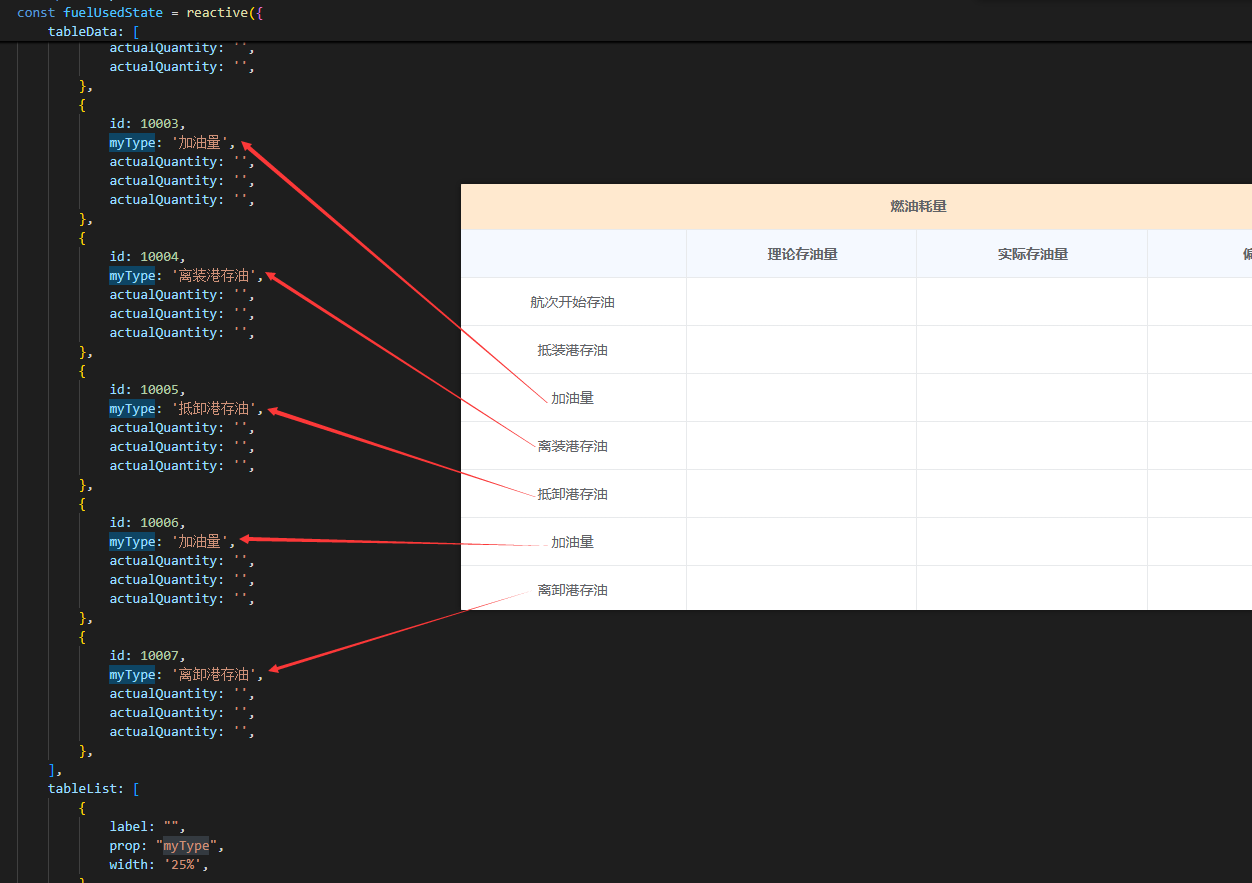
实现效果:
实现思路:
第一列 的属性值,等价于 表头
核心代码:
完整代码:
import { reactive, ref, watch } from \"vue\";const fuelUsedState = reactive({ loading: false, tableData: [ { id: 10001, myType: \'航次开始存油\', actualQuantity: \'\', actualQuantity: \'\', actualQuantity: \'\', }, { id: 10002, myType: \'抵装港存油\', actualQuantity: \'\', actualQuantity: \'\', actualQuantity: \'\', }, { id: 10003, myType: \'加油量\', actualQuantity: \'\', actualQuantity: \'\', actualQuantity: \'\', }, { id: 10004, myType: \'离装港存油\', actualQuantity: \'\', actualQuantity: \'\', actualQuantity: \'\', }, { id: 10005, myType: \'抵卸港存油\', actualQuantity: \'\', actualQuantity: \'\', actualQuantity: \'\', }, { id: 10006, myType: \'加油量\', actualQuantity: \'\', actualQuantity: \'\', actualQuantity: \'\', }, { id: 10007, myType: \'离卸港存油\', actualQuantity: \'\', actualQuantity: \'\', actualQuantity: \'\', }, ], tableList: [ { label: \"\", prop: \"myType\", width: \'25%\', }, { label: \"理论存油量\", prop: \"actualQuantity\", width: \'25%\', }, { label: \"实际存油量\", prop: \"actualQuantity\", width: \'25%\', }, { label: \"偏差度\", prop: \"actualQuantity\", width: \'25%\', }, ], mergeCells: []}):deep(.vxe-header--row) { background-color: #def0ff; &:last-child { background-color: #f5f9ff; }}.infoState { height: 400px;}示例四:合并单元格。横着合并叫做合并列,竖着合并叫做合并行
实现效果:
实现思路:
合并单元格,如果想要合并单元格的行或者列,可以使用官方文档的这个方法merge-cells=【{ row: 0, col: 4, rowspan: 1, colspan: 2 },...{对象四个参数}】。
官网链接:点击跳转
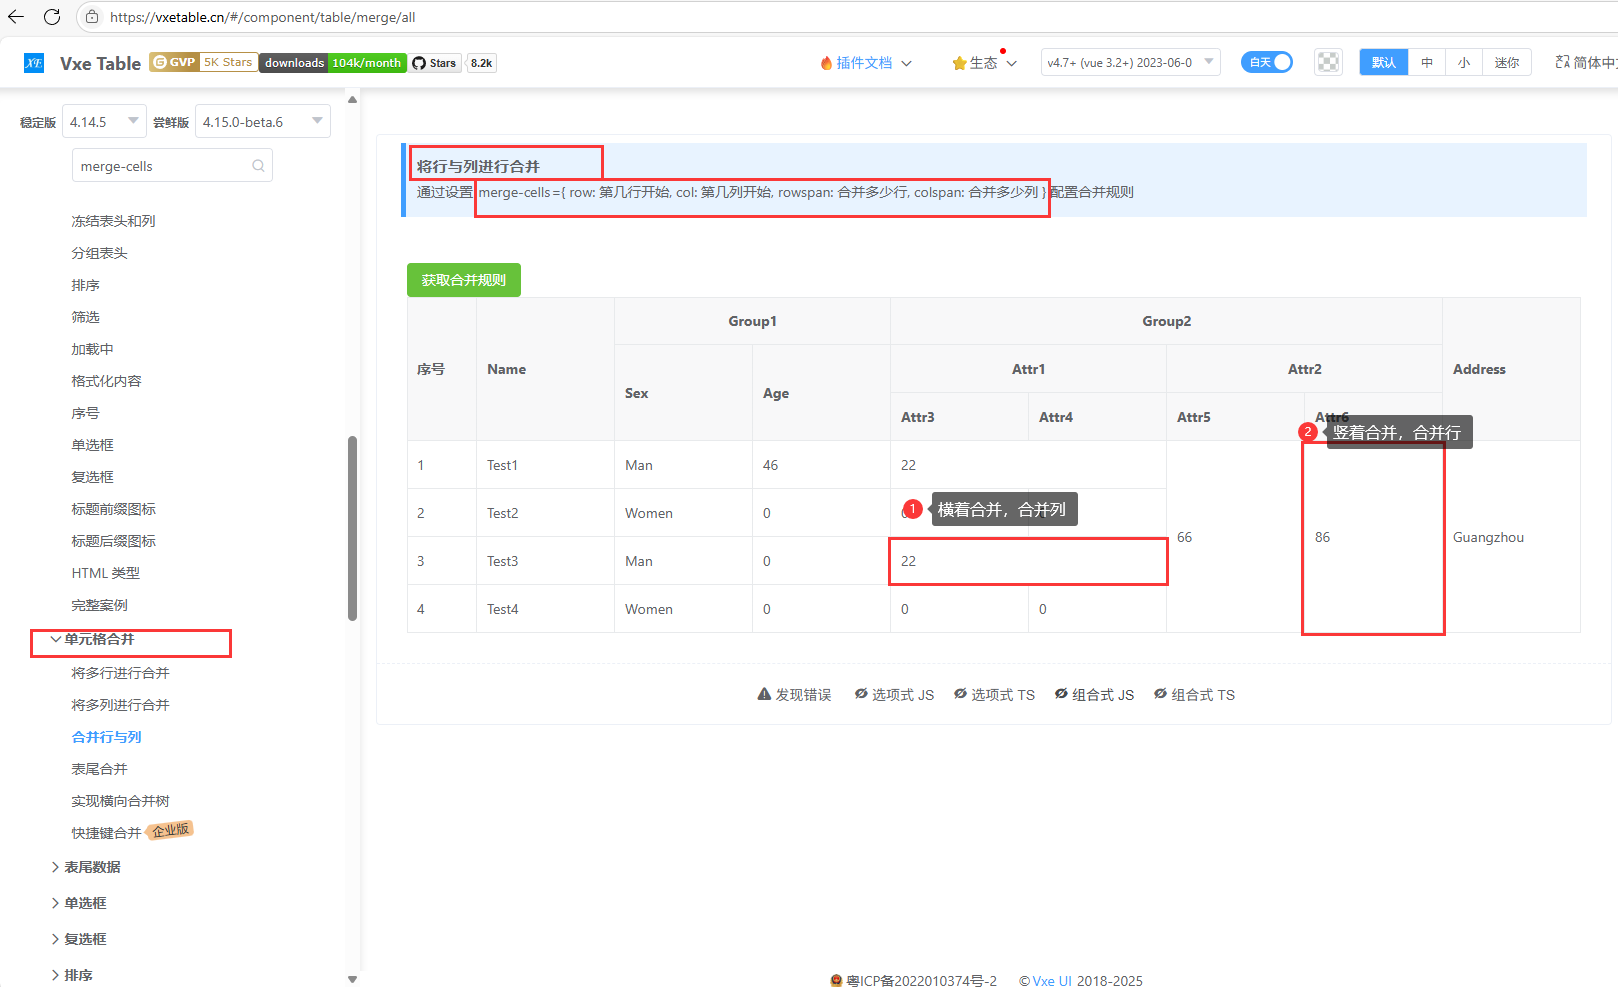
合并单元格的规律:
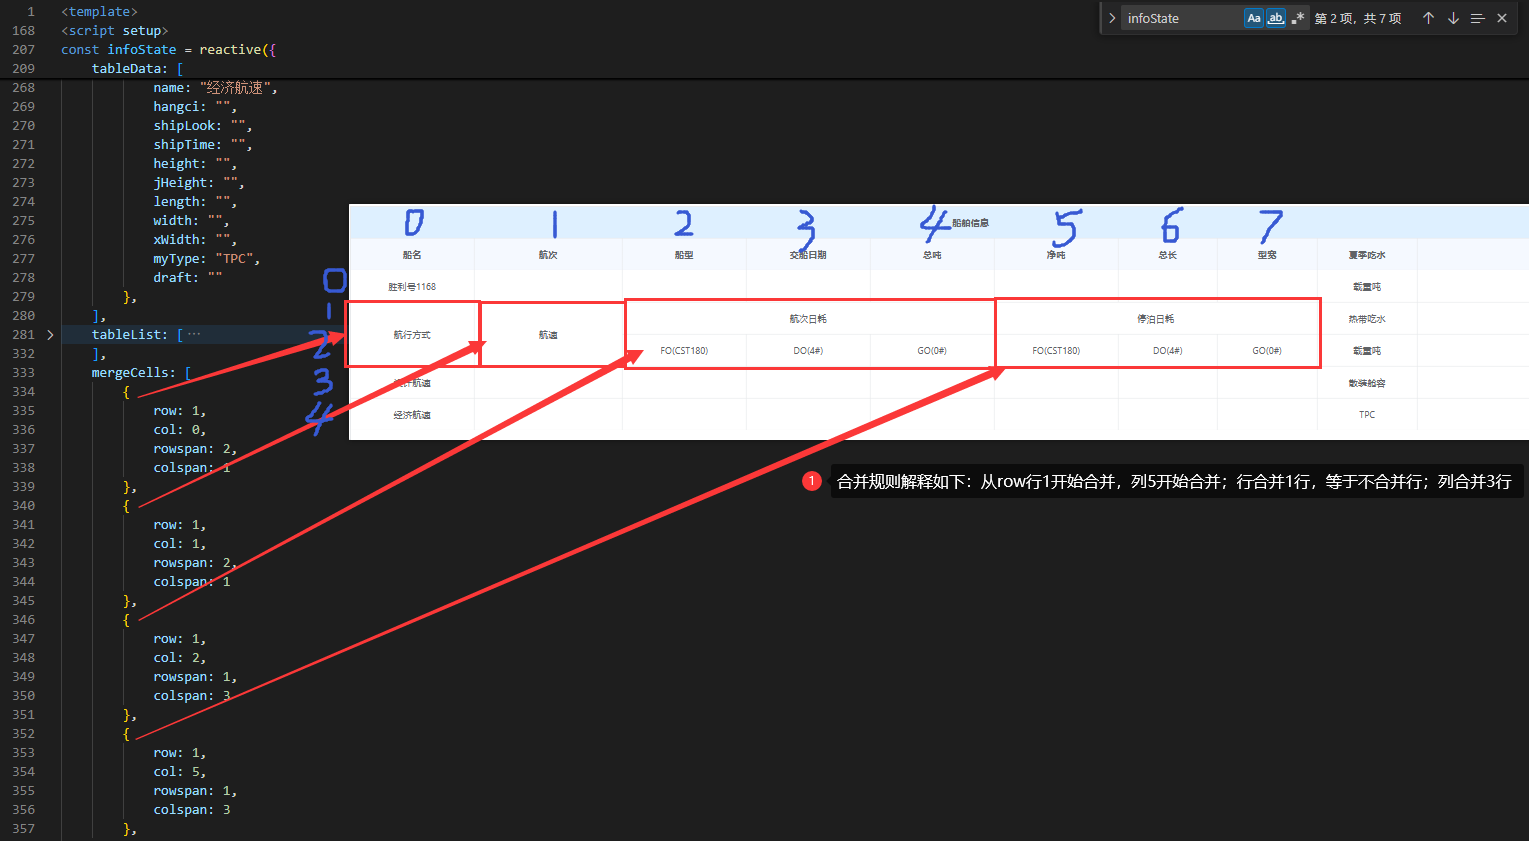
合并单元格的规律是从数值0开始数,行或者列都是从0开始数。行是根据表头确定总数值,列是从第一列确定数值0 ,然后从上往下递增。

合并单元格的规则解释:
示例如下:
写到这儿,你已经能够理解什么是合并行,合并列了 。。。接下来是更复杂的合并单元格
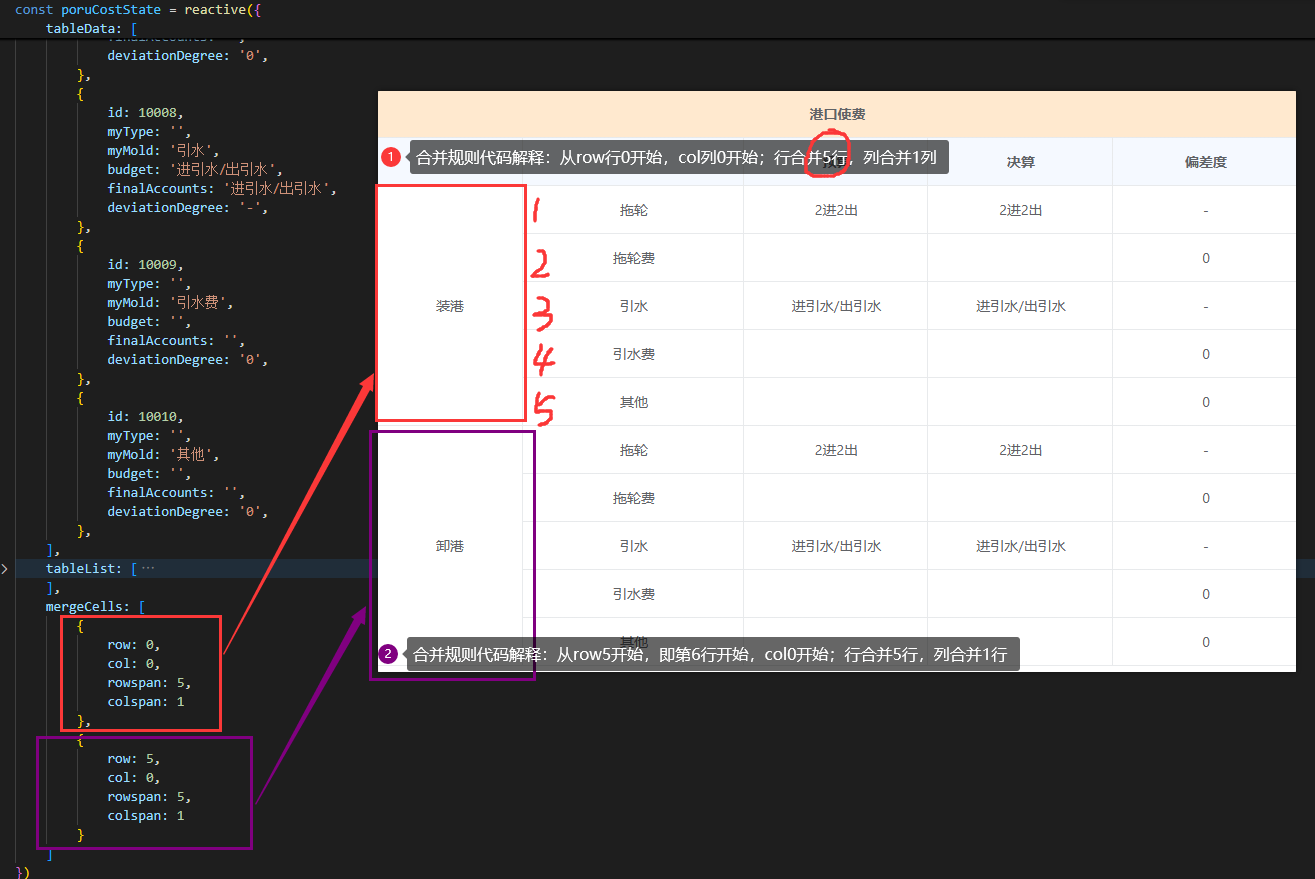
更复杂的示例,如下:
实现效果:

三、合并单元格的merge-cells
(1)、合并单元格
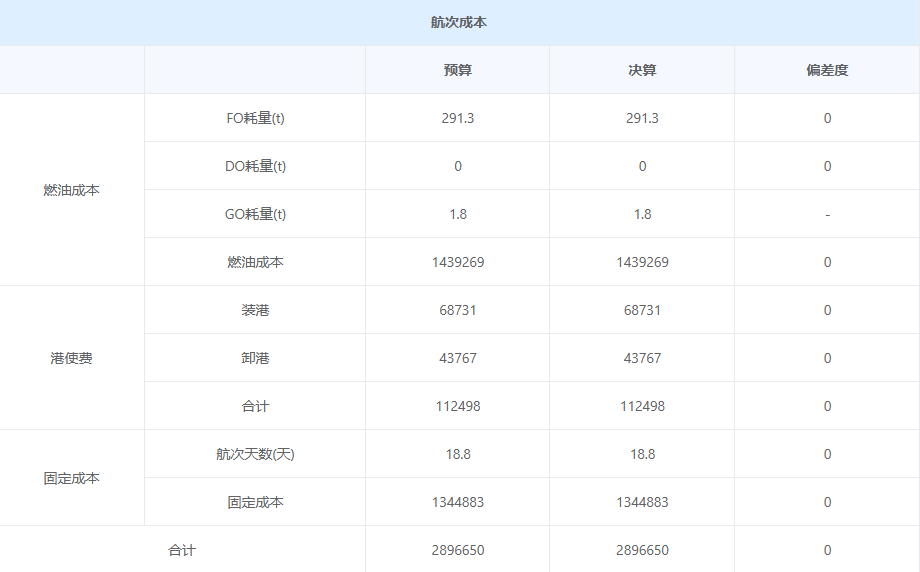
实现效果:
 实现思路:
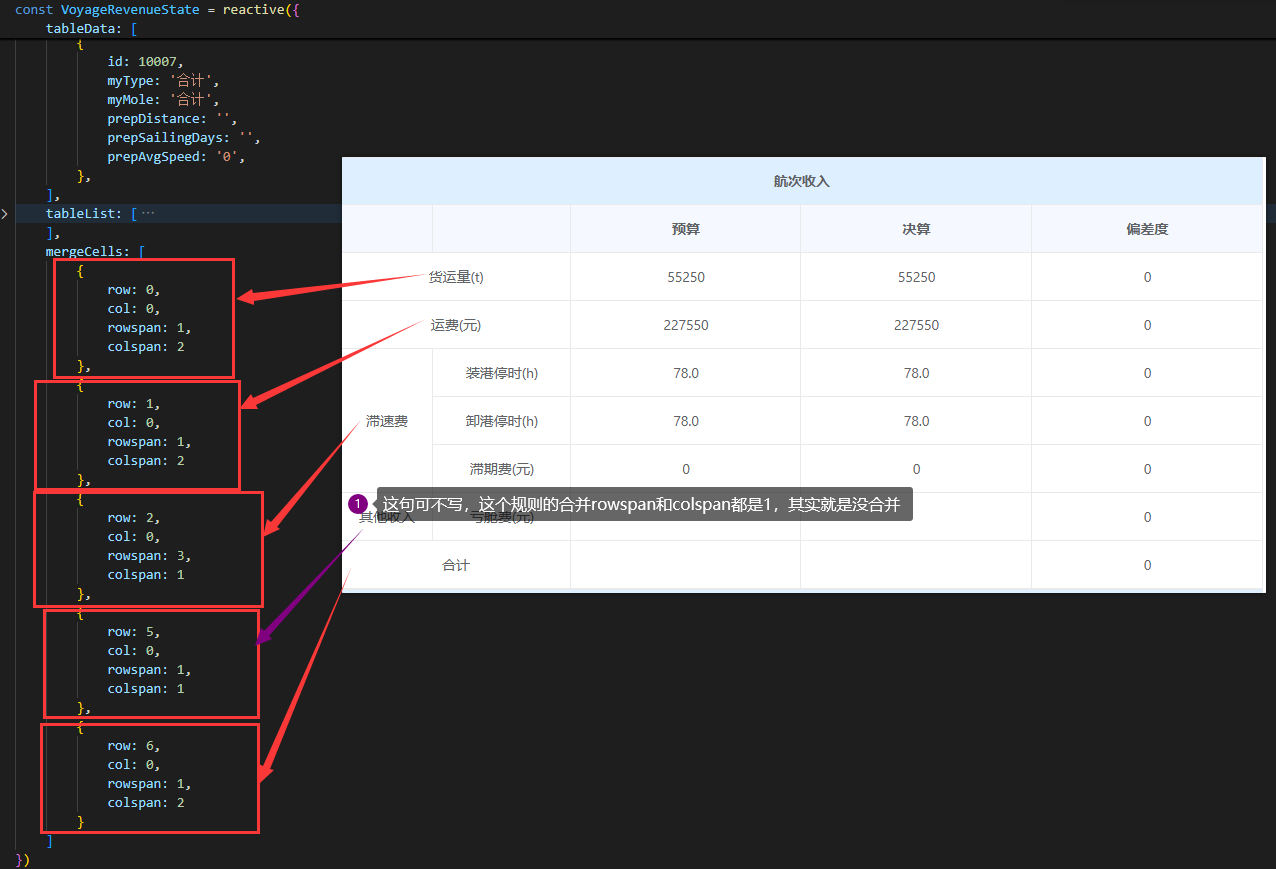
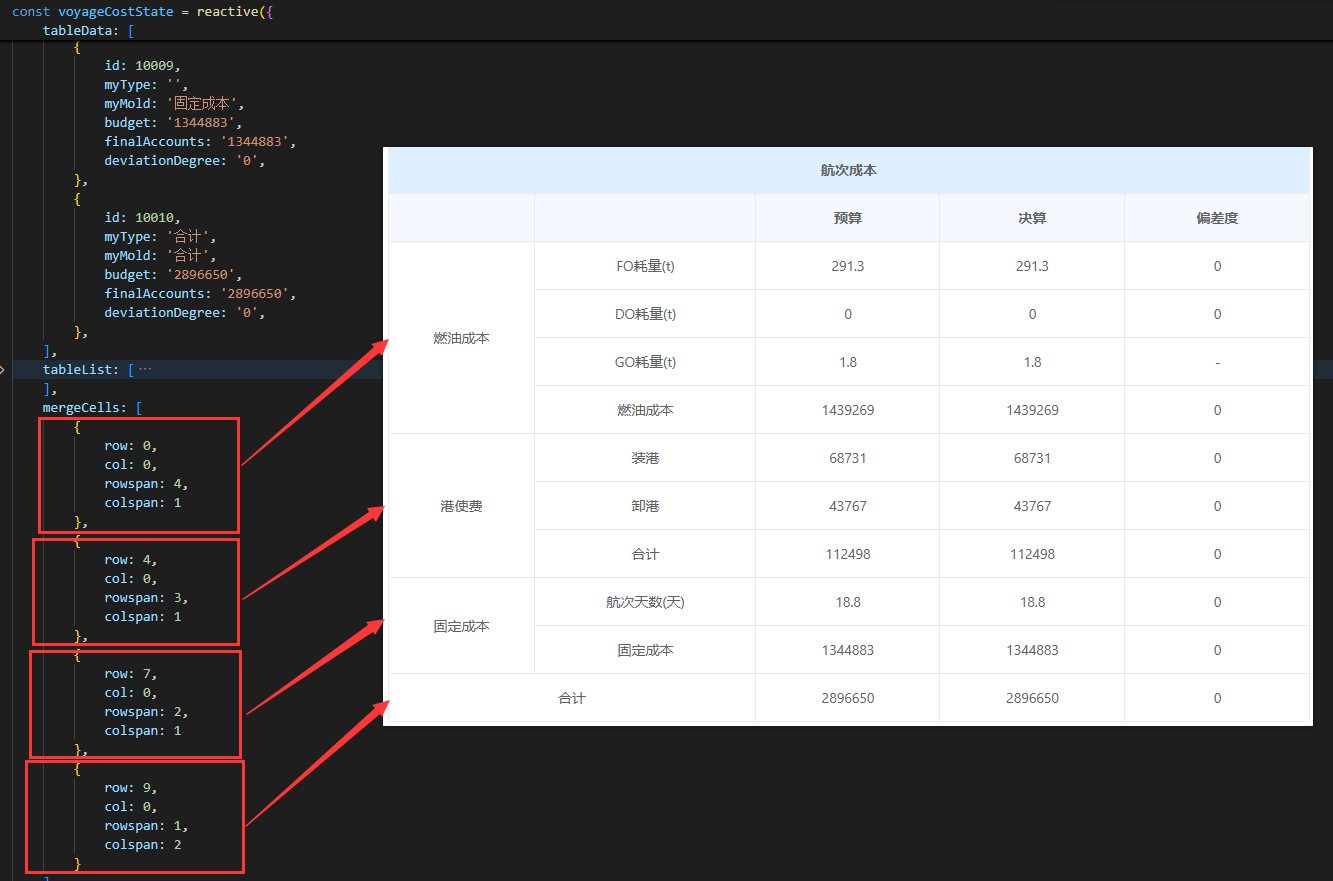
实现思路:
上面这张实现效果,从上往下看,以及从左往右看。有行的合并,也有列的合并。
实现代码:
完整代码:
import { reactive, ref, watch } from \"vue\";const infoState = reactive({ loading: false, tableData: [ { id: 10001, name: \"胜利号1168\", hangci: \"\", shipLook: \"\", shipTime: \"\", height: \"\", jHeight: \"\", length: \"\", width: \"\", xWidth: \"\", myType: \"载重吨\", draft: \"\" }, { id: 10002, name: \"航行方式\", hangci: \"航速\", shipLook: \"航次日耗\", shipTime: \"航次日耗\", height: \"航次日耗\", jHeight: \"停泊日耗\", length: \"停泊日耗\", width: \"停泊日耗\", xWidth: \"31\", myType: \"热带吃水\", draft: \"\" }, { id: 10003, name: \"航行方式\", hangci: \"航速\", shipLook: \"FO(CST180)\", shipTime: \"DO(4#)\", height: \"GO(0#)\", jHeight: \"FO(CST180)\", length: \"DO(4#)\", width: \"GO(0#)\", xWidth: \"31\", myType: \"载重吨\", draft: \"\" }, { id: 10004, name: \"设计航速\", hangci: \"\", shipLook: \"\", shipTime: \"\", height: \"\", jHeight: \"\", length: \"\", width: \"\", xWidth: \"\", myType: \"散装舱容\", draft: \"\" }, { id: 10005, name: \"经济航速\", hangci: \"\", shipLook: \"\", shipTime: \"\", height: \"\", jHeight: \"\", length: \"\", width: \"\", xWidth: \"\", myType: \"TPC\", draft: \"\" }, ], tableList: [ { label: \"船名\", prop: \"name\", width: \'10%\', }, { label: \"航次\", prop: \"hangci\", width: \'12%\', }, { label: \"船型\", prop: \"shipLook\", width: \'10%\', }, { label: \"交船日期\", prop: \"shipTime\", width: \'10%\', }, { label: \"总吨\", prop: \"height\", width: \'10%\', }, { label: \"净吨\", prop: \"jHeight\", width: \'10%\', }, { label: \"总长\", prop: \"length\", width: \'8%\', }, { label: \"型宽\", prop: \"width\", width: \'8%\', }, { label: \"夏季吃水\", prop: \"myType\", width: \'8%\', }, { label: \"\", prop: \"draft\", width: \'14%\', }, ], mergeCells: [ { row: 1, col: 0, rowspan: 2, colspan: 1 }, { row: 1, col: 1, rowspan: 2, colspan: 1 }, { row: 1, col: 2, rowspan: 1, colspan: 3 }, { row: 1, col: 5, rowspan: 1, colspan: 3 }, ]});:deep(.vxe-header--row) { background-color: #def0ff; &:last-child { background-color: #f5f9ff; }}.infoState { height: 400px;}写到这儿,我们就可以自定义表单,各种样式就可以实现了。。。

