vue3配置husky代码规范;基于vite和vue3、 eslint、prettier、stylelint、husky规范;git触发eslint校验_vue husky
前言
为提高前端代码格式化和规范开发。主要使用eslint、prettier、husky完成对git提交commit信息校验和代码eslint格式化校验,不符合要求的代码,提交不到仓库。
参考链接1
参考链接2
文章目录
- 前言
- 一、效果图
-
- 1.git提交触发eslint规范校验
- 2.版本与分支名不一致校验
- 3.commit提交不规范校验
- 4.代码提交规范相关介绍
- 二、Prettier准备
-
- 1.安装Prettier
- 2.安装对应插件
- 3.配置
- 4.配置格式化
- 5.保存自动格式化代码设置
- 三、eslint准备
-
- 1.安装eslint插件
- 2.勾选
- 3.安装eslint依赖
- 4.根添加配置
- 5.package.json添加校验命令
- 四、git检查提交分支和package.json的version版本是否一致
-
- 1.安装命令husky和lint-staged
- 2.初始化
- 3.创建校验脚本
- 4.配置ckage.json
- 5.更新 Husky 钩子
- 6.测试版本不一致的提交效果
- 7.新增分支时自动化同步版本名称
-
- 7.1 实现1(推荐):
- 7.2实现2(不推荐)
- 五、支持eslint.config.js的解析
-
- 1.原生语法解析(无就jsx、无ts)
- 2.有jsx无ts
- 3.有jsx有ts
- 六、git提交规范化类型
-
- 1.package.json添加命令和初始化husky
- 2.安装
- 3.配置git提交类型
- 4.添加commit-msg
- 5.测试git提交规范
- 七、git提交触发eslint
-
- 1.package.json修改
- 2.测试git提交触发eslint
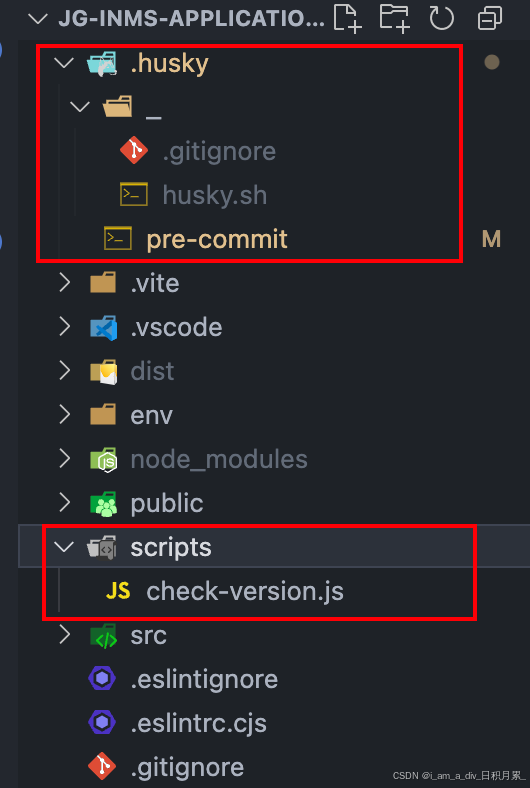
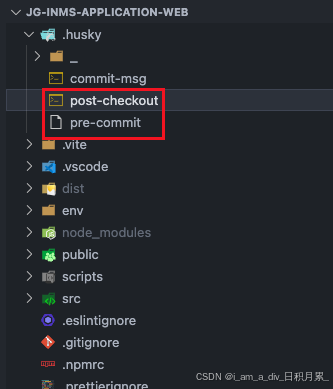
- 八、最终结构
- 九、eslint相关报错
一、效果图
1.git提交触发eslint规范校验

2.版本与分支名不一致校验

3.commit提交不规范校验

4.代码提交规范相关介绍
代码格式规范相关:
- eslint:代码格式校验
- prettier:prettier 主要是为了格式化代码,而在没有 prettier 之前,是用 eslint —fix和 编辑器自带代码格式来进行代码格式化的。
- stylelint:css样式格式校验
代码提交规范相关:
- lint-staged:一个在git暂存文件上运行linters的工具,检查本次修改更新的代码,并自动修复并且可以添加到暂存区
- husky: 是一个Git Hook 工具。将其安装到所在仓库的过程中它会自动在 .git/ 目录下增加相应的钩子实现对应的功能,这里我们通过使用husky来
监测commit-msg钩子,完成提交信息校验;监测 pre-commit 钩子,完成代码校验。 - pre-commit:git hooks的钩子,在代码提交前检查代码是否符合规范,不符合规范将不可被提交
- commit-msg:git hooks的钩子,在代码提交前检查commit信息是否符合规范
- commitizen:git的规范化提交工具,帮助你填写commit信息,符合约定式提交要求
- commitlint:用于检测提交的信息。
文档:
- git规范提交文档
- stylelint
- eslint
二、Prettier准备
1.安装Prettier
Prettier是一个代码格式化工具,它可以自动调整代码的缩进、换行、引号等格式,使代码风格保持一致。与ESLint不同,Prettier主要关注代码的格式问题,而不是语法或逻辑错误。
npm install prettier --save-devpackage.json添加
\"scripts\": { \"prettier\": \"npx prettier . --write\", },2.安装对应插件

3.配置
.prettierignore忽略文件
.github.husky.vscode/public/**/node_modules/****/*.svg**/*.sh.prettierrc.cjs配置文件
/* eslint-disable no-undef */module.exports = { printWidth: 200, tabWidth: 2, useTabs: false, semi: false, trailingComma: \"none\", singleQuote: false, bracketSpacing: true, jsxBracketSameLine: false, endOfLine: \"auto\", arrowParens: \"avoid\", singleAttributePerLine: false, htmlWhitespaceSensitivity: \"ignore\"}4.配置格式化
在vscode 的设置里面 找到代码格式化设置,设置为使用 prettier格式化代码
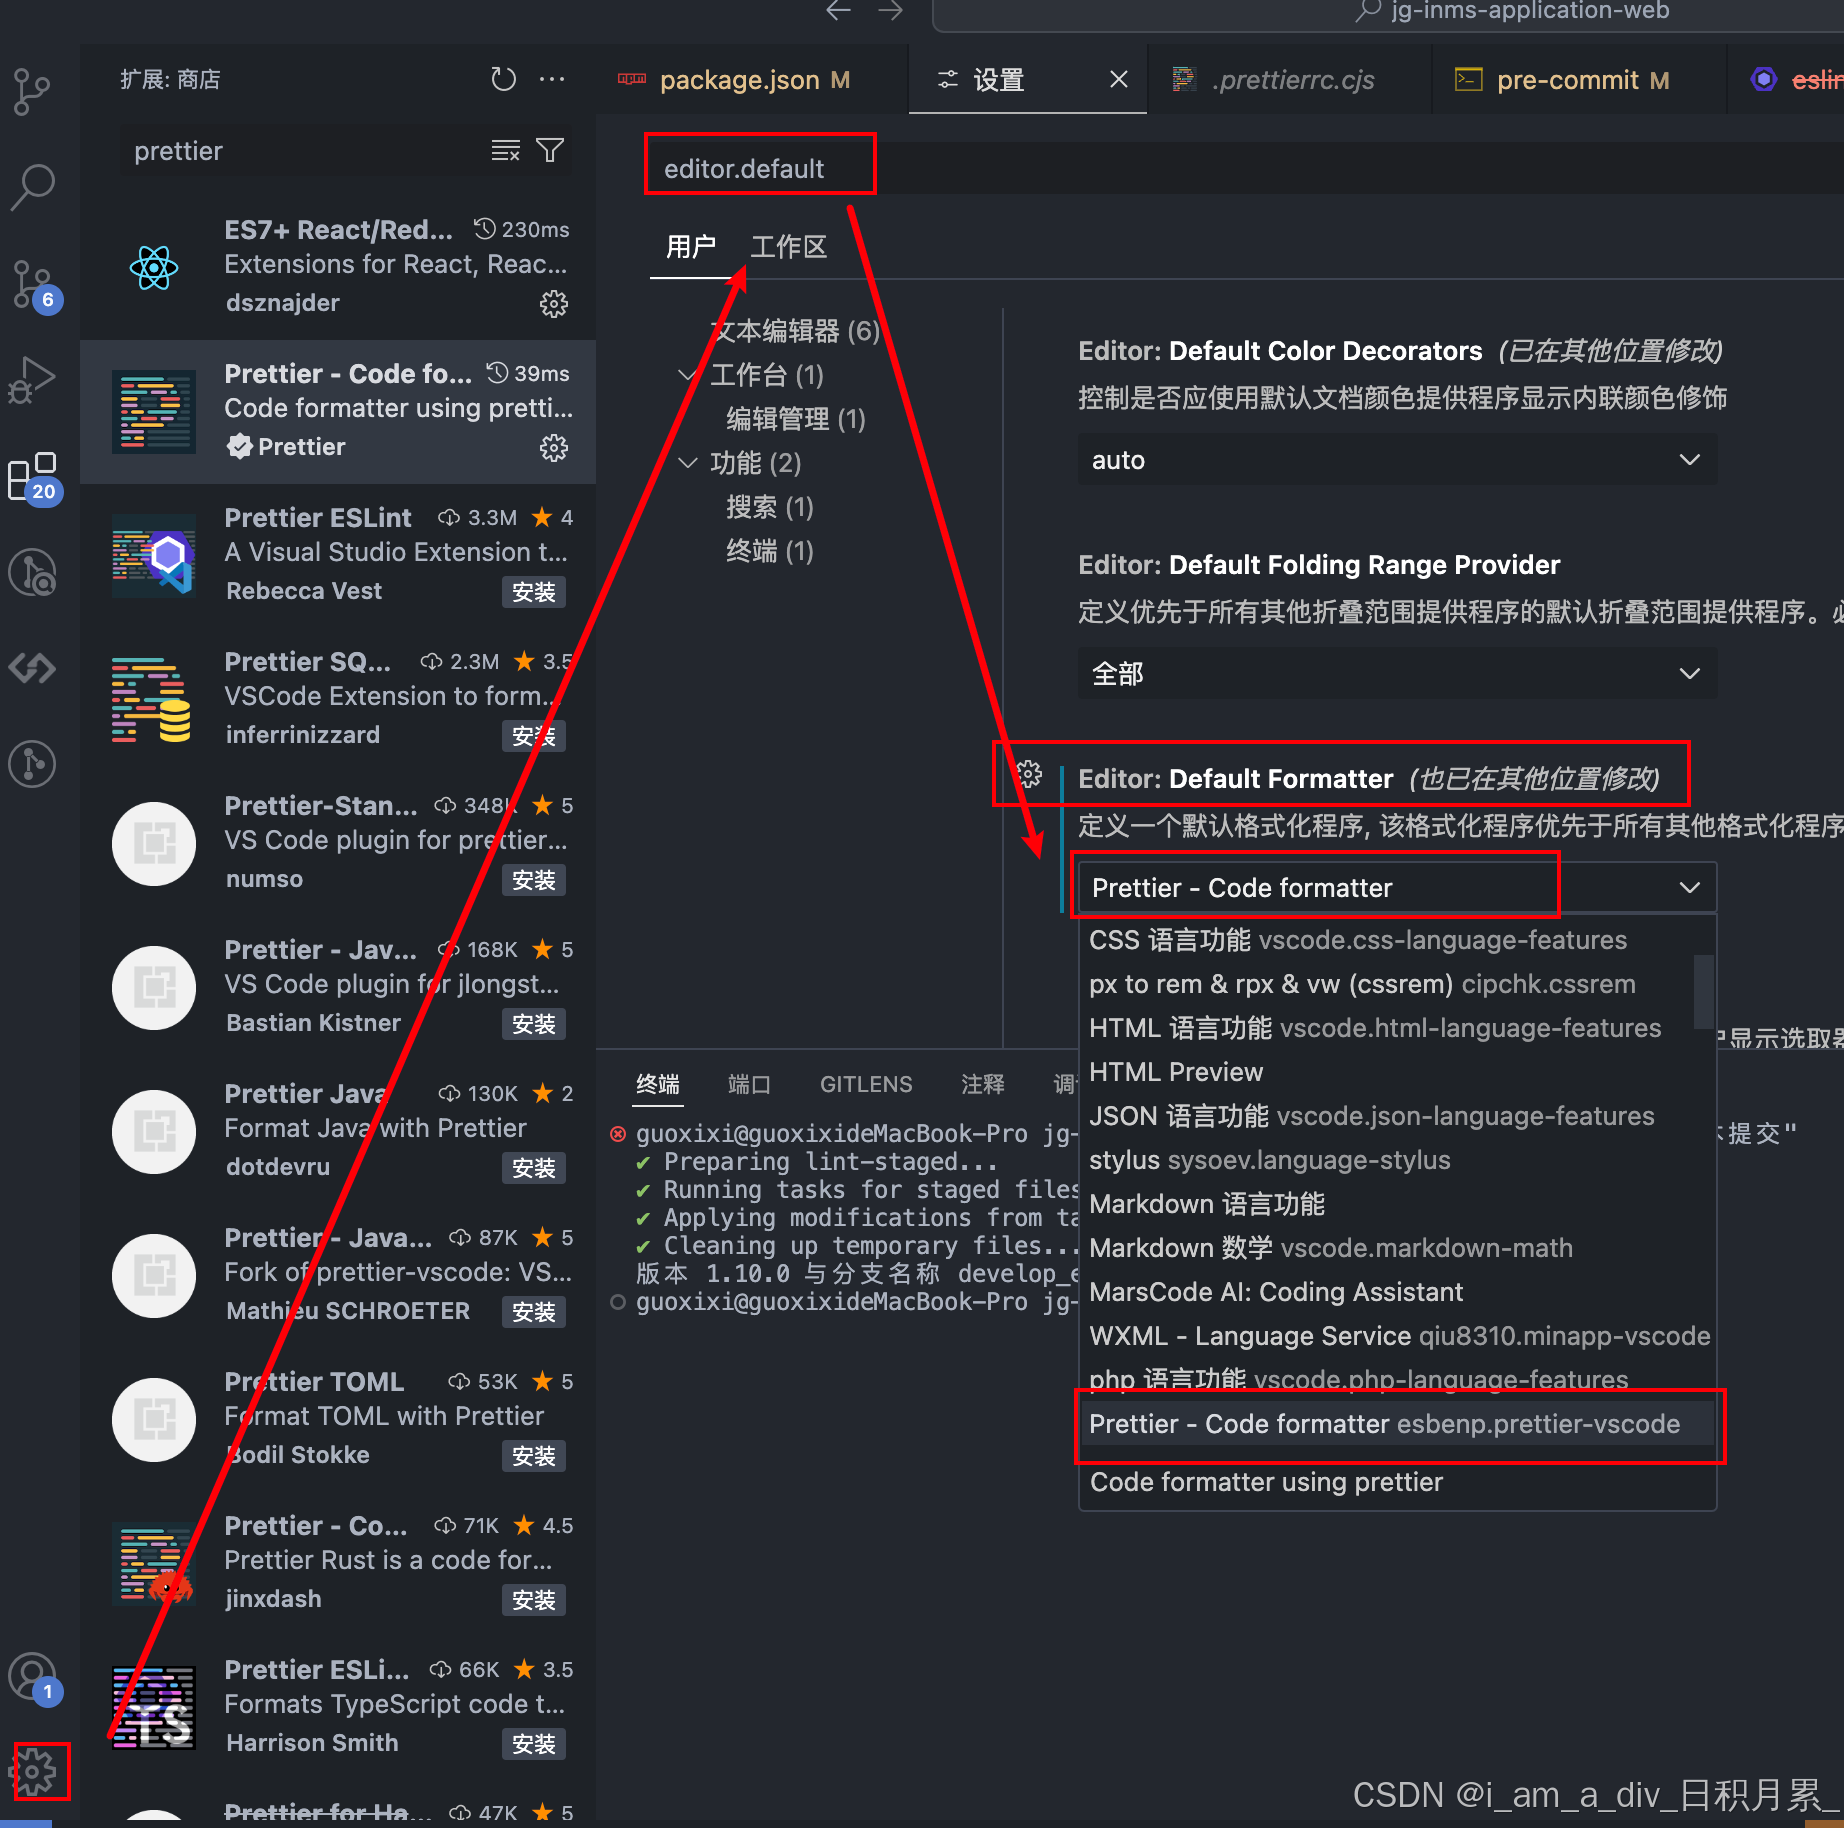
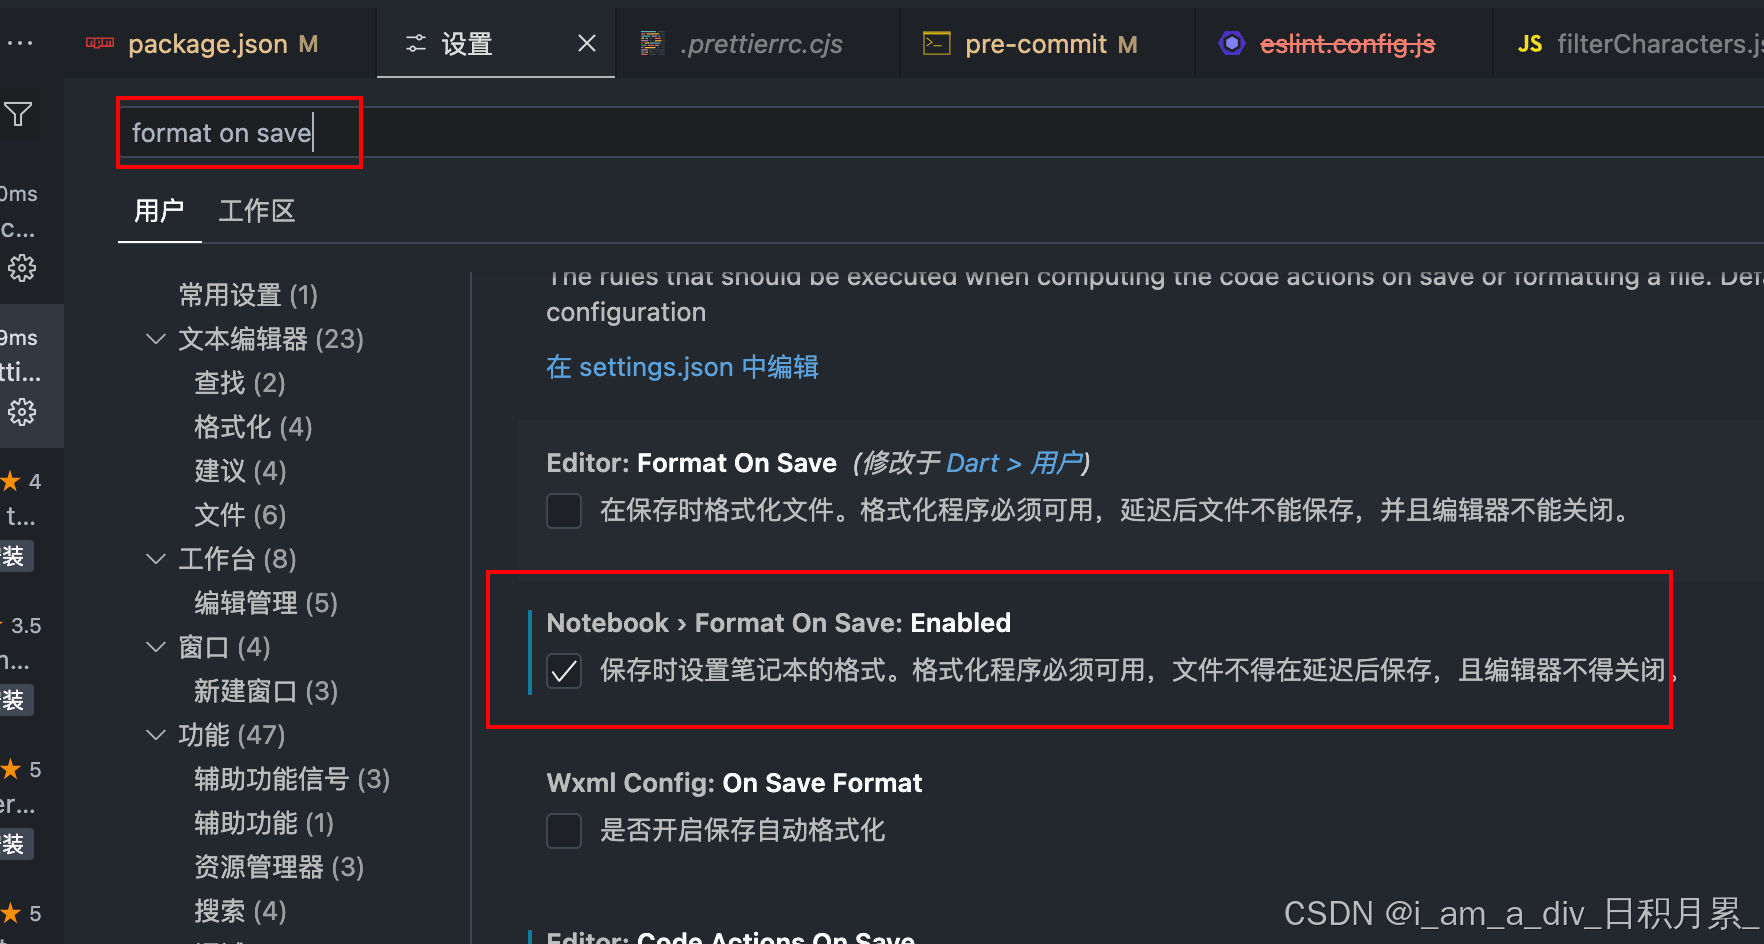
5.保存自动格式化代码设置
三、eslint准备
1.安装eslint插件

2.勾选
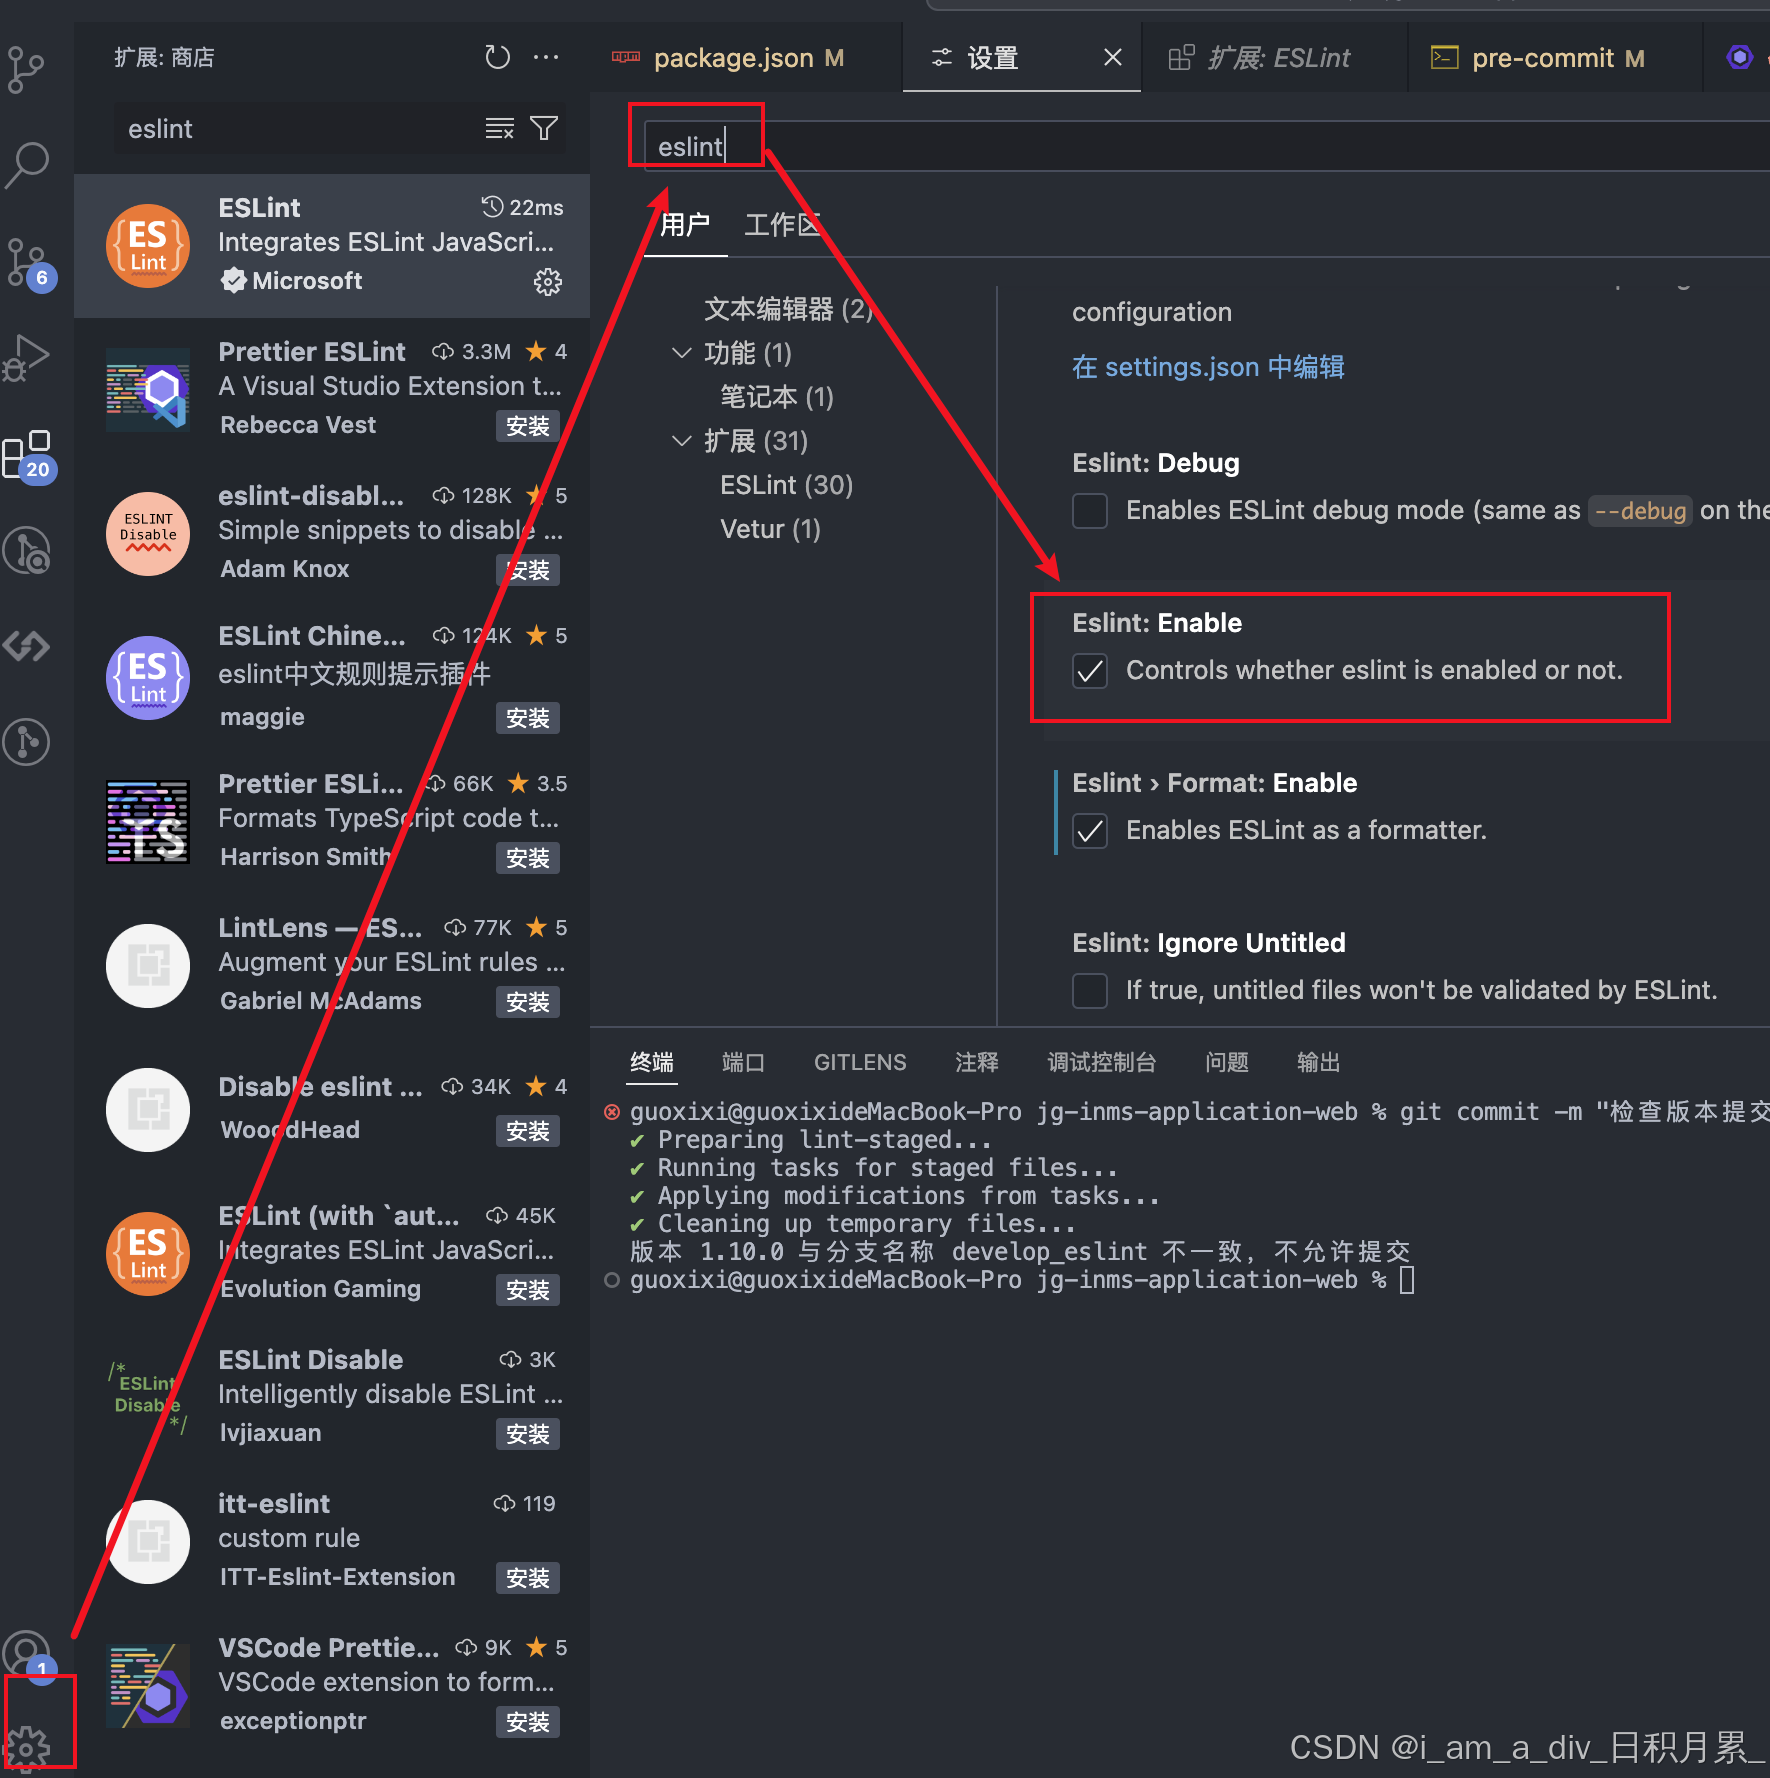
3.安装eslint依赖
pnpm add @eslint/js@9.8.0 eslint@9.8.0 eslint-plugin-vue@9.27.0 globals@15.8.0 --save-dev4.根添加配置
.eslintignore
*.sh*.md*.woff*.ttf.vscode.husky.githubnode_modulesdisteslint.config.js: 添加这个文件后才可以支持eslnt触发校验
这个文件的配置,具体可以看文章最后的 五、支持eslint.config.js的解析 内容
import globals from \"globals\"import pluginJs from \"@eslint/js\"import pluginVue from \"eslint-plugin-vue\"export default [ { files: [\"**/*.{js,mjs,cjs,vue}\"] }, // 注意范围 { languageOptions: { globals: { ...globals.browser, ...globals.node } } }, pluginJs.configs.recommended, ...pluginVue.configs[\"flat/essential\"], { files: [\"**/*.vue\"], rules: { \"vue/html-self-closing\": \"off\", \"vue/multi-word-component-names\": \"off\", \"vue/max-attributes-per-line\": \"off\", \"vue/singleline-html-element-content-newline\": \"off\", \"max-lines\": [\"error\", { max: 500, skipBlankLines: true, skipComments: true }] } }, { ignores: [\"node_modules/*\", \"dist/*\", \"public/*\"] }]5.package.json添加校验命令
5.1命令
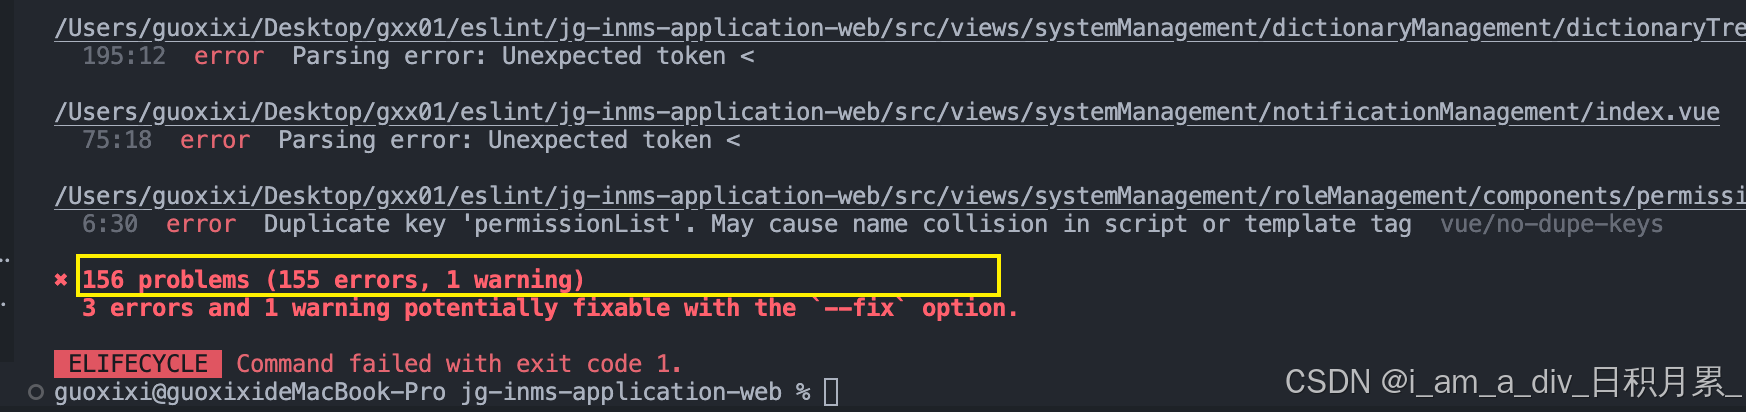
\"scripts\": { \"prettier\": \"npx prettier . --write\", \"lint\": \"npx eslint .\" },5.2执行npm run lint就会触发eslint的校验,看到eslint报错。
5.3同时页面应该也可以看到eslint的报错了。
- 如果此时vscode看不到具体的页面的eslint报错,那就关闭项目,重启vscode。
- 如果发现做了上述操作之后,还是没触发,那就把vscode的 eslint、prettier 扩展插件 卸载了重新安装,然后重启vscode,就可以解决了
四、git检查提交分支和package.json的version版本是否一致
详细单独配置版本检查看此篇
新增内容:
1.安装命令husky和lint-staged
npm install husky@9.1.4 lint-staged@15.2.9 --save-dev2.初始化
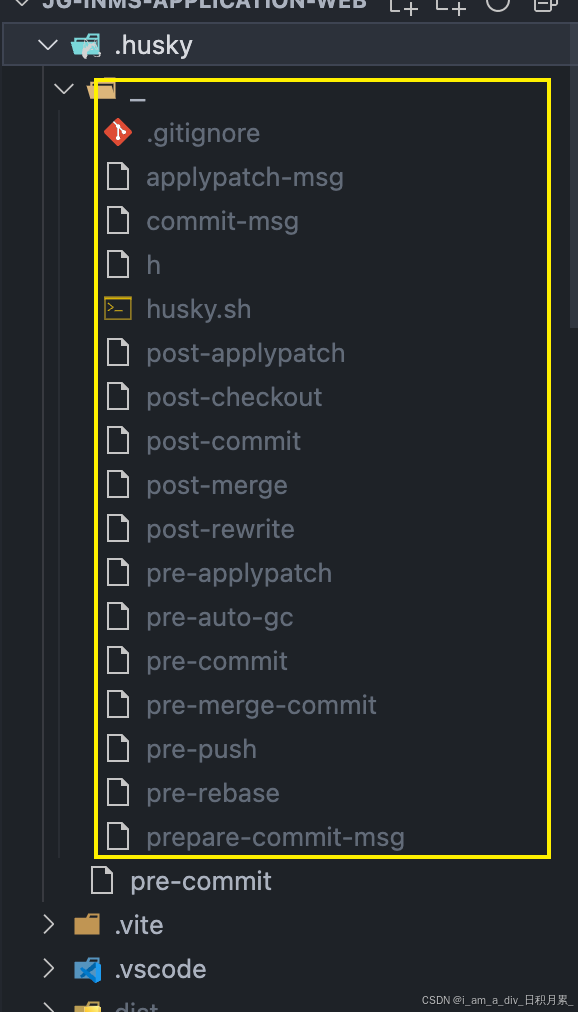
npx husky-init && pnpm install生成 .husky 目录及 pre-commit 钩子文件
3.创建校验脚本
在项目根目录新建 scripts/check-version.js:
import fs from \"fs\"import { execSync } from \"child_process\"// 获取packageJson内容const packageJson = JSON.parse(fs.readFileSync(\"package.json\", \"utf8\"))// 获取当前分支名const branchName = execSync(\"git rev-parse --abbrev-ref HEAD\").toString().trim()if (!branchName.includes(packageJson.version)) { console.error(`版本 ${packageJson.version} 与分支名称 ${branchName} 不一致,不允许提交`) process.exit(1)}4.配置ckage.json
配置lint-staged,添加校验:
注意此时仅仅校验版本,没有校验eslint
\"scripts\": { \"prepare\": \"husky install\" }, \"lint-staged\": { \"*.{js,jsx,ts,tsx}\": [ \"prettier --write\" ], \"*.vue\": [ \"prettier --write\" ] }5.更新 Husky 钩子
修改 .husky/pre-commit:
npx lint-stagednode scripts/check-version.js6.测试版本不一致的提交效果
7.新增分支时自动化同步版本名称
-
如果仅是满足校验提交时候的分支和version版本是否一致,上述1-6步骤已经够了。
-
第7步是为了优化:使用
git checkout -b abc创建新分支abc时候,自动将package.json的version版本名改成当前新分支名abc7.1 实现1(推荐):
- 创建.husky/post-checkout文件,在post-checkout文件内添加以下代码即可:
#!/bin/shBRANCH=$(git rev-parse --abbrev-ref HEAD)node -e \"const fs=require(\'fs\');const pkg=require(\'./package.json\');pkg.version=\'$BRANCH\';fs.writeFileSync(\'./package.json\', JSON.stringify(pkg, null, 2));\"- 注意此方式确实可以完成创建新分支时候,版本名称和分支名一致,自己再进行git add .和git commit -m即可。
- 略微有点瑕疵(也不算瑕疵):就是你在vscode的左右使用撤回操作,是无法撤回掉这个version修改的;在package.json里使用撤回是可以撤回成功(但是你也没必要撤回,因为你要保持分支和版本一致)
- 至于为什么左侧无法撤回:因为Git的撤销操作只能还原被Git跟踪的文件变更,而你的钩子脚本是在每次切换分支时主动修改了package.json,Git会认为这是你主动的修改而非需要跟踪的变更。
新建分支和版本一致的效果图:

7.2实现2(不推荐)
- 创建.husky/post-checkout文件,在post-checkout文件内添加以下代码即可:
#!/bin/shBRANCH=$(git rev-parse --abbrev-ref HEAD)node -e \"const fs=require(\'fs\');const pkg=require(\'./package.json\');pkg.version=\'$BRANCH\';fs.writeFileSync(\'./package.json\', JSON.stringify(pkg, null, 2));\"# 自动保存版本commit信息git add package.jsongit commit --no-verify -m \"feat: 创建 $BRANCH 新分支,自动同步更新version\"- 该脚本实在修改version后,通过脚本进行了git add和git commit。通过git log查看确实也commit成功了,但是vscode本身却监听不到这个自动化执行的脚本,导致切换分支时候也可以切换成功,但是会有git提示
效果图:

五、支持eslint.config.js的解析
1.原生语法解析(无就jsx、无ts)
import globals from \"globals\"import pluginJs from \"@eslint/js\"import pluginVue from \"eslint-plugin-vue\"export default [ { files: [\"**/*.{js,mjs,cjs,vue}\"] }, // 注意范围 { languageOptions: { globals: { ...globals.browser, ...globals.node } } }, pluginJs.configs.recommended, ...pluginVue.configs[\"flat/essential\"], { files: [\"**/*.vue\"], rules: { \"vue/html-self-closing\": \"off\", \"vue/multi-word-component-names\": \"off\", \"vue/max-attributes-per-line\": \"off\", \"vue/singleline-html-element-content-newline\": \"off\", \"max-lines\": [\"error\", { max: 500, skipBlankLines: true, skipComments: true }] } }, { ignores: [\"node_modules/*\", \"dist/*\", \"public/*\"] }]2.有jsx无ts
报错:jsx报错Parsing error: Unexpected token <eslint
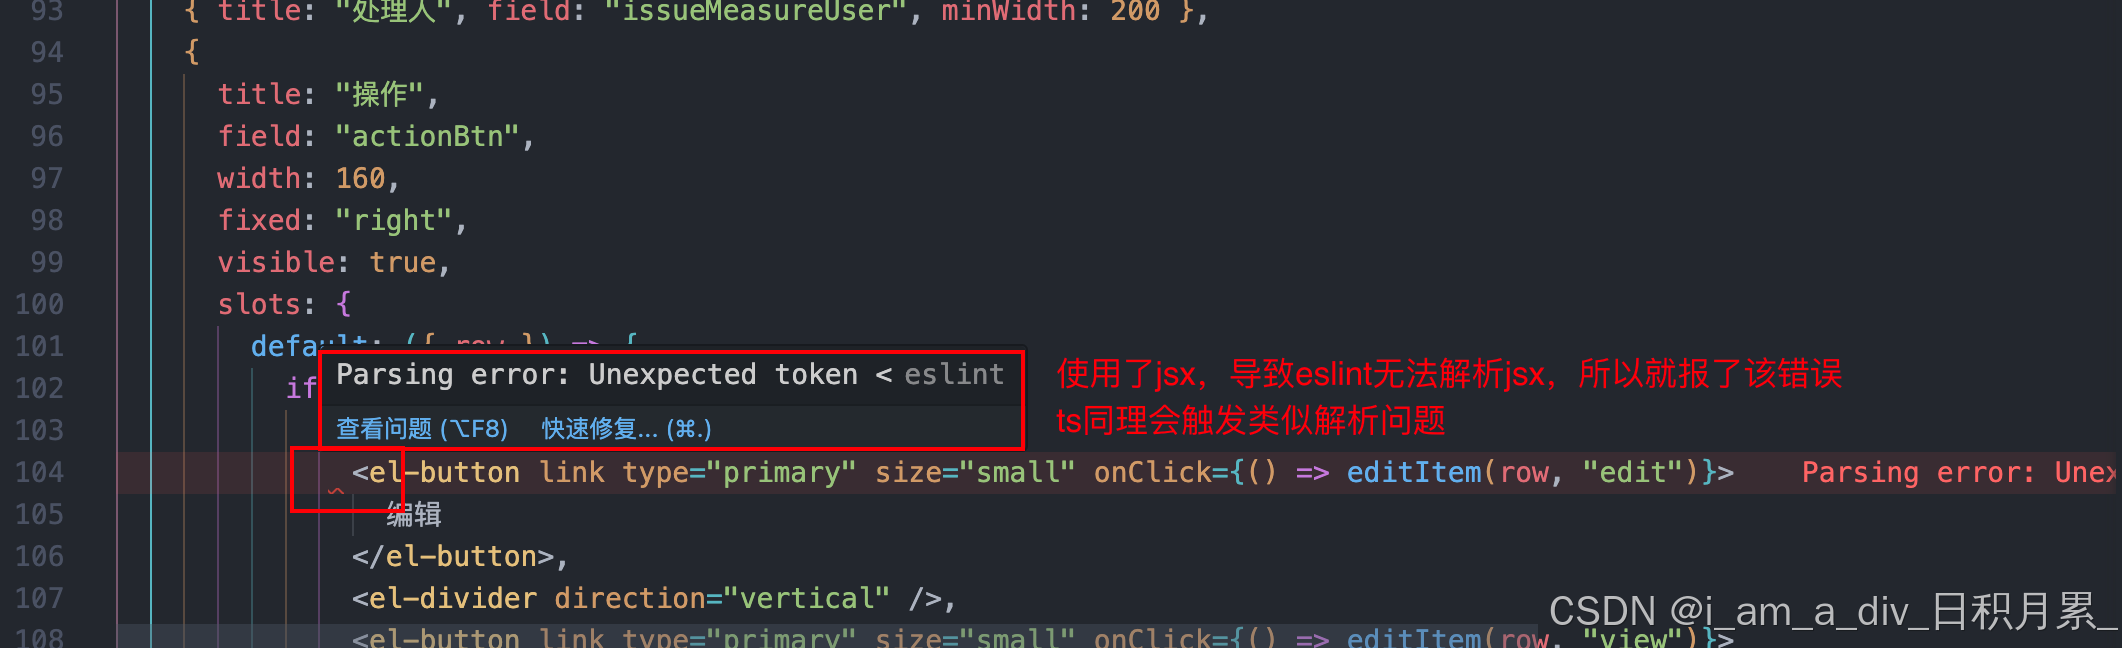
安装依赖
npm install vue-eslint-parser --save-devimport globals from \"globals\"import pluginJs from \"@eslint/js\"import pluginVue from \"eslint-plugin-vue\"import babelParser from \"vue-eslint-parser\"; // 显式导入解析器对象-否则引入报错export default [ { files: [\"**/*.{js,jsx,vue}\"], // 注意范围 languageOptions: { // 正确引用解析器对象(非字符串) parser: babelParser, parserOptions: { ecmaVersion: \"latest\", sourceType: \"module\", ecmaFeatures: { jsx: true } }, globals: { ...globals.browser, ...globals.node } } }, pluginJs.configs.recommended, ...pluginVue.configs[\"flat/essential\"], { files: [\"**/*.vue\"], rules: { \"vue/html-self-closing\": \"off\", \"vue/multi-word-component-names\": \"off\", \"vue/max-attributes-per-line\": \"off\", \"vue/singleline-html-element-content-newline\": \"off\", \"max-lines\": [\"error\", { max: 500, skipBlankLines: true, skipComments: true }] } }, { ignores: [\"node_modules/*\", \"dist/*\", \"public/*\"] }]3.有jsx有ts
- 我的这里比较特殊,最初有jsx和ts代码时候,没有安装
@typescript-eslint/parser和@typescript-eslint/eslint-plugin这两个插件时候,ts的代码是会报Parsing error: Unexpected token {的eslint问题。 - 但是当我安装下面两个依赖后,
eslint.config.js继续使用2.有jsx无ts的配置时,发现ts的报错也没了。。。 - 原因:
files: [\"**/*.{js,jsx,ts,tsx,vue}\"],漏了写ts,tsx - 正确解决问题的方式如下
安装依赖
npm install @typescript-eslint/parser @typescript-eslint/eslint-plugin --save-dev注意:project: \"./tsconfig.json\"的路径
import globals from \"globals\";import pluginJs from \"@eslint/js\";import pluginVue from \"eslint-plugin-vue\";import vueParser from \"vue-eslint-parser\";import tsParser from \"@typescript-eslint/parser\"; // 导入 TS 解析器import tsEslintParser from \"@typescript-eslint/eslint-plugin\"; // 导入 TS 解析器export default [ // 核心配置 { files: [\"**/*.{js,jsx,ts,tsx,vue}\"], // 注意范围 languageOptions: { // 主解析器:处理 Vue 文件 parser: vueParser, parserOptions: { // 子解析器:处理非 Vue 文件(TS/JS) parser: { js: tsParser, // 处理 JS/JSX ts: tsParser, // 处理 TS/TSX jsx: tsParser, tsx: tsParser }, ecmaVersion: \"latest\", sourceType: \"module\", ecmaFeatures: { jsx: true }, // 关联 tsconfig.json(路径根据实际项目调整) project: \"./tsconfig.json\" // 【【【【【【【【【【【【【【【【【【【【【【【【【【【【【【【【【【注意这里路径调整,没有ts配置文件就注释掉该行】】】】】】】】】】】】】】】】】】】】】】】】】】】】】】】】】】】】】 }, globals: { ...globals.browser, ...globals.node } } }, // 应用推荐规则 pluginJs.configs.recommended, // Vue3 配置 ...pluginVue.configs[\"flat/essential\"], // TypeScript 配置 { plugins: { \"@typescript-eslint\": tsEslintParser }, rules: { // \"@typescript-eslint/no-unused-vars\": \"warn\" // 示例规则 } }, // 自定义规则 { files: [\"**/*.vue\"], rules: { \"vue/html-self-closing\": \"off\", \"vue/multi-word-component-names\": \"off\", \"vue/max-attributes-per-line\": \"off\", \"vue/singleline-html-element-content-newline\": \"off\", \"max-lines\": [\"error\", { max: 500, skipBlankLines: true, skipComments: true }] } }, // 忽略文件 { ignores: [\"node_modules/*\", \"dist/*\", \"public/*\"] }]六、git提交规范化类型
规范提交文档
1.package.json添加命令和初始化husky
package.json至少要有这些配置
\"scripts\": { \"prettier\": \"npx prettier . --write\", \"prepare\": \"husky install\", \"commitlint\": \"commitlint --edit\" }, \"husky\": { \"hooks\": { \"commit-msg\": \"commitlint -E HUSKY_GIT_PARAMS\" } }, \"lint-staged\": { \"*.{js,jsx,ts,tsx}\": [ \"prettier --write\" ], \"*.vue\": [ \"prettier --write\" ] }执行npm run prepare,初始化husky的文件
2.安装
npm i @commitlint/cli @commitlint/config-conventional -D3.配置git提交类型
- 根目录配置:commitlint.config.js 这个已经满足常用的git格式规范了
const config = { ignores: [commit => commit.includes(\"init\")], rules: { \"header-max-length\": [2, \"always\", 100], \"scope-case\": [2, \"always\", \"lowerCase\"], \"subject-empty\": [2, \"never\"], \"subject-case\": [2, \"always\", [\"lower-case\", \"sentence-case\", \"start-case\", \"pascal-case\", \"upper-case\"]], \"subject-full-stop\": [2, \"never\", \".\"], \"type-empty\": [2, \"never\"], \"type-case\": [2, \"always\", \"lowerCase\"], \"type-enum\": [2, \"always\", [\"feat\", \"fix\", \"style\", \"perf\", \"docs\", \"refactor\", \"test\"]] }}export default config特殊规则配置,看这里
4.添加commit-msg
在.husky/下新增commit-msg
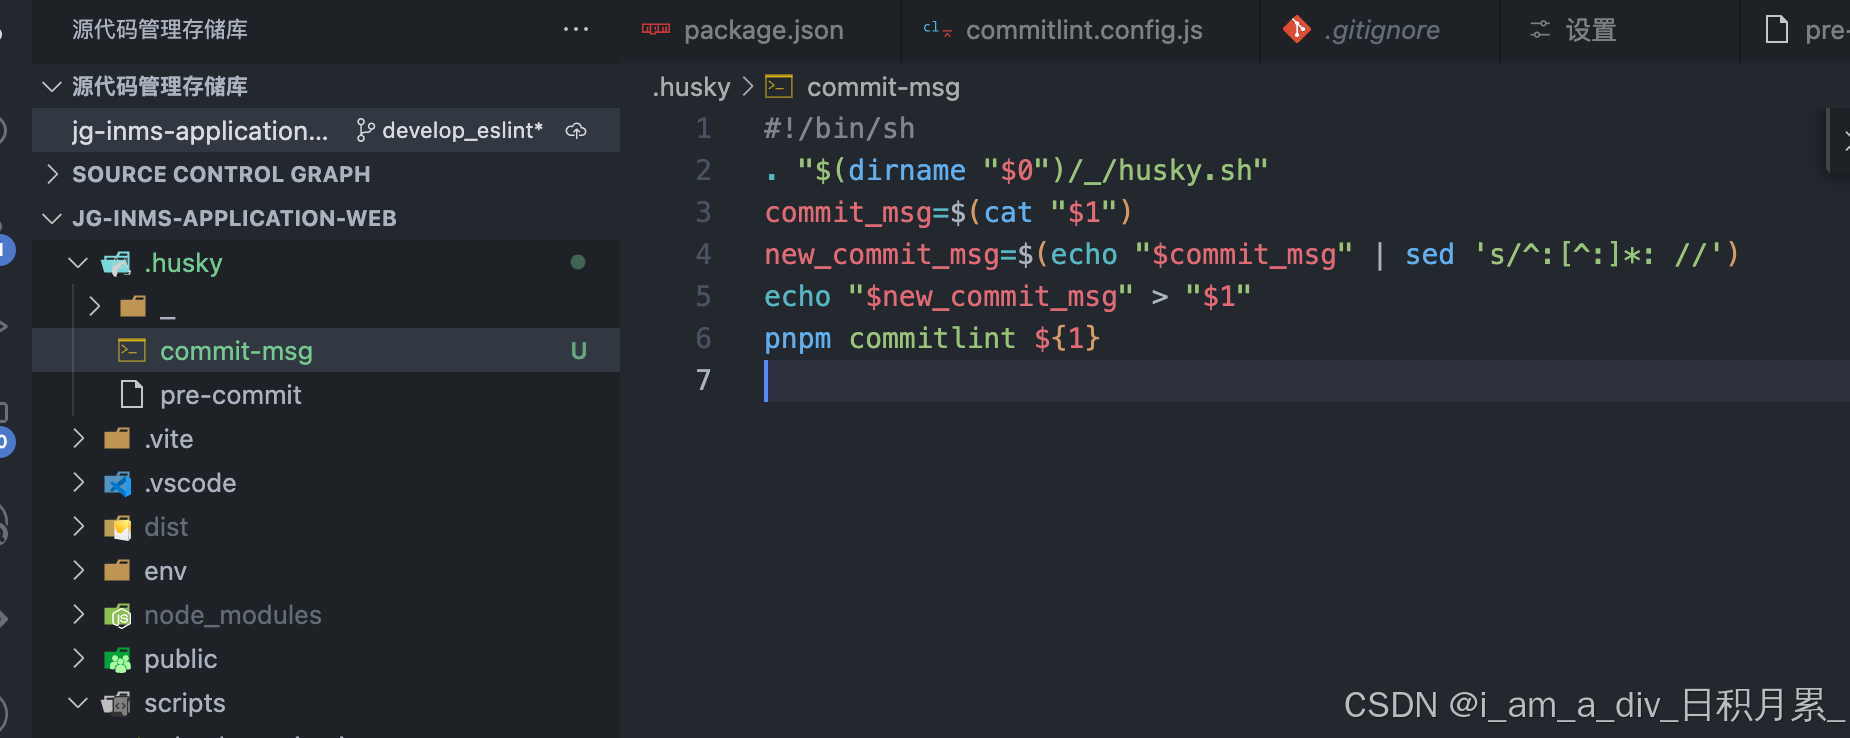
#!/bin/sh. \"$(dirname \"$0\")/_/husky.sh\"commit_msg=$(cat \"$1\")new_commit_msg=$(echo \"$commit_msg\" | sed \'s/^:[^:]*: //\')echo \"$new_commit_msg\" > \"$1\"pnpm commitlint ${1}5.测试git提交规范
七、git提交触发eslint
注意:只是针对当前新增的缓存区文件,触发eslint;历史提交成功的文件,eslint就不校验了。可以通过npm run eslint去单独触发,单独依次修改掉
1.package.json修改
在上述所有步骤的基础上加上\"eslint --fix\",
\"lint-staged\": { \"*.{js,jsx,ts,tsx}\": [ \"eslint --fix\", \"prettier --write\" ], \"*.vue\": [ \"eslint --fix\", \"prettier --write\" ] }2.测试git提交触发eslint
八、最终结构
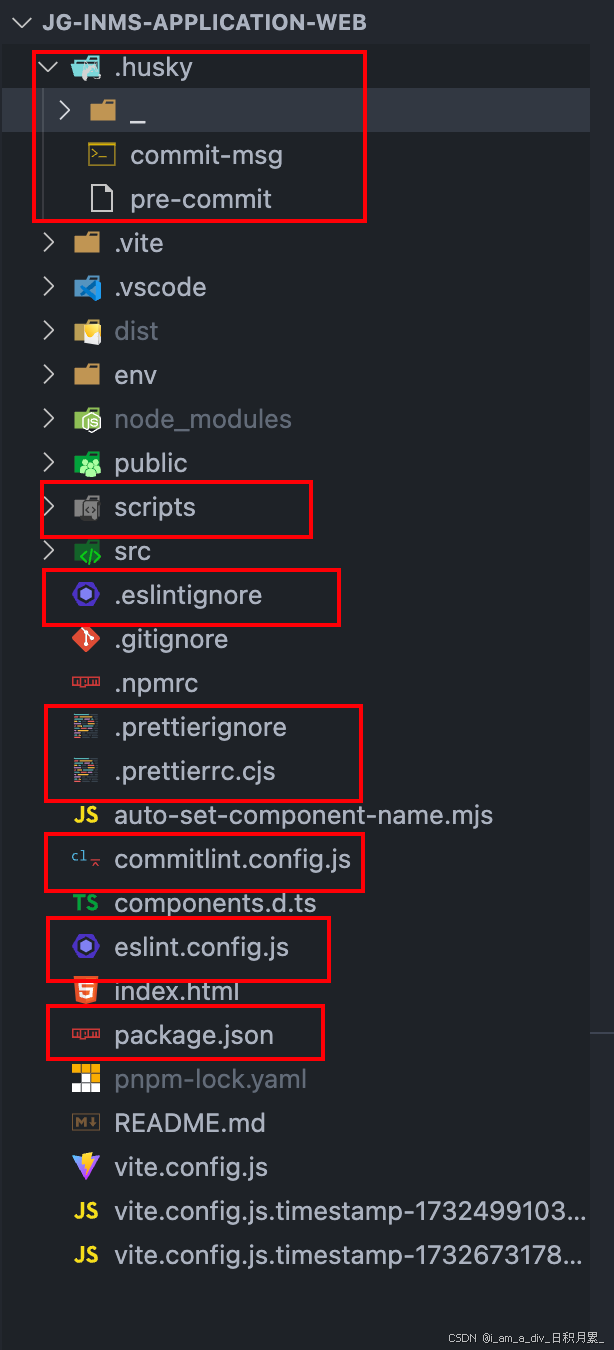
package.json配置
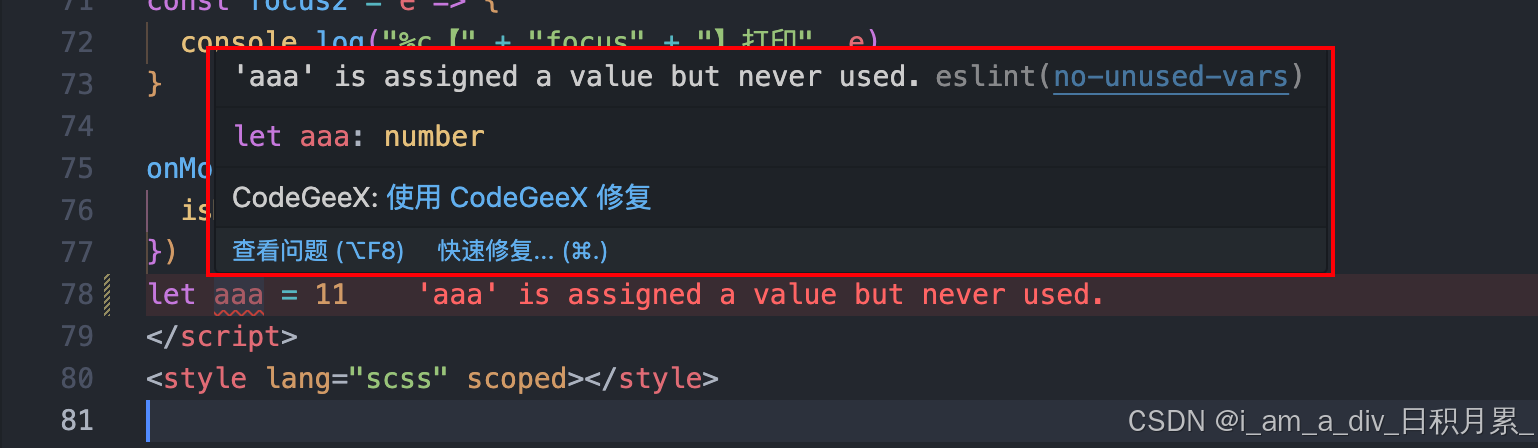
{ \"name\": \"jg-risk-detection-web\", \"private\": true, \"version\": \"develop_eslint\", \"type\": \"module\", \"scripts\": { \"dev\": \"pnpm setName && vite --mode beta --host\", \"setName\": \"node auto-set-component-name.mjs\", \"develop\": \"vite build --mode develop\", \"test\": \"vite build --mode test\", \"online\": \"vite build --mode online\", \"build\": \"vite build\", \"build:electron\": \"vite build --mode electron\", \"build:prod\": \"pnpm test && pnpm build:electron\", \"preview\": \"vite preview\", \"prettier\": \"npx prettier . --write\", \"prepare\": \"husky install\", \"lint\": \"npx eslint .\", \"commitlint\": \"commitlint --edit\" }, \"dependencies\": { \"@antv/g6\": \"^4.8.24\", \"@element-plus/icons-vue\": \"^2.3.1\", \"@jg/jg-ui\": \"^0.0.1\", \"@vueuse/core\": \"^10.11.1\", \"@web/jg-plugin\": \"^0.0.34\", \"@xterm/addon-fit\": \"^0.10.0\", \"@xterm/xterm\": \"^5.5.0\", \"axios\": \"^1.6.8\", \"dayjs\": \"^1.11.10\", \"echarts\": \"^5.4.3\", \"element-plus\": \"2.8.4\", \"element-resize-detector\": \"^1.2.4\", \"fast-glob\": \"^3.3.2\", \"highlight.js\": \"^11.10.0\", \"lodash\": \"^4.17.21\", \"pinia\": \"^2.1.7\", \"pinia-plugin-persist\": \"1.0.0\", \"pinia-plugin-persistedstate\": \"^3.2.1\", \"sortablejs\": \"^1.15.6\", \"vite-plugin-svg-icons\": \"^2.0.1\", \"vue\": \"^3.4.21\", \"vue-diff\": \"^1.2.4\", \"vue-draggable-plus\": \"^0.6.0\", \"vue-router\": \"4\", \"vxe-pc-ui\": \"4.3.82\", \"vxe-table\": \"4.9.29\" }, \"devDependencies\": { \"@commitlint/cli\": \"^19.8.0\", \"@commitlint/config-conventional\": \"^19.8.0\", \"@eslint/js\": \"9.8.0\", \"@typescript-eslint/eslint-plugin\": \"^8.31.0\", \"@typescript-eslint/parser\": \"^8.31.0\", \"@vitejs/plugin-vue\": \"^5.0.4\", \"@vitejs/plugin-vue-jsx\": \"^4.0.1\", \"eslint\": \"^9.8.0\", \"eslint-plugin-vue\": \"^9.27.0\", \"globals\": \"15.8.0\", \"gm-crypt\": \"^0.0.2\", \"gm-crypto\": \"^0.1.12\", \"husky\": \"^9.1.4\", \"lint-staged\": \"^15.2.9\", \"prettier\": \"3.2.5\", \"sass\": \"1.65.1\", \"unplugin-auto-import\": \"^0.17.5\", \"unplugin-vue-components\": \"^0.26.0\", \"unplugin-vue-define-options\": \"^1.4.2\", \"vite\": \"^5.2.0\", \"vite-plugin-lazy-import\": \"^1.0.7\", \"vue-eslint-parser\": \"^10.1.3\" }, \"husky\": { \"hooks\": { \"commit-msg\": \"commitlint -E HUSKY_GIT_PARAMS\" } }, \"lint-staged\": { \"*.{js,jsx,ts,tsx}\": [ \"eslint --fix\", \"prettier --write\" ], \"*.vue\": [ \"eslint --fix\", \"prettier --write\" ] }}九、eslint相关报错
链接


