Vue中的TDD与单元测试_关于vue项目的单元测试
Vue中的TDD与单元测试
- 一、什么是TDD
-
- 1.TDD开发流程
- 2.TDD的优势
- 二、Vue环境中配置Jest
- 三、vue-test-utils的配置和使用
- 四、使用TDD的方式开发Header组件
- 五、Header快照测试
- 六、通用代码提取
- 七、实现undolist
- 八、完整代码
- 九、CodeCoverage代码覆盖率
- 十、总结
一、什么是TDD
1.TDD开发流程
- 编写测试用例
- 运行测试,测试用例无法通过测试
- 编写代码,使测试用例通过测试
- 优化代码,完成开发
- 重复上述步骤
2.TDD的优势
- 长期减少回归bug
- 代码质量更好(阻止,可维护性)
- 测试覆盖率高
- 错误测试代码不容易出现
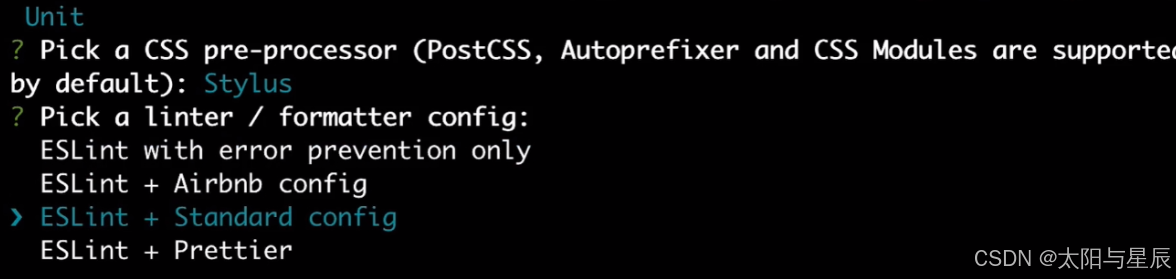
二、Vue环境中配置Jest
安装vue脚手架工具:
vue create jest-vue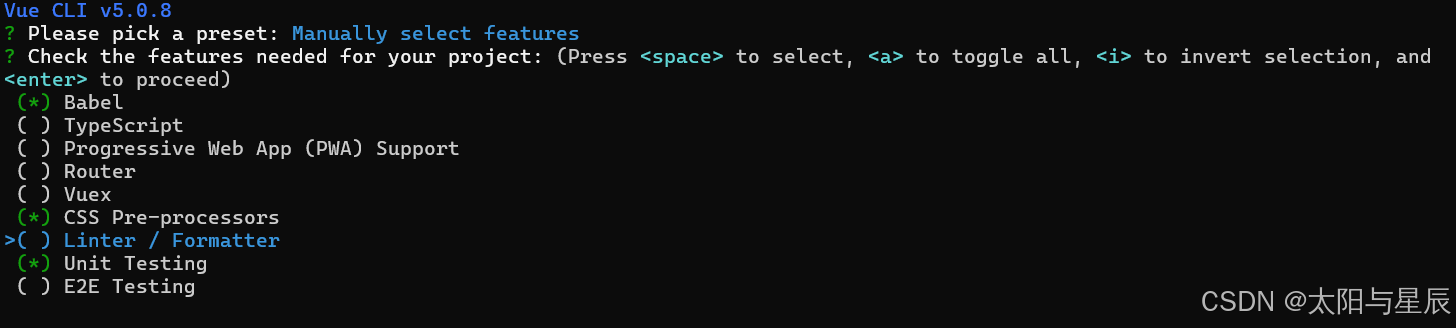


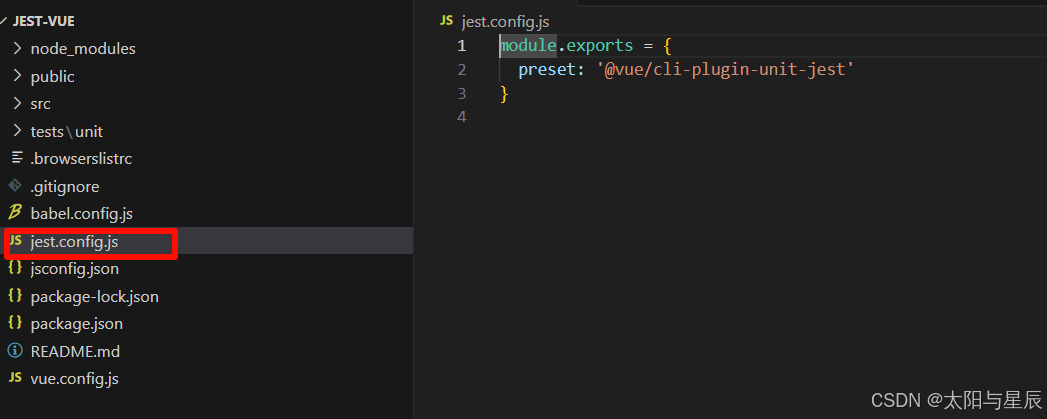
安装成功之后项目目录如下:
不同版本项目的jest配置文件可能不太一样,目录也可能大同小异,不过影响不大。
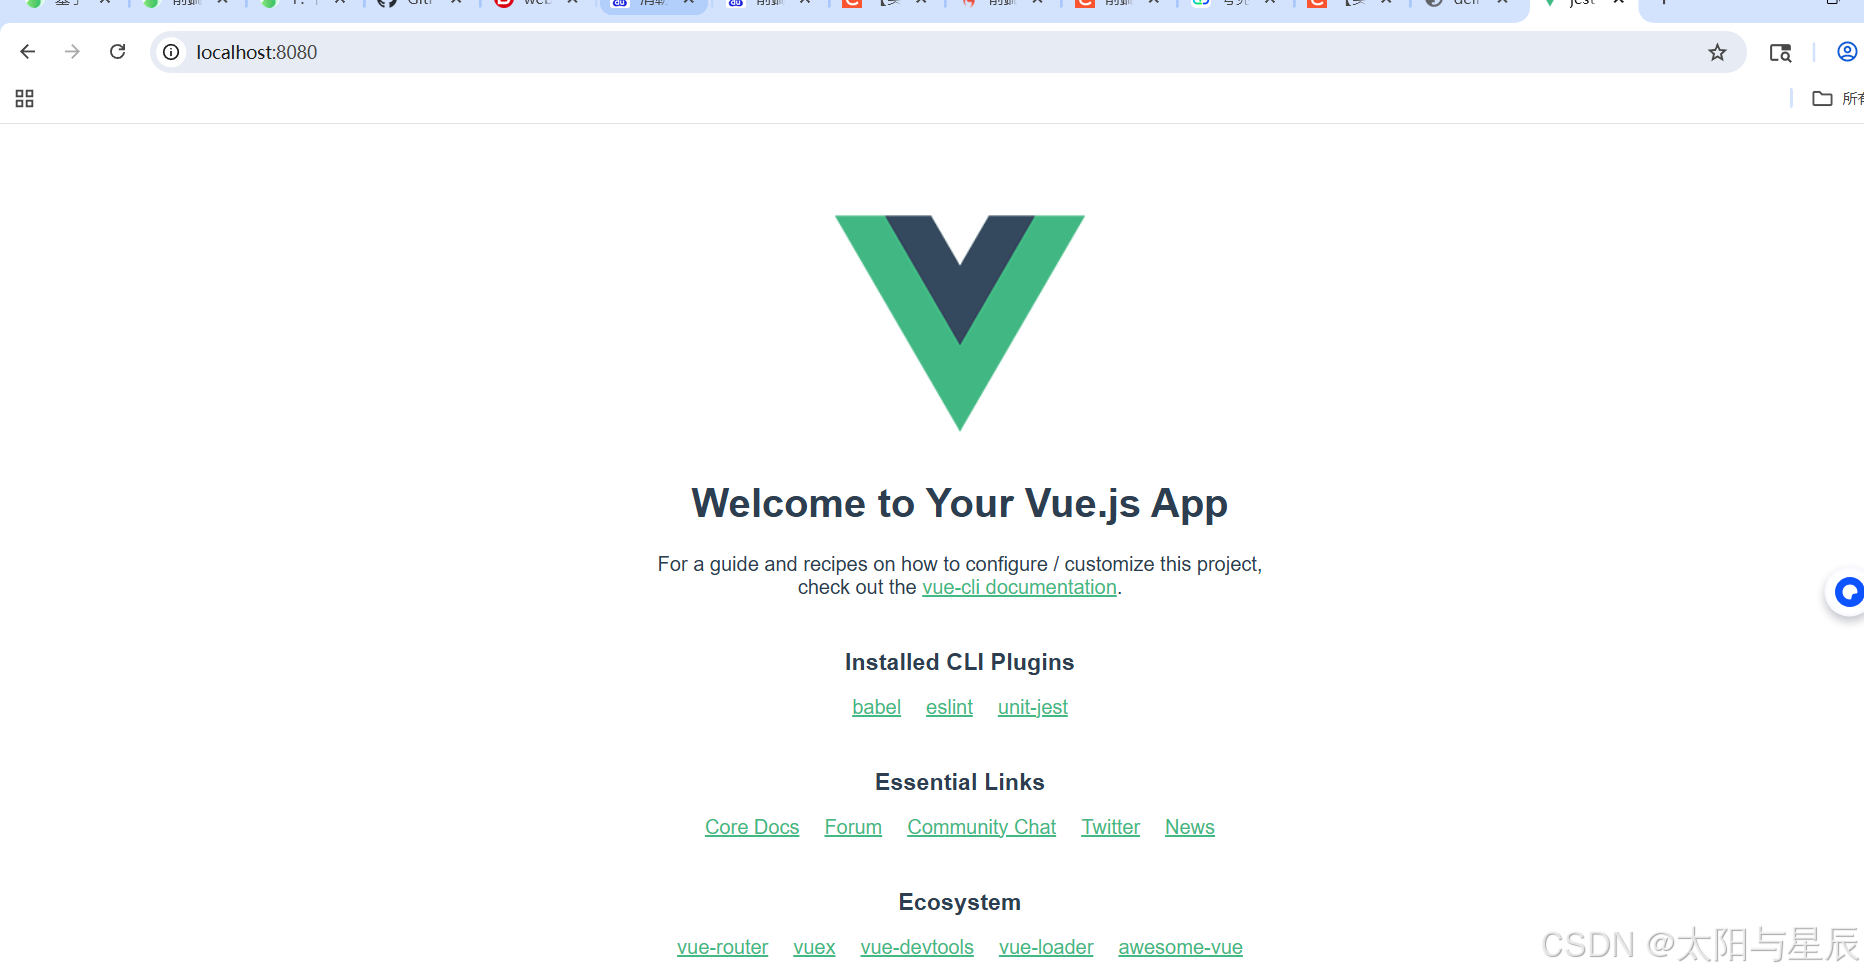
运行npm run serve:
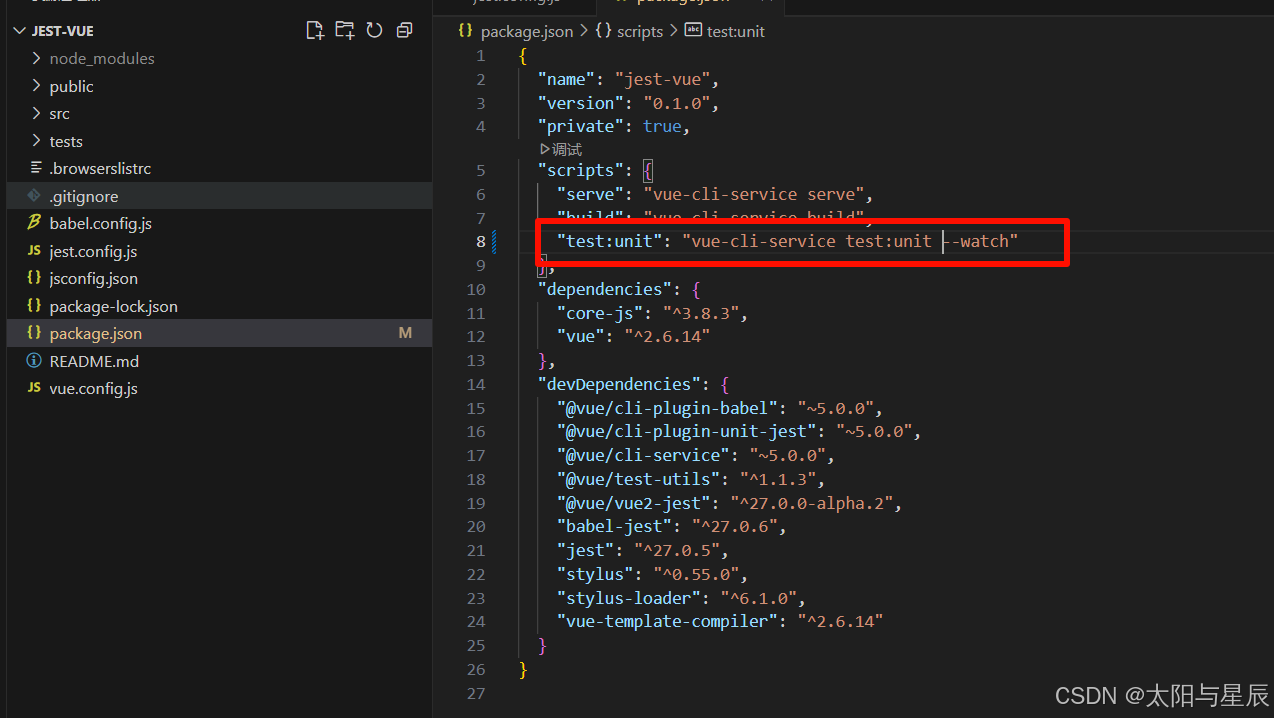
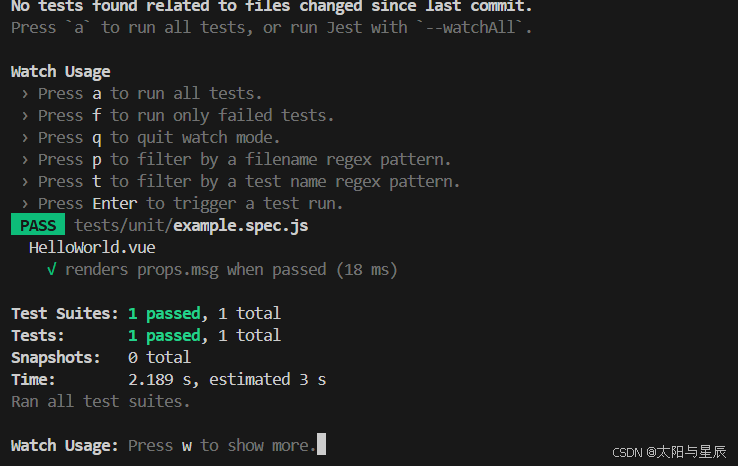
输入npm run test:unit

按a:
三、vue-test-utils的配置和使用
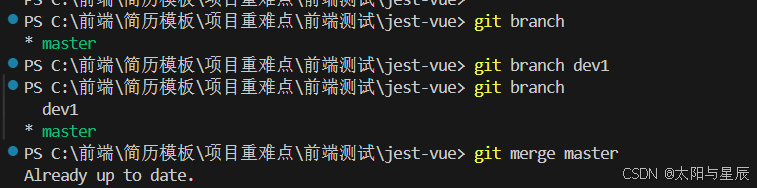
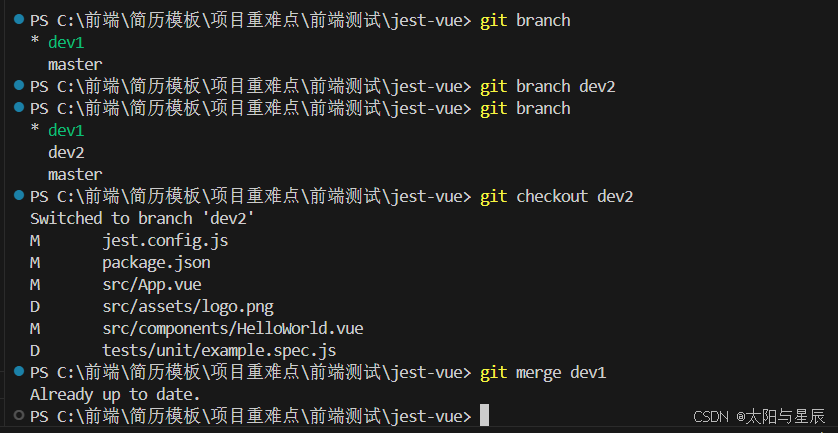
新建一个分支:
对没用的文件资源进行清理(这个可自行清理)。
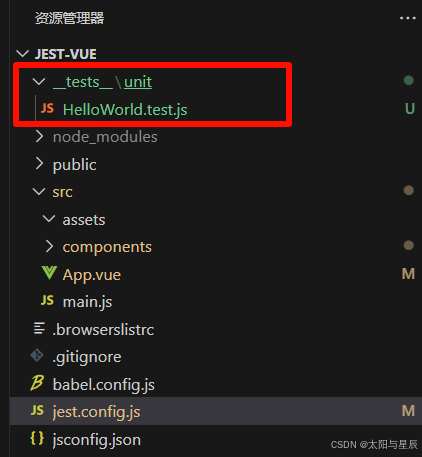
去test/unit文件夹下:
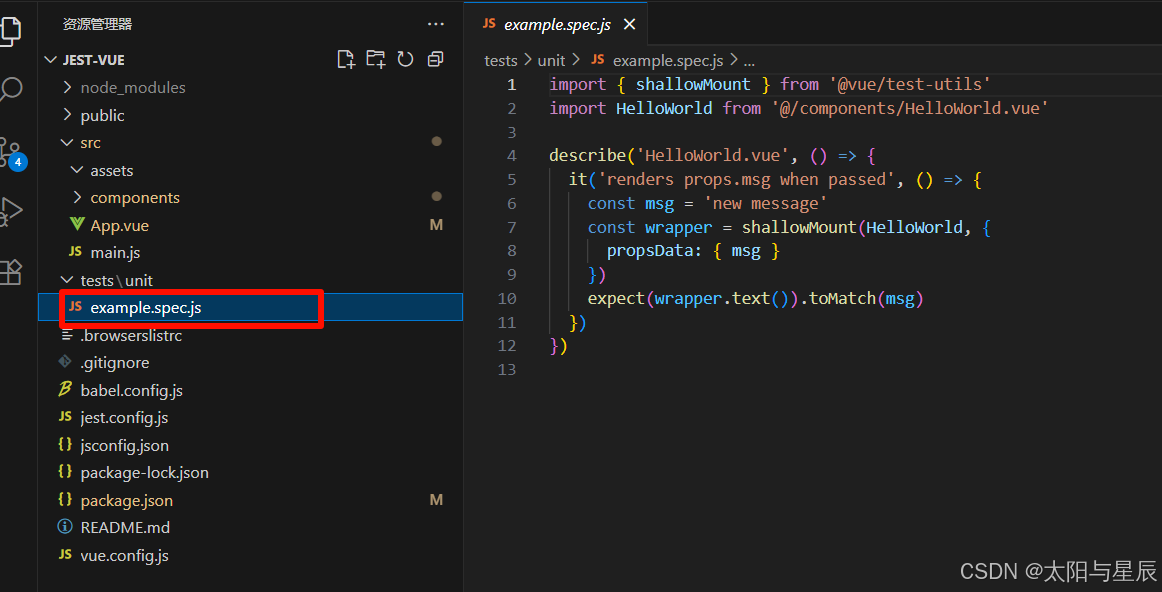
修改一下文件夹名称和文件名字:
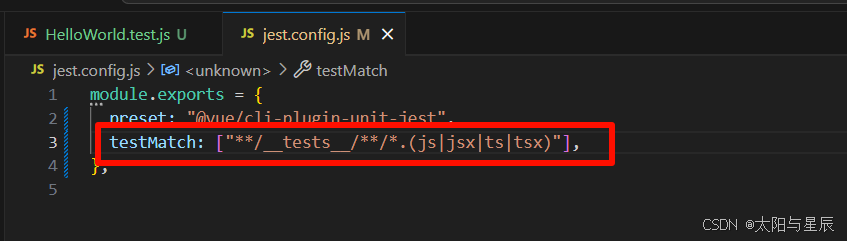
此时需要修改一下jest.config.js配置文件:
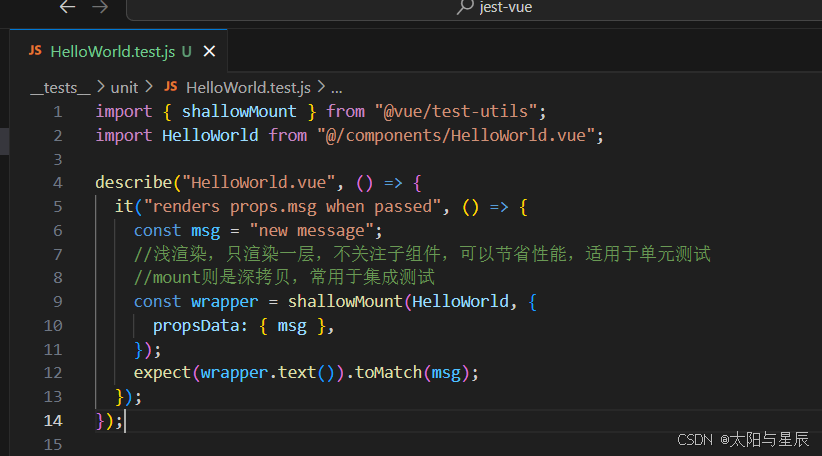
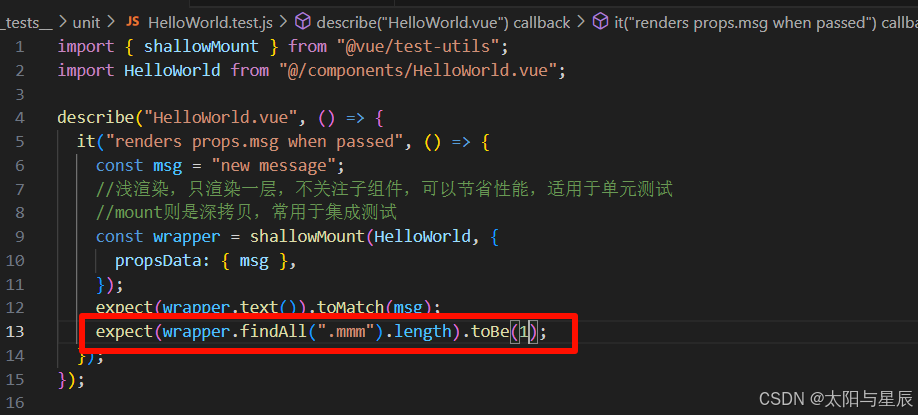
我们可以看看HelloWorld.test.js中内容:
注意:在刚开始安装vue脚手架时候,因为选择了单元测试,所以自带了vue-test-utils组件。
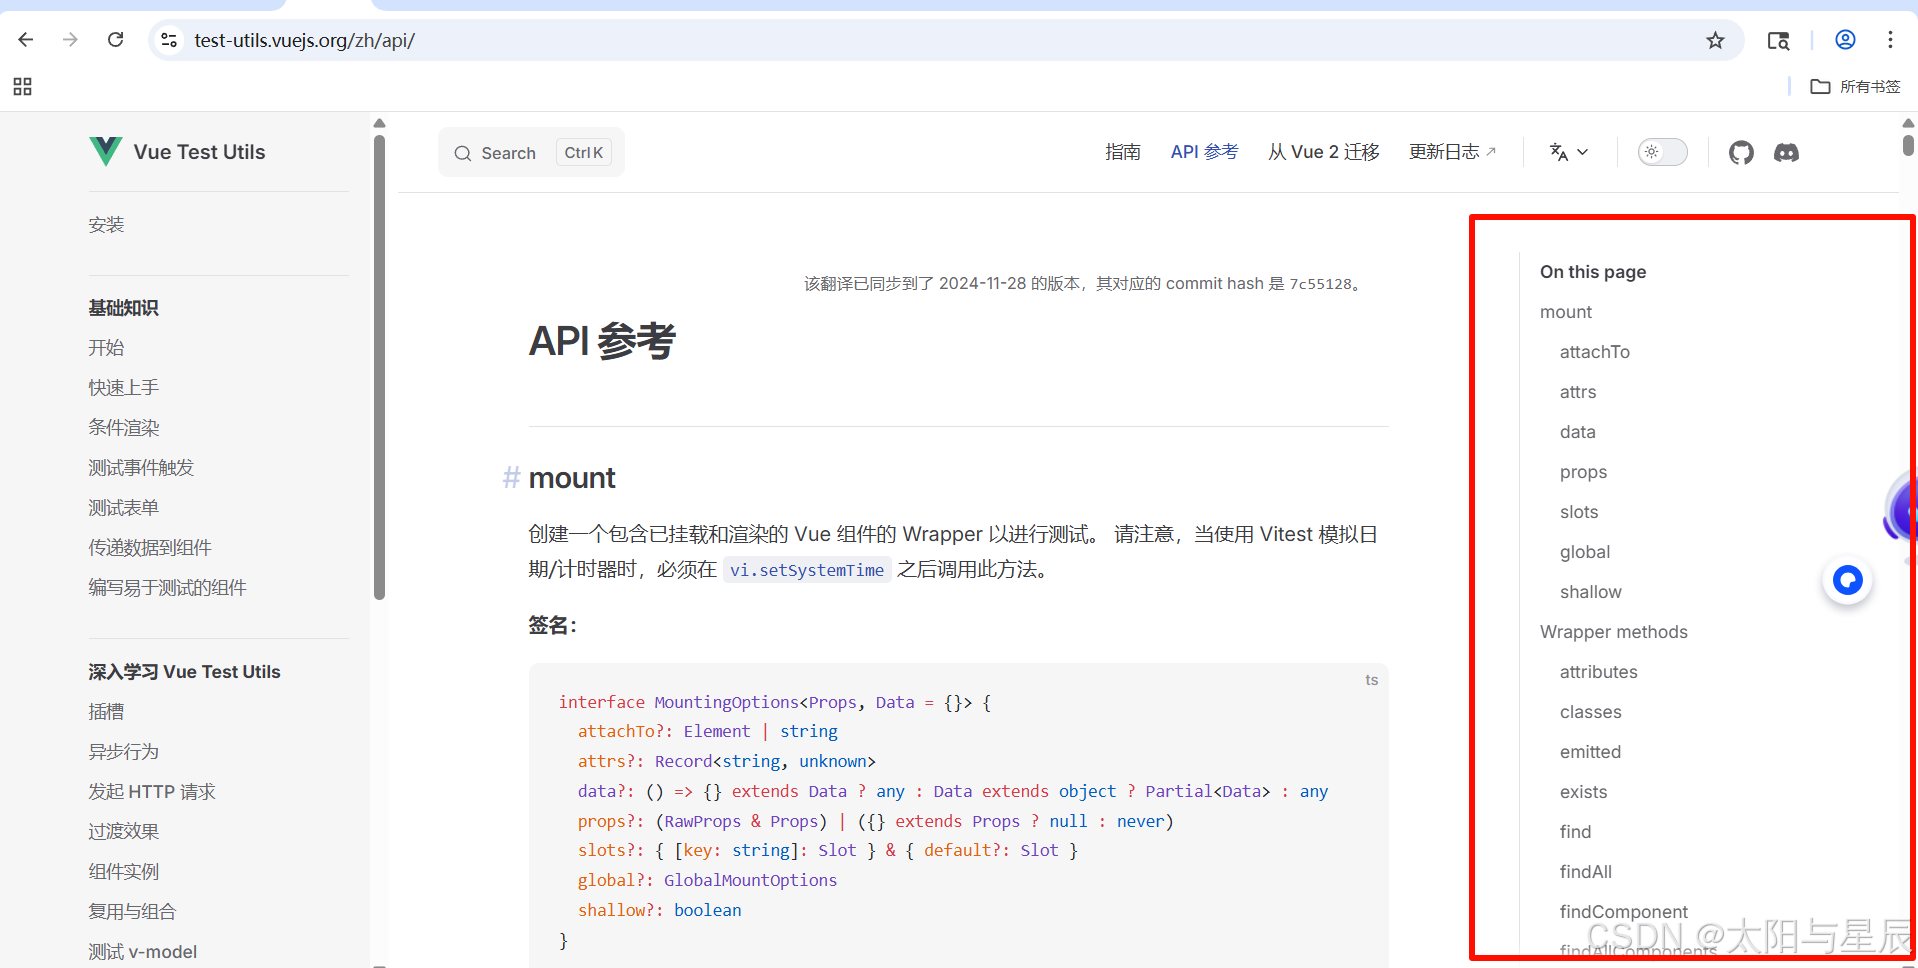
关于vue-test-utils中的具体细节可以查看官网。
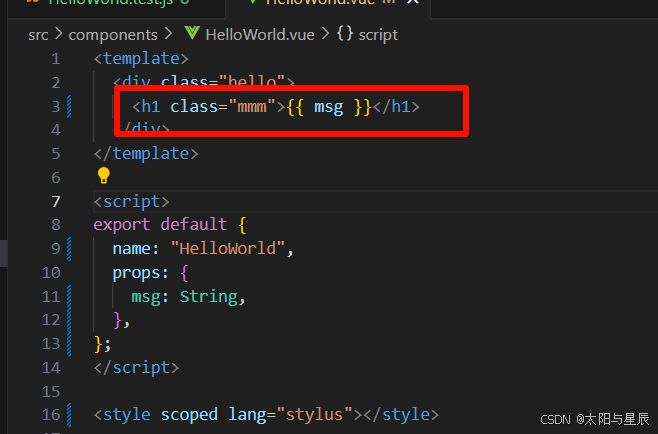
我们给HelloWorld组件加一个类名:
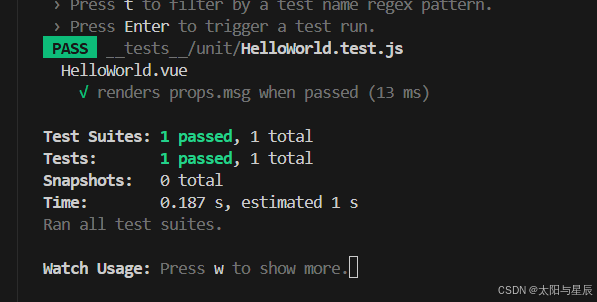
然后在HelloWorld.test.js中增加测试代码:
四、使用TDD的方式开发Header组件
新建dev2分支:
假如我们想要做一个todolist组件。
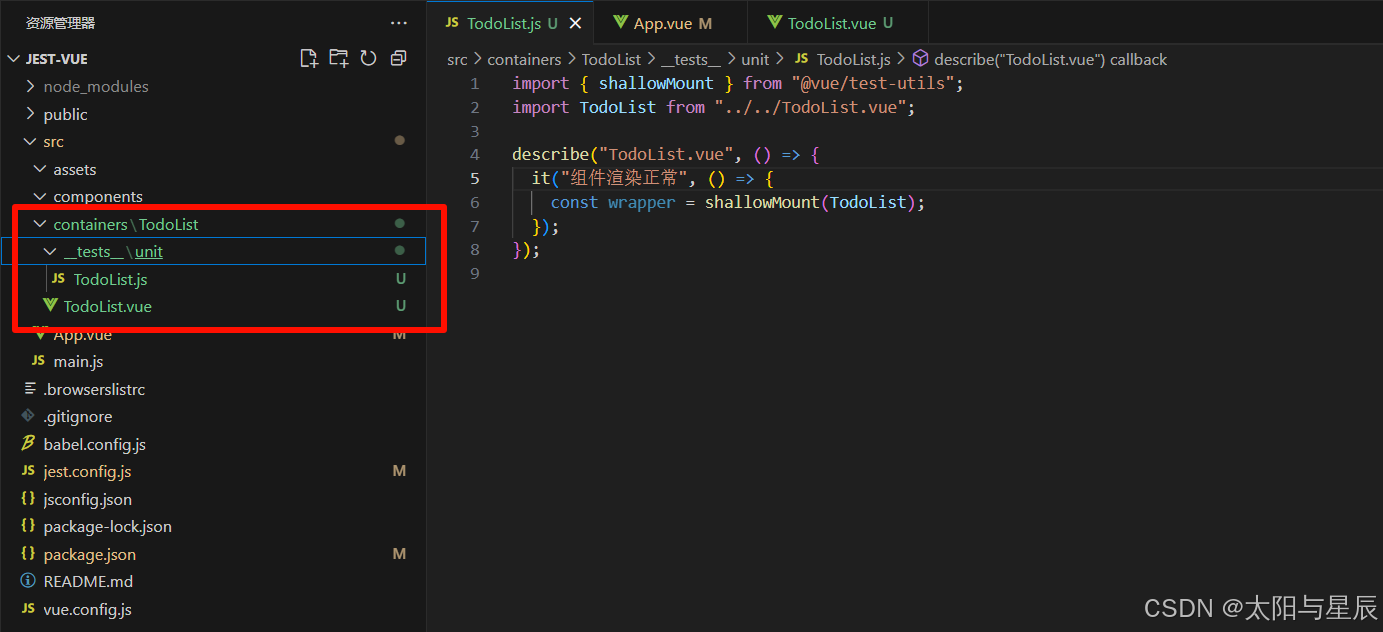
我们做一些准备,项目目录如下:
接下了我们要进行TDD开发:
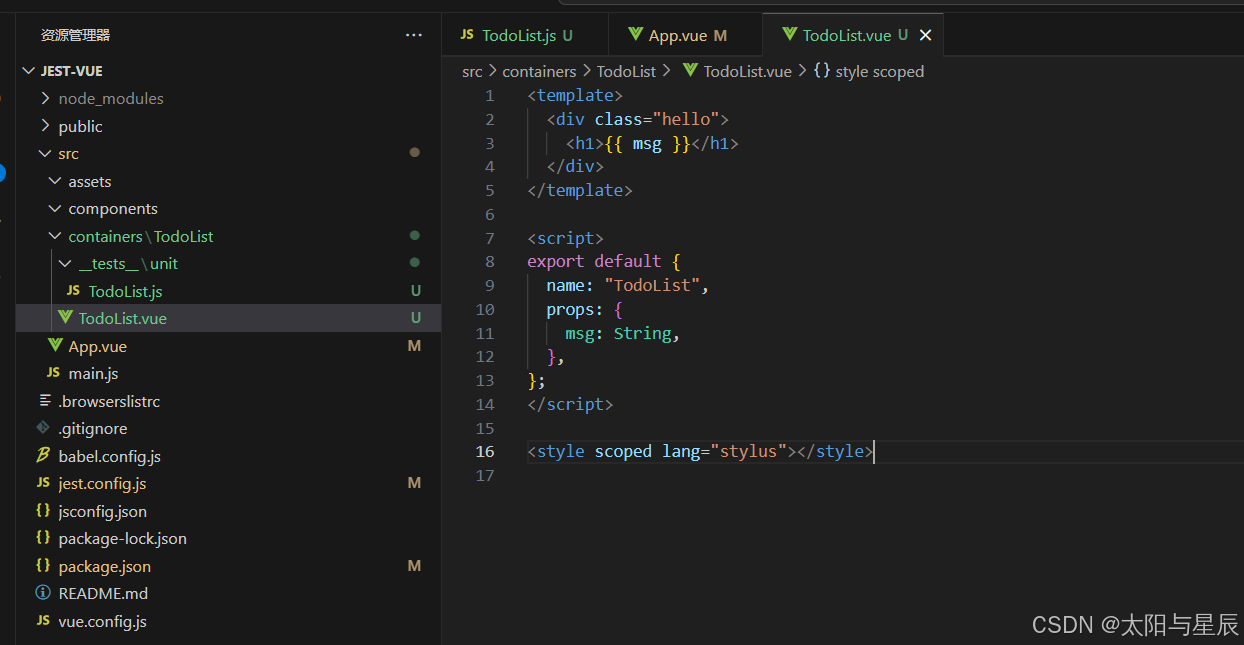
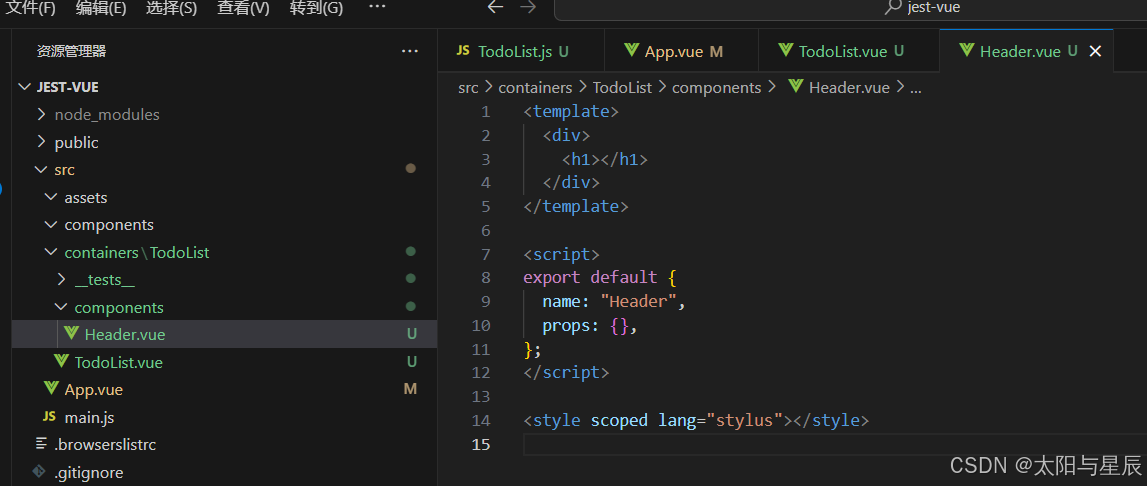
先要实现TodoList中的header。现在TodoList文件夹下新建components文件夹。然后新建Header.vue组件:
TDD的思想是先写测试用例后开发。先新加Header.js文件:
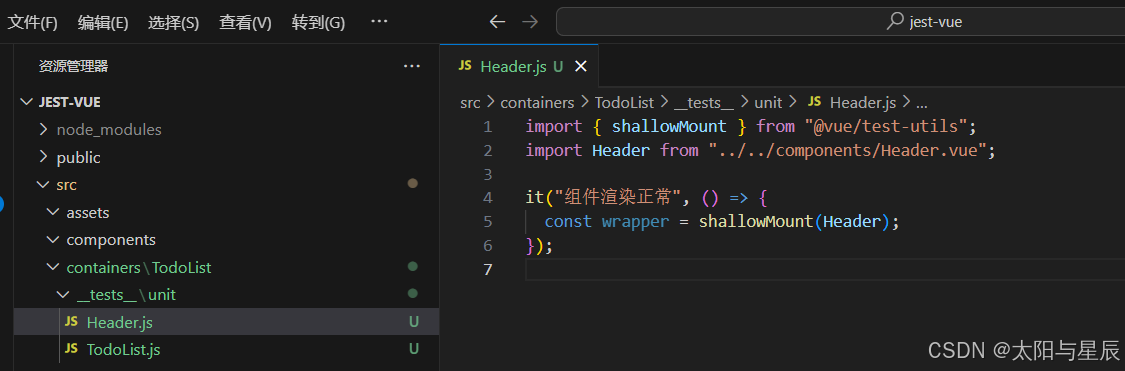
我们先分析header组件,然后编写测试用例。
首先Header应该有个input框:
import { shallowMount } from \"@vue/test-utils\";import Header from \"../../components/Header.vue\";it(\"Header 包含 input框:\", () => { const wrapper = shallowMount(Header); const input = wrapper.find(\'[data-test=\"input\"]\'); expect(input.exists()).toBe(true);});这时候运行测试脚本肯定不通过。因为还没开始开发:
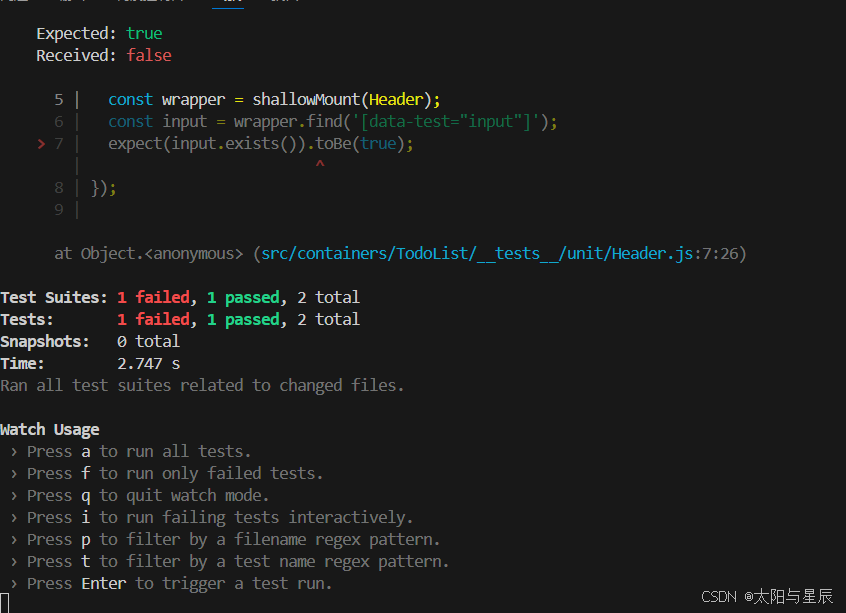
修改Header.vue代码:
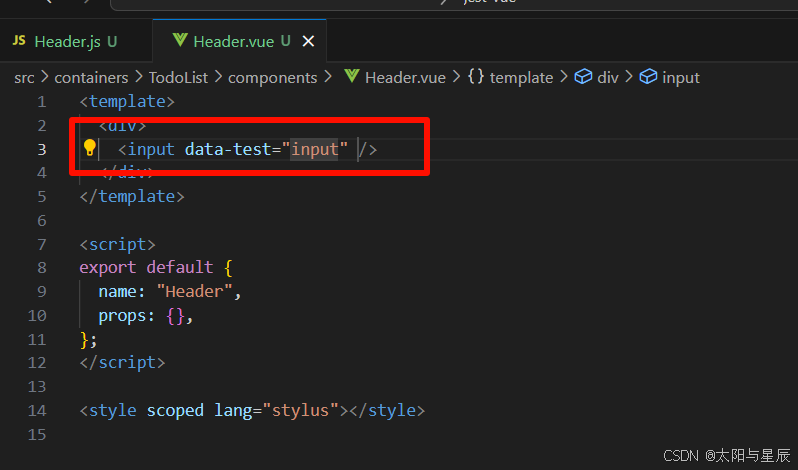
这时候再运行就通过了。
以此类推,我们可以编写一堆关于Header组件的测试用例:
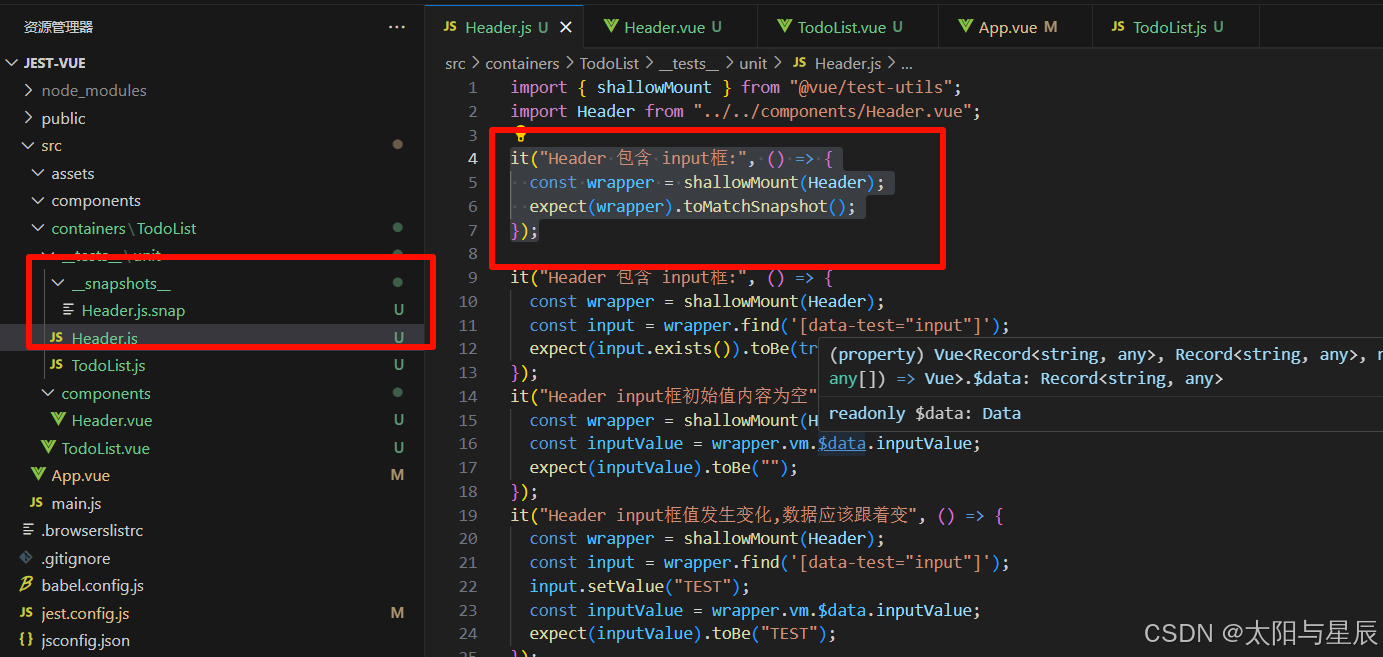
import { shallowMount } from \"@vue/test-utils\";import Header from \"../../components/Header.vue\";it(\"Header 包含 input框:\", () => { const wrapper = shallowMount(Header); const input = wrapper.find(\'[data-test=\"input\"]\'); expect(input.exists()).toBe(true);});it(\"Header input框初始值内容为空\", () => { const wrapper = shallowMount(Header); const inputValue = wrapper.vm.$data.inputValue; expect(inputValue).toBe(\"\");});it(\"Header input框值发生变化,数据应该跟着变\", () => { const wrapper = shallowMount(Header); const input = wrapper.find(\'[data-test=\"input\"]\'); input.setValue(\"TEST\"); const inputValue = wrapper.vm.$data.inputValue; expect(inputValue).toBe(\"TEST\");});it(\"Header input框输入回车,无内容时无反应\", () => { const wrapper = shallowMount(Header); const input = wrapper.find(\'[data-test=\"input\"]\'); input.setValue(\"\"); input.trigger(\"keyup.enter\"); expect(wrapper.emitted().add).toBeFalsy();});it(\"Header input框输入回车,有内容时向外触发事件\", () => { const wrapper = shallowMount(Header); const input = wrapper.find(\'[data-test=\"input\"]\'); input.setValue(\"TEST\"); input.trigger(\"keyup.enter\"); expect(wrapper.emitted().add).toBeTruthy();});it(\"Header input框输入回车,有内容时向外触发事件,同时清空inputValue\", () => { const wrapper = shallowMount(Header); const input = wrapper.find(\'[data-test=\"input\"]\'); input.setValue(\"TEST\"); input.trigger(\"keyup.enter\"); expect(wrapper.emitted().add).toBeTruthy(); expect(wrapper.vm.$data.inputValue).toBe(\"\");});然后依照Header的测试用例去修改Header组件:
<template> <div> <input data-test=\"input\" v-model=\"inputValue\" @keyup.enter=\"addTodoItem\" /> </div></template><script>export default { name: \"Header\", data() { return { inputValue: \"\", }; }, methods: { addTodoItem() { if (this.inputValue) { this.$emit(\"add\", this.inputValue); this.inputValue = \"\"; } }, },};</script><style scoped lang=\"stylus\"></style>这就是TDD(测试驱动开发)。
我们接着对Todolist写测试用例:
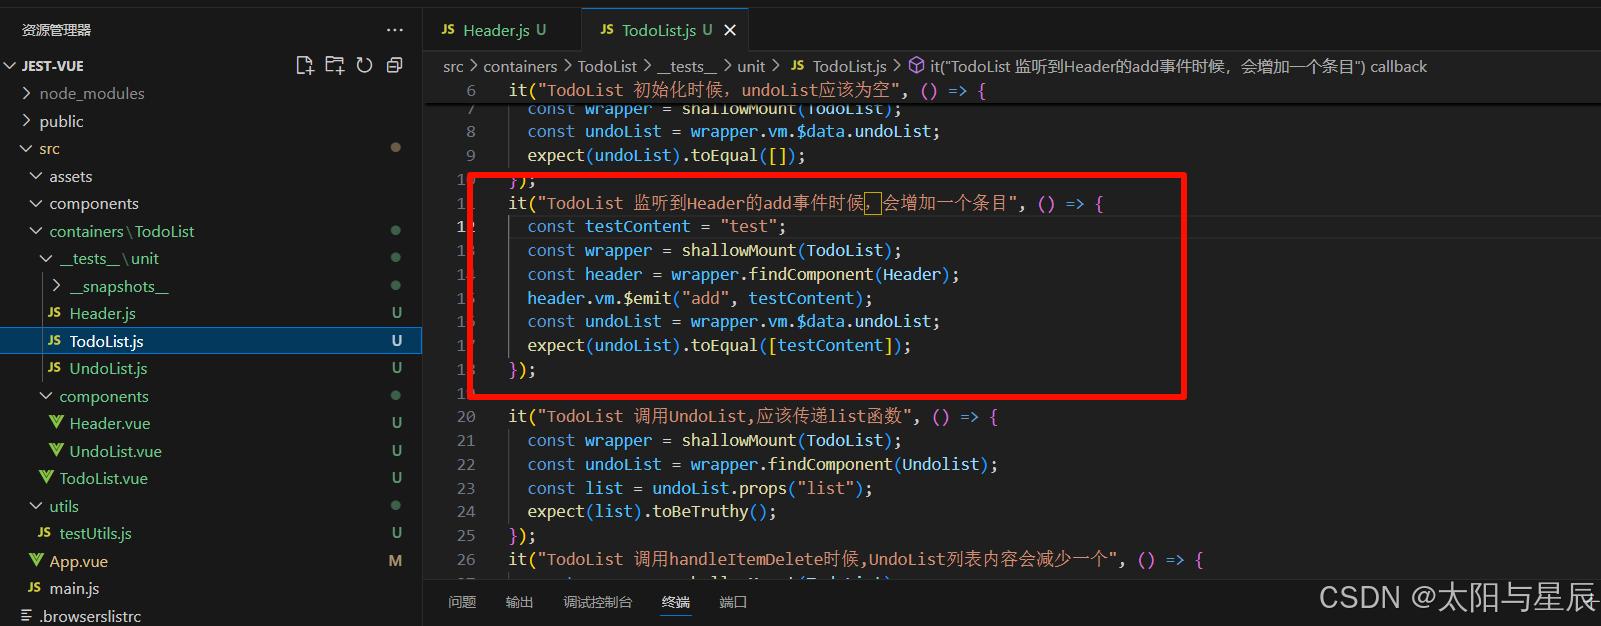
import { shallowMount } from \"@vue/test-utils\";import TodoList from \"../../TodoList.vue\";import Header from \"../../components/Header.vue\";it(\"TodoList 初始化时候,undoList应该为空\", () => { const wrapper = shallowMount(TodoList); const undoList = wrapper.vm.$data.undoList; expect(undoList).toEqual([]);});it(\"TodoList 监听到Header的add事件时候,会增加一个条目\", () => { const testContent = \"test\"; const wrapper = shallowMount(TodoList); const header = wrapper.findComponent(Header); header.vm.$emit(\"add\", testContent); const undoList = wrapper.vm.$data.undoList; expect(undoList).toEqual([testContent]);});按照todolist测试用例来写todolist组件:
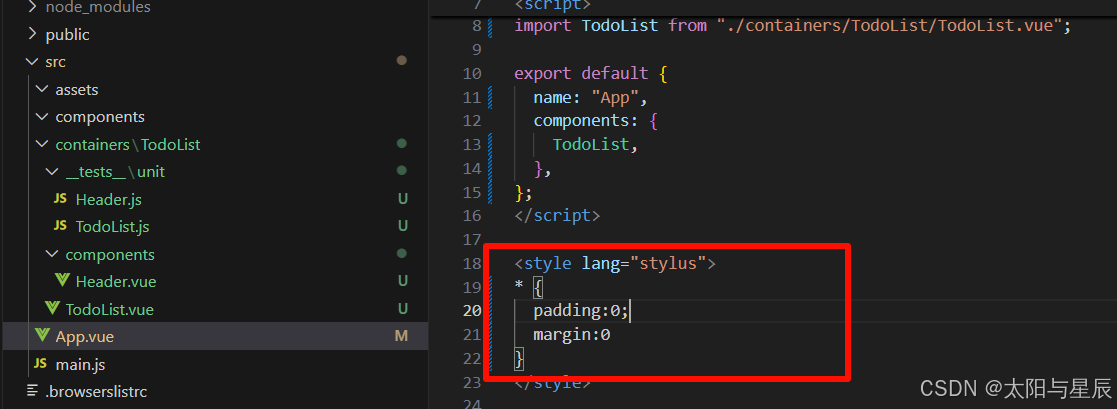
<template> <div class=\"hello\"> <Header @add=\"addUndoItem\" /> <ul> <li v-for=\"item in undoList\" :key=\"item\">{{ item }}</li> </ul> </div></template><script>import Header from \"./components/Header.vue\";export default { name: \"TodoList\", components: { Header }, data() { return { undoList: [], }; }, methods: { addUndoItem(inputValue) { this.undoList.push(inputValue); }, },};</script><style scoped lang=\"stylus\"></style>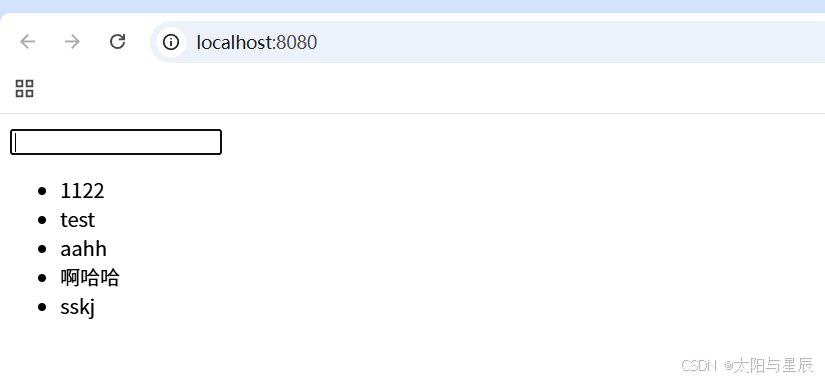
五、Header快照测试
先修改一下Header组件的样式:
Header.vue:
<template> <div class=\"header\"> <div class=\"header-content\"> TodoList <input class=\"header-input\" data-test=\"input\" v-model=\"inputValue\" @keyup.enter=\"addTodoItem\" placeholder=\"TodoItem\" /> </div> </div></template><script>export default { name: \"Header\", data() { return { inputValue: \"\", }; }, methods: { addTodoItem() { if (this.inputValue) { this.$emit(\"add\", this.inputValue); this.inputValue = \"\"; } }, },};</script><style scoped lang=\"stylus\">.header{ line-height:60px; height:60px; background: #333;}.header-content{ width 600px; margin:0 auto; color:#fff; font-size:24px;}.header-input{ float:right; width 360px; margin-top:16px; line-height:24px; color:#333; outline:none; text-indent:10px;}</style>接下来我们来测试一下Header的样式快照:
it(\"Header 样式是否修改:\", () => { const wrapper = shallowMount(Header); expect(wrapper).toMatchSnapshot();});运行npm run test:unit会生成该组件的样式快照:
这时候如果我们修改header组件的样式,测试会报错:
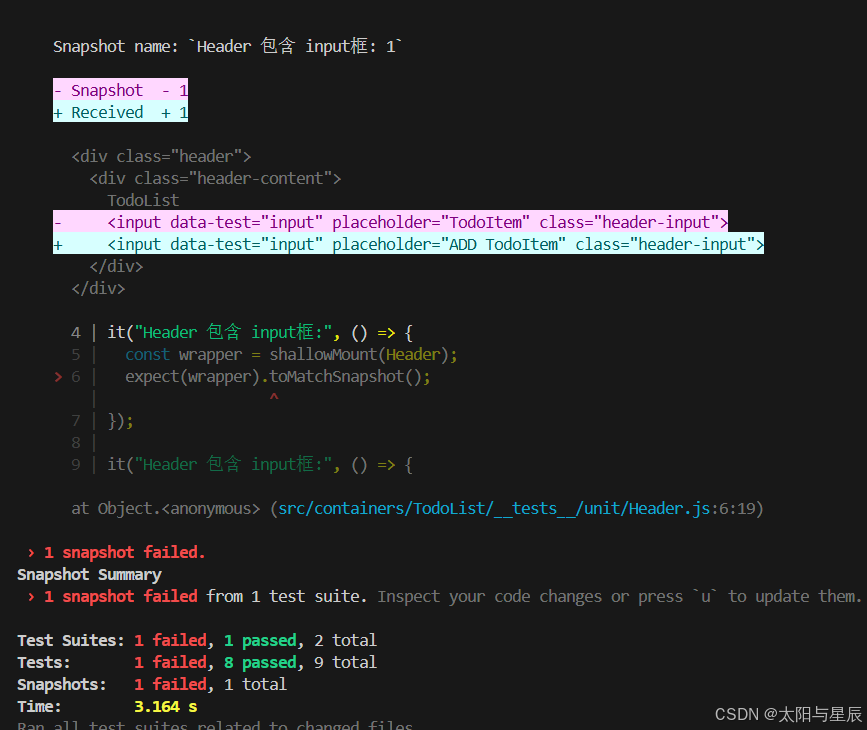
如果接受UI样式的变化,可以按u键。
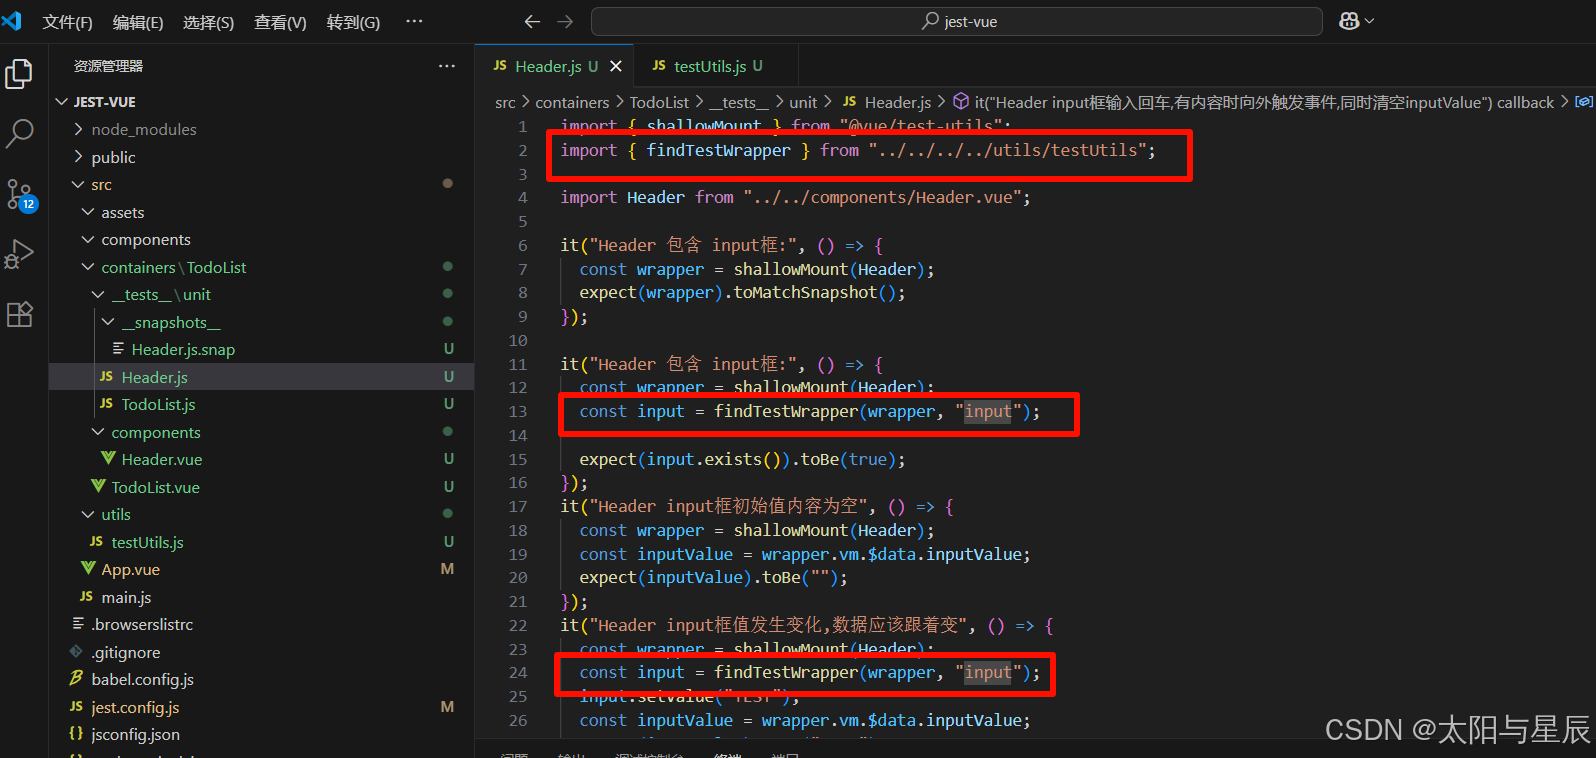
六、通用代码提取
我们发现有些代码是重复的:
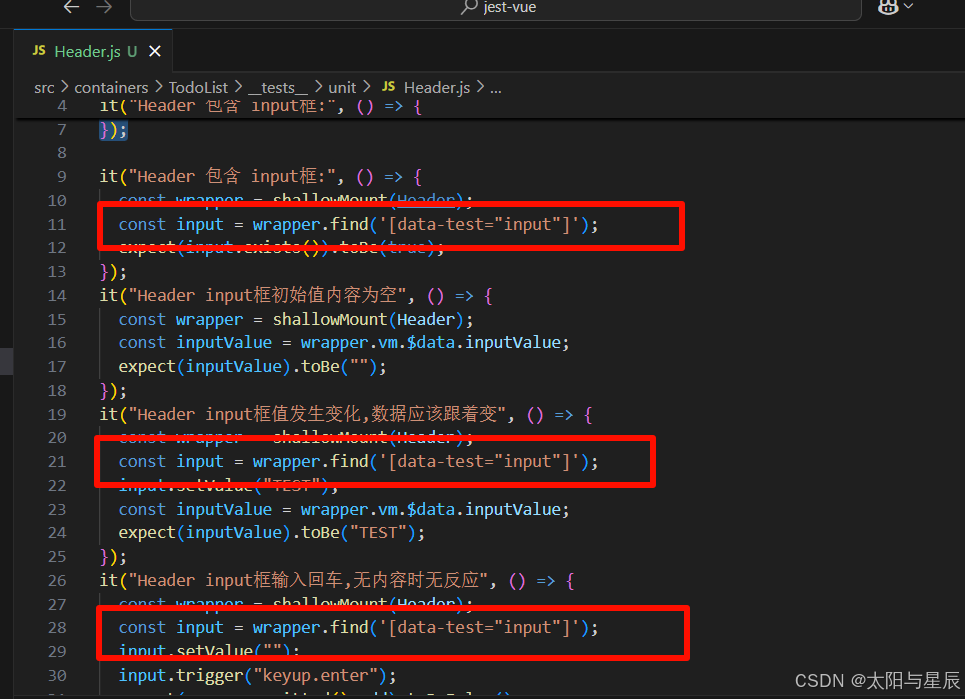
我们可以把它提取到一个公共的文件夹中:

七、实现undolist
先编写undoList测试用例
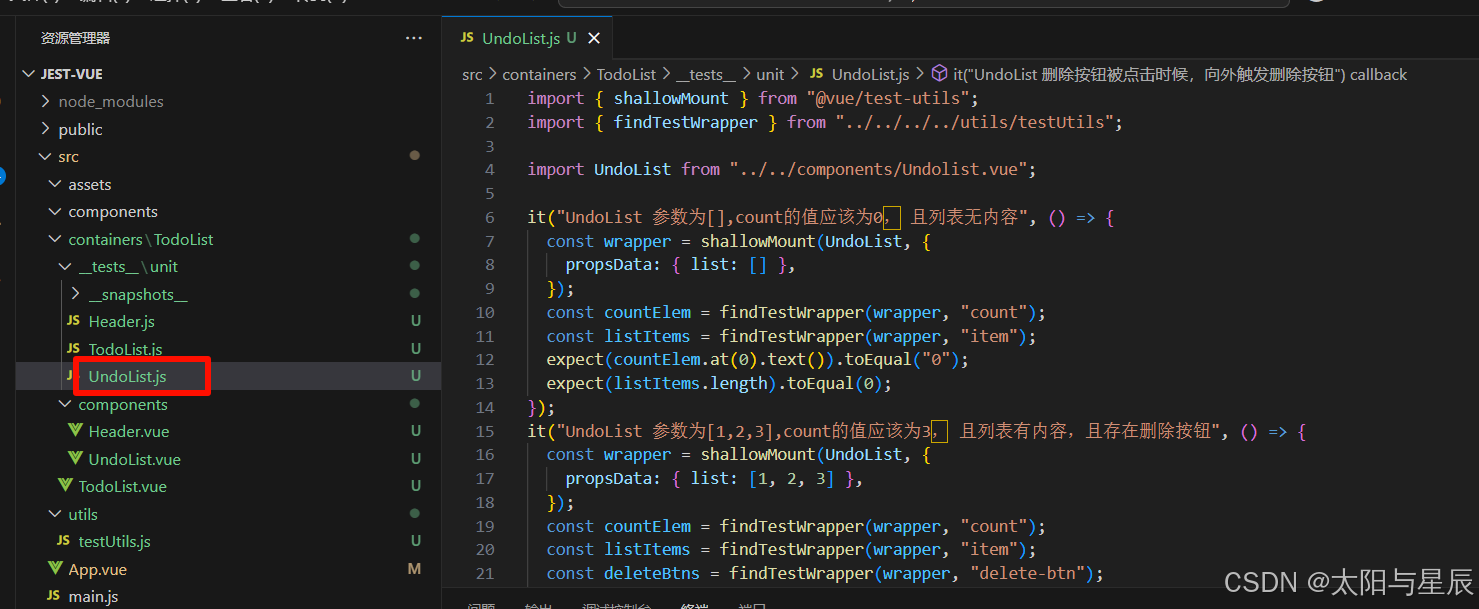
import { shallowMount } from \"@vue/test-utils\";import { findTestWrapper } from \"../../../../utils/testUtils\";import UndoList from \"../../components/UndoList.vue\";it(\"UndoList 参数为[],count的值应该为0, 且列表无内容\", () => { const wrapper = shallowMount(UndoList, { propsData: { list: [] }, }); const countElem = findTestWrapper(wrapper, \"count\"); const listItems = findTestWrapper(wrapper, \"item\"); expect(countElem.at(0).text()).toEqual(\"0\"); expect(listItems.length).toEqual(0);});it(\"UndoList 参数为[1,2,3],count的值应该为3, 且列表有内容,且存在删除按钮\", () => { const wrapper = shallowMount(UndoList, { propsData: { list: [1, 2, 3] }, }); const countElem = findTestWrapper(wrapper, \"count\"); const listItems = findTestWrapper(wrapper, \"item\"); const deleteBtns = findTestWrapper(wrapper, \"delete-btn\"); expect(countElem.at(0).text()).toEqual(\"3\"); expect(listItems.length).toEqual(3); expect(deleteBtns.length).toEqual(3);});it(\"UndoList 删除按钮被点击时候,向外触发删除时间\", () => { const wrapper = shallowMount(UndoList, { propsData: { list: [1, 2, 3] }, }); const deleteBtn = findTestWrapper(wrapper, \"delete-btn\").at(1); deleteBtn.trigger(\"click\"); expect(wrapper.emitted().delete).toBeTruthy(); expect(wrapper.emitted().delete[0][0]).toBe(1);});按照undolist测试用例编写组件:
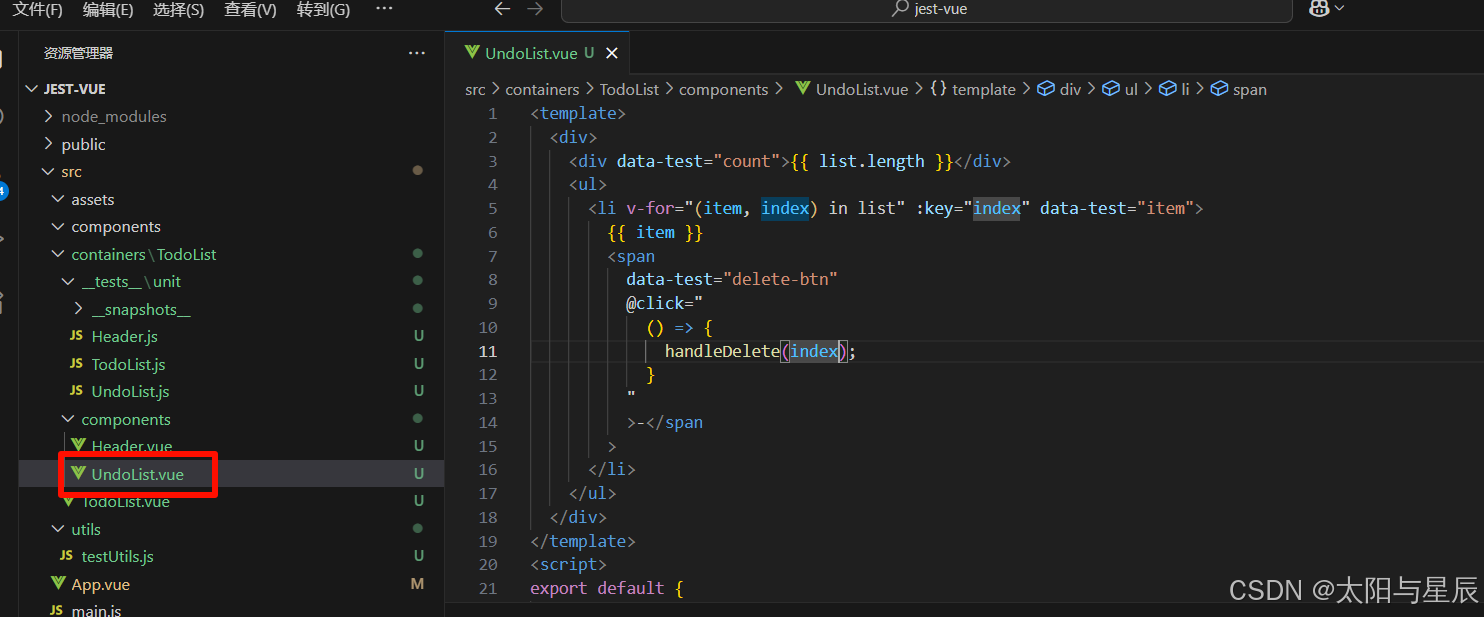
<template> <div> <div data-test=\"count\">{{ list.length }}</div> <ul> <li v-for=\"(item, index) in list\" :key=\"index\" data-test=\"item\"> {{ item }} <span data-test=\"delete-btn\" @click=\" () => { handleDelete(index); } \" >-</span > </li> </ul> </div></template><script>export default { name: \"UndoList\", props: [\"list\"], methods: { handleDelete(index) { this.$emit(\"delete\", index); }, },};</script><style scoped lang=\"stylus\"></style>继续写TodoList测试用例:
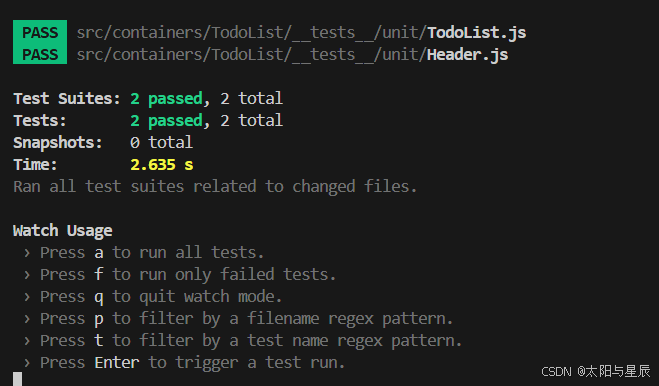
import { shallowMount } from \"@vue/test-utils\";import TodoList from \"../../TodoList.vue\";import Header from \"../../components/Header.vue\";import Undolist from \"../../components/UndoList.vue\";it(\"TodoList 初始化时候,undoList应该为空\", () => { const wrapper = shallowMount(TodoList); const undoList = wrapper.vm.$data.undoList; expect(undoList).toEqual([]);});it(\"TodoList 监听到Header的add事件时候,会增加一个条目\", () => { const testContent = \"test\"; const wrapper = shallowMount(TodoList); const header = wrapper.findComponent(Header); header.vm.$emit(\"add\", testContent); const undoList = wrapper.vm.$data.undoList; expect(undoList).toEqual([testContent]);});it(\"TodoList 调用UndoList,应该传递list函数\", () => { const wrapper = shallowMount(TodoList); const undoList = wrapper.findComponent(Undolist); const list = undoList.props(\"list\"); expect(list).toBeTruthy();});it(\"TodoList 调用handleItemDelete时候,UndoList列表内容会减少一个\", () => { const wrapper = shallowMount(TodoList); wrapper.setData({ undoList: [1, 2, 3], }); wrapper.vm.handleItemDelete(1); expect(wrapper.vm.$data.undoList).toEqual([1, 3]);});修改todoList组件:
<template> <div class=\"hello\"> <Header @add=\"addUndoItem\" /> <UndoList :list=\"undoList\" @delete=\"handleItemDelete\" /> </div></template><script>import Header from \"./components/Header.vue\";import UndoList from \"./components/UndoList.vue\";export default { name: \"TodoList\", components: { Header, UndoList }, data() { return { undoList: [], }; }, methods: { addUndoItem(inputValue) { this.undoList.push(inputValue); }, handleItemDelete(index) { this.undoList.splice(index, 1); }, },};</script><style scoped lang=\"stylus\"></style>我们来看下面一个问题:
上面这个测试本来一个是todolist的单元测试,但它实际上确实一个集成测试,因为它有Header组件的交互。这涉及到两个模块的联动。所以我们需要进行改造:
it(\"TodoList 监听到Header的add事件时候,会增加一个条目\", () => { // const testContent = \"test\"; // const wrapper = shallowMount(TodoList); // const header = wrapper.findComponent(Header); // header.vm.$emit(\"add\", testContent); // const undoList = wrapper.vm.$data.undoList; // expect(undoList).toEqual([testContent]); const wrapper = shallowMount(TodoList); wrapper.setData({ undoList: [1, 2, 3], }); wrapper.vm.addUndoItem(5); expect(wrapper.vm.$data.undoList).toEqual([1, 2, 3, 5]);});我们接下来实现todolist的编辑功能。同时优化一下代码。
八、完整代码
我们可以先看看项目的目录结构:
Header.js:
import { shallowMount } from \"@vue/test-utils\";import { findTestWrapper } from \"../../../../utils/testUtils\";import Header from \"../../components/Header.vue\";describe(\"Header 组件\", () => { it(\"样式快照:\", () => { const wrapper = shallowMount(Header); expect(wrapper).toMatchSnapshot(); }); it(\"包含 input框:\", () => { const wrapper = shallowMount(Header); const input = findTestWrapper(wrapper, \"input\"); expect(input.exists()).toBe(true); }); it(\"input框初始值内容为空\", () => { const wrapper = shallowMount(Header); const inputValue = wrapper.vm.$data.inputValue; expect(inputValue).toBe(\"\"); }); it(\"input框值发生变化,数据应该跟着变\", () => { const wrapper = shallowMount(Header); const input = findTestWrapper(wrapper, \"input\"); input.setValue(\"TEST\"); const inputValue = wrapper.vm.$data.inputValue; expect(inputValue).toBe(\"TEST\"); }); it(\"input框输入回车,无内容时无反应\", () => { const wrapper = shallowMount(Header); const input = findTestWrapper(wrapper, \"input\"); input.setValue(\"\"); input.trigger(\"keyup.enter\"); expect(wrapper.emitted().add).toBeFalsy(); }); it(\"input框输入回车,有内容时向外触发事件\", () => { const wrapper = shallowMount(Header); const input = findTestWrapper(wrapper, \"input\"); input.setValue(\"TEST\"); input.trigger(\"keyup.enter\"); expect(wrapper.emitted().add).toBeTruthy(); }); it(\"input框输入回车,有内容时向外触发事件,同时清空inputValue\", () => { const wrapper = shallowMount(Header); const input = findTestWrapper(wrapper, \"input\"); input.setValue(\"TEST\"); input.trigger(\"keyup.enter\"); expect(wrapper.emitted().add).toBeTruthy(); expect(wrapper.vm.$data.inputValue).toBe(\"\"); });});Header.vue:
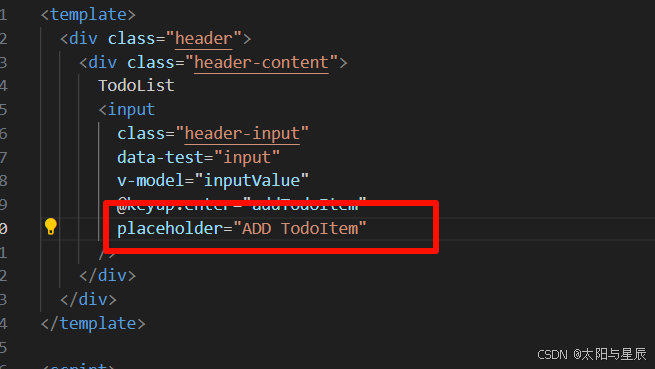
<template> <div class=\"header\"> <div class=\"header-content\"> TodoList <input class=\"header-input\" data-test=\"input\" v-model=\"inputValue\" @keyup.enter=\"addTodoItem\" placeholder=\"ADD TodoItem\" /> </div> </div></template><script>export default { name: \"Header\", data() { return { inputValue: \"\", }; }, methods: { addTodoItem() { if (this.inputValue) { this.$emit(\"add\", this.inputValue); this.inputValue = \"\"; } }, },};</script><style scoped lang=\"stylus\">.header{ line-height:60px; height:60px; background: #333;}.header-content{ width 600px; margin:0 auto; color:#fff; font-size:24px;}.header-input{ float:right; width 360px; margin-top:16px; line-height:24px; color:#333; outline:none; text-indent:10px;}</style>UndoList.js:
import { shallowMount } from \"@vue/test-utils\";import { findTestWrapper } from \"../../../../utils/testUtils\";import UndoList from \"../../components/Undolist.vue\";describe(\"UndoList 组件\", () => { it(\"参数为[],count的值应该为0, 且列表无内容\", () => { const wrapper = shallowMount(UndoList, { propsData: { list: [] }, }); const countElem = findTestWrapper(wrapper, \"count\"); const listItems = findTestWrapper(wrapper, \"item\"); expect(countElem.at(0).text()).toEqual(\"0\"); expect(listItems.length).toEqual(0); }); it(\"参数为[1,2,3],count的值应该为3, 且列表有内容,且存在删除按钮\", () => { const wrapper = shallowMount(UndoList, { propsData: { list: [ { status: \"div\", value: 1 }, { status: \"div\", value: 2 }, { status: \"div\", value: 3 }, ], }, }); const countElem = findTestWrapper(wrapper, \"count\"); const listItems = findTestWrapper(wrapper, \"item\"); const deleteBtns = findTestWrapper(wrapper, \"delete-btn\"); expect(countElem.at(0).text()).toEqual(\"3\"); expect(listItems.length).toEqual(3); expect(deleteBtns.length).toEqual(3); }); it(\"删除按钮被点击时候,向外触发删除事件\", () => { const wrapper = shallowMount(UndoList, { propsData: { list: [ { status: \"div\", value: 1 }, { status: \"div\", value: 2 }, { status: \"div\", value: 3 }, ], }, }); const deleteBtn = findTestWrapper(wrapper, \"delete-btn\").at(1); deleteBtn.trigger(\"click\"); expect(wrapper.emitted().delete).toBeTruthy(); expect(wrapper.emitted().delete[0][0]).toBe(1); }); it(\"列表项被点击时候,向外触发status事件\", () => { const wrapper = shallowMount(UndoList, { propsData: { list: [ { status: \"div\", value: 1 }, { status: \"div\", value: 2 }, { status: \"div\", value: 3 }, ], }, }); const currentBtn = findTestWrapper(wrapper, \"item\").at(1); currentBtn.trigger(\"click\"); expect(wrapper.emitted().status).toBeTruthy(); expect(wrapper.emitted().status[0][0]).toBe(1); }); it(\"列表项显示一个输入框,两个正常列表内容\", () => { const wrapper = shallowMount(UndoList, { propsData: { list: [ { status: \"div\", value: 1 }, { status: \"input\", value: 2 }, { status: \"div\", value: 3 }, ], }, }); const input = findTestWrapper(wrapper, \"input\"); expect(input.at(0).element.value).toBe(\"2\"); expect(input.length).toBe(1); }); it(\"input失去焦点时候,向外触发reset事件\", () => { const wrapper = shallowMount(UndoList, { propsData: { list: [ { status: \"div\", value: 1 }, { status: \"input\", value: 2 }, { status: \"div\", value: 3 }, ], }, }); const inputElem = findTestWrapper(wrapper, \"input\").at(0); inputElem.trigger(\"blur\"); expect(wrapper.emitted().reset).toBeTruthy(); }); it(\"input变化时候,向外触发change事件\", () => { const wrapper = shallowMount(UndoList, { propsData: { list: [ { status: \"div\", value: 1 }, { status: \"input\", value: 123 }, { status: \"div\", value: 3 }, ], }, }); const inputElem = findTestWrapper(wrapper, \"input\").at(0); inputElem.trigger(\"change\"); expect(wrapper.emitted().change).toBeTruthy(); console.log(wrapper.emitted().change); expect(wrapper.emitted().change[0][0]).toEqual({ value: \"123\", index: 1, }); });});UndoList.vue:
<template> <div class=\"undolist\"> <div class=\"title\"> 正在进行 <span data-test=\"count\" class=\"count\">{{ list.length }}</span> </div> <ul class=\"list\"> <li v-for=\"(item, index) in list\" :key=\"index\" data-test=\"item\" @click=\"() => changeStatus(index)\" class=\"item\" > <input data-test=\"input\" :value=\"item.value\" v-if=\"item.status === \'input\'\" @blur=\"handleInputBlur\" @change=\"(e) => handleInputChange(e.target.value, index)\" /> <span v-else> {{ item.value }}</span> <span data-test=\"delete-btn\" @click=\" () => { handleDelete(index); } \" class=\"delete\" >-</span > </li> </ul> </div></template><script>export default { name: \"UndoList\", props: [\"list\"], methods: { handleDelete(index) { this.$emit(\"delete\", index); }, changeStatus(index) { this.$emit(\"status\", index); }, handleInputBlur() { this.$emit(\"reset\"); }, handleInputChange(value, index) { this.$emit(\"change\", { value, index, }); }, },};</script><style scoped lang=\"stylus\">.undolist{ width :600px; margin: 0 auto;}.title{ margin:10px 0px; line-height:30px; font-size:24px; font-weight:bold;}.count{ margin-top:5px; float:right; display:block; width:20px; height:20px; line-height:20px; text-align:center; background:#e6e6e6; border-radius:10px; font-size:12px; color:#000;}.list{ list-style-type:none;}.item{ margin-bottom:10px line-height:32px; border-radius:3px; border-left:5px solid #629A9A; font-size:14px; background:#fff; text-indent:10px;}.delete{ margin-top:5px; float:right; display:block; width:20px; height:20px; line-height:20px; text-align:center; background:#e6e6e6; border-radius:10px; font-size:12px; color:#000; text-indent:0px; margin-right:10px; cursor:pointer}</style>TodoList.js:
import { shallowMount } from \"@vue/test-utils\";import TodoList from \"../../TodoList.vue\";import Header from \"../../components/Header.vue\";import Undolist from \"../../components/UndoList.vue\";describe(\"TodoList 组件\", () => { it(\"初始化时候,undoList应该为空\", () => { const wrapper = shallowMount(TodoList); const undoList = wrapper.vm.$data.undoList; expect(undoList).toEqual([]); }); it(\"监听到Header的add事件时候,会增加一个条目\", () => { // const testContent = \"test\"; // const wrapper = shallowMount(TodoList); // const header = wrapper.findComponent(Header); // header.vm.$emit(\"add\", testContent); // const undoList = wrapper.vm.$data.undoList; // expect(undoList).toEqual([testContent]); const wrapper = shallowMount(TodoList); wrapper.setData({ undoList: [ { status: \"div\", value: 1 }, { status: \"div\", value: 2 }, { status: \"div\", value: 3 }, ], }); wrapper.vm.addUndoItem(5); expect(wrapper.vm.$data.undoList).toEqual([ { status: \"div\", value: 1 }, { status: \"div\", value: 2 }, { status: \"div\", value: 3 }, { status: \"div\", value: 5 }, ]); }); it(\"调用UndoList,应该传递list函数\", () => { const wrapper = shallowMount(TodoList); const undoList = wrapper.findComponent(Undolist); const list = undoList.props(\"list\"); expect(list).toBeTruthy(); }); it(\"调用handleItemDelete时候,UndoList列表内容会减少一个\", () => { const wrapper = shallowMount(TodoList); wrapper.setData({ undoList: [ { status: \"div\", value: 1 }, { status: \"div\", value: 2 }, { status: \"div\", value: 3 }, ], }); wrapper.vm.handleItemDelete(1); expect(wrapper.vm.$data.undoList).toEqual([ { status: \"div\", value: 1 }, { status: \"div\", value: 3 }, ]); }); it(\"changeStatus被调用时候,UndoList列表内容变化\", () => { const wrapper = shallowMount(TodoList); wrapper.setData({ undoList: [ { status: \"div\", value: 1 }, { status: \"div\", value: 2 }, { status: \"div\", value: 3 }, ], }); wrapper.vm.changeStatus(1); expect(wrapper.vm.$data.undoList).toEqual([ { status: \"div\", value: 1 }, { status: \"input\", value: 2 }, { status: \"div\", value: 3 }, ]); }); it(\"resetStatus被调用时候,UndoList列表内容变化\", () => { const wrapper = shallowMount(TodoList); wrapper.setData({ undoList: [ { status: \"div\", value: 1 }, { status: \"input\", value: 2 }, { status: \"div\", value: 3 }, ], }); wrapper.vm.resetStatus(); expect(wrapper.vm.$data.undoList).toEqual([ { status: \"div\", value: 1 }, { status: \"div\", value: 2 }, { status: \"div\", value: 3 }, ]); }); it(\"changeItemValue被调用时候,UndoList列表内容变化\", () => { const wrapper = shallowMount(TodoList); wrapper.setData({ undoList: [ { status: \"div\", value: 1 }, { status: \"input\", value: 2 }, { status: \"div\", value: 3 }, ], }); wrapper.vm.changeItemValue({ value: \"444\", index: 1 }); expect(wrapper.vm.$data.undoList).toEqual([ { status: \"div\", value: 1 }, { status: \"input\", value: \"444\" }, { status: \"div\", value: 3 }, ]); });});TodoList.vue:
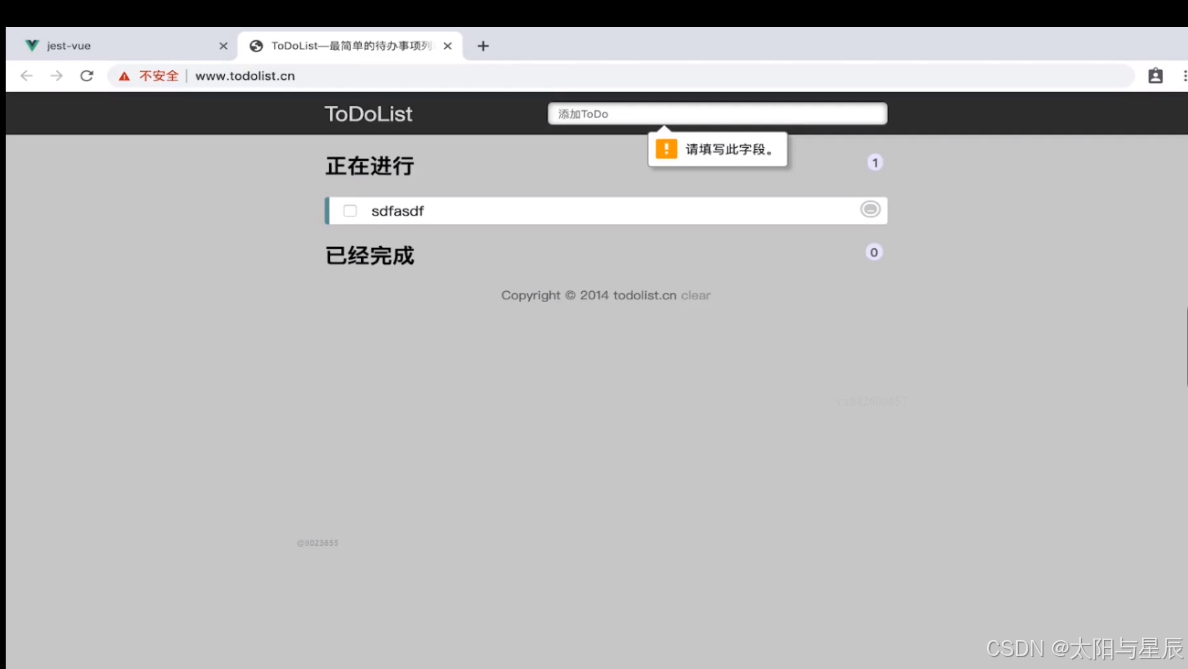
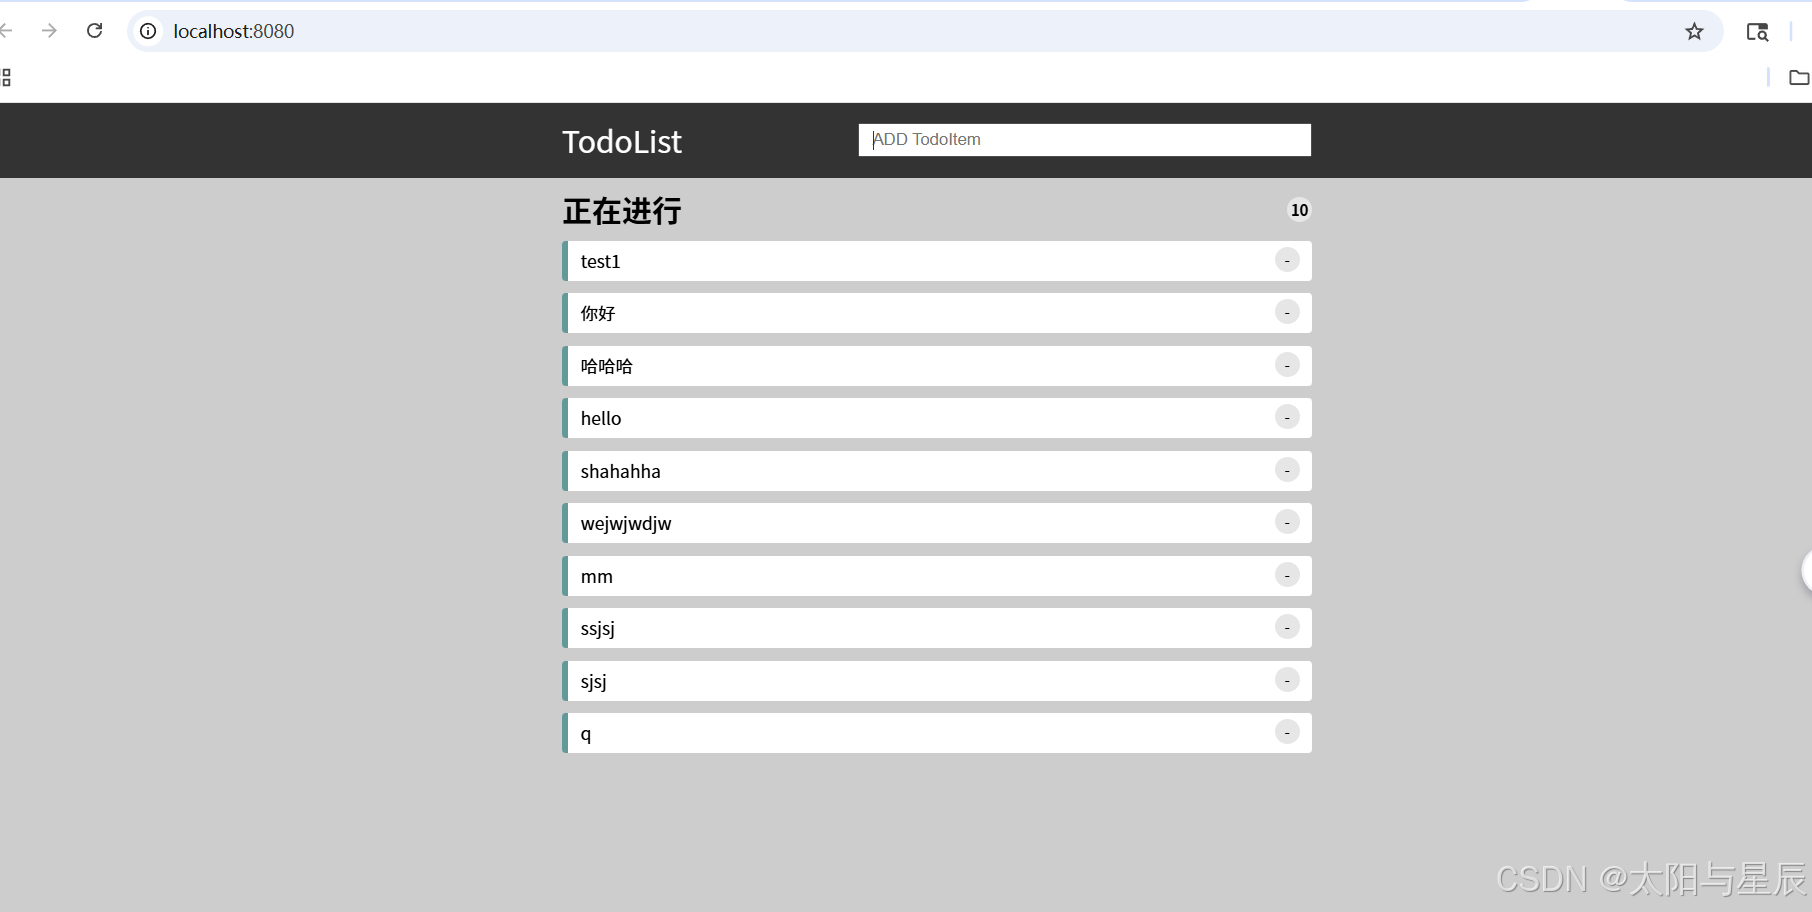
<template> <div class=\"hello\"> <Header @add=\"addUndoItem\" /> <UndoList :list=\"undoList\" @delete=\"handleItemDelete\" @status=\"changeStatus\" @reset=\"resetStatus\" @change=\"changeItemValue\" /> </div></template><script>import Header from \"./components/Header.vue\";import UndoList from \"./components/UndoList.vue\";export default { name: \"TodoList\", components: { Header, UndoList }, data() { return { undoList: [], }; }, methods: { addUndoItem(inputValue) { this.undoList.push({ status: \"div\", value: inputValue, }); }, handleItemDelete(index) { this.undoList.splice(index, 1); }, changeStatus(index) { let newList = []; this.undoList.forEach((item, itemIndex) => { if (itemIndex === index) { newList.push({ status: \"input\", value: item.value, }); } else { newList.push({ status: \"div\", value: item.value, }); } }); this.undoList = newList; }, resetStatus() { let newList = []; this.undoList.forEach((item, itemIndex) => { newList.push({ status: \"div\", value: item.value, }); }); this.undoList = newList; }, changeItemValue(obj) { this.undoList[obj.index].value = obj.value; }, },};</script><style scoped lang=\"stylus\"></style>这样子一个简单的todolist组件就完成了:
我们从上面的代码会发现,开发业务组件时候使用单元测试结合TDD方法并不好。每次修改时候都要先修改测试用例再修改组件,耦合度太高。对于纯函数,类似工具库的开发可以使用单元测试+TDD方法。
九、CodeCoverage代码覆盖率
打开vue-test-utils教程文档https://v1.test-utils.vuejs.org/zh/installation/#用-jest-测试单文件组件,复制以下代码:
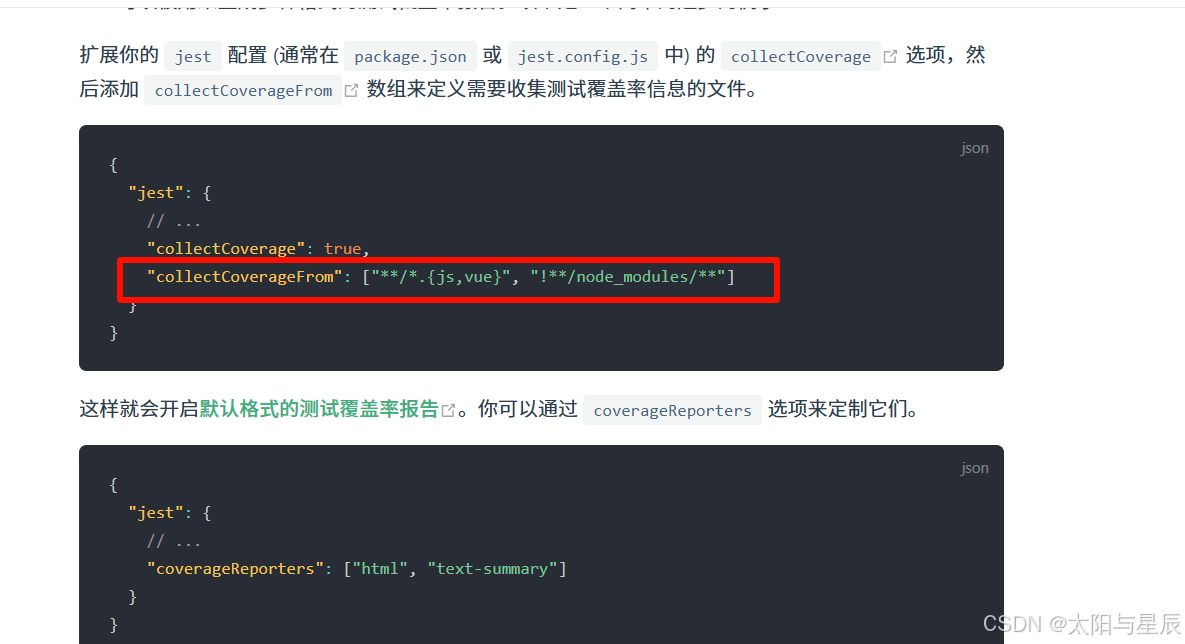
修改去掉js,复制到下面文件:
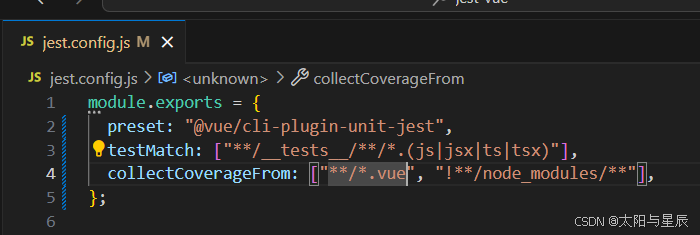
增加脚本:
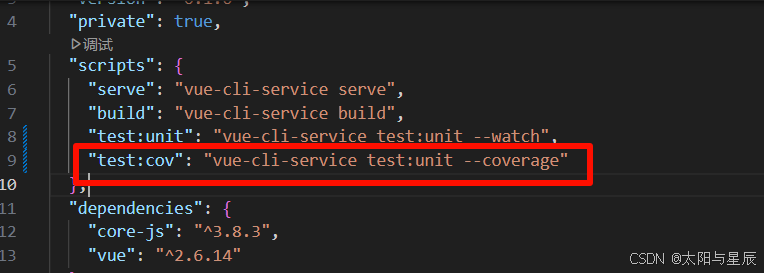
运行npm run test:cov
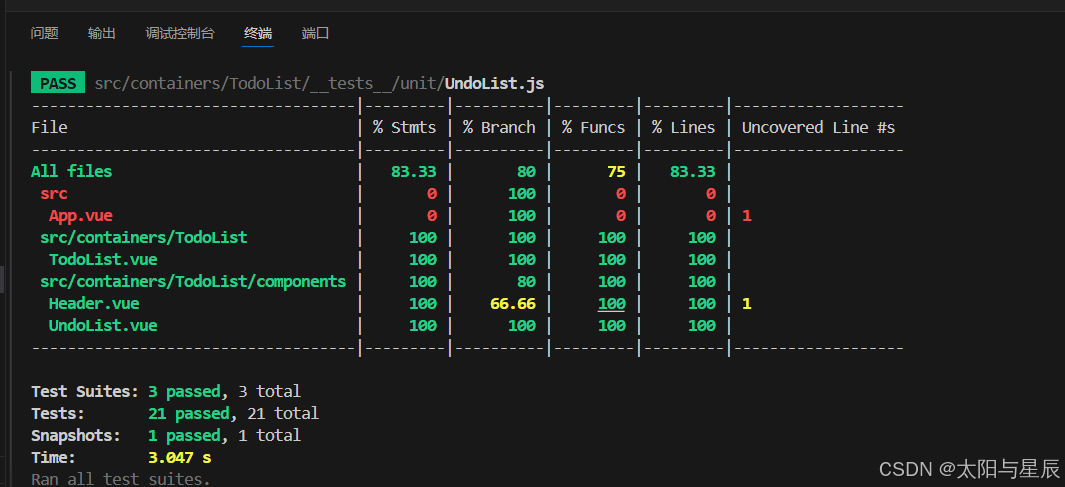
会生成一个coverage文件夹:
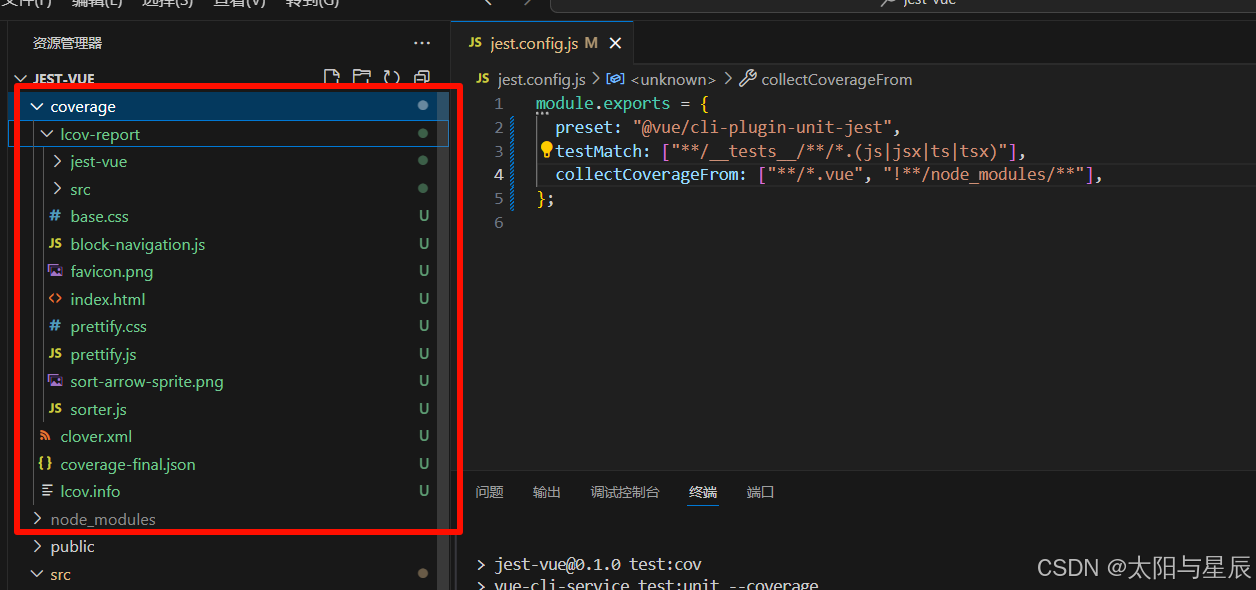
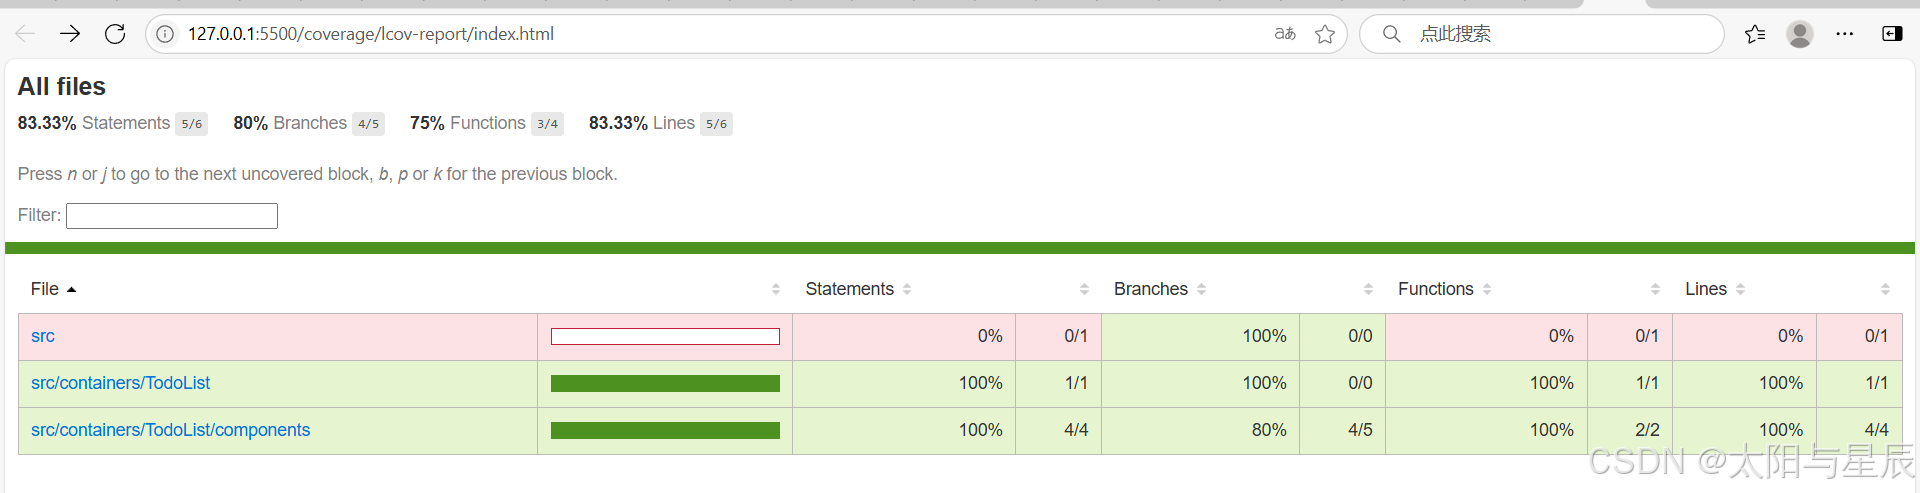
打开index.html网页:
十、总结
ps:TDD和单元测试不是一个概念。二者可以结合使用,TDD也可以和集成测试结合。
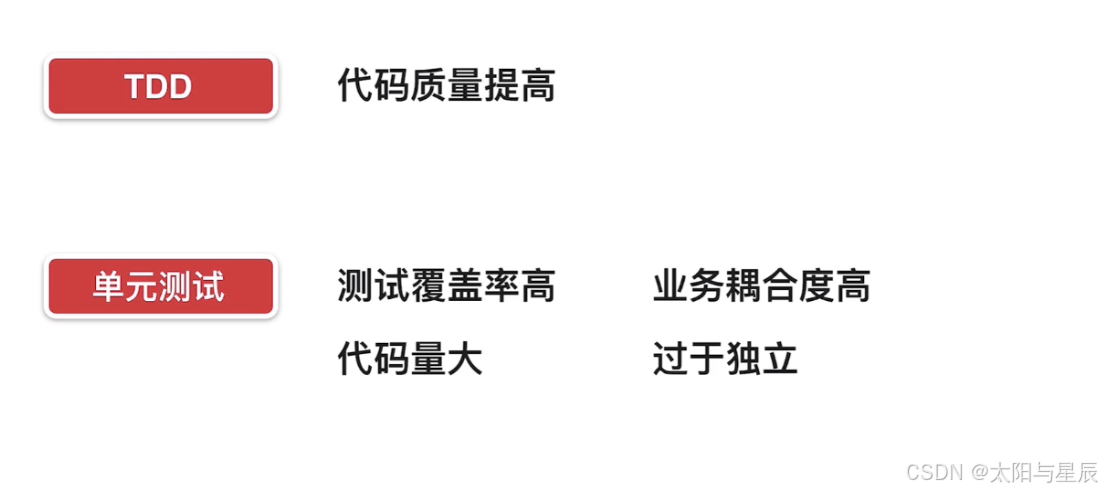
如果我们开发函数库,可以用单元测试结合TDD。但如果是开发业务组件,那就不适合用单元测试+TDD了。

