【机智云教程】STM32+ESP8266连接机智云的详细步骤,上传温湿度+继电器控制_【【机智云教程】stm32+esp8266连接机智云的详细步骤,上传温湿度+继电器控制
先看效果:
【教程】STM32+ESP8266连接机智云,实现远程开关控制与温湿度显示
文章目录
-
- 先看效果:
- 一、前期准备
-
- 1、元器件
- 2、硬件连接
- 二、ESP8266固件烧录
- 三、机智云平台配置
- 四、代码移植
- 五、APP机智云上绑定设备
一、前期准备
资料下载链接:资料下载
1、元器件
STM32F103C8T6最小系统板
DHT11
ESP8266-01s
ESP8266烧录器
杜邦线
继电器
OLED屏幕

2、硬件连接
二、ESP8266固件烧录
将ESP8266和ESP8266烧录器组装,插入电脑。(需要安装CH340C驱动)。
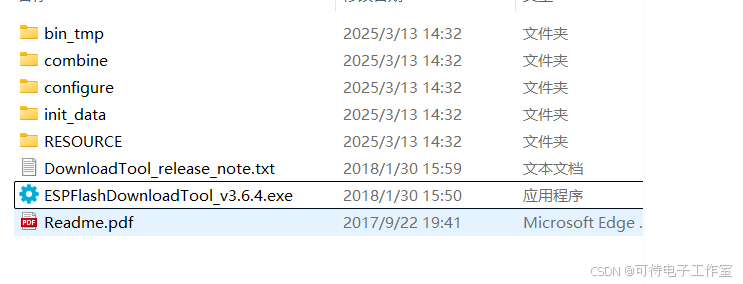
打开资料包里的“ESP8266烧录工具”文件夹,双击运行“ESPFlashDownloadTool_v3.6.4.exe\"。

如图进行设置,等待下载完成
;第一步,在资料里面选择 “ESP8266机智云固件” 文件夹里的

第五步,COMx 根据自己电脑识别到的COM口来选择。

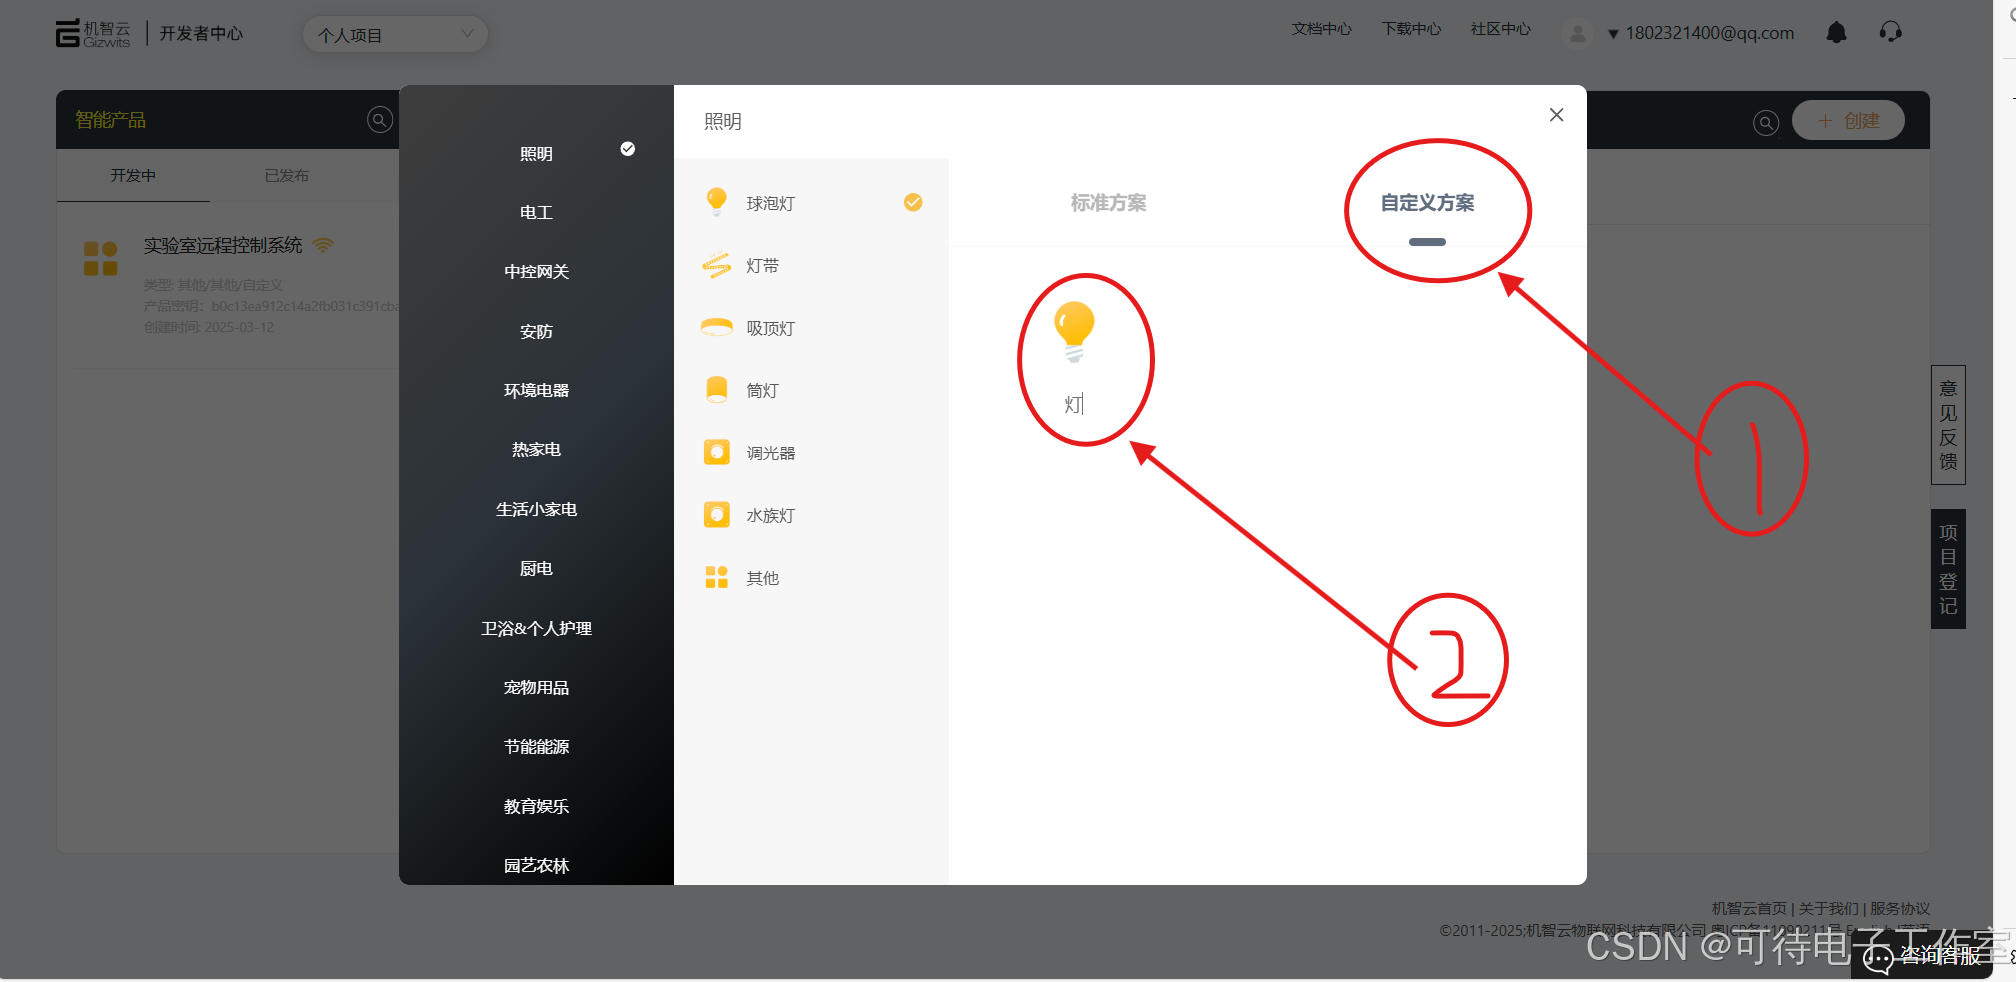
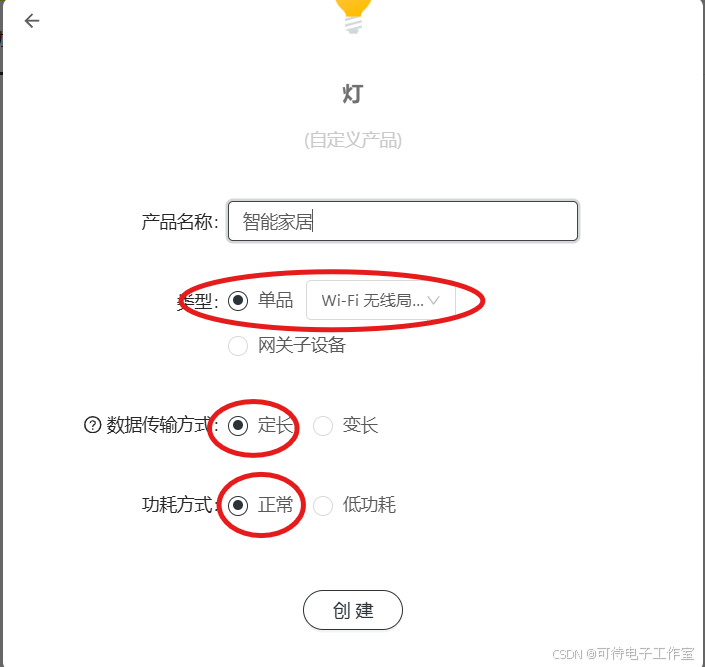
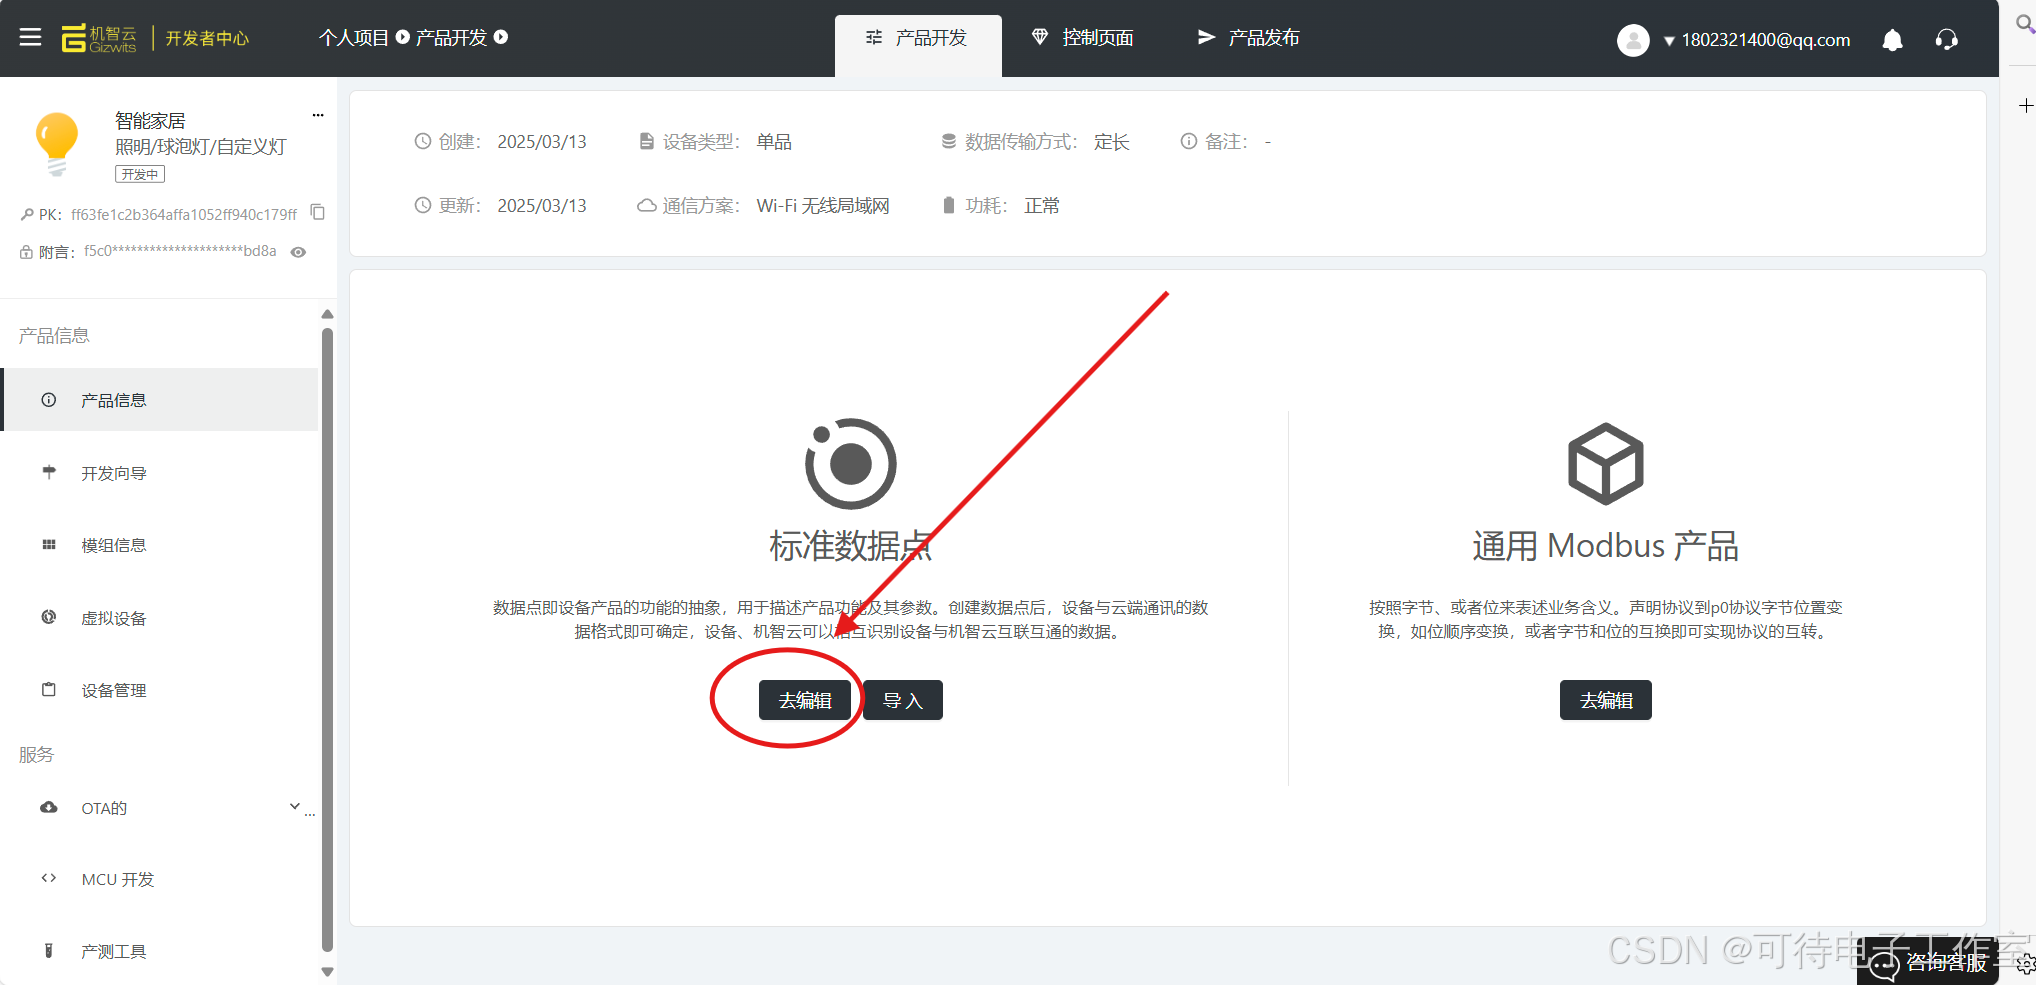
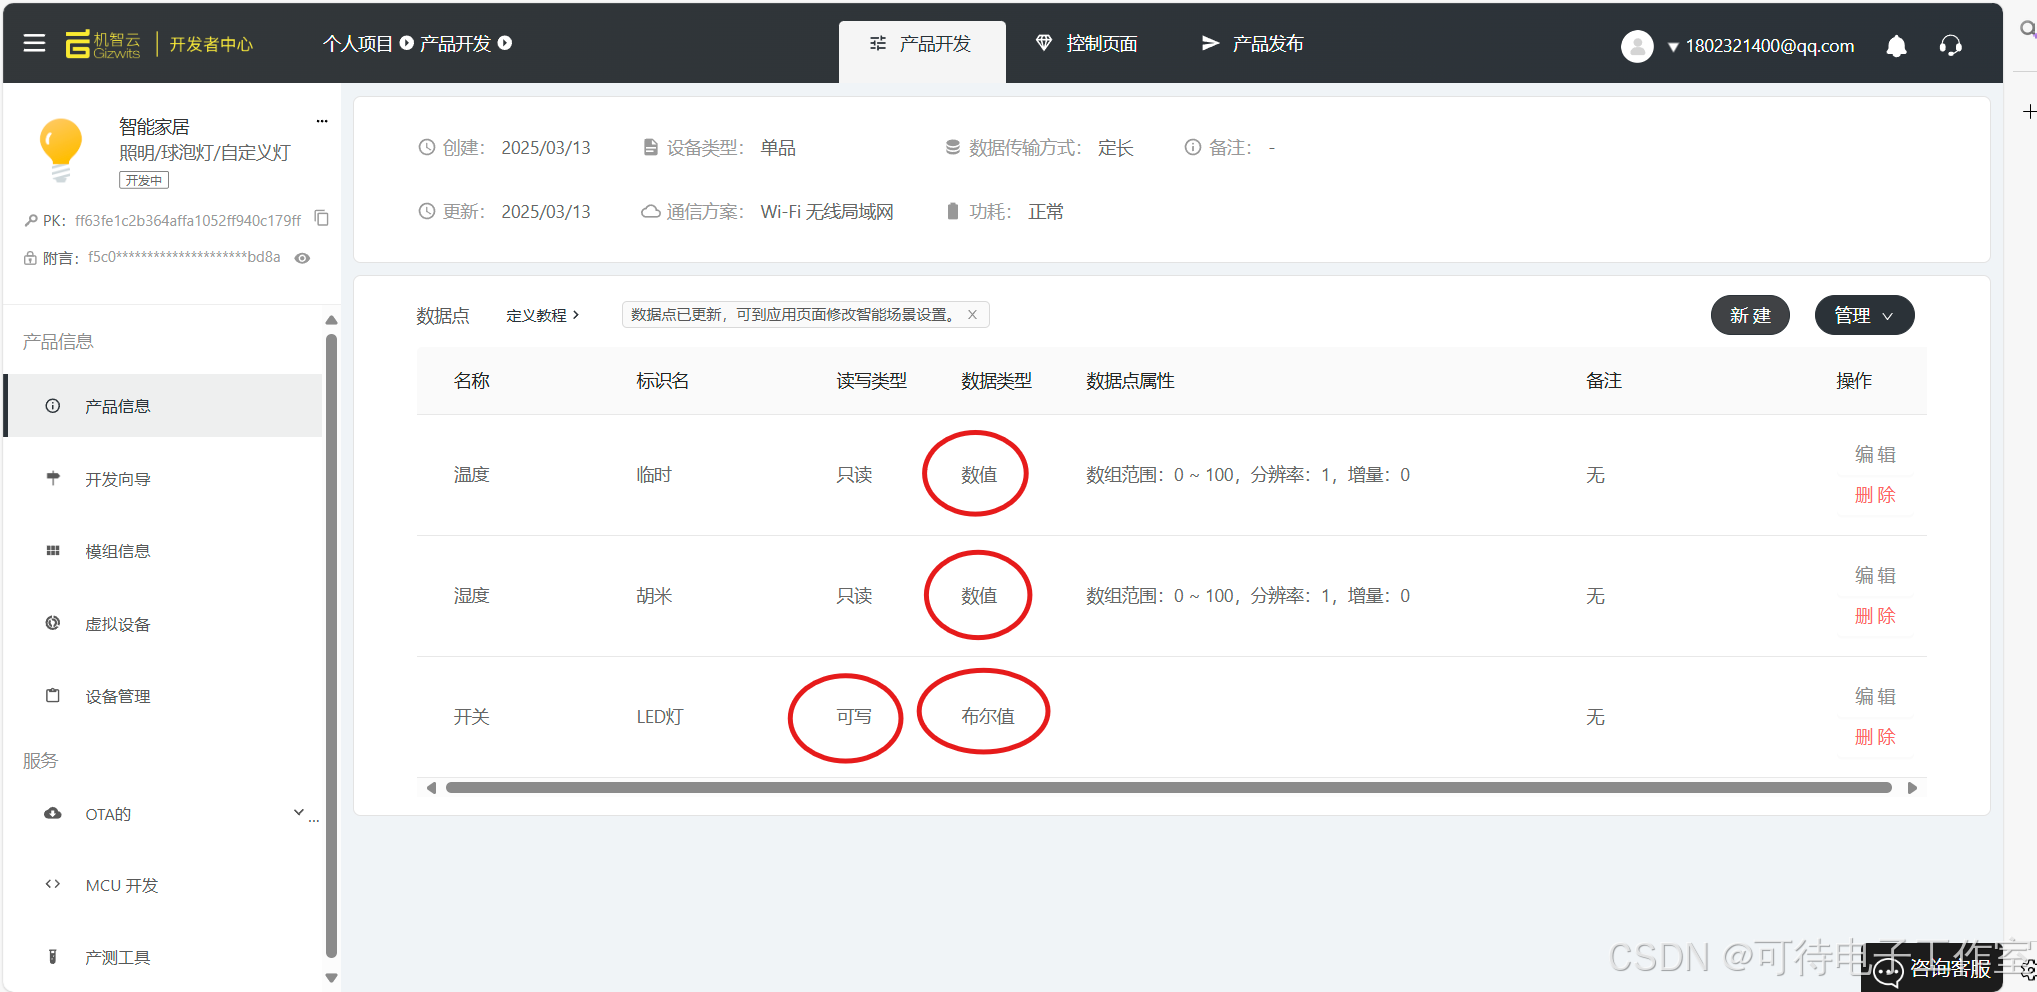
三、机智云平台配置
在机智云开发者中心网址进行注册:https://dev.gizwits.com/zh-cn/developer/intro
注册后,进入开发者中心网址:https://developer.gizwits.com/menu/dashboard
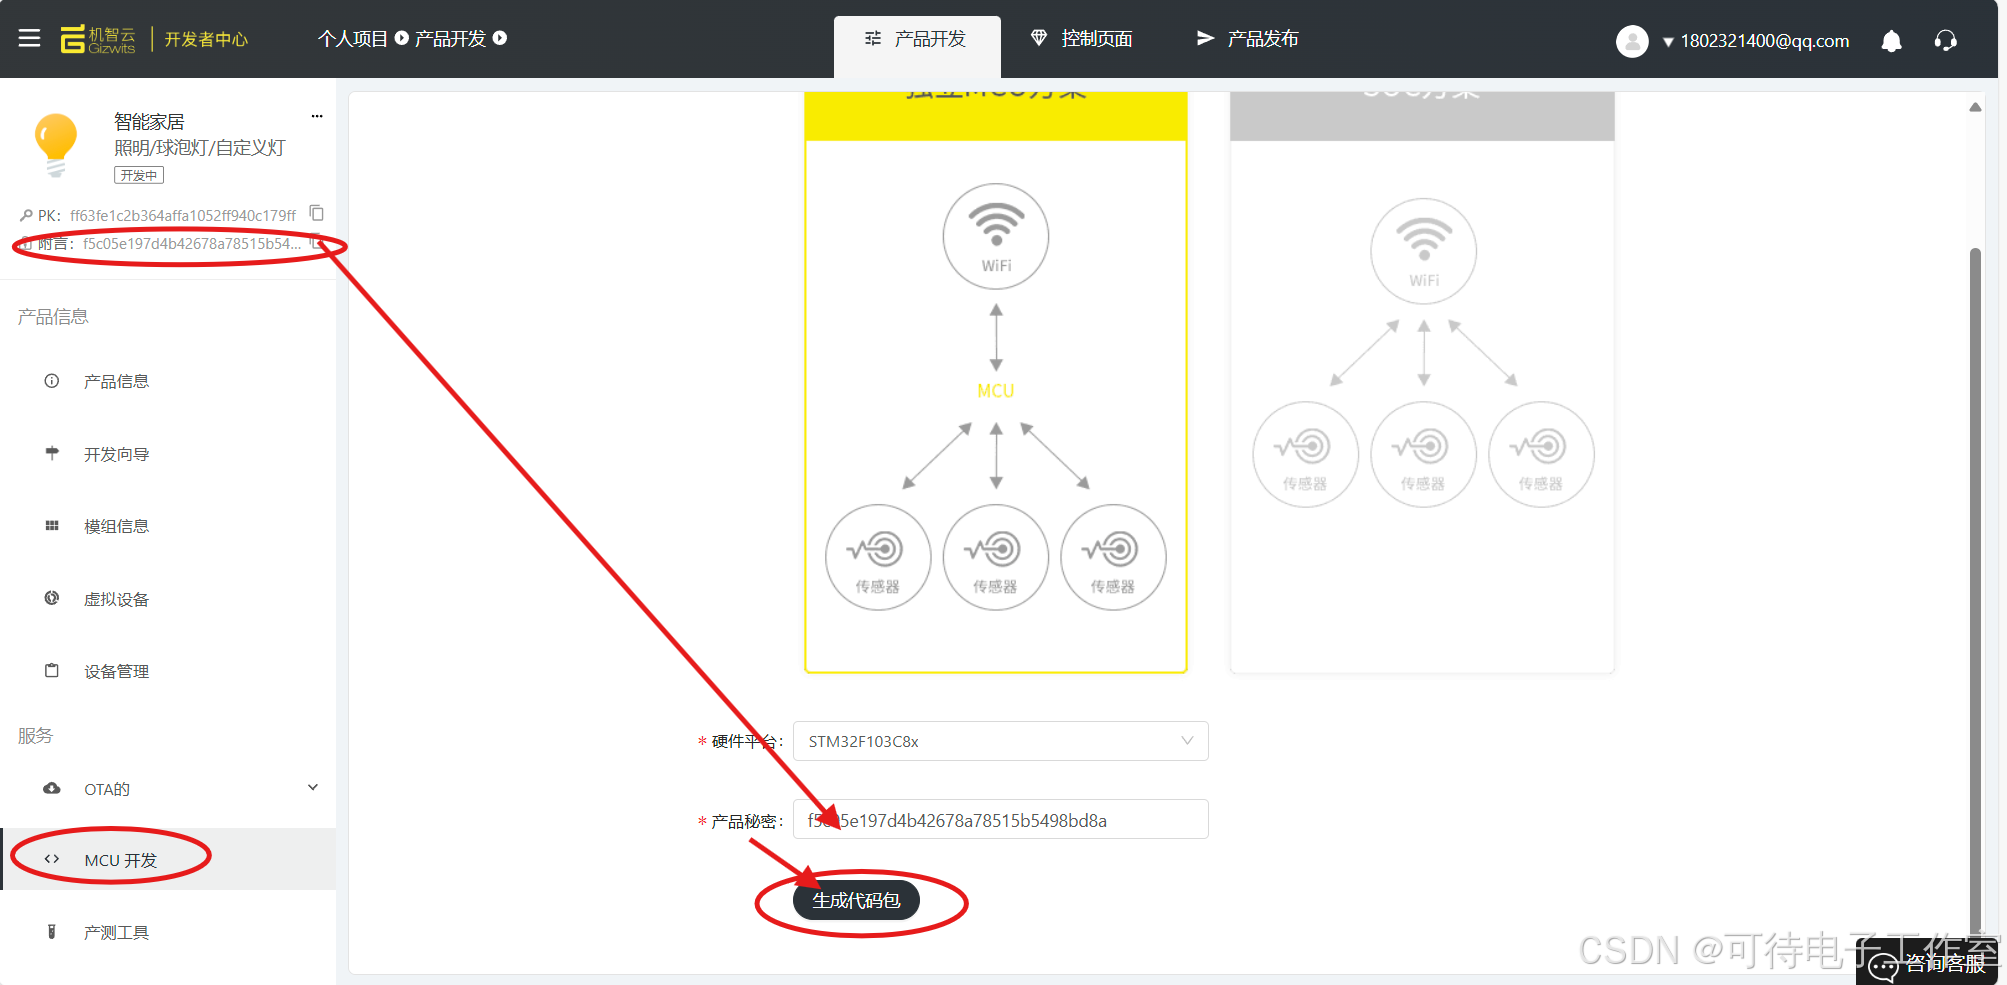
四、代码移植
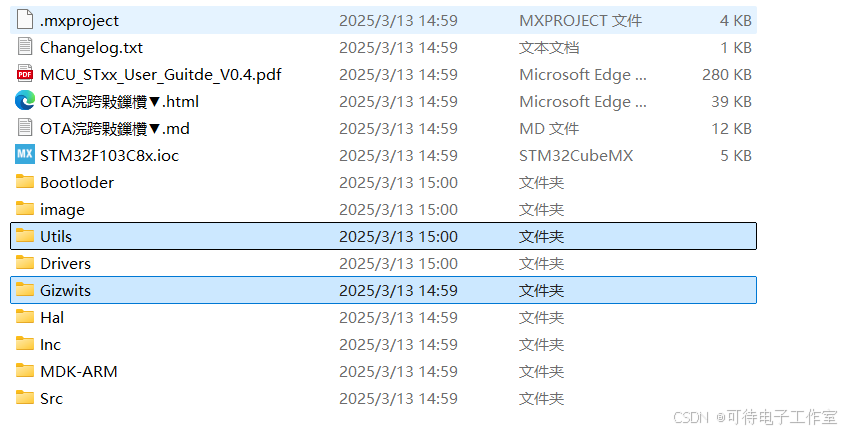
将生成的代码,下载解压后,复制以下2个文件到我的工程中
打开我的代码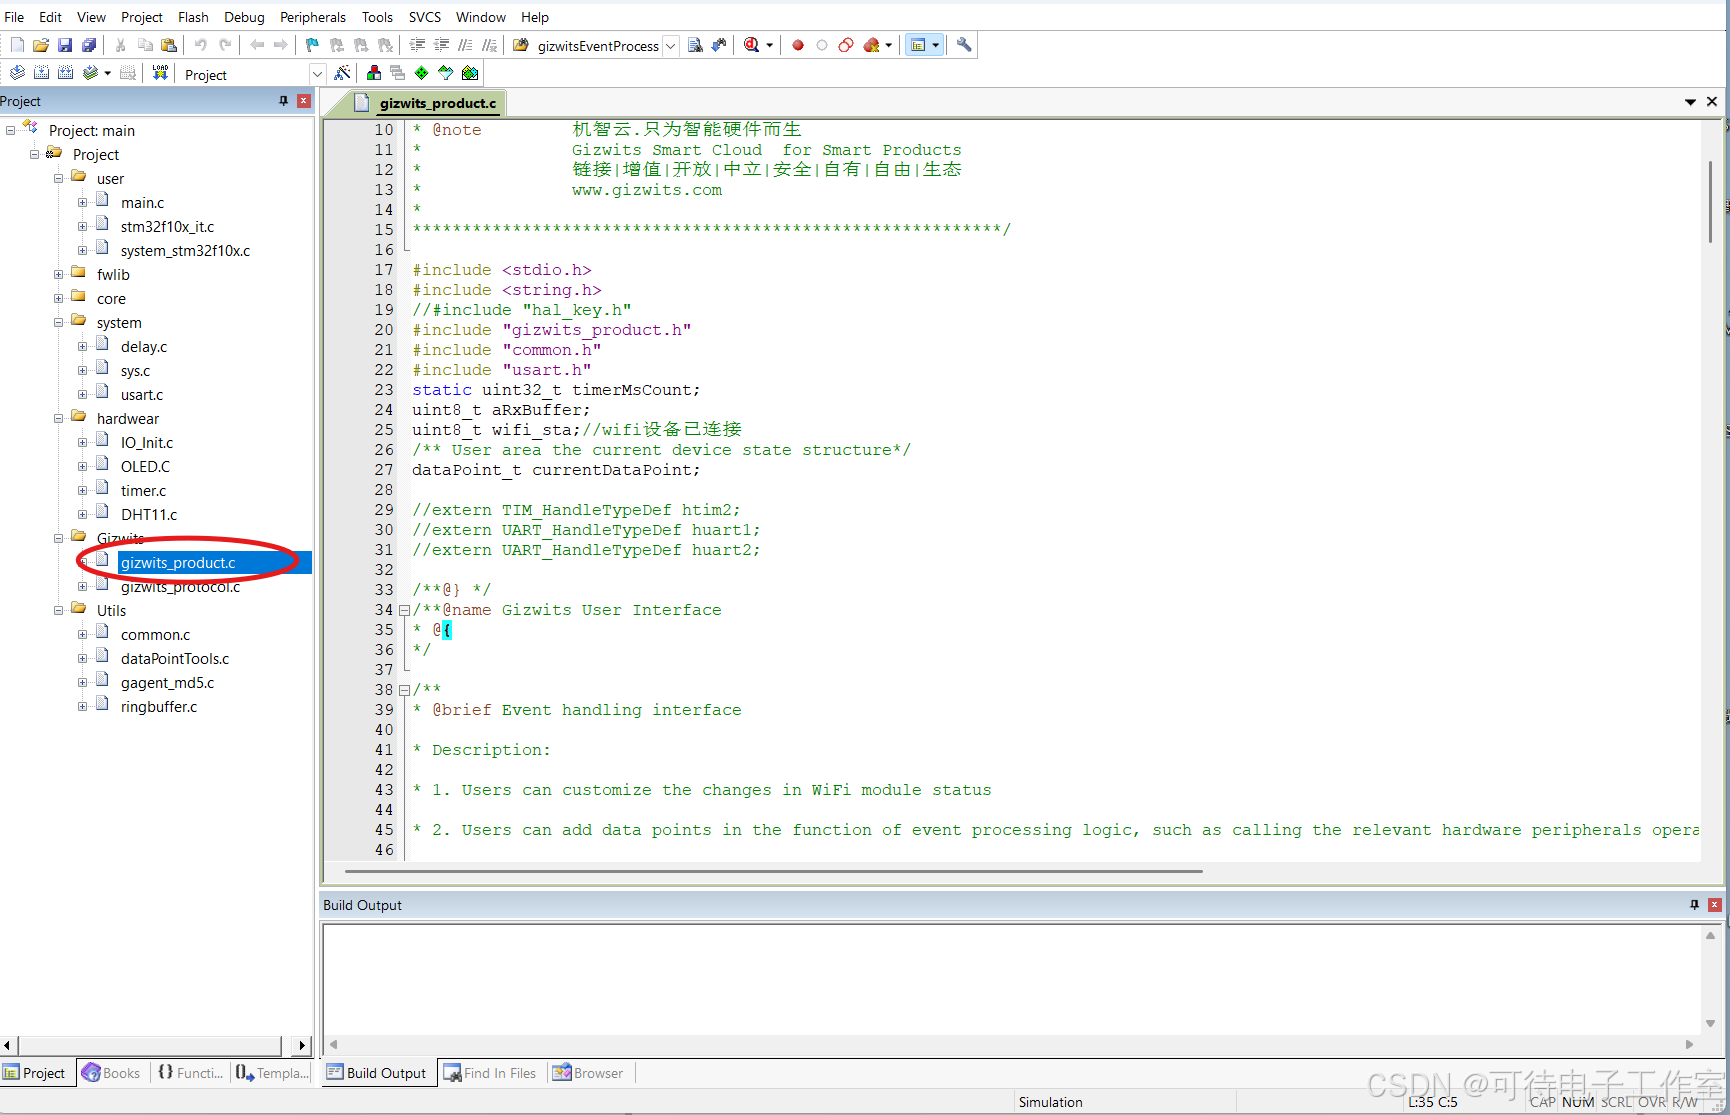
将gizwits_product.c中的文件用下面的代码替换就ok了。
/*************************************************************** @file gizwits_product.c* @brief Gizwits control protocol processing, and platform-related hardware initialization * @author Gizwits* @date 2017-07-19* @version V03030000* @copyright Gizwits* * @note 机智云.只为智能硬件而生* Gizwits Smart Cloud for Smart Products* 链接|增值ֵ|开放|中立|安全|自有|自由|生态* www.gizwits.com************************************************************/#include #include //#include \"hal_key.h\"#include \"gizwits_product.h\"#include \"common.h\"#include \"usart.h\"static uint32_t timerMsCount;uint8_t aRxBuffer;uint8_t wifi_sta;//wifi设备已连接/** User area the current device state structure*/dataPoint_t currentDataPoint;/**@} *//**@name Gizwits User Interface* @{*//*** @brief Event handling interface* Description:* 1. Users can customize the changes in WiFi module status* 2. Users can add data points in the function of event processing logic, such as calling the relevant hardware peripherals operating interface* @param [in] info: event queue* @param [in] data: protocol data* @param [in] len: protocol data length* @return NULL* @ref gizwits_protocol.h*/int8_t gizwitsEventProcess(eventInfo_t *info, uint8_t *gizdata, uint32_t len){ uint8_t i = 0; dataPoint_t *dataPointPtr = (dataPoint_t *)gizdata; moduleStatusInfo_t *wifiData = (moduleStatusInfo_t *)gizdata; protocolTime_t *ptime = (protocolTime_t *)gizdata; #if MODULE_TYPE gprsInfo_t *gprsInfoData = (gprsInfo_t *)gizdata;#else moduleInfo_t *ptModuleInfo = (moduleInfo_t *)gizdata;#endif if((NULL == info) || (NULL == gizdata)) { return -1; } for(i=0; i<info->num; i++) { switch(info->event[i]) { case EVENT_relay: currentDataPoint.valuerelay = dataPointPtr->valuerelay; GIZWITS_LOG(\"Evt: EVENT_relay %d \\n\", currentDataPoint.valuerelay); if(0x01 == currentDataPoint.valuerelay) { //user handle } else { //user handle } break; case WIFI_SOFTAP: break; case WIFI_AIRLINK: break; case WIFI_STATION: break; case WIFI_CON_ROUTER: break; case WIFI_DISCON_ROUTER: break; case WIFI_CON_M2M: wifi_sta = 1; break; case WIFI_DISCON_M2M: wifi_sta=0;//wifi设备断开//第三处,添加 break; case WIFI_RSSI: GIZWITS_LOG(\"RSSI %d\\n\", wifiData->rssi); break; case TRANSPARENT_DATA: GIZWITS_LOG(\"TRANSPARENT_DATA \\n\"); //user handle , Fetch data from [data] , size is [len] break; case WIFI_NTP: GIZWITS_LOG(\"WIFI_NTP : [%d-%d-%d %02d:%02d:%02d][%d] \\n\",ptime->year,ptime->month,ptime->day,ptime->hour,ptime->minute,ptime->second,ptime->ntp); break; case MODULE_INFO: GIZWITS_LOG(\"MODULE INFO ...\\n\");#if MODULE_TYPE GIZWITS_LOG(\"GPRS MODULE ...\\n\"); //Format By gprsInfo_t GIZWITS_LOG(\"moduleType : [%d] \\n\",gprsInfoData->Type);#else GIZWITS_LOG(\"WIF MODULE ...\\n\"); //Format By moduleInfo_t GIZWITS_LOG(\"moduleType : [%d] \\n\",ptModuleInfo->moduleType);#endif break; default: break; } } return 0;}/*** User data acquisition* Here users need to achieve in addition to data points other than the collection of data collection, can be self-defined acquisition frequency and design data filtering algorithm* @param none* @return none*/void userHandle(void){ /* currentDataPoint.valuetemp = ;//Add Sensor Data Collection currentDataPoint.valuehumi = ;//Add Sensor Data Collection */}/*** Data point initialization function* In the function to complete the initial user-related data* @param none* @return none* @note The developer can add a data point state initialization value within this function*/void userInit(void){ memset((uint8_t*)¤tDataPoint, 0, sizeof(dataPoint_t)); /** Warning !!! DataPoint Variables Init , Must Within The Data Range **/ /* currentDataPoint.valuerelay = ; currentDataPoint.valuetemp = ; currentDataPoint.valuehumi = ; */}/*** @brief Millisecond timing maintenance function, milliseconds increment, overflow to zero* @param none* @return none*/void gizTimerMs(void){ timerMsCount++;}/*** @brief Read millisecond count* @param none* @return millisecond count*/uint32_t gizGetTimerCount(void){ return timerMsCount;}/*** @brief MCU reset function* @param none* @return none*/void mcuRestart(void){ __set_FAULTMASK(1); NVIC_SystemReset();}/**@} */#ifdef __GNUC__ /* With GCC/RAISONANCE, small printf (option LD Linker->Libraries->Small printf set to \'Yes\') calls __io_putchar() */ #define PUTCHAR_PROTOTYPE int __io_putchar(int ch)#else #define PUTCHAR_PROTOTYPE int fputc(int ch, FILE *f)#endif /* __GNUC__ *//** * @brief Retargets the C library printf function to the USART. * @param None * @retval None */PUTCHAR_PROTOTYPE{ /* Place your implementation of fputc here */ /* e.g. write a character to the USART1 and Loop until the end of transmission */UsartSendData(USART2,ch); return ch;}/** * @brief This function handles USART IDLE interrupt. */void USART1_IRQHandler(void) //串口1中断服务程序{u8 res;if(USART_GetITStatus(USART1, USART_IT_RXNE) != RESET) //接收中断(接收到的数据必须是0x0d 0x0a结尾){res =USART1->DR;//读取接收到的数据gizPutData(&res, 1); }}/*** @brief Serial port write operation, send data to WiFi module** @param buf : buf address* @param len : buf length** @return : Return effective data length;-1,return failure*/int32_t uartWrite(uint8_t *buf, uint32_t len){uint8_t crc[1] = {0x55}; uint32_t i = 0; if(NULL == buf) { return -1; } for(i=0; i<len; i++) { UsartSendData(USART1,buf[i]); if(i >=2 && buf[i] == 0xFF) {UsartSendData(USART1, crc[0]); } }#ifdef PROTOCOL_DEBUG GIZWITS_LOG(\"MCU2WiFi[%4d:%4d]: \", gizGetTimerCount(), len); for(i=0; i<len; i++) { GIZWITS_LOG(\"%02x \", buf[i]); if(i >=2 && buf[i] == 0xFF) { GIZWITS_LOG(\"%02x \", 0x55); } } GIZWITS_LOG(\"\\n\");#endifreturn len;} 五、APP机智云上绑定设备
取消这一段的屏蔽,然后烧录一次代码
ESP8266就会进入Soft配网模式。手机查看ESP8266的热点名称,一般是XPG-GAgent-xxx,密码123456789。
在手机APP添加设备,选择热点配网模式,第一、二行输入你家路由器的WiFi名称,密码,第三、四行输入设备产生的热点名称:XPG-GAgent-xxx和密码123456789。选择模组类型:乐鑫、乐鑫广播。根据提示操作即可。
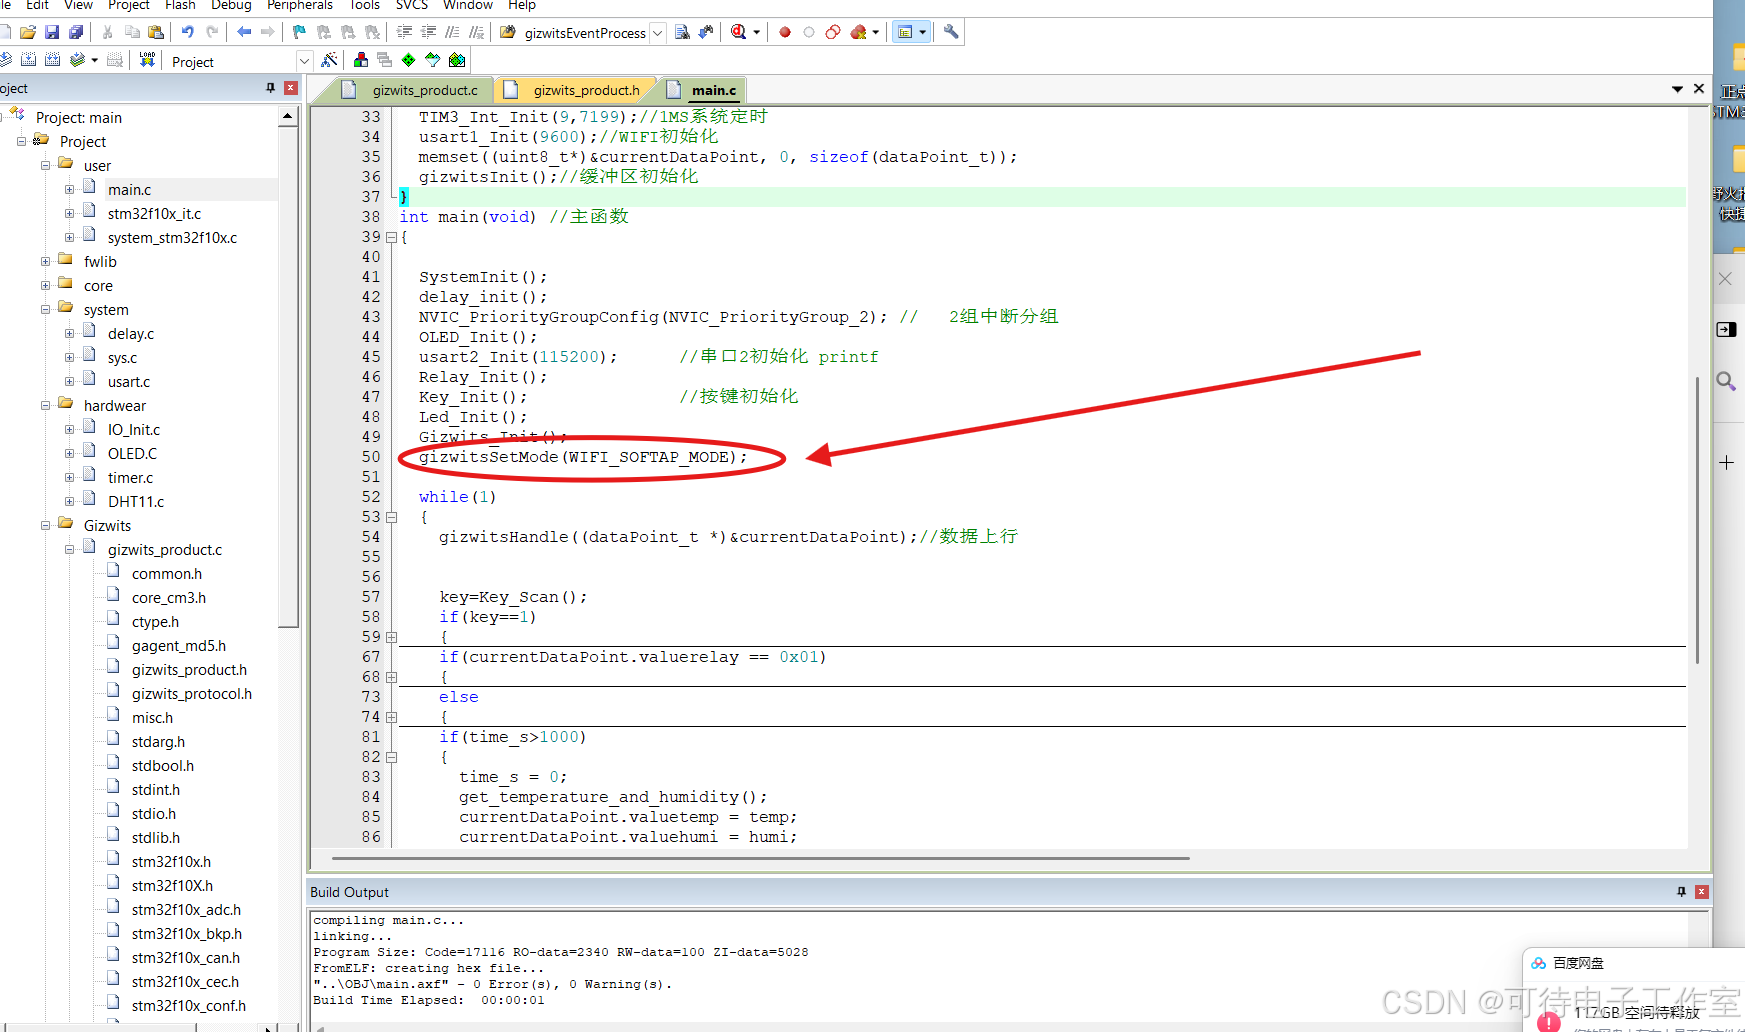
配网完成后,不要断电,直接给STM32烧录屏蔽掉这个配网的代码(不然路由器信息不能保存,每次设备上电都要进行配网。。。。)
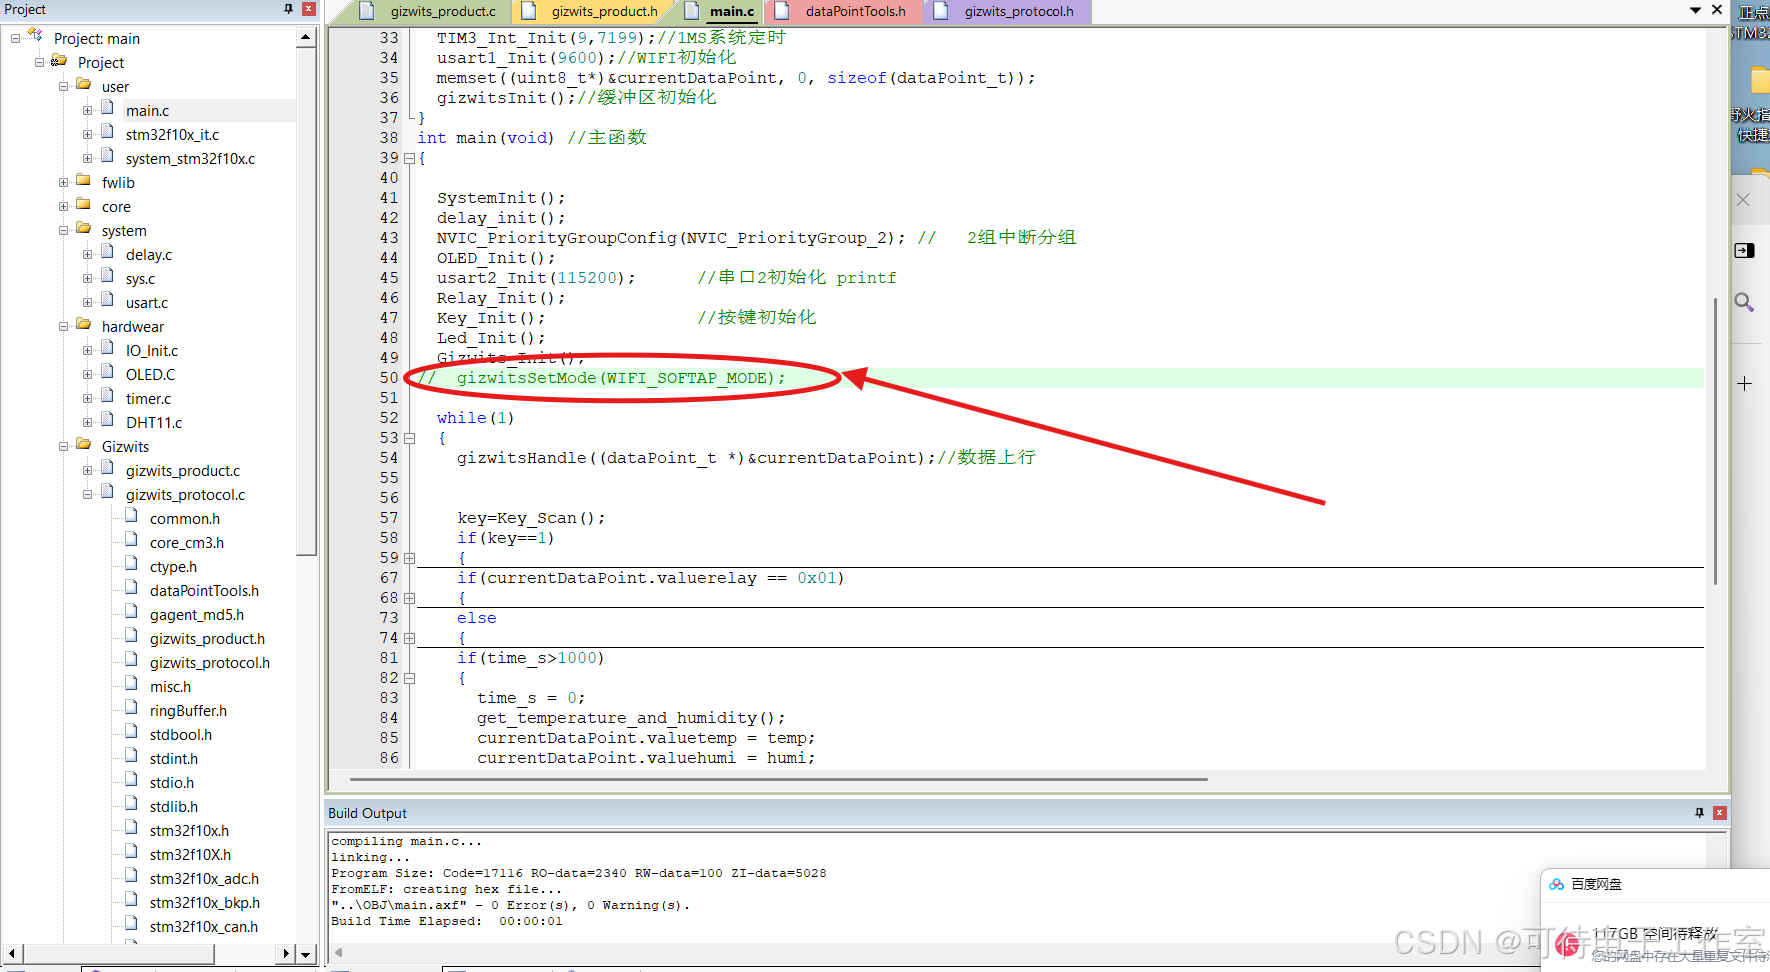
现在就可以进行控制了。

