Python API接口实战指南:从入门到精通

🌟 Hello,我是蒋星熠Jaxonic!
🌈 在浩瀚无垠的技术宇宙中,我是一名执着的星际旅人,用代码绘制探索的轨迹。
🚀 每一个算法都是我点燃的推进器,每一行代码都是我航行的星图。
🔭 每一次性能优化都是我的天文望远镜,每一次架构设计都是我的引力弹弓。
🎻 在数字世界的协奏曲中,我既是作曲家也是首席乐手。让我们携手,在二进制星河中谱写属于极客的壮丽诗篇!
摘要
作为一名多年沉浸在API开发与集成领域的技术探索者,我深刻体会到API接口已成为现代软件开发的核心基石。在这个万物互联的时代,掌握API调用技术不再是锦上添花,而是开发者必备的基本技能。本文将带领大家深入Python API接口的奇妙世界,从基础概念到实战应用,全方位剖析如何利用Python高效调用各类API接口。我们将探讨RESTful API、GraphQL、WebSocket等不同类型接口的特点与应用场景,通过实际案例演示如何使用requests、aiohttp等库进行接口调用,并深入讨论认证机制、错误处理、性能优化等关键技术点。无论你是刚入门的新手,还是寻求提升的老手,这篇文章都将为你提供系统化的API接口调用知识体系,助你在这个API驱动的世界中游刃有余。让我们一起揭开API的神秘面纱,探索如何通过简单的Python代码连接无限可能!
一、API基础知识
1.1 什么是API
API(Application Programming Interface,应用程序编程接口)是软件组件之间定义的交互方式,允许不同的应用程序相互通信和共享数据。
# API调用的基本模式import requests# 发送请求到API端点response = requests.get(\'https://api.example.com/data\')# 处理响应if response.status_code == 200: data = response.json() # 解析JSON响应 print(data)else: print(f\"请求失败: {response.status_code}\")1.2 API的类型
#mermaid-svg-oQ2pdBFbcW0uouNW {font-family:\"trebuchet ms\",verdana,arial,sans-serif;font-size:16px;fill:#000000;}#mermaid-svg-oQ2pdBFbcW0uouNW .error-icon{fill:#552222;}#mermaid-svg-oQ2pdBFbcW0uouNW .error-text{fill:#552222;stroke:#552222;}#mermaid-svg-oQ2pdBFbcW0uouNW .edge-thickness-normal{stroke-width:2px;}#mermaid-svg-oQ2pdBFbcW0uouNW .edge-thickness-thick{stroke-width:3.5px;}#mermaid-svg-oQ2pdBFbcW0uouNW .edge-pattern-solid{stroke-dasharray:0;}#mermaid-svg-oQ2pdBFbcW0uouNW .edge-pattern-dashed{stroke-dasharray:3;}#mermaid-svg-oQ2pdBFbcW0uouNW .edge-pattern-dotted{stroke-dasharray:2;}#mermaid-svg-oQ2pdBFbcW0uouNW .marker{fill:#5D8AA8;stroke:#5D8AA8;}#mermaid-svg-oQ2pdBFbcW0uouNW .marker.cross{stroke:#5D8AA8;}#mermaid-svg-oQ2pdBFbcW0uouNW svg{font-family:\"trebuchet ms\",verdana,arial,sans-serif;font-size:16px;}#mermaid-svg-oQ2pdBFbcW0uouNW .label{font-family:\"trebuchet ms\",verdana,arial,sans-serif;color:#000000;}#mermaid-svg-oQ2pdBFbcW0uouNW .cluster-label text{fill:#333;}#mermaid-svg-oQ2pdBFbcW0uouNW .cluster-label span{color:#333;}#mermaid-svg-oQ2pdBFbcW0uouNW .label text,#mermaid-svg-oQ2pdBFbcW0uouNW span{fill:#000000;color:#000000;}#mermaid-svg-oQ2pdBFbcW0uouNW .node rect,#mermaid-svg-oQ2pdBFbcW0uouNW .node circle,#mermaid-svg-oQ2pdBFbcW0uouNW .node ellipse,#mermaid-svg-oQ2pdBFbcW0uouNW .node polygon,#mermaid-svg-oQ2pdBFbcW0uouNW .node path{fill:#cde498;stroke:#13540c;stroke-width:1px;}#mermaid-svg-oQ2pdBFbcW0uouNW .node .label{text-align:center;}#mermaid-svg-oQ2pdBFbcW0uouNW .node.clickable{cursor:pointer;}#mermaid-svg-oQ2pdBFbcW0uouNW .arrowheadPath{fill:green;}#mermaid-svg-oQ2pdBFbcW0uouNW .edgePath .path{stroke:#5D8AA8;stroke-width:2.0px;}#mermaid-svg-oQ2pdBFbcW0uouNW .flowchart-link{stroke:#5D8AA8;fill:none;}#mermaid-svg-oQ2pdBFbcW0uouNW .edgeLabel{background-color:#e8e8e8;text-align:center;}#mermaid-svg-oQ2pdBFbcW0uouNW .edgeLabel rect{opacity:0.5;background-color:#e8e8e8;fill:#e8e8e8;}#mermaid-svg-oQ2pdBFbcW0uouNW .cluster rect{fill:#cdffb2;stroke:#6eaa49;stroke-width:1px;}#mermaid-svg-oQ2pdBFbcW0uouNW .cluster text{fill:#333;}#mermaid-svg-oQ2pdBFbcW0uouNW .cluster span{color:#333;}#mermaid-svg-oQ2pdBFbcW0uouNW div.mermaidTooltip{position:absolute;text-align:center;max-width:200px;padding:2px;font-family:\"trebuchet ms\",verdana,arial,sans-serif;font-size:12px;background:#D6EAF8;border:1px solid #6eaa49;border-radius:2px;pointer-events:none;z-index:100;}#mermaid-svg-oQ2pdBFbcW0uouNW :root{--mermaid-font-family:\"trebuchet ms\",verdana,arial,sans-serif;}#mermaid-svg-oQ2pdBFbcW0uouNW .rest>*{fill:#5D8AA8!important;stroke:#1A5276!important;color:#fff!important;}#mermaid-svg-oQ2pdBFbcW0uouNW .rest span{fill:#5D8AA8!important;stroke:#1A5276!important;color:#fff!important;}#mermaid-svg-oQ2pdBFbcW0uouNW .graphql>*{fill:#8E44AD!important;stroke:#4A235A!important;color:#fff!important;}#mermaid-svg-oQ2pdBFbcW0uouNW .graphql span{fill:#8E44AD!important;stroke:#4A235A!important;color:#fff!important;}#mermaid-svg-oQ2pdBFbcW0uouNW .soap>*{fill:#F39C12!important;stroke:#9A7D0A!important;color:#fff!important;}#mermaid-svg-oQ2pdBFbcW0uouNW .soap span{fill:#F39C12!important;stroke:#9A7D0A!important;color:#fff!important;}#mermaid-svg-oQ2pdBFbcW0uouNW .websocket>*{fill:#27AE60!important;stroke:#196F3D!important;color:#fff!important;}#mermaid-svg-oQ2pdBFbcW0uouNW .websocket span{fill:#27AE60!important;stroke:#196F3D!important;color:#fff!important;}#mermaid-svg-oQ2pdBFbcW0uouNW .rpc>*{fill:#E74C3C!important;stroke:#943126!important;color:#fff!important;}#mermaid-svg-oQ2pdBFbcW0uouNW .rpc span{fill:#E74C3C!important;stroke:#943126!important;color:#fff!important;} API类型 RESTful API GraphQL SOAP API WebSocket API RPC API 基于HTTP方法 无状态 资源导向 单一端点 精确查询 强类型架构 基于XML 严格规范 内置安全机制 全双工通信 实时数据 持久连接 远程过程调用 gRPC/XML-RPC 高性能
图1:API类型分类流程图 - 展示了主要API类型及其特点
1.3 API认证方式
不同的API使用不同的认证机制来确保安全访问:
# API密钥认证import requestsapi_key = \"your_api_key_here\"headers = {\"Authorization\": f\"Bearer {api_key}\"}response = requests.get(\"https://api.example.com/data\", headers=headers)# OAuth 2.0认证from requests_oauthlib import OAuth2Sessionclient_id = \"your_client_id\"client_secret = \"your_client_secret\"oauth = OAuth2Session(client_id)# 获取授权URL和状态authorization_url, state = oauth.authorization_url(\"https://example.com/oauth/authorize\")# 用户授权后获取tokentoken = oauth.fetch_token(\"https://example.com/oauth/token\", authorization_response=\"callback_url_with_code\", client_secret=client_secret)# 使用token访问APIresponse = oauth.get(\"https://api.example.com/data\")二、Python API调用基础
2.1 常用HTTP库对比
2.2 使用requests库调用RESTful API
import requestsimport json# GET请求def get_data(url, params=None, headers=None): \"\"\" 发送GET请求获取数据 参数: url (str): API端点URL params (dict): 查询参数 headers (dict): 请求头 返回: dict: 响应数据 \"\"\" response = requests.get(url, params=params, headers=headers) response.raise_for_status() # 如果请求失败则抛出异常 return response.json()# POST请求def create_resource(url, data, headers=None): \"\"\" 发送POST请求创建资源 参数: url (str): API端点URL data (dict): 要发送的数据 headers (dict): 请求头 返回: dict: 响应数据 \"\"\" if headers is None: headers = {\"Content-Type\": \"application/json\"} response = requests.post(url, data=json.dumps(data), headers=headers) response.raise_for_status() return response.json()# 使用示例try: # 获取用户列表 users = get_data(\"https://api.example.com/users\", params={\"page\": 1, \"limit\": 10}, headers={\"Authorization\": \"Bearer token123\"}) print(f\"获取到 {len(users)} 个用户\") # 创建新用户 new_user = create_resource(\"https://api.example.com/users\", {\"name\": \"张三\", \"email\": \"zhangsan@example.com\"}, {\"Authorization\": \"Bearer token123\"}) print(f\"创建用户成功: {new_user[\'id\']}\") except requests.exceptions.HTTPError as e: print(f\"HTTP错误: {e}\")except requests.exceptions.ConnectionError: print(\"连接错误: 请检查网络连接\")except requests.exceptions.Timeout: print(\"超时错误: 请求超时\")except requests.exceptions.RequestException as e: print(f\"请求错误: {e}\")2.3 异步API调用
import asyncioimport aiohttpimport timeasync def fetch_data(session, url): \"\"\"异步获取单个URL的数据\"\"\" async with session.get(url) as response: return await response.json()async def fetch_all(urls): \"\"\"并发获取多个URL的数据\"\"\" async with aiohttp.ClientSession() as session: tasks = [fetch_data(session, url) for url in urls] # 并发执行所有任务 results = await asyncio.gather(*tasks) return results# 使用示例async def main(): # 需要获取数据的API端点列表 urls = [ \"https://api.example.com/users/1\", \"https://api.example.com/users/2\", \"https://api.example.com/users/3\", \"https://api.example.com/users/4\", \"https://api.example.com/users/5\" ] start_time = time.time() results = await fetch_all(urls) end_time = time.time() print(f\"异步获取 {len(results)} 个API结果,耗时: {end_time - start_time:.2f}秒\") return results# 运行异步主函数if __name__ == \"__main__\": results = asyncio.run(main())## 三、实战案例:常用API接口调用### 3.1 天气API调用```pythonimport requestsfrom datetime import datetimedef get_weather(city, api_key): \"\"\" 获取指定城市的天气信息 参数: city (str): 城市名称 api_key (str): OpenWeatherMap API密钥 返回: dict: 天气信息 \"\"\" base_url = \"https://api.openweathermap.org/data/2.5/weather\" params = { \"q\": city, \"appid\": api_key, \"units\": \"metric\", # 使用摄氏度 \"lang\": \"zh_cn\" # 中文结果 } response = requests.get(base_url, params=params) response.raise_for_status() weather_data = response.json() # 格式化天气信息 formatted_data = { \"城市\": weather_data[\"name\"], \"天气\": weather_data[\"weather\"][0][\"description\"], \"温度\": f\"{weather_data[\'main\'][\'temp\']}°C\", \"体感温度\": f\"{weather_data[\'main\'][\'feels_like\']}°C\", \"湿度\": f\"{weather_data[\'main\'][\'humidity\']}%\", \"风速\": f\"{weather_data[\'wind\'][\'speed\']}m/s\", \"更新时间\": datetime.fromtimestamp(weather_data[\"dt\"]).strftime(\"%Y-%m-%d %H:%M:%S\") } return formatted_data# 使用示例if __name__ == \"__main__\": API_KEY = \"your_openweathermap_api_key\" # 替换为你的API密钥 city = \"北京\" try: weather_info = get_weather(city, API_KEY) print(f\"== {weather_info[\'城市\']}天气信息 ==\") for key, value in weather_info.items(): if key != \"城市\": print(f\"{key}: {value}\") except requests.exceptions.HTTPError as e: print(f\"获取天气信息失败: {e}\")3.2 翻译API调用
import requestsimport uuidimport hashlibimport timedef translate_text(text, from_lang, to_lang, app_id, app_key): \"\"\" 使用百度翻译API翻译文本 参数: text (str): 要翻译的文本 from_lang (str): 源语言代码,如\'auto\'自动检测,\'zh\'中文,\'en\'英文 to_lang (str): 目标语言代码 app_id (str): 百度翻译API的APP ID app_key (str): 百度翻译API的密钥 返回: str: 翻译后的文本 \"\"\" endpoint = \"https://fanyi-api.baidu.com/api/trans/vip/translate\" # 生成随机数 salt = str(uuid.uuid4()) # 计算签名: appid+q+salt+密钥 sign_str = app_id + text + salt + app_key sign = hashlib.md5(sign_str.encode()).hexdigest() # 组装请求参数 params = { \'q\': text, \'from\': from_lang, \'to\': to_lang, \'appid\': app_id, \'salt\': salt, \'sign\': sign } # 发送请求 response = requests.get(endpoint, params=params) result = response.json() # 检查是否有错误 if \'error_code\' in result: raise Exception(f\"翻译错误 (代码: {result[\'error_code\']}): {result.get(\'error_msg\', \'未知错误\')}\") # 提取翻译结果 translated_text = result[\'trans_result\'][0][\'dst\'] return translated_text# 使用示例if __name__ == \"__main__\": APP_ID = \"your_baidu_app_id\" # 替换为你的百度翻译APP ID APP_KEY = \"your_baidu_app_key\" # 替换为你的百度翻译密钥 text_to_translate = \"人工智能正在改变我们的世界\" try: # 中文翻译为英文 translated = translate_text(text_to_translate, \'zh\', \'en\', APP_ID, APP_KEY) print(f\"原文: {text_to_translate}\") print(f\"译文: {translated}\") # 防止API调用过于频繁 time.sleep(1) # 再将结果翻译回中文 back_translated = translate_text(translated, \'en\', \'zh\', APP_ID, APP_KEY) print(f\"回译: {back_translated}\") except Exception as e: print(f\"翻译失败: {e}\")#mermaid-svg-nFhYpJx6pwtwWaAz {font-family:\"trebuchet ms\",verdana,arial,sans-serif;font-size:16px;fill:#000000;}#mermaid-svg-nFhYpJx6pwtwWaAz .error-icon{fill:#552222;}#mermaid-svg-nFhYpJx6pwtwWaAz .error-text{fill:#552222;stroke:#552222;}#mermaid-svg-nFhYpJx6pwtwWaAz .edge-thickness-normal{stroke-width:2px;}#mermaid-svg-nFhYpJx6pwtwWaAz .edge-thickness-thick{stroke-width:3.5px;}#mermaid-svg-nFhYpJx6pwtwWaAz .edge-pattern-solid{stroke-dasharray:0;}#mermaid-svg-nFhYpJx6pwtwWaAz .edge-pattern-dashed{stroke-dasharray:3;}#mermaid-svg-nFhYpJx6pwtwWaAz .edge-pattern-dotted{stroke-dasharray:2;}#mermaid-svg-nFhYpJx6pwtwWaAz .marker{fill:#6495ED;stroke:#6495ED;}#mermaid-svg-nFhYpJx6pwtwWaAz .marker.cross{stroke:#6495ED;}#mermaid-svg-nFhYpJx6pwtwWaAz svg{font-family:\"trebuchet ms\",verdana,arial,sans-serif;font-size:16px;}#mermaid-svg-nFhYpJx6pwtwWaAz .actor{stroke:hsl(0, 0%, 83%);fill:#eee;}#mermaid-svg-nFhYpJx6pwtwWaAz text.actor>tspan{fill:#333;stroke:none;}#mermaid-svg-nFhYpJx6pwtwWaAz .actor-line{stroke:#6495ED;}#mermaid-svg-nFhYpJx6pwtwWaAz .messageLine0{stroke-width:1.5;stroke-dasharray:none;stroke:#333;}#mermaid-svg-nFhYpJx6pwtwWaAz .messageLine1{stroke-width:1.5;stroke-dasharray:2,2;stroke:#333;}#mermaid-svg-nFhYpJx6pwtwWaAz #arrowhead path{fill:#333;stroke:#333;}#mermaid-svg-nFhYpJx6pwtwWaAz .sequenceNumber{fill:white;}#mermaid-svg-nFhYpJx6pwtwWaAz #sequencenumber{fill:#333;}#mermaid-svg-nFhYpJx6pwtwWaAz #crosshead path{fill:#333;stroke:#333;}#mermaid-svg-nFhYpJx6pwtwWaAz .messageText{fill:#333;stroke:#333;}#mermaid-svg-nFhYpJx6pwtwWaAz .labelBox{stroke:hsl(0, 0%, 83%);fill:#eee;}#mermaid-svg-nFhYpJx6pwtwWaAz .labelText,#mermaid-svg-nFhYpJx6pwtwWaAz .labelText>tspan{fill:#333;stroke:none;}#mermaid-svg-nFhYpJx6pwtwWaAz .loopText,#mermaid-svg-nFhYpJx6pwtwWaAz .loopText>tspan{fill:#333;stroke:none;}#mermaid-svg-nFhYpJx6pwtwWaAz .loopLine{stroke-width:2px;stroke-dasharray:2,2;stroke:hsl(0, 0%, 83%);fill:hsl(0, 0%, 83%);}#mermaid-svg-nFhYpJx6pwtwWaAz .note{stroke:#999;fill:#666;}#mermaid-svg-nFhYpJx6pwtwWaAz .noteText,#mermaid-svg-nFhYpJx6pwtwWaAz .noteText>tspan{fill:#fff;stroke:none;}#mermaid-svg-nFhYpJx6pwtwWaAz .activation0{fill:#f4f4f4;stroke:#666;}#mermaid-svg-nFhYpJx6pwtwWaAz .activation1{fill:#f4f4f4;stroke:#666;}#mermaid-svg-nFhYpJx6pwtwWaAz .activation2{fill:#f4f4f4;stroke:#666;}#mermaid-svg-nFhYpJx6pwtwWaAz .actorPopupMenu{position:absolute;}#mermaid-svg-nFhYpJx6pwtwWaAz .actorPopupMenuPanel{position:absolute;fill:#eee;box-shadow:0px 8px 16px 0px rgba(0,0,0,0.2);filter:drop-shadow(3px 5px 2px rgb(0 0 0 / 0.4));}#mermaid-svg-nFhYpJx6pwtwWaAz .actor-man line{stroke:hsl(0, 0%, 83%);fill:#eee;}#mermaid-svg-nFhYpJx6pwtwWaAz .actor-man circle,#mermaid-svg-nFhYpJx6pwtwWaAz line{stroke:hsl(0, 0%, 83%);fill:#eee;stroke-width:2px;}#mermaid-svg-nFhYpJx6pwtwWaAz :root{--mermaid-font-family:\"trebuchet ms\",verdana,arial,sans-serif;} 客户端 翻译API服务 认证服务 1. 生成随机数salt 2. 计算签名sign 3. 发送请求(文本,语言,appid,salt,sign) 4. 验证appid和sign 5. 验证结果 6a. 返回错误信息 6b. 执行翻译 7. 返回翻译结果 alt [验证失败] [验证成功] 8. 解析并展示结果 客户端 翻译API服务 认证服务
图3:翻译API调用时序图 - 展示了翻译API的完整调用流程
3.3 图像识别API调用
import requestsimport base64import jsondef recognize_image(image_path, api_key): \"\"\" 使用百度AI图像识别API识别图片内容 参数: image_path (str): 图片文件路径 api_key (str): 百度AI平台的API密钥 返回: dict: 识别结果 \"\"\" # 获取访问令牌 def get_access_token(api_key, secret_key): url = \"https://aip.baidubce.com/oauth/2.0/token\" params = { \"grant_type\": \"client_credentials\", \"client_id\": api_key, \"client_secret\": secret_key } response = requests.post(url, params=params) return response.json().get(\"access_token\") # 读取图片文件并进行base64编码 with open(image_path, \"rb\") as f: image_data = base64.b64encode(f.read()).decode(\"utf-8\") # 获取访问令牌 access_token = get_access_token(api_key[\"api_key\"], api_key[\"secret_key\"]) # 调用通用物体识别API recognize_url = f\"https://aip.baidubce.com/rest/2.0/image-classify/v2/advanced_general?access_token={access_token}\" headers = {\"Content-Type\": \"application/x-www-form-urlencoded\"} data = {\"image\": image_data} response = requests.post(recognize_url, headers=headers, data=data) result = response.json() if \"error_code\" in result: raise Exception(f\"识别错误 (代码: {result[\'error_code\']}): {result.get(\'error_msg\', \'未知错误\')}\") return result# 使用示例if __name__ == \"__main__\": # 百度AI平台的API密钥信息 API_INFO = { \"api_key\": \"your_baidu_api_key\", \"secret_key\": \"your_baidu_secret_key\" } # 要识别的图片路径 IMAGE_PATH = \"example.jpg\" try: result = recognize_image(IMAGE_PATH, API_INFO) print(\"图像识别结果:\") for item in result[\"result\"]: print(f\"- {item[\'keyword\']}: 置信度 {item[\'score\']*100:.2f}%\") except Exception as e: print(f\"识别失败: {e}\")## 四、API接口性能优化### 4.1 API调用性能指标```mermaid%%{init: {\'theme\': \'neutral\', \'themeVariables\': { \'primaryColor\': \'#6495ED\', \'primaryTextColor\': \'#fff\', \'primaryBorderColor\': \'#4169E1\', \'lineColor\': \'#6495ED\', \'secondaryColor\': \'#B0C4DE\', \'tertiaryColor\': \'#E6E6FA\' }}}%%pie title API调用性能影响因素占比 \"网络延迟\" : 35 \"服务器处理时间\" : 25 \"数据序列化/反序列化\" : 15 \"认证开销\" : 10 \"客户端处理\" : 10 \"其他因素\" : 5图2:API调用性能影响因素占比饼图 - 展示了影响API调用性能的主要因素及其占比
4.2 连接池与会话复用
import requestsfrom requests.adapters import HTTPAdapterfrom urllib3.util.retry import Retrydef create_session(): \"\"\" 创建一个具有连接池和重试机制的会话对象 返回: requests.Session: 配置好的会话对象 \"\"\" session = requests.Session() # 配置重试策略 retry_strategy = Retry( total=3, # 最多重试3次 backoff_factor=0.5, # 重试间隔 = {backoff factor} * (2 ^ ({number of previous retries})) status_forcelist=[429, 500, 502, 503, 504], # 这些状态码会触发重试 allowed_methods=[\"GET\", \"POST\"] # 允许重试的HTTP方法 ) # 配置适配器,最大连接数为10 adapter = HTTPAdapter(max_retries=retry_strategy, pool_connections=10, pool_maxsize=10) # 将适配器挂载到会话 session.mount(\"http://\", adapter) session.mount(\"https://\", adapter) return session# 使用示例def fetch_multiple_apis(urls): \"\"\" 使用会话复用方式获取多个API数据 参数: urls (list): API端点URL列表 返回: list: 响应数据列表 \"\"\" session = create_session() results = [] for url in urls: try: response = session.get(url, timeout=(3.05, 27)) # (连接超时, 读取超时) response.raise_for_status() results.append(response.json()) except requests.exceptions.RequestException as e: print(f\"请求 {url} 失败: {e}\") results.append(None) return results# 使用示例if __name__ == \"__main__\": api_urls = [ \"https://api.example.com/data/1\", \"https://api.example.com/data/2\", \"https://api.example.com/data/3\" ] results = fetch_multiple_apis(api_urls) print(f\"成功获取 {sum(1 for r in results if r is not None)} 个API结果,共 {len(api_urls)} 个\")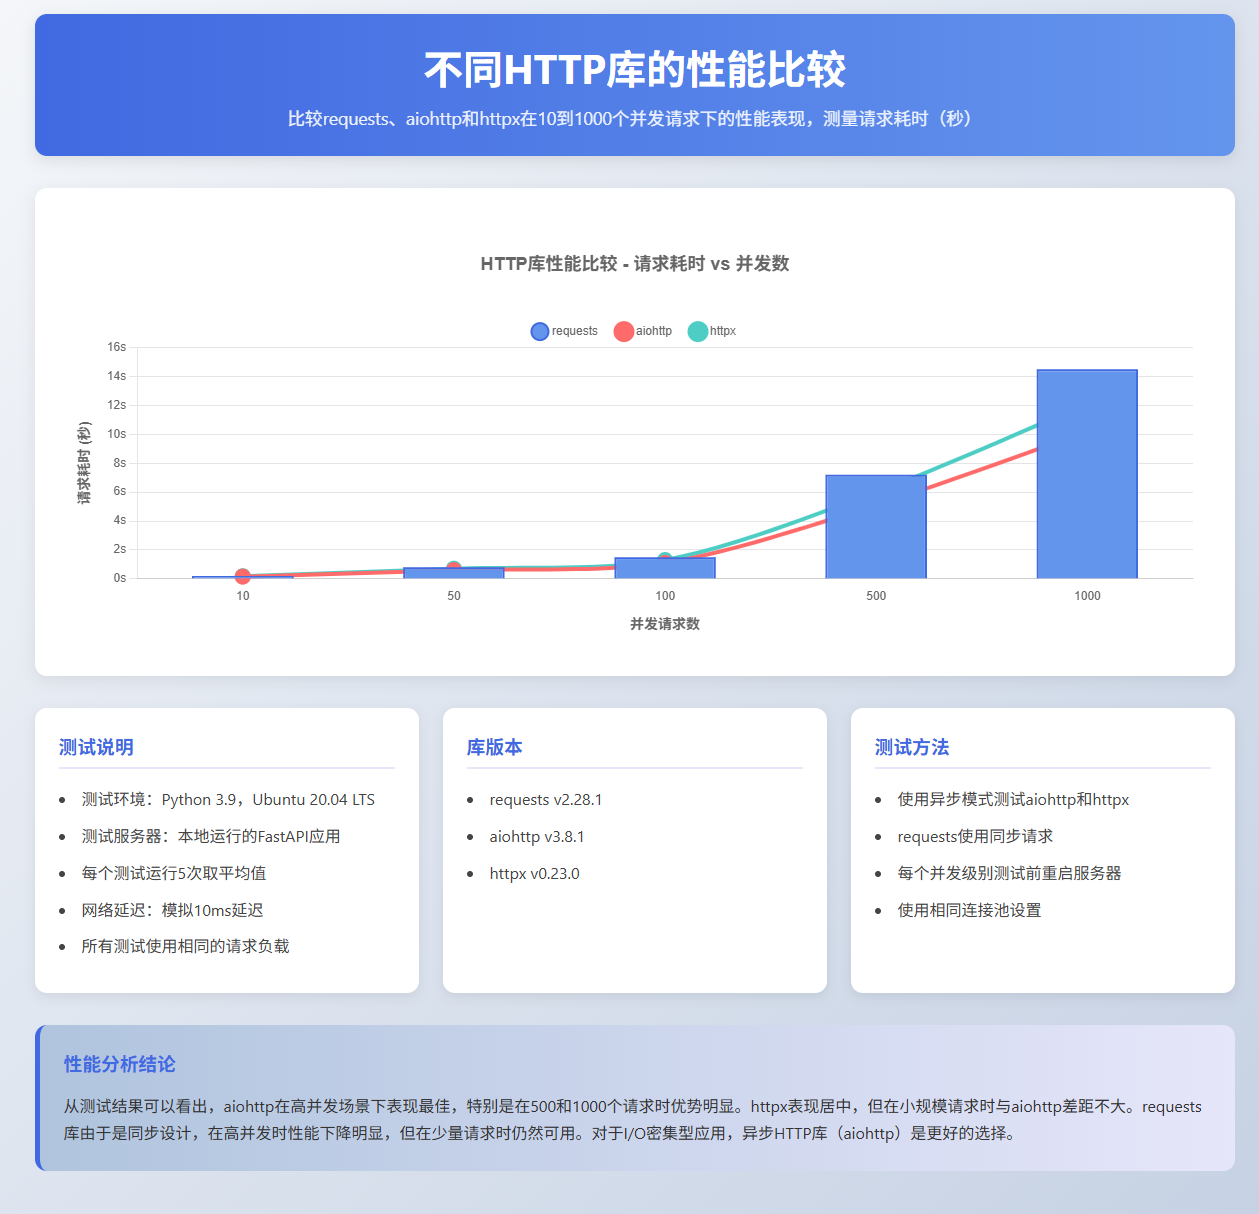
图4:不同HTTP库性能比较图 - 展示了不同HTTP库在不同请求数量下的性能表现
4.3 异步并发与限流
import asyncioimport aiohttpimport timefrom aiohttp import ClientSessionfrom asyncio import Semaphoreclass RateLimiter: \"\"\"API调用限流器\"\"\" def __init__(self, calls_limit, time_period): \"\"\" 初始化限流器 参数: calls_limit (int): 时间段内允许的最大调用次数 time_period (float): 时间段长度(秒) \"\"\" self.calls_limit = calls_limit self.time_period = time_period self.calls_times = [] async def acquire(self): \"\"\" 获取调用许可,必要时等待 \"\"\" now = time.time() # 清理过期的调用记录 self.calls_times = [t for t in self.calls_times if now - t <= self.time_period] # 如果已达到限制,等待到最早的调用过期 if len(self.calls_times) >= self.calls_limit: oldest_call = self.calls_times[0] wait_time = self.time_period - (now - oldest_call) if wait_time > 0: await asyncio.sleep(wait_time) # 记录本次调用时间 self.calls_times.append(time.time())async def fetch_with_rate_limit(session, url, rate_limiter, semaphore): \"\"\" 使用限流和并发控制获取API数据 参数: session (ClientSession): aiohttp会话 url (str): API端点URL rate_limiter (RateLimiter): 限流器 semaphore (Semaphore): 并发控制信号量 返回: dict: API响应数据 \"\"\" # 获取限流许可 await rate_limiter.acquire() # 获取并发许可 async with semaphore: try: async with session.get(url) as response: if response.status == 200: return await response.json() else: print(f\"请求失败: {url}, 状态码: {response.status}\") return None except Exception as e: print(f\"请求异常: {url}, 错误: {e}\") return Noneasync def fetch_all_apis(urls, rate_limit=10, period=1.0, max_concurrency=5): \"\"\" 批量获取API数据,带限流和并发控制 参数: urls (list): API端点URL列表 rate_limit (int): 每个时间段内的最大请求数 period (float): 时间段长度(秒) max_concurrency (int): 最大并发请求数 返回: list: API响应数据列表 \"\"\" # 创建限流器和信号量 rate_limiter = RateLimiter(rate_limit, period) semaphore = Semaphore(max_concurrency) async with ClientSession() as session: tasks = [ fetch_with_rate_limit(session, url, rate_limiter, semaphore) for url in urls ] return await asyncio.gather(*tasks)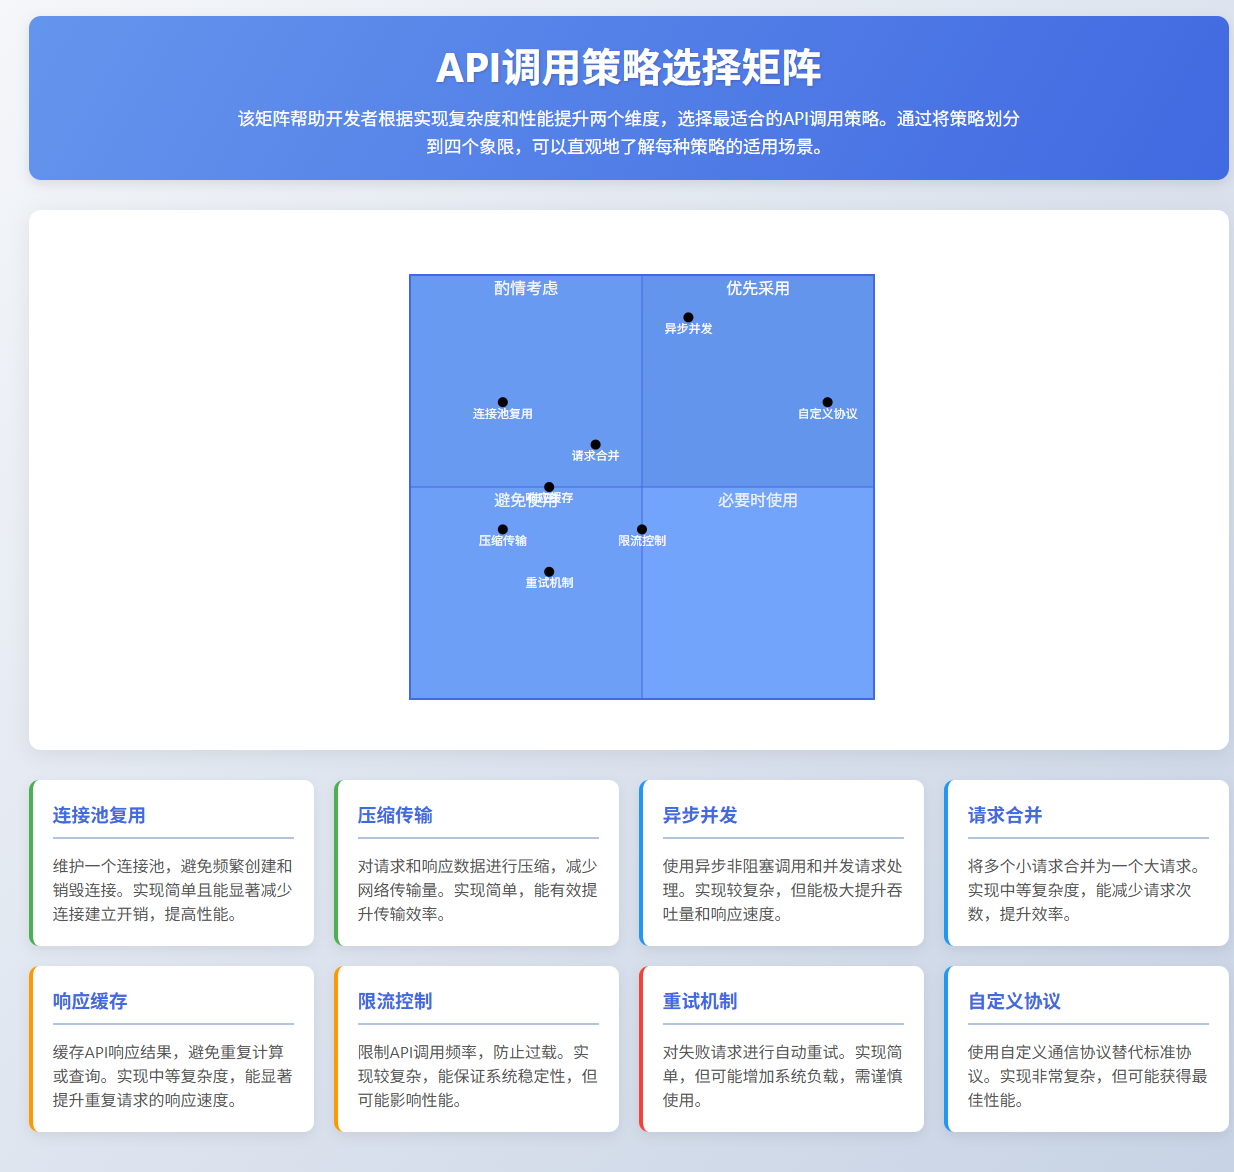
图5:API调用策略选择矩阵 - 展示了不同API调用优化策略的实现复杂度与性能提升对比
五、API接口调用架构设计
5.1 API客户端封装
class APIClient: \"\"\"通用API客户端封装\"\"\" def __init__(self, base_url, auth_token=None, timeout=30): \"\"\" 初始化API客户端 参数: base_url (str): API基础URL auth_token (str): 认证令牌 timeout (int): 请求超时时间(秒) \"\"\" self.base_url = base_url.rstrip(\'/\') self.timeout = timeout self.session = requests.Session() # 设置通用请求头 self.session.headers.update({ \"Content-Type\": \"application/json\", \"Accept\": \"application/json\" }) # 设置认证令牌 if auth_token: self.session.headers.update({ \"Authorization\": f\"Bearer {auth_token}\" }) def _build_url(self, endpoint): \"\"\"构建完整的API URL\"\"\" endpoint = endpoint.lstrip(\'/\') return f\"{self.base_url}/{endpoint}\" def _handle_response(self, response): \"\"\"处理API响应\"\"\" try: response.raise_for_status() return response.json() except requests.exceptions.HTTPError as e: # 尝试解析错误响应 error_detail = {} try: error_detail = response.json() except: error_detail = {\"message\": response.text} raise APIError( status_code=response.status_code, message=f\"HTTP错误: {e}\", detail=error_detail ) except ValueError: # 响应不是有效的JSON return {\"raw_content\": response.text} def get(self, endpoint, params=None): \"\"\"发送GET请求\"\"\" url = self._build_url(endpoint) response = self.session.get(url, params=params, timeout=self.timeout) return self._handle_response(response) def post(self, endpoint, data=None, json_data=None): \"\"\"发送POST请求\"\"\" url = self._build_url(endpoint) response = self.session.post(url, data=data, json=json_data, timeout=self.timeout) return self._handle_response(response) def put(self, endpoint, data=None, json_data=None): \"\"\"发送PUT请求\"\"\" url = self._build_url(endpoint) response = self.session.put(url, data=data, json=json_data, timeout=self.timeout) return self._handle_response(response) def delete(self, endpoint, params=None): \"\"\"发送DELETE请求\"\"\" url = self._build_url(endpoint) response = self.session.delete(url, params=params, timeout=self.timeout) return self._handle_response(response)class APIError(Exception): \"\"\"API错误异常\"\"\" def __init__(self, status_code, message, detail=None): self.status_code = status_code self.message = message self.detail = detail super().__init__(self.message) def __str__(self): if self.detail: return f\"{self.message} - {self.detail}\" return self.message# 使用示例if __name__ == \"__main__\": # 创建API客户端 client = APIClient( base_url=\"https://api.example.com/v1\", auth_token=\"your_auth_token_here\" ) try: # 获取用户列表 users = client.get(\"/users\", params={\"limit\": 10}) print(f\"获取到 {len(users)} 个用户\") # 创建新用户 new_user = client.post(\"/users\", json_data={ \"name\": \"张三\", \"email\": \"zhangsan@example.com\" }) print(f\"创建用户成功: ID={new_user[\'id\']}\") except APIError as e: print(f\"API错误: {e}\")5.2 API接口适配器模式
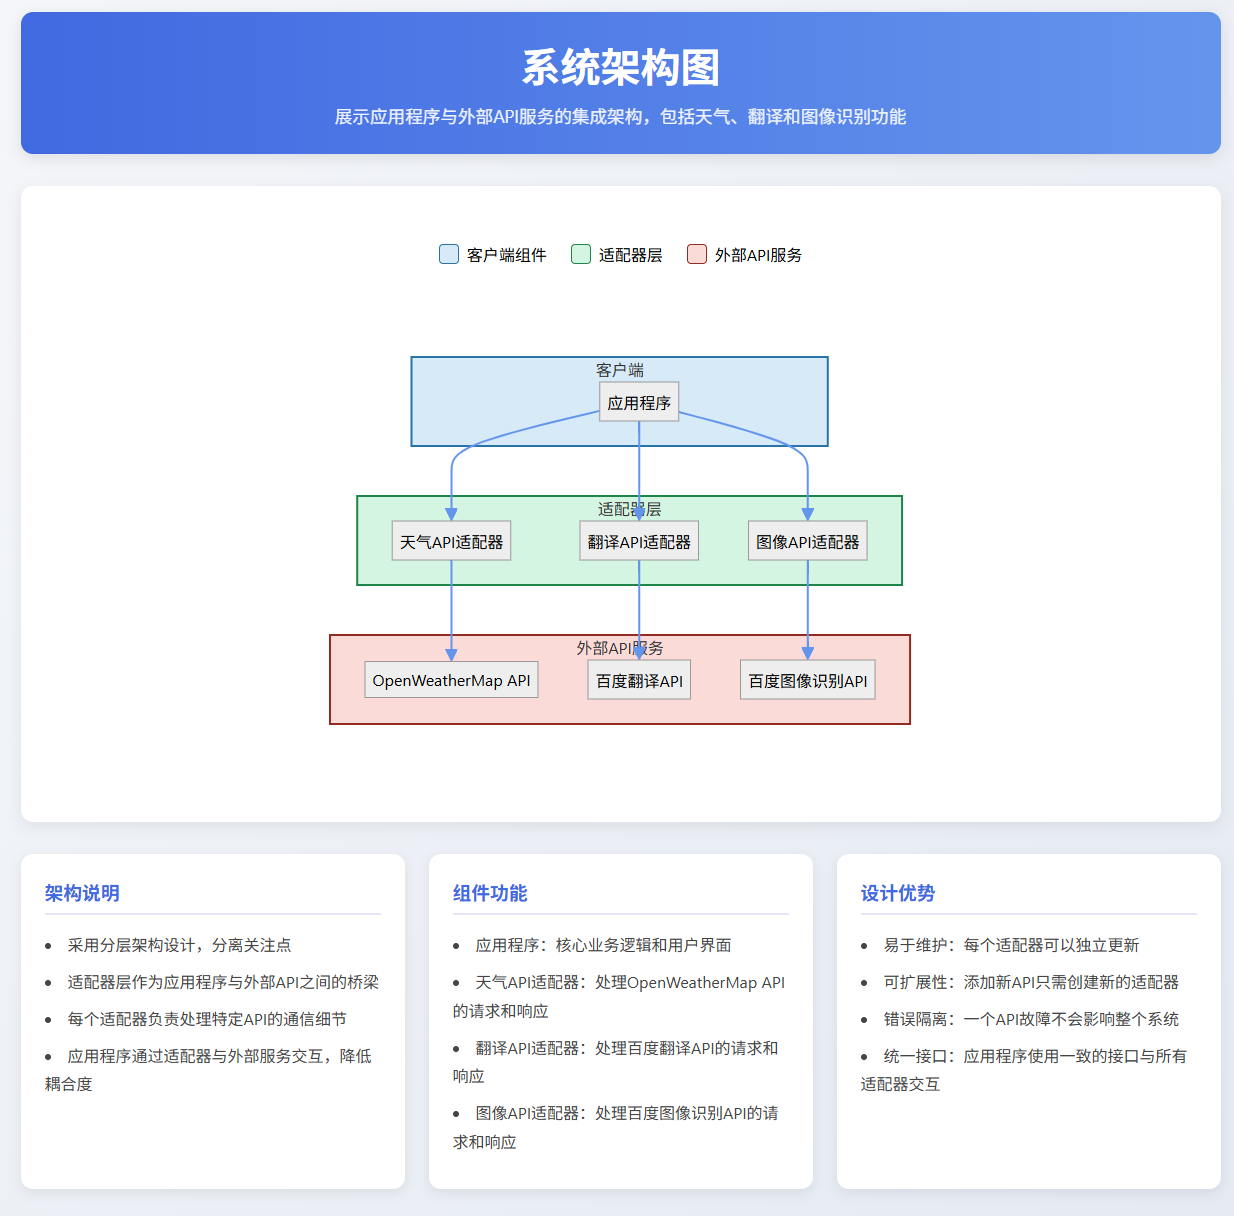
图6:API接口适配器架构图 - 展示了使用适配器模式统一不同API接口的架构设计
from abc import ABC, abstractmethod
抽象接口
class TranslationService(ABC):
“”“翻译服务抽象接口”“”
@abstractmethoddef translate(self, text, source_lang, target_lang): \"\"\" 翻译文本 参数: text (str): 要翻译的文本 source_lang (str): 源语言代码 target_lang (str): 目标语言代码 返回: str: 翻译后的文本 \"\"\" pass具体实现 - 百度翻译
class BaiduTranslation(TranslationService):
“”“百度翻译服务实现”“”
def __init__(self, app_id, app_key): self.app_id = app_id self.app_key = app_keydef translate(self, text, source_lang, target_lang): # 转换语言代码格式 source = self._convert_lang_code(source_lang) target = self._convert_lang_code(target_lang) # 调用百度翻译API import uuid import hashlib import requests endpoint = \"https://fanyi-api.baidu.com/api/trans/vip/translate\" salt = str(uuid.uuid4()) sign_str = self.app_id + text + salt + self.app_key sign = hashlib.md5(sign_str.encode()).hexdigest() params = { \'q\': text, \'from\': source, \'to\': target, \'appid\': self.app_id, \'salt\': salt, \'sign\': sign } response = requests.get(endpoint, params=params) result = response.json() if \'error_code\' in result: raise Exception(f\"翻译错误: {result.get(\'error_msg\', \'未知错误\')}\") return result[\'trans_result\'][0][\'dst\']def _convert_lang_code(self, lang_code): \"\"\"将标准语言代码转换为百度API使用的代码\"\"\" # 语言代码映射表 mapping = { \"en\": \"en\", \"zh\": \"zh\", \"ja\": \"jp\", \"ko\": \"kor\", \"fr\": \"fra\", \"es\": \"spa\", \"auto\": \"auto\" } return mapping.get(lang_code.lower(), lang_code)具体实现 - Google翻译
class GoogleTranslation(TranslationService):
“”“Google翻译服务实现”“”
def __init__(self, api_key): self.api_key = api_keydef translate(self, text, source_lang, target_lang): # 这里是Google翻译API的实现 # 实际代码中需要使用Google Cloud Translation API import requests url = \"https://translation.googleapis.com/language/translate/v2\" params = { \"q\": text, \"source\": source_lang, \"target\": target_lang, \"key\": self.api_key } response = requests.post(url, params=params) result = response.json() if \"error\" in result: raise Exception(f\"翻译错误: {result[\'error\'][\'message\']}\") return result[\"data\"][\"translations\"][0][\"translatedText\"]使用示例
def translate_with_service(service, text, source=“auto”, target=“en”):
“”\"
使用指定的翻译服务翻译文本
参数: service (TranslationService): 翻译服务实例 text (str): 要翻译的文本 source (str): 源语言代码 target (str): 目标语言代码返回: str: 翻译后的文本\"\"\"try: result = service.translate(text, source, target) return resultexcept Exception as e: print(f\"翻译失败: {e}\") return None客户端代码
if name == “main”:
# 创建百度翻译服务
baidu_service = BaiduTranslation(
app_id=“your_baidu_app_id”,
app_key=“your_baidu_app_key”
)
# 创建Google翻译服务google_service = GoogleTranslation( api_key=\"your_google_api_key\")# 要翻译的文本text = \"人工智能正在改变世界\"# 使用百度翻译baidu_result = translate_with_service(baidu_service, text, \"zh\", \"en\")print(f\"百度翻译结果: {baidu_result}\")# 使用Google翻译google_result = translate_with_service(google_service, text, \"zh\", \"en\")print(f\"Google翻译结果: {google_result}\")六、总结与最佳实践
“API不仅仅是技术接口,更是连接不同系统、不同团队、不同思想的桥梁。优秀的API调用代码应当像优秀的外交官一样,既能准确传达信息,又能优雅处理各种意外情况。” —— 软件架构师谚语
在这个万物互联的时代,API已经成为现代软件开发的核心基础设施。通过本文的学习,我们已经掌握了使用Python调用各种API接口的基本技能和高级技巧。以下是一些关键的最佳实践总结:
-
选择合适的HTTP库:根据项目需求选择合适的HTTP库,一般情况下requests是最佳选择,但高并发场景应考虑aiohttp等异步库。
-
错误处理与重试:永远不要假设API调用会成功,始终实现完善的错误处理和适当的重试机制。
-
性能优化:对于频繁调用的API,应使用连接池、会话复用等技术减少连接开销。
-
限流控制:尊重API提供方的限制,实现客户端限流以避免被封禁。
-
抽象与适配:使用适配器模式等设计模式,将具体API实现与业务逻辑分离。
-
安全性考虑:妥善保管API密钥,避免硬编码在代码中,使用环境变量或配置文件存储敏感信息。
-
文档与测试:为API调用代码编写清晰的文档和单元测试,确保其可维护性和稳定性。
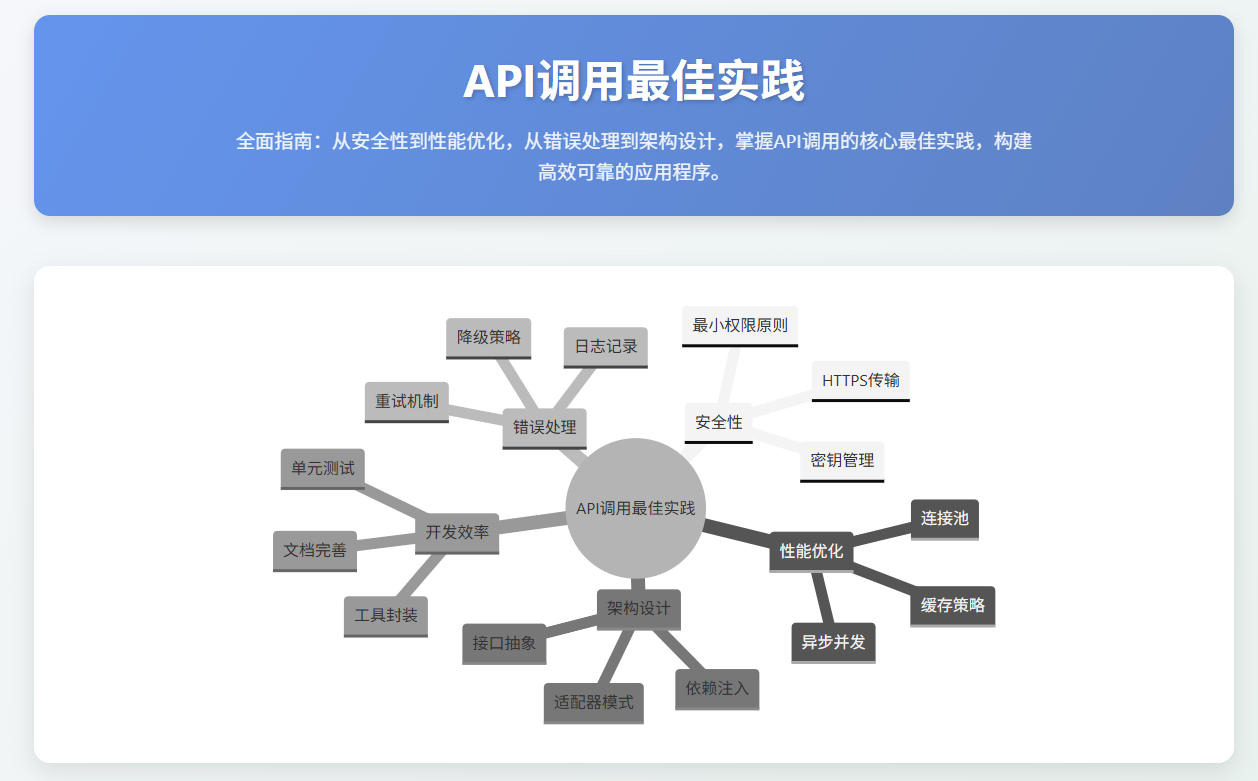

图7:API调用最佳实践思维导图 - 展示了API调用开发中的关键最佳实践
结语
从最初的简单HTTP请求,到如今的复杂分布式系统集成,API技术一直在不断演进。在这个过程中,Python凭借其简洁的语法和丰富的生态系统,成为了API调用的理想语言之一。
通过本文的学习,我们已经掌握了从基础到高级的Python API调用技术,包括RESTful API调用、异步并发、性能优化、架构设计等方面的知识。这些技能将帮助你在实际项目中更加高效地集成各种第三方服务,构建更加强大的应用程序。
记住,API调用不仅仅是技术问题,更是一种沟通艺术。优秀的API调用代码应当既能准确传达需求,又能优雅处理各种异常情况。希望本文能够帮助你在API的海洋中航行得更加顺利,构建出更加强大、可靠的应用程序。
在未来的开发中,随着微服务架构、云原生应用的普及,API调用技术将变得越来越重要。持续学习、实践和优化你的API调用代码,将使你在技术浪潮中保持竞争力。让我们一起,在这个API驱动的世界中,用代码连接无限可能!
■ 我是蒋星熠Jaxonic!如果这篇文章在你的技术成长路上留下了印记
■ 👁 【关注】与我一起探索技术的无限可能,见证每一次突破
■ 👍 【点赞】为优质技术内容点亮明灯,传递知识的力量
■ 🔖 【收藏】将精华内容珍藏,随时回顾技术要点
■ 💬 【评论】分享你的独特见解,让思维碰撞出智慧火花
■ 🗳 【投票】用你的选择为技术社区贡献一份力量
■ 技术路漫漫,让我们携手前行,在代码的世界里摘取属于程序员的那片星辰大海!
参考链接
- Python Requests官方文档
- aiohttp异步HTTP客户端/服务器文档
- RESTful API设计最佳实践
- 百度翻译API开发者文档
- OpenWeatherMap API文档


