干货分享:Harmonyos Next组件式开发中的高效传参技巧_hramonyos 组件传值
文章目录
前言
大家好,我是若城。写这个系列的目的是为了帮助大家在HarmonyOS开发时能够快速地掌握实用功能的开发技巧。本系列注重实用性和可操作性,提供简洁明了的代码示例和讲解,让开发者能够直接复制粘贴就可以实现相应功能。
本文将重点介绍HarmonyOS Next中组件式开发的传参方法,这是构建可维护、可复用应用的关键技能。通过实际案例,我们将展示如何在父子组件间传递数据和方法,帮助你掌握组件通信的核心技巧。
功能概述
本文将详细介绍HarmonyOS Next中组件式开发的传参方法,通过一个实用的食物卡路里查询应用示例,展示如何在父组件和子组件之间进行数据和方法的传递。主要包括:
- 使用
@Link装饰器实现双向数据绑定 - 通过函数传递实现子组件调用父组件方法
- 组件属性的正确声明和初始化方式
通过本教程,你将学会如何构建可复用的UI组件并实现组件间的高效通信。
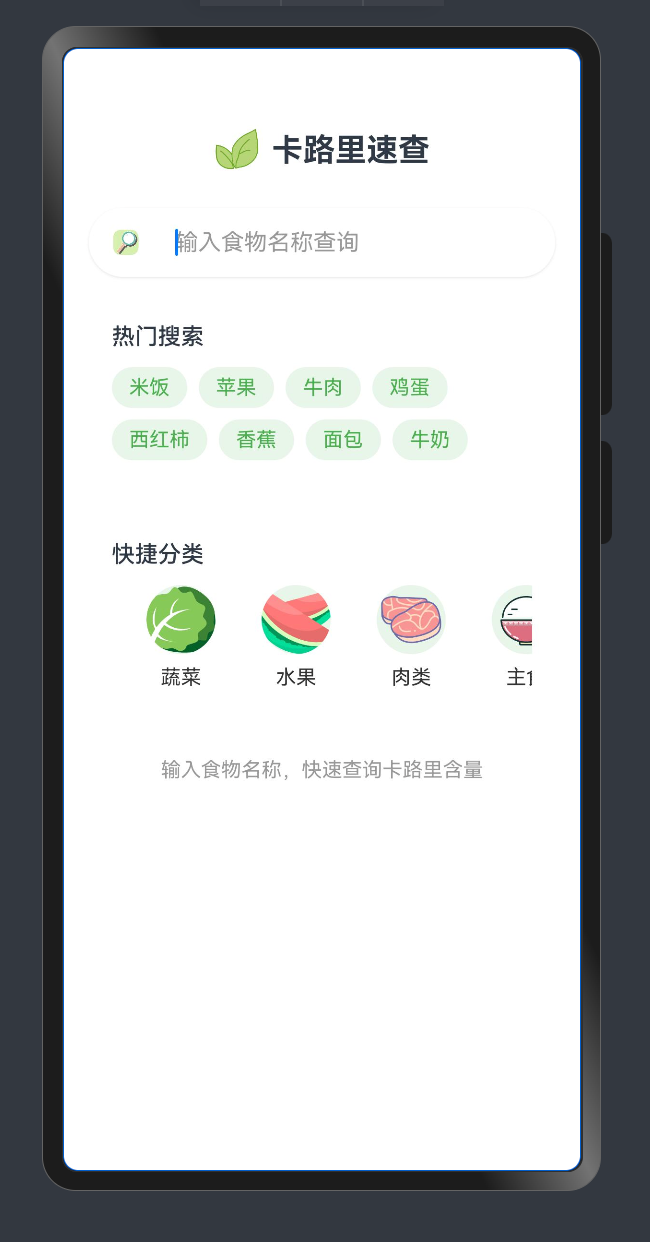
效果演示
下图展示了我们将要实现的食物卡路里查询应用界面。整个界面是通过组件化方式构建的,主要包含搜索框、热门搜索标签和快捷分类区域。这些UI元素都封装在一个可复用的SearchHeader组件中:
项目结构说明
为了更好地理解本示例,首先来看一下项目的文件结构:
- pages // 页面入口区 - Index.ets // 主页面区域,负责整体布局和状态管理 - SearchHeader.ets // 搜索头部组件,封装了搜索相关UI和交互- utils - dataList.ets // 模拟数据文件,包含热门搜索标签和分类数据 - types.ets // 定义数据类型,如FoodItem和Category接口这种结构遵循了组件化和关注点分离的原则,使代码更加模块化和可维护。
Index 完整代码
首先,让我们看一下主页面Index.ets的完整代码。这个页面是应用的入口,负责管理应用状态并引入SearchHeader组件:
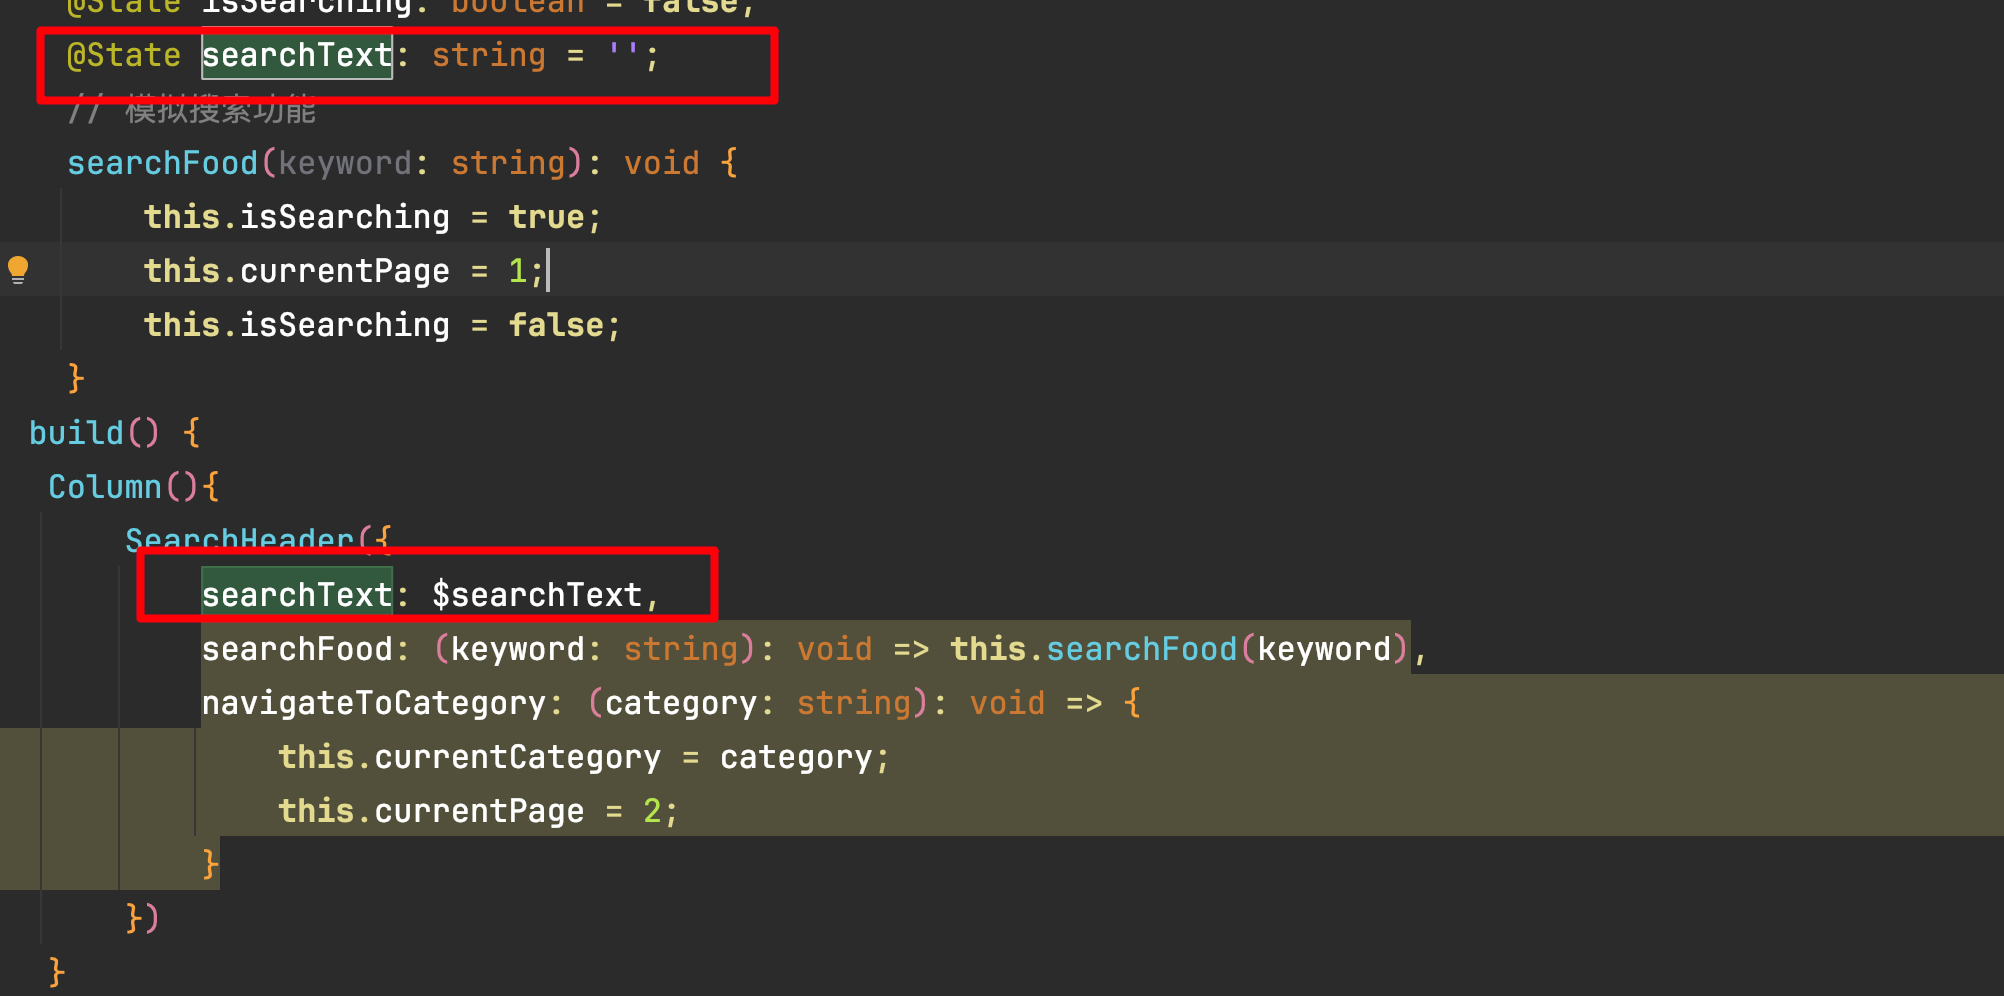
// 导入SearchHeader组件和FoodItem类型定义import {SearchHeader} from \"./SearchHeader\"import { FoodItem } from \'../utils/types\';@Entry // 标记为入口组件@Componentstruct Index { // 使用@State装饰器定义组件内部状态,这些状态变化会触发UI更新 @State searchResults: Array = []; // 搜索结果列表 @State currentPage: number = 0; // 当前页面索引 @State currentCategory: string = \'全部\'; // 当前选中的分类 @State isSearching: boolean = false; // 搜索状态标记 @State searchText: string = \'\'; // 搜索文本,将与子组件共享 // 模拟搜索功能,实际应用中会调用API或查询本地数据 searchFood(keyword: string): void { this.isSearching = true; // 这里可以添加实际的搜索逻辑 this.currentPage = 1; // 切换到搜索结果页 this.isSearching = false; } build() { Column() { // 引入SearchHeader组件并传递参数 SearchHeader({ // 使用$符号传递双向绑定的状态变量 searchText: $searchText, // 传递方法引用,使子组件能调用父组件方法 searchFood: (keyword: string): void => this.searchFood(keyword), // 传递导航方法,用于分类切换 navigateToCategory: (category: string): void => { this.currentCategory = category; this.currentPage = 2; // 切换到分类页 } }) // 这里可以根据currentPage添加其他页面内容 } }}SearchHeader 完整代码
接下来,让我们看一下SearchHeader组件的完整代码。这个组件封装了搜索相关的UI和交互逻辑:
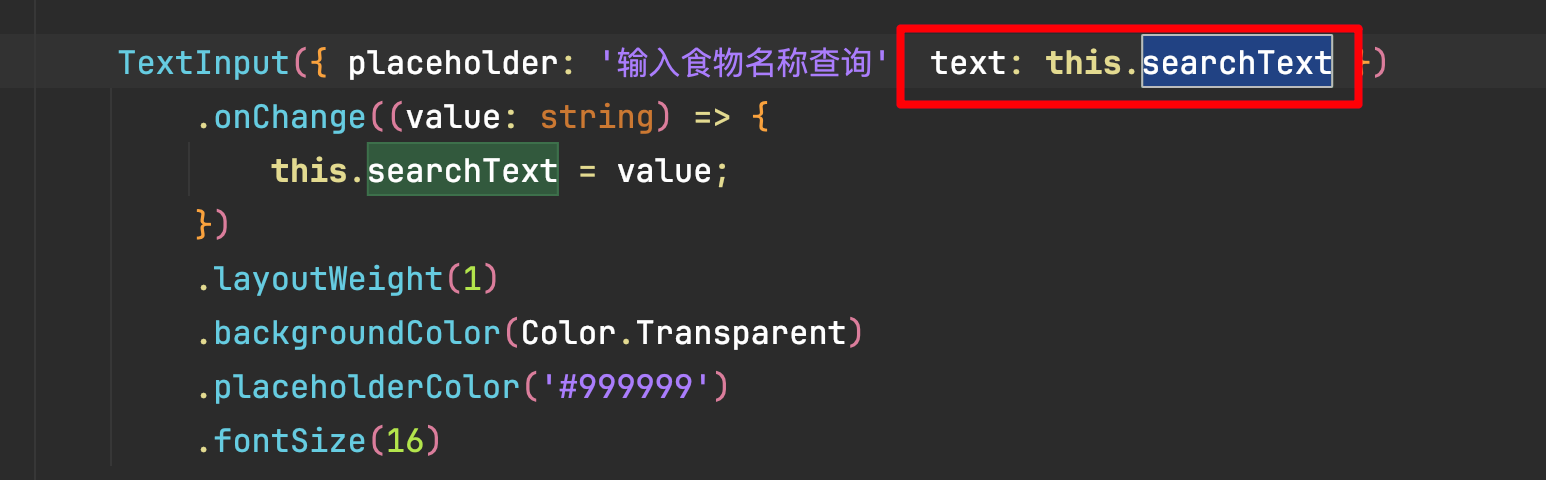
// 导入必要的类型和数据import { Category } from \'../utils/types\';import { hotSearchTags, categories } from \'../utils/dataList\';@Component // 标记为组件export struct SearchHeader { // @Link装饰器创建与父组件状态的双向绑定 // 当子组件修改此值时,父组件中对应的值也会同步更新,反之亦然 @Link searchText: string; // 定义函数类型的属性,用于接收父组件传递的方法 // 注意初始化为空函数,避免未定义错误 private searchFood: (keyword: string) => void = () => {}; private navigateToCategory: (category: string) => void = () => {}; build() { Column() { // 顶部标题 Row() { Image($r(\'app.media.treeicon\')) // 餐具/绿叶图标 .width(32) .height(32) .margin({ right: 8 }) Text(\'卡路里速查\') .fontSize(22) .fontWeight(FontWeight.Bold) } .width(\'100%\') .padding({ left: 16, right: 16, top: 16, bottom: 8 }) .justifyContent(FlexAlign.Center) // 搜索框 Row() { Image($r(\'app.media.searchicon\')) // 放大镜图标 .width(20) .height(20) .margin({ right: 8 }) TextInput({ placeholder: \'输入食物名称查询\', text: this.searchText }) .onChange((value: string) => { this.searchText = value; }) .layoutWeight(1) .backgroundColor(Color.Transparent) .placeholderColor(\'#999999\') .fontSize(16) if (this.searchText.length > 0) { Image($r(\'app.media.clear\')) // 清除按钮 .width(20) .height(20) .margin({ left: 8 }) .onClick((): void => { this.searchText = \'\'; }) } } .width(\'90%\') .height(48) .padding({ left: 16, right: 16 }) .borderRadius(24) .backgroundColor(Color.White) .margin({ top: 16, bottom: 16 }) .shadow({ radius: 4, color: \'rgba(0, 0, 0, 0.1)\', offsetY: 2 }) .onClick((): void => { if (this.searchText.length > 0) { this.searchFood(this.searchText); } }) // 热门搜索标签 Column() { Text(\'热门搜索\') .fontSize(16) .fontWeight(FontWeight.Medium) .alignSelf(ItemAlign.Start) .margin({ bottom: 12 }) Flex({ wrap: FlexWrap.Wrap, justifyContent: FlexAlign.Start }) { ForEach(hotSearchTags, (tag: string) => { Text(tag) .fontSize(14) .backgroundColor(\'#E8F5E9\') .fontColor(\'#4CAF50\') .borderRadius(16) .padding({ left: 12, right: 12, top: 6, bottom: 6 }) .margin({ right: 8, bottom: 8 }) .onClick((): void => { this.searchText = tag; this.searchFood(tag); }) }) } } .width(\'90%\') .padding(16) .borderRadius(12) .backgroundColor(Color.White) .margin({ bottom: 16 }) // 快捷分类区 Column() { Text(\'快捷分类\') .fontSize(16) .fontWeight(FontWeight.Medium) .alignSelf(ItemAlign.Start) .margin({ bottom: 12 }) Scroll() { Row() { ForEach(categories, (category: Category) => { Column() { Image(category.icon) .width(48) .height(48) .borderRadius(24) .backgroundColor(\'#E8F5E9\') .margin({ bottom: 8 }) Text(category.name) .fontSize(14) .fontColor(\'#333333\') } .width(80) .alignItems(HorizontalAlign.Center) .onClick((): void => { this.navigateToCategory(category.name); }) }) } .padding({ left: 8, right: 8 }) } .scrollable(ScrollDirection.Horizontal) .scrollBar(BarState.Off) } .width(\'90%\') .padding(16) .borderRadius(12) .backgroundColor(Color.White) .margin({ bottom: 16 }) // 底部说明文字 Text(\'输入食物名称,快速查询卡路里含量\') .fontSize(14) .fontColor(\'#999999\') .margin({ top: 16 }) } .width(\'100%\') .height(\'100%\') .padding({ bottom: 56 }) }}核心传参机制讲解
虽然SearchHeader组件的代码看起来较多,但其核心在于组件间的传参机制。下面我们通过图解方式详细分析组件间的数据和方法传递:
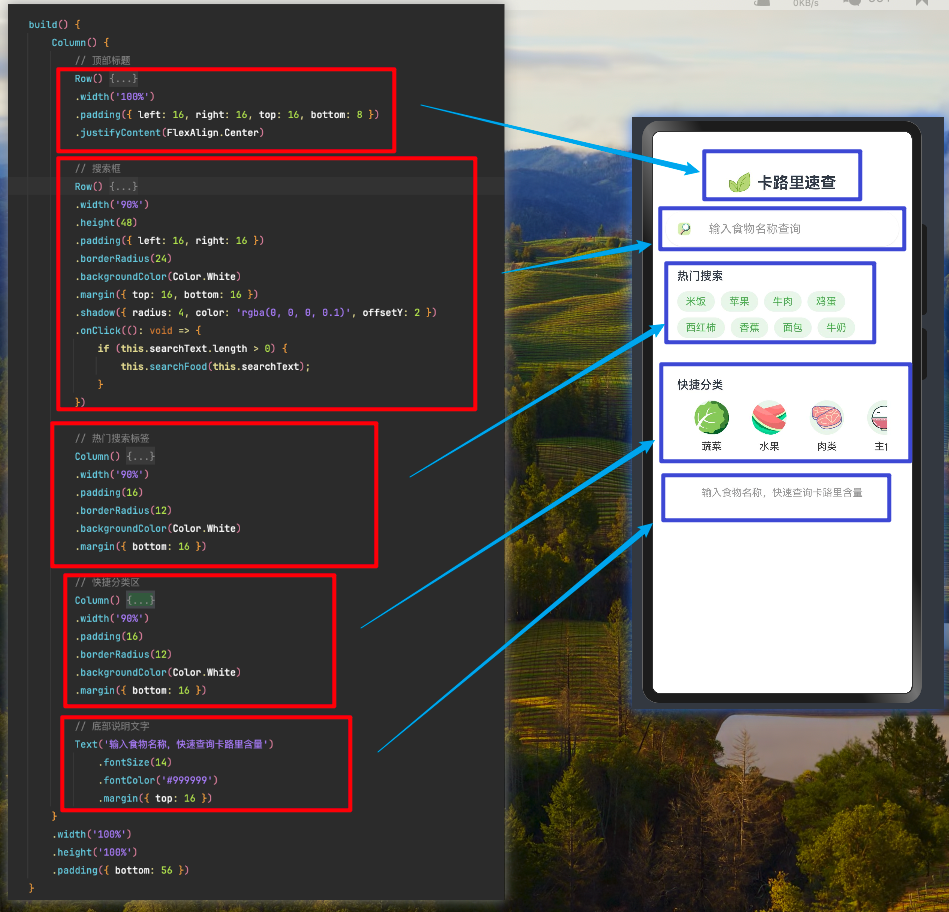
在组件的顶部,我们定义了需要从父组件接收的数据和方法:
// 使用@Link装饰器创建双向数据绑定@Link searchText: string;// 定义函数类型的属性,用于接收父组件传递的方法private searchFood: (keyword: string) => void = () => {};private navigateToCategory: (category: string) => void = () => {};1. 双向数据绑定 - @Link装饰器
searchText变量使用@Link装饰器,实现了与父组件的双向数据绑定。当用户在搜索框中输入内容时,这个变量会自动更新,同时父组件中的对应变量也会同步更新:
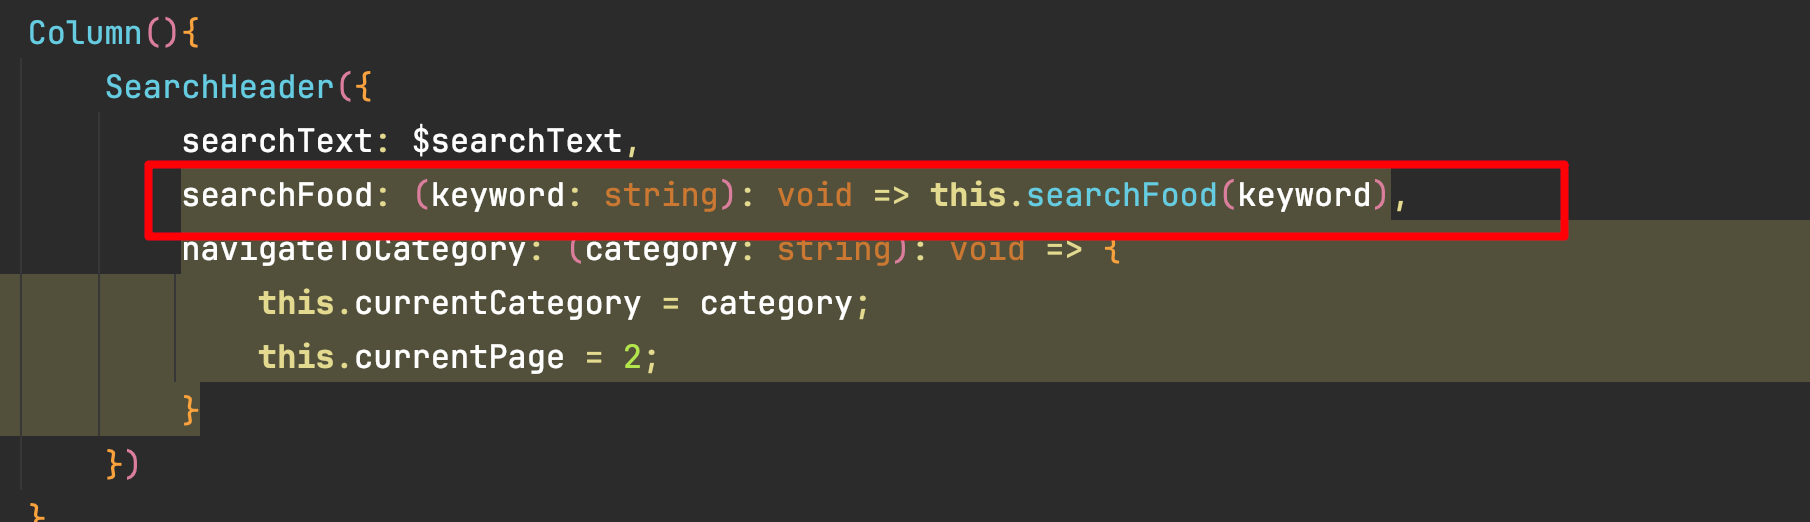
在父组件中,我们通过$符号传递状态变量,表示这是一个双向绑定:
2. 方法传递 - 函数引用
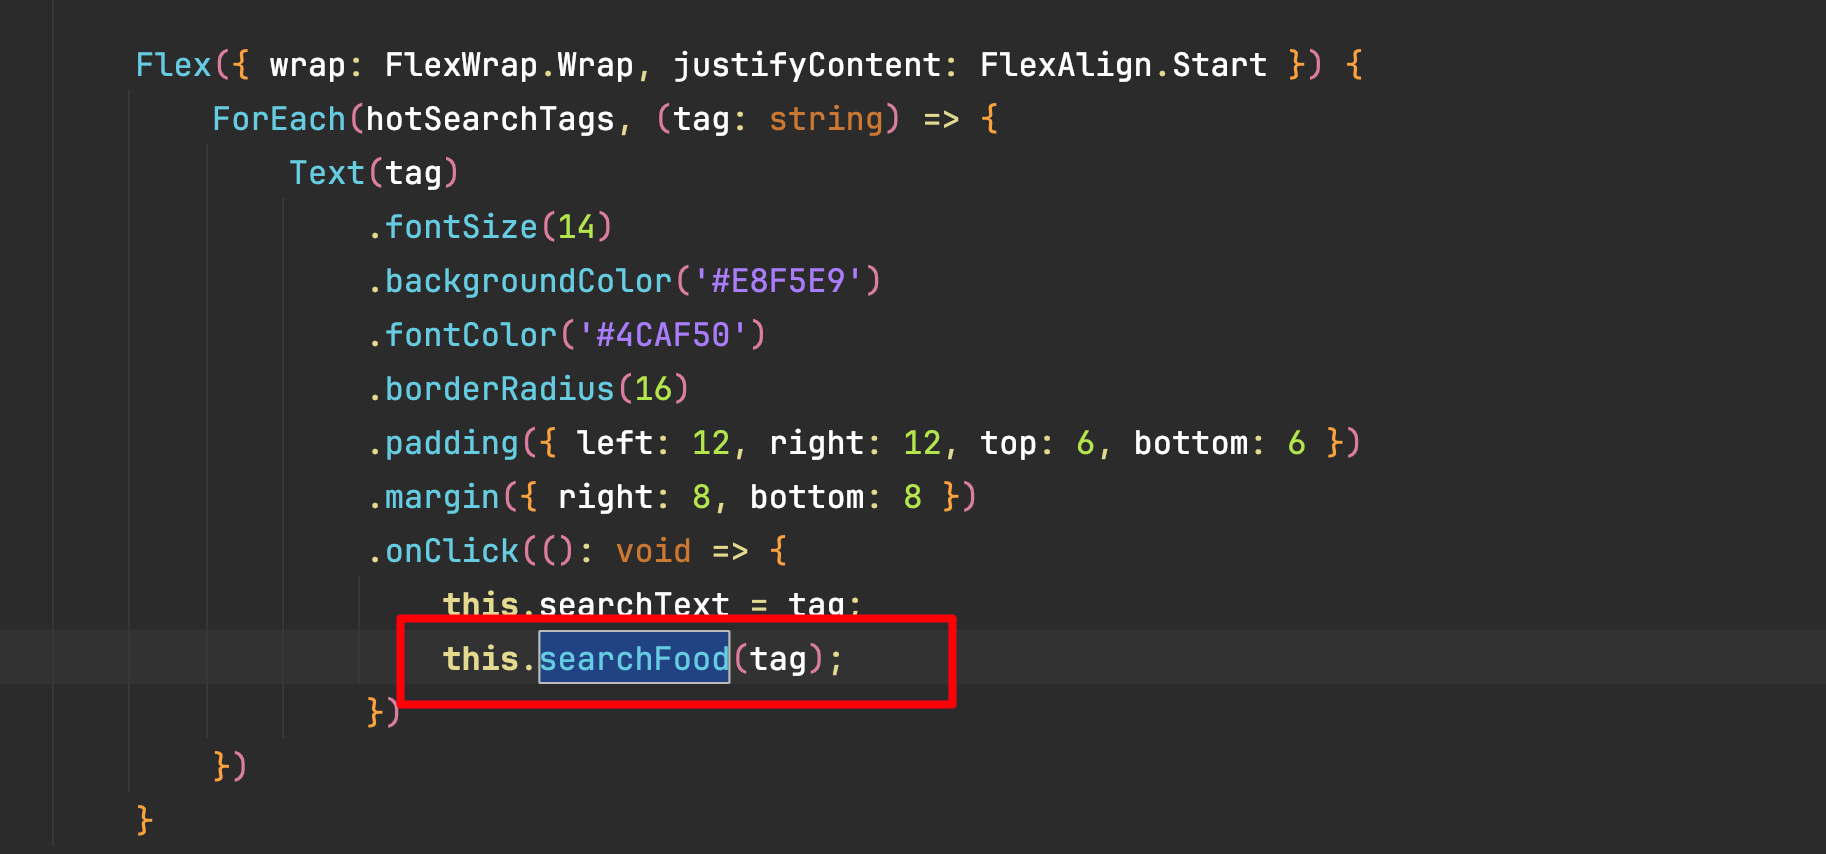
searchFood方法在子组件中的使用场景:
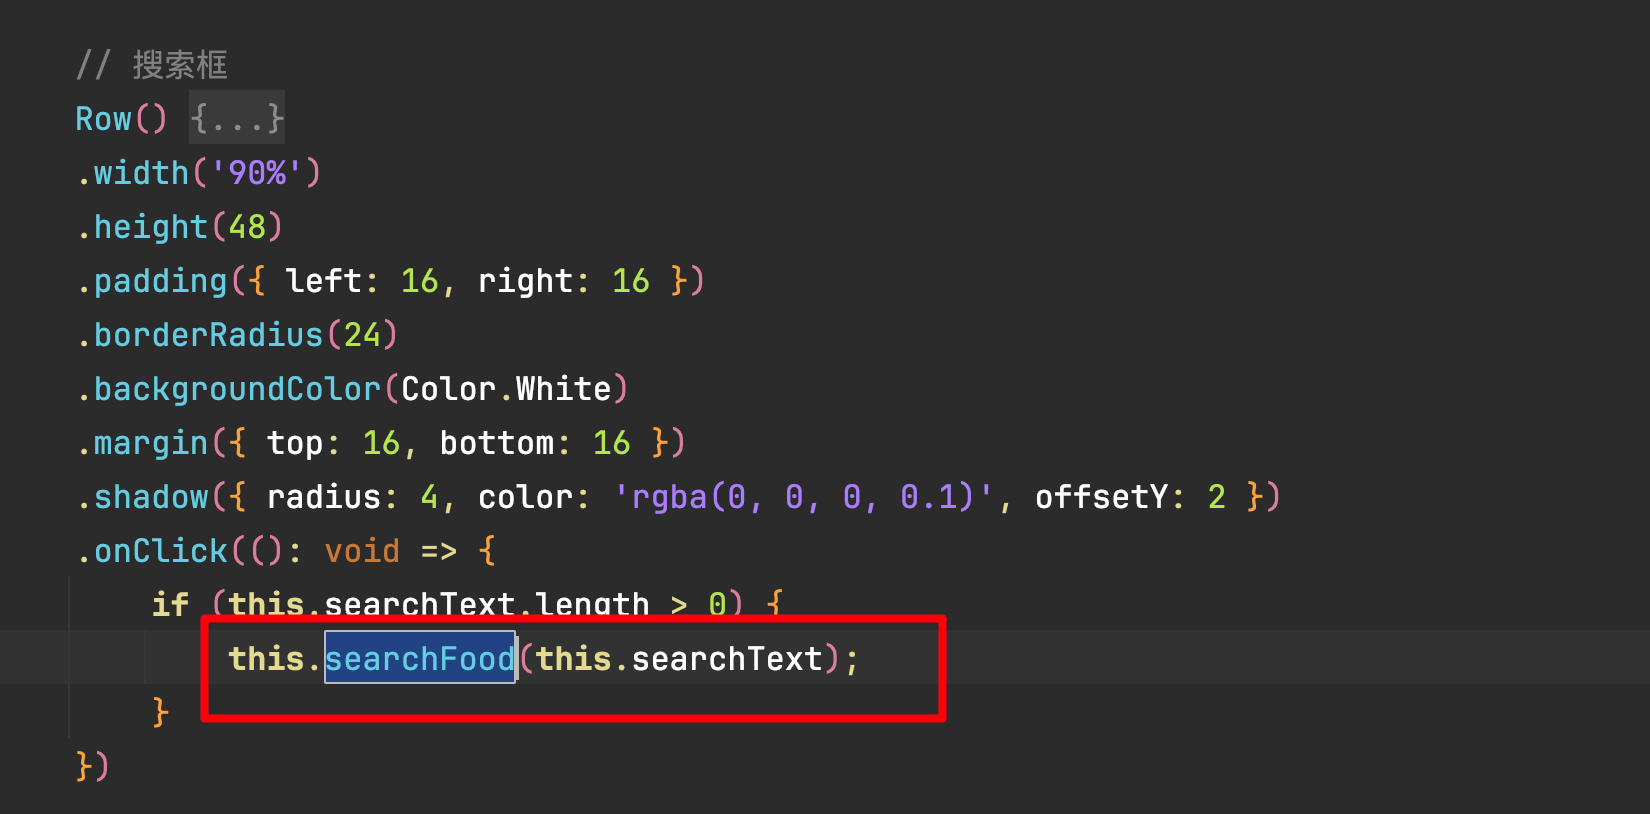
当用户点击搜索框或热门标签时,子组件会调用这个方法:
在父组件中,我们通过箭头函数传递方法引用:
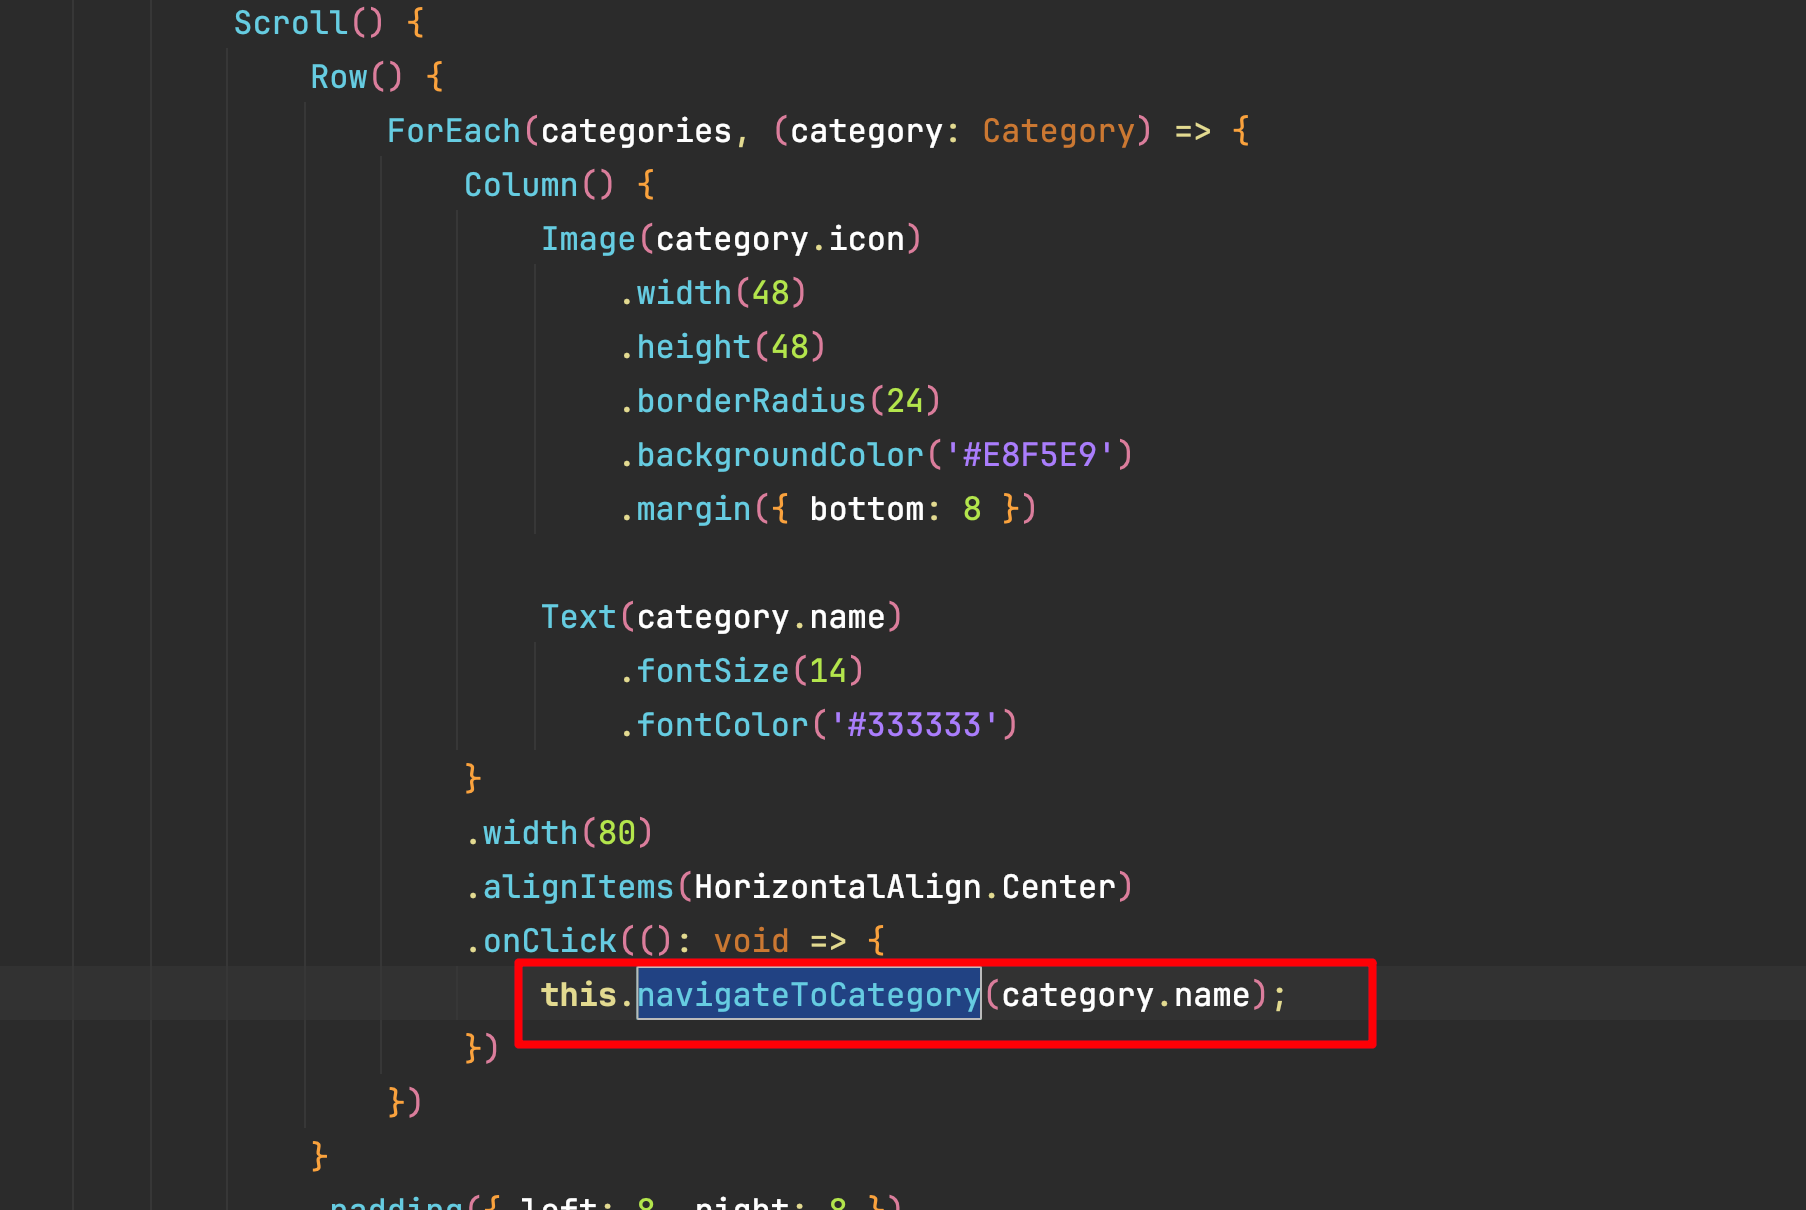
同样,navigateToCategory方法在子组件中用于处理分类点击事件:
3. 函数属性的正确初始化
在组件中声明函数类型的属性时,必须正确初始化为空函数,避免未定义错误。这是HarmonyOS组件开发中的一个重要规范:
❌ 错误写法 - 没有初始化函数属性
private searchFood: (keyword: string) => void; // 错误:未初始化private navigateToCategory: (category: string) => void; // 错误:未初始化✅ 正确写法 - 初始化为空函数
private searchFood: (keyword: string) => void = () => {}; // 正确:初始化为空函数private navigateToCategory: (category: string) => void = () => {}; // 正确:初始化为空函数这种初始化方式确保即使父组件没有传递对应的方法,子组件调用时也不会出现错误,提高了代码的健壮性。
总结
这种组件式开发模式使我们能够构建更加模块化、可维护的应用程序。在实际开发中,你可以根据需要扩展这种模式,创建更复杂的组件层次结构和交互方式, 欢快的时光是短暂的, 下课~~~

