服务器安装jupyterLab_服务器上安装jupyter lab
目录
- 什么是jupyterlab
- 安装环境配置说明
-
- 检查Python版本
- 升级pip(可选但推荐)
- 升级OpenSSL
-
- 1. 安装编译依赖
- 2. 下载并安装新版 OpenSSL
- 安装jupyterLab
- 启动jupyterlab
- myjupyter启停脚本
什么是jupyterlab
JupyterLab 是一个交互式开发环境,专为数据科学、科学计算和机器学习工作流设计。它基于 Jupyter Notebook 的传统架构,提供了更高级的用户界面和功能扩展,支持多种编程语言(如 Python、R、Julia 等),并允许用户创建包含实时代码、方程式、可视化和文本的文档。
主要特点
- 模块化界面:支持多文档标签页和可拖拽面板,用户可以自定义工作区布局,同时查看代码、输出、数据可视化、文件浏览器等组件。
- 丰富的文件支持:不仅能处理 Notebook 文件(.ipynb),还能编辑普通代码文件(如.py、.R)、Markdown 文档、CSV 表格、图像等。
- 交互式计算:提供代码即时执行、变量检查和可视化功能,支持实时数据探索。
- 扩展系统:通过安装第三方插件(Extensions),可以增强功能,如添加主题、版本控制、代码自动补全、远程服务器连接等。
基本使用场景 - 数据分析与可视化:结合 pandas、matplotlib、Plotly 等库进行数据处理和图表展示。
- 机器学习模型开发:使用 TensorFlow、PyTorch 等框架训练和调试模型。
- 教学与学术研究:创建可交互的教学材料或研究报告。
安装环境配置说明
JupyterLab 的安装和运行对 Python 环境有一定要求,以下是具体说明:
最低 Python 版本要求
- Python 3.7+:从 JupyterLab 3.0 版本开始,官方明确要求 Python 环境为 3.7 及以上。更早的 Python 版本(如 Python 2 或 Python 3.6 及以下)可能无法正常安装或运行。
版本兼容性注意事项
- JupyterLab 4.x:建议使用 Python 3.8 及以上版本,以确保所有功能正常工作。
- JupyterLab 3.x:支持 Python 3.7+,但部分扩展可能需要更高版本。
- 旧版本 JupyterLab(如 2.x 及以下):可能支持 Python 3.6,但不推荐使用,因为官方已停止维护旧版本。
安装建议
为避免兼容性问题,推荐使用Python 3.8 及以上版本,并搭配最新的 pip 包管理器:
检查Python版本
python3 --version # 确保输出为Python 3.7或更高升级pip(可选但推荐)
pip3 install --upgrade pip验证安装环境
安装前,建议确认 Python 环境是否满足要求:
# 查看Python版本python3 --version # 或 python3 --version# 查看pip版本(确保为最新)pip3 --version常见问题与解决方案
- Python 版本过低:如果系统默认 Python 版本不符合要求,可通过以下方式升级:
- 使用conda创建独立环境:conda create -n jupyterlab python=3.9
- 使用pyenv管理多版本 Python:pyenv install 3.9.13
- 依赖冲突:安装时可能遇到包版本冲突,建议:
- 使用虚拟环境(venv或conda)隔离项目依赖
- 安装前清理旧版本:
pip3 uninstall jupyterlab && pip3 install jupyterlab
升级OpenSSL
不升级可能会报以下错误
ImportError: urllib3 v2 only supports OpenSSL 1.1.1+, currently the \'ssl\' module is compiled with \'OpenSSL 1.0.2k-fips 26 Jan 2017\'. See: https://github.com/urllib3/urllib3/issues/2168
升级 OpenSSL 并重建 Python 环境(更彻底)
适用于需要长期维护的环境(操作较复杂):
1. 安装编译依赖
sudo yum install -y gcc make zlib-devel2. 下载并安装新版 OpenSSL
cd /tmpwget https://www.openssl.org/source/openssl-1.1.1w.tar.gztar -zxvf openssl-1.1.1w.tar.gzcd openssl-1.1.1w./config --prefix=/usr/local/openssl --openssldir=/usr/local/opensslmake -j$(nproc)sudo make install# 3. 设置库路径echo \"/usr/local/openssl/lib\" | sudo tee /etc/ld.so.conf.d/openssl-1.1.1.confsudo ldconfig# 4. 重新编译 Python 3.9# 进入python的解压文件夹cd Python-3.9.18# 配置时链接新 OpenSSLexport LDFLAGS=\"-L/usr/local/openssl/lib\"export CPPFLAGS=\"-I/usr/local/openssl/include\"./configure --prefix=/usr/local/python3 --with-openssl=/usr/local/openssl sudo make && make install # 5. 重装 Jupyterpip3 uninstall jupyterlab && pip3 install jupyterlab验证修复bash# 检查 OpenSSL 链接情况python3 -c \"import ssl; print(ssl.OPENSSL_VERSION)\"# 应显示 OpenSSL 1.1.1w 或更高安装jupyterLab
官方安装地址传送门
-
服务器安装指令
pip3 install jupyterlab# 国内镜像源加速pip3 install jupyterlab -i https://pypi.tuna.tsinghua.edu.cn/simple -
配置jupyterlab
用root执行jupyter lab --generate-config执行完只有一个文件如下:
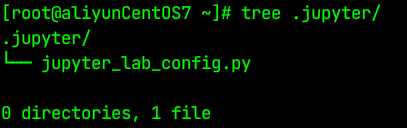
-
生成密码
jupyter lab password输入两次密码,确认后生成密码文件。
为了方便使用jupyterlab我习惯密码设置为123456
然后多出一个文件夹,如下:
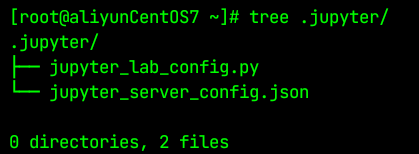
-
创建jupyterlab工作目录
mkdir /root/jupyter-workspace -
修改配置文件
vim /root/.jupyter/jupyter_lab_config.py在jupyter_lab_config.py中增加下面内容:
c.ServerApp.allow_remote_access = True # 允许远程访问c.ServerApp.allow_root = True # 允许root运行c.ServerApp.notebook_dir = u\'/root/jupyter-workspace/\' # 设置工作目录,默认为用户家目录c.ServerApp.ip = \'*\' # 监听地址c.ServerApp.port = 8888 # 运行端口,默认8888# 这里的密码需要自己修改自己的,# 在 cat .jupyter/jupyter_server_config.json里面c.ServerApp.password = \"argon2:$argon2id$v=19$m=10240,t=10,p=8$mkz4PovyvKdZir9TQGM9CQ$iXKNBrnCSBOE0plxR5K8e5CXUdxa+Of0dAis6KNMcSI\" c.ServerApp.open_browser = True # 打开浏览器
主要是:配置端口、程序默认路径、可访问的IP
未用默认端口8888 。
如果防火墙端口没打开,请去服务器官网控制台设置端口规则访问jupyterlab
网页格式为:
http://服务器公网ip:8888
启动jupyterlab
- 后台运行
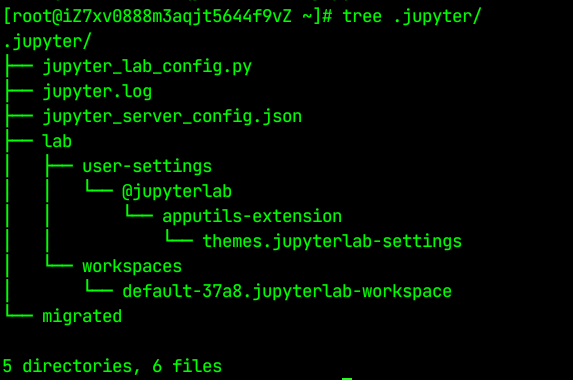
nohup python3 -m jupyterlab --allow-root > /root/.jupyter/jupyter.log 2>&1 &执行这行指令后多出这些文件夹
- 编写启停脚本
-
创建root用户脚本路径
mkdir /root/bin -
编写脚本
vim /root/bin/myjupyter输入一下内容
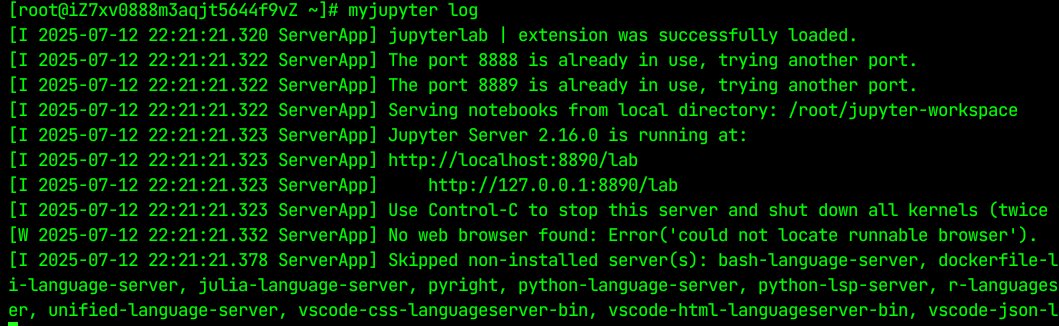
#!/bin/bashcase \"$1\" instart) nohup python3 -m jupyterlab --allow-root > /root/.jupyter/jupyter.log 2>&1 & echo \"JupyterLab started.\" ;;stop) ps -ef | grep \'jupyterlab\' | grep -v grep | awk \'{print $2}\' | xargs kill -9 echo \"JupyterLab stopped.\" ;;restart) $0 stop sleep 2 $0 start echo \"JupyterLab restarted.\" ;; log) tail -f /root/.jupyter/jupyter.log ;;*) echo \"Usage: $0 {start|stop|restart|log}\" exit 1 ;;esac -
赋予执行程序
chmod a+x /root/bin/myjupyter
-
myjupyter启停脚本
-
启动
myjupyter start
-
停止
myjupyter stop
-
重启
myjupyter restart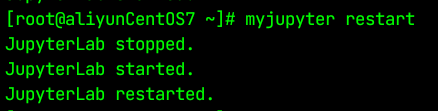
-
查看日志
myjupyter log