Zabbix 7.0分布式监控系统部署解决方案_zabbix7.0部署
基于Centos 9/Rocky 9部署单节点zabbix 7.0监控系统
文章目录
- 基于`Centos 9/Rocky 9`部署单节点`zabbix 7.0`监控系统
- 一、主机初始化
- 二、安装`zabbix-server`服务端
-
- 2.1 安装`zabbix-server`基础组件
- 2.2 安装`MySQL8.0`服务作为后端存储
- 2.3 配置`zabbix-server`数据库配置
- 2.4 启动`zabbix-server`相关组件服务
- 三、访问验证
- 四、修复监控图形中文乱码现象
- 五、配置`Grafana`作为图形展示
- 六、`zabbix-server`实现自我监控
-
- 6.1 `zabbix dashboard`查看
- 6.2 `Grafana`查看
- 基于`Centos 9/Rocky 9`部署`Zabbix 7.0 HA`分布式监控系统
- 一、`MySQL 8.0`高可用集群部署
-
- 1.1 节点规划
- 1.2 `MySQL InnoDB Cluster` 集群概念
-
- 1.2.1 简介
- 1.3 集群部署
-
- 1.3.1 `mysql-innodb01`操作
- 1.3.2 `mysql-innodb02`操作
- 1.3.3 `mysql-innodb03`操作
- 1.3.4 `mysql-innodb01`创建集群
- 1.4 部署`mysql-router`
- 1.5 高可用负载均衡器配置
-
- 1.5.1 `mysql-innodb01`和`mysql-innodb02`安装
- 1.5.2 两台负载均衡器配置文件修改
- 1.5.2 `mysql-innodb01`高可用配置文件修改
- 1.5.3 `mysql-innodb02`高可用配置文件修改
- 1.5.4 两个节点分别启动服务
- 1.5.5 通过`VIP`连接读写端口
- 1.5.6 通过`VIP`连接只读端口
- 1.6 `MySQL Innodb Cluster`集群角色管理
-
- 1.6.1 切换为多个`Primary`模式
- 1.6.2 切换为单个`Primary`模式
- 1.6.3 指定节点切换为`Primary`模式
- 1.6.4 从集群删除节点
- 二、`zabbix-server HA`部署之高可用负载均衡配置文件修改
-
- 2.1 两台`Haproxy`配置文件修改
- 2.2 `mysql-innodb01` `keepalived`配置文件修改
- 2.3 `mysql-innodb02` `keepalived`配置文件修改
- 2.4 两台节点高可用负载均衡重启服务
- 三、`zabbix-server HA`部署之`zabbix-server`双节点部署
-
- 3.1 两台主机更改主机名
- 3.2 两台主机安装`zabbix 7.0`安装源
- 3.3 两台主机安装`zabbix-server`和`zabbix-agent2`
- 3.4 `mysql-innodb01`数据库服务器上执行
- 3.5 `zabbix-server01`导入`MySQL`基础数据
- 3.6 `mysql-innodb01`数据库服务器上执行
- 3.7 两台`zabbix-server`服务器上执行
-
- 3.7.1 `zabbix-server01`配置文件修改
- 3.7.2 `zabbix-server02`配置文件修改
- 3.7.3 两台主机启动`zabbix-server`
- 四、`zabbix-server HA`部署之`zabbix-web`双节点部署
-
- 4.1 `zabbix`前端配置文件更改
-
- 4.1.1`zabbix-server01` 配置文件更改
- 4.1.2 `zabbix-server02` 配置文件更改
- 4.1.3 两台主机启动服务
- 五、`zabbix-server`分别初始化
-
- 5.1 `zabbix-server01`初始化
- 5.2 `zabbix-server02`初始化
- 5.3 访问负载均衡`VIP`
- 5.4 `zabbix-server HA`集群状态
-
- 5.4.1 验证集群状态
- 5.4.2 调整故障转移延迟
- 5.4.3 移除故障节点
- 六、`zabbix-server HA`部署之`zabbix-proxy`双节点部署
-
- 6.1 节点规划
- 6.2 两台主机修改主机名
- 6.3 两台主机配置`zabbix`源
- 6.4 两台主机安装`zabbix-proxy`
- 6.5 导入基础数据
- 6.6 `zabbix-proxy`导入基础数据
-
- 6.6.1 `zabbix-proxy01`导入基础数据
- 6.6.2 `zabbix-proxy02`导入基础数据
- 6.6.1 `mysql-innodb01`禁用`log_bin_trust_function_creators`
- 6.7 `zabbix-proxy`文件配置
-
- 6.7.1 `zabbix-proxy01`配置文件修改
- 6.7.2 `zabbix-proxy02`配置文件修改
- 6.7.3 两台主机启动`zabbix-proxy`
- 七、`zabbix webUI`配置`zabbix-proxy`
- 八、测试使用
-
-
- 6.7.3 两台主机启动`zabbix-proxy`
-
- 七、`zabbix webUI`配置`zabbix-proxy`
- 八、测试使用
作者:猫先生
一、主机初始化
# Step 1:修改主机名hostnamectl set-hostname zabbix-server# Step 2:关闭防火墙及Seliunxsystemctl disable --now firewalldsetenforce 0sed -ri \"s/^SELINUX=enforcing/SELINUX=disabled/\" /etc/selinux/configsed -i \'s#SELINUX=enforcing#SELINUX=disabled#g\' /etc/sysconfig/selinux# Step 3:查看主机架构uname -a# Step 4:查看操作系统版本cat /etc/redhat-release# Step 5:编写更换yum源脚本清华源地址:https://mirrors.tuna.tsinghua.edu.cn/help/centos-stream/vi /root/update_mirror.pl#!/usr/bin/perluse strict;use warnings;use autodie;my $mirrors = \'https://mirrors.tuna.tsinghua.edu.cn/centos-stream\';if (@ARGV < 1) { die \"Usage: $0 ...\\n\";}while (my $filename = shift @ARGV) { my $backup_filename = $filename . \'.bak\'; rename $filename, $backup_filename; open my $input, \"<\", $backup_filename; open my $output, \">\", $filename; while (<$input>) { s/^metalink/# metalink/; if (m/^name/) { my (undef, $repo, $arch) = split /-/; $repo =~ s/^\\s+|\\s+$//g; ($arch = defined $arch ? lc($arch) : \'\') =~ s/^\\s+|\\s+$//g; if ($repo =~ /^Extras/) { $_ .= \"baseurl=${mirrors}/SIGs/\\$releasever-stream/extras\" . ($arch eq \'source\' ? \"/${arch}/\" : \"/\\$basearch/\") . \"extras-common\\n\"; } else { $_ .= \"baseurl=${mirrors}/\\$releasever-stream/$repo\" . ($arch eq \'source\' ? \"/\" : \"/\\$basearch/\") . ($arch ne \'\' ? \"${arch}/tree/\" : \"os\") . \"\\n\"; } } print $output $_; }}# Step 6:安装perl及基础工具dnf install perl vim wget -y# Step 7:更换yum源perl ./update_mirror.pl /etc/yum.repos.d/centos*.repo# Step 8:更新软件包缓存dnf clean all && dnf makecache# Step 9:安装epel源清华大学源:https://mirrors.tuna.tsinghua.edu.cn/help/epel/dnf install -y epel-release# Step 10:更改epel源国内地址sed -e \'s!^metalink=!#metalink=!g\' \\ -e \'s!^#baseurl=!baseurl=!g\' \\ -e \'s!https\\?://download\\.fedoraproject\\.org/pub/epel!https://mirrors.tuna.tsinghua.edu.cn/epel!g\' \\ -e \'s!https\\?://download\\.example/pub/epel!https://mirrors.tuna.tsinghua.edu.cn/epel!g\' \\ -i /etc/yum.repos.d/epel{,-testing}.repo # Step 11:更新软件包缓存dnf clean all && dnf makecache# Step 12:自动跳过所有以zabbix开头的软件包。vim /etc/yum.repos.d/epel.repoexcludepkgs=zabbix*
二、安装zabbix-server服务端
官网:下载Zabbix 7.0 LTS for CentOS 9 Stream, MySQL, Nginx
2.1 安装zabbix-server基础组件
# Step 1:zabbix-server主机配置zabbix仓库rpm -Uvh https://repo.zabbix.com/zabbix/7.0/centos/9/x86_64/zabbix-release-latest-7.0.el9.noarch.rpm # Step 2:zabbix-server安装Zabbix server、Web前端、agent2dnf install zabbix-server-mysql zabbix-web-mysql zabbix-nginx-conf zabbix-sql-scripts zabbix-selinux-policy zabbix-agent2 -yzabbix-server-mysql:Zabbix的核心服务器组件,负责数据收集、处理、存储和告警触发。必须配合数据库(如MySQL)和Web前端(如zabbix-web-mysql)使用。zabbix-web-mysql:Zabbix的Web管理界面,基于PHP实现,用于配置监控项、查看图表、管理告警等。需要Web服务器(如Apache/Nginx)和PHP环境,通常通过zabbix-nginx-conf或zabbix-apache-conf包配置。zabbix-nginx-conf:提供Nginx服务器的预配置模板,用于托管Zabbix Web前端。若选择Nginx作为Zabbix Web的服务器,需安装此包。zabbix-sql-scripts:包含Zabbix服务器所需的数据库初始化脚本,用于创建表结构、初始数据。安装Zabbix Server后,需手动执行这些脚本初始化数据库(例如:zcat /usr/share/zabbix-sql-scripts/mysql/server.sql.gz | mysql -u zabbix -p zabbix)。zabbix-selinux-policy:为SELinux提供安全策略,确保Zabbix组件在启用SELinux的系统上正常运行。zabbix-agent2:用于在被监控主机上收集数据并发送给Zabbix Server。
2.2 安装MySQL8.0服务作为后端存储
# Step 1:下载MySQL8.0安装包wget https://dev.mysql.com/get/Downloads/MySQL-8.0/mysql-8.0.37-1.el9.x86_64.rpm-bundle.tar# Step 2:创建目录mkdir -p /opt/mysql/ # Step 3:解压安装包到指定目录tar xf mysql-8.0.37-1.el9.x86_64.rpm-bundle.tar -C /opt/mysql/# Step 4:切换工作目录cd /opt/mysql/# Step 5:安装MySQL8.0服务 rpm -ivh mysql-community-* --force --nodeps# 代码输出内容如下:警告:mysql-community-client-8.0.37-1.el9.x86_64.rpm: 头V4 RSA/SHA256 Signature, 密钥 ID a8d3785c: NOKEYVerifying... ################################# [100%]准备中... ################################# [100%]正在升级/安装... 1:mysql-community-debugsource-8.0.3################################# [ 6%] 2:mysql-community-debuginfo-8.0.37-################################# [ 12%] 3:mysql-community-common-8.0.37-1.e################################# [ 18%] 4:mysql-community-client-plugins-8.################################# [ 24%] 5:mysql-community-libs-8.0.37-1.el9################################# [ 29%] 6:mysql-community-client-8.0.37-1.e################################# [ 35%] 7:mysql-community-icu-data-files-8.################################# [ 41%] 8:mysql-community-server-8.0.37-1.e################################# [ 47%] 9:mysql-community-server-debug-8.0.################################# [ 53%] 10:mysql-community-test-8.0.37-1.el9################################# [ 59%] 11:mysql-community-devel-8.0.37-1.el################################# [ 65%] 12:mysql-community-client-debuginfo-################################# [ 71%] 13:mysql-community-client-plugins-de################################# [ 76%] 14:mysql-community-libs-debuginfo-8.################################# [ 82%] 15:mysql-community-server-debug-debu################################# [ 88%] 16:mysql-community-server-debuginfo-################################# [ 94%] 17:mysql-community-test-debuginfo-8.################################# [100%]-i:安装软件包。-v:显示详细输出。-h:显示安装进度。--force:强制覆盖已经存在的文件。这可能会破坏系统,因为它会覆盖现有的文件而不进行任何检查。--nodeps:安装软件包时,不检查其依赖关系。这可能会导致软件包无法正常工作,因为它可能缺少必要的库或依赖项。
# Step 6:永久启动MySQL8.0服务systemctl enable --now mysqld# Step 7:查看MySQL8.0密码,默认在MySQL8.0启动日志中cat /var/log/mysqld.log | grep password
# Step 8:登录MySQL8.0 mysql -uroot -p\'zid?%MuYe8k:\'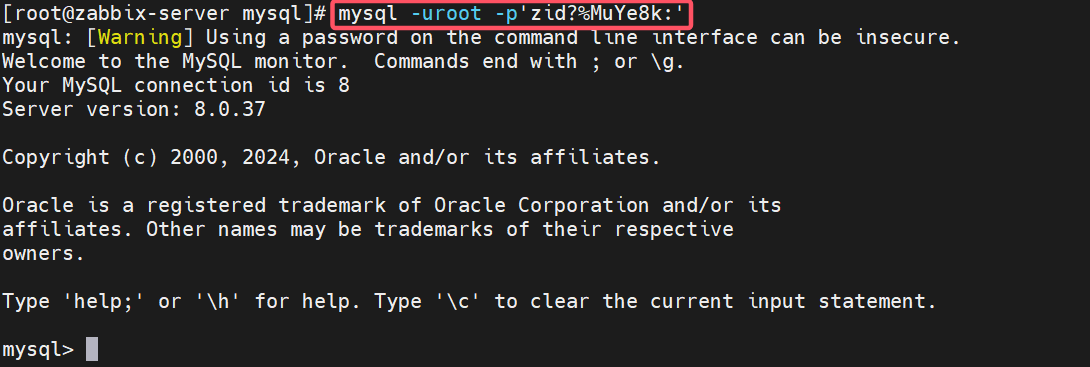
# Step 9:修改MySQL8.0用户密码mysql> ALTER USER \'root\'@\'localhost\' IDENTIFIED BY \'Xa%^3T%T4!\';Query OK, 0 rows affected (0.00 sec)# Step 10:设置密码检查等级mysql> set global validate_password.policy=0;Query OK, 0 rows affected (0.01 sec)# 0 (或LOW):允许密码包含最简单的密码(只包含小写字母、数字、特殊字符中的一类)。# 1 (或MEDIUM):要求密码至少包含小写字母、大写字母、数字、特殊字符中的三类。# 2 (或STRONG):要求密码至少包含小写字母、大写字母、数字、特殊字符中的四类。# Step 11:密码的最短长度mysql> set global validate_password.length=5;Query OK, 0 rows affected (0.00 sec)# Step 12:密码至少要包含的小写字母个数和大写字母个数mysql> set global validate_password.mixed_case_count=0;Query OK, 0 rows affected (0.00 sec)# Step 13:重新MySQL8.0用户密码mysql> ALTER USER \'root\'@\'localhost\' IDENTIFIED BY \'zabbix\';Query OK, 0 rows affected (0.00 sec)# Step 14:创建zabbix数据库mysql> create database zabbix character set utf8mb4 collate utf8mb4_bin;Query OK, 1 row affected (0.01 sec)# Step 15:创建zabbix用户。如果MySQL8.0和zabbix-server未在同一台主机将localhost改为%或者指定IP或网段mysql> create user zabbix@localhost identified by \'zabbix\';Query OK, 0 rows affected (0.00 sec)# Step 16:zabbix用户授权mysql> grant all privileges on zabbix.* to zabbix@localhost;Query OK, 0 rows affected (0.00 sec)# Step 17:关闭log_bin_trust_function_creatorsmysql> set global log_bin_trust_function_creators = 1;Query OK, 0 rows affected, 1 warning (0.01 sec)# Step 18:退出MySQL8.0mysql> exit;Bye提示:
Zabbix使用存储过程和函数来初始化数据库,这些对象可能包含非确定性操作,或者没有显式声明为DETERMINISTIC。当MySQL的二进制日志启用时,默认情况下(log_bin_trust_function_creators=0),MySQL会阻止创建这类函数,导致Zabbix的数据库初始化失败。Zabbix Server依赖数据库中的存储过程来执行监控逻辑(如告警计算、历史数据清理)。如果这些存储过程无法创建,安装会失败。如果未设置log_bin_trust_function_creators=1,MySQL会拒绝执行Zabbix的初始化SQL脚本,导致以下错误:ERROR 1418 (HY000): This function has none of DETERMINISTIC...
# Step 19:导入zabbix基础数据zcat /usr/share/zabbix-sql-scripts/mysql/server.sql.gz | mysql --default-character-set=utf8mb4 -uzabbix -p zabbix# Step 20:验证是否导入成功# Step 20.1:登录数据库mysql -uroot -pzabbix# Step 20.2:切换数据库use zabbix# Step 20.3:查看数据表(如果存在相关表,则代表基础数据导入成功)show tables;# Step 17:开启log_bin_trust_function_creatorsmysql> set global log_bin_trust_function_creators = 0;Query OK, 0 rows affected, 1 warning (0.00 sec)2.3 配置zabbix-server数据库配置
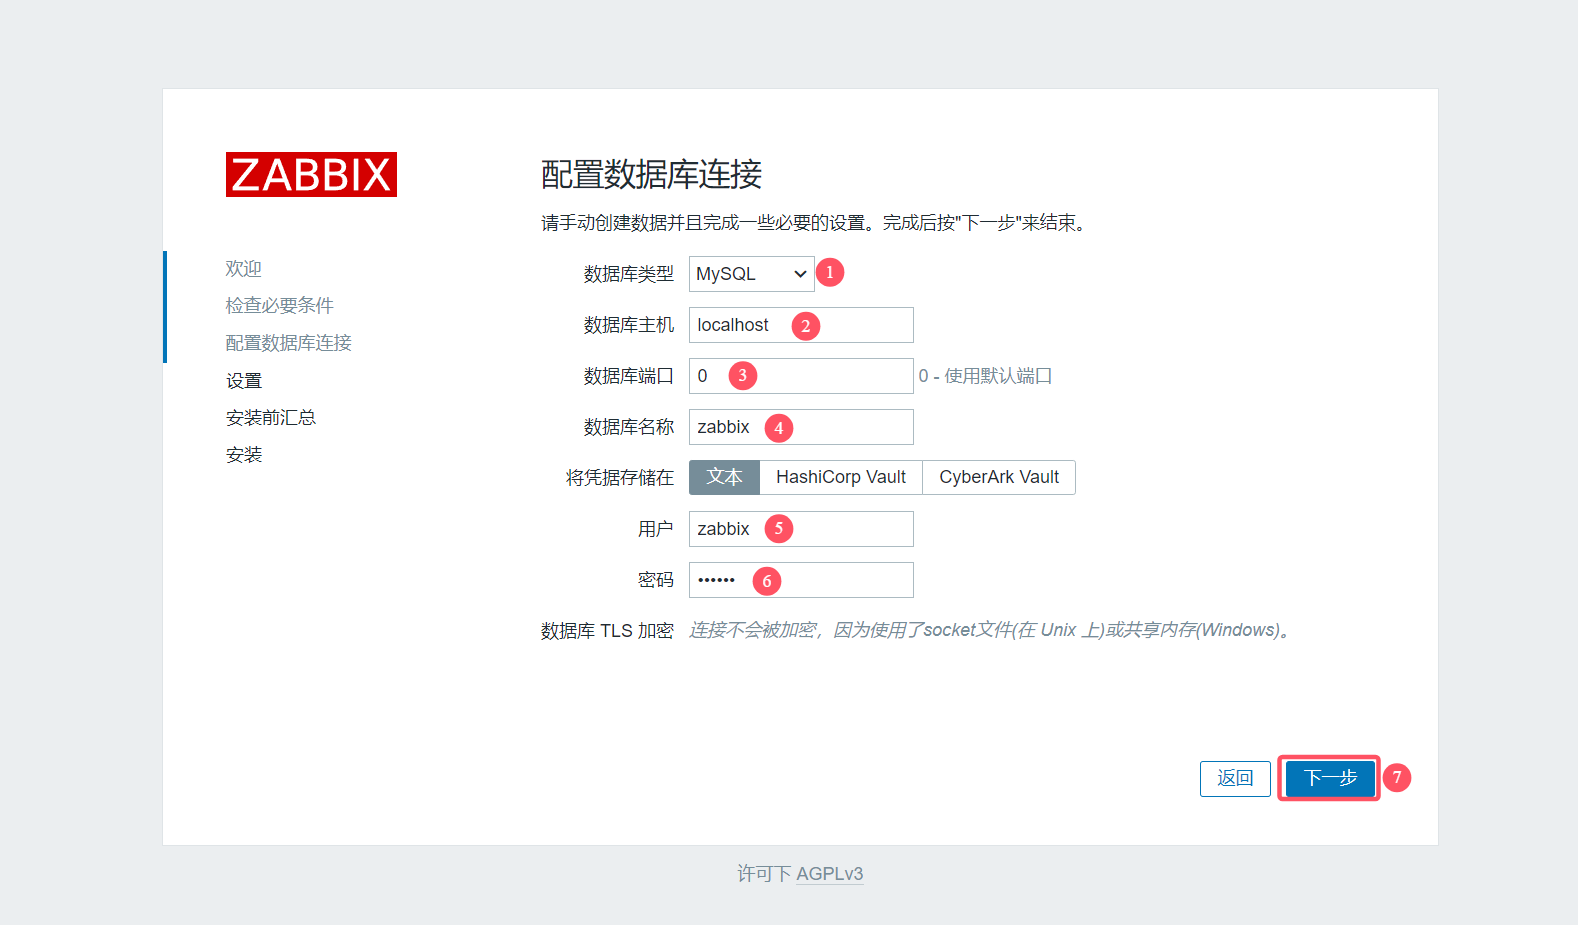
# Step 1:配置zabbix-server配置文件vim /etc/zabbix/zabbix_server.confDBPassword=zabbix2.4 启动zabbix-server相关组件服务
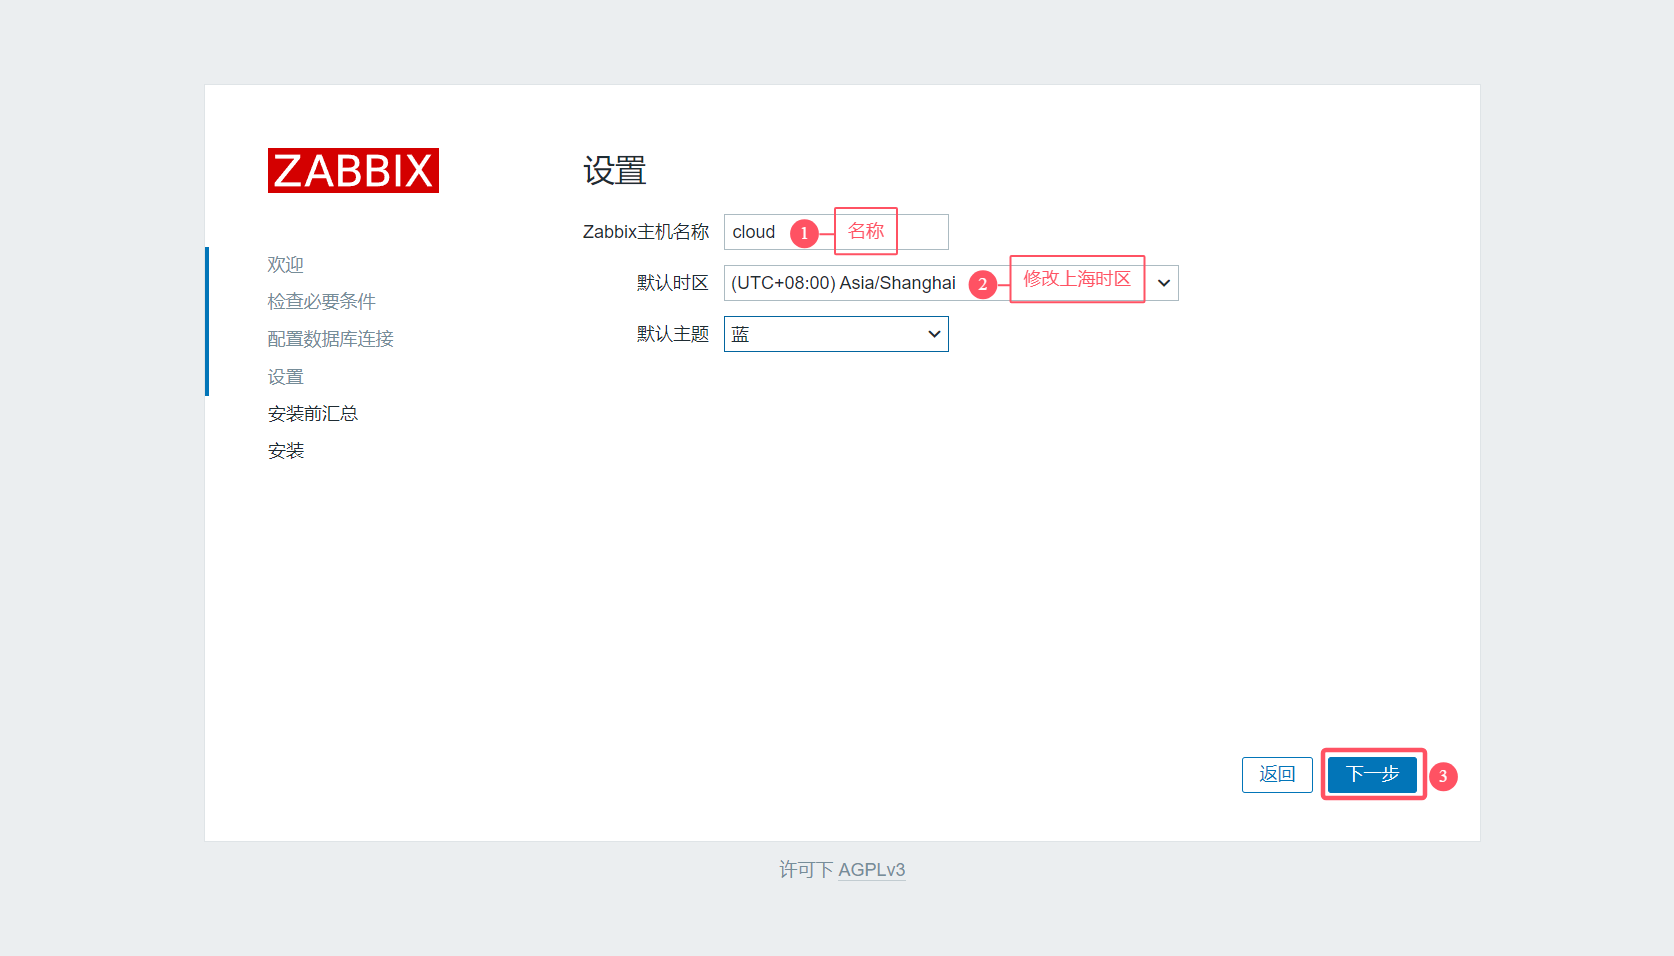
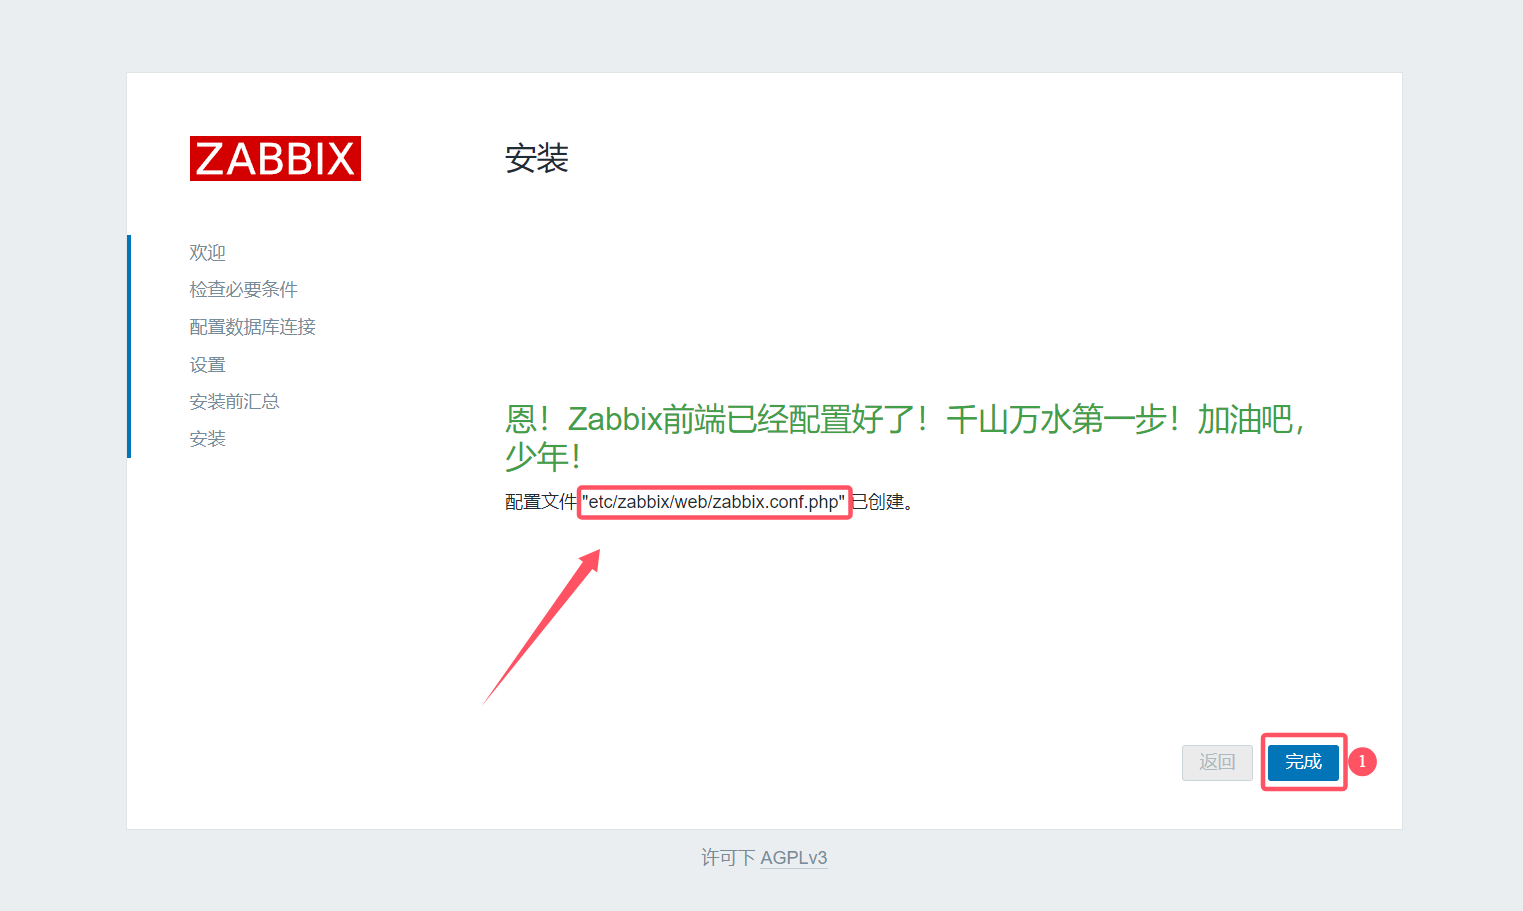
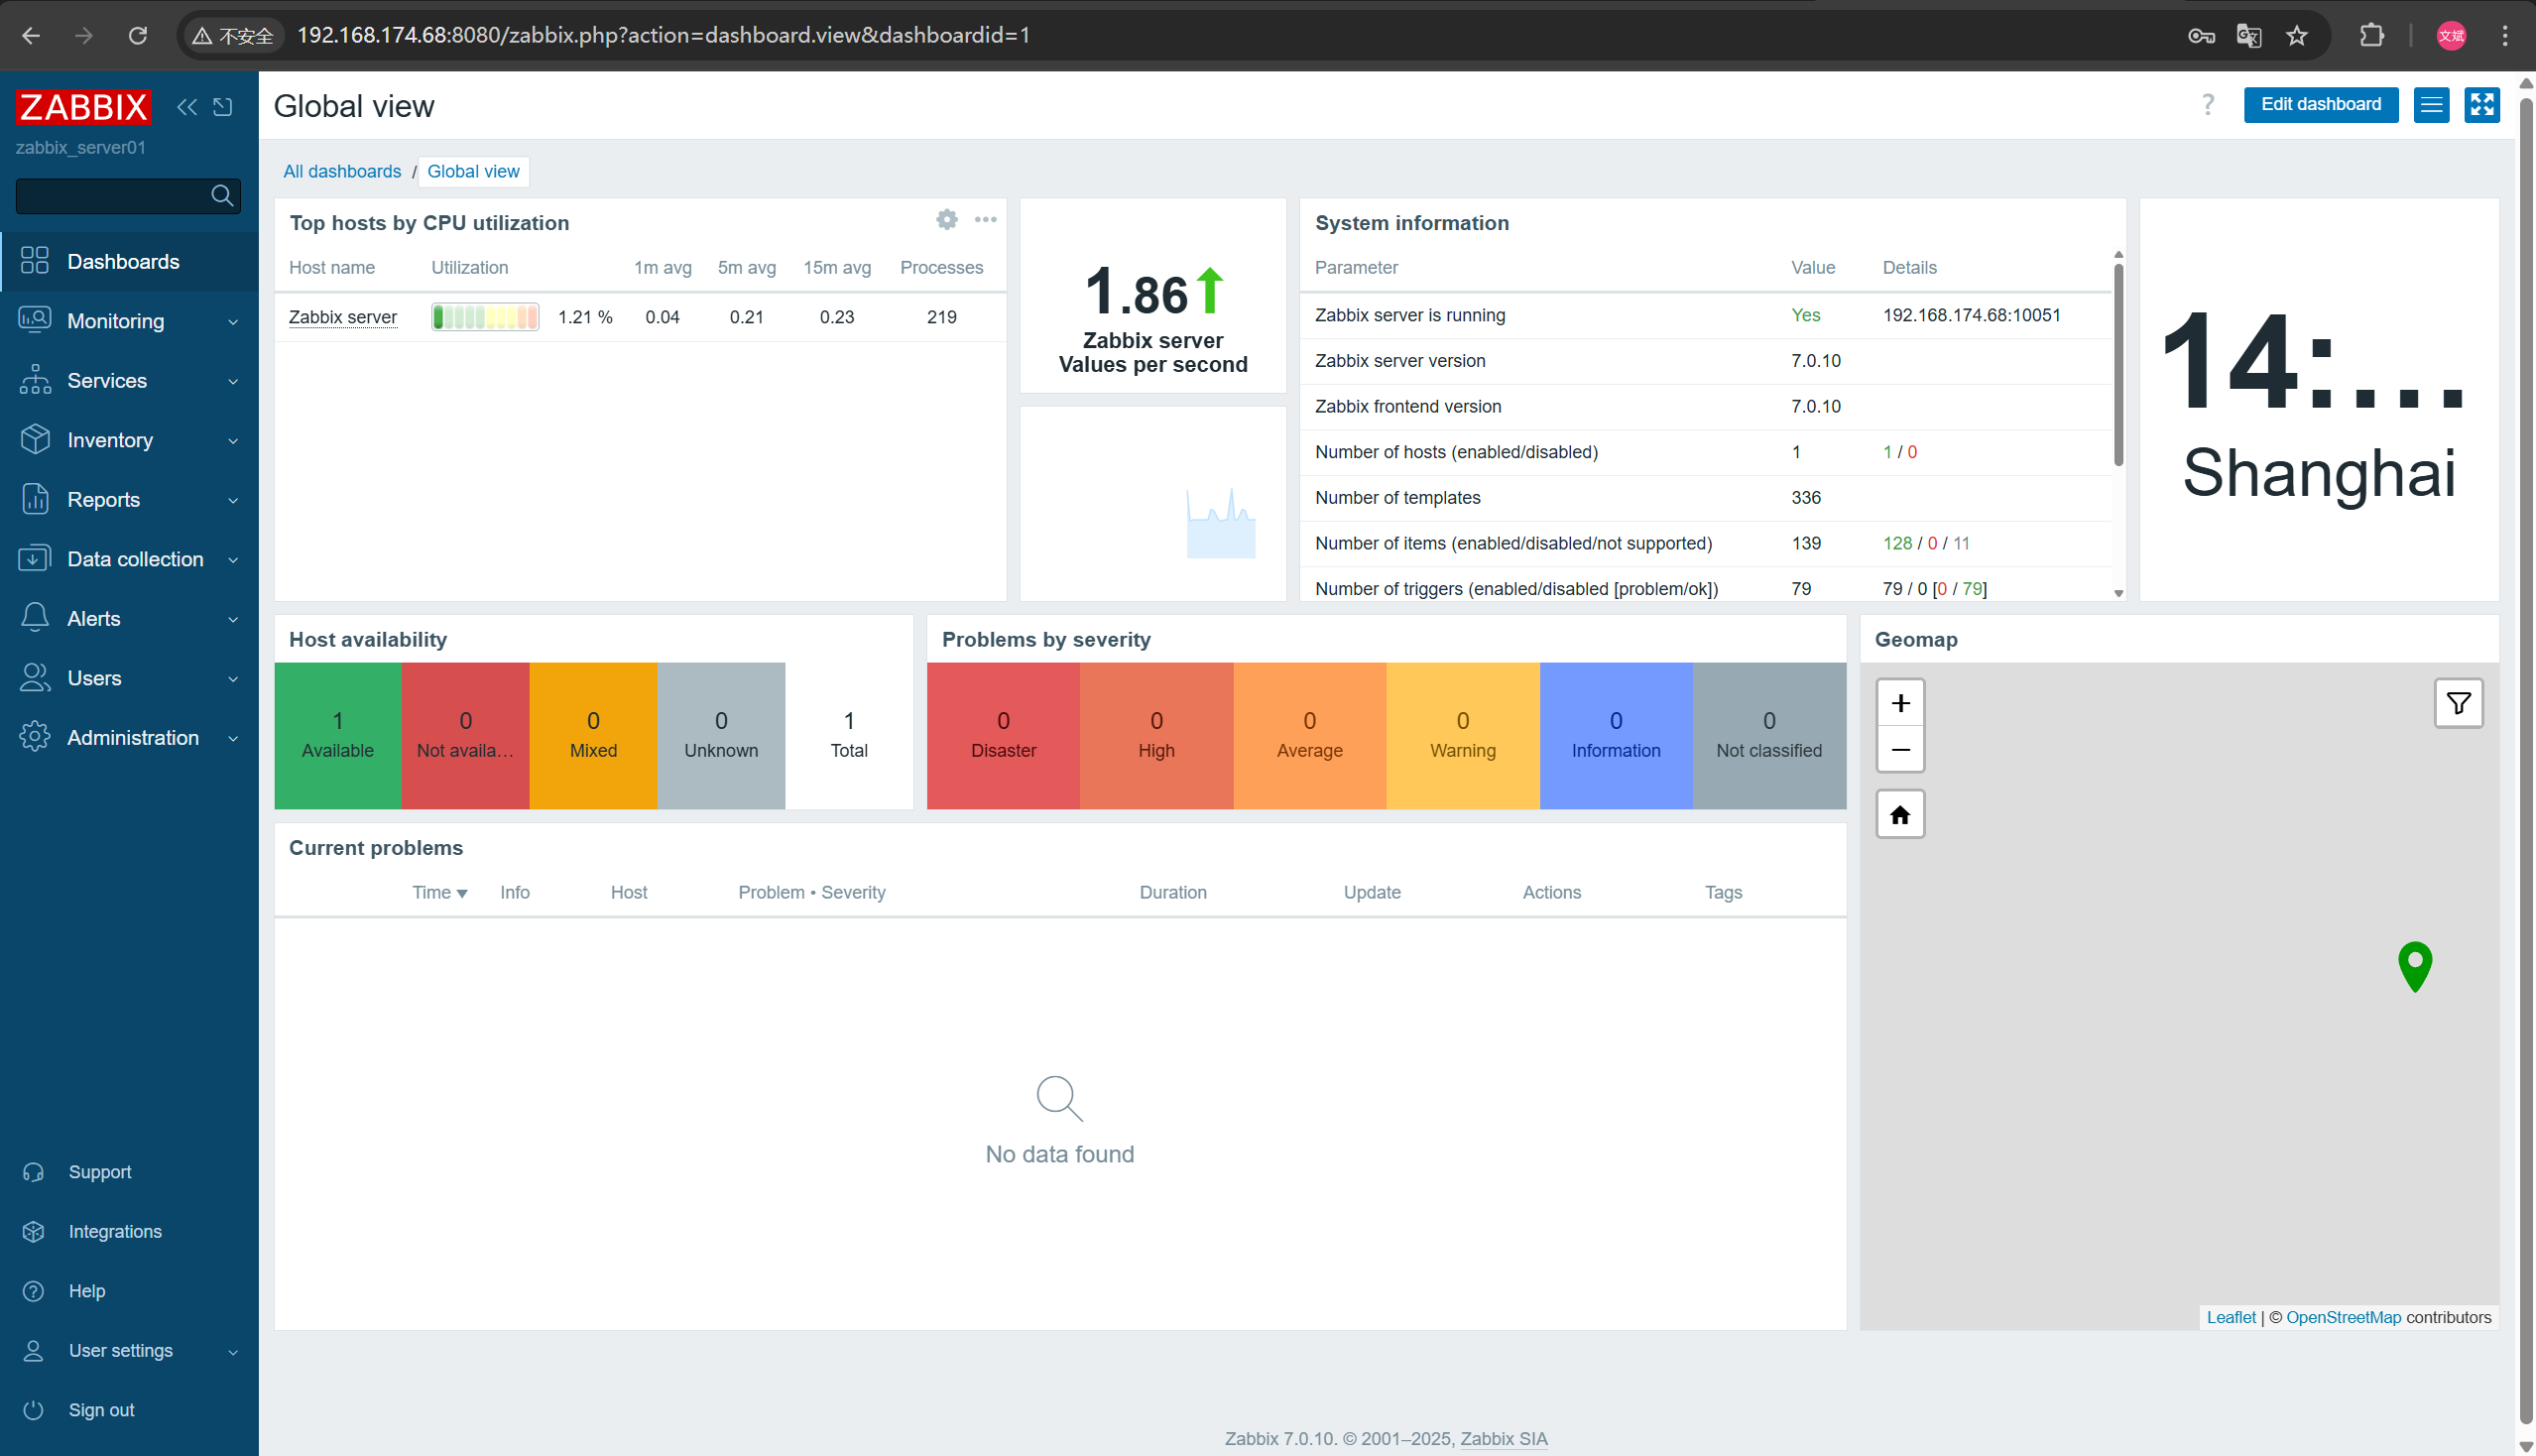
systemctl enable --now zabbix-server nginx php-fpm三、访问验证
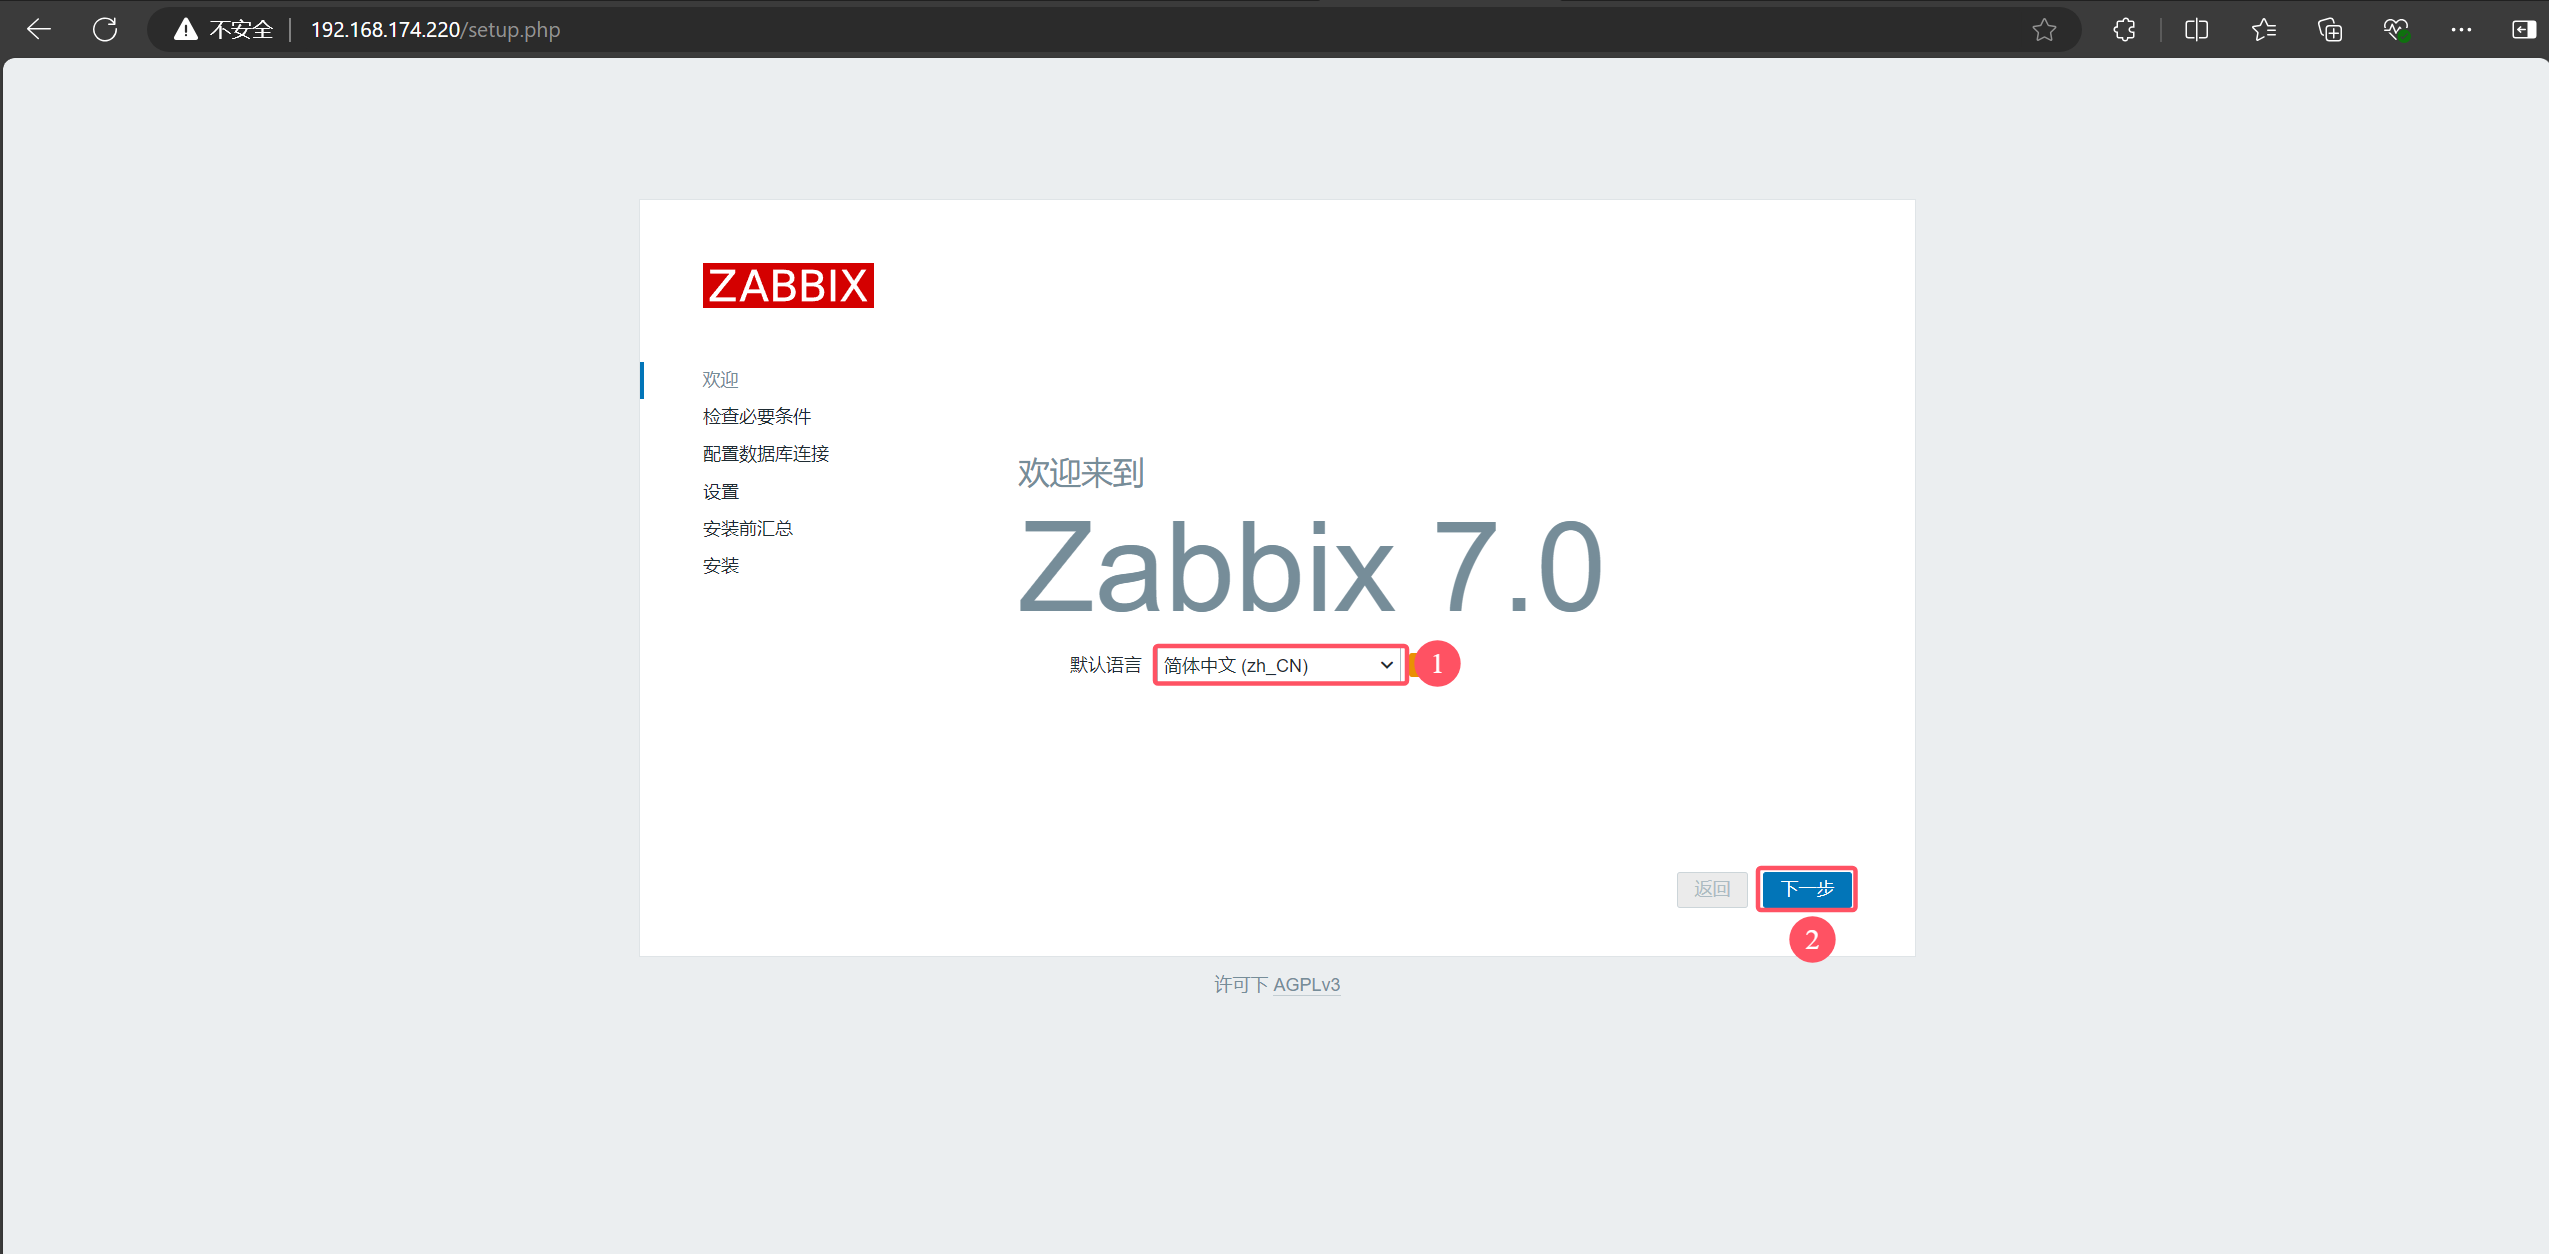
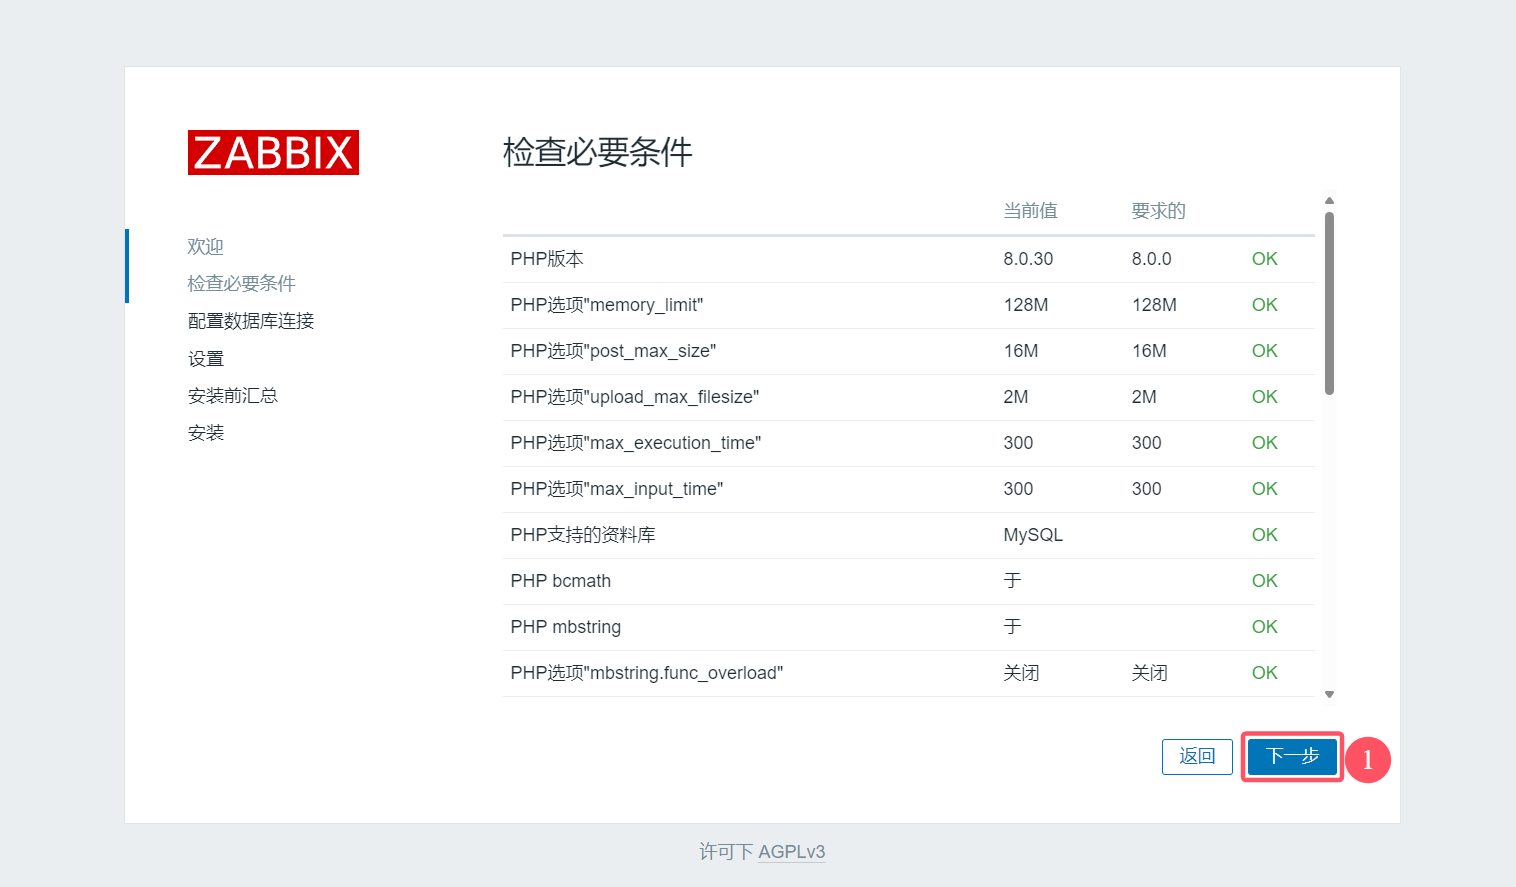
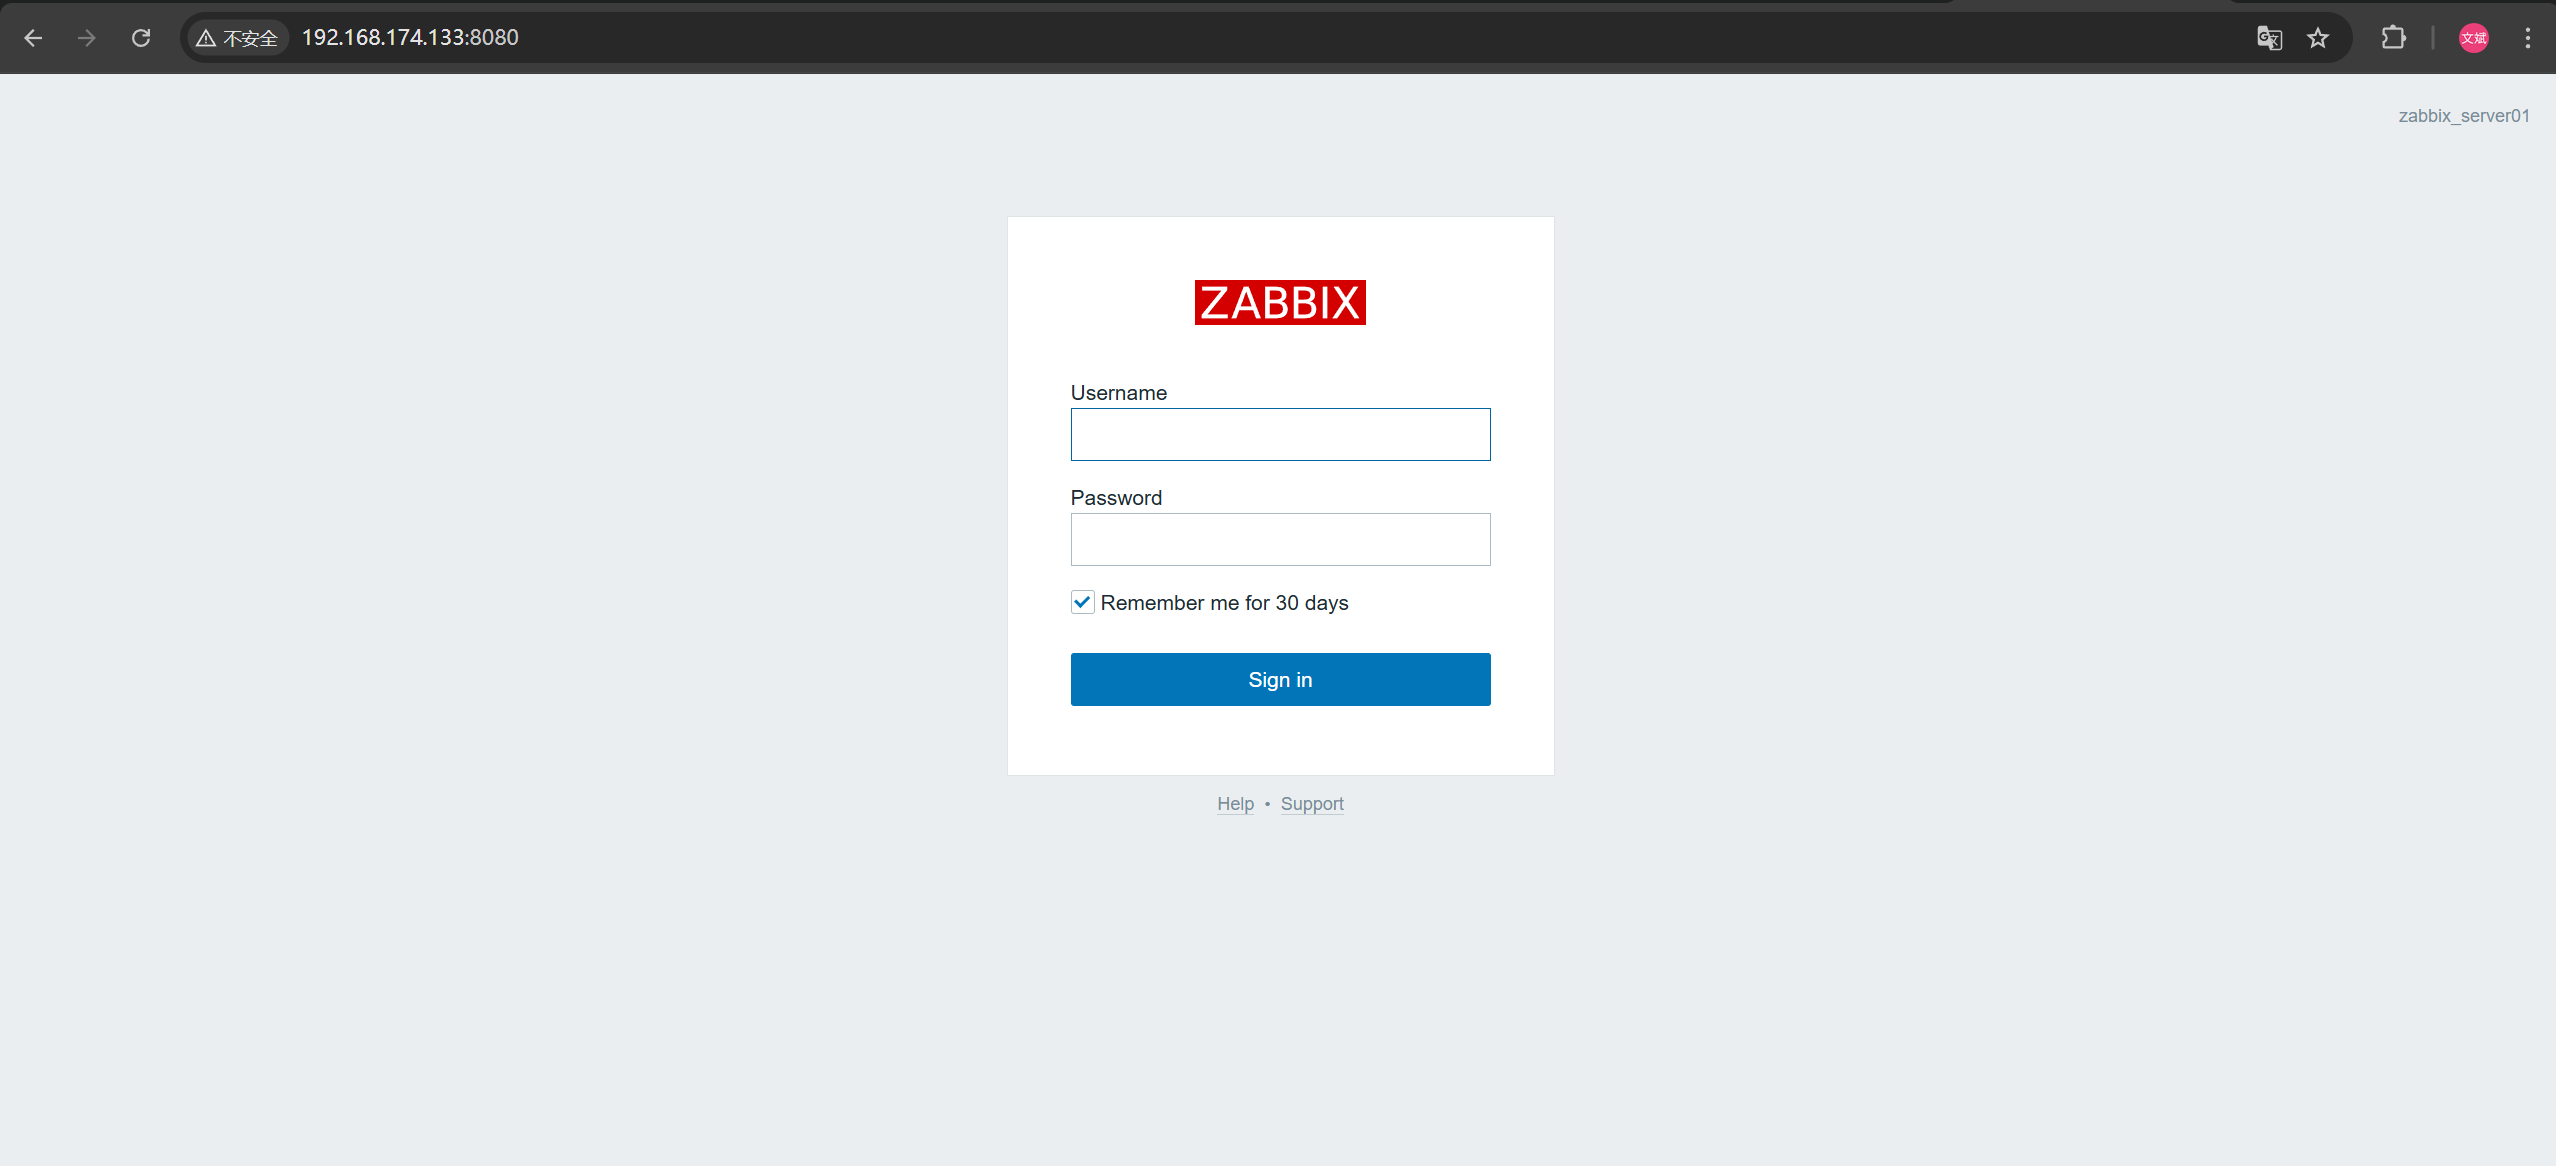
浏览器访问主机IP
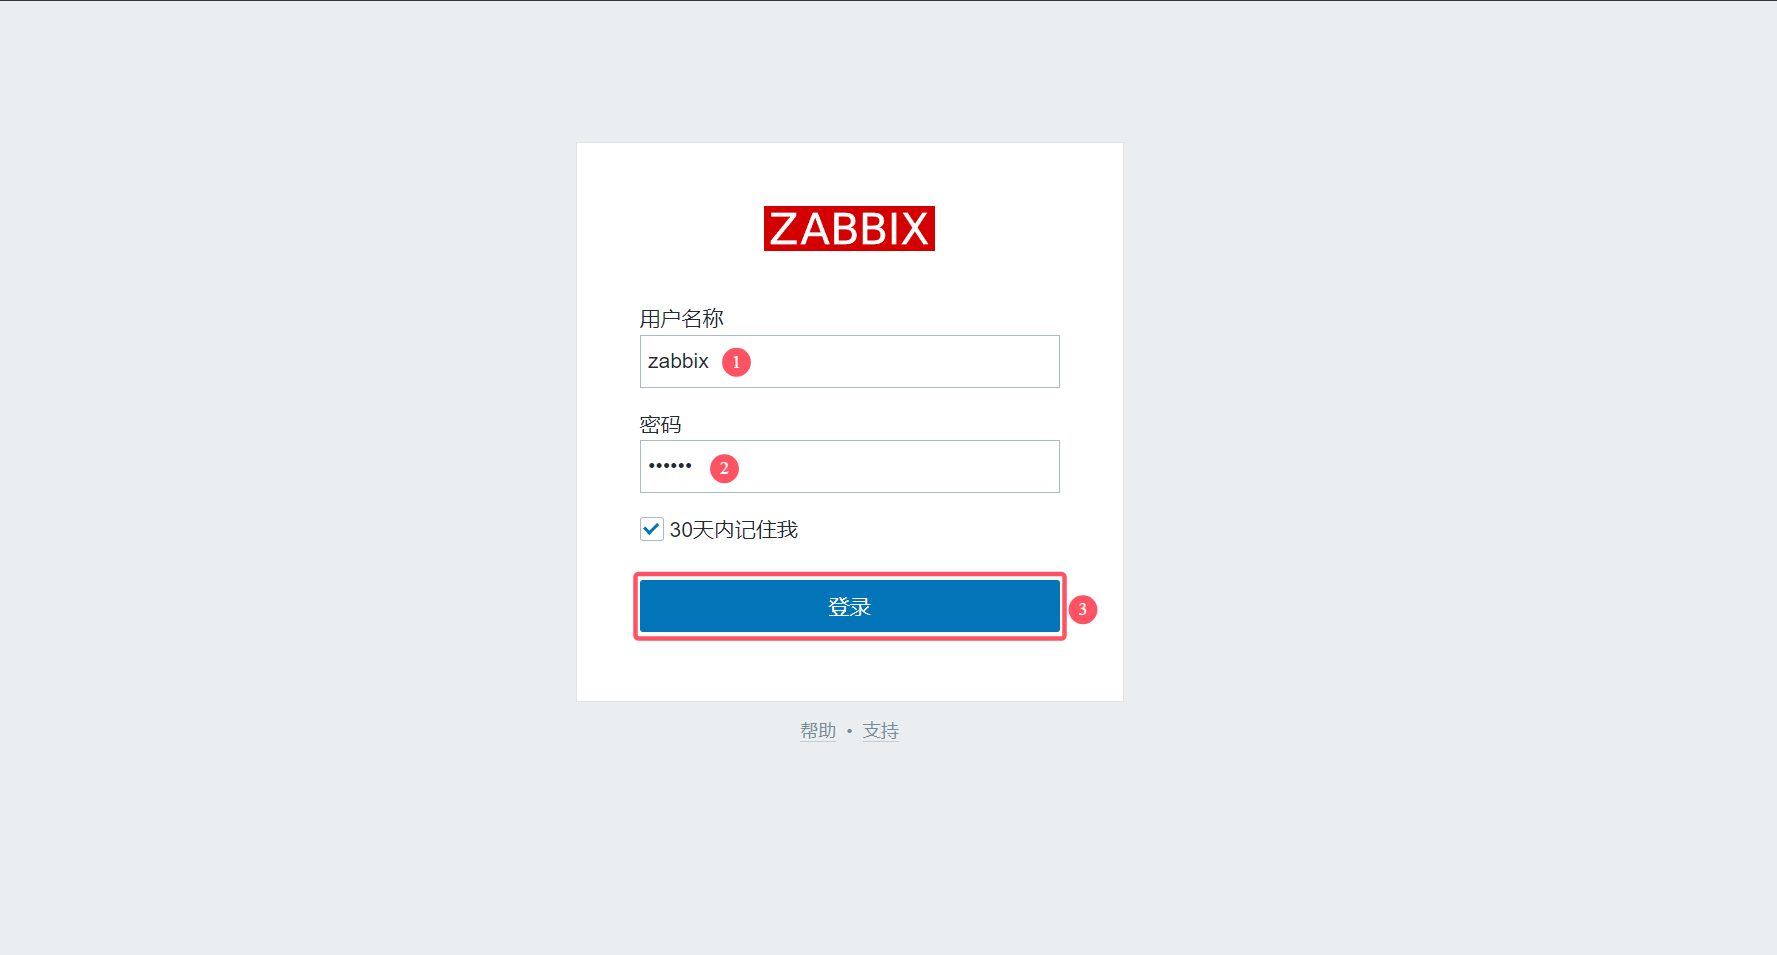
默认用户名为:
Admin密码为:zabbix
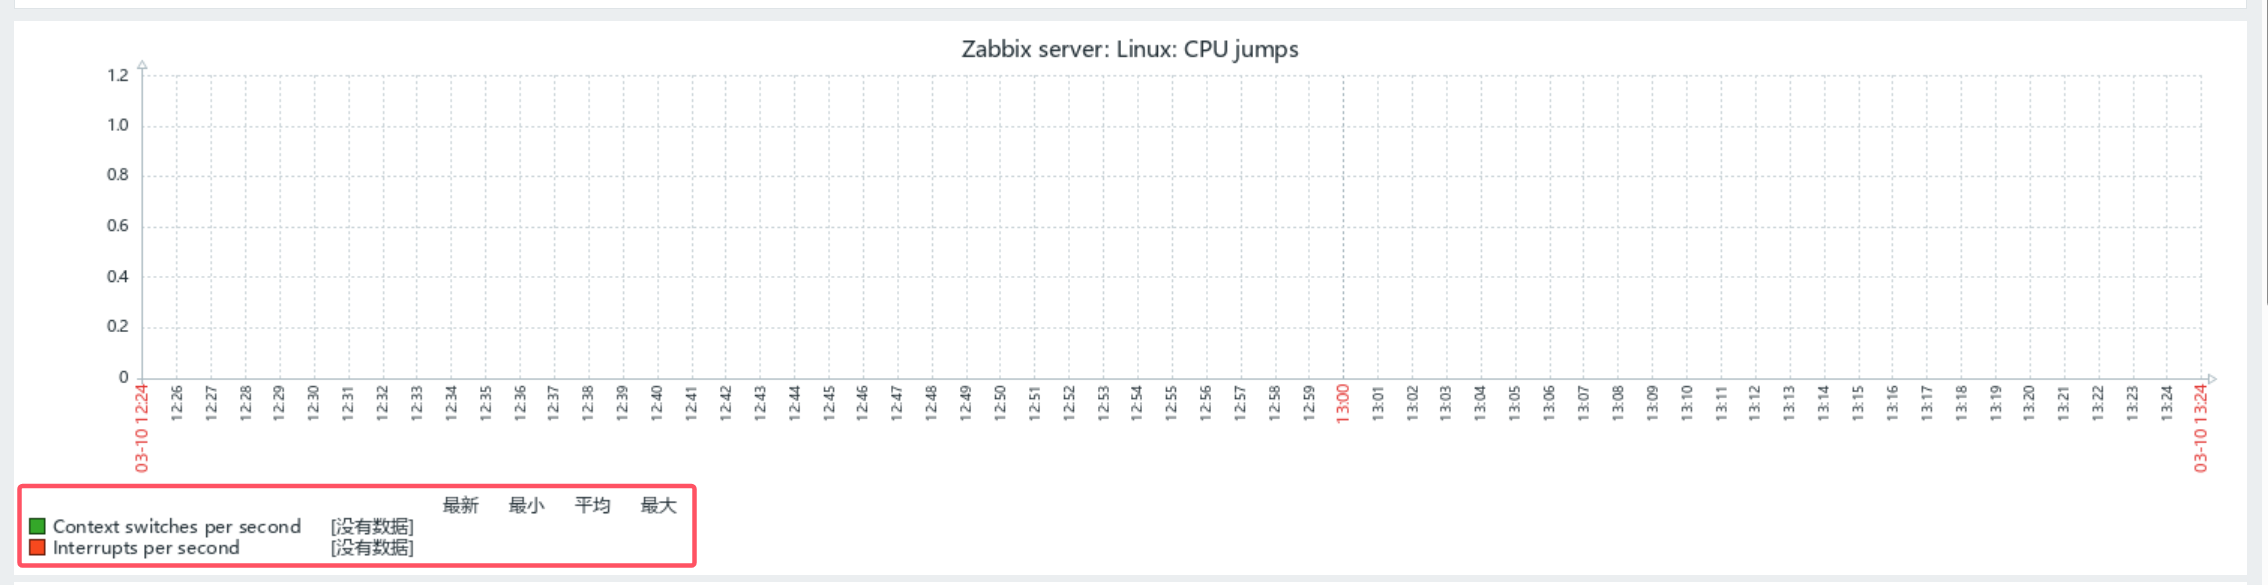
四、修复监控图形中文乱码现象
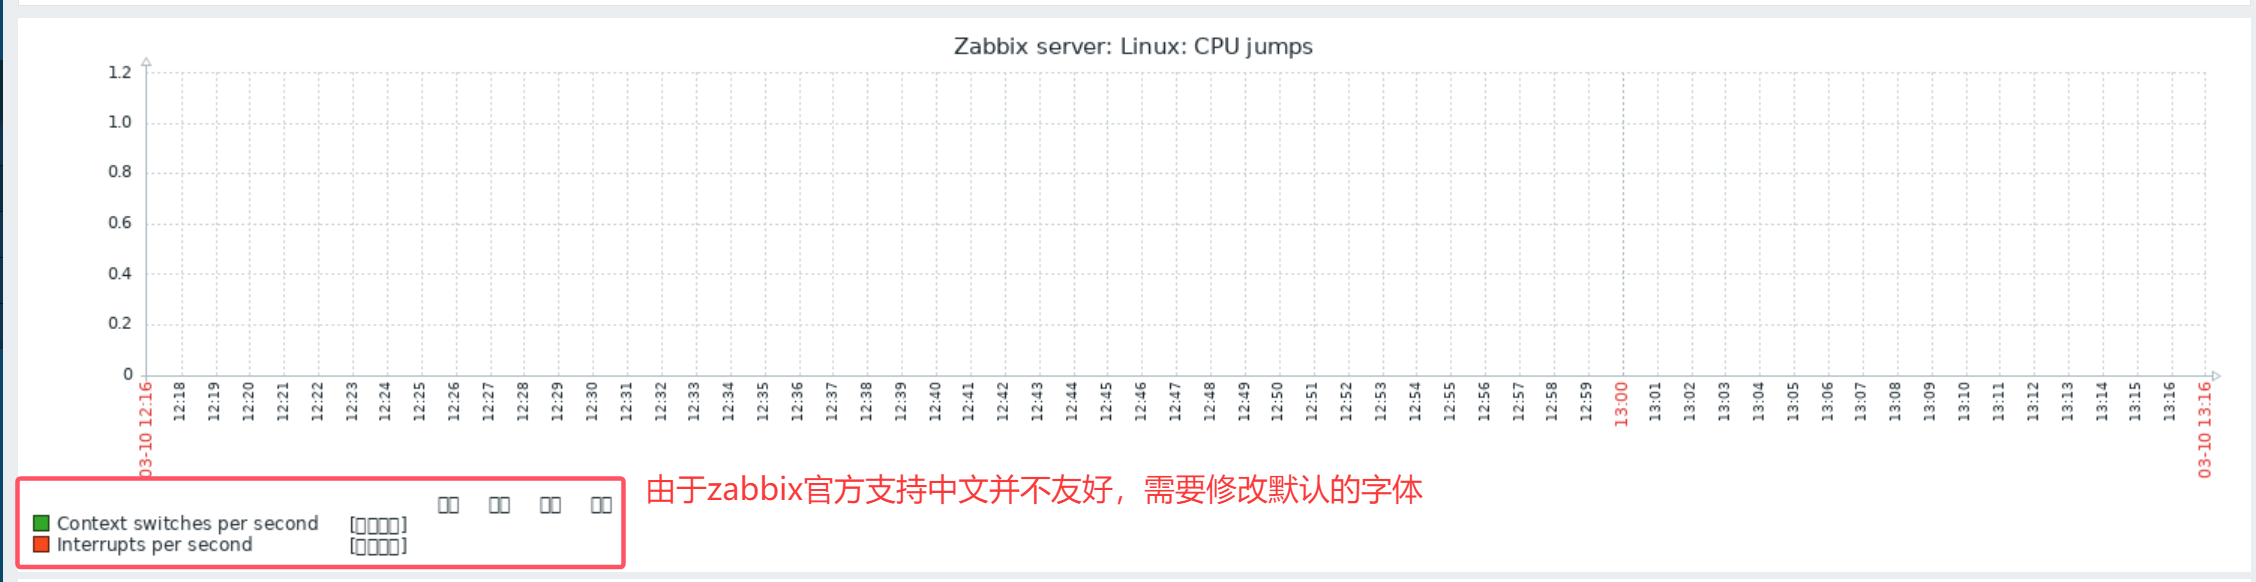
# Step 1:zabbix-server切换字体工作目录cd /usr/share/zabbix/assets/fonts# Step 2:查看上传字体ls msyh.ttc# Step 3:修改默认字体名称mv graphfont.ttf graphfont.ttf.bak# Step 4:更改新字体名称mv msyh.ttc graphfont.ttf 回到zabbix-server dashboard界面,刷新后重试。
五、配置Grafana作为图形展示
官网:Download Grafana | Grafana Labs
# Step 1:安装Grafanadnf install -y https://dl.grafana.com/oss/release/grafana-11.5.2-1.x86_64.rpm# Step 2:启动Grafanasystemctl enable --now grafana-server# Step 3:访问Grafanahttp://IP:3000
默认用户名密码均为:
admin
# Step 1:Grafana查看zabbix插件grafana-cli plugins list-remote | grep -i zabbix
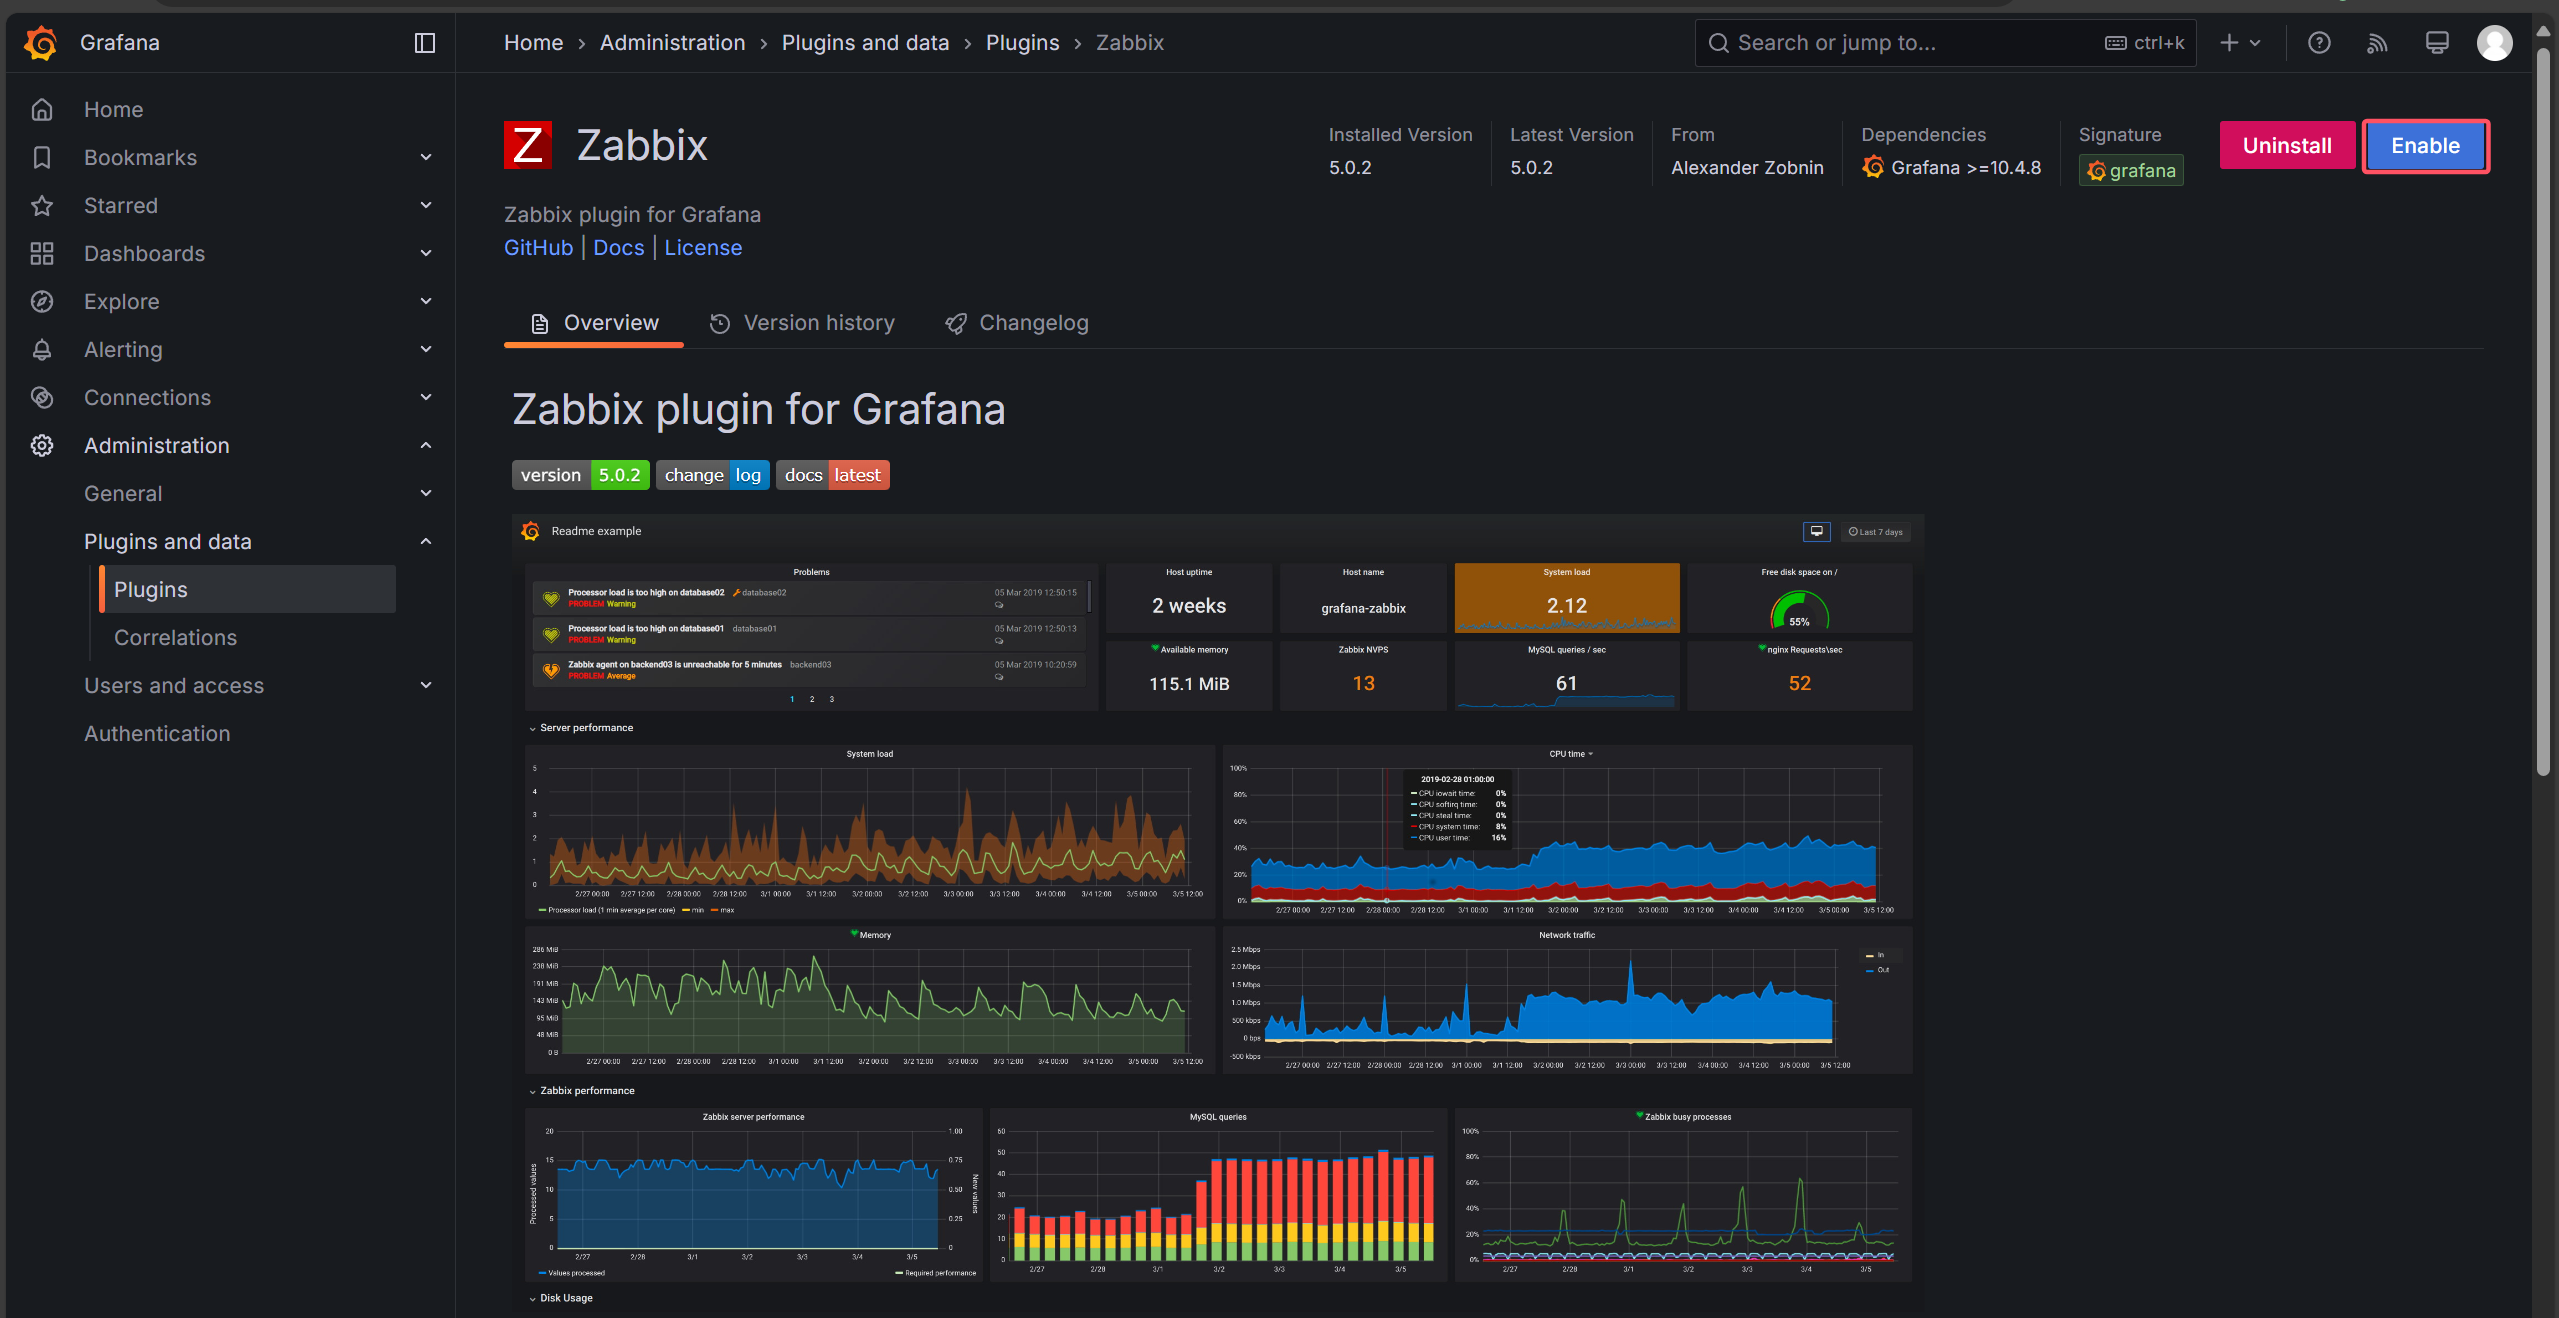
# Step 2:安装插件grafana-cli plugins install alexanderzobnin-zabbix-app 5.0.2
# Step 3:重启Granafasystemctl restart grafana-server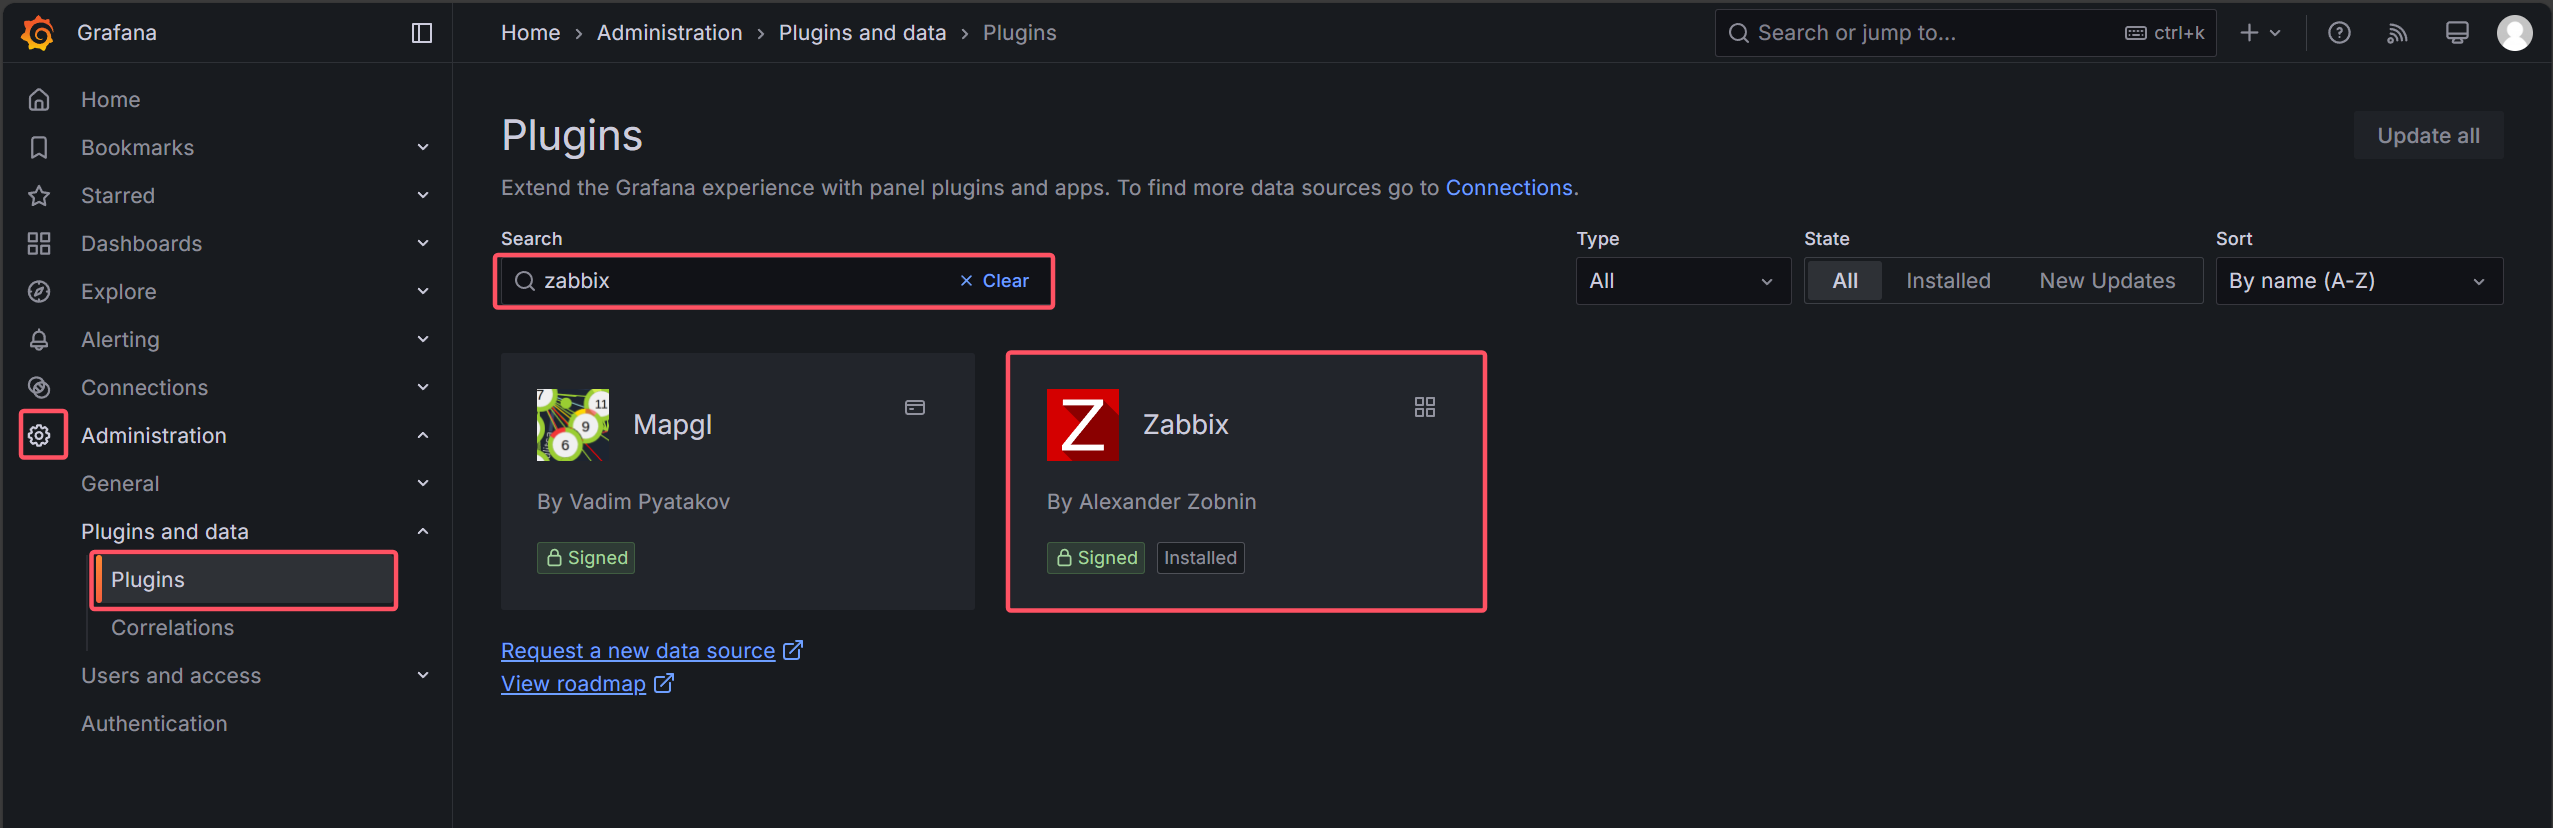

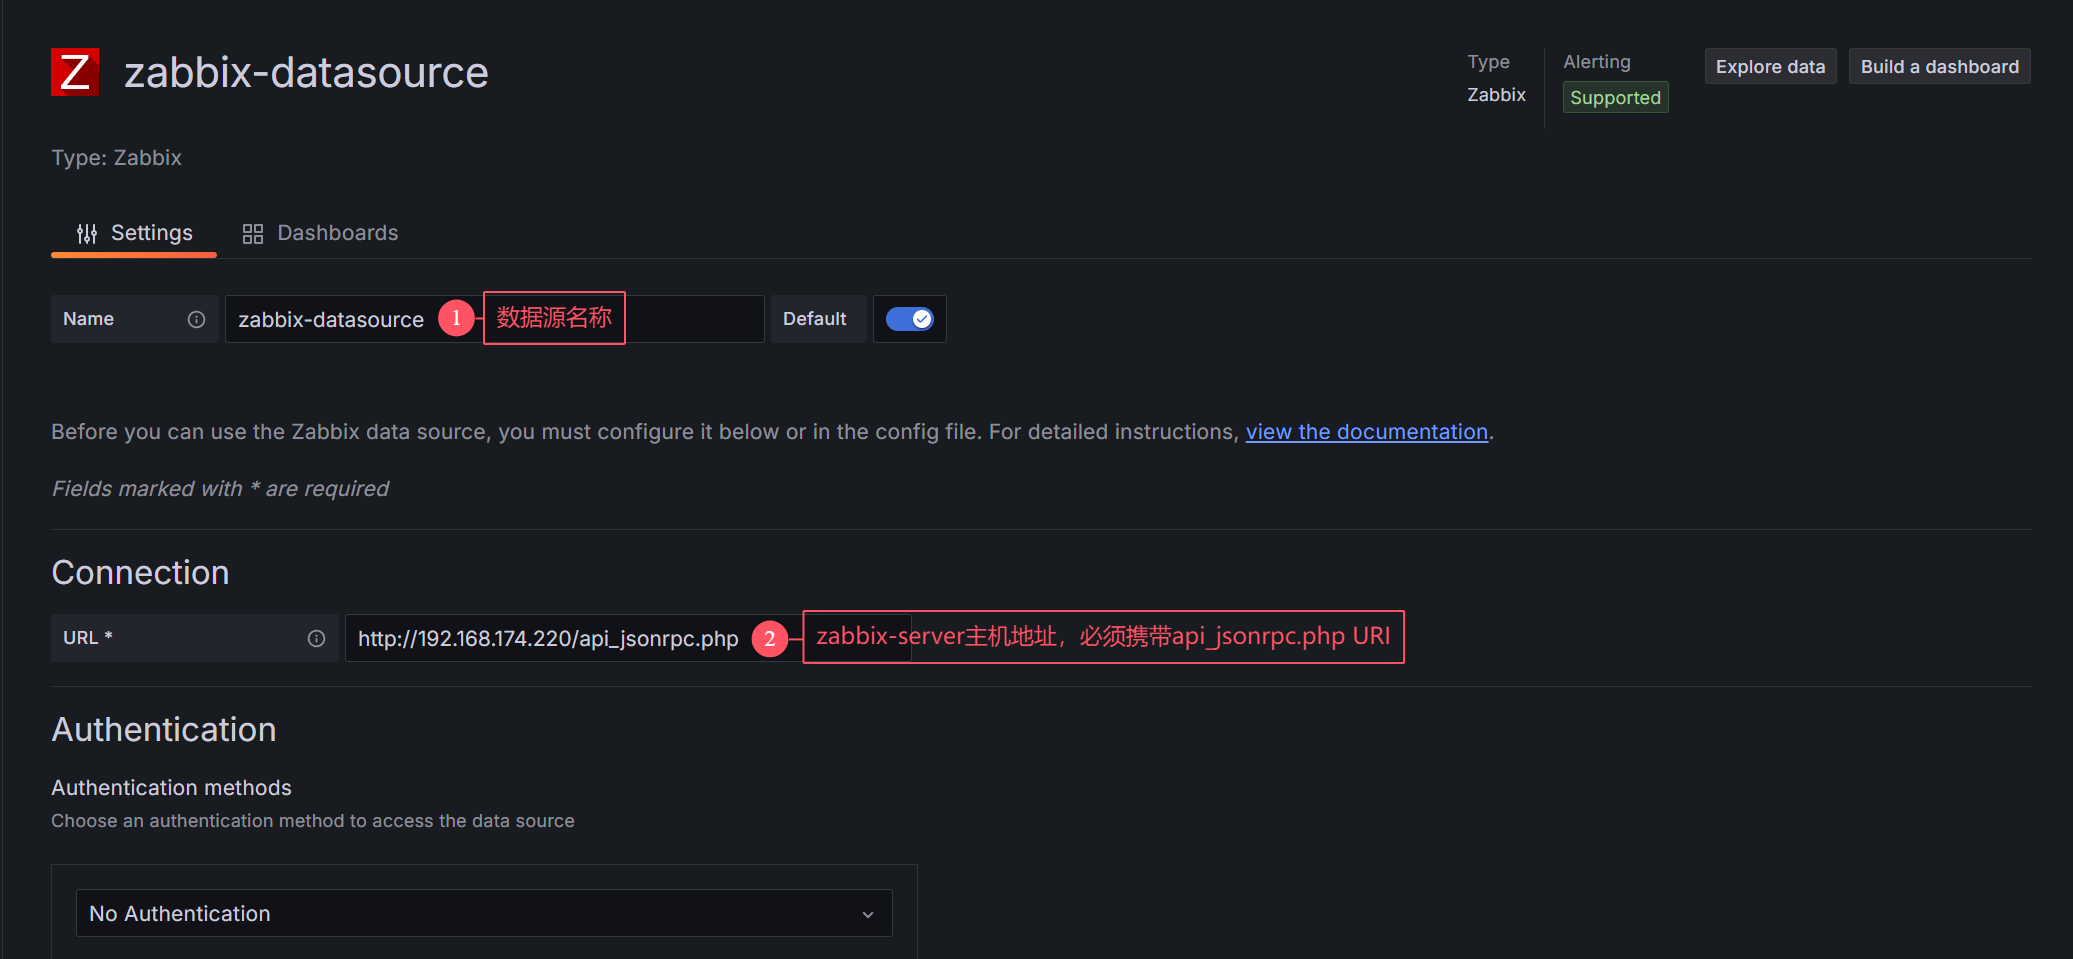
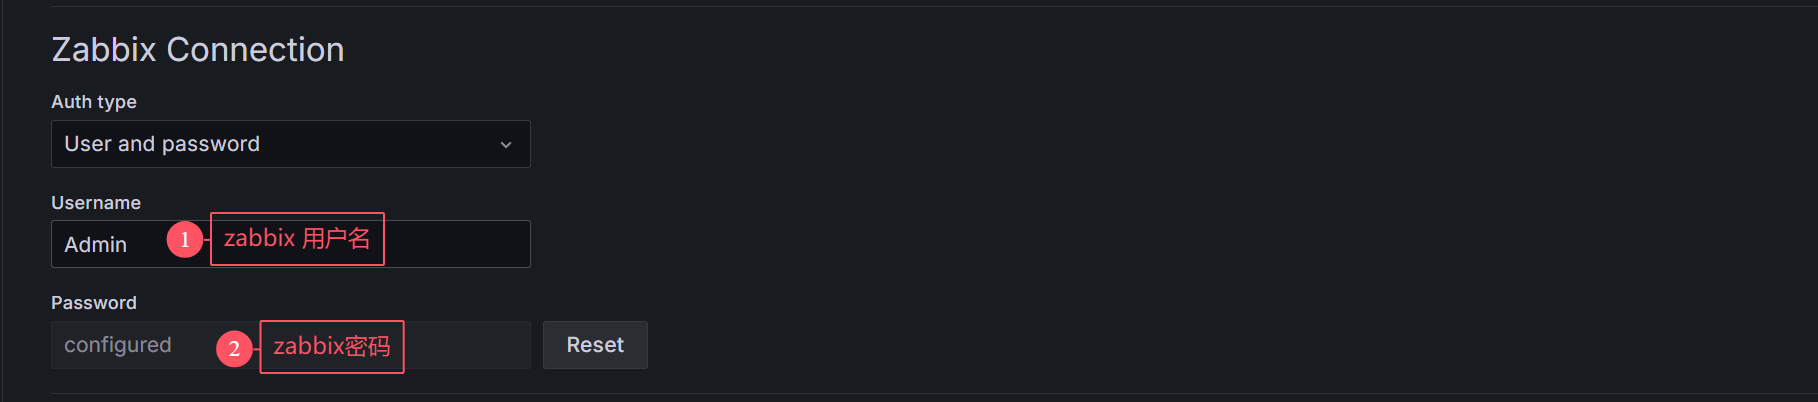
http://192.168.174.220/api_jsonrpc.php
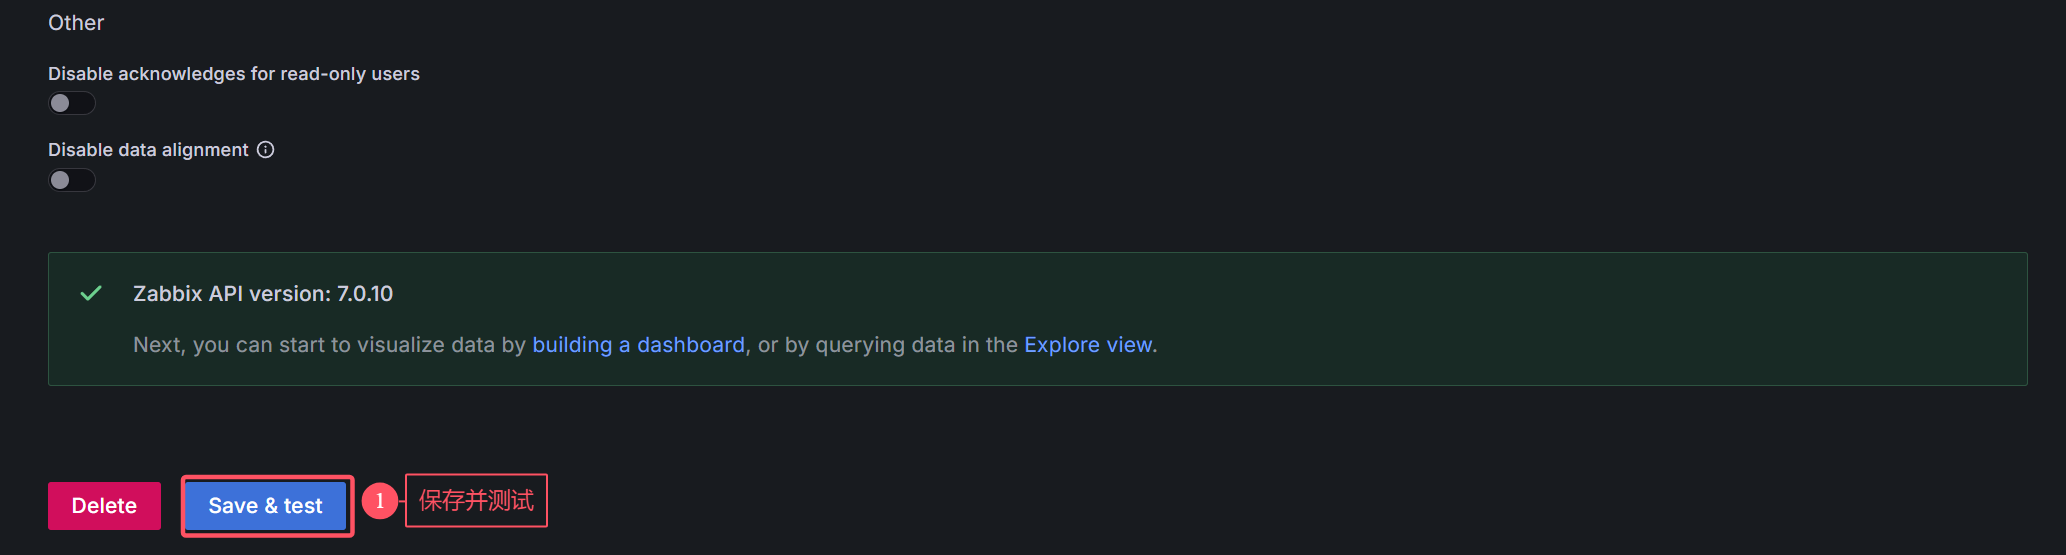
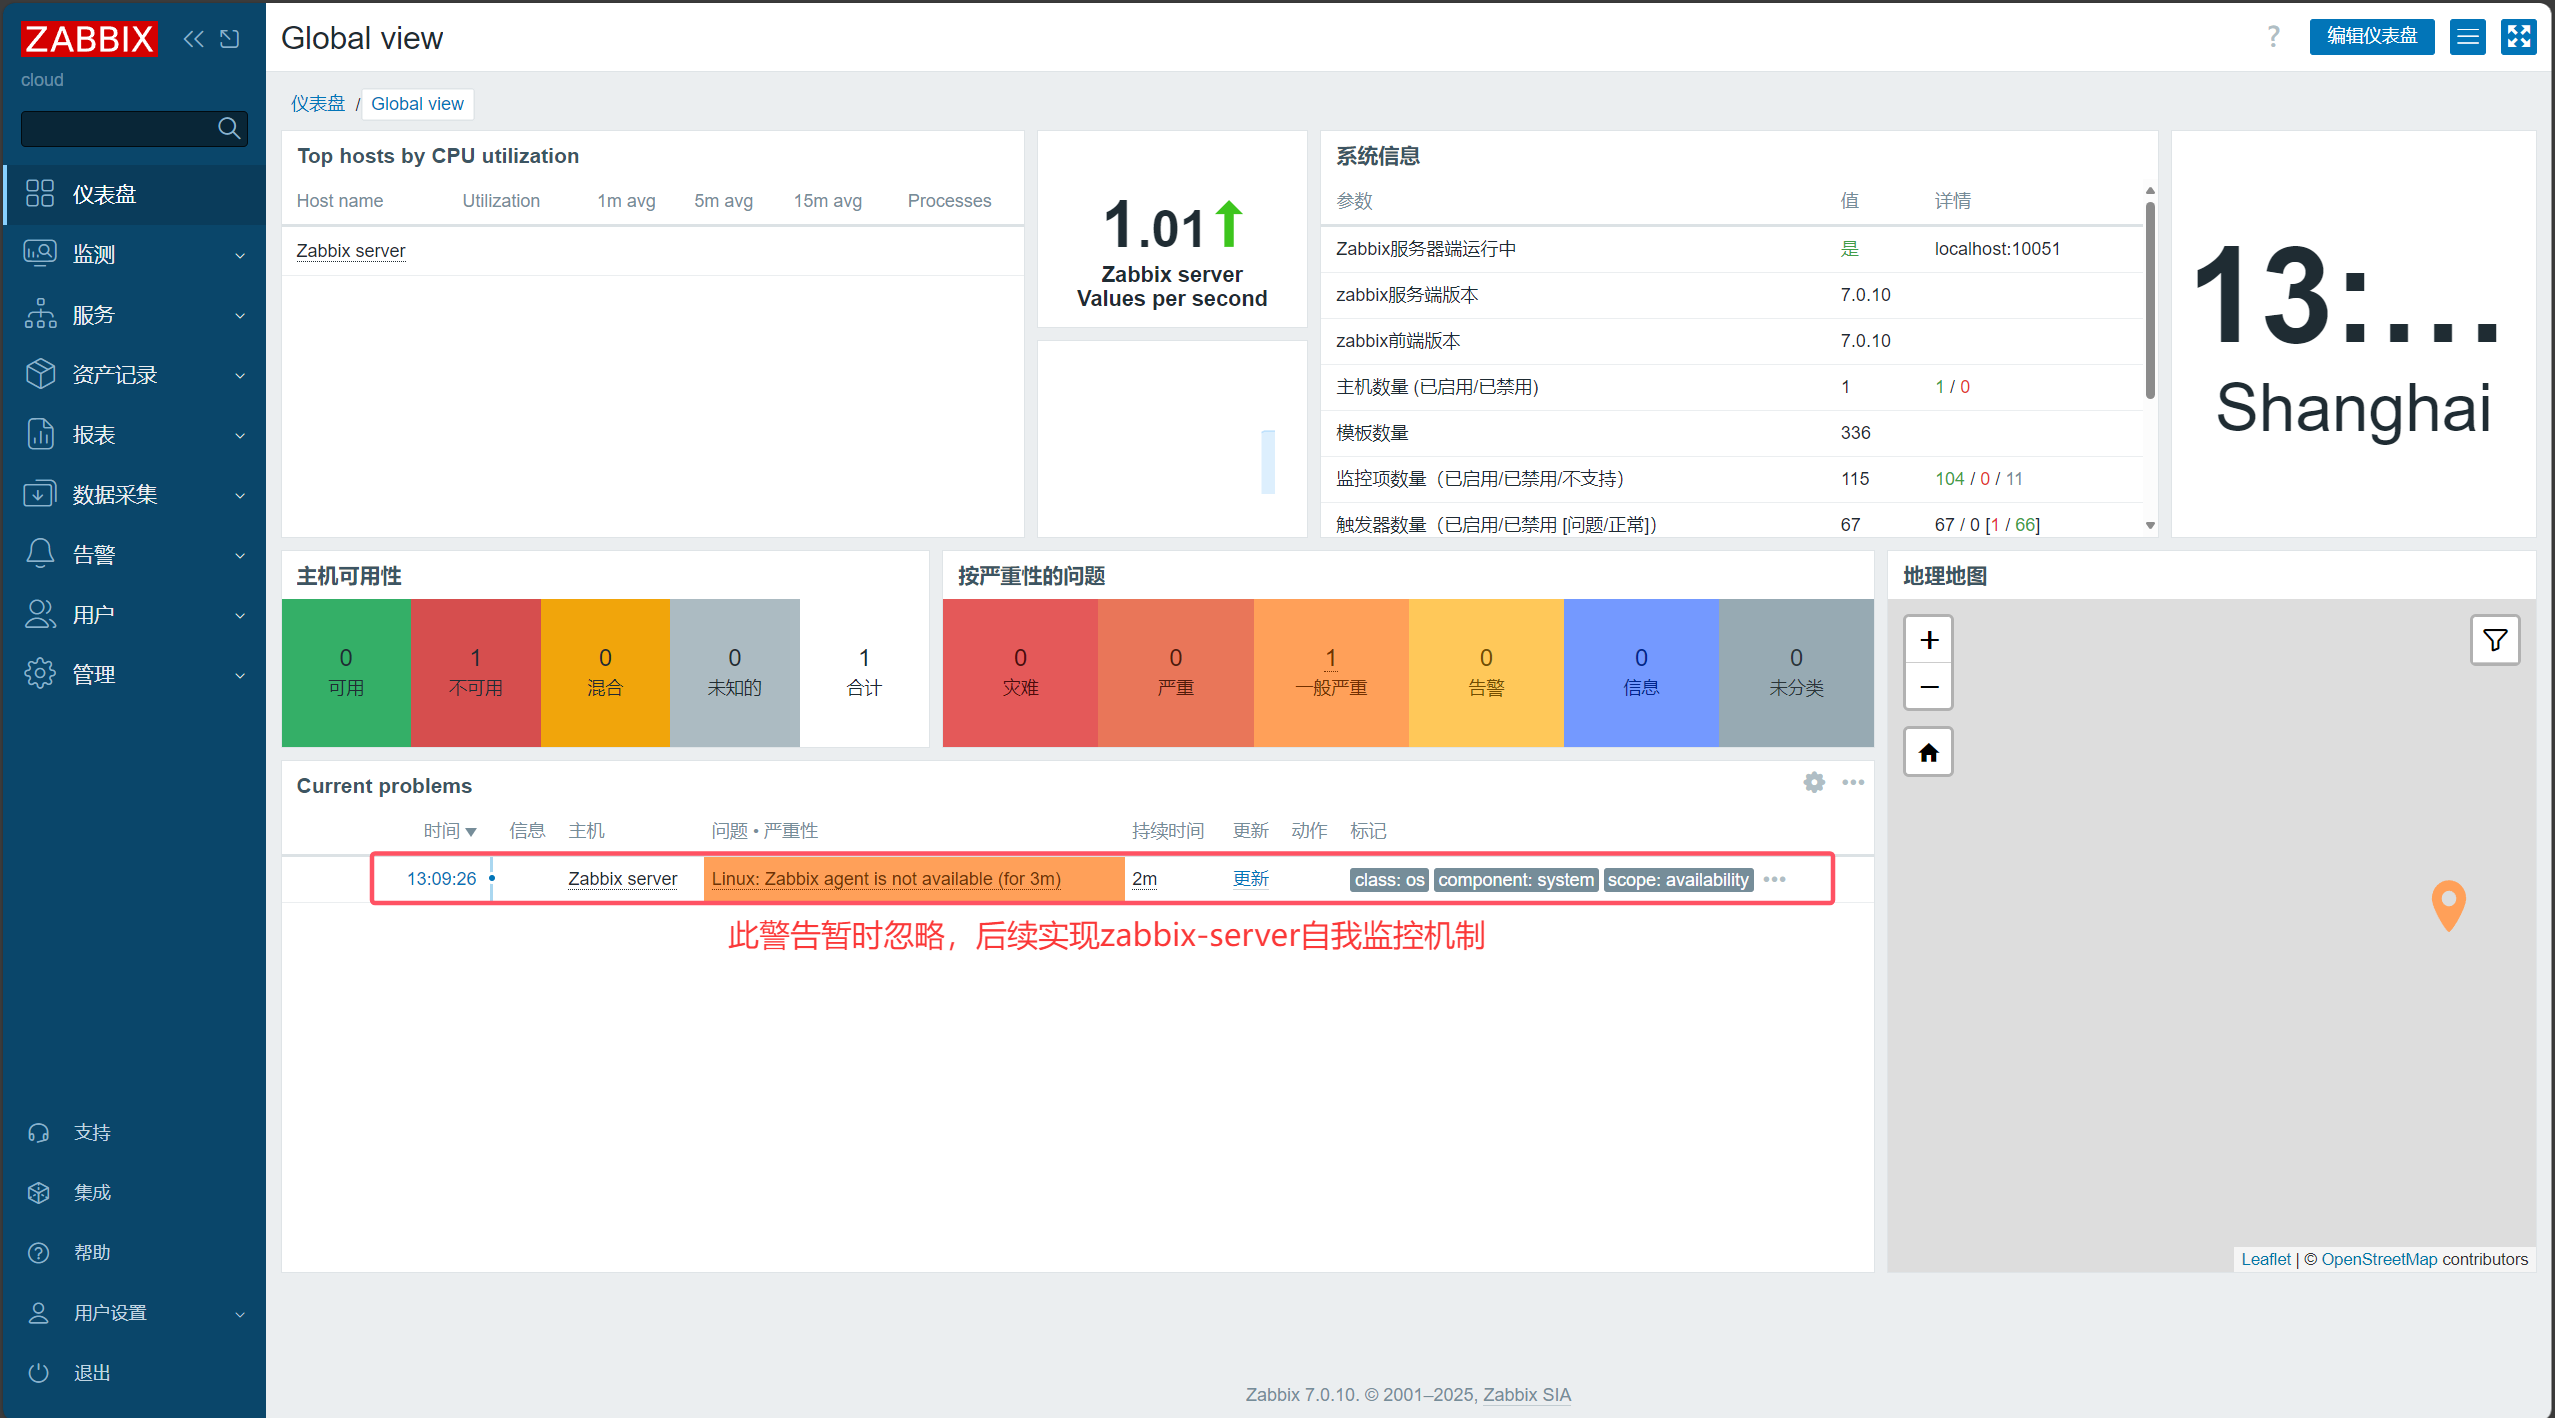
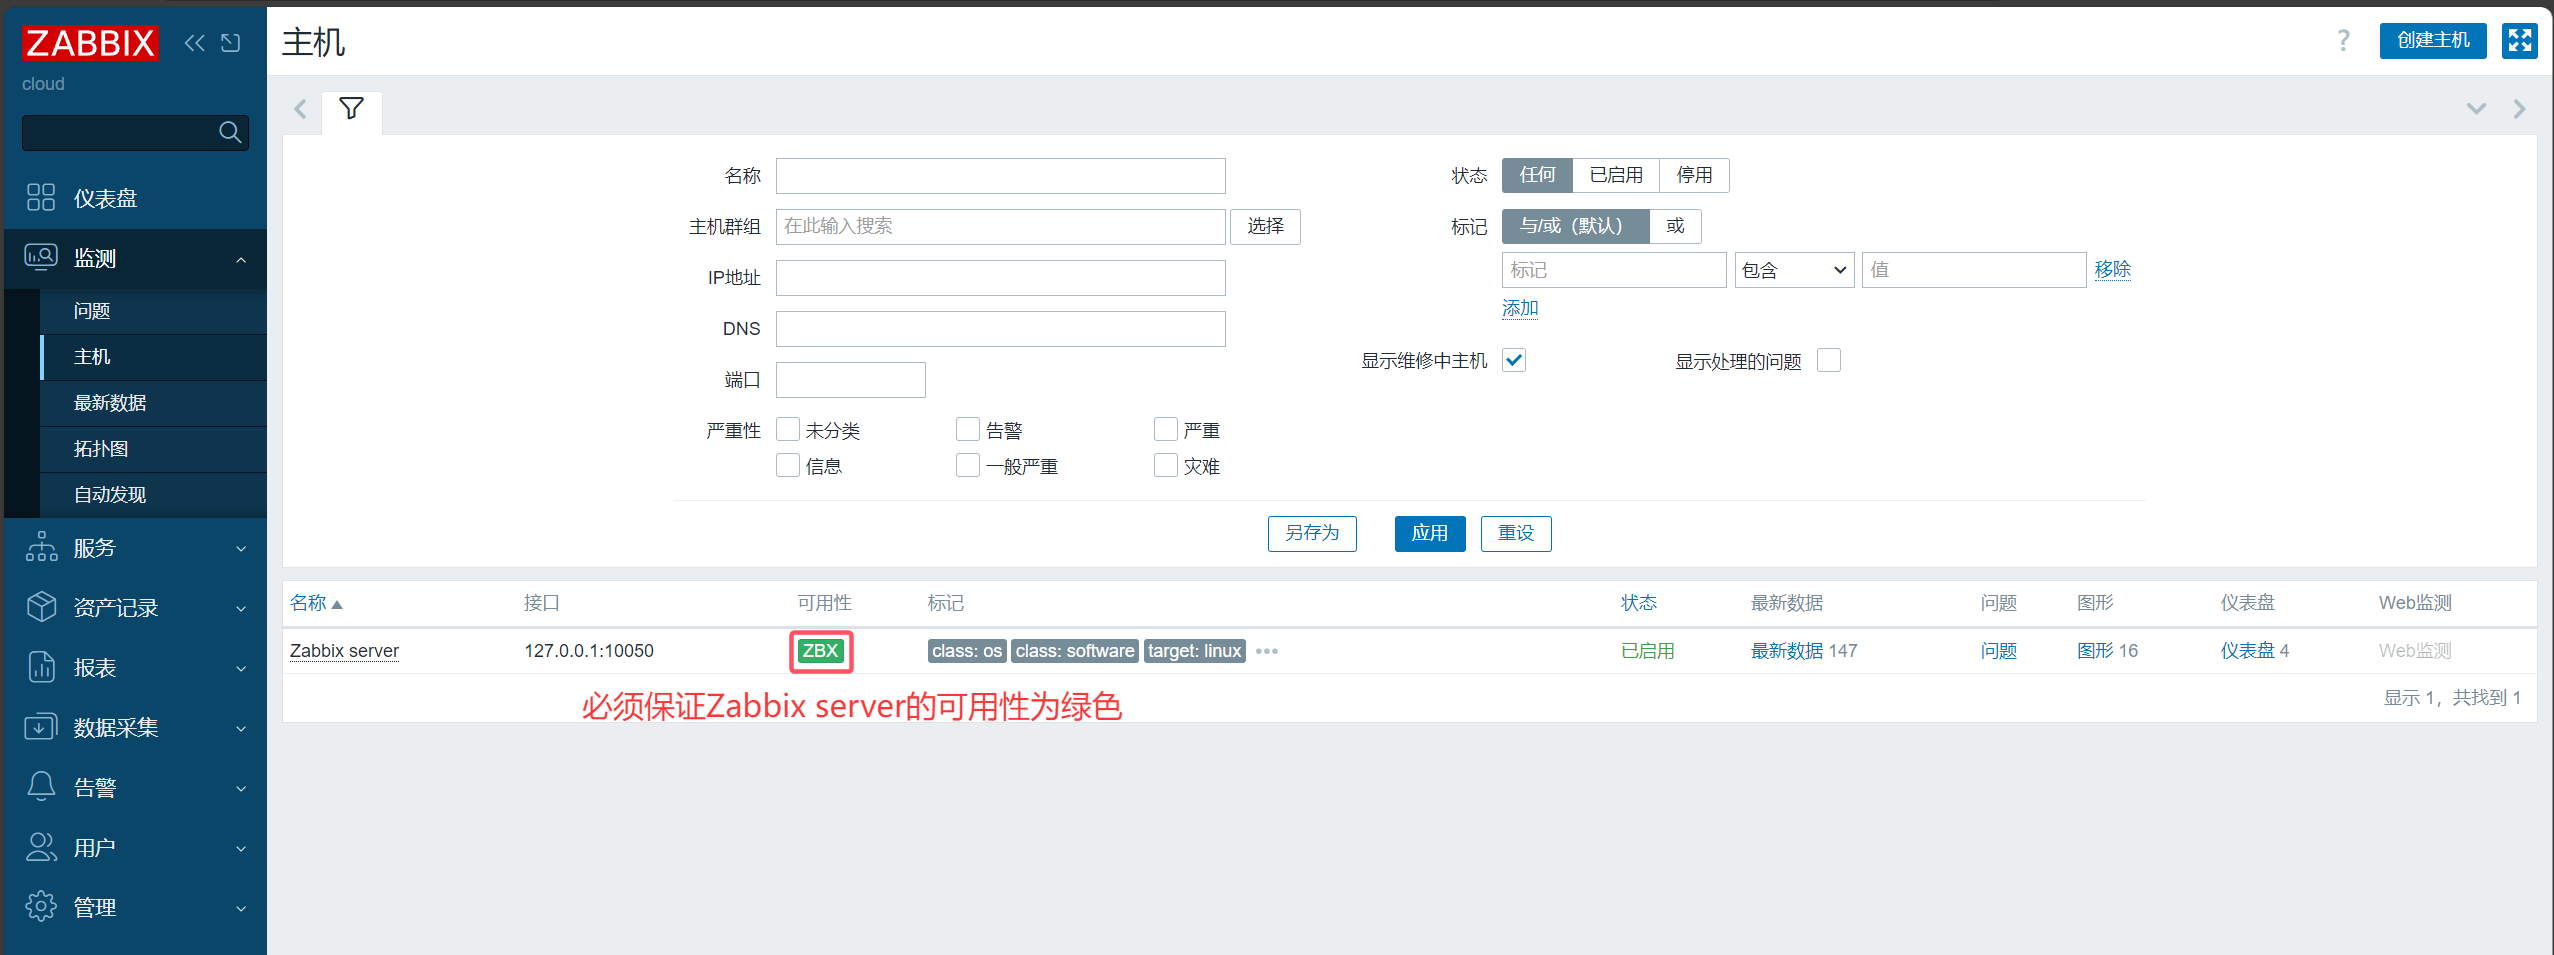
六、zabbix-server实现自我监控
# Step 1:修改zabbix-agent2配置文件vim /etc/zabbix/zabbix_agent2.confHostname=zabbix-server# Step 2:启动zabbix-agent2systemctl enable --now zabbix-agent2# Step 3:查看zabbix-agent2状态systemctl status zabbix-agent2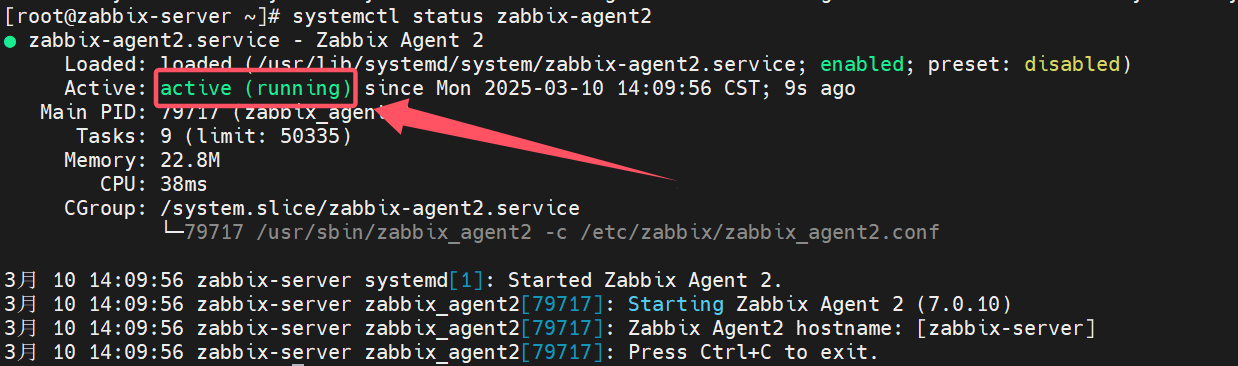
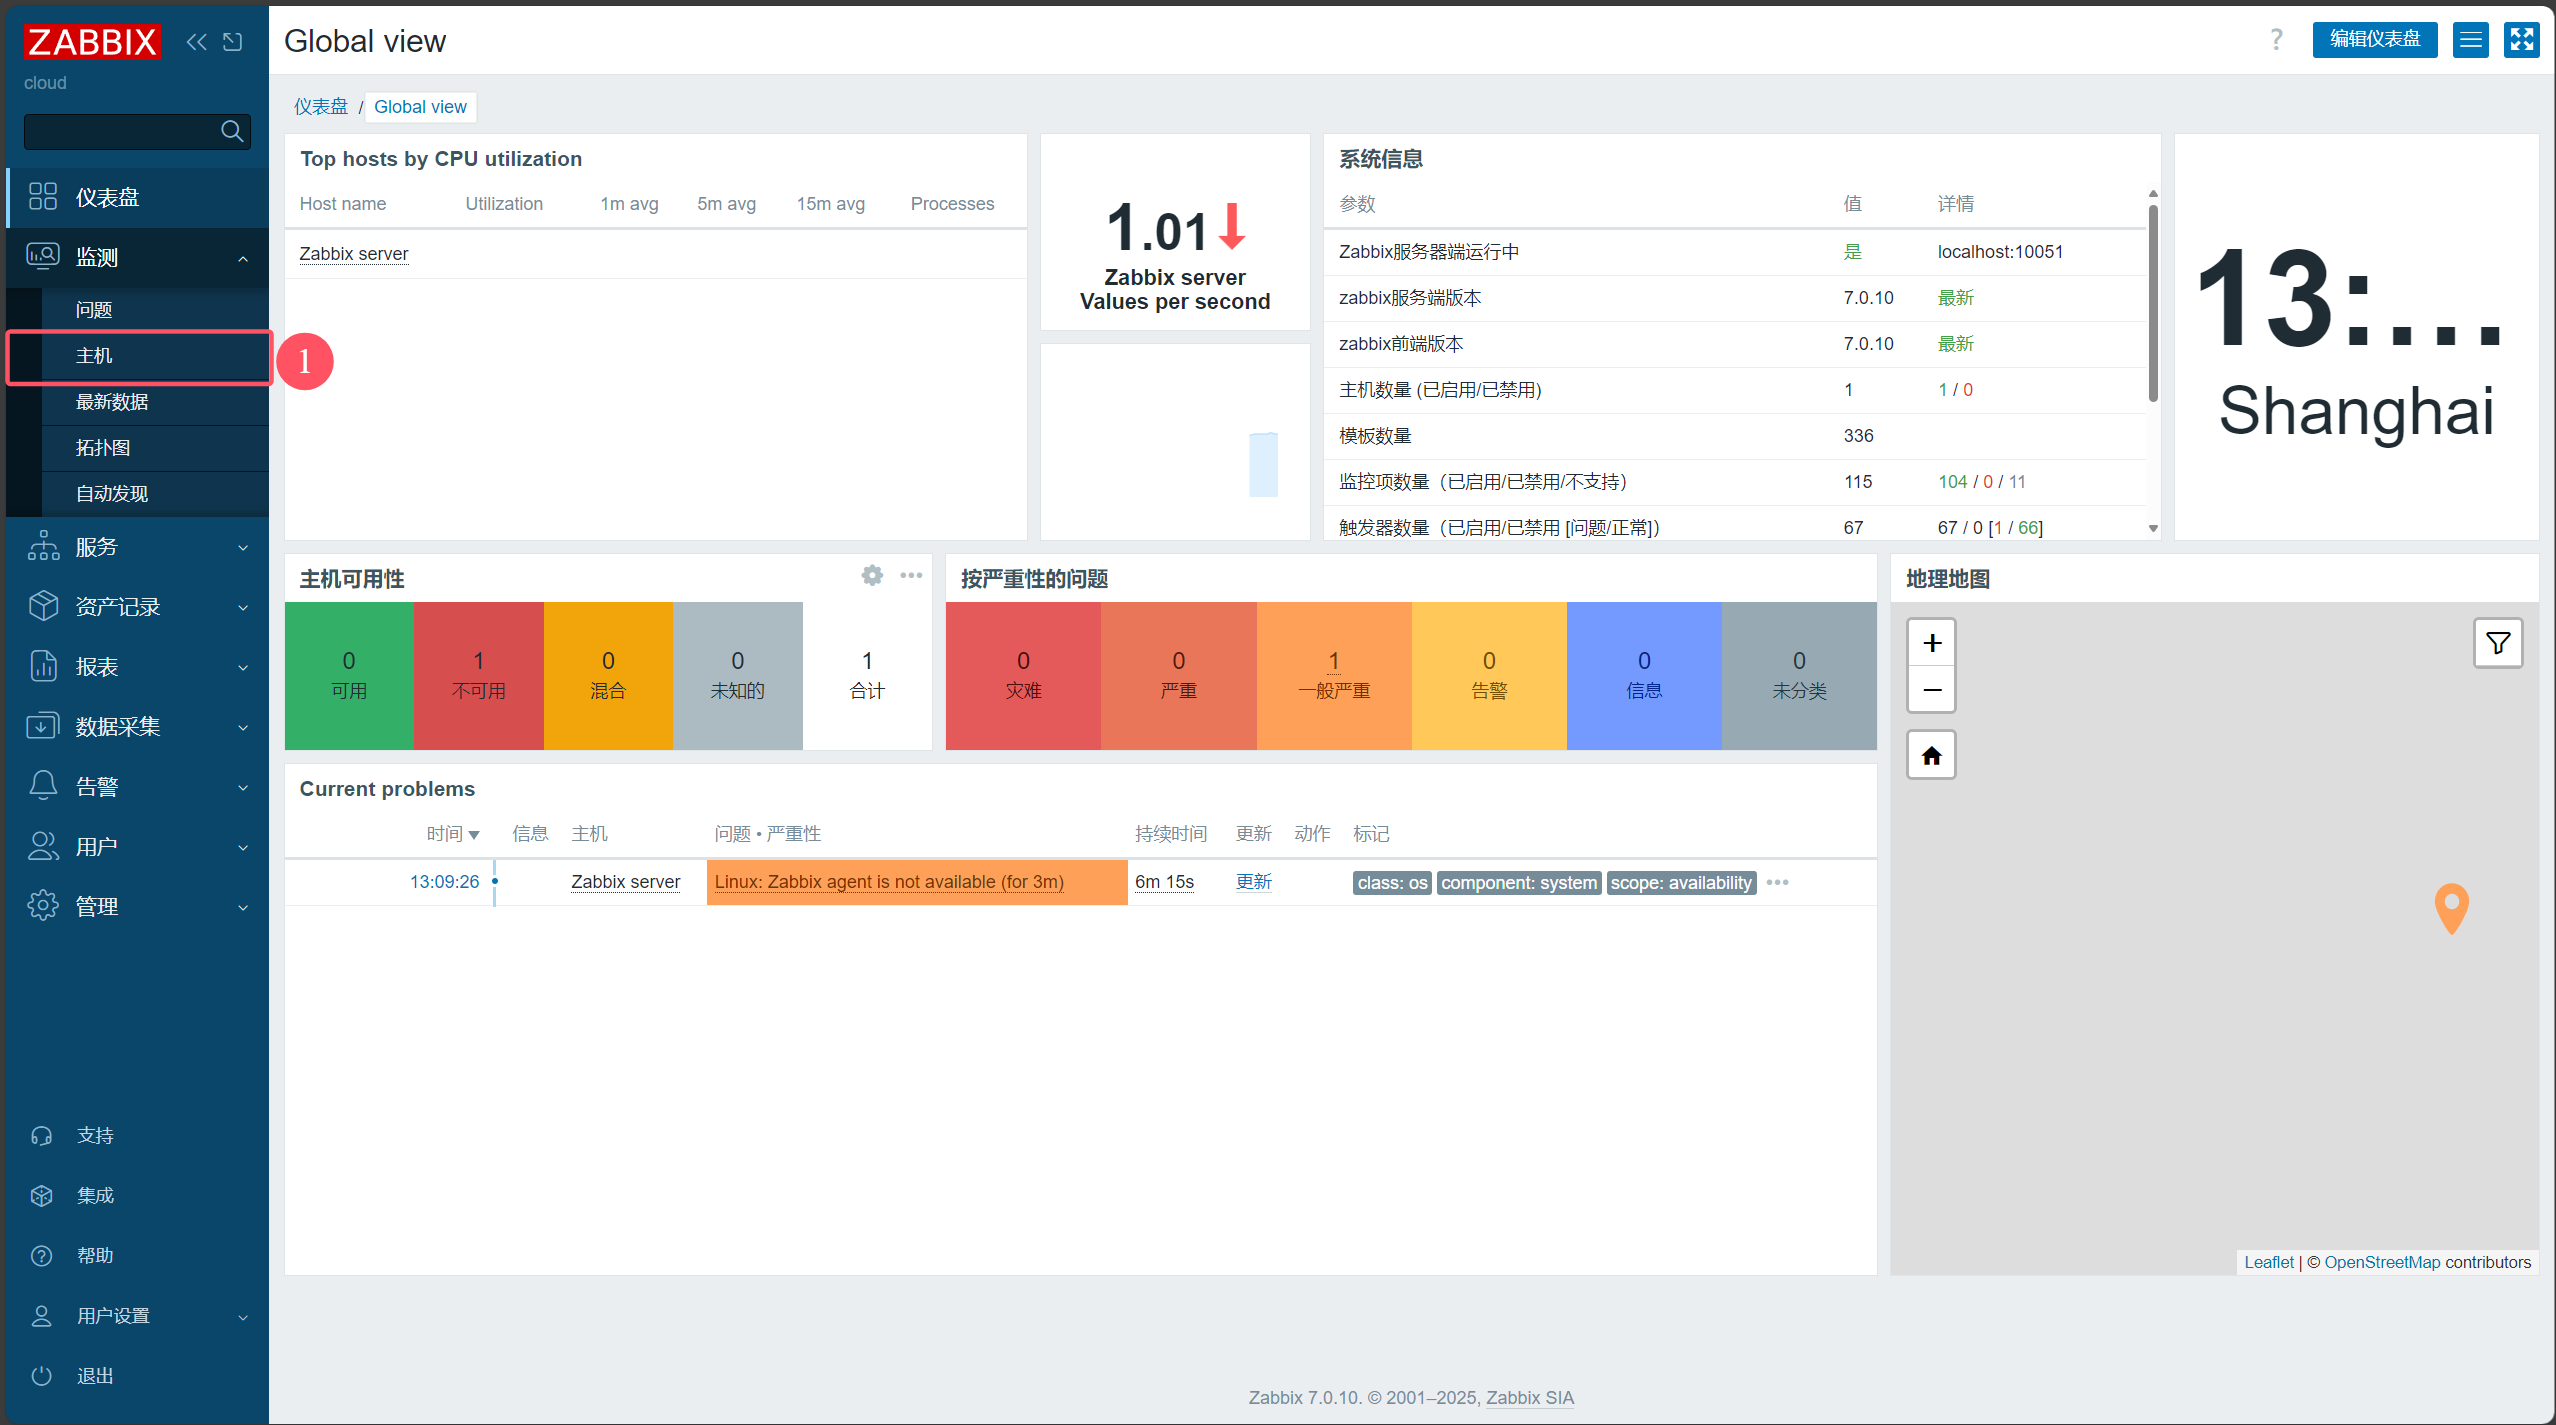
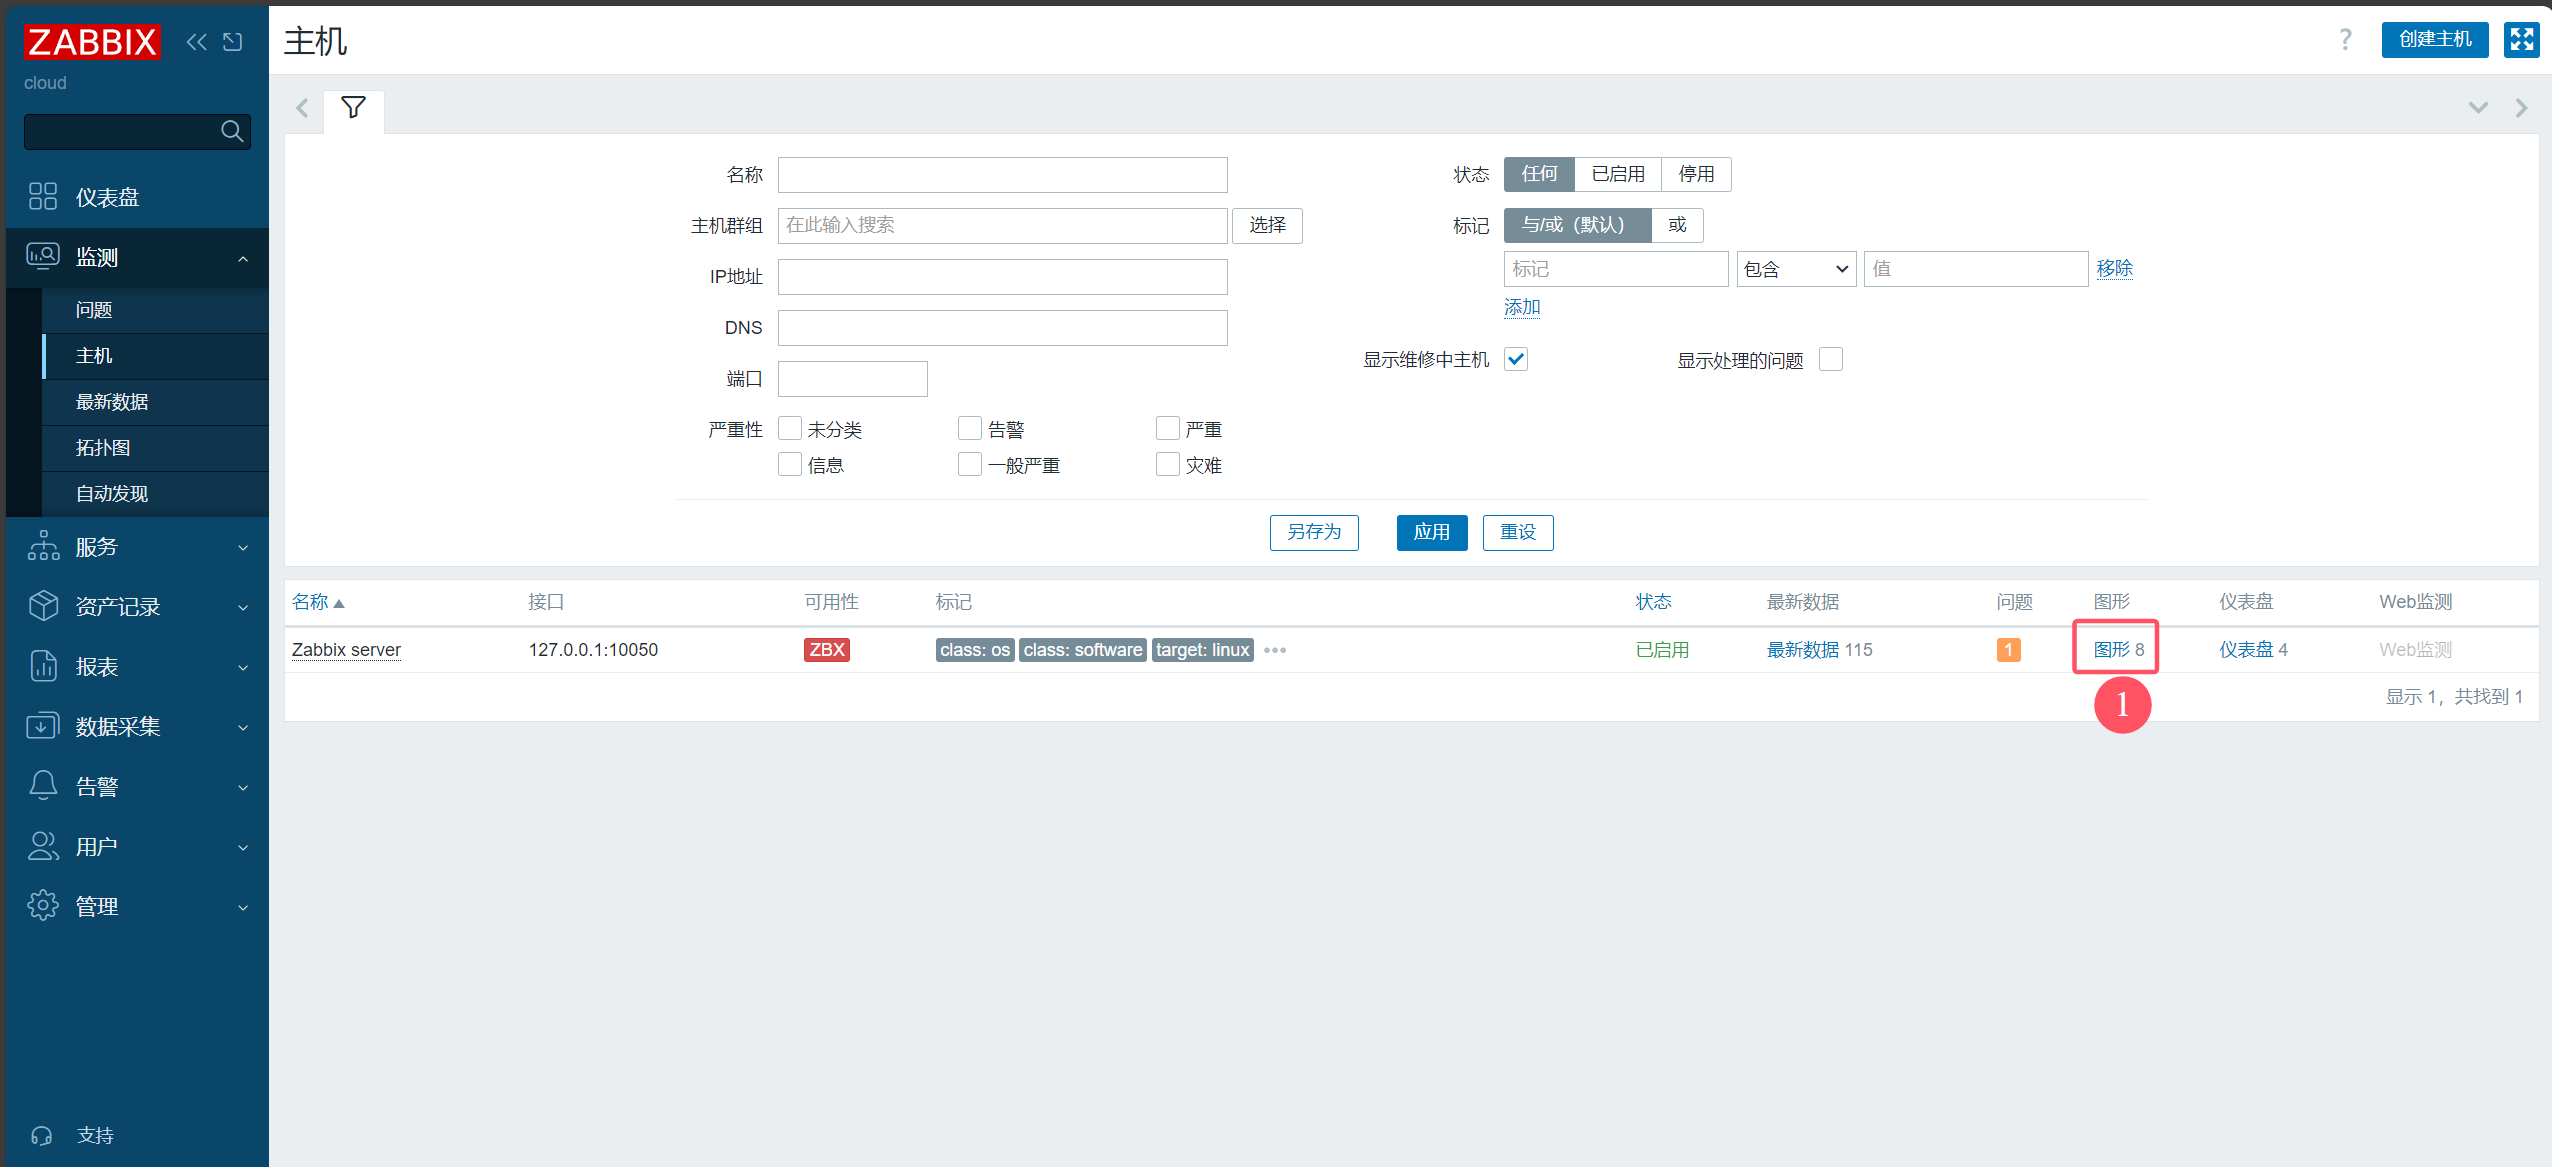
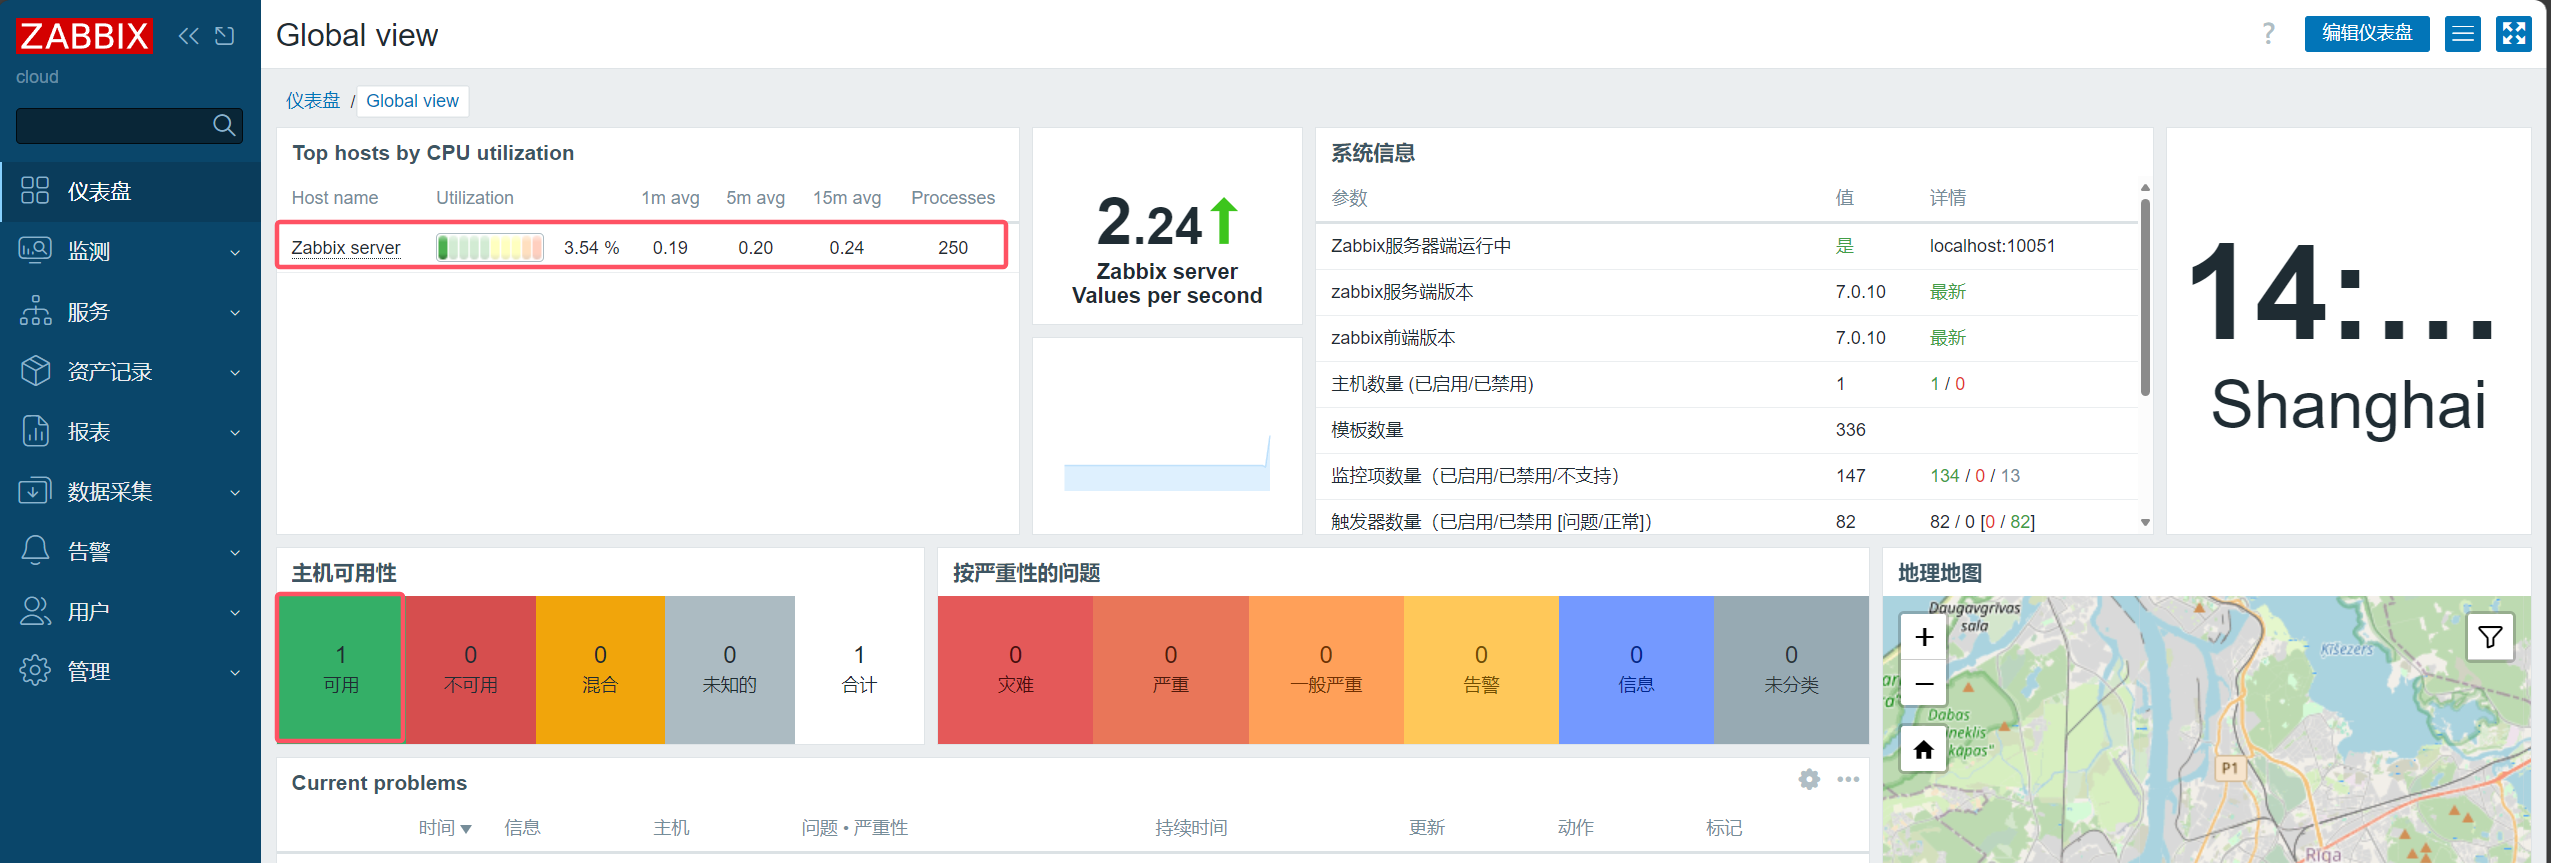
6.1 zabbix dashboard查看
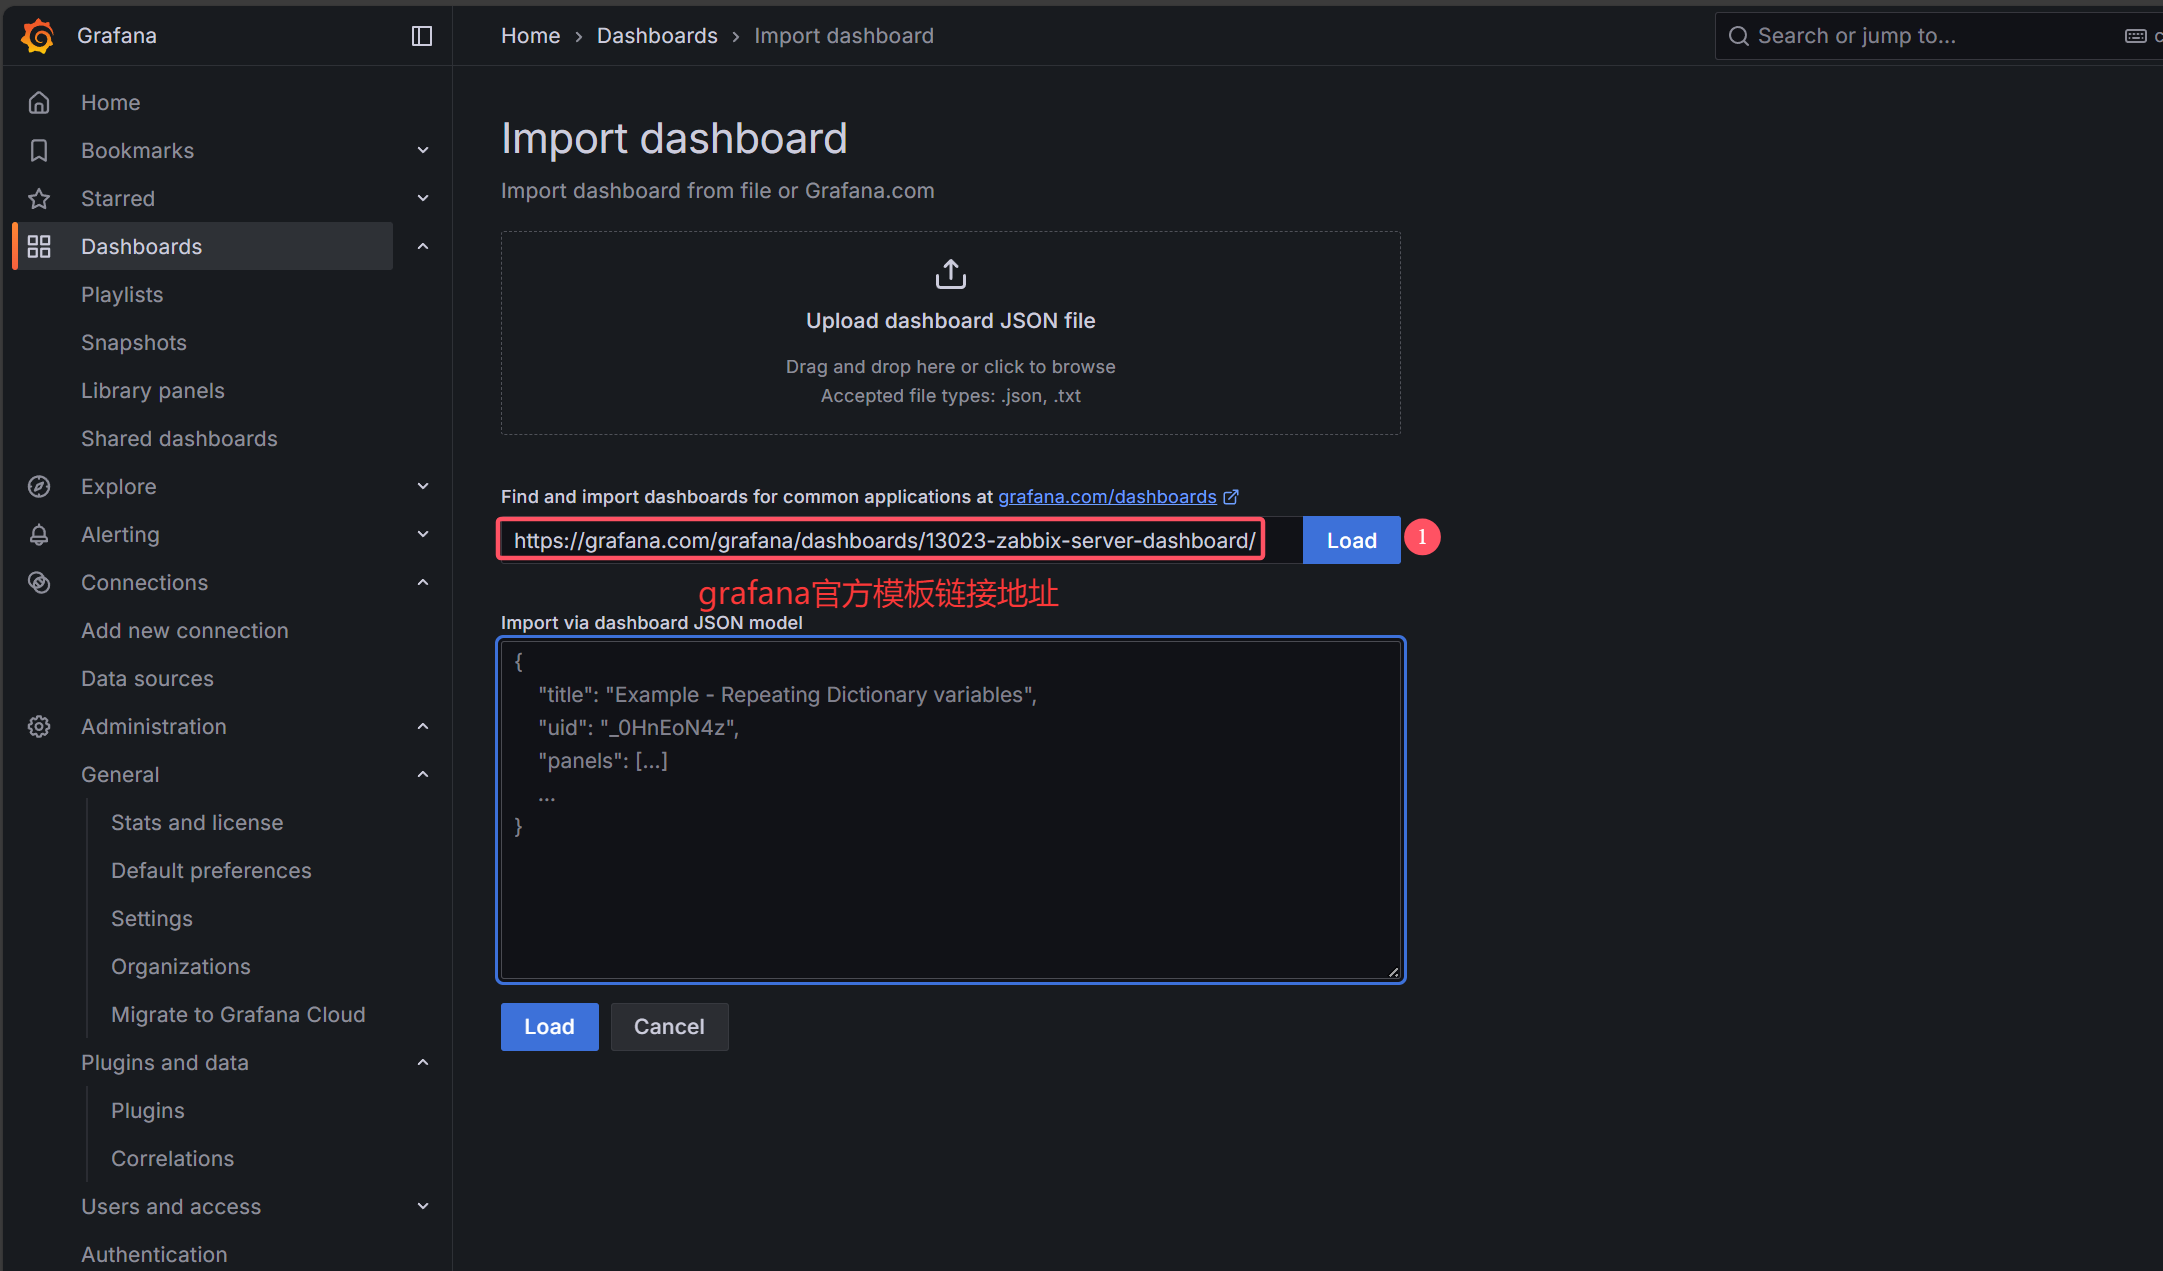
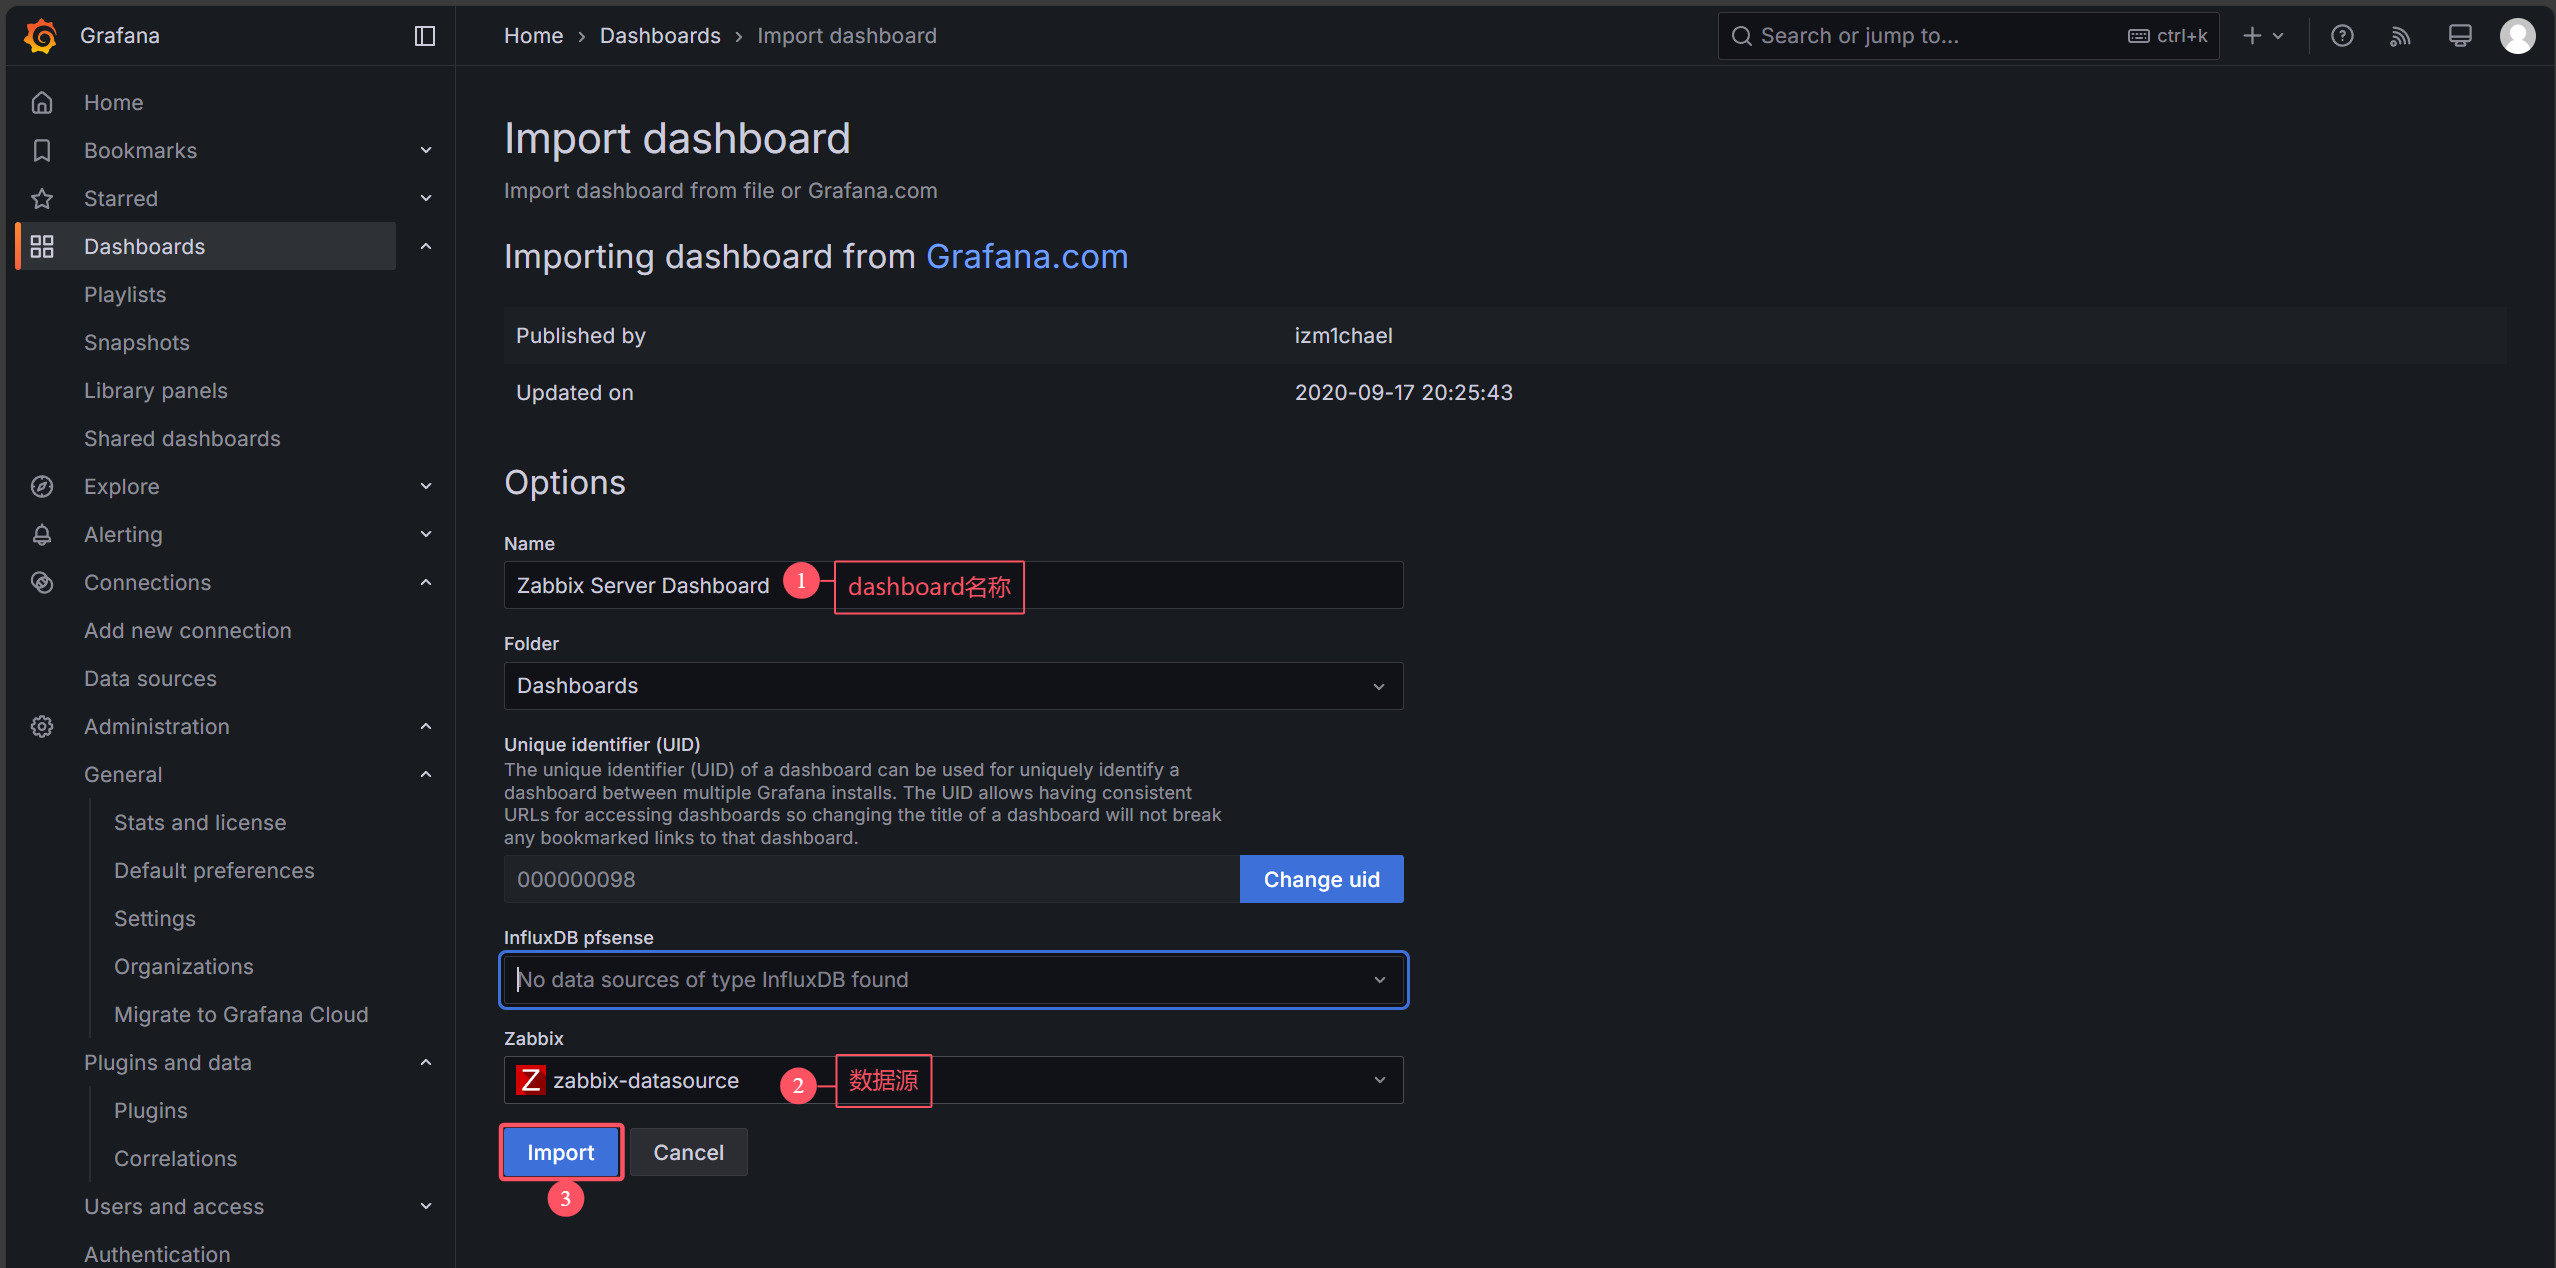
6.2 Grafana查看
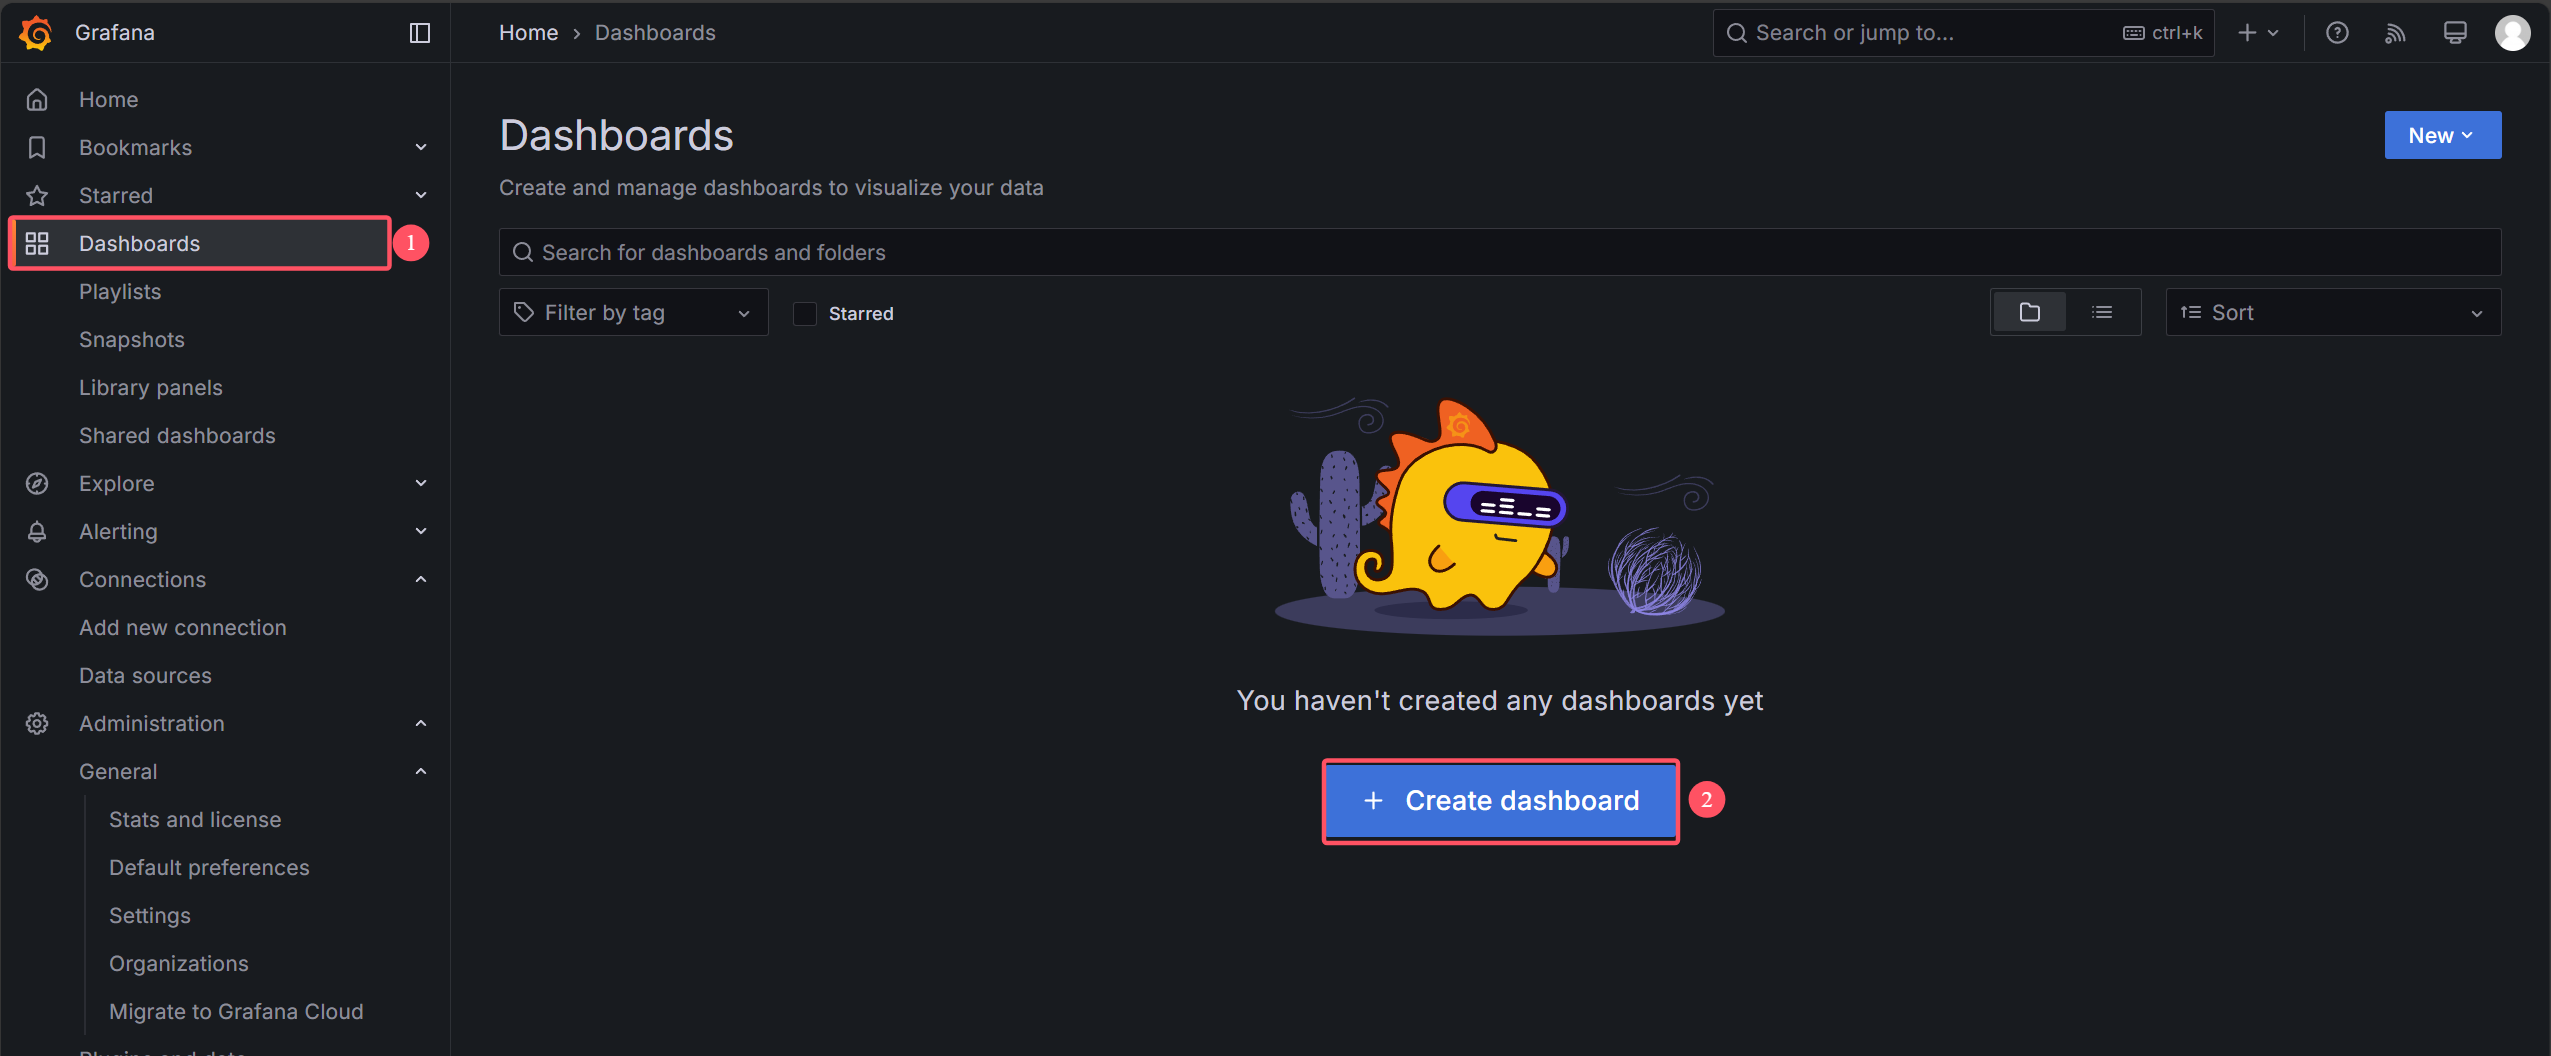
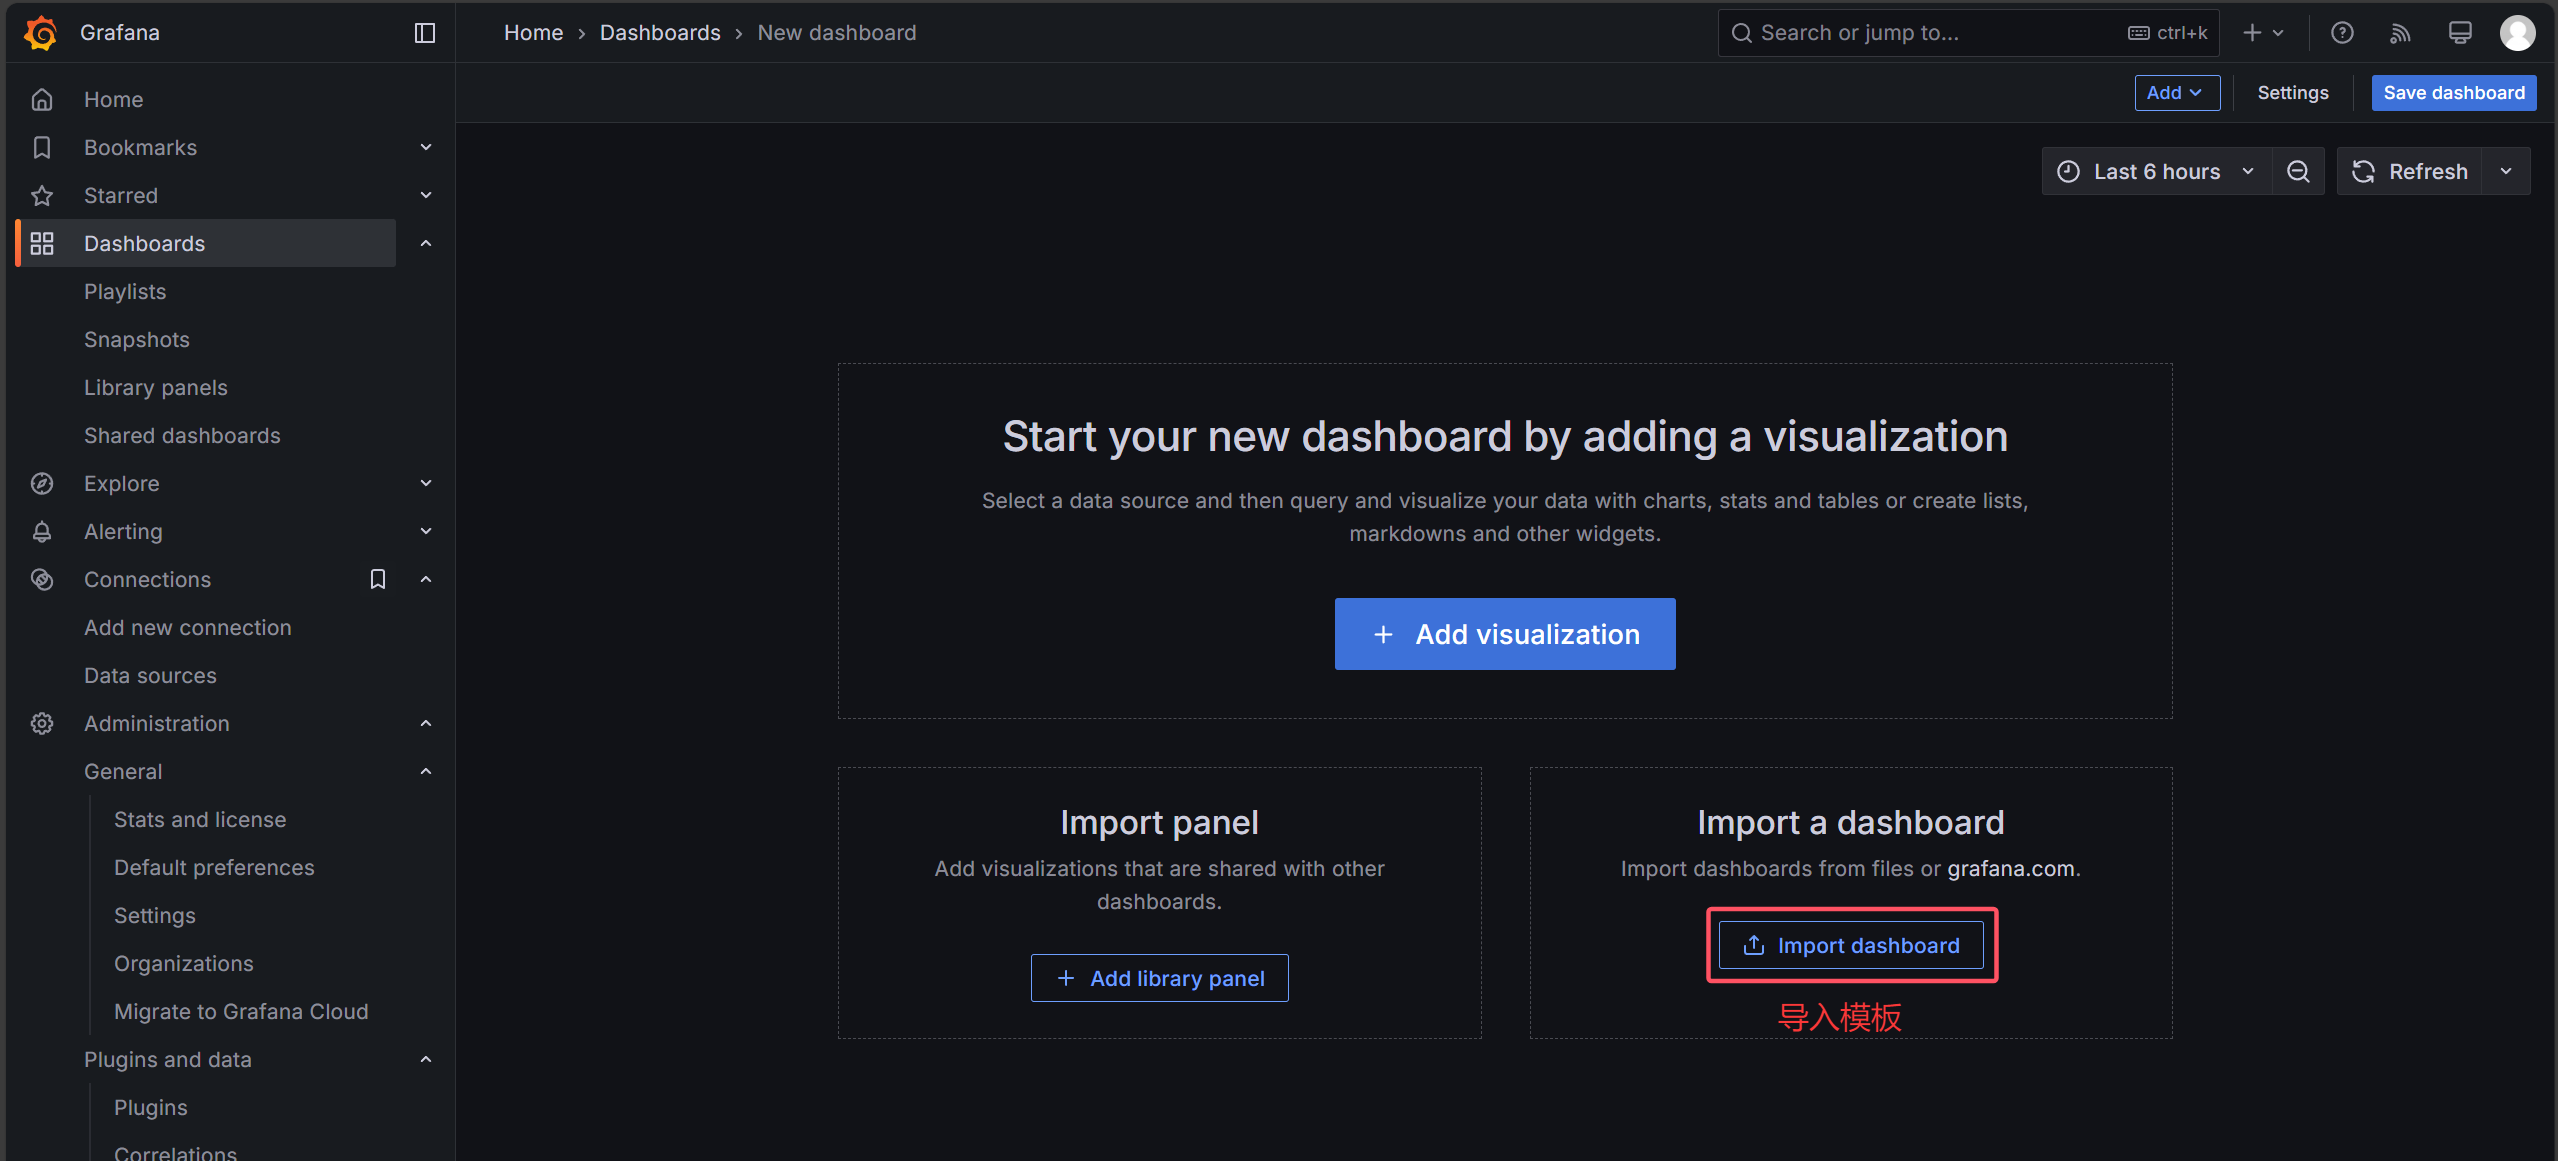
Zabbix Server Dashboard | Grafana Labs

基于Centos 9/Rocky 9部署Zabbix 7.0 HA分布式监控系统
一、MySQL 8.0高可用集群部署
1.1 节点规划
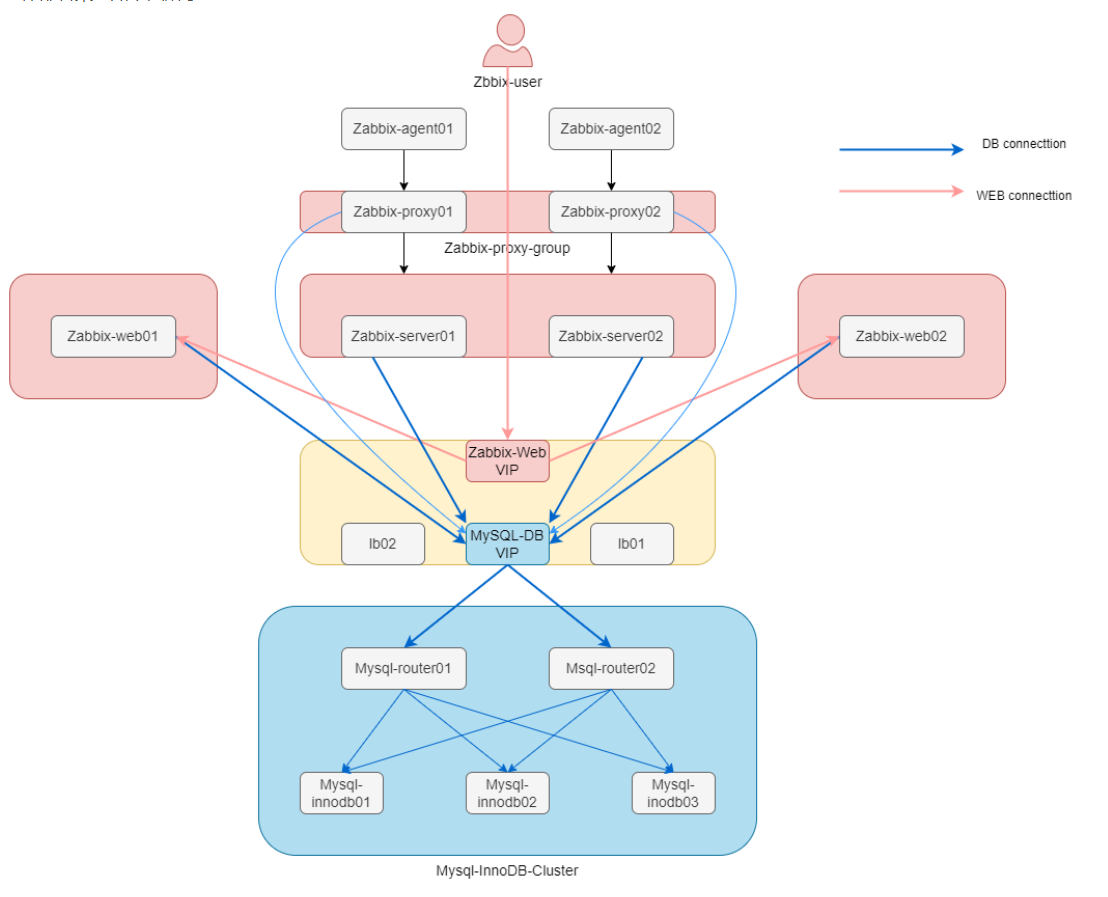
必须部署至少三台MySQL服务器,用于mysql innodb节点,至少一台MySQL Router服务器。
IP地址192.168.174.47mysql-innodb01192.168.174.48mysql-innodb02192.168.174.49mysql-innodb031.2 MySQL InnoDB Cluster 集群概念
1.2.1 简介
官网:https://dev.mysql.com/doc/refman/8.4/en/mysql-innodb-cluster-introduction.html
InnoDB Cluster 至少由三个 MySQL 服务器实例组成,它提供高可用性和扩展功能。InnoDB Cluster 使用以下 MySQL 技术:
- MySQL Shell,是
MySQL的高级客户端和代码编辑器。 MySQL服务器和组复制,使一组MySQL实例能够提供高可用性。InnoDB Cluster提供了一种替代的、易于使用的编程方式来处理组复制。- MySQL Router是一种轻量级中间件,可在应用程序和
InnoDB Cluster之间提供透明路由。
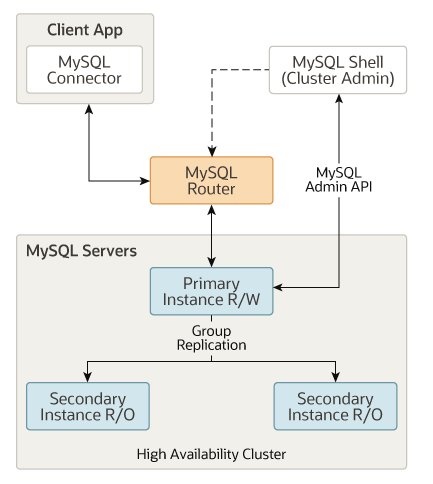
基于 MySQL组复制 构建,提供自动成员管理、容错、自动故障转移等功能。InnoDB 集群通常以单主模式运行,具有一个主实例(读写)和多个辅助实例(只读)。高级用户还可以利用 多主 模式,其中所有实例都是主实例。甚至可以在 InnoDB 集群在线时更改集群的拓扑,以确保最高的可用性。
1.3 集群部署
# Step 1:三台主机修改主机名hostnamectl set-hostname mysql-innodb01 hostnamectl set-hostname mysql-innodb02hostnamectl set-hostname mysql-innodb03# Step 2:三台主机实现本地解析cat << EOF > /etc/hosts192.168.174.47 mysql-innodb01 mysql-router01192.168.174.48 mysql-innodb02 mysql-router02192.168.174.49 mysql-innodb03 EOF# Step 3:三台主机安装MySQL8.0dnf install -y wget wget https://dev.mysql.com/get/mysql84-community-release-el9-1.noarch.rpmdnf install -y mysql84-community-release-el9-1.noarch.rpmdnf update -ydnf install -y mysql-server mysql-shell# Step 4:三台主机启动MySQL8.0systemctl enable --now mysqld# Step 5:三台主机查看MySQL8.0密码grep \"password\" /var/log/mysqld.log2025-03-13T06:33:35.657919Z 6 [Note] [MY-010454] [Server] A temporary password is generated for root@localhost: >nw_ejuun4Ih# Step 6:三台主机修改密码mysql -uroot -p\'>nw_ejuun4Ih\'mysql> ALTER USER \'root\'@\'localhost\' IDENTIFIED BY \'Xa%^3T%T4!\';Query OK, 0 rows affected (0.01 sec)1.3.1 mysql-innodb01操作
# Step 7:在mysql-innodb01节点执行连接到mysql-shell[root@mysql-innodb01 ~]# mysqlshCannot set LC_ALL to locale en_US.UTF-8: No such file or directoryMySQL Shell 8.4.4Copyright (c) 2016, 2025, Oracle and/or its affiliates.Oracle is a registered trademark of Oracle Corporation and/or its affiliates.Other names may be trademarks of their respective owners.Type \'\\help\' or \'\\?\' for help; \'\\quit\' to exit. MySQL SQL > \\connect root@localhostCreating a session to \'root@localhost\'Please provide the password for \'root@localhost\': ********** # 输入MySQL root用户密码Save password for \'root@localhost\'? [Y]es/[N]o/Ne[v]er (default No): yFetching global names for auto-completion... Press ^C to stop.Your MySQL connection id is 9 (X protocol)Server version: 8.4.4 MySQL Community Server - GPLNo default schema selected; type \\use <schema> to set one. MySQL localhost:33060+ ssl SQL > \\sql MySQL localhost:33060+ ssl SQL > show schemas; # 查看本地数据库+--------------------+| Database |+--------------------+| information_schema || mysql || performance_schema || sys |+--------------------+4 rows in set (0.0013 sec)# 切换到JS模式 MySQL localhost:33060+ ssl SQL > \\jsSwitching to JavaScript mode... MySQL localhost:33060+ ssl JS > \\sql show schemas;+--------------------+| Database |+--------------------+| information_schema || mysql || performance_schema || sys |+--------------------+4 rows in set (0.0010 sec)# 为innodb集群创建独立账号icadmin,密码为icadminPassw0rd! MySQL localhost:33060+ ssl JS > dba.configureInstance(\'root@localhost:3306\', {clusterAdmin: \"\'icadmin\'@\'%\'\", clusterAdminPassword: \'icadminPassw0rd!\'});Please provide the password for \'root@localhost:3306\': ********** # 输入MySQL root用户密码Save password for \'root@localhost:3306\'? [Y]es/[N]o/Ne[v]er (default No): YConfiguring local MySQL instance listening at port 3306 for use in an InnoDB Cluster...This instance reports its own address as mysql-innodb01:3306Clients and other cluster members will communicate with it through this address by default. If this is not correct, the report_host MySQL system variable should be changed.applierWorkerThreads will be set to the default value of 4.NOTE: Some configuration options need to be fixed:+--------------------------+---------------+----------------+--------------------------------------------------+| Variable | Current Value | Required Value | Note |+--------------------------+---------------+----------------+--------------------------------------------------+| enforce_gtid_consistency | OFF | ON | Update read-only variable and restart the server || gtid_mode | OFF | ON | Update read-only variable and restart the server || server_id | 1 | <unique ID> | Update read-only variable and restart the server |+--------------------------+---------------+----------------+--------------------------------------------------+Some variables need to be changed, but cannot be done dynamically on the server.Do you want to perform the required configuration changes? [y/n]: yDo you want to restart the instance after configuring it? [y/n]: yCreating user icadmin@%.Account icadmin@% was successfully created.Configuring instance...The instance \'mysql-innodb01:3306\' was configured to be used in an InnoDB Cluster.Restarting MySQL...NOTE: MySQL server at mysql-innodb01:3306 was restarted.# 查看数据库信息,查看本节点数据库实例Uptime参数,确认已重启 MySQL localhost:33060+ ssl JS > \\sqlSwitching to SQL mode... Commands end with ; MySQL localhost:33060+ ssl SQL > \\sMySQL Shell version 8.4.4Error Retrieving Status: MySQL Error 2006: MySQL server has gone awayThe global session got disconnected..Attempting to reconnect to \'mysqlx://root@localhost:33060\'..The global session was successfully reconnected. MySQL localhost:33060+ ssl SQL > \\sMySQL Shell version 8.4.4Connection Id: 8Default schema:Current schema:Current user: root@localhostSSL: Cipher in use: TLS_AES_128_GCM_SHA256 TLSv1.3Using delimiter: ;Server version: 8.4.4 MySQL Community Server - GPLProtocol version: X protocolClient library: 8.4.4Connection: localhost via TCP/IPTCP port: 33060Server characterset: utf8mb4Schema characterset: utf8mb4Client characterset: utf8mb4Conn. characterset: utf8mb4Result characterset: utf8mb4Compression: Enabled (DEFLATE_STREAM)Uptime: 1 min 11.0000 sec 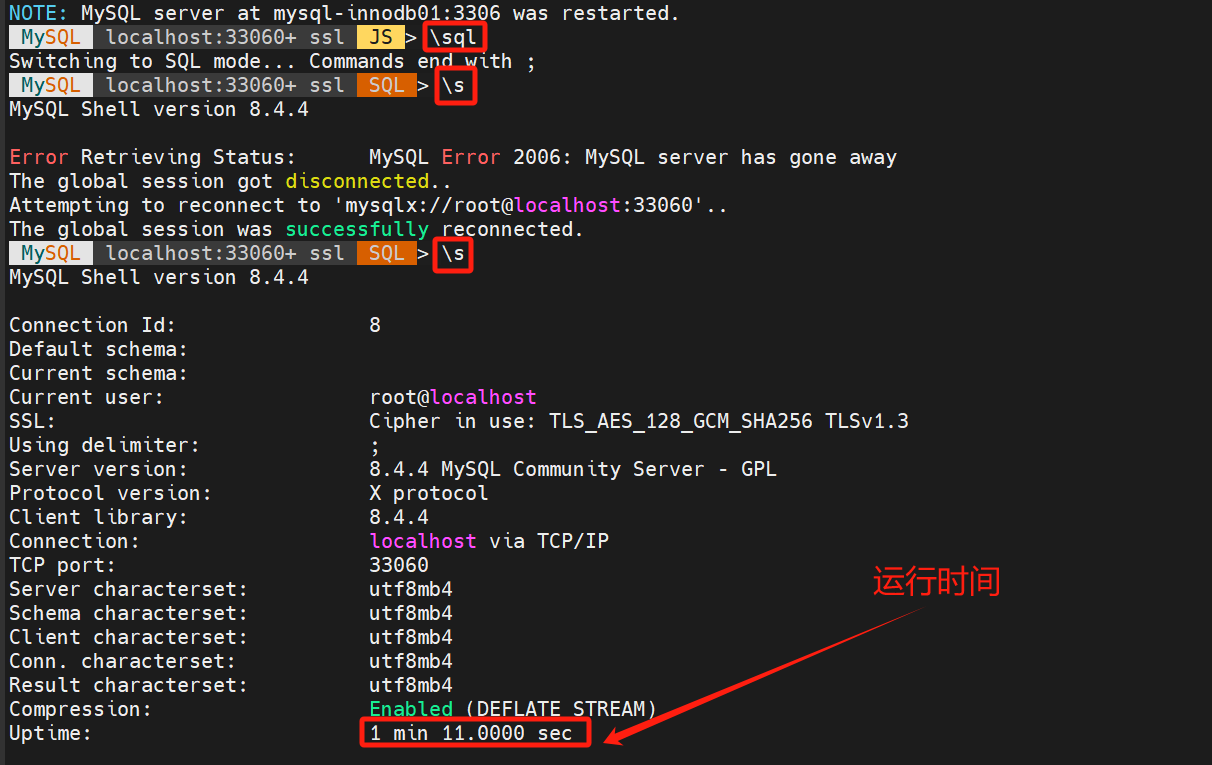
# 查看gtid_mode 已启用 MySQL localhost:33060+ ssl SQL > \\jsSwitching to JavaScript mode... MySQL localhost:33060+ ssl JS > \\sql select @@gtid_mode, @@server_id+-------------+-------------+| @@gtid_mode | @@server_id |+-------------+-------------+| ON | 3589772745 |+-------------+-------------+1 row in set (0.0004 sec) MySQL localhost:33060+ ssl JS > \\quitBye!# 查看生成的mysqld-auto.cnf配置文件cat /var/lib/mysql/mysqld-auto.cnf
# 重新连接集群账户mysqlshCannot set LC_ALL to locale en_US.UTF-8: No such file or directoryMySQL Shell 8.4.4Copyright (c) 2016, 2025, Oracle and/or its affiliates.Oracle is a registered trademark of Oracle Corporation and/or its affiliates.Other names may be trademarks of their respective owners.Type \'\\help\' or \'\\?\' for help; \'\\quit\' to exit. MySQL SQL > \\jsSwitching to JavaScript mode... MySQL JS > \\connect icadmin@localhostCreating a session to \'icadmin@localhost\'Please provide the password for \'icadmin@localhost\': ****************Save password for \'icadmin@localhost\'? [Y]es/[N]o/Ne[v]er (default No): yFetching schema names for auto-completion... Press ^C to stop.Your MySQL connection id is 9 (X protocol)Server version: 8.4.4 MySQL Community Server - GPLNo default schema selected; type \\use <schema> to set one.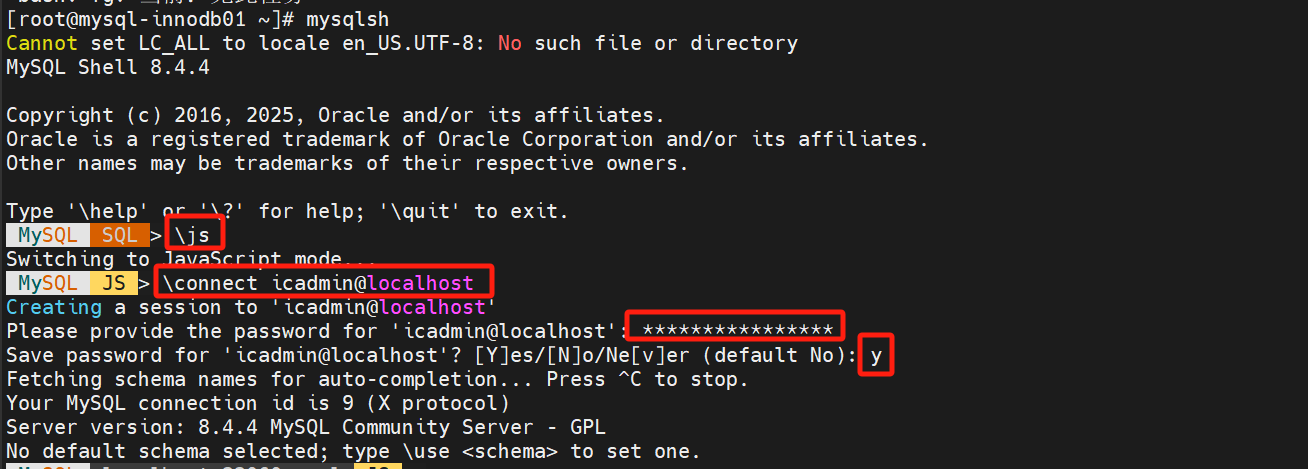
# 检查实例配置,确认status参数为ok。 MySQL localhost:33060+ ssl JS > dba.checkInstanceConfiguration()Validating local MySQL instance listening at port 3306 for use in an InnoDB Cluster...This instance reports its own address as mysql-innodb01:3306Clients and other cluster members will communicate with it through this address by default. If this is not correct, the report_host MySQL system variable should be changed.Checking whether existing tables comply with Group Replication requirements...No incompatible tables detectedChecking instance configuration...Instance configuration is compatible with InnoDB clusterThe instance \'mysql-innodb01:3306\' is valid for InnoDB Cluster usage.{ \"status\": \"ok\"}
1.3.2 mysql-innodb02操作
# innodb02连接到mysql-shell mysqlshCannot set LC_ALL to locale en_US.UTF-8: No such file or directoryMySQL Shell 8.4.4Copyright (c) 2016, 2025, Oracle and/or its affiliates.Oracle is a registered trademark of Oracle Corporation and/or its affiliates.Other names may be trademarks of their respective owners.Type \'\\help\' or \'\\?\' for help; \'\\quit\' to exit. MySQL SQL > \\connect root@localhostCreating a session to \'root@localhost\'Please provide the password for \'root@localhost\': **********Save password for \'root@localhost\'? [Y]es/[N]o/Ne[v]er (default No): yFetching global names for auto-completion... Press ^C to stop.Your MySQL connection id is 9 (X protocol)Server version: 8.4.4 MySQL Community Server - GPLNo default schema selected; type \\use <schema> to set one. MySQL localhost:33060+ ssl SQL > \\jsSwitching to JavaScript mode...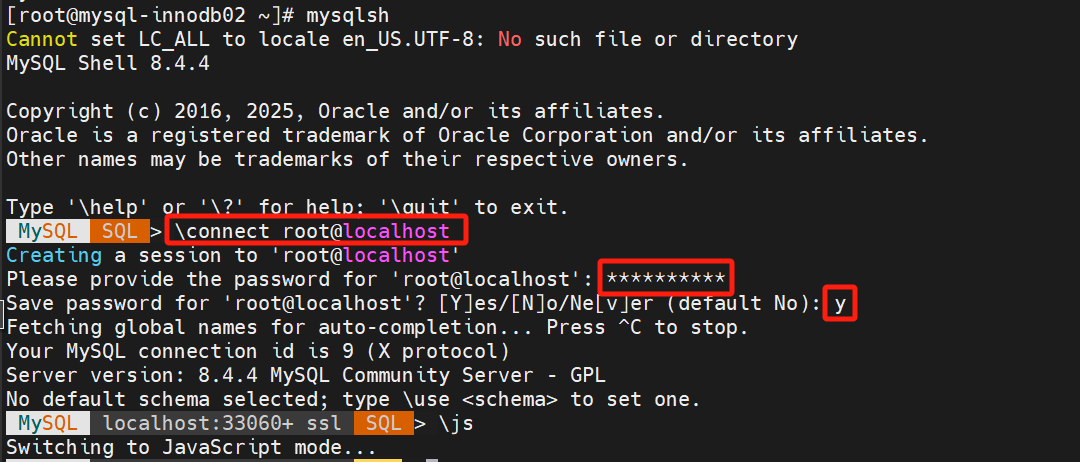
# 为innodb集群创建独立账号icadmin,密码为icadminPassw0rd!dba.configureInstance(\'root@localhost:3306\', {clusterAdmin: \"\'icadmin\'@\'%\'\", clusterAdminPassword: \'icadminPassw0rd!\'}); 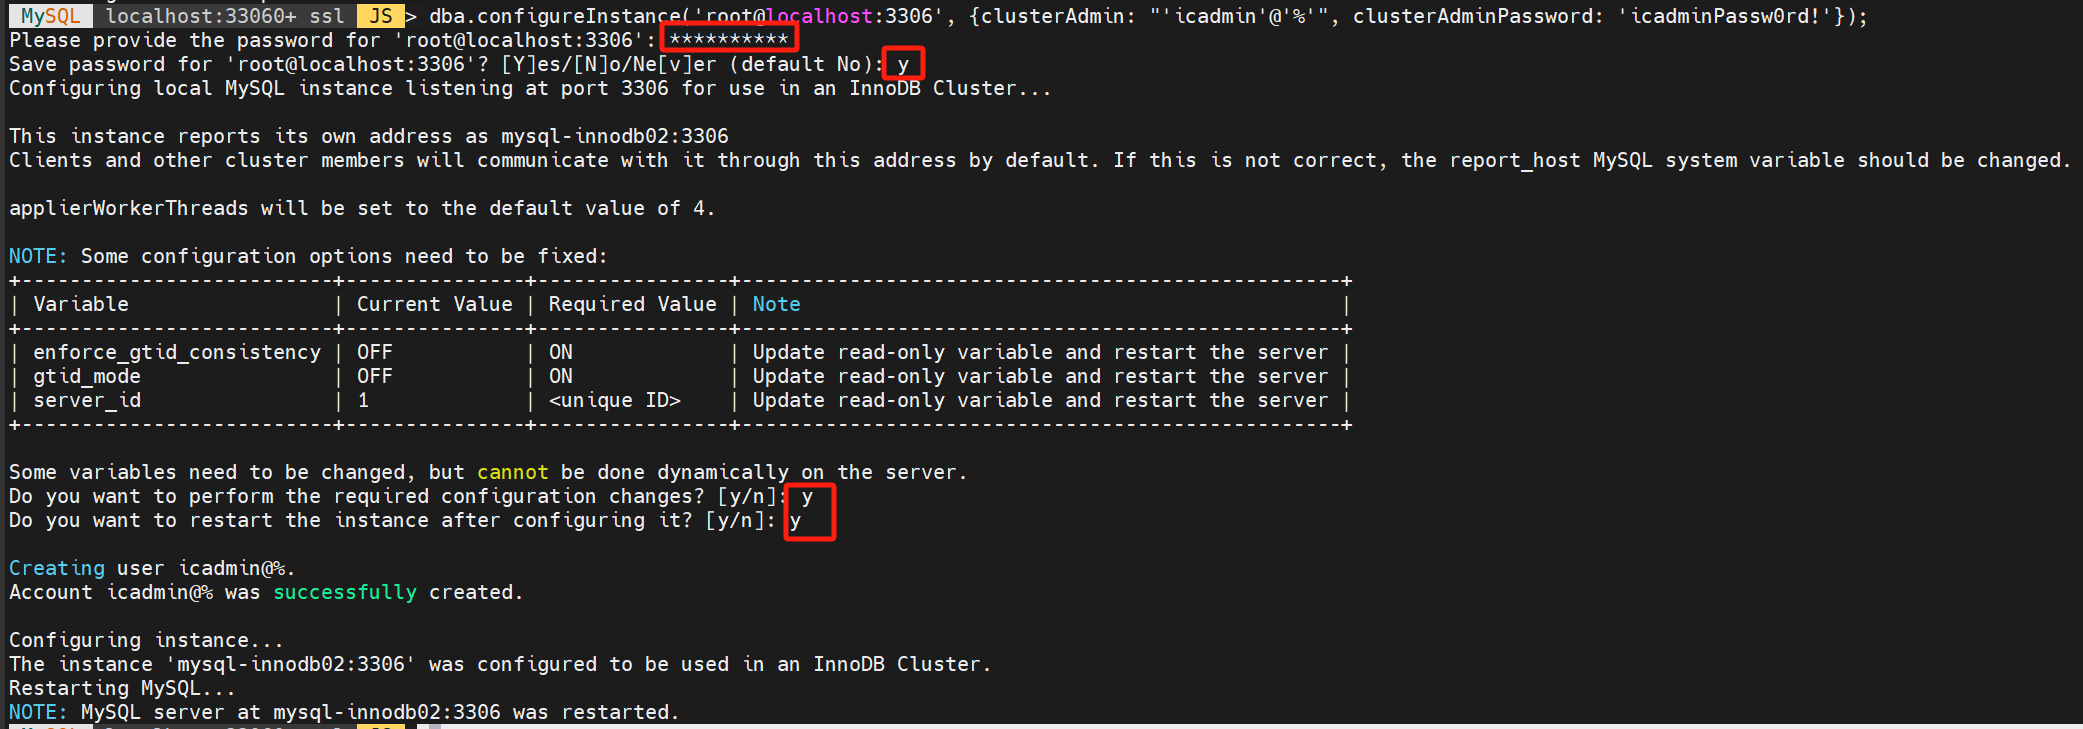
# 连接到集群账号 MySQL localhost:33060+ ssl JS > \\connect icadmin@localhostCreating a session to \'icadmin@localhost\'Please provide the password for \'icadmin@localhost\': ****************Save password for \'icadmin@localhost\'? [Y]es/[N]o/Ne[v]er (default No): yFetching schema names for auto-completion... Press ^C to stop.Closing old connection...Your MySQL connection id is 8 (X protocol)Server version: 8.4.4 MySQL Community Server - GPLNo default schema selected; type \\use <schema> to set one.# 检查实例 MySQL localhost:33060+ ssl JS > dba.checkInstanceConfiguration()Validating local MySQL instance listening at port 3306 for use in an InnoDB Cluster...This instance reports its own address as mysql-innodb02:3306Clients and other cluster members will communicate with it through this address by default. If this is not correct, the report_host MySQL system variable should be changed.Checking whether existing tables comply with Group Replication requirements...No incompatible tables detectedChecking instance configuration...Instance configuration is compatible with InnoDB clusterThe instance \'mysql-innodb02:3306\' is valid for InnoDB Cluster usage.{ \"status\": \"ok\"}
1.3.3 mysql-innodb03操作
# 连接到数据库账号mysqlshCannot set LC_ALL to locale en_US.UTF-8: No such file or directoryMySQL Shell 8.4.4Copyright (c) 2016, 2025, Oracle and/or its affiliates.Oracle is a registered trademark of Oracle Corporation and/or its affiliates.Other names may be trademarks of their respective owners.Type \'\\help\' or \'\\?\' for help; \'\\quit\' to exit. MySQL SQL > \\connect root@localhostCreating a session to \'root@localhost\'Please provide the password for \'root@localhost\': **********Save password for \'root@localhost\'? [Y]es/[N]o/Ne[v]er (default No): yFetching global names for auto-completion... Press ^C to stop.Your MySQL connection id is 9 (X protocol)Server version: 8.4.4 MySQL Community Server - GPLNo default schema selected; type \\use <schema> to set one.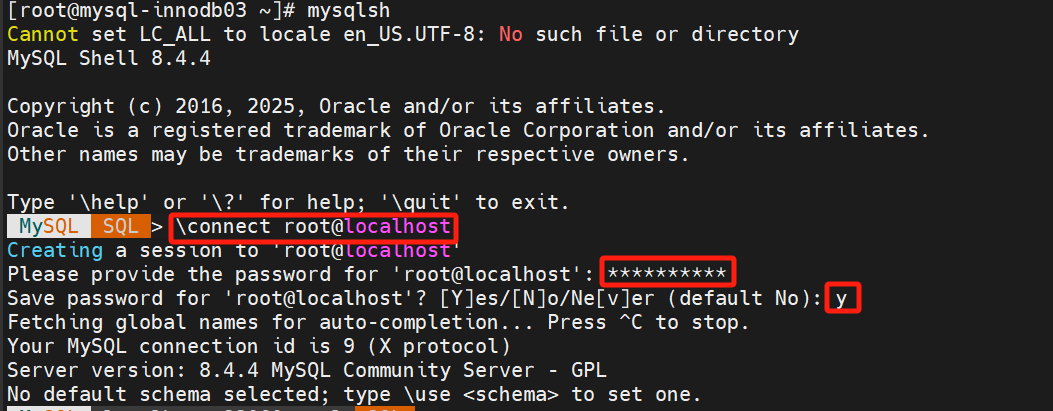
# 为innodb集群创建独立账号icadmin,密码为icadminPassw0rd! MySQL localhost:33060+ ssl JS > dba.configureInstance(\'root@localhost:3306\', {clusterAdmin: \"\'icadmin\'@\'%\'\", clusterAdminPassword: \'icadminPassw0rd!\'});Please provide the password for \'root@localhost:3306\': **********Save password for \'root@localhost:3306\'? [Y]es/[N]o/Ne[v]er (default No): yConfiguring local MySQL instance listening at port 3306 for use in an InnoDB Cluster...This instance reports its own address as mysql-innodb03:3306Clients and other cluster members will communicate with it through this address by default. If this is not correct, the report_host MySQL system variable should be changed.applierWorkerThreads will be set to the default value of 4.NOTE: Some configuration options need to be fixed:+--------------------------+---------------+----------------+--------------------------------------------------+| Variable | Current Value | Required Value | Note |+--------------------------+---------------+----------------+--------------------------------------------------+| enforce_gtid_consistency | OFF | ON | Update read-only variable and restart the server || gtid_mode | OFF | ON | Update read-only variable and restart the server || server_id | 1 | <unique ID> | Update read-only variable and restart the server |+--------------------------+---------------+----------------+--------------------------------------------------+Some variables need to be changed, but cannot be done dynamically on the server.Do you want to perform the required configuration changes? [y/n]: yDo you want to restart the instance after configuring it? [y/n]: yCreating user icadmin@%.Account icadmin@% was successfully created.Configuring instance...The instance \'mysql-innodb03:3306\' was configured to be used in an InnoDB Cluster.Restarting MySQL...NOTE: MySQL server at mysql-innodb03:3306 was restarted.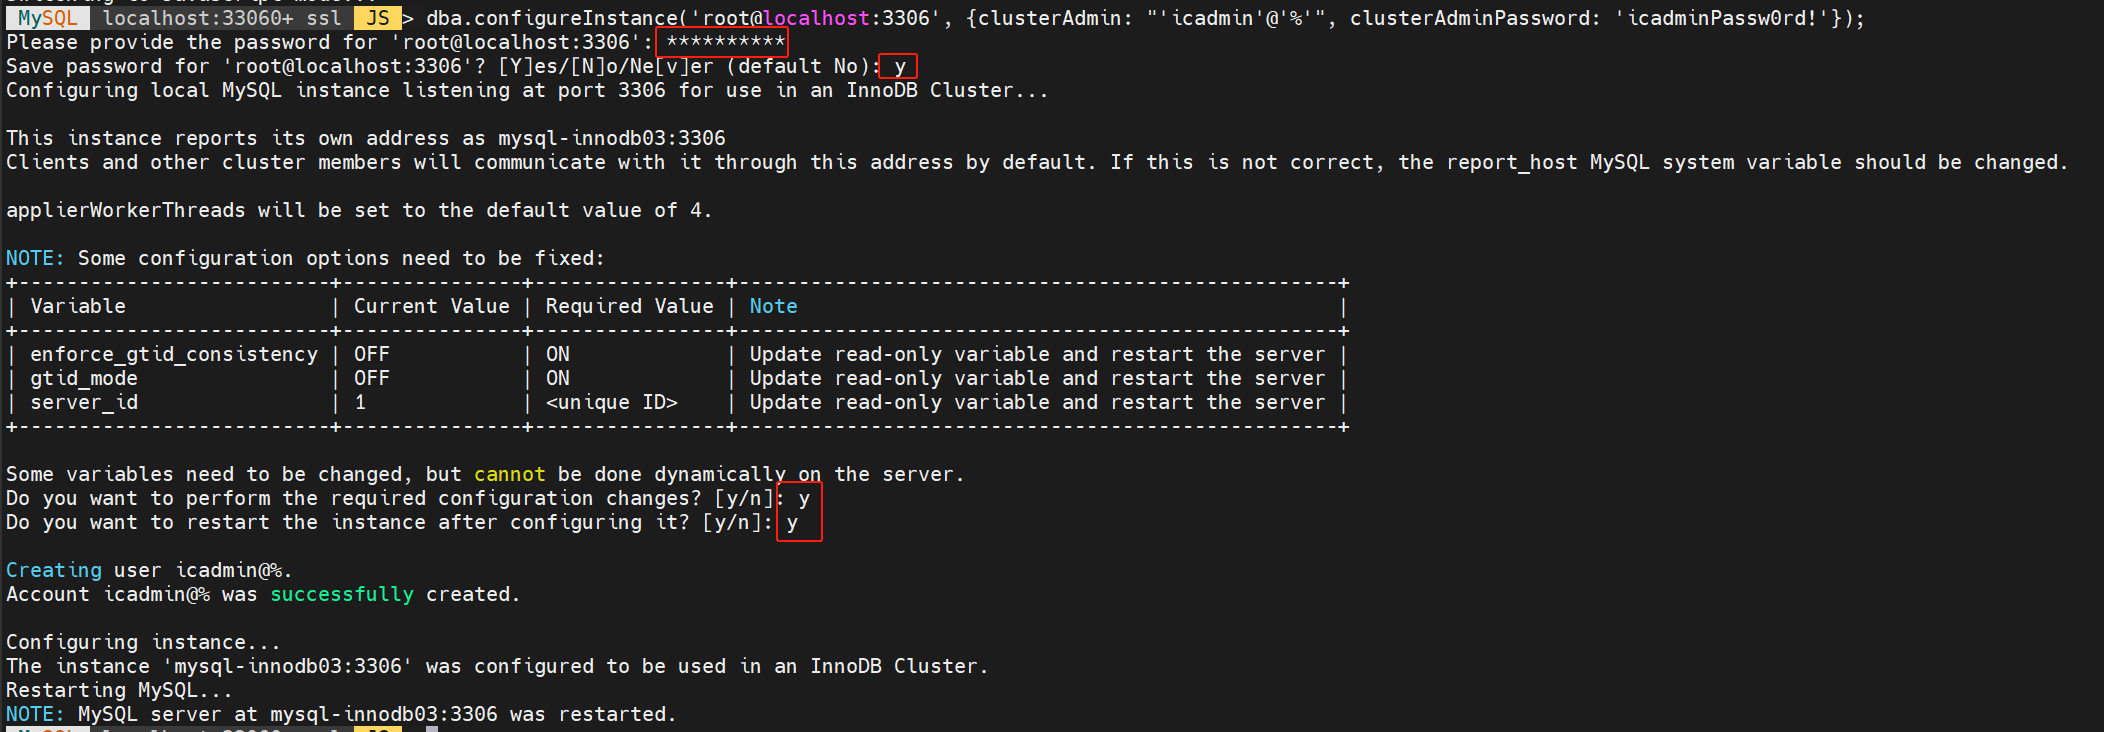
# 连接到集群账号 MySQL localhost:33060+ ssl JS > \\connect icadmin@localhostCreating a session to \'icadmin@localhost\'Please provide the password for \'icadmin@localhost\': ****************Save password for \'icadmin@localhost\'? [Y]es/[N]o/Ne[v]er (default No): yFetching schema names for auto-completion... Press ^C to stop.Closing old connection...Your MySQL connection id is 8 (X protocol)Server version: 8.4.4 MySQL Community Server - GPLNo default schema selected; type \\use <schema> to set one.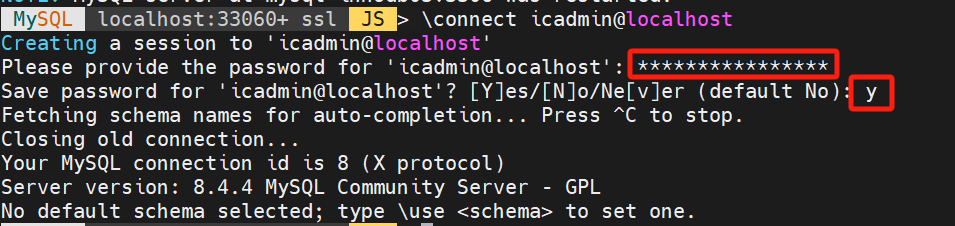
# 检查实例 MySQL localhost:33060+ ssl JS > dba.checkInstanceConfiguration()Validating local MySQL instance listening at port 3306 for use in an InnoDB Cluster...This instance reports its own address as mysql-innodb03:3306Clients and other cluster members will communicate with it through this address by default. If this is not correct, the report_host MySQL system variable should be changed.Checking whether existing tables comply with Group Replication requirements...No incompatible tables detectedChecking instance configuration...Instance configuration is compatible with InnoDB clusterThe instance \'mysql-innodb03:3306\' is valid for InnoDB Cluster usage.{ \"status\": \"ok\"}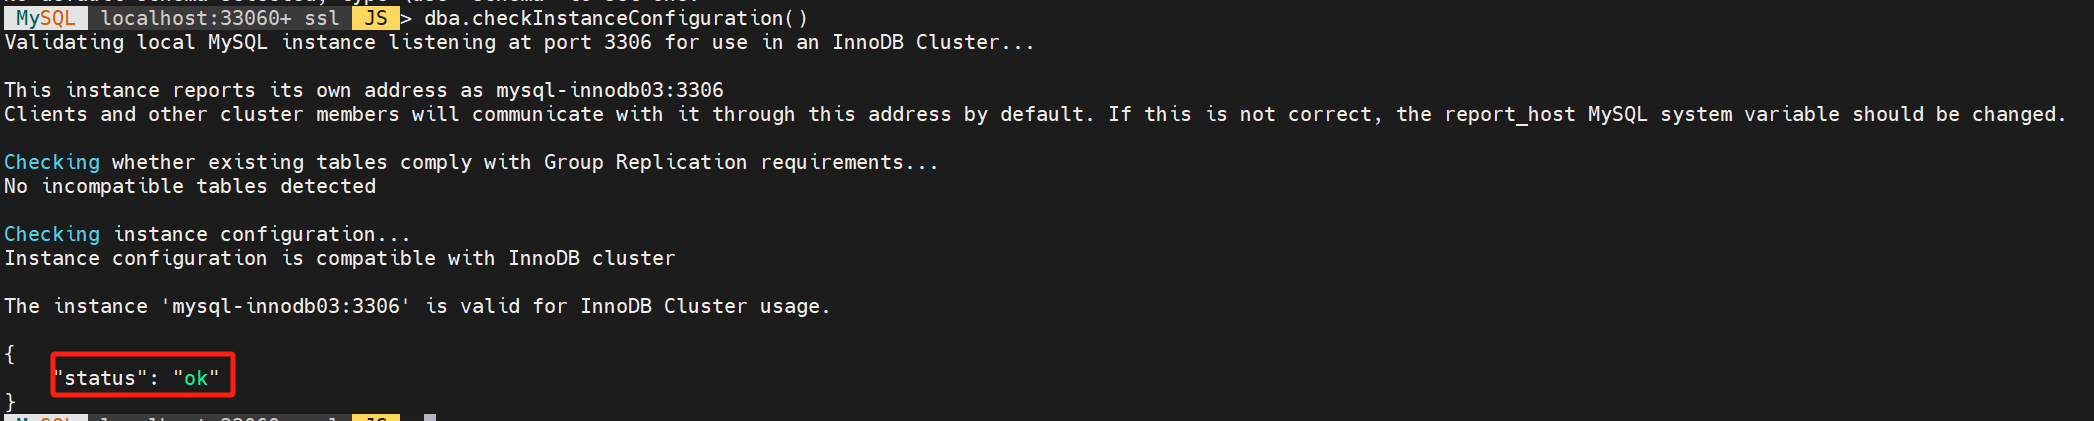
1.3.4 mysql-innodb01创建集群
MySQL localhost:33060+ ssl JS > dba.createCluster(\'my_innodb_cluster\')A new InnoDB Cluster will be created on instance \'mysql-innodb01:3306\'.Validating instance configuration at localhost:3306...This instance reports its own address as mysql-innodb01:3306Instance configuration is suitable.NOTE: Group Replication will communicate with other members using \'mysql-innodb01:3306\'. Use the localAddress option to override.* Checking connectivity and SSL configuration...Creating InnoDB Cluster \'my_innodb_cluster\' on \'mysql-innodb01:3306\'...Adding Seed Instance...Cluster successfully created. Use Cluster.addInstance() to add MySQL instances.At least 3 instances are needed for the cluster to be able to withstand up toone server failure.<Cluster:my_innodb_cluster> 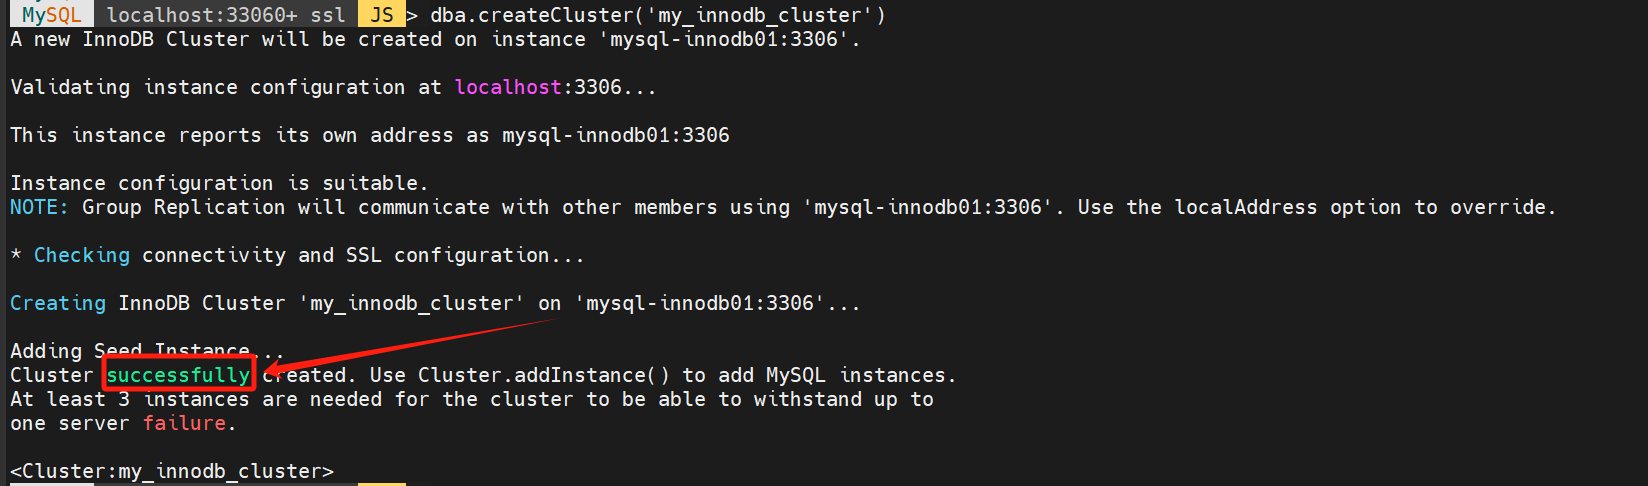
# 查看集群状态 MySQL localhost:33060+ ssl JS > dba.getCluster()<Cluster:my_innodb_cluster> MySQL localhost:33060+ ssl JS > herc = dba.getCluster()<Cluster:my_innodb_cluster> MySQL localhost:33060+ ssl JS > herc.status(){ \"clusterName\": \"my_innodb_cluster\", \"defaultReplicaSet\": { \"name\": \"default\", \"primary\": \"mysql-innodb01:3306\", \"ssl\": \"REQUIRED\", \"status\": \"OK_NO_TOLERANCE\", \"statusText\": \"Cluster is NOT tolerant to any failures.\", \"topology\": { \"mysql-innodb01:3306\": { \"address\": \"mysql-innodb01:3306\", \"memberRole\": \"PRIMARY\", \"mode\": \"R/W\", \"readReplicas\": {}, \"replicationLag\": \"applier_queue_applied\", \"role\": \"HA\", \"status\": \"ONLINE\", \"version\": \"8.4.4\" } }, \"topologyMode\": \"Single-Primary\" }, \"groupInformationSourceMember\": \"mysql-innodb01:3306\"} 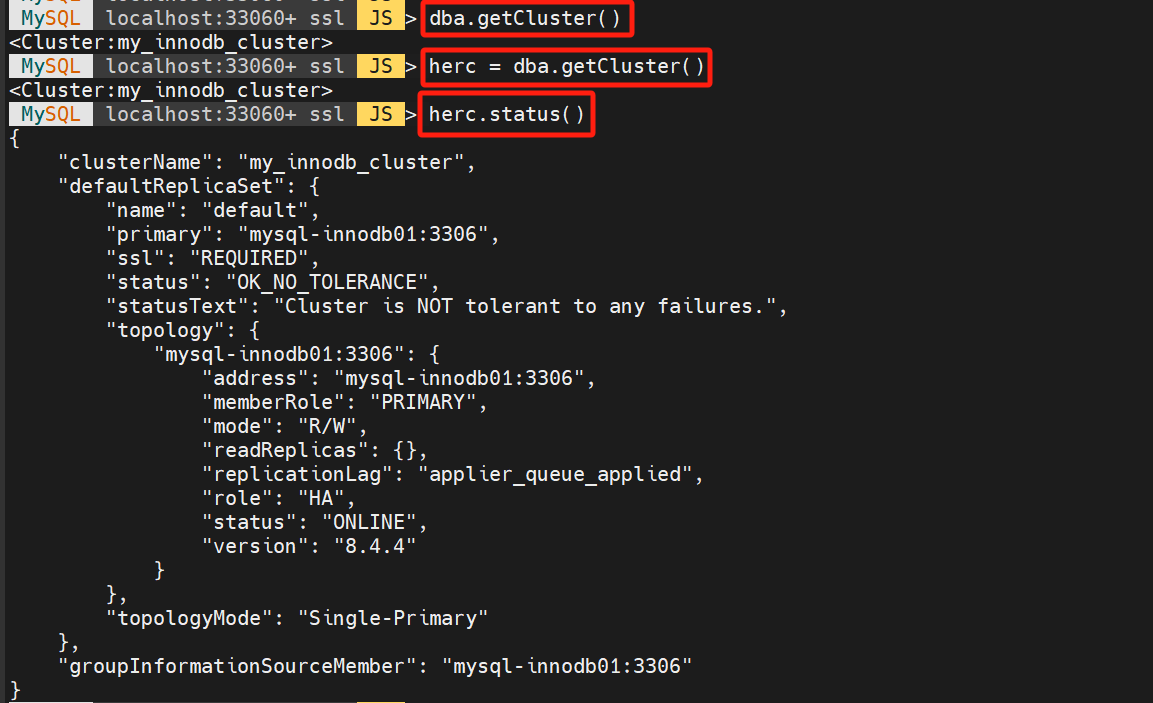
# 添加mysql-innodb02节点到集群 MySQL localhost:33060+ ssl JS > herc.addInstance(\'icadmin@mysql-innodb02\')NOTE: The target instance \'mysql-innodb02:3306\' has not been pre-provisioned (GTID set is empty). The Shell is unable to decide whether incremental state recovery can correctly provision it.The safest and most convenient way to provision a new instance is through automatic clone provisioning, which will completely overwrite the state of \'mysql-innodb02:3306\' with a physical snapshot from an existing cluster member. To use this method by default, set the \'recoveryMethod\' option to \'clone\'.The incremental state recovery may be safely used if you are sure all updates ever executed in the cluster were done with GTIDs enabled, there are no purged transactions and the new instance contains the same GTID set as the cluster or a subset of it. To use this method by default, set the \'recoveryMethod\' option to \'incremental\'.Please select a recovery method [C]lone/[I]ncremental recovery/[A]bort (default Clone): CValidating instance configuration at mysql-innodb02:3306...This instance reports its own address as mysql-innodb02:3306Instance configuration is suitable.NOTE: Group Replication will communicate with other members using \'mysql-innodb02:3306\'. Use the localAddress option to override.* Checking connectivity and SSL configuration...A new instance will be added to the InnoDB Cluster. Depending on the amount ofdata on the cluster this might take from a few seconds to several hours.Adding instance to the cluster...Monitoring recovery process of the new cluster member. Press ^C to stop monitoring and let it continue in background.Clone based state recovery is now in progress.NOTE: A server restart is expected to happen as part of the clone process. If theserver does not support the RESTART command or does not come back after awhile, you may need to manually start it back.* Waiting for clone to finish...NOTE: mysql-innodb02:3306 is being cloned from mysql-innodb01:3306** Stage DROP DATA: Completed** Clone Transfer FILE COPY ############################################################ 100% Completed PAGE COPY ############################################################ 100% Completed REDO COPY ############################################################ 100% CompletedNOTE: mysql-innodb02:3306 is shutting down...* Waiting for server restart... ready* mysql-innodb02:3306 has restarted, waiting for clone to finish...** Stage RESTART: Completed* Clone process has finished: 73.65 MB transferred in 2 sec (36.83 MB/s)State recovery already finished for \'mysql-innodb02:3306\'The instance \'mysql-innodb02:3306\' was successfully added to the cluster. 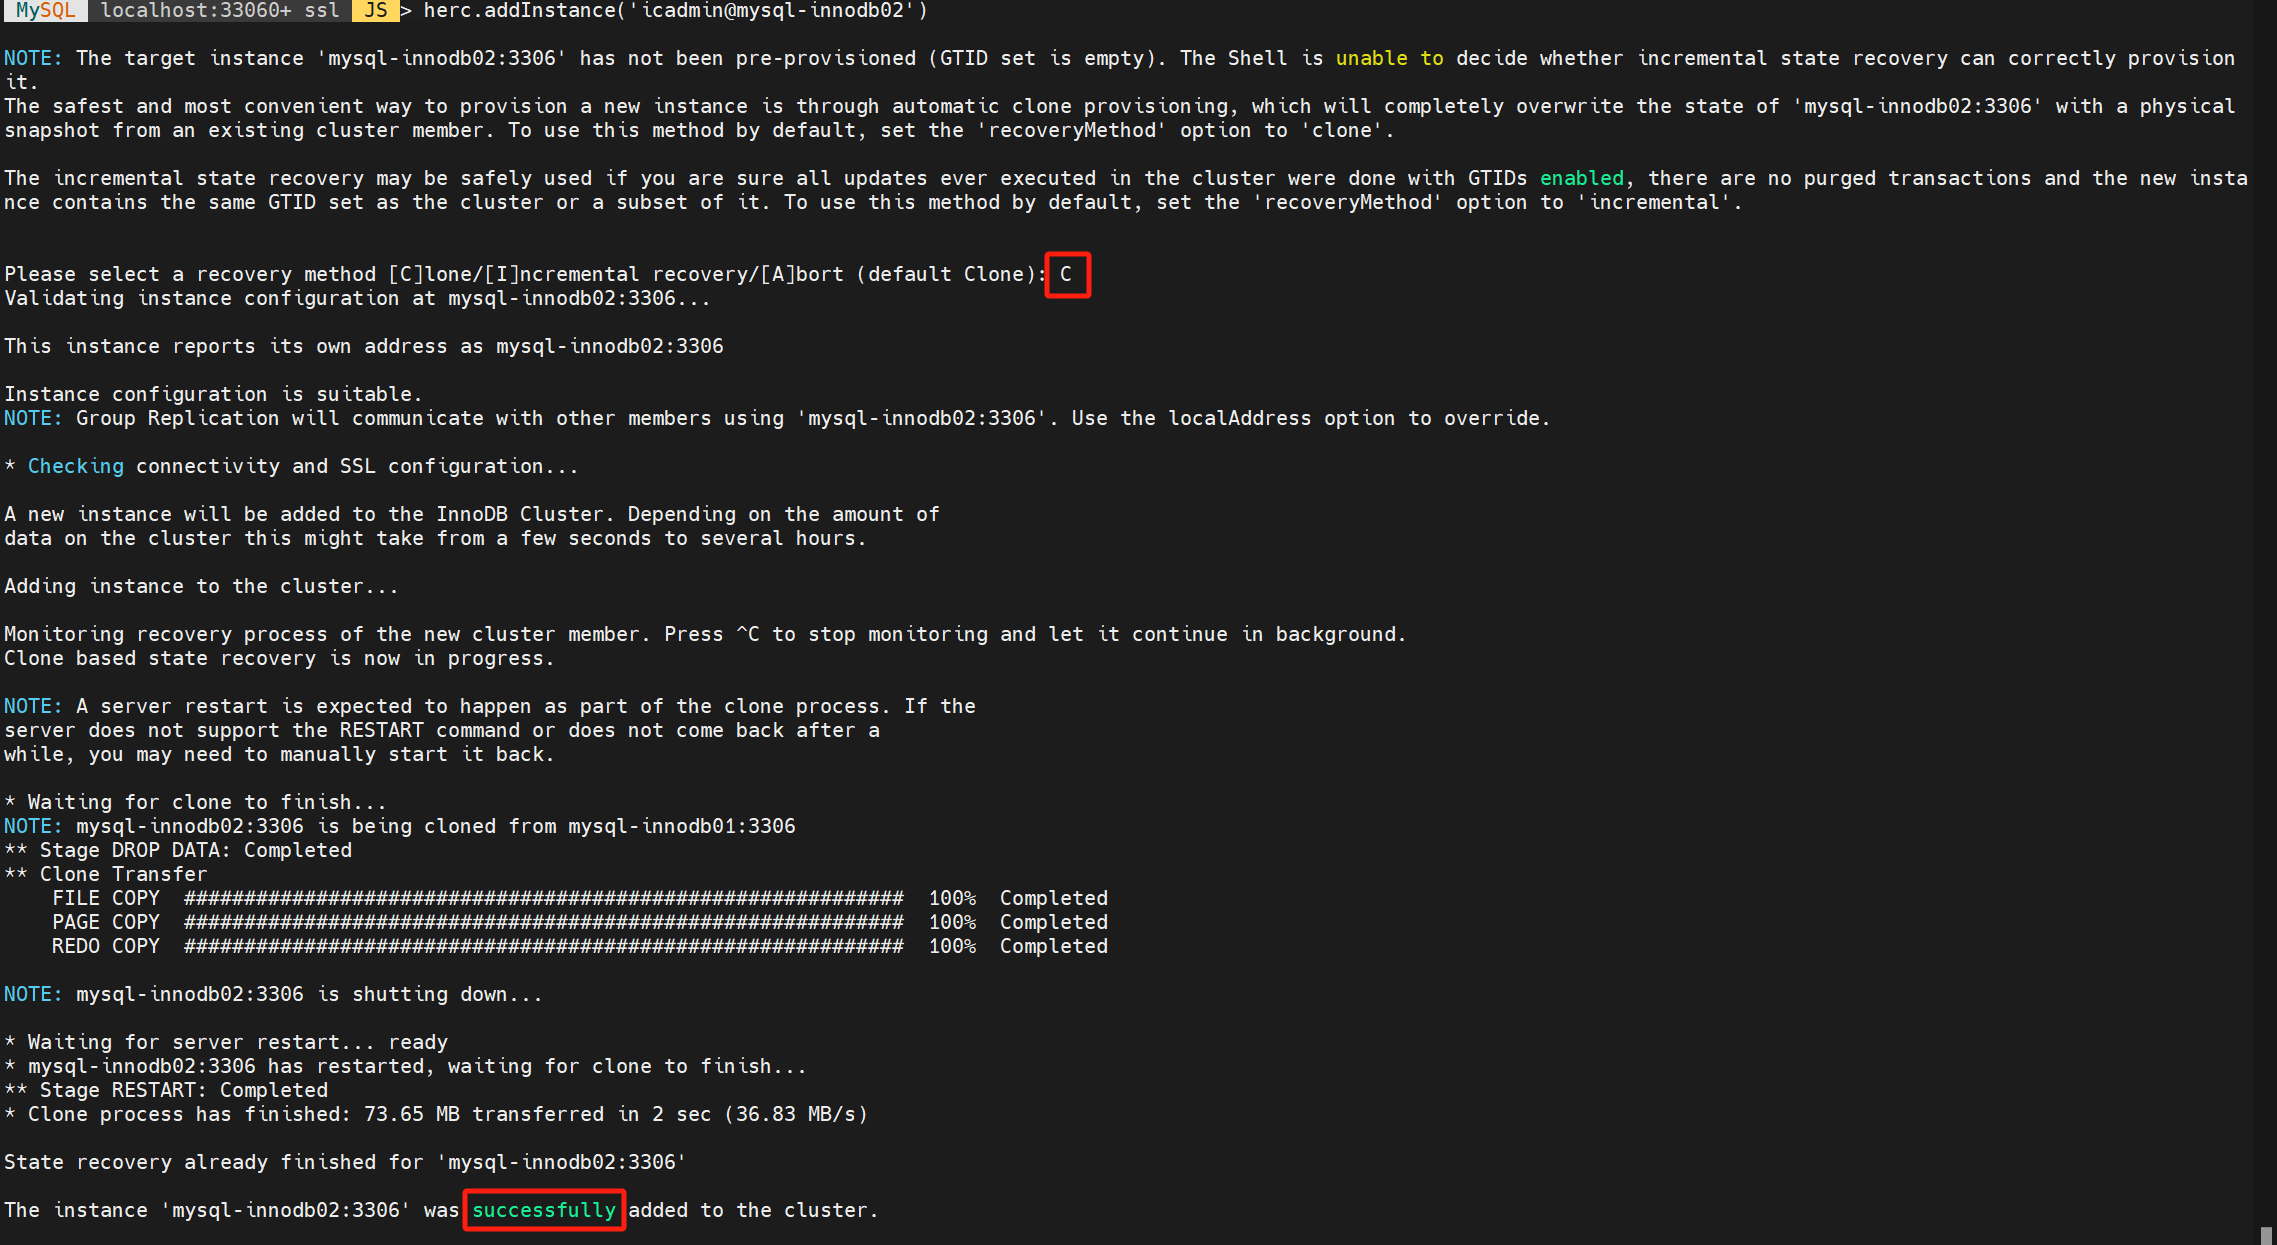
# 检查集群状态 MySQL localhost:33060+ ssl JS > herc.status(){ \"clusterName\": \"my_innodb_cluster\", \"defaultReplicaSet\": { \"name\": \"default\", \"primary\": \"mysql-innodb01:3306\", \"ssl\": \"REQUIRED\", \"status\": \"OK_NO_TOLERANCE\", \"statusText\": \"Cluster is NOT tolerant to any failures.\", \"topology\": { \"mysql-innodb01:3306\": { \"address\": \"mysql-innodb01:3306\", \"memberRole\": \"PRIMARY\", \"mode\": \"R/W\", \"readReplicas\": {}, \"replicationLag\": \"applier_queue_applied\", \"role\": \"HA\", \"status\": \"ONLINE\", \"version\": \"8.4.4\" }, \"mysql-innodb02:3306\": { \"address\": \"mysql-innodb02:3306\", \"memberRole\": \"SECONDARY\", \"mode\": \"R/O\", \"readReplicas\": {}, \"replicationLag\": \"applier_queue_applied\", \"role\": \"HA\", \"status\": \"ONLINE\", \"version\": \"8.4.4\" } }, \"topologyMode\": \"Single-Primary\" }, \"groupInformationSourceMember\": \"mysql-innodb01:3306\"} 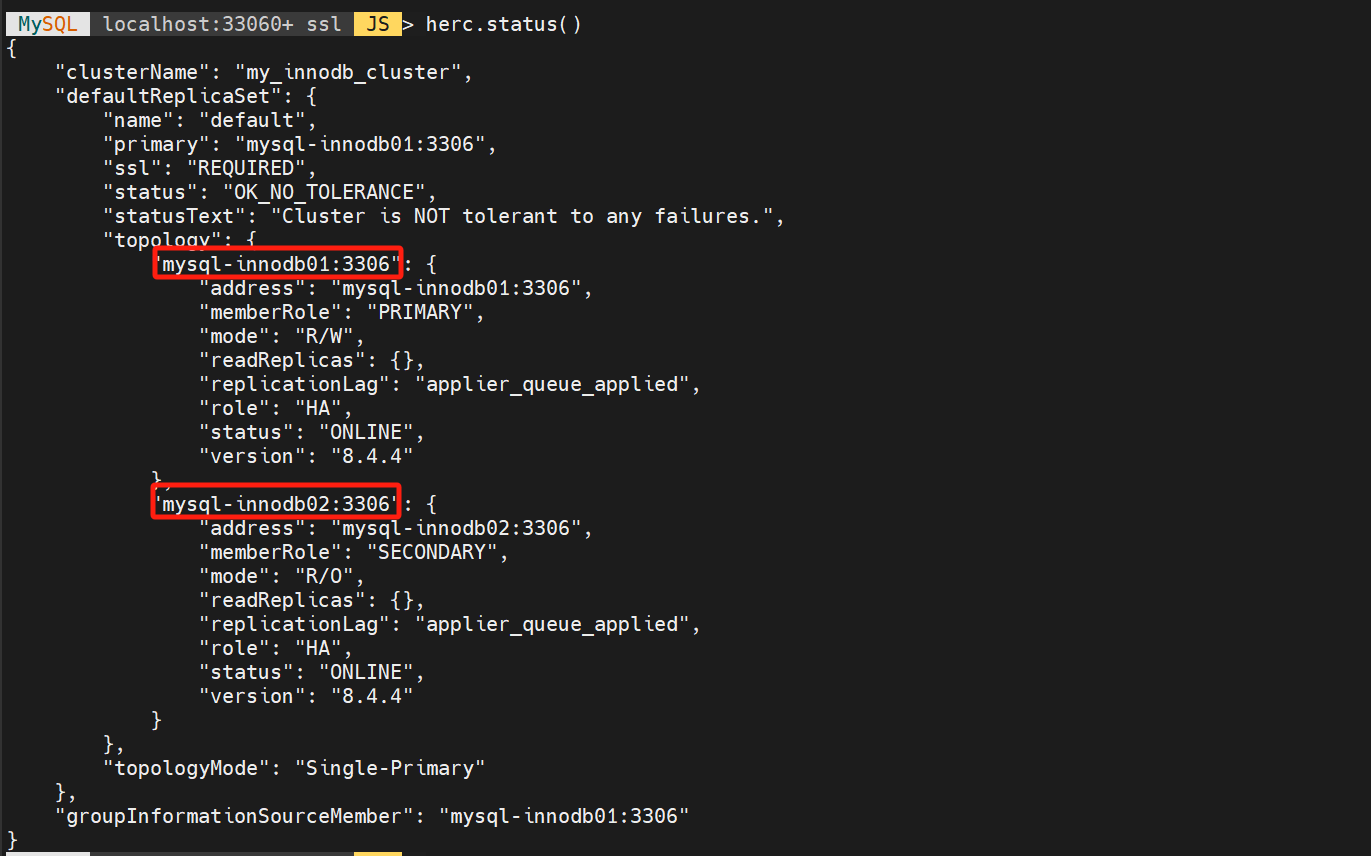
# 在mysql-innnodb01节点检查super_read_only参数,只读节点数为0 MySQL localhost:33060+ ssl JS > \\sql select @@super_read_only;+-------------------+| @@super_read_only |+-------------------+| 0 |+-------------------+1 row in set (0.0005 sec)# 在mysql-innnodb02节点检查super_read_only参数,只读节点数为1 MySQL localhost:33060+ ssl JS > \\sql select @@super_read_only;+-------------------+| @@super_read_only |+-------------------+| 1 |+-------------------+1 row in set (0.0003 sec)# 添加mysql-innodb03节点到集群,mysql-innodb01操作 MySQL localhost:33060+ ssl JS > herc.addInstance(\'icadmin@mysql-innodb03\')NOTE: The target instance \'mysql-innodb03:3306\' has not been pre-provisioned (GTID set is empty). The Shell is unable to decide whether incremental state recovery can correctly provision it.The safest and most convenient way to provision a new instance is through automatic clone provisioning, which will completely overwrite the state of \'mysql-innodb03:3306\' with a physical snapshot from an existing cluster member. To use this method by default, set the \'recoveryMethod\' option to \'clone\'.The incremental state recovery may be safely used if you are sure all updates ever executed in the cluster were done with GTIDs enabled, there are no purged transactions and the new instance contains the same GTID set as the cluster or a subset of it. To use this method by default, set the \'recoveryMethod\' option to \'incremental\'.Please select a recovery method [C]lone/[I]ncremental recovery/[A]bort (default Clone): CValidating instance configuration at mysql-innodb03:3306...This instance reports its own address as mysql-innodb03:3306Instance configuration is suitable.NOTE: Group Replication will communicate with other members using \'mysql-innodb03:3306\'. Use the localAddress option to override.* Checking connectivity and SSL configuration...A new instance will be added to the InnoDB Cluster. Depending on the amount ofdata on the cluster this might take from a few seconds to several hours.Adding instance to the cluster...Monitoring recovery process of the new cluster member. Press ^C to stop monitoring and let it continue in background.Clone based state recovery is now in progress.NOTE: A server restart is expected to happen as part of the clone process. If theserver does not support the RESTART command or does not come back after awhile, you may need to manually start it back.* Waiting for clone to finish...NOTE: mysql-innodb03:3306 is being cloned from mysql-innodb02:3306** Stage DROP DATA: Completed** Clone Transfer FILE COPY ############################################################ 100% Completed PAGE COPY ############################################################ 100% Completed REDO COPY ############################################################ 100% CompletedNOTE: mysql-innodb03:3306 is shutting down...* Waiting for server restart... ready* mysql-innodb03:3306 has restarted, waiting for clone to finish...** Stage RESTART: Completed* Clone process has finished: 73.65 MB transferred in about 1 second (~73.65 MB/s)State recovery already finished for \'mysql-innodb03:3306\'The instance \'mysql-innodb03:3306\' was successfully added to the cluster. 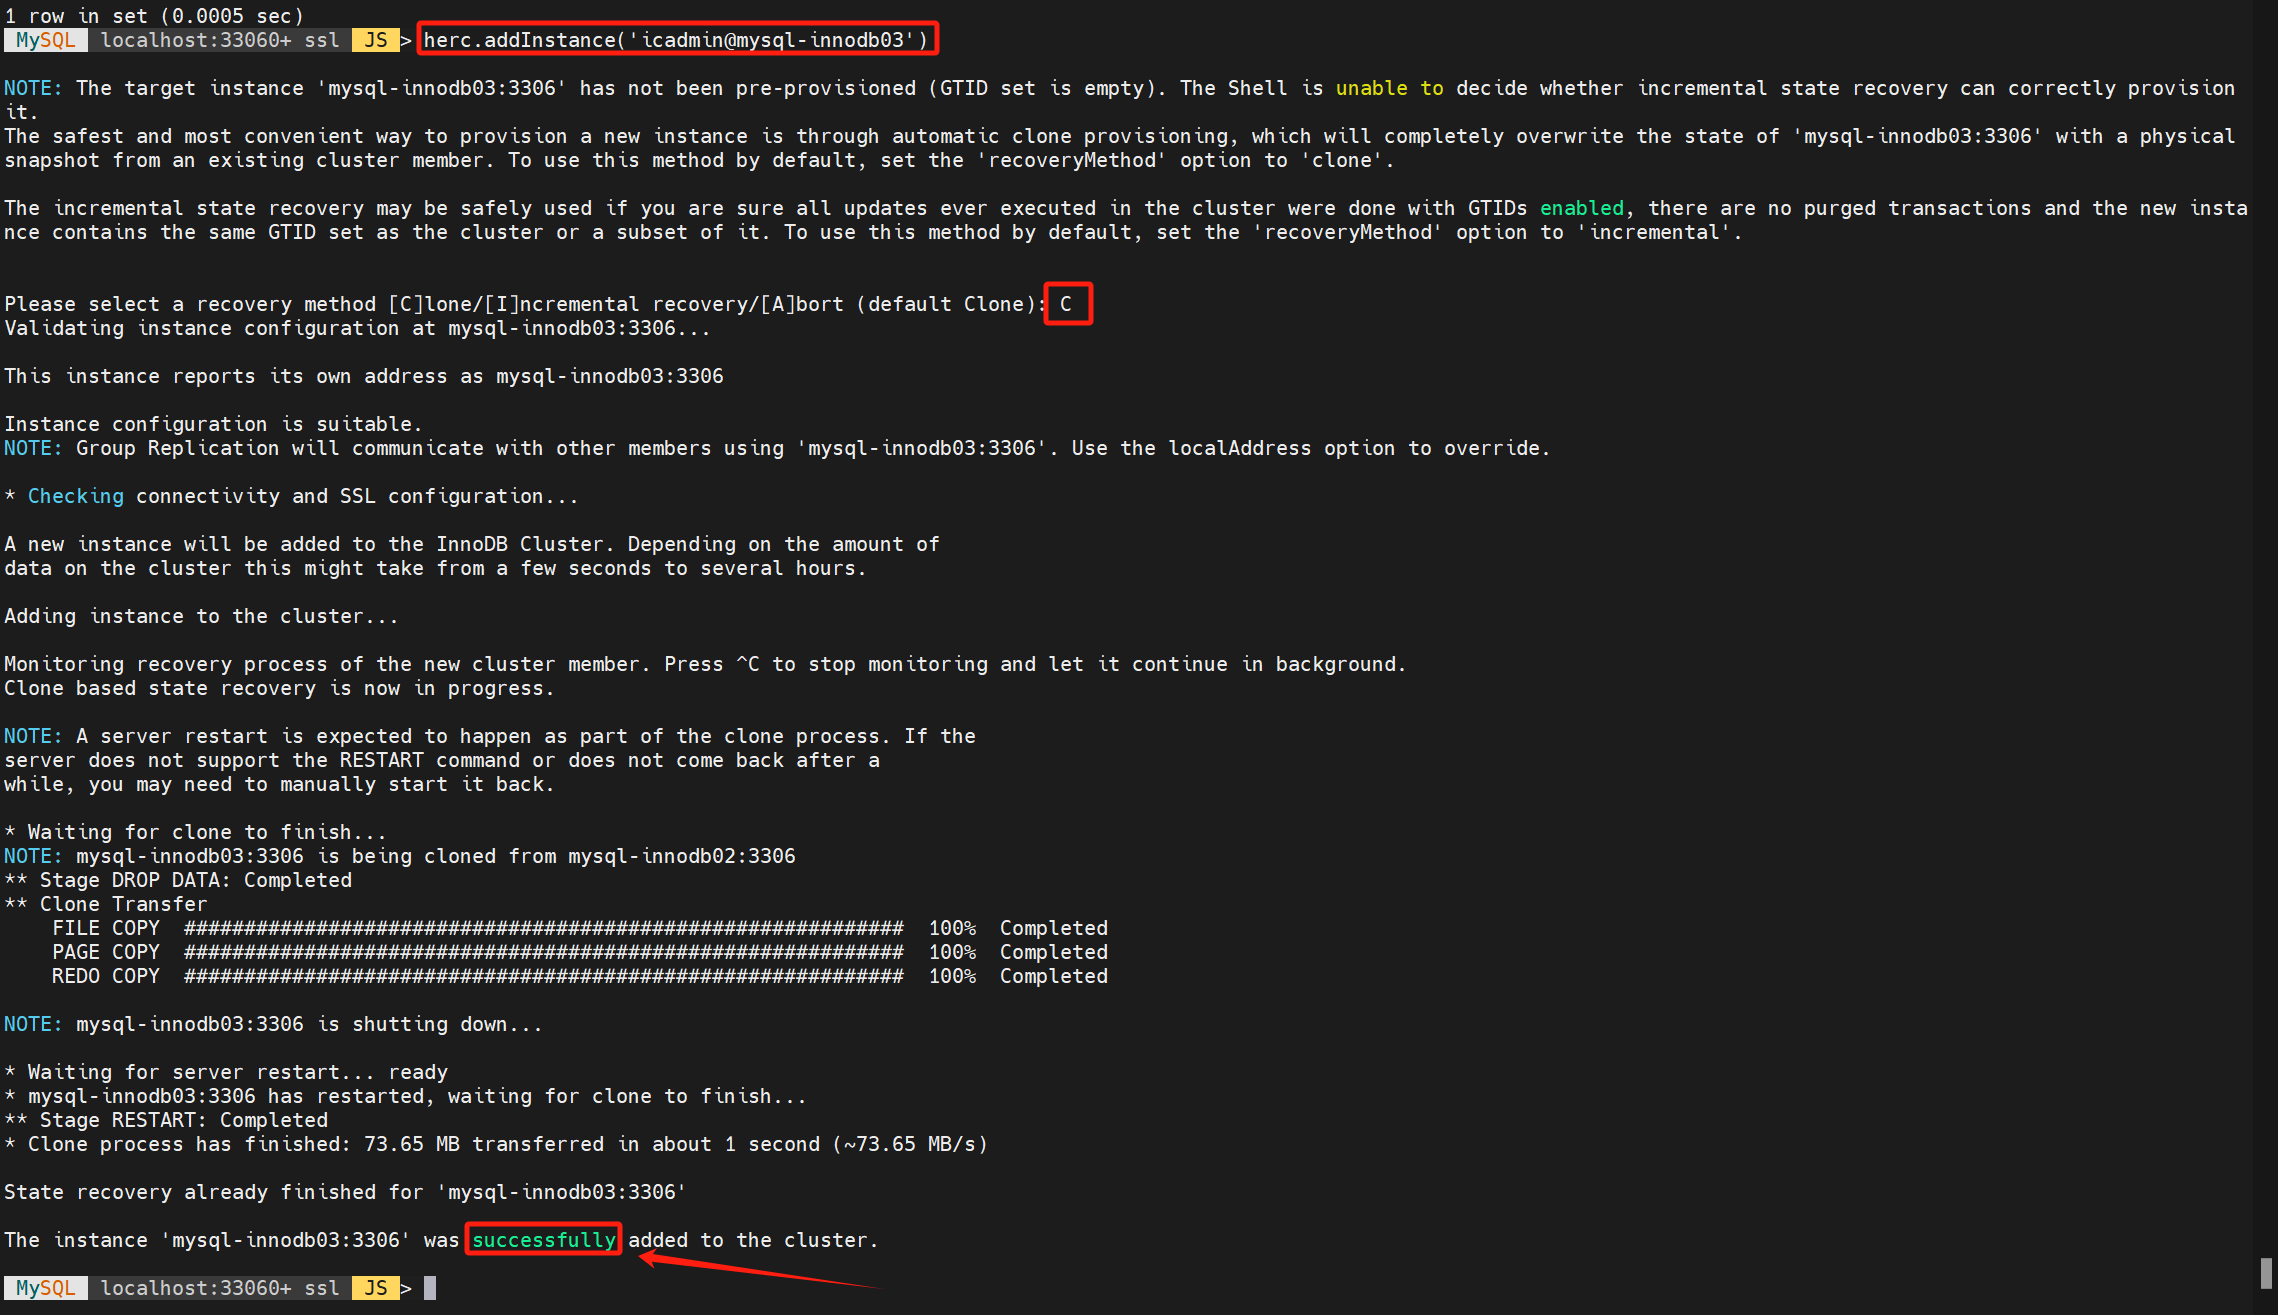
# mysql-innodb01查看集群状态 MySQL localhost:33060+ ssl JS > herc.status(){ \"clusterName\": \"my_innodb_cluster\", \"defaultReplicaSet\": { \"name\": \"default\", \"primary\": \"mysql-innodb01:3306\", \"ssl\": \"REQUIRED\", \"status\": \"OK\", \"statusText\": \"Cluster is ONLINE and can tolerate up to ONE failure.\", \"topology\": { \"mysql-innodb01:3306\": { \"address\": \"mysql-innodb01:3306\", \"memberRole\": \"PRIMARY\", \"mode\": \"R/W\", \"readReplicas\": {}, \"replicationLag\": \"applier_queue_applied\", \"role\": \"HA\", \"status\": \"ONLINE\", \"version\": \"8.4.4\" }, \"mysql-innodb02:3306\": { \"address\": \"mysql-innodb02:3306\", \"memberRole\": \"SECONDARY\", \"mode\": \"R/O\", \"readReplicas\": {}, \"replicationLag\": \"applier_queue_applied\", \"role\": \"HA\", \"status\": \"ONLINE\", \"version\": \"8.4.4\" }, \"mysql-innodb03:3306\": { \"address\": \"mysql-innodb03:3306\", \"memberRole\": \"SECONDARY\", \"mode\": \"R/O\", \"readReplicas\": {}, \"replicationLag\": \"applier_queue_applied\", \"role\": \"HA\", \"status\": \"ONLINE\", \"version\": \"8.4.4\" } }, \"topologyMode\": \"Single-Primary\" }, \"groupInformationSourceMember\": \"mysql-innodb01:3306\"} 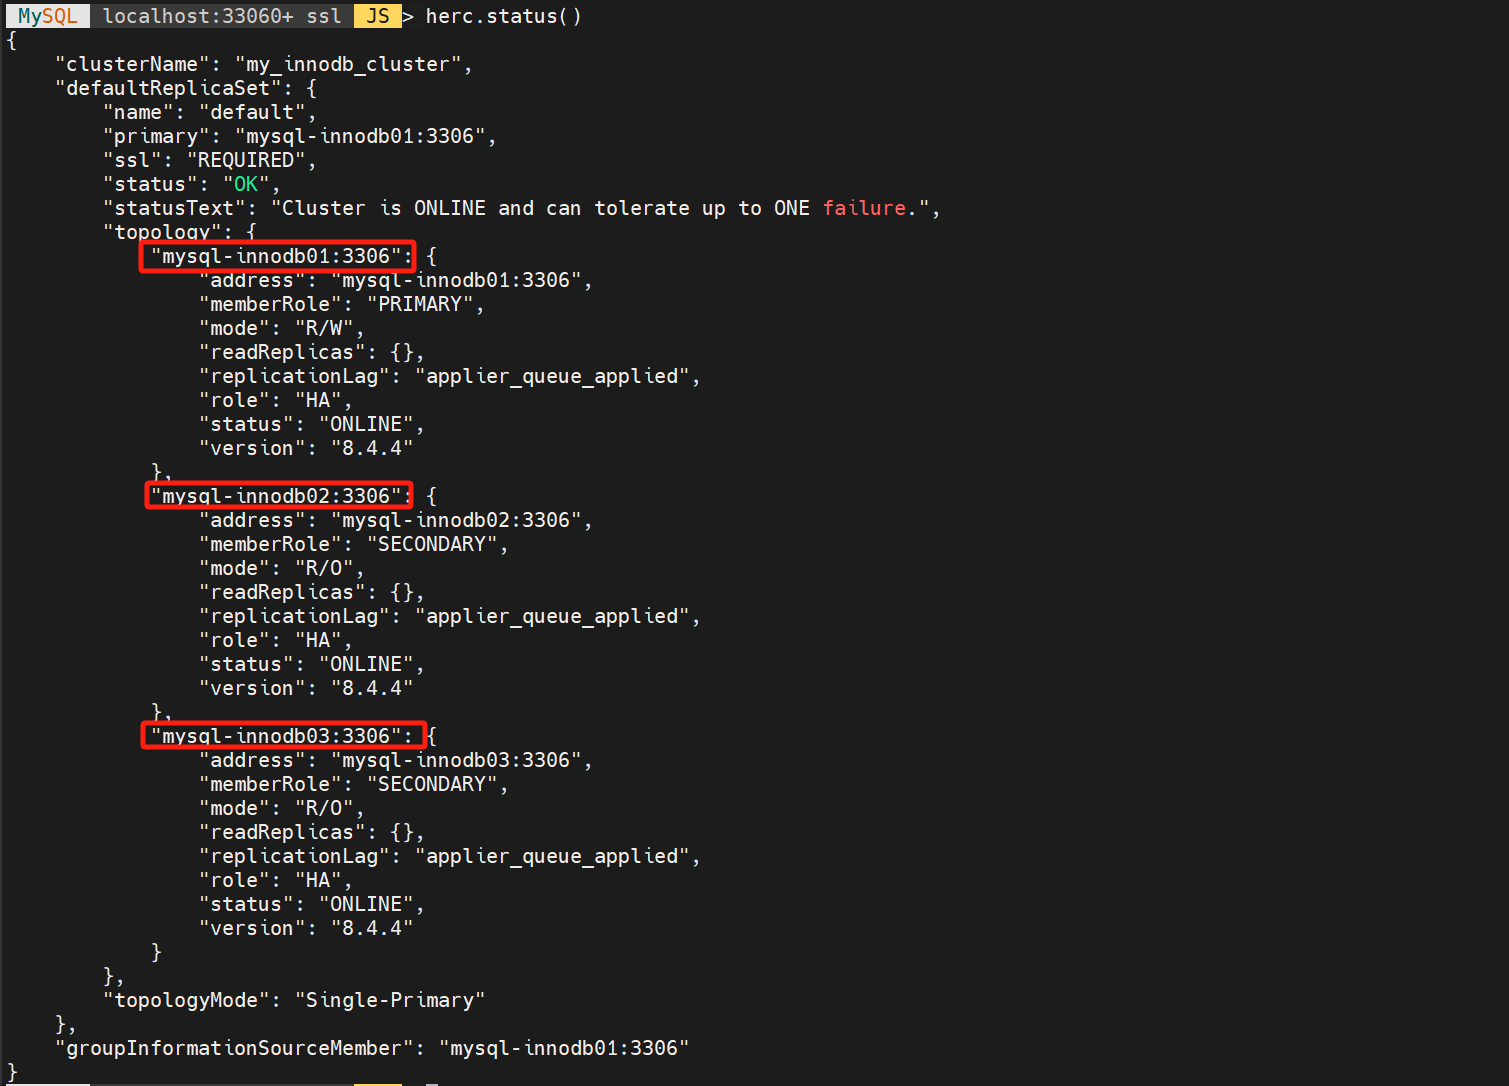
关键字段如下:
\"status\": “OK” 表示集群状态是正常的。- “
topologyMode”: “Single-Primary” 表示是单主模式。- “
mode”: “R/W” 表示可读可写。- “
mode”: “R/O” 表示只读。
# 查看MySQL数据库和表 MySQL localhost:33060+ ssl SQL > \\sql MySQL localhost:33060+ ssl SQL > show schemas -> ;+-------------------------------+| Database|+-------------------------------+| information_schema || mysql || mysql_innodb_cluster_metadata || performance_schema || sys |+-------------------------------+5 rows in set (0.0010 sec) MySQL localhost:33060+ ssl SQL > use mysql_innodb_cluster_metadata;Default schema set to `mysql_innodb_cluster_metadata`.Fetching global names, object names from `mysql_innodb_cluster_metadata` for auto-completion... Press ^C to stop. MySQL localhost:33060+ ssl mysql_innodb_cluster_metadata SQL > show tables;+-----------------------------------------+| Tables_in_mysql_innodb_cluster_metadata |+-----------------------------------------+| async_cluster_members || async_cluster_views || clusters || clusterset_members|| clusterset_views || clustersets || instances || router_rest_accounts || routers || schema_version || v2_ar_clusters || v2_ar_members || v2_clusters || v2_cs_clustersets || v2_cs_members || v2_cs_router_options || v2_gr_clusters || v2_instances || v2_router_options || v2_router_rest_accounts || v2_routers || v2_this_instance |+-----------------------------------------+22 rows in set (0.0014 sec) MySQL localhost:33060+ ssl mysql_innodb_cluster_metadata SQL > use performance_schema;Default schema set to `performance_schema`.Fetching global names, object names from `performance_schema` for auto-completion... Press ^C to stop. MySQL localhost:33060+ ssl performance_schema SQL > show tables;+------------------------------------------------------+| Tables_in_performance_schema |+------------------------------------------------------+| accounts || binary_log_transaction_compression_stats || clone_progress || clone_status || cond_instances || data_lock_waits || data_locks || error_log|| events_errors_summary_by_account_by_error || events_errors_summary_by_host_by_error || events_errors_summary_by_thread_by_error || events_errors_summary_by_user_by_error || events_errors_summary_global_by_error || events_stages_current || events_stages_history || events_stages_history_long || events_stages_summary_by_account_by_event_name || events_stages_summary_by_host_by_event_name || events_stages_summary_by_thread_by_event_name || events_stages_summary_by_user_by_event_name || events_stages_summary_global_by_event_name || events_statements_current || events_statements_histogram_by_digest || events_statements_histogram_global || events_statements_history || events_statements_history_long || events_statements_summary_by_account_by_event_name || events_statements_summary_by_digest || events_statements_summary_by_host_by_event_name || events_statements_summary_by_program || events_statements_summary_by_thread_by_event_name || events_statements_summary_by_user_by_event_name || events_statements_summary_global_by_event_name || events_transactions_current || events_transactions_history || events_transactions_history_long || events_transactions_summary_by_account_by_event_name || events_transactions_summary_by_host_by_event_name || events_transactions_summary_by_thread_by_event_name || events_transactions_summary_by_user_by_event_name || events_transactions_summary_global_by_event_name || events_waits_current || events_waits_history || events_waits_history_long || events_waits_summary_by_account_by_event_name || events_waits_summary_by_host_by_event_name || events_waits_summary_by_instance || events_waits_summary_by_thread_by_event_name || events_waits_summary_by_user_by_event_name || events_waits_summary_global_by_event_name || file_instances || file_summary_by_event_name || file_summary_by_instance || global_status || global_variables || host_cache || hosts || innodb_redo_log_files || keyring_component_status || keyring_keys || log_status || memory_summary_by_account_by_event_name || memory_summary_by_host_by_event_name || memory_summary_by_thread_by_event_name || memory_summary_by_user_by_event_name || memory_summary_global_by_event_name || metadata_locks || mutex_instances || objects_summary_global_by_type || performance_timers || persisted_variables || prepared_statements_instances || processlist || replication_applier_configuration || replication_applier_filters || replication_applier_global_filters || replication_applier_status || replication_applier_status_by_coordinator || replication_applier_status_by_worker || replication_asynchronous_connection_failover || replication_asynchronous_connection_failover_managed || replication_connection_configuration || replication_connection_status || replication_group_communication_information || replication_group_configuration_version || replication_group_member_actions || replication_group_member_stats || replication_group_members || rwlock_instances || session_account_connect_attrs || session_connect_attrs || session_status || session_variables || setup_actors || setup_consumers || setup_instruments || setup_meters || setup_metrics || setup_objects || setup_threads || socket_instances || socket_summary_by_event_name || socket_summary_by_instance || status_by_account || status_by_host || status_by_thread || status_by_user || table_handles || table_io_waits_summary_by_index_usage || table_io_waits_summary_by_table|| table_lock_waits_summary_by_table || threads || tls_channel_status || user_defined_functions || user_variables_by_thread || users || variables_by_thread || variables_info |+------------------------------------------------------+118 rows in set (0.0022 sec)# 查看replication_group_members MySQL localhost:33060+ ssl performance_schema SQL > select * from replication_group_members;+---------------------------+--------------------------------------+----------------+-------------+--------------+-------------+----------------+----------------------------+| CHANNEL_NAME | MEMBER_ID | MEMBER_HOST | MEMBER_PORT | MEMBER_STATE | MEMBER_ROLE | MEMBER_VERSION | MEMBER_COMMUNICATION_STACK |+---------------------------+--------------------------------------+----------------+-------------+--------------+-------------+----------------+----------------------------+| group_replication_applier | 165b48d9-ffd5-11ef-a493-0050562ca97b | mysql-innodb03 | 3306 | ONLINE | SECONDARY | 8.4.4 | MySQL|| group_replication_applier | 165ca6b4-ffd5-11ef-9d63-00505638d8cf | mysql-innodb02 | 3306 | ONLINE | SECONDARY | 8.4.4 | MySQL|| group_replication_applier | 16657b6f-ffd5-11ef-b7b1-0050563a3648 | mysql-innodb01 | 3306 | ONLINE | PRIMARY | 8.4.4 | MySQL|+---------------------------+--------------------------------------+----------------+-------------+--------------+-------------+----------------+----------------------------+3 rows in set (0.0009 sec)
3节点mysql innodb集群部署已经完成。
1.4 部署mysql-router
# Step 1:所有mysql-router节点执行dnf install -y mysql-router# Step 2:mysql-innodb01执行mysqlrouter --bootstrap icadmin@mysql-innodb01:3306 --directory /var/lib/mysqlrouter --conf-bind-address 0.0.0.0 --user=mysqlrouterPlease enter MySQL password for icadmin:# Bootstrapping MySQL Router 8.4.4 (MySQL Community - GPL) instance at \'/var/lib/mysqlrouter\'...- Creating account(s) (only those that are needed, if any)- Verifying account (using it to run SQL queries that would be run by Router)- Storing account in keyring- Adjusting permissions of generated files- Creating configuration /var/lib/mysqlrouter/mysqlrouter.conf# MySQL Router configured for the InnoDB Cluster \'my_innodb_cluster\'After this MySQL Router has been started with the generated configuration $ mysqlrouter -c /var/lib/mysqlrouter/mysqlrouter.confInnoDB Cluster \'my_innodb_cluster\' can be reached by connecting to:## MySQL Classic protocol- Read/Write Connections: localhost:6446- Read/Only Connections: localhost:6447- Read/Write Split Connections: localhost:6450## MySQL X protocol- Read/Write Connections: localhost:6448- Read/Only Connections: localhost:6449 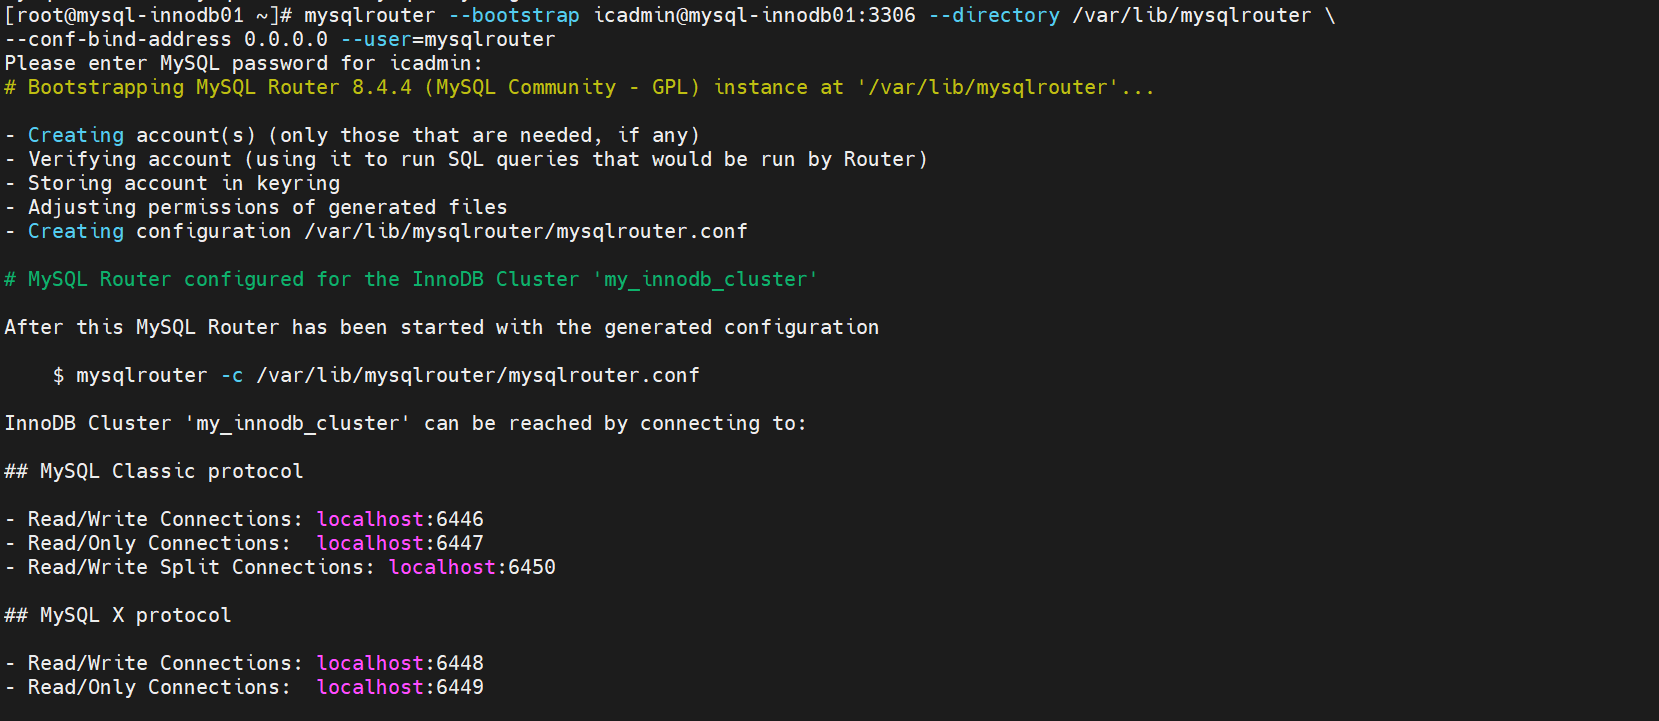
# Step 3:查看端口ss -atunlp
# Step 4:手动临时启动服务cd /var/lib/mysqlrouter/./start.sh
重新查看监听端口,
mysql router读写端口为6446,mysql router只读端口为6447。

# Step 5:查看配置文件监听端口cat /var/lib/mysqlrouter/mysqlrouter.conf | grep port
# Step 6:查看缓存的集群信息cat /var/lib/mysqlrouter/data/state.json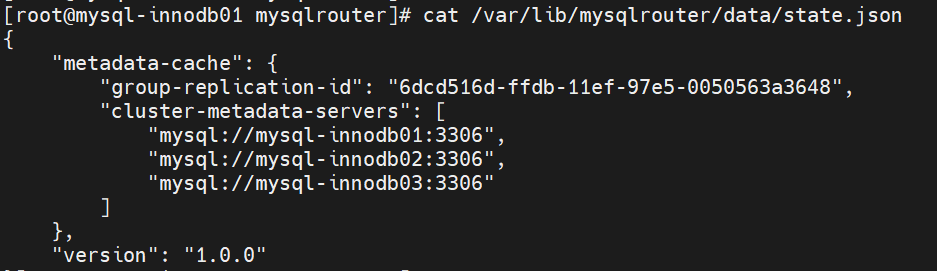
# Step 7:新建mysqlrouter systemd配置文件cat >/etc/systemd/system/mysqlrouter.service<<EOF[Unit]Description=MySQL RouterAfter=network.targetAfter=syslog.target[Service]Type=notifyUser=mysqlrouterGroup=mysqlrouter# Start main serviceExecStart=/usr/bin/mysqlrouter -c /var/lib/mysqlrouter/mysqlrouter.conf --user=mysqlrouter# Sets open_files_limitLimitNOFILE = 10000Restart=on-failure[Install]WantedBy=multi-user.targetEOF# Step 8:重新加载配置并启动mysqlroutercd /var/lib/mysqlrouter./stop.shsystemctl daemon-reloadsystemctl enable --now mysqlrouter# Step 9:连接数据库mysql -uroot -p\'Xa%^3T%T4!\'# Step 10:创建示例用户mysql> create user app@\'%\' identified by \'App@123456\';Query OK, 0 rows affected (0.01 sec)mysql> grant all on *.* to app@\'%\';Query OK, 0 rows affected (0.00 sec)mysql> flush privileges;Query OK, 0 rows affected (0.00 sec)# Step 11:通过mysql-router连接到读写数据库,并测试mysql -h127.0.0.1 -P 6446 -u app -p\'App@123456\'mysql> select @@hostname;+----------------+| @@hostname |+----------------+| mysql-innodb01 |+----------------+1 row in set (0.00 sec)mysql> create database mydb;Query OK, 1 row affected (0.01 sec)mysql> \\qBye# Step 12:通过mysql-router连接到只读数据库,并测试mysql -h127.0.0.1 -P 6447 -u app -p\'App@123456\'mysql> select @@hostname;+----------------+| @@hostname |+----------------+| mysql-innodb02 |+----------------+1 row in set (0.00 sec)mysql> create database mydb1;ERROR 1290 (HY000): The MySQL server is running with the --super-read-only option so it cannot execute this statementmysql> select user, host from mysql.user;+---------------------------------+-----------+| user | host |+---------------------------------+-----------+| app | % || icadmin | % || mysql_innodb_cluster_2350966802 | % || mysql_innodb_cluster_3589772745 | % || mysql_innodb_cluster_4189872328 | % || mysql_router1_f82maf4 | % || mysql.infoschema | localhost || mysql.session | localhost || mysql.sys | localhost || root | localhost |+---------------------------------+-----------+10 rows in set (0.00 sec)mysql> \\qBye1.5 高可用负载均衡器配置
1.5.1 mysql-innodb01和mysql-innodb02安装
dnf install -y haproxy keepalived1.5.2 两台负载均衡器配置文件修改
# Step 1:修改haproxy配置文件vim /etc/haproxy/haproxy.cfg# HAProxy Configuration for lb01global log /dev/log local0 log /dev/log local1 notice chroot /var/lib/haproxy stats socket /run/haproxy/admin.sock mode 660 level admin expose-fd listeners stats timeout 30s user haproxy group haproxy daemondefaults log global mode tcp option tcplog option dontlognull timeout connect 5000 timeout client 50000 timeout server 50000frontend db_rw_front bind *:16446 default_backend db_rw_backbackend db_rw_back balance roundrobin server router01 192.168.174.47:6446 check server router02 192.168.174.48:6446 checkfrontend db_ro_front bind *:16447 default_backend db_ro_backbackend db_ro_back balance roundrobin server router01 192.168.174.47:6447 check server router02 192.168.174.48:6447 check1.5.2 mysql-innodb01高可用配置文件修改
# Step 1:配置keepalived配置文件vim /etc/keepalived/keepalived.conf # Keepalived Configuration for lb01global_defs { router_id 51 script_user root enable_script_security}vrrp_script check_haproxy { script \"/usr/bin/killall -0 haproxy\" interval 2 fall 2 # require 2 failures for KO rise 2 # require 2 successes for OK}vrrp_instance db_vip { state MASTER interface ens33 mcast_src_ip 192.168.174.47 virtual_router_id 51 priority 100 advert_int 2 authentication { auth_type PASS auth_pass secret456 } virtual_ipaddress { 192.168.174.177 } track_script { check_haproxy }}1.5.3 mysql-innodb02高可用配置文件修改
# Step 1:配置keepalived配置文件vim /etc/keepalived/keepalived.conf# Keepalived Configuration for lb01global_defs { router_id 51 script_user root enable_script_security}vrrp_script check_haproxy { script \"/usr/bin/killall -0 haproxy\" interval 2 fall 2 # require 2 failures for KO rise 2 # require 2 successes for OK}vrrp_instance db_vip { state BACKUP interface ens33 mcast_src_ip 192.168.174.48 virtual_router_id 51 priority 90 nopreempt advert_int 1 authentication { auth_type PASS auth_pass secret456 } virtual_ipaddress { 192.168.174.177 } track_script { check_haproxy }}1.5.4 两个节点分别启动服务
# Step 1:启动keepalived haproxysystemctl enable --now haproxy keepalived# Step 2:mysql-innodb01查看VIPip a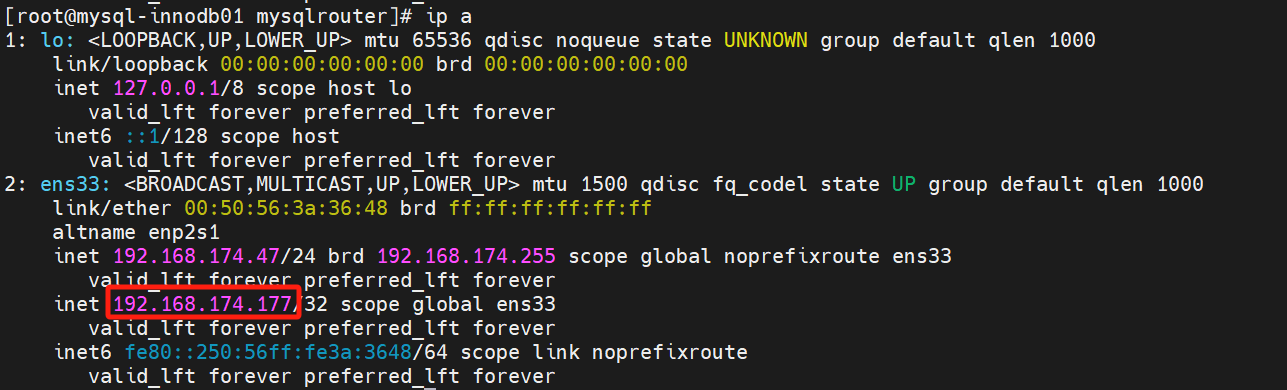
# 查看端口ss -tunlp
1.5.5 通过VIP连接读写端口
mysql -h192.168.174.177 -P 16446 -u app -p\'App@123456\'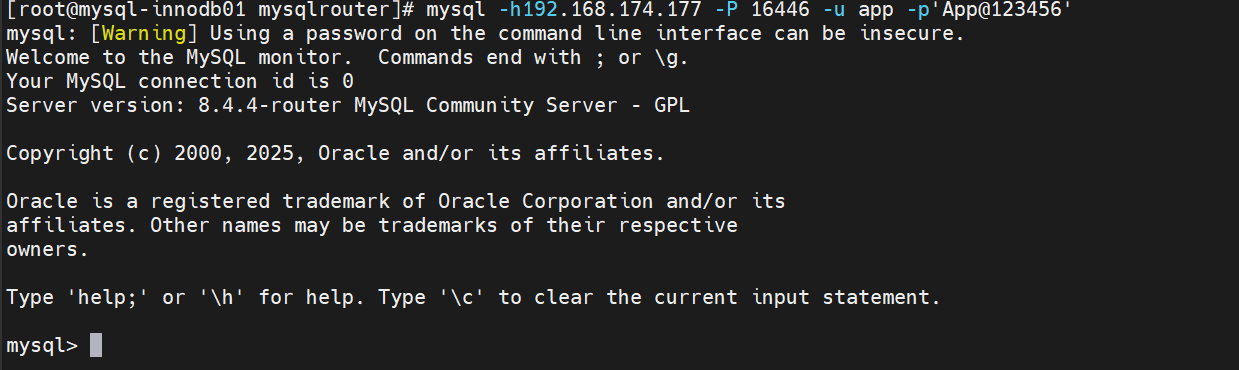
1.5.6 通过VIP连接只读端口
mysql -h192.168.174.177 -P 16447 -u app -p\'App@123456\'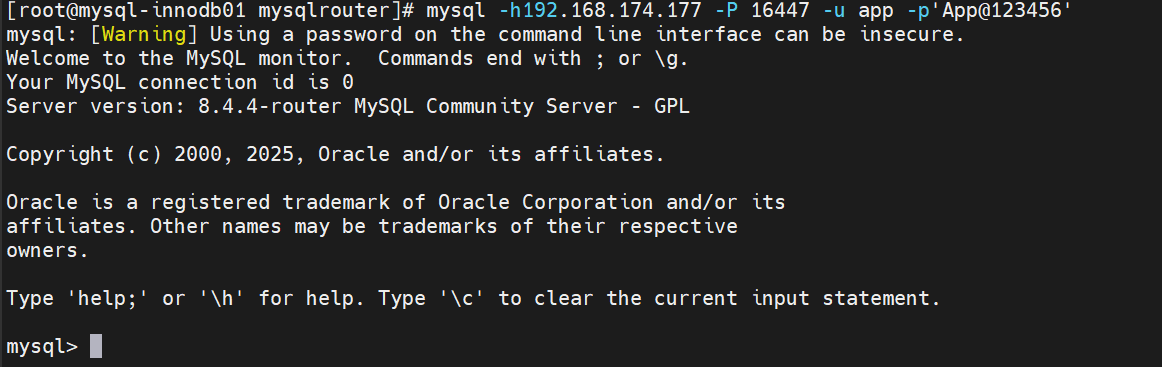
1.6 MySQL Innodb Cluster集群角色管理
1.6.1 切换为多个Primary模式
MySQL localhost:33060+ ssl JS > herc.switchToMultiPrimaryMode()1.6.2 切换为单个Primary模式
MySQL localhost:33060+ ssl JS > herc.switchToSinglePrimaryMode()1.6.3 指定节点切换为Primary模式
MySQL localhost:33060+ ssl JS > herc.setPrimaryInstance(\'mysql-innodb02\')1.6.4 从集群删除节点
MySQL localhost:33060+ ssl JS > herc.removeInstance(\'mysql-innodb03\')二、zabbix-server HA部署之高可用负载均衡配置文件修改
2.1 两台Haproxy配置文件修改
# Step 1:两台主机配置haproxy配置文件vim /etc/haproxy/haproxy.cfg# HAProxy Configuration for lb01global log /dev/log local0 log /dev/log local1 notice chroot /var/lib/haproxy stats socket /run/haproxy/admin.sock mode 660 level admin expose-fd listeners stats timeout 30s user haproxy group haproxy daemondefaults log global mode tcp option tcplog option dontlognull timeout connect 5000 timeout client 50000 timeout server 50000frontend web_front bind *:8080 default_backend web_backbackend web_back balance roundrobin server web01 192.168.174.68:8080 check server web02 192.168.174.69:8080 checkfrontend db_rw_front bind *:16446 default_backend db_rw_backbackend db_rw_back balance roundrobin server router01 192.168.174.47:6446 check server router02 192.168.174.48:6446 checkfrontend db_ro_front bind *:16447 default_backend db_ro_backbackend db_ro_back balance roundrobin server router01 192.168.174.47:6447 check server router02 192.168.174.48:6447 check2.2 mysql-innodb01 keepalived配置文件修改
# Step 1:配置keepalived配置文件vim /etc/keepalived/keepalived.conf# Keepalived Configuration for lb01global_defs { router_id 51 script_user root enable_script_security}vrrp_script check_haproxy { script \"/usr/bin/killall -0 haproxy\" interval 2 fall 2 # require 2 failures for KO rise 2 # require 2 successes for OK}vrrp_instance web_vip { state MASTER interface ens33 mcast_src_ip 192.168.174.47 virtual_router_id 52 priority 100 advert_int 2 authentication { auth_type PASS auth_pass secret123 } virtual_ipaddress { 192.168.174.133 } track_script { check_haproxy }}vrrp_instance db_vip { state MASTER interface ens33 mcast_src_ip 192.168.174.47 virtual_router_id 51 priority 100 advert_int 1 authentication { auth_type PASS auth_pass secret456 } virtual_ipaddress { 192.168.174.177 } track_script { check_haproxy }}2.3 mysql-innodb02 keepalived配置文件修改
# Step 1:配置keepalived配置文件vim /etc/keepalived/keepalived.conf# Keepalived Configuration for lb01global_defs { router_id 51 script_user root enable_script_security}vrrp_script check_haproxy { script \"/usr/bin/killall -0 haproxy\" interval 2 fall 2 # require 2 failures for KO rise 2 # require 2 successes for OK}vrrp_instance web_vip { state BACKUP interface ens33 mcast_src_ip 192.168.174.48 virtual_router_id 52 priority 90 nopreempt advert_int 2 authentication { auth_type PASS auth_pass secret123 } virtual_ipaddress { 192.168.174.133 } track_script { check_haproxy }}vrrp_instance db_vip { state BACKUP interface ens33 mcast_src_ip 192.168.174.48 virtual_router_id 51 priority 90 nopreempt advert_int 1 authentication { auth_type PASS auth_pass secret456 } virtual_ipaddress { 192.168.174.177 } track_script { check_haproxy }}2.4 两台节点高可用负载均衡重启服务
# Step 1:重启服务systemctl restart haproxy keepalived# Step 2:查看IPip a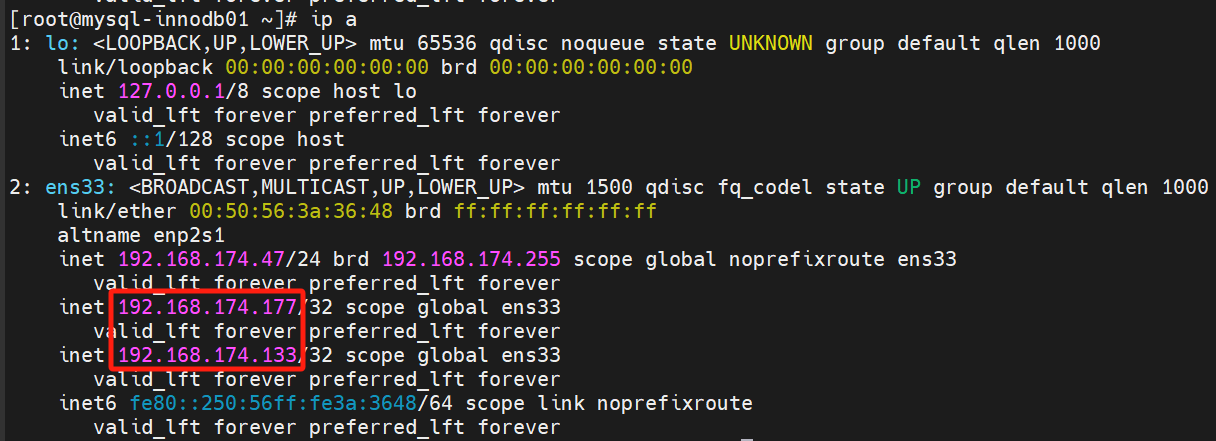
三、zabbix-server HA部署之zabbix-server双节点部署
IP地址192.168.174.68zabbix-server01192.168.174.69zabbix-server02 官网:https://www.zabbix.com/cn/download?zabbix=7.0&os_distribution=centos&os_version=9&components=server_frontend_agent&db=mysql&ws=nginx
3.1 两台主机更改主机名
hostnamectl set-hostname zabbix-server01hostnamectl set-hostname zabbix-server023.2 两台主机安装zabbix 7.0安装源
# Step 1:安装zabbix 7.0 安装源rpm -Uvh https://repo.zabbix.com/zabbix/7.0/centos/9/x86_64/zabbix-release-latest-7.0.el9.noarch.rpm# Step 2:缓存元数据dnf makecache3.3 两台主机安装zabbix-server和zabbix-agent2
# Step 1:安装zabbix-server和zabbix-agent2dnf install -y zabbix-server-mysql zabbix-sql-scripts zabbix-agent2# Step 2:查看zabbix-server版本zabbix_server -Vzabbix_server (Zabbix) 7.0.10# Step 3:查看zabbix-agent2版本zabbix_agent2 -Vzabbix_agent2 (Zabbix) 7.0.103.4 mysql-innodb01数据库服务器上执行
# Step 1:登录数据库mysql -uroot -p\'Xa%^3T%T4!\'# Step 2:创建zabbix-server基础数据库mysql> create database zabbix character set utf8mb4 collate utf8mb4_bin;Query OK, 1 row affected (0.01 sec)# Step 3:创建zabbix-server MySQL用户mysql> create user \'zabbix\'@\'%\' identified by \'Zbx@123456\';Query OK, 0 rows affected (0.01 sec)# Step 4:MySQL用户授权mysql> grant all privileges on zabbix.* to \'zabbix\'@\'%\';Query OK, 0 rows affected (0.00 sec)# Step 5:关闭检查mysql> set global log_bin_trust_function_creators = 1;Query OK, 0 rows affected, 1 warning (0.00 sec)# Step 6:退出数据库mysql> quit;Bye3.5 zabbix-server01导入MySQL基础数据
# Step 1:安装mariadb客户端工具yum install -y mariadb# Step 2:测试连接MySQL写库mysql -h 192.168.174.177 -P 16446 -u zabbix -p\'Zbx@123456\' -Dzabbix# Step 3:导入zabbix基础数据zcat /usr/share/zabbix-sql-scripts/mysql/server.sql.gz | mysql --default-character-set=utf8mb4 -uzabbix -P 16446 -p\'Zbx@123456\' -h192.168.174.177 -Dzabbix# Step 4:查看基础数据mysql -h 192.168.174.177 -P 16447 -u zabbix -p\'Zbx@123456\' -DzabbixMySQL [zabbix]> use zabbix;Database changedMySQL [zabbix]> show tables;3.6 mysql-innodb01数据库服务器上执行
# Step 1:登录数据路mysql -uroot -p\'Xa%^3T%T4!\'# Step 2:开启检查mysql> set global log_bin_trust_function_creators = 0;Query OK, 0 rows affected, 1 warning (0.00 sec)mysql> quit;Bye3.7 两台zabbix-server服务器上执行
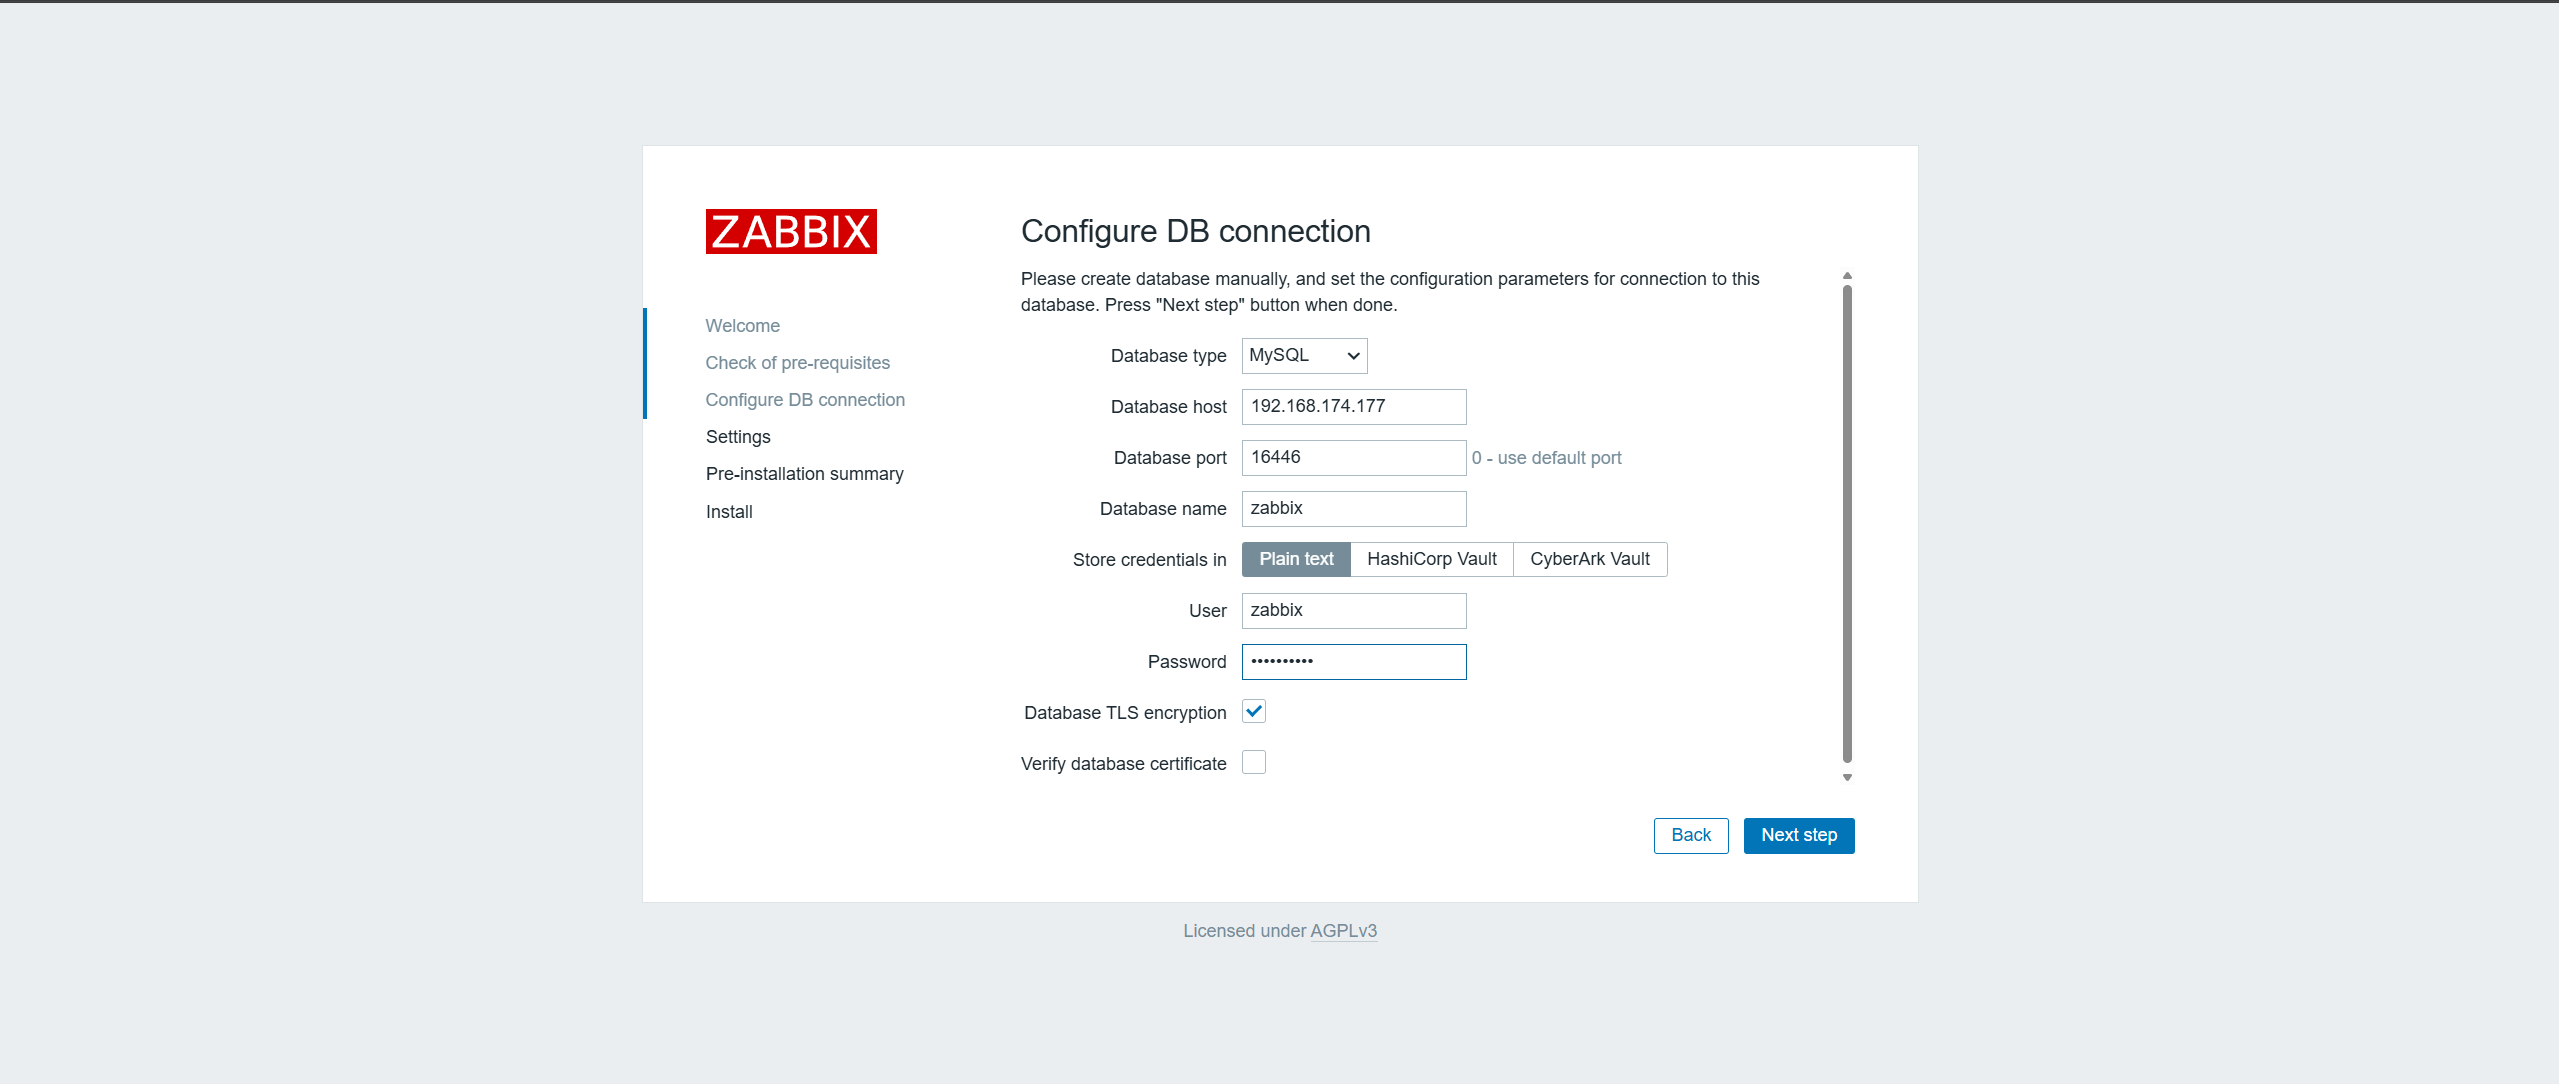
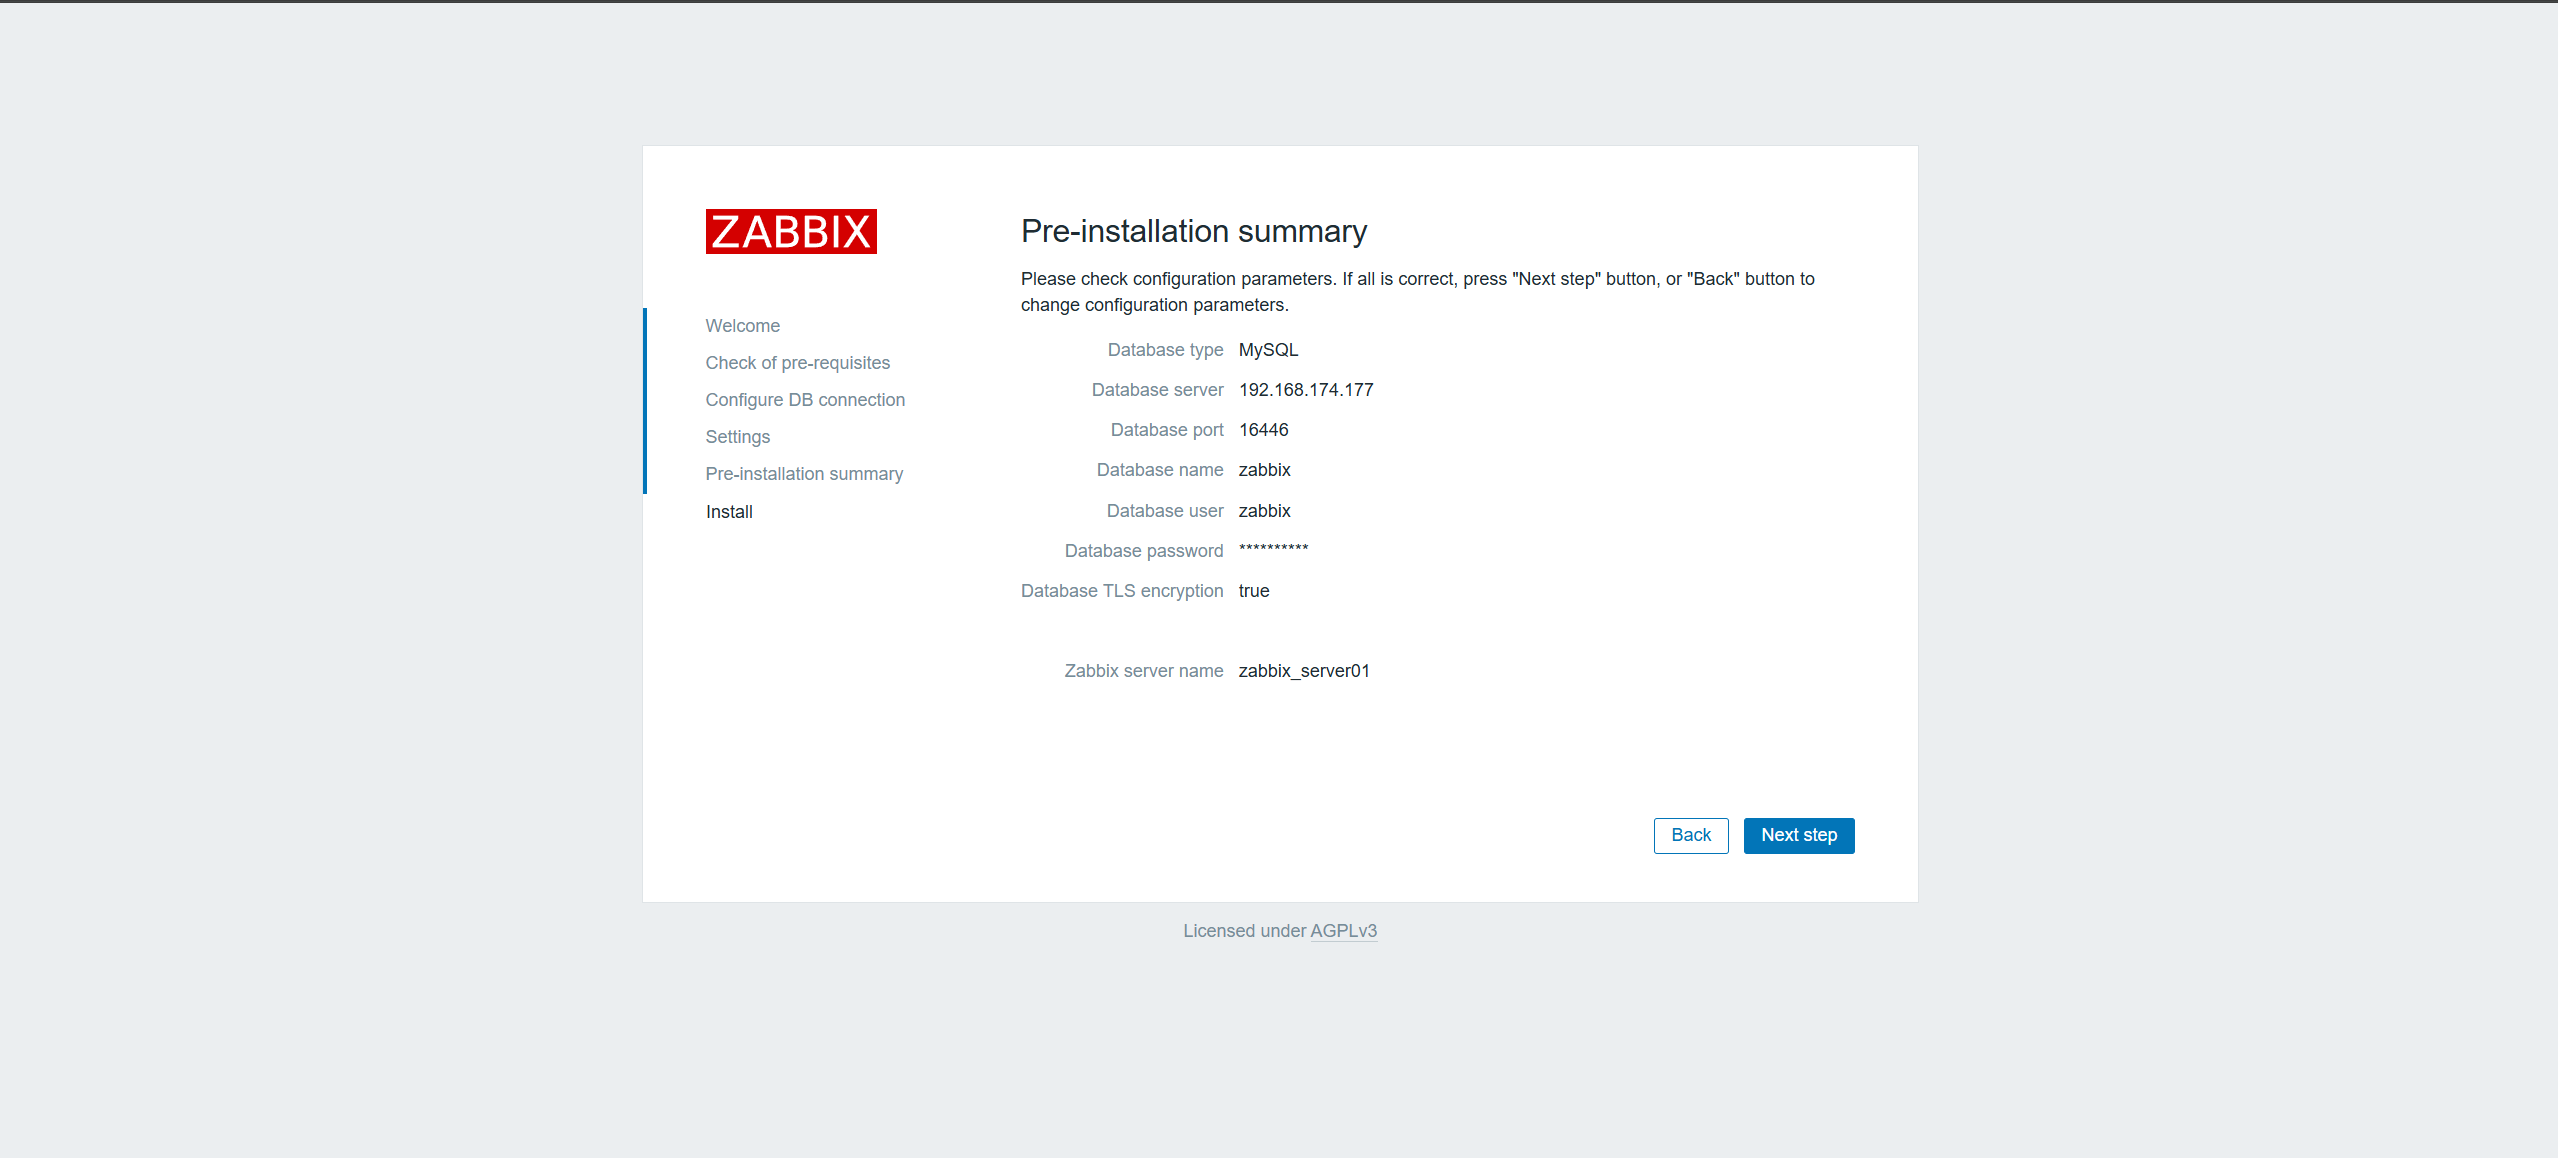
为两台Zabbix server配置数据库,编辑配置文件 /etc/zabbix/zabbix_server.conf
3.7.1 zabbix-server01配置文件修改
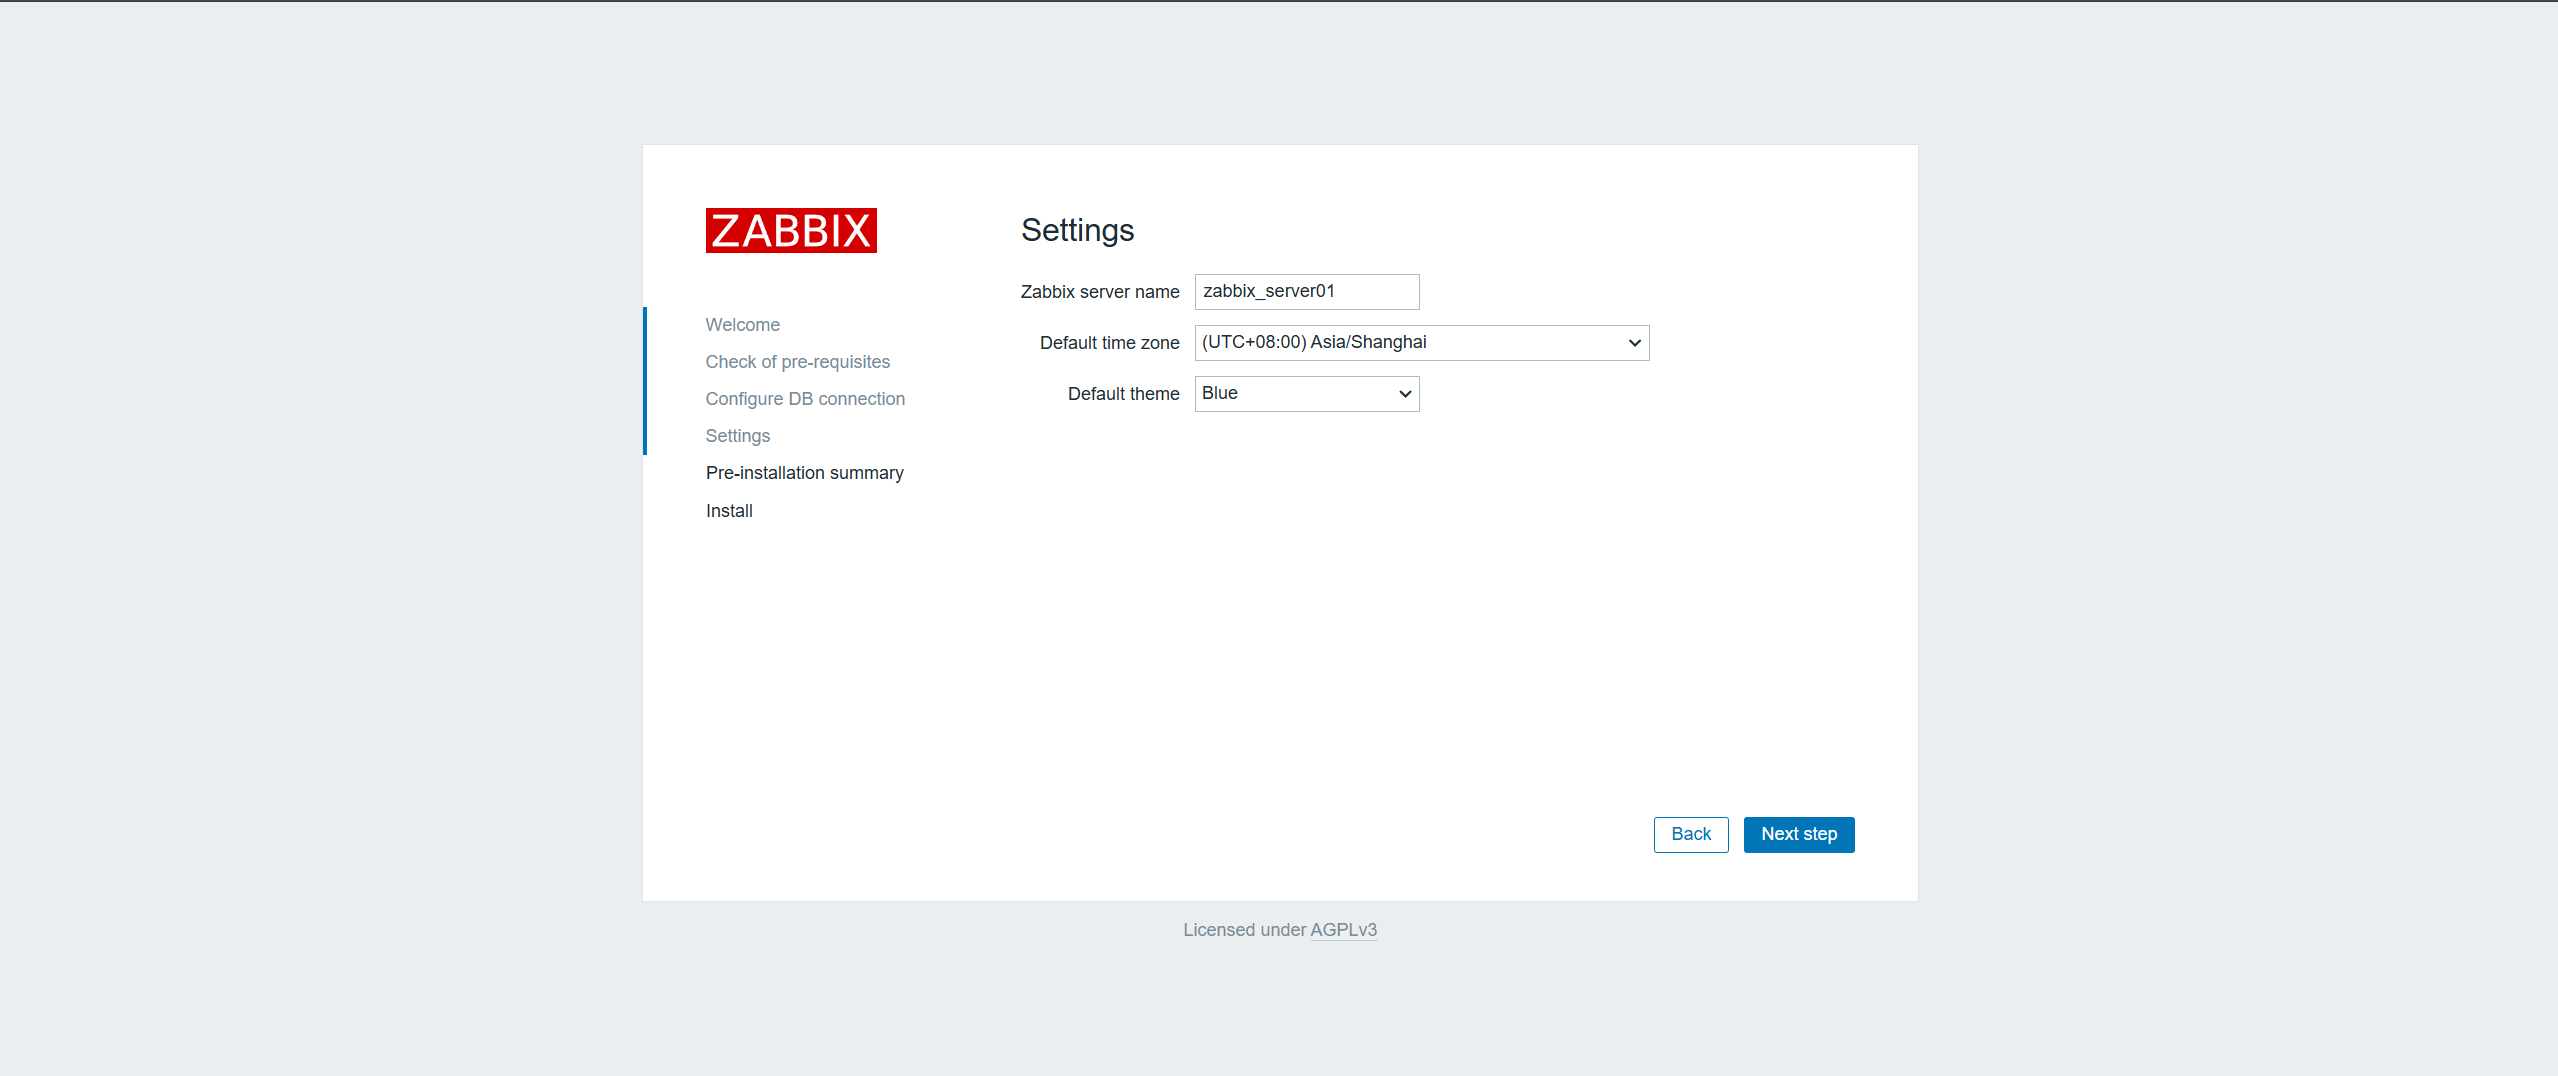
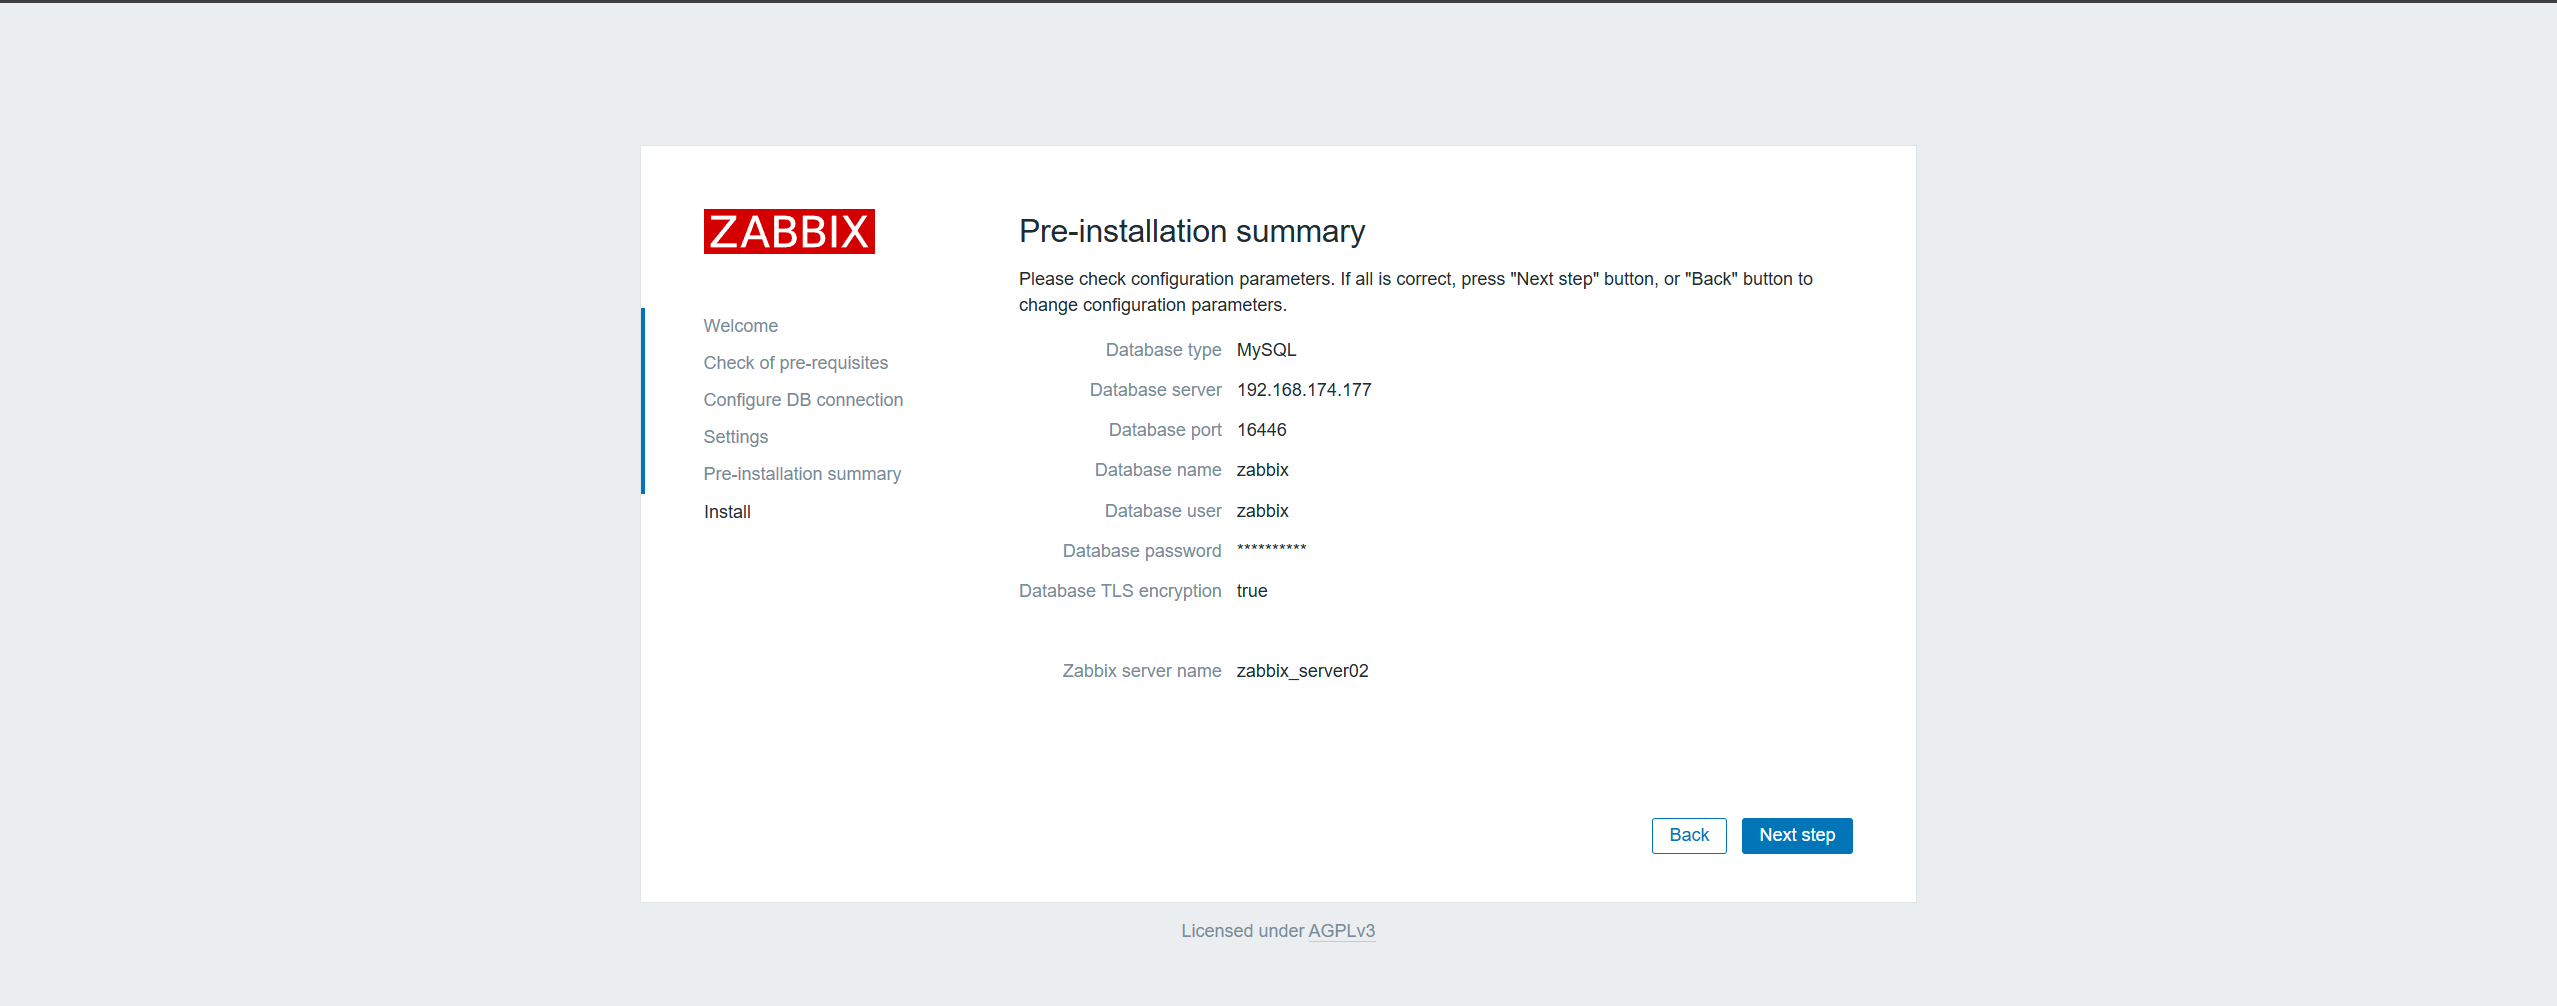
egrep -v \"^(#|$)\" /etc/zabbix/zabbix_server.confLogFile=/var/log/zabbix/zabbix_server.logLogFileSize=0PidFile=/run/zabbix/zabbix_server.pidSocketDir=/run/zabbixDBHost=192.168.174.177 # MySQL VIP地址DBName=zabbix # MySQL 数据库名称DBUser=zabbix # MySQL 用户DBPassword=Zbx@123456 # MySQL密码DBPort=16446 # MySQL haproxy监听端口号SNMPTrapperFile=/var/log/snmptrap/snmptrap.logTimeout=4LogSlowQueries=3000StatsAllowedIP=127.0.0.1EnableGlobalScripts=0HANodeName=zabbix-server01 # 当前主机名称NodeAddress=192.168.174.68:10051 # 当前主机的IP地址和zabbix server的端口号3.7.2 zabbix-server02配置文件修改
egrep -v \"^(#|$)\" /etc/zabbix/zabbix_server.confLogFile=/var/log/zabbix/zabbix_server.logLogFileSize=0PidFile=/run/zabbix/zabbix_server.pidSocketDir=/run/zabbixDBHost=192.168.174.177 # MySQL VIP地址DBName=zabbix # MySQL 数据库名称DBUser=zabbix # MySQL 用户DBPassword=Zbx@123456 # MySQL密码DBPort=16446 # MySQL haproxy监听端口号SNMPTrapperFile=/var/log/snmptrap/snmptrap.logTimeout=4LogSlowQueries=3000StatsAllowedIP=127.0.0.1EnableGlobalScripts=0HANodeName=zabbix-server02 # 当前主机名称NodeAddress=192.168.174.69:10051 # 当前主机的IP地址和zabbix server的端口号3.7.3 两台主机启动zabbix-server
systemctl enable --now zabbix-server zabbix-agent2四、zabbix-server HA部署之zabbix-web双节点部署
注意:在真正的生产环境中。
zabbix-web应和zabbix-server分开部署。
dnf install zabbix-web-mysql zabbix-nginx-conf zabbix-selinux-policy -y4.1 zabbix前端配置文件更改
4.1.1zabbix-server01 配置文件更改
vim /etc/nginx/conf.d/zabbix.confserver {# listen 8080;# server_name example.com; listen 8080; server_name 192.168.174.68;4.1.2 zabbix-server02 配置文件更改
vim /etc/nginx/conf.d/zabbix.confserver {# listen 8080;# server_name example.com; listen 8080; server_name 192.168.174.69;4.1.3 两台主机启动服务
systemctl enable --now nginx php8.1-fpm五、zabbix-server分别初始化
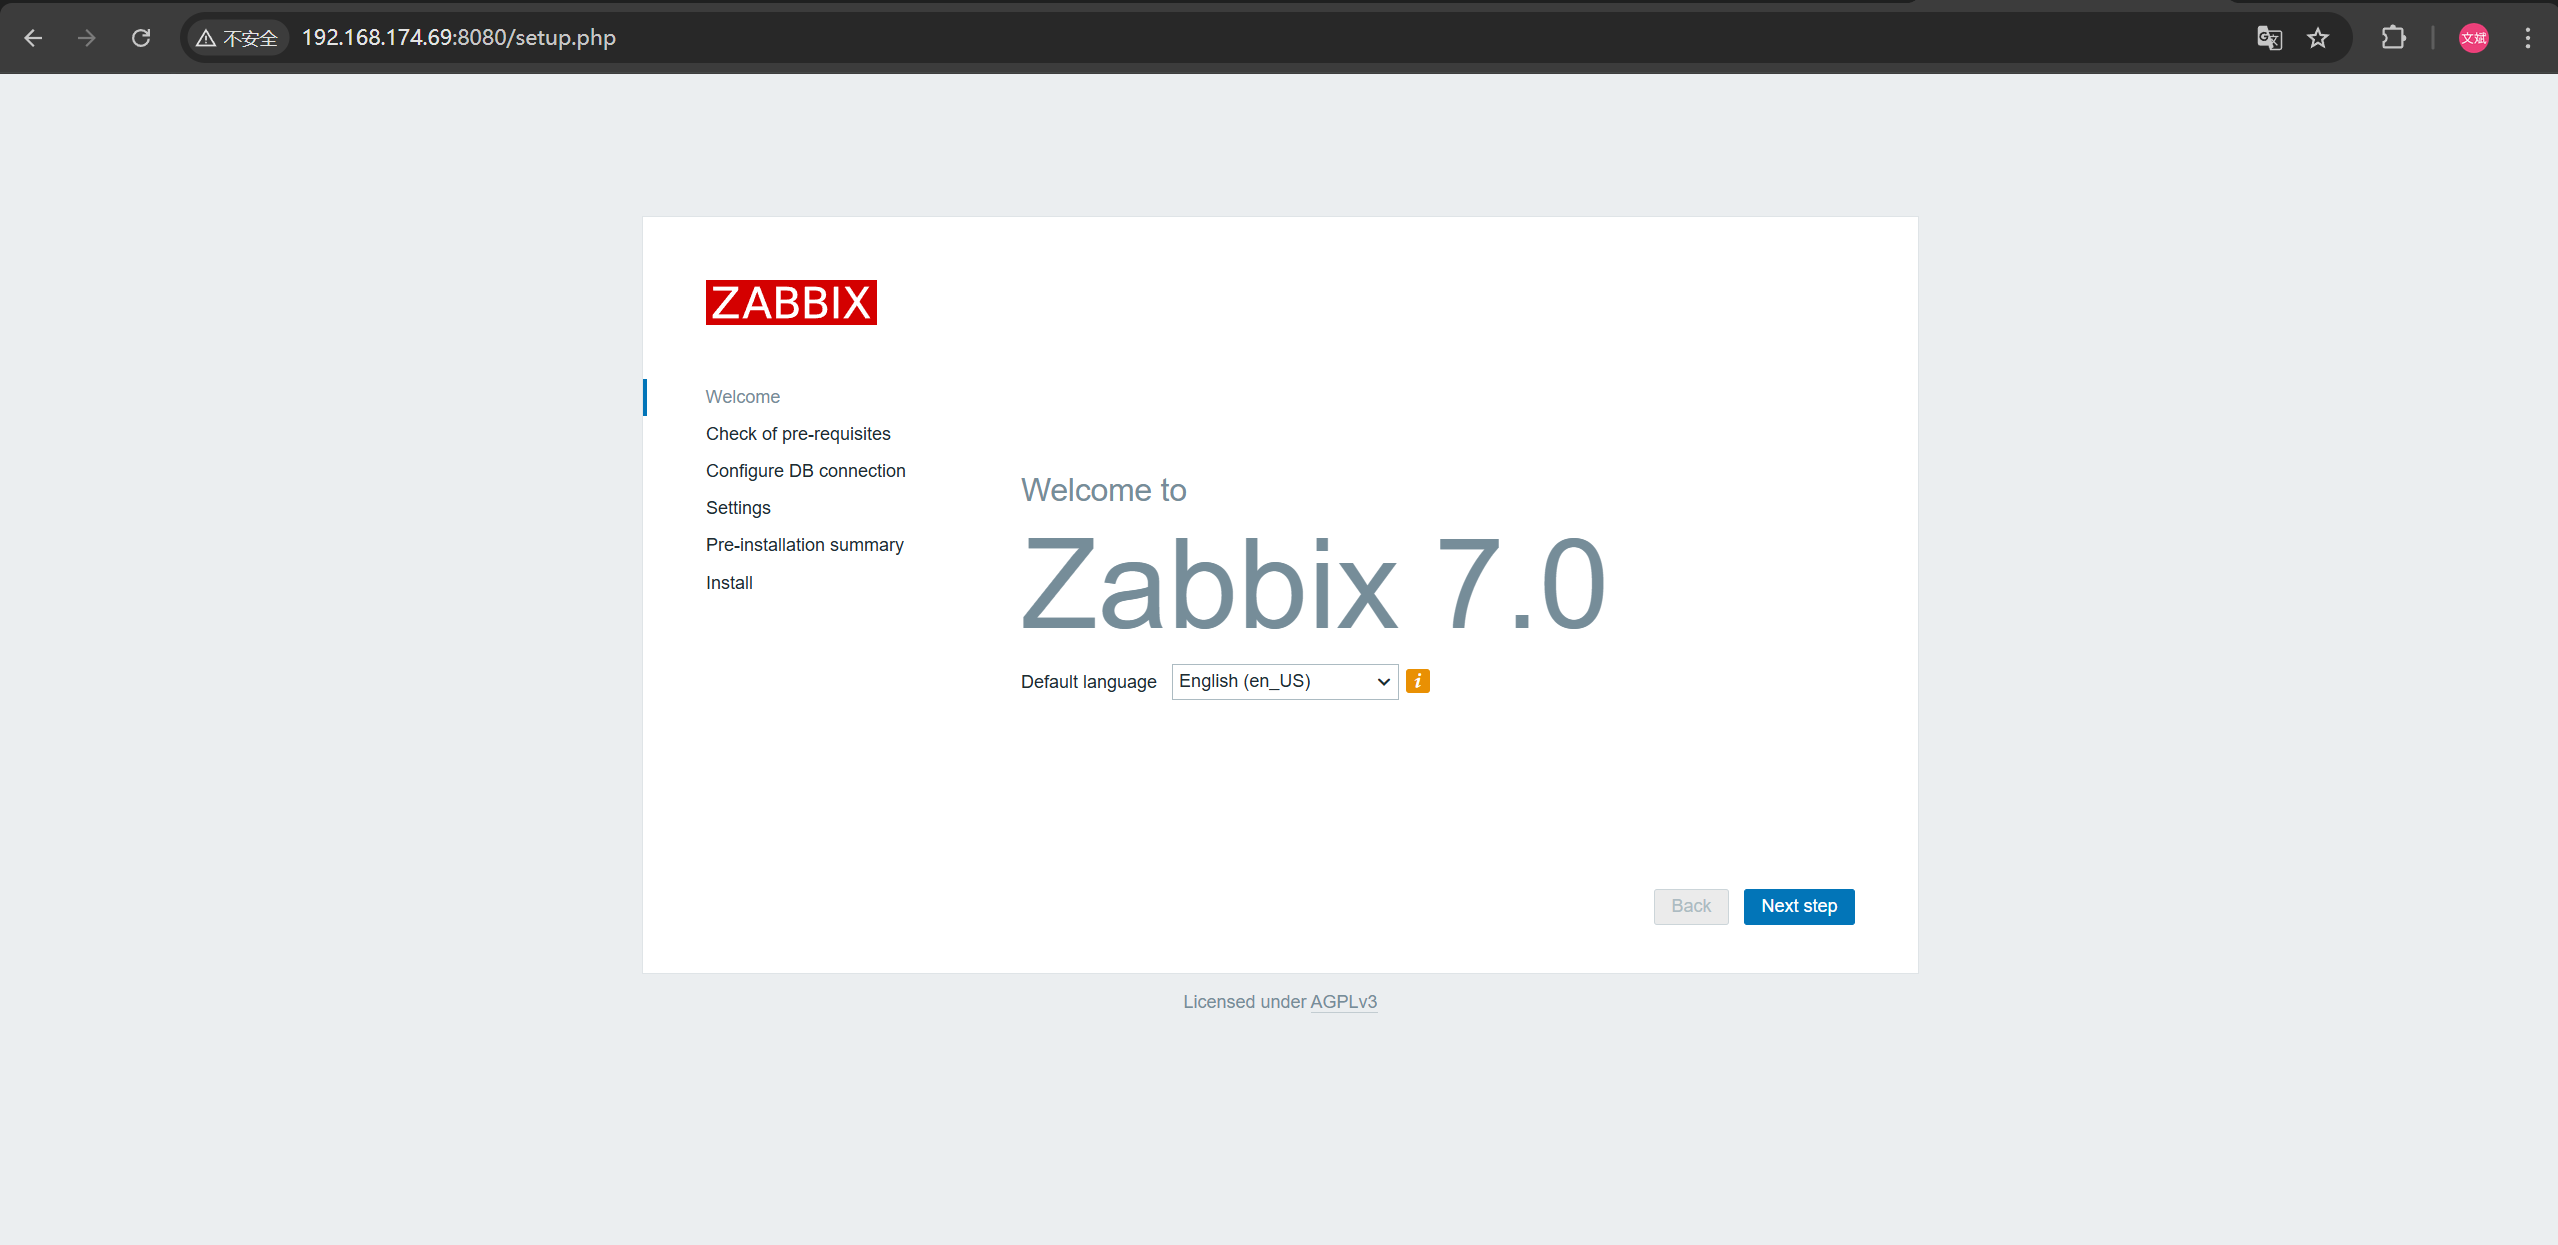
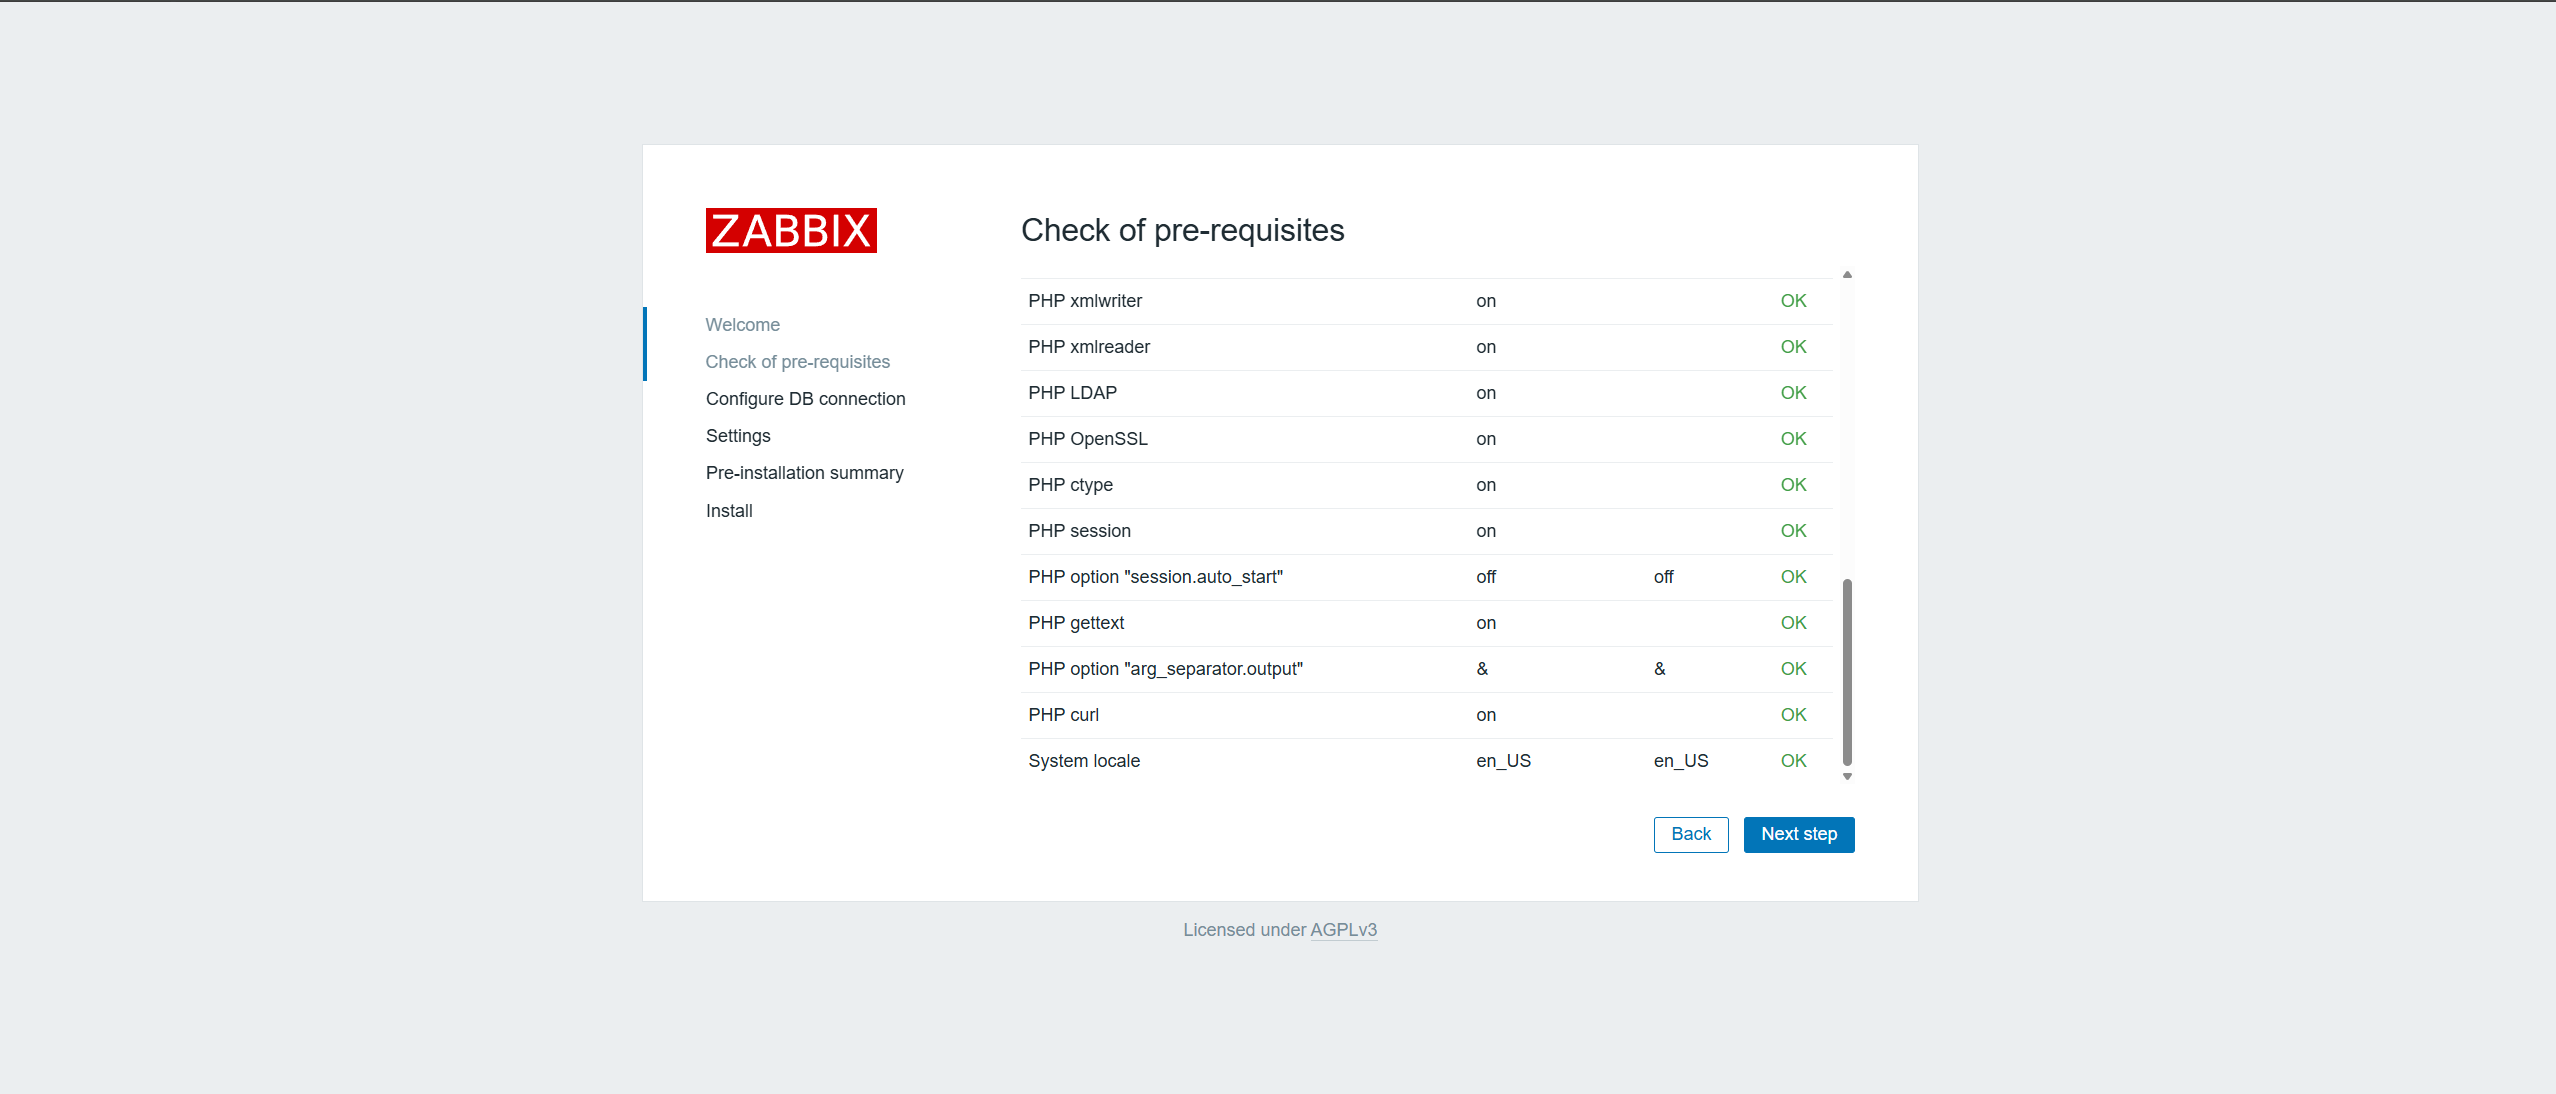
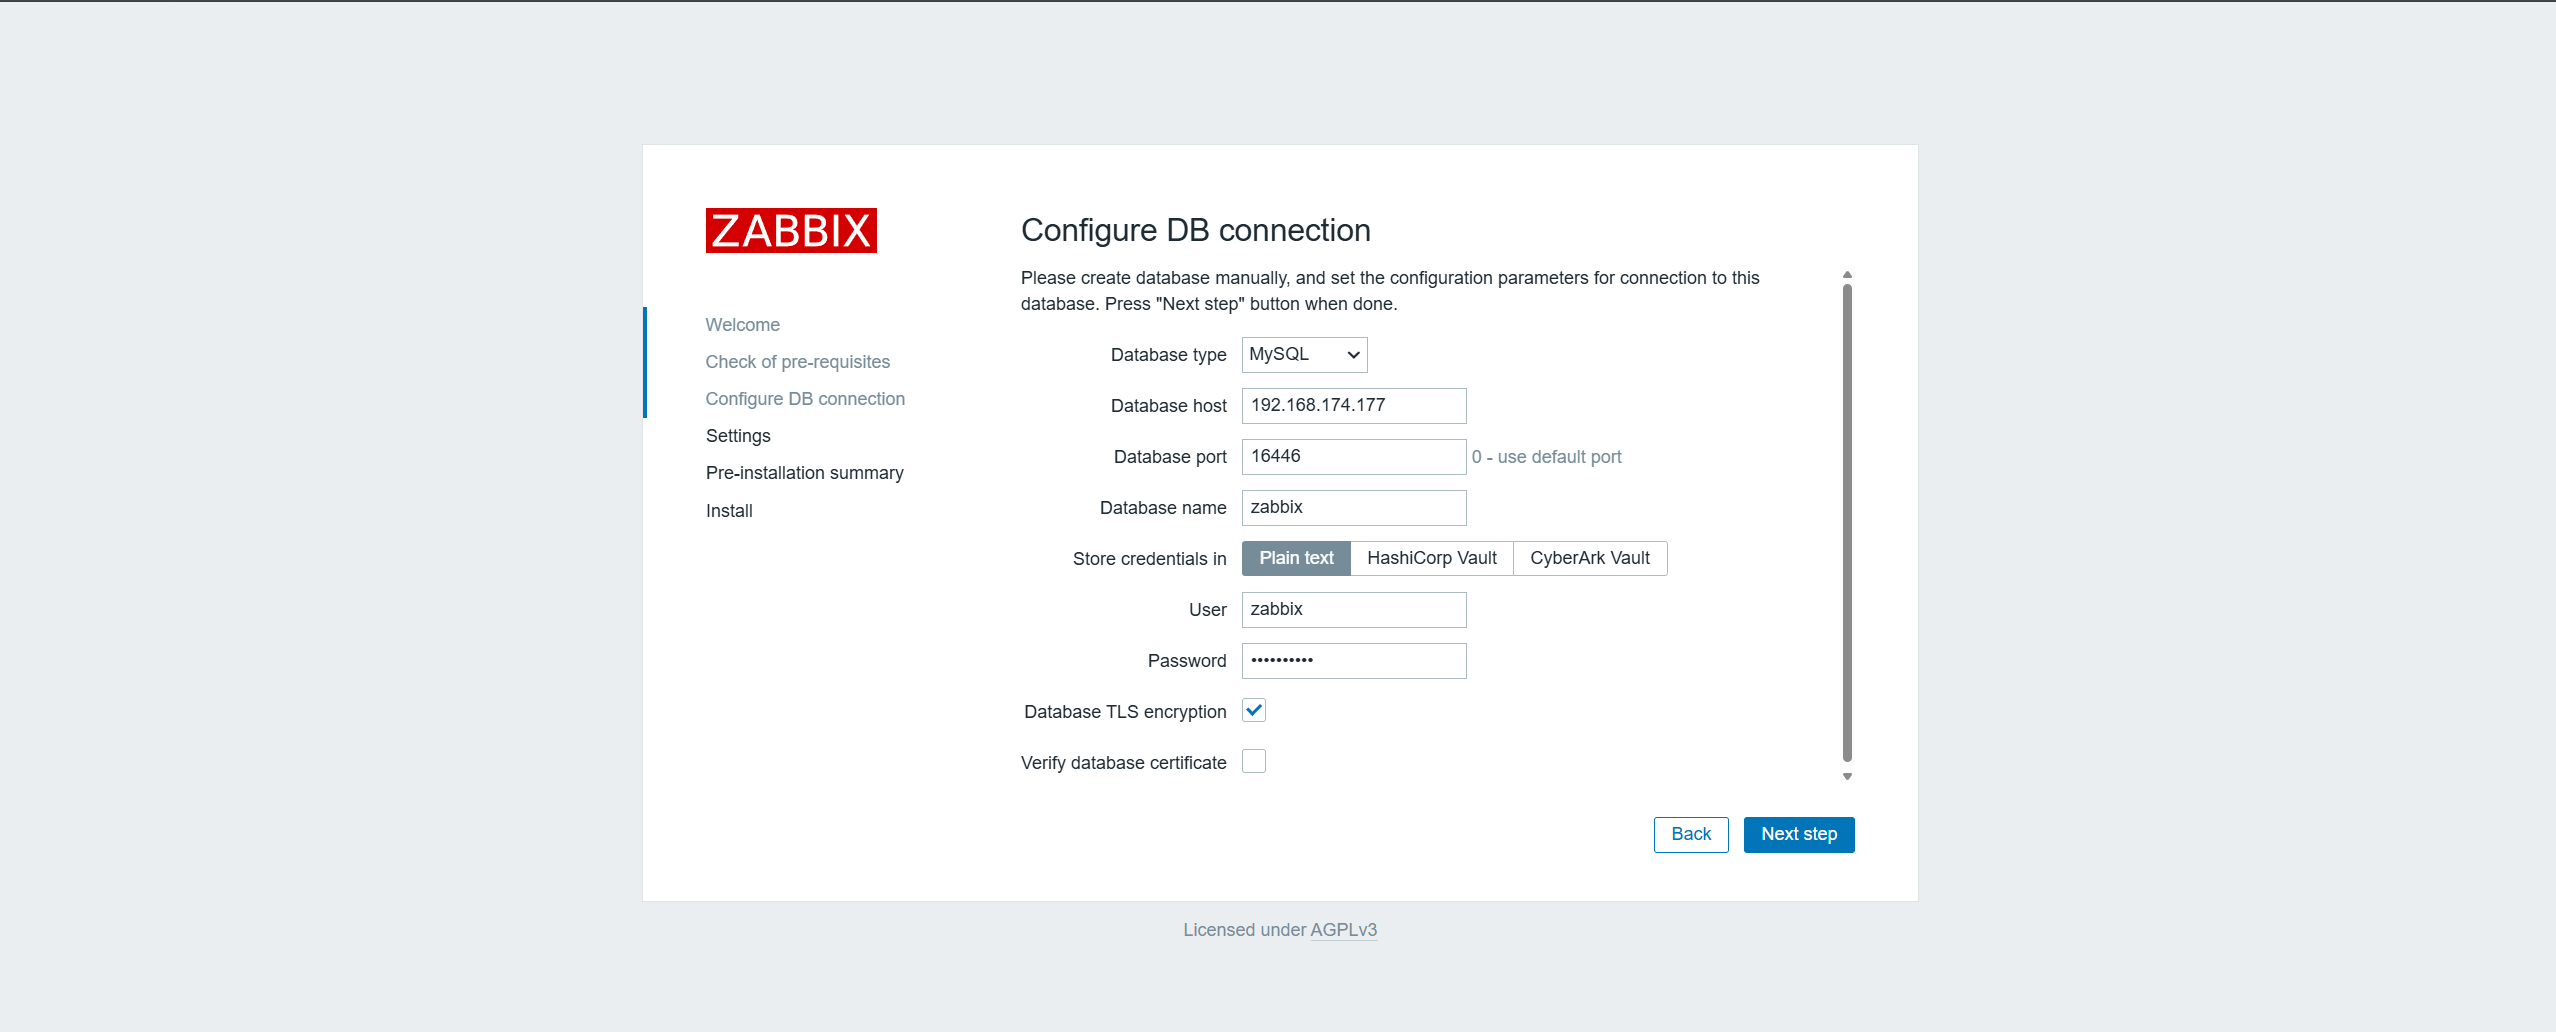
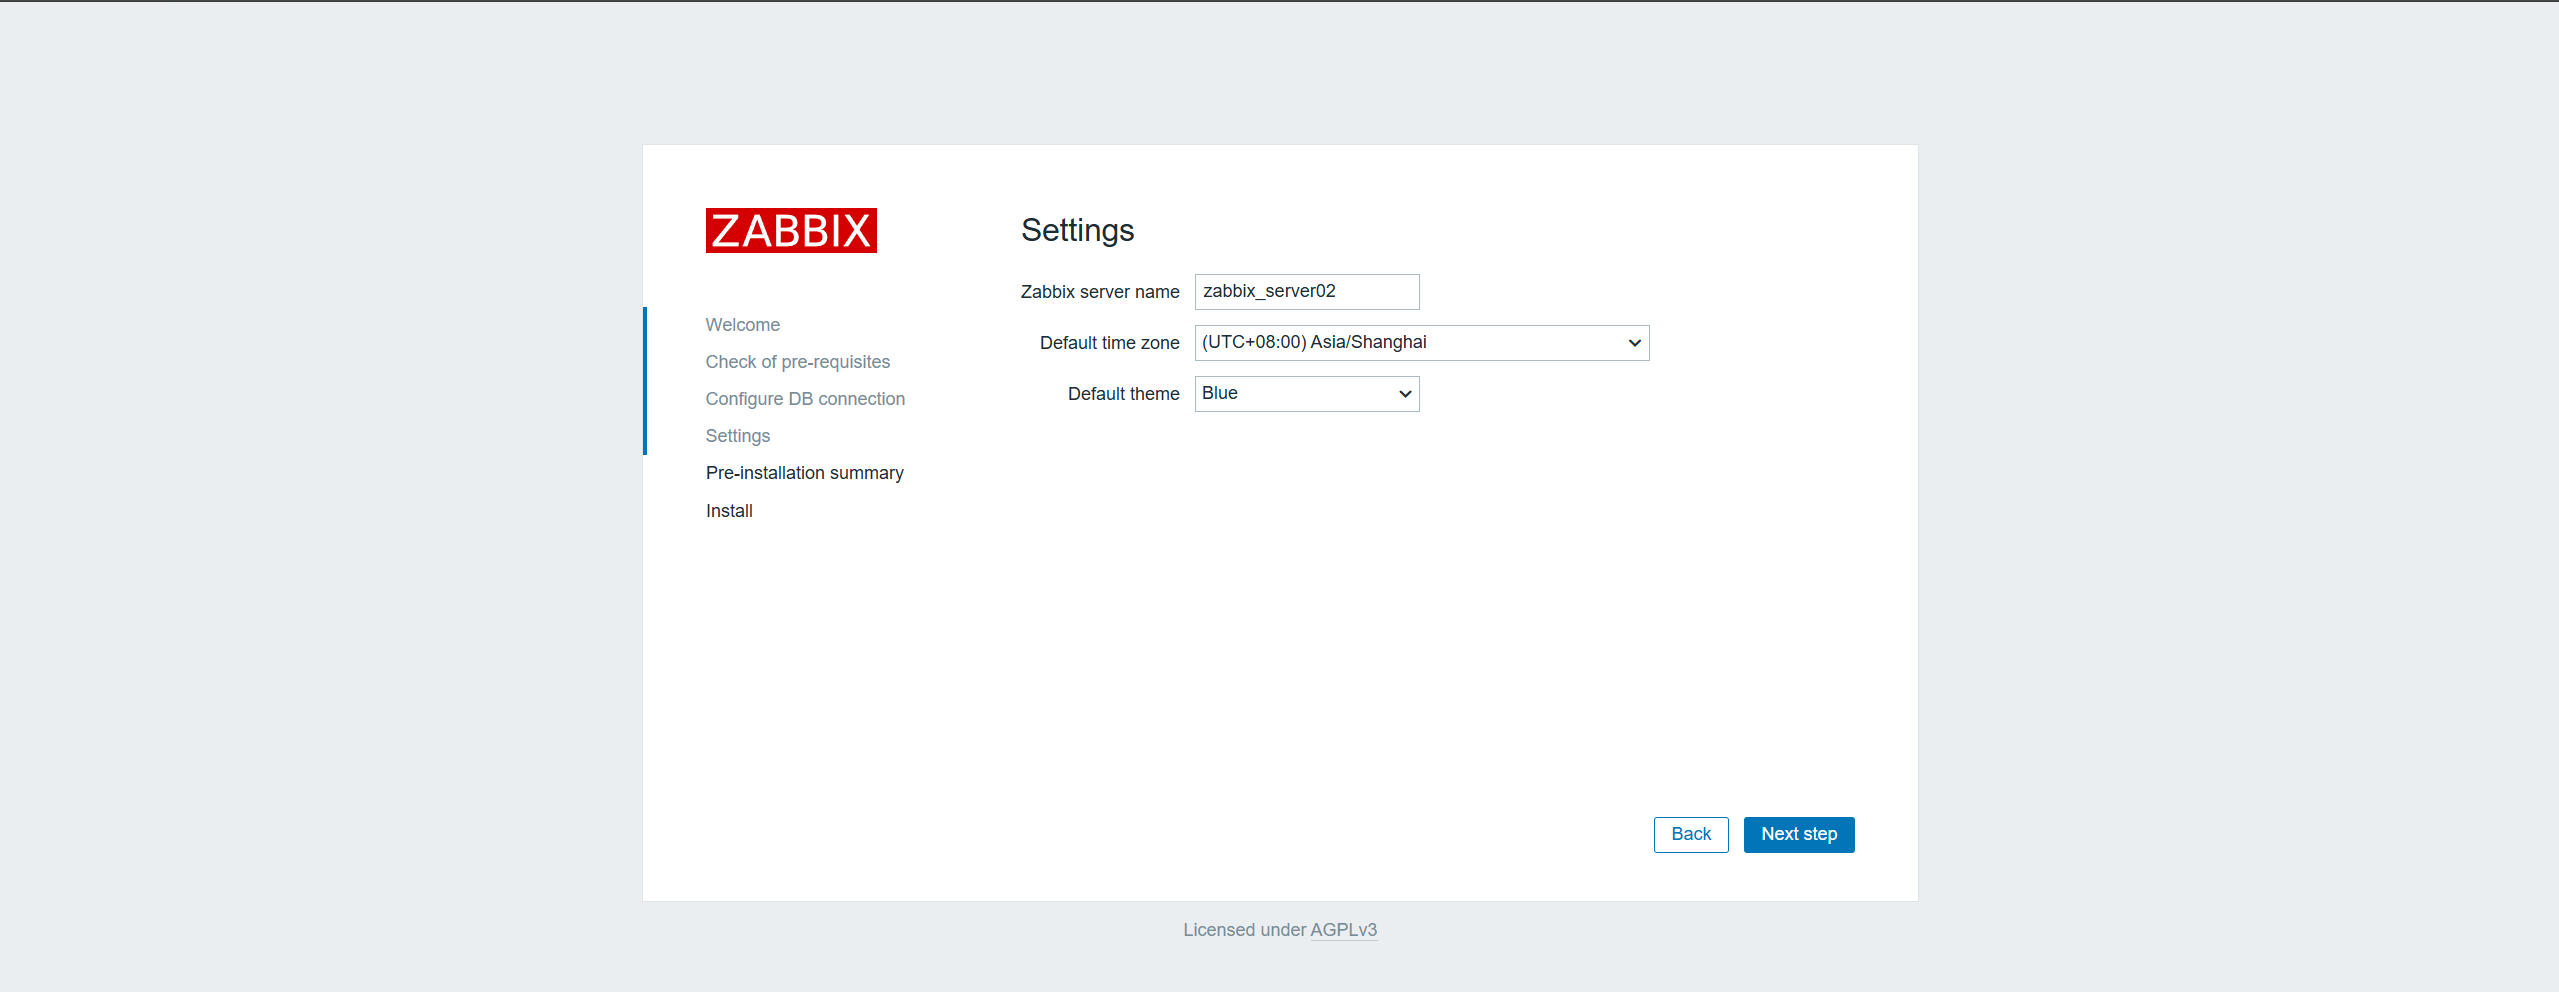
5.1 zabbix-server01初始化
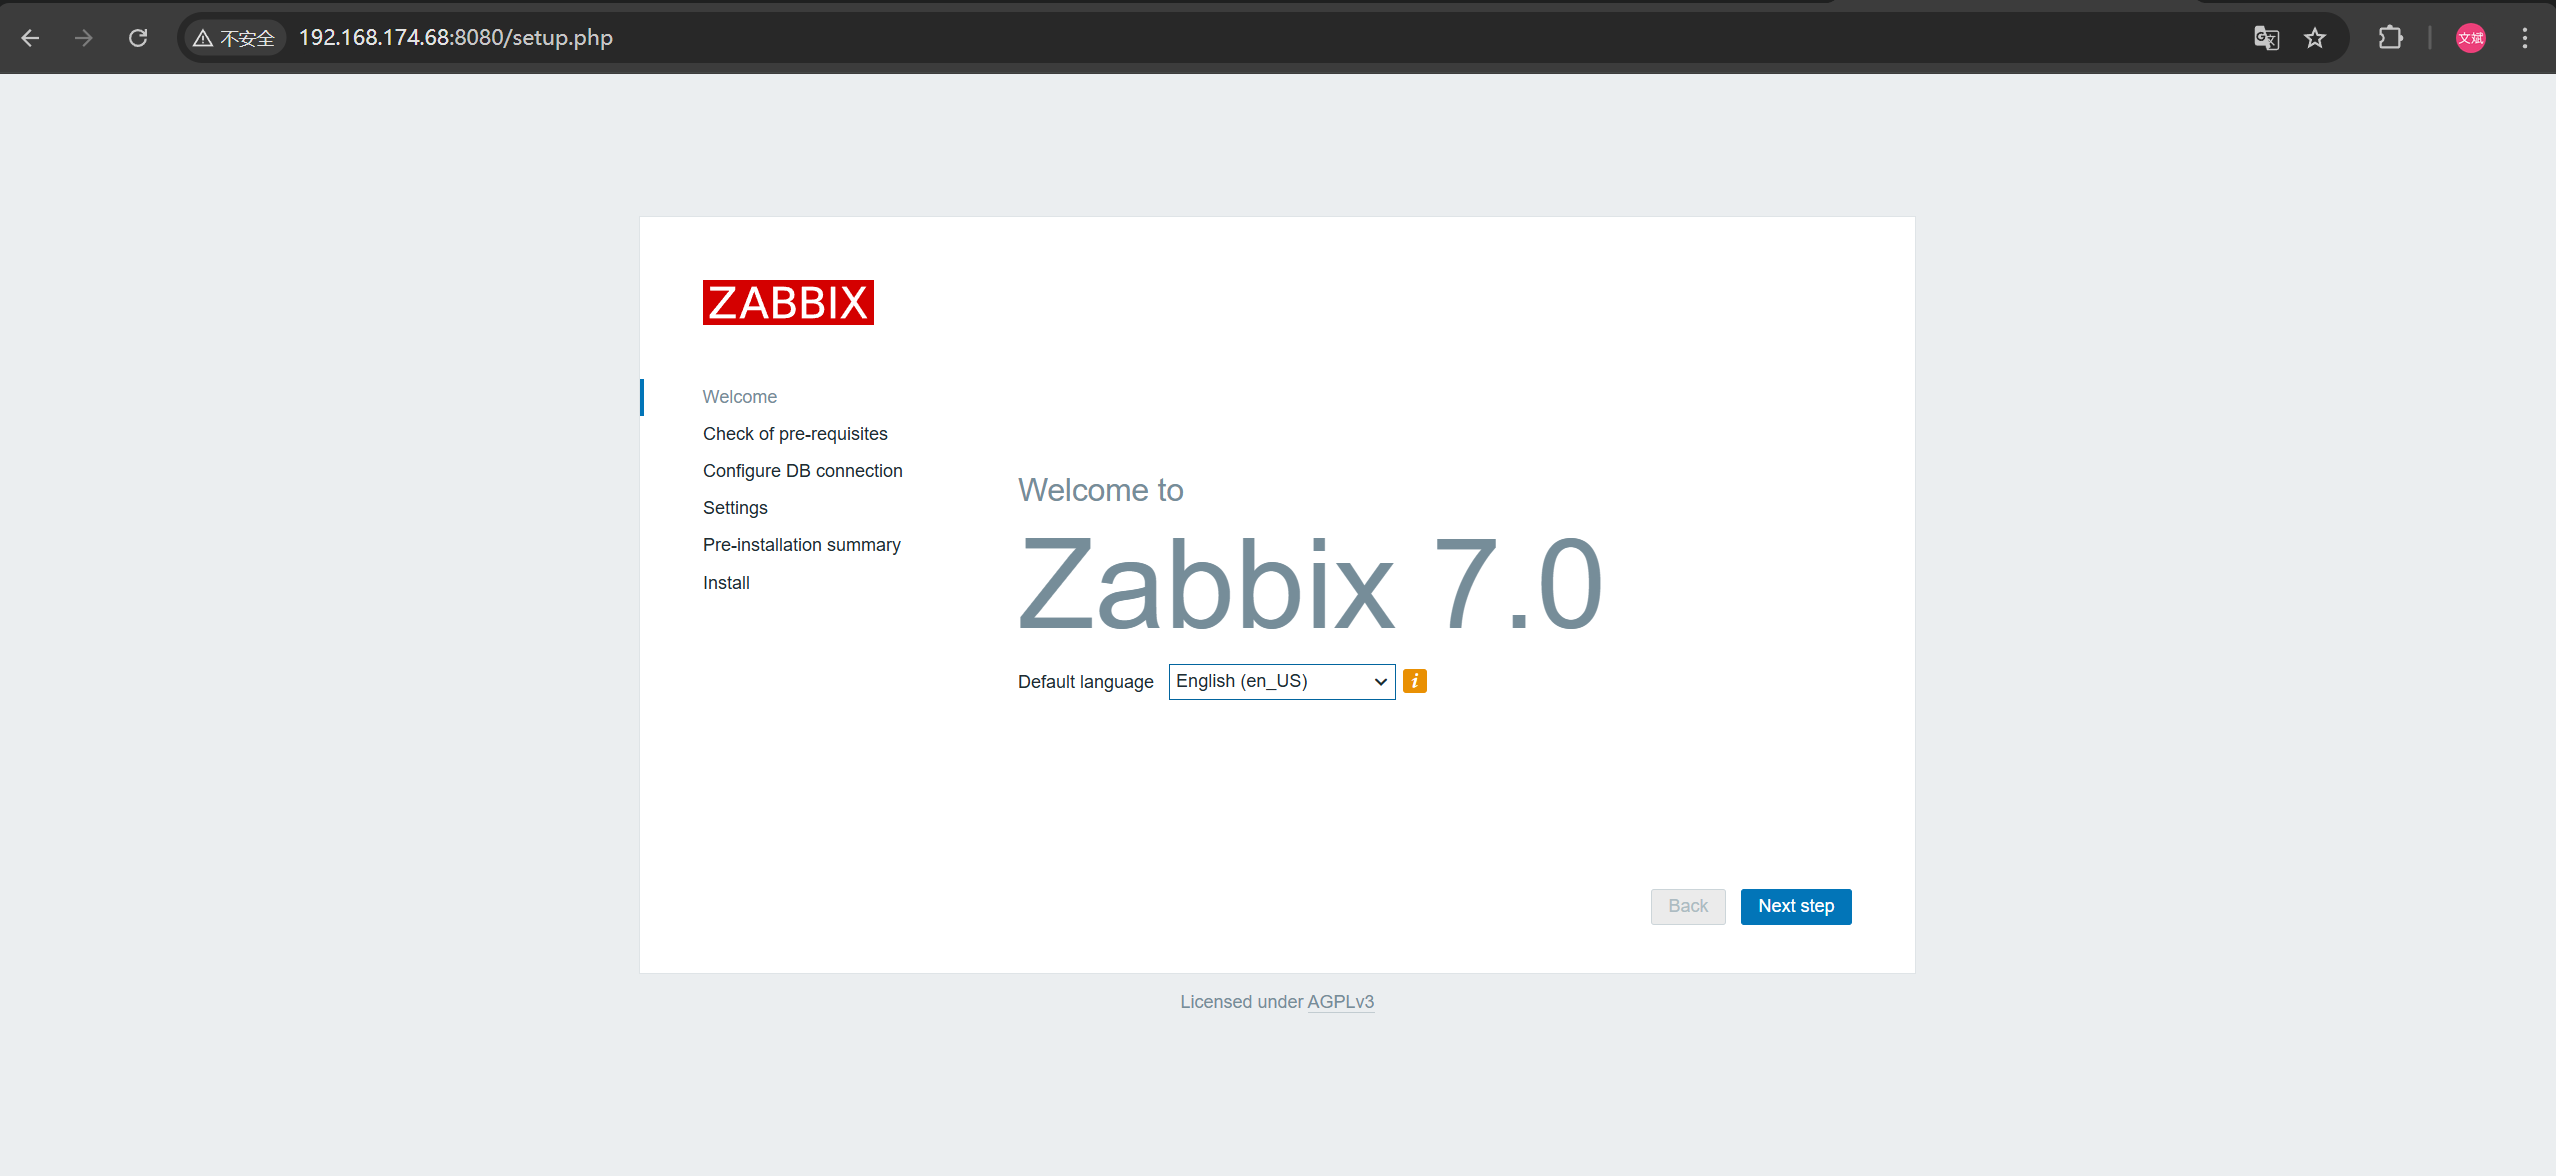
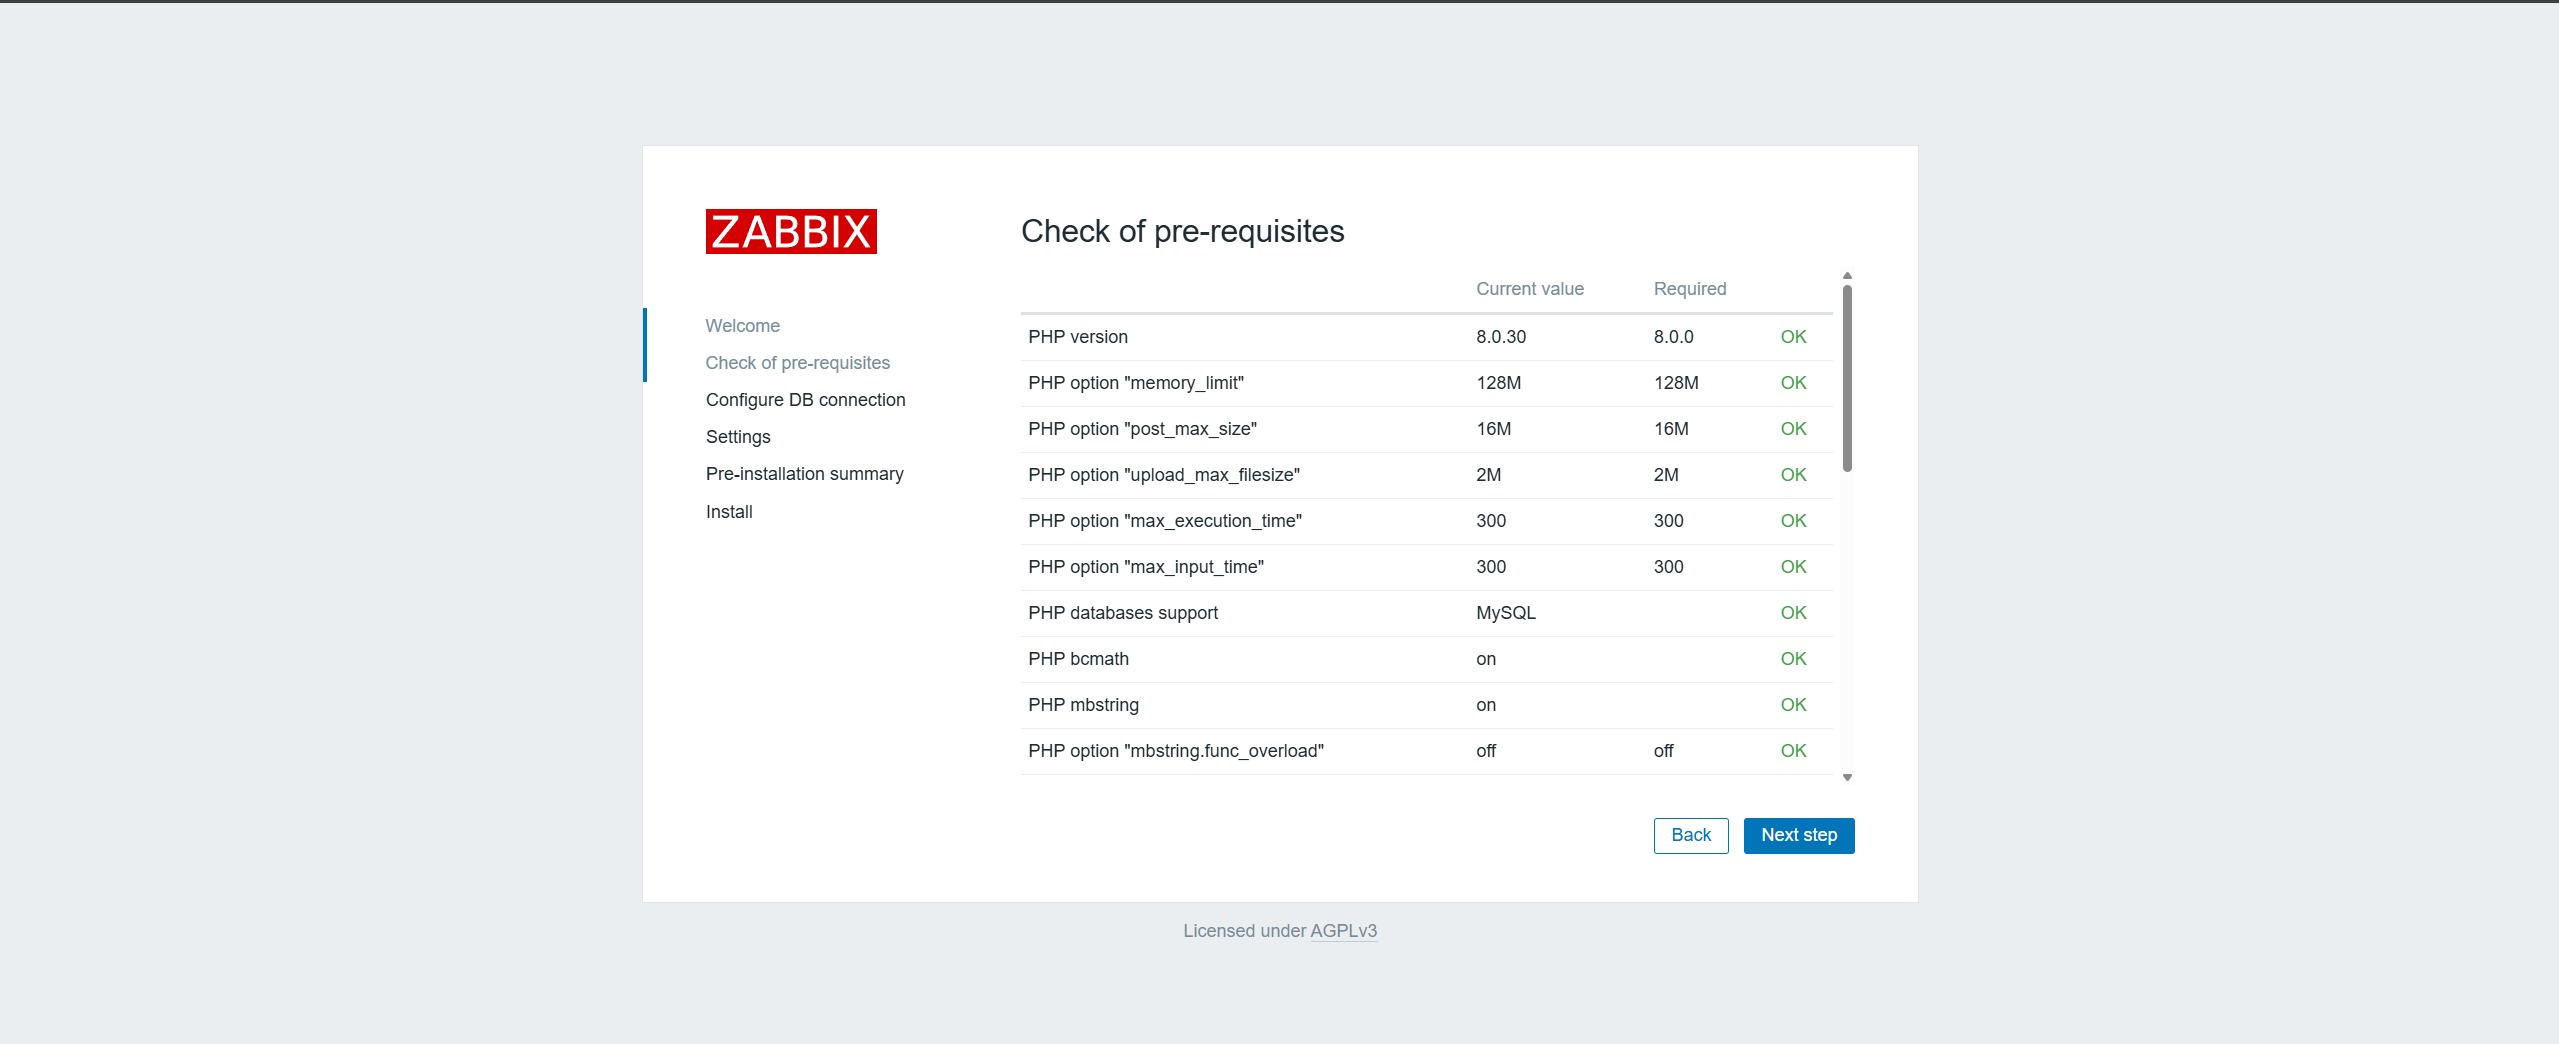
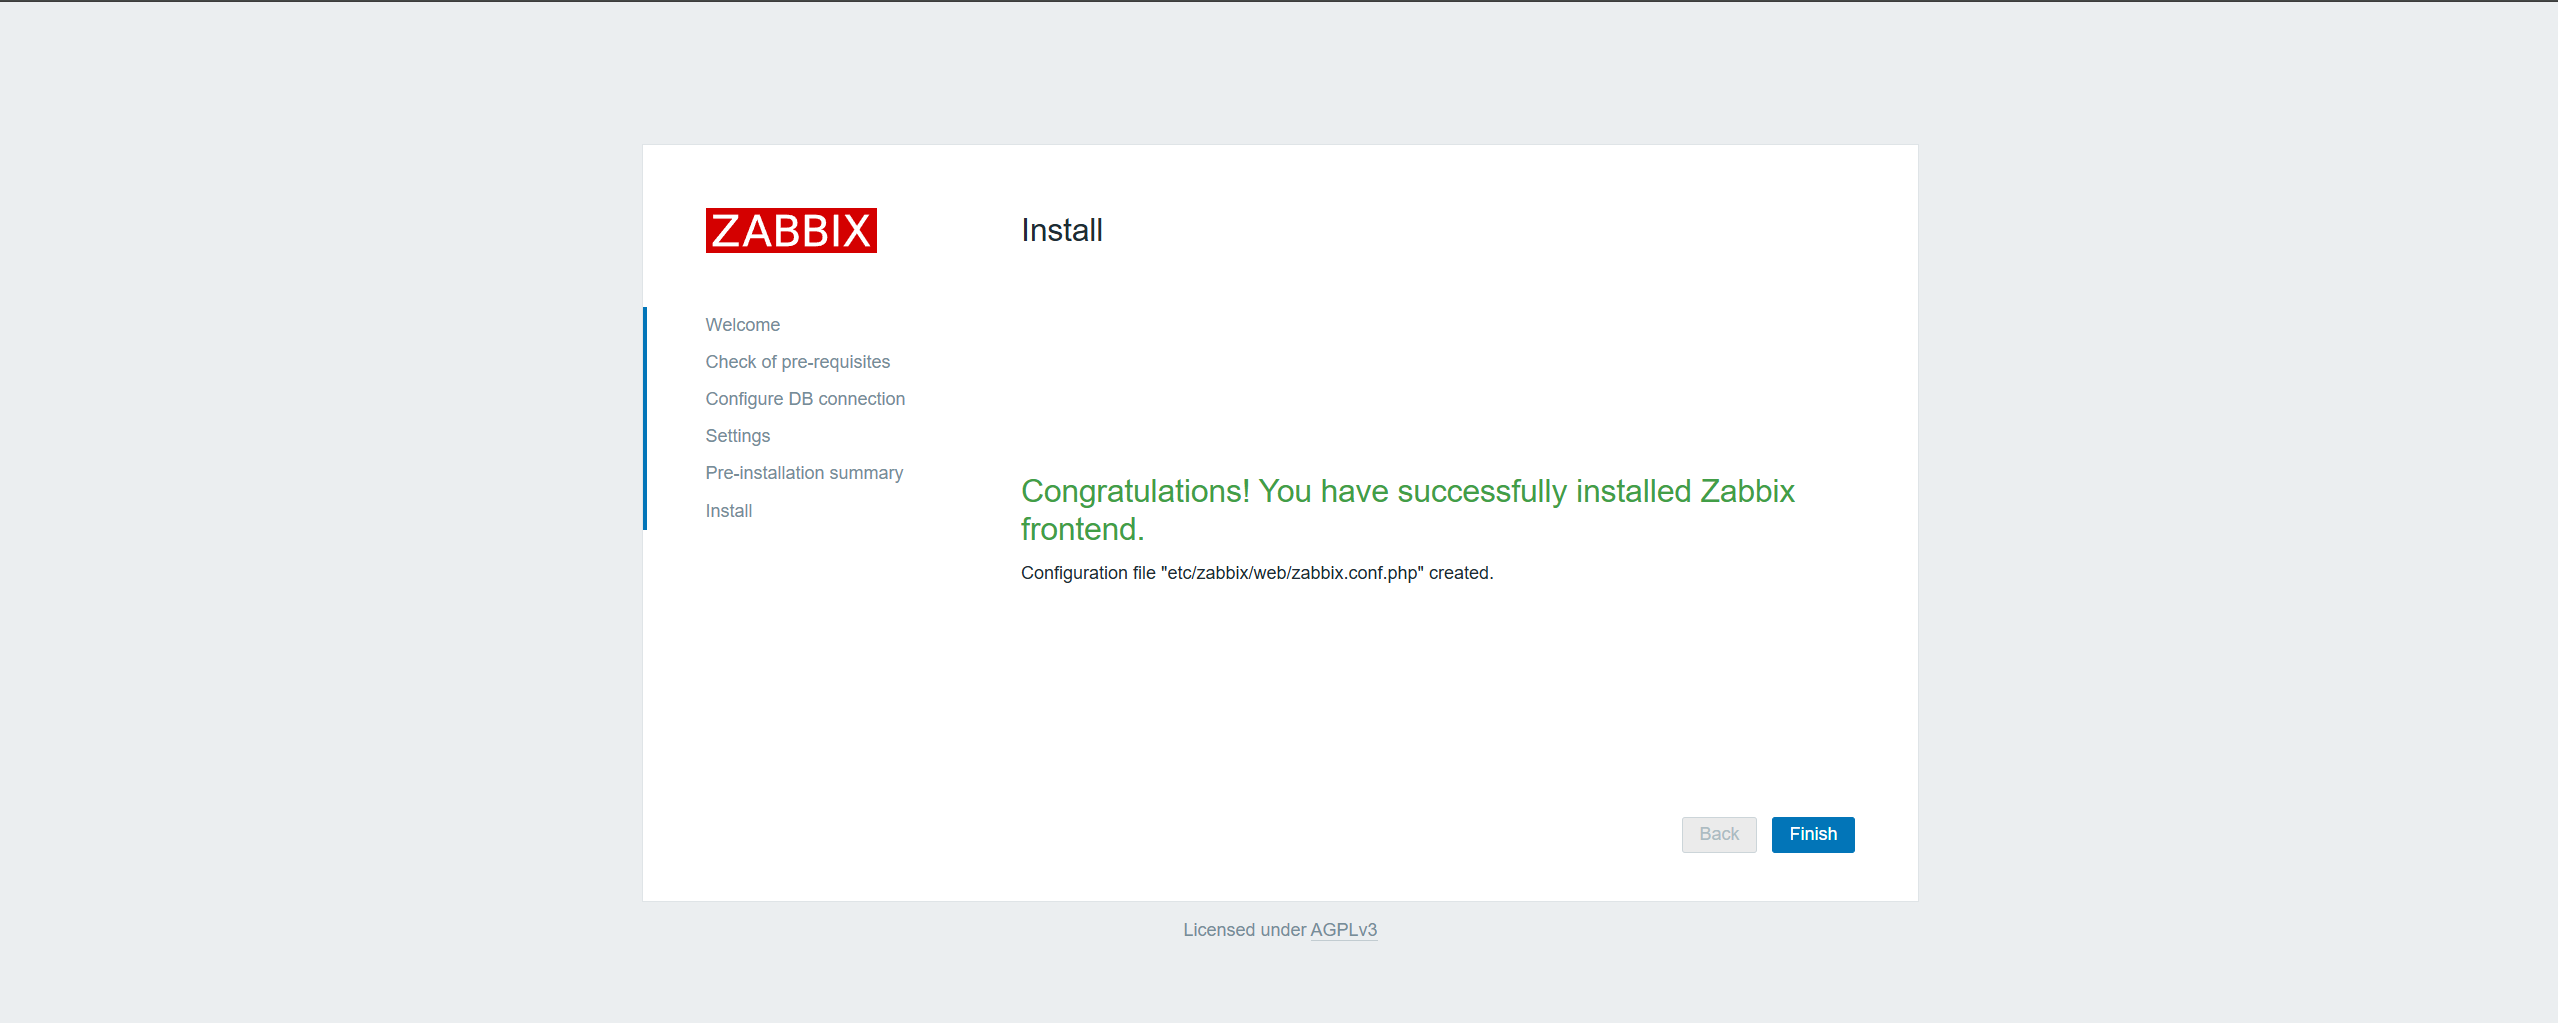

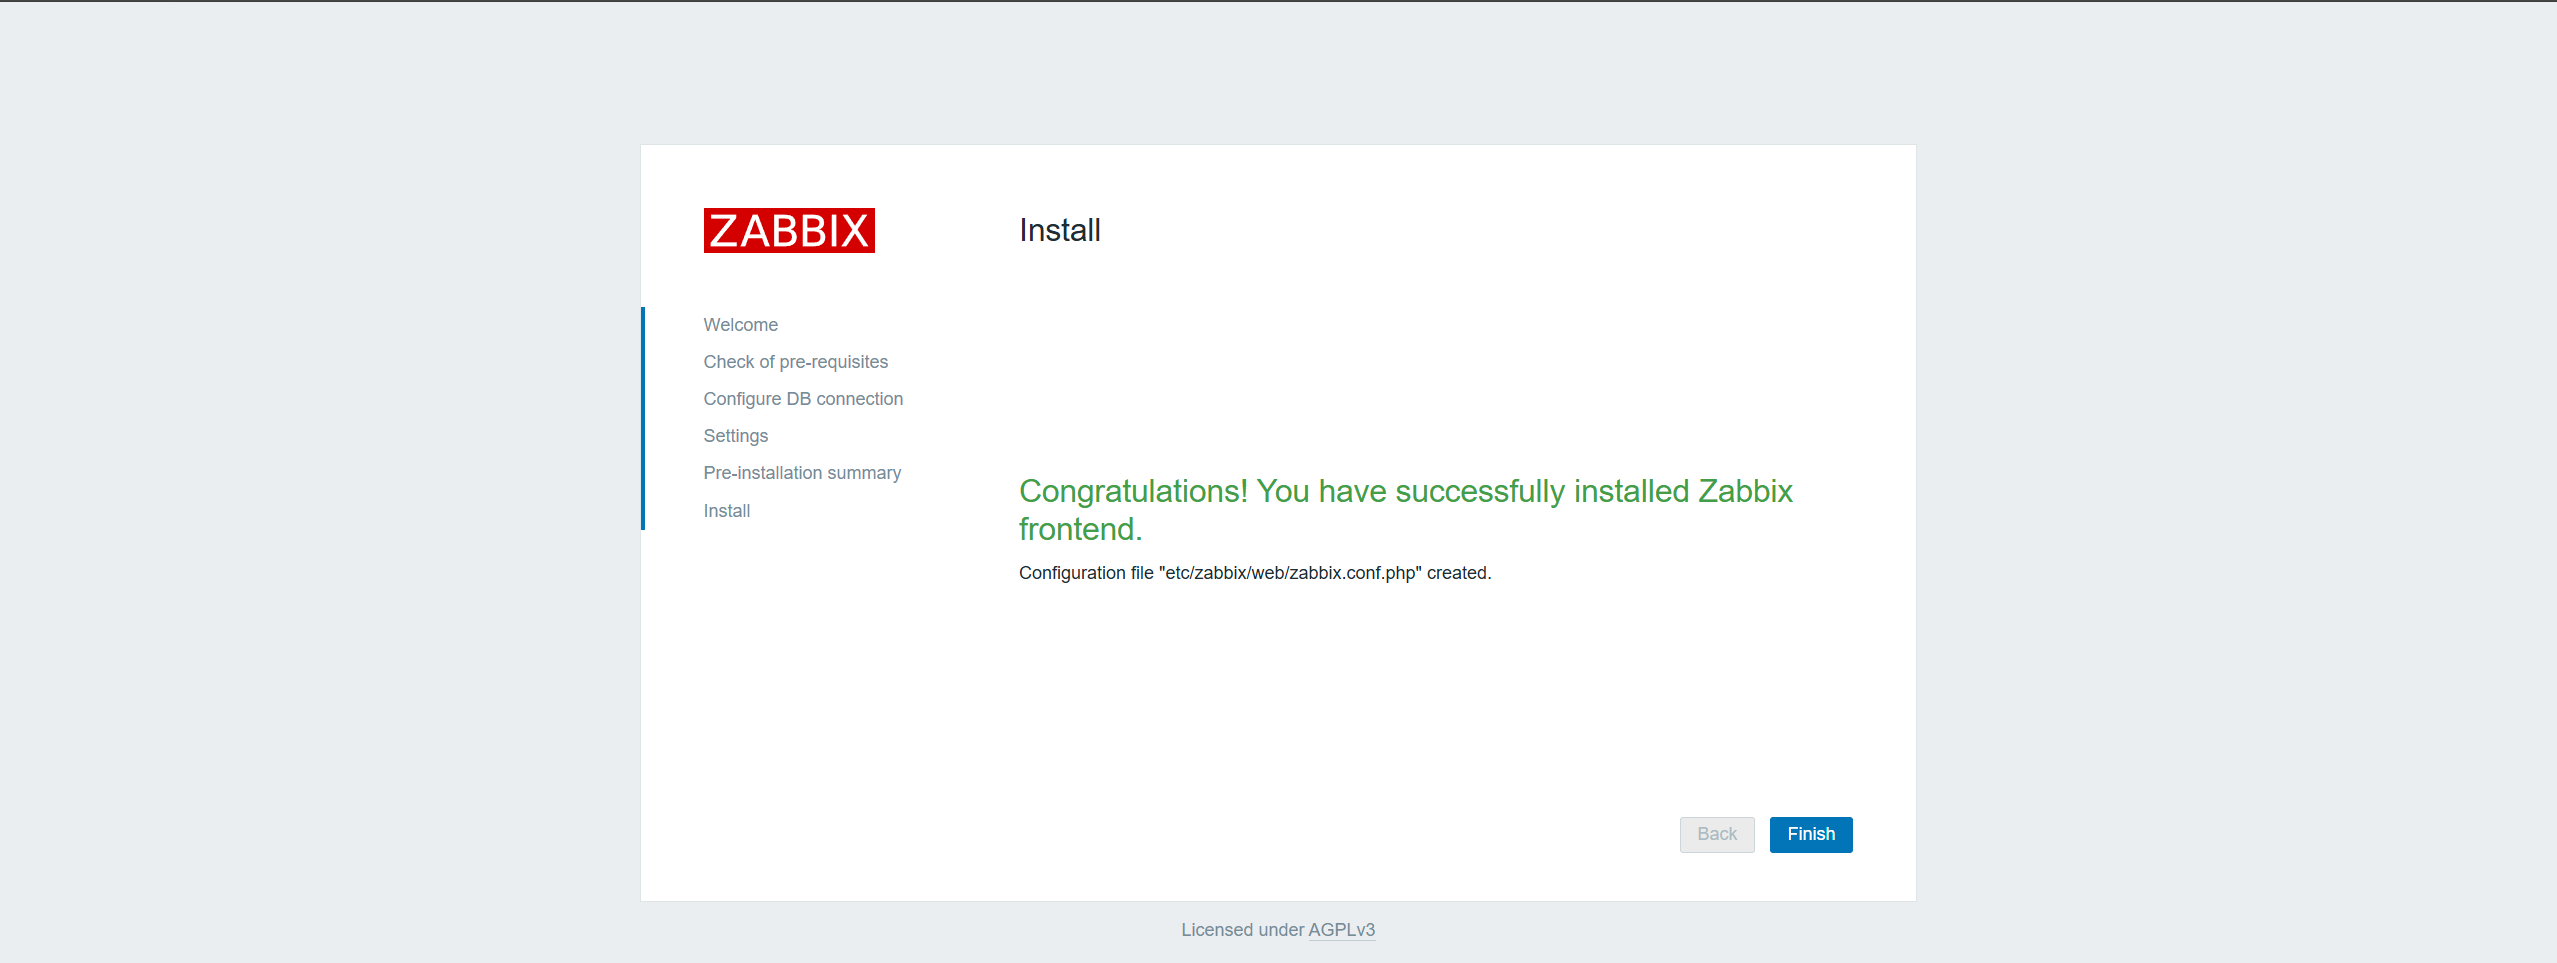
5.2 zabbix-server02初始化

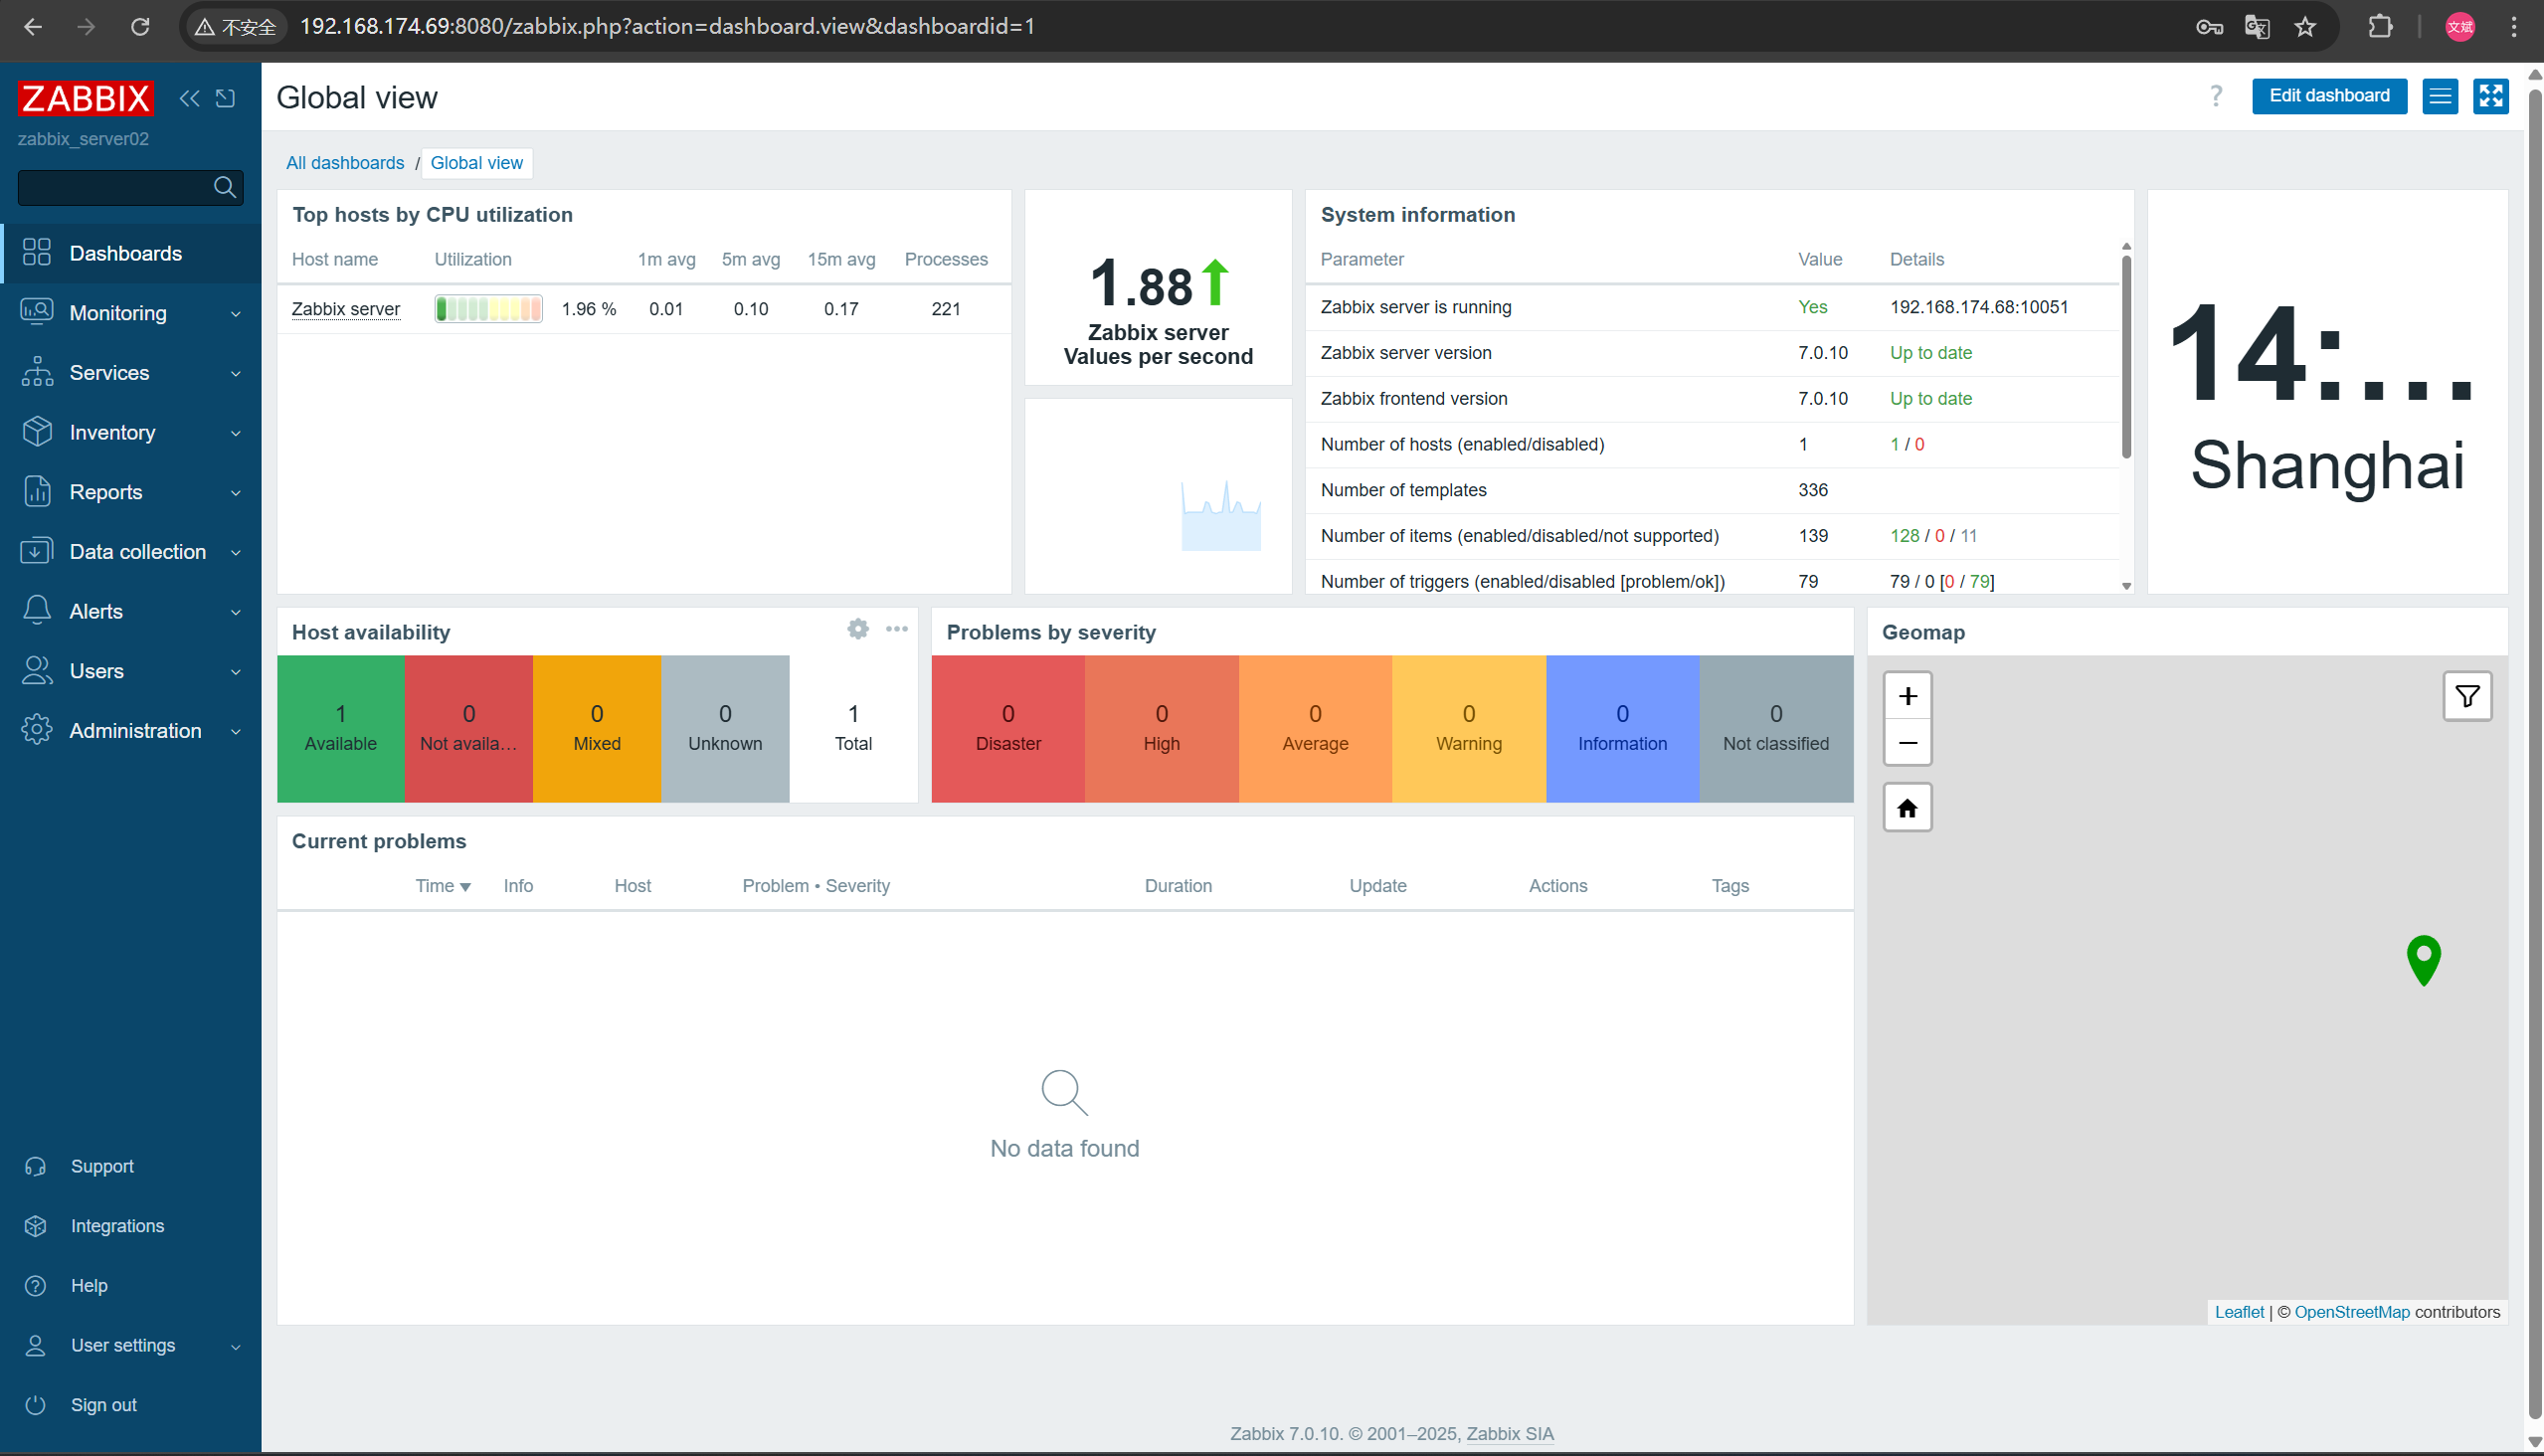
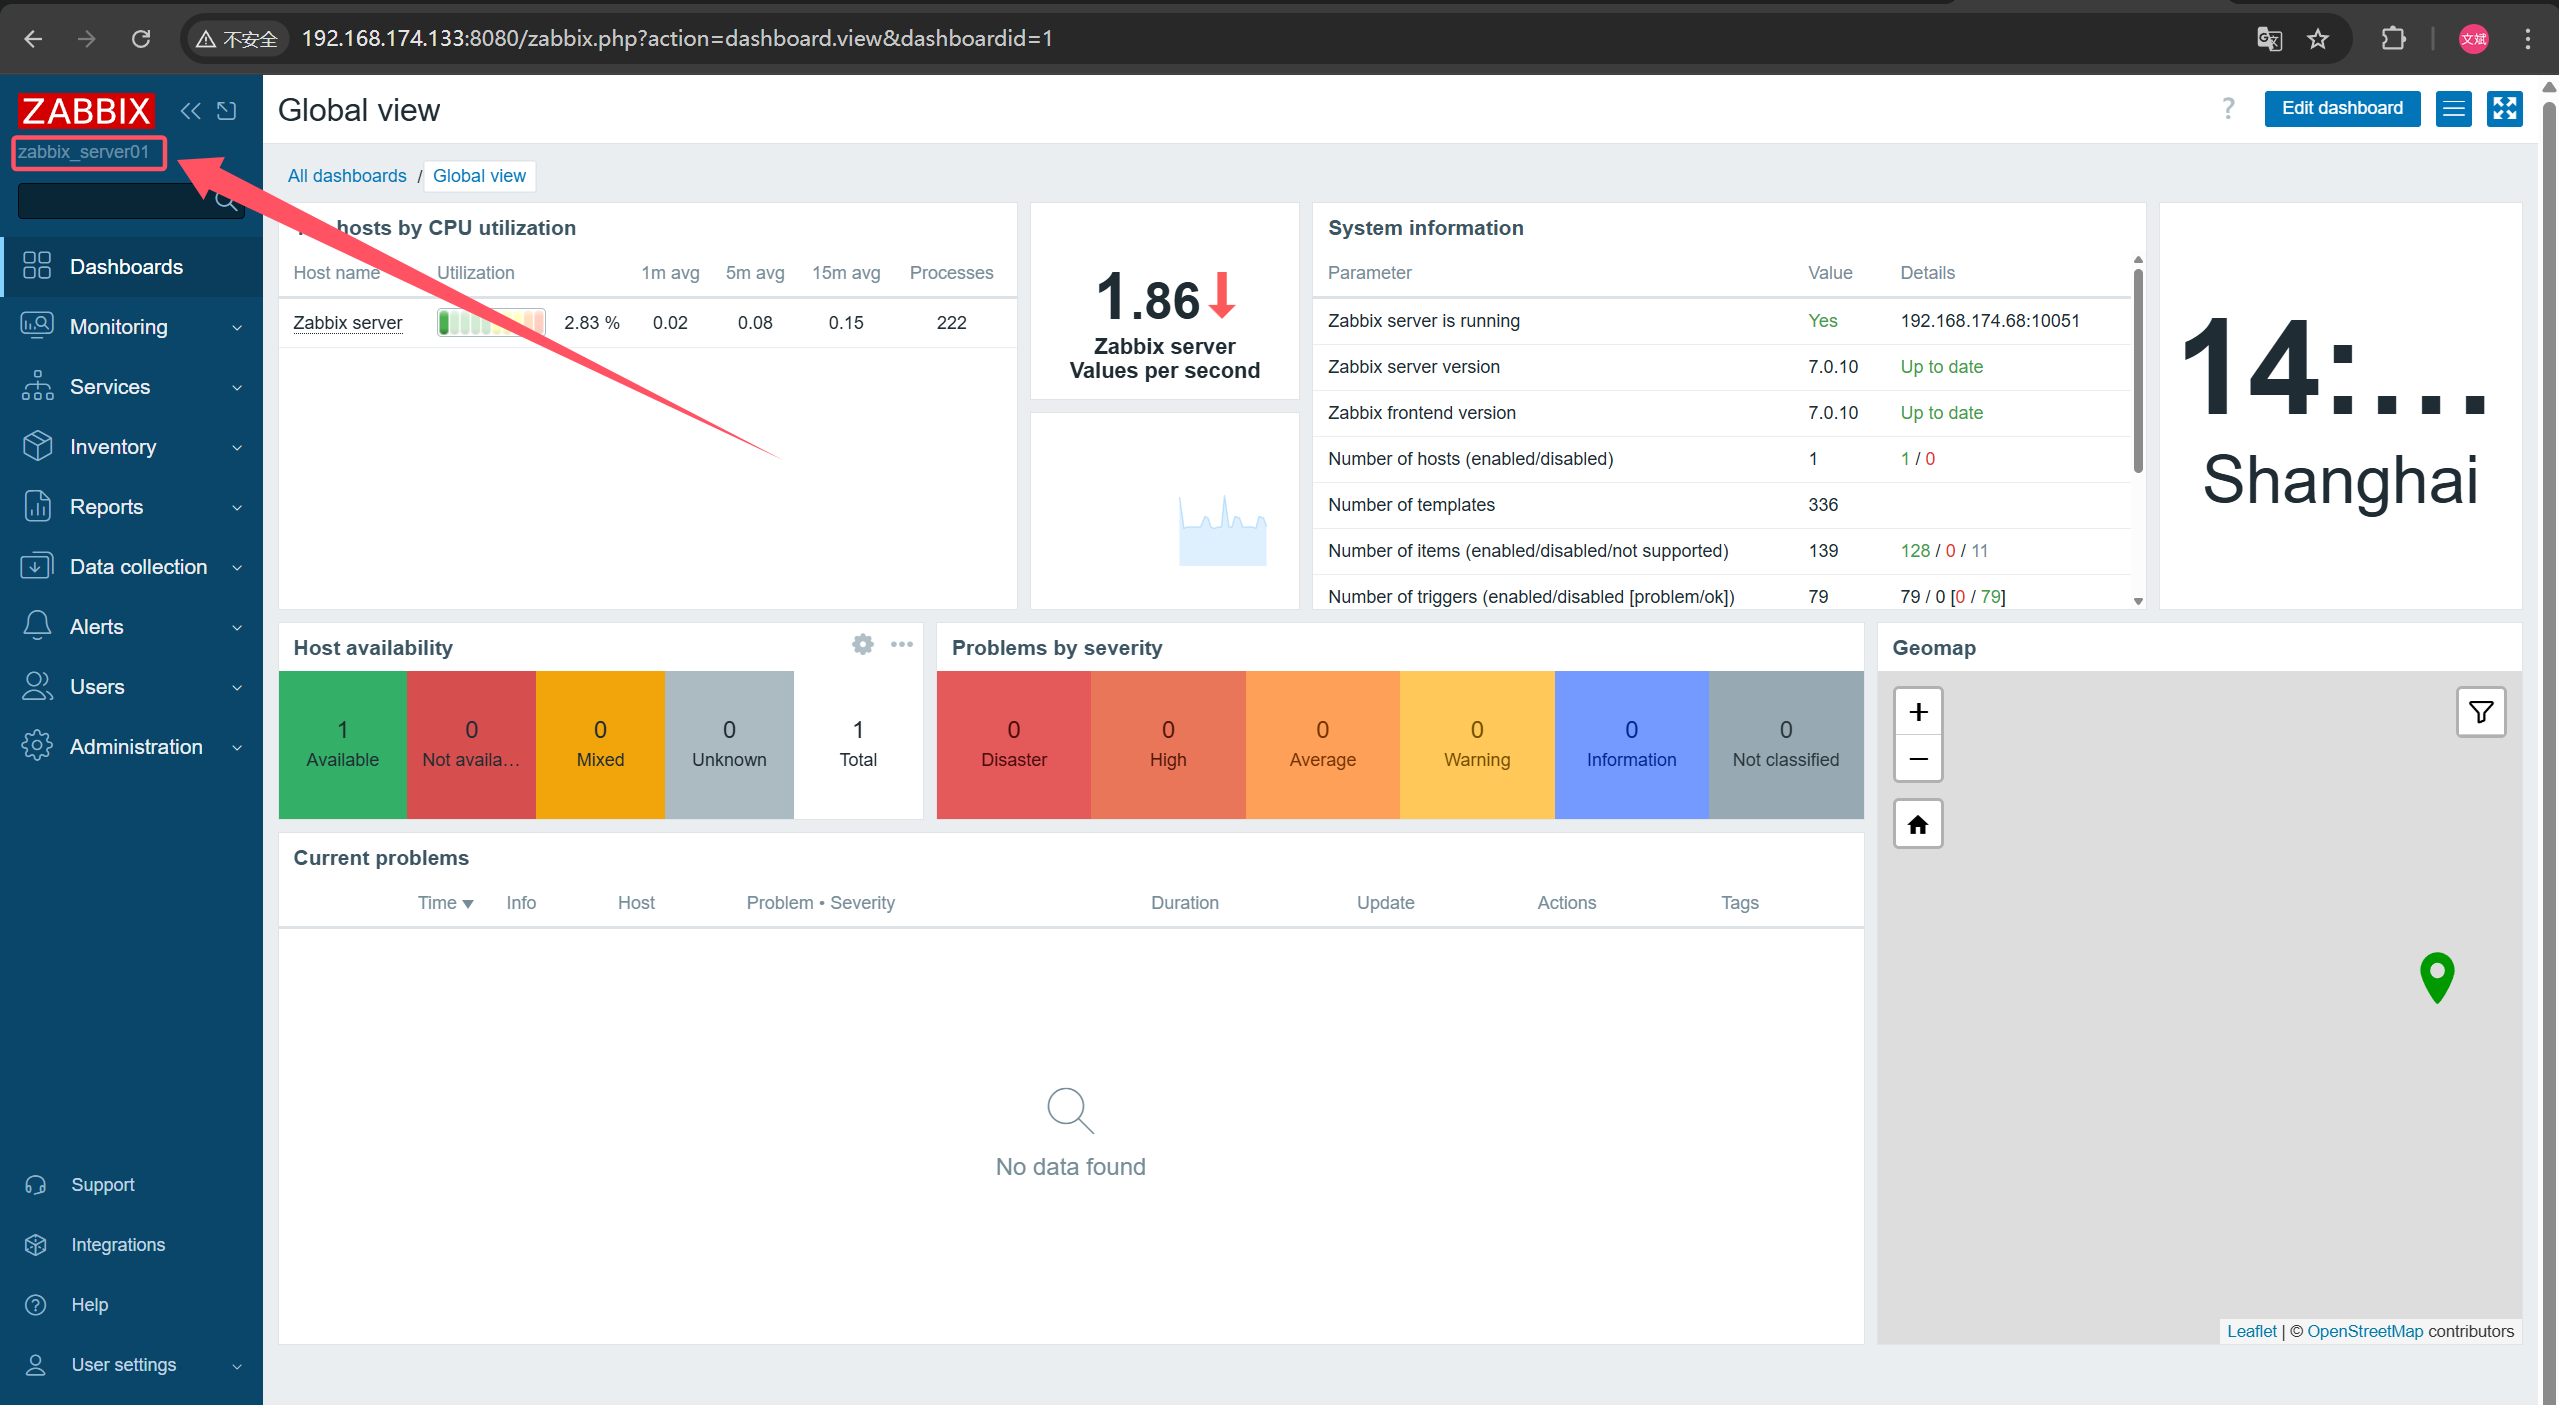
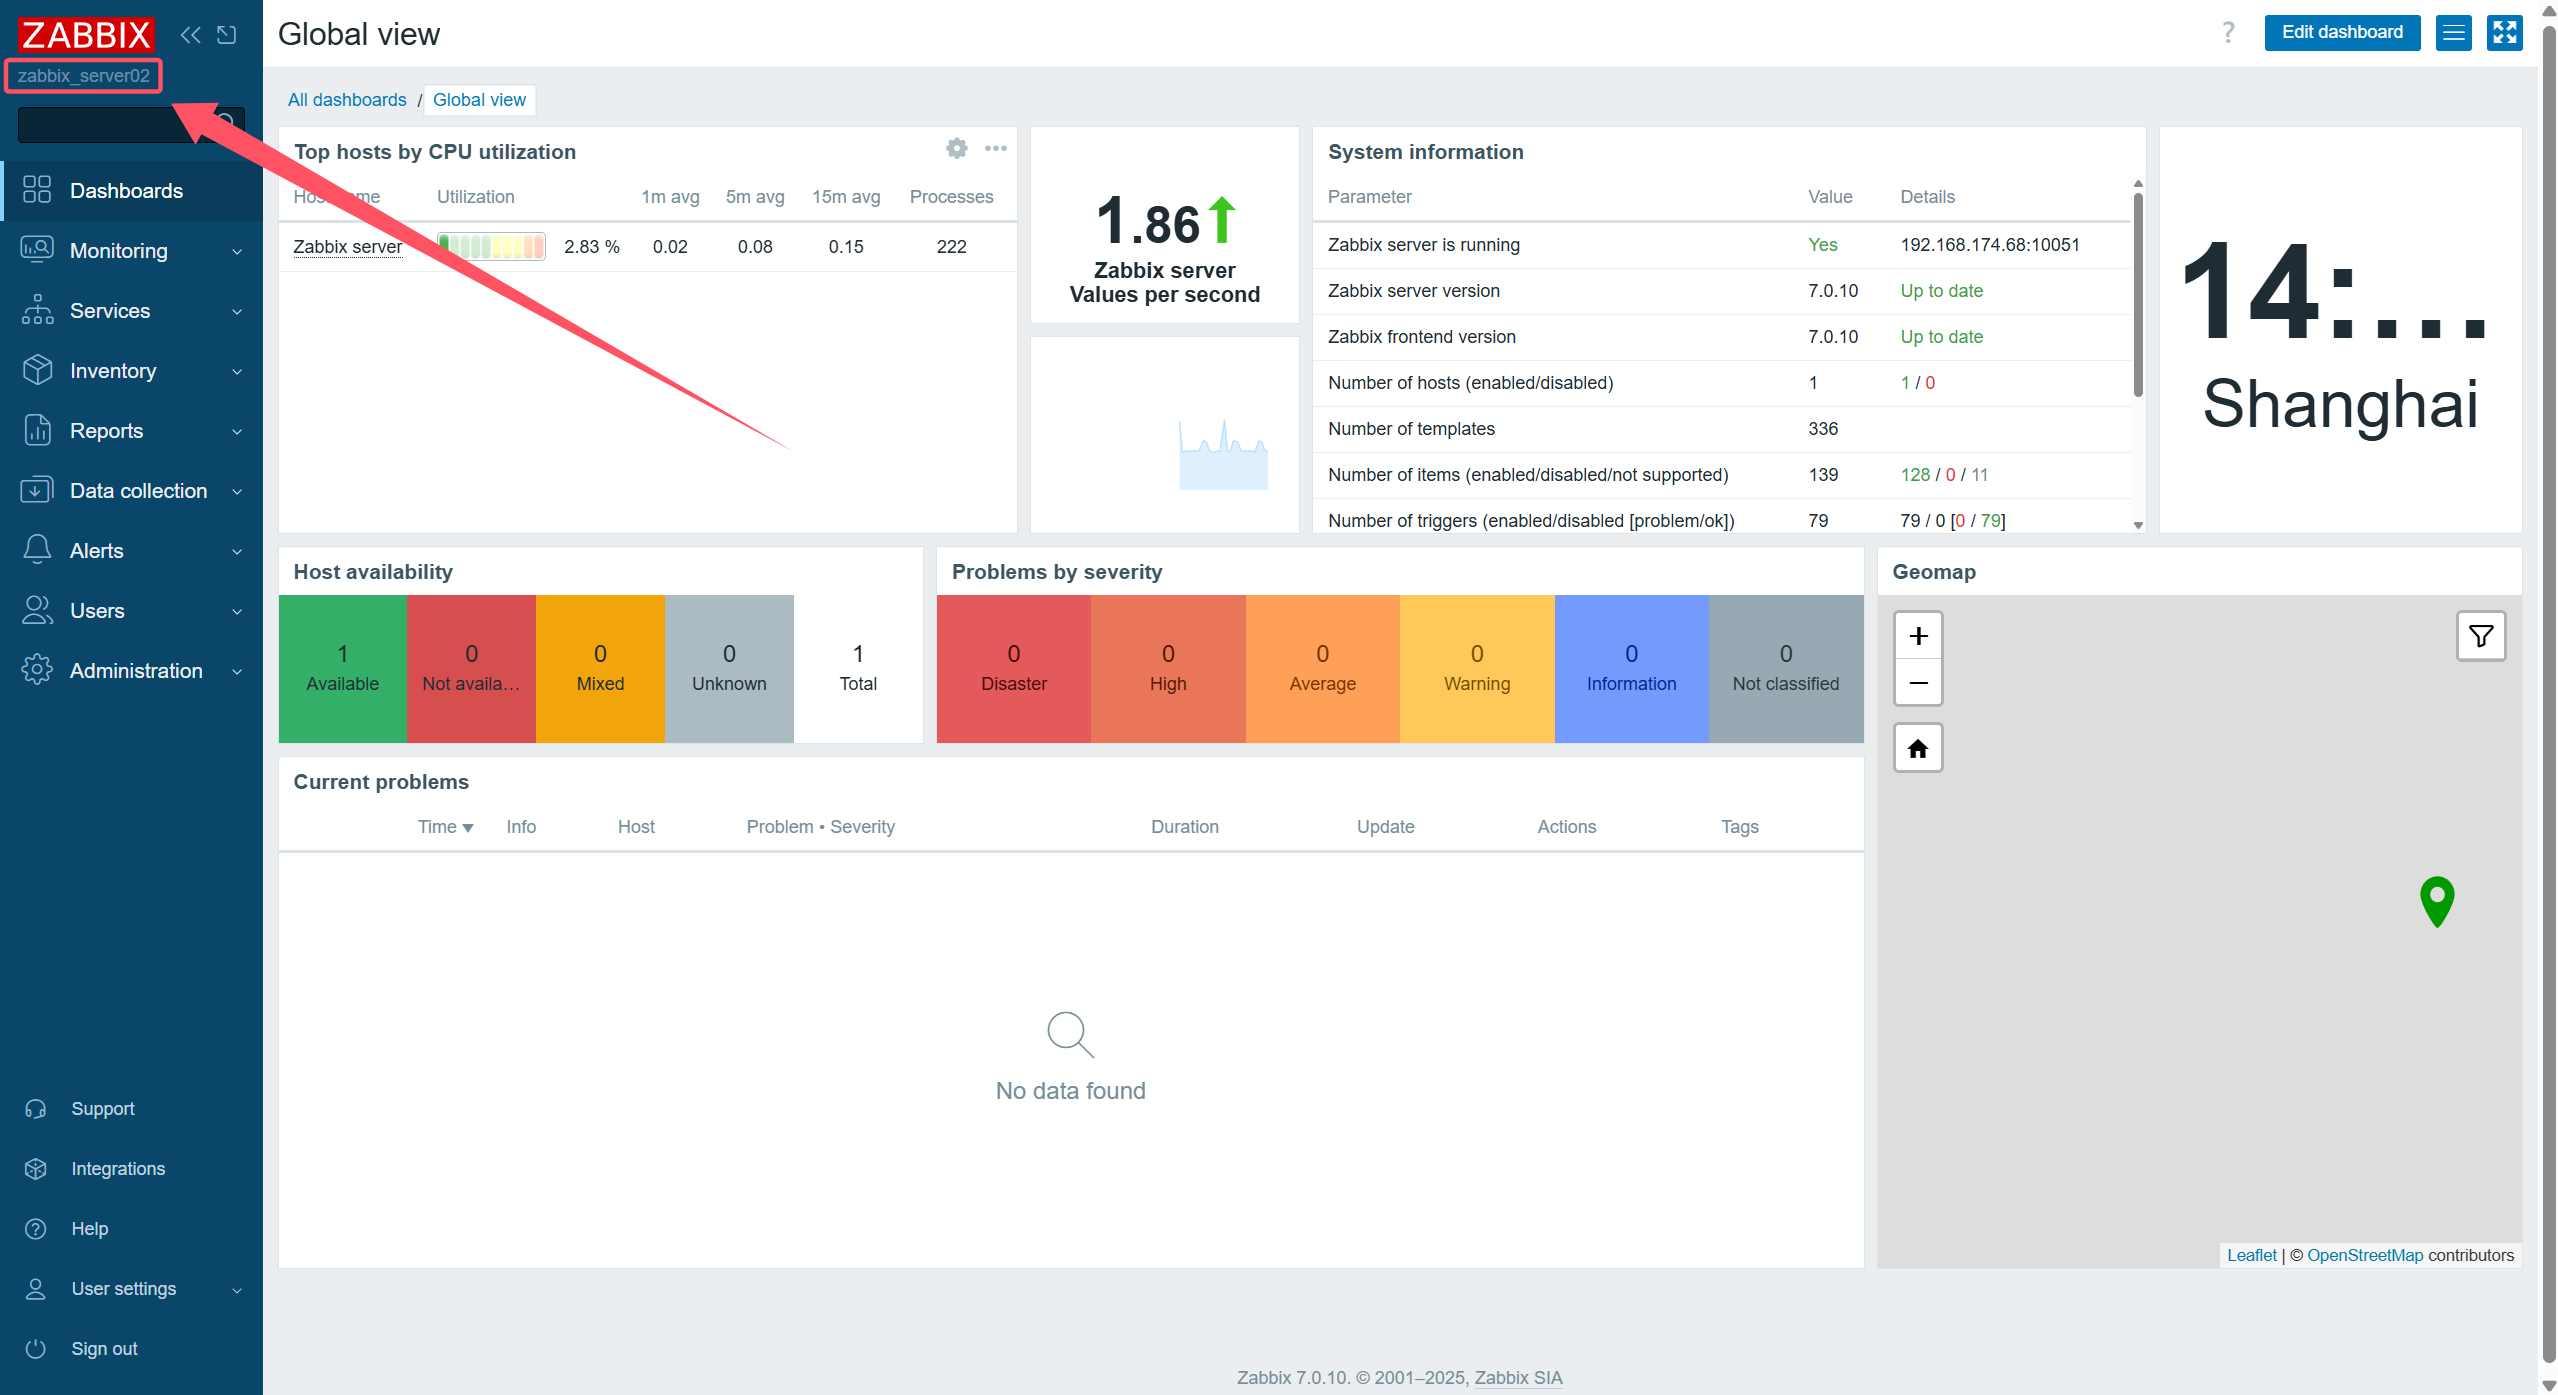
5.3 访问负载均衡VIP
通过负载均衡VIP地址192.168.174.133访问zabbix页面,查看HA状态
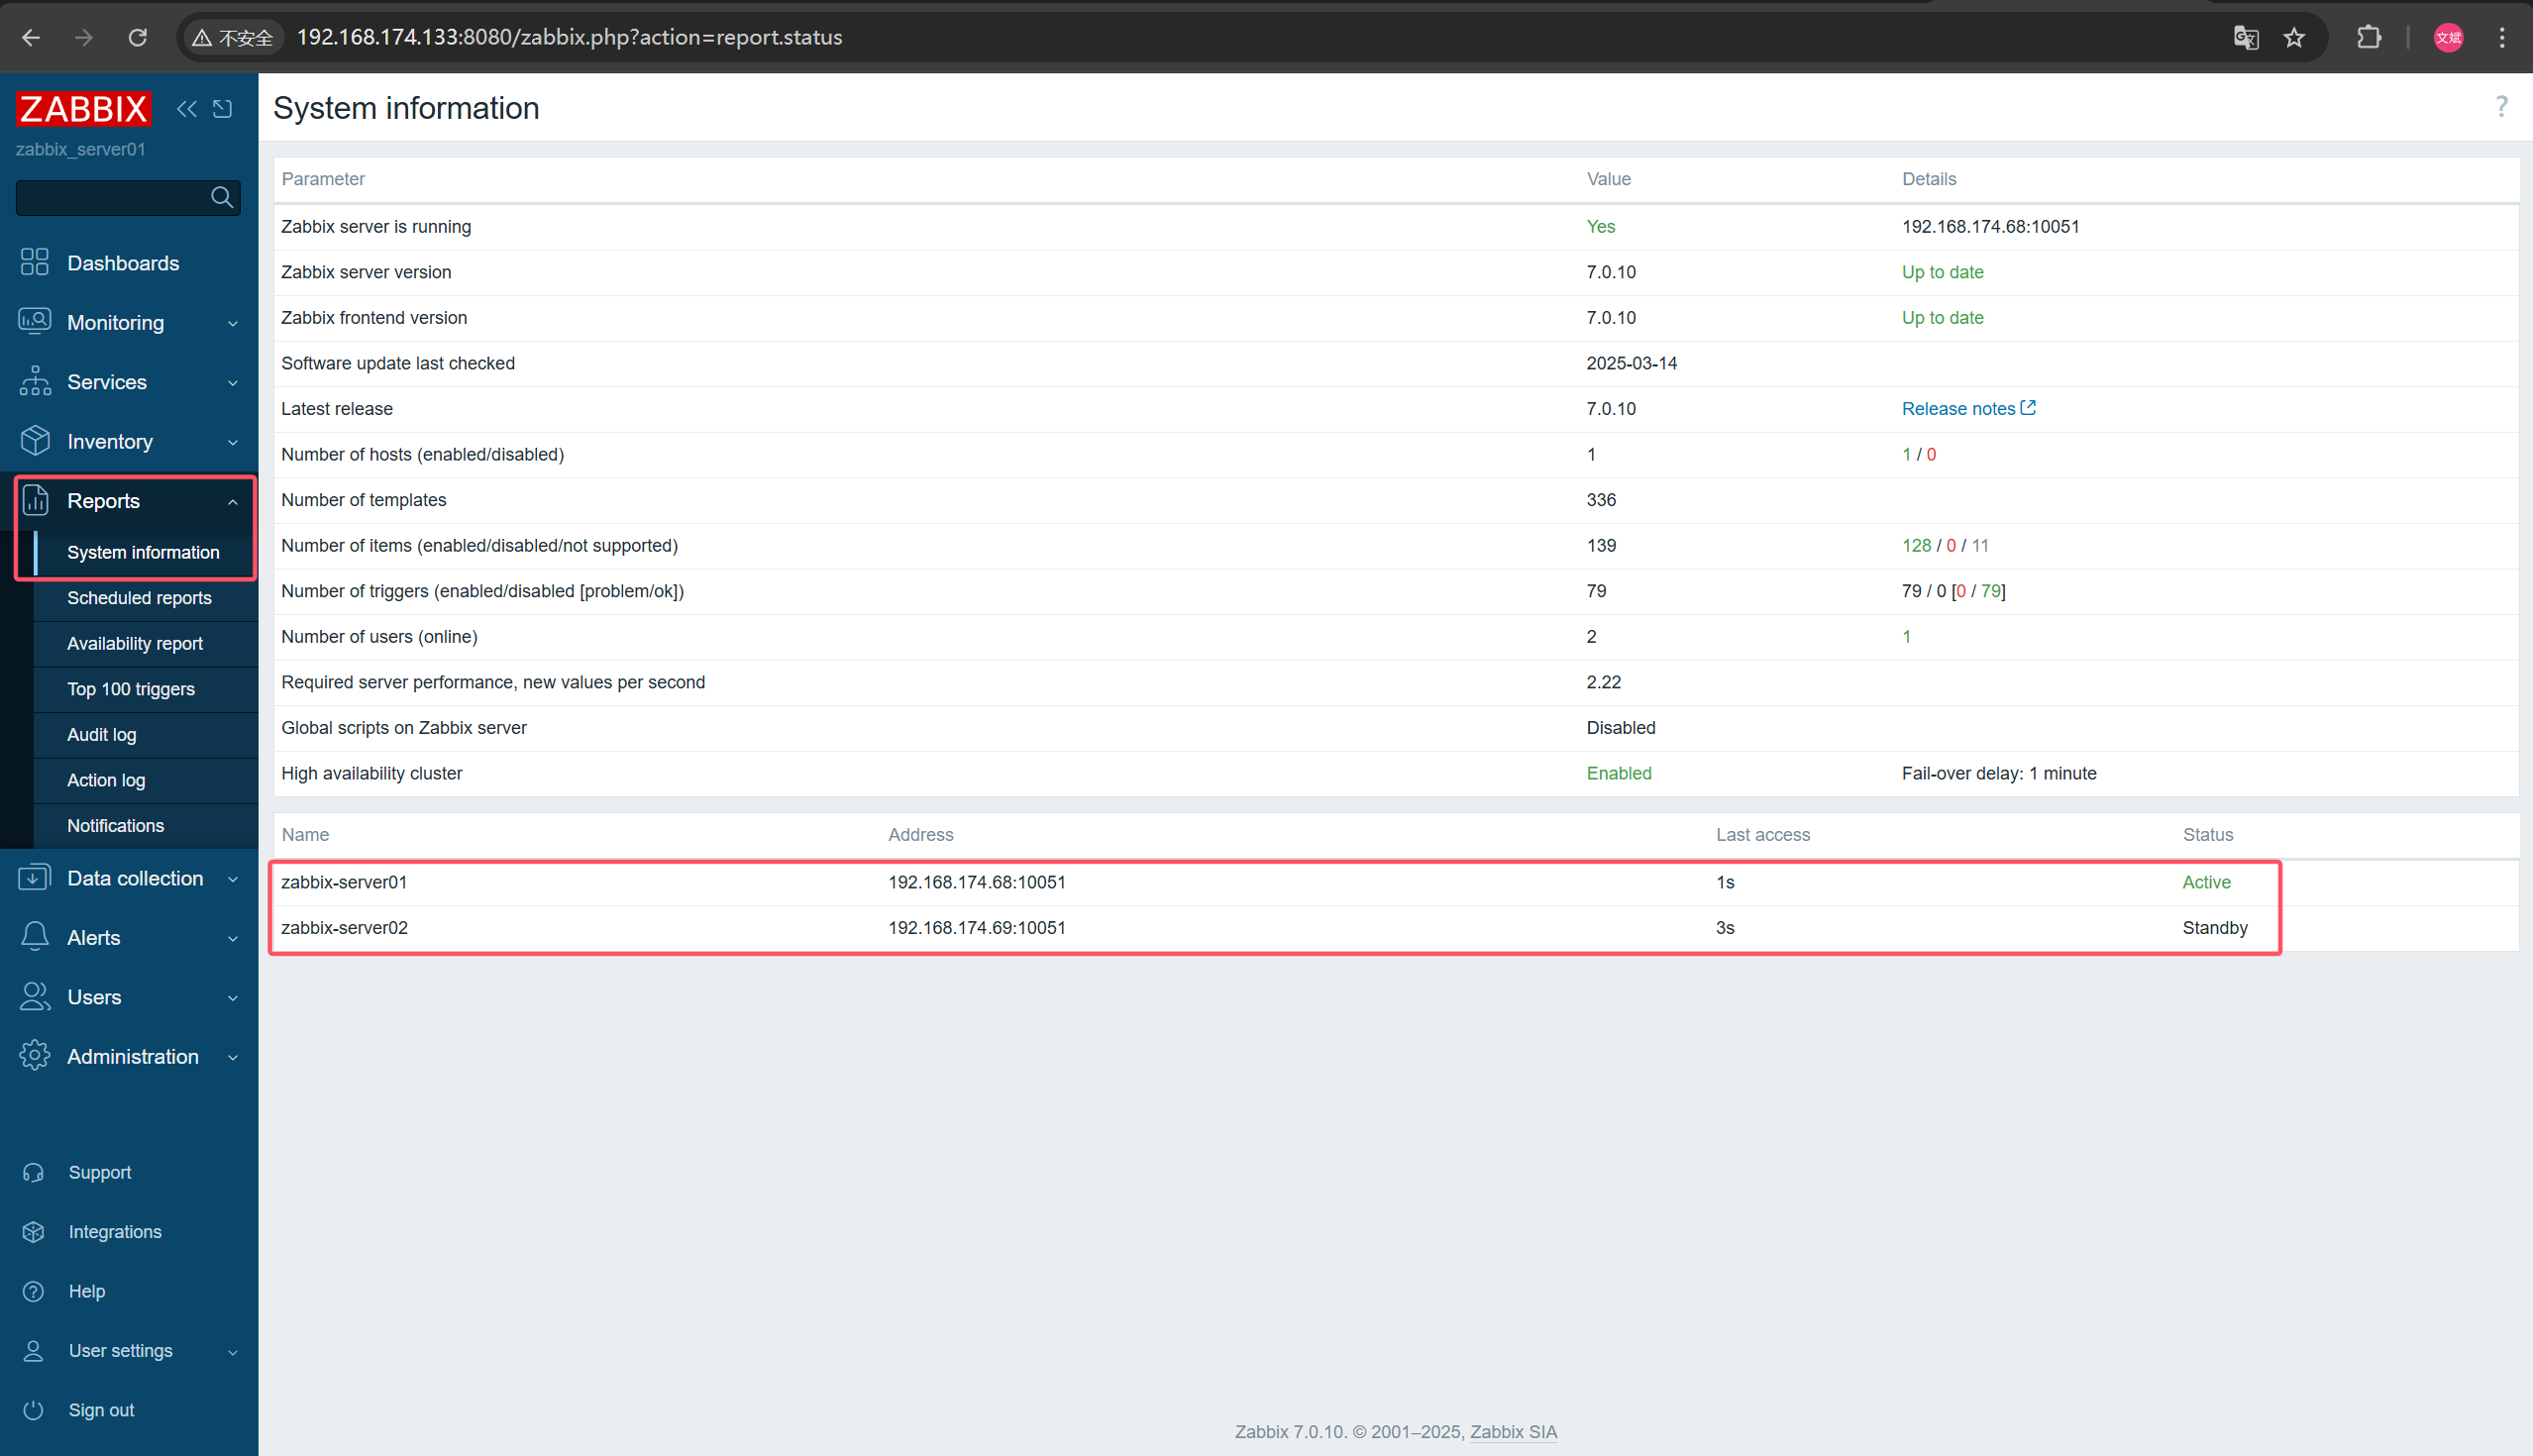
5.4 zabbix-server HA集群状态
Active节点处理任务,Standby节点作为备用。如果Active节点正常关闭,Standby节点会在5秒内接管;但如果Active节点意外崩溃,Standby节点需要等待故障转移延迟(默认1分钟)加上5秒才会接管。用户可能需要调整这个延迟时间,可以使用zabbix_server -R ha_set_failover_delay=5m来修改。
5.4.1 验证集群状态
zabbix_server -R ha_status
5.4.2 调整故障转移延迟
zabbix_server -R ha_set_failover_delay=5m5.4.3 移除故障节点
zabbix_server -R ha_remove_node=2 # 根据 ha_status 输出的节点 ID六、zabbix-server HA部署之zabbix-proxy双节点部署
6.1 节点规划
192.168.174.97zabbix-proxy01192.168.174.98zabbix-proxy026.2 两台主机修改主机名
hostnamectl set-hostname zabbix-proxy01hostnamectl set-hostname zabbix-proxy026.3 两台主机配置zabbix源
rpm -Uvh https://repo.zabbix.com/zabbix/7.0/centos/9/x86_64/zabbix-release-latest-7.0.el9.noarch.rpm6.4 两台主机安装zabbix-proxy
dnf install -y zabbix-proxy-mysql zabbix-sql-scripts6.5 导入基础数据
注意:不同的
zabbix-proxy主机需要使用不同的MySQL数据库。
连接到mysql-innodb01节点,为zabbix-proxy01节点创建专用数据库zabbix_proxy01_db以及用户zabbix_proxy01。
mysql -uroot -p\'Xa%^3T%T4!\'mysql> create database zabbix_proxy01_db character set utf8mb4 collate utf8mb4_bin;Query OK, 1 row affected (0.00 sec)mysql> create user zabbix_proxy01@\'%\' identified by \'Zbx@123456\';Query OK, 0 rows affected (0.01 sec)mysql> grant all privileges on zabbix_proxy01_db.* to zabbix_proxy01@\'%\';Query OK, 0 rows affected (0.00 sec)mysql> set global log_bin_trust_function_creators = 1;Query OK, 0 rows affected, 1 warning (0.00 sec)mysql> quit;Bye 连接到mysql-innodb01节点,为zabbix-proxy02节点创建专用数据库zabbix_proxy02_db以及用户zabbix_proxy02。
mysql -uroot -p\'Xa%^3T%T4!\'mysql> create database zabbix_proxy02_db character set utf8mb4 collate utf8mb4_bin;Query OK, 1 row affected (0.00 sec)mysql> create user zabbix_proxy02@\'%\' identified by \'Zbx@123456\';Query OK, 0 rows affected (0.01 sec)mysql> grant all privileges on zabbix_proxy02_db.* to zabbix_proxy02@\'%\';Query OK, 0 rows affected (0.00 sec)mysql> quit;Bye6.6 zabbix-proxy导入基础数据
6.6.1 zabbix-proxy01导入基础数据
dnf install -y mariadbcat /usr/share/zabbix-sql-scripts/mysql/proxy.sql | mysql --default-character-set=utf8mb4 -uzabbix_proxy01 -P 16446 -p\'Zbx@123456\' -h192.168.174.177 -Dzabbix_proxy01_db6.6.2 zabbix-proxy02导入基础数据
dnf install -y mariadbcat /usr/share/zabbix-sql-scripts/mysql/proxy.sql | mysql --default-character-set=utf8mb4 -uzabbix_proxy02 -P 16446 -p\'Zbx@123456\' -h192.168.174.177 -Dzabbix_proxy02_db6.6.1 mysql-innodb01禁用log_bin_trust_function_creators
mysql -uroot -p\'Xa%^3T%T4!\'mysql> set global log_bin_trust_function_creators = 0;Query OK, 0 rows affected, 1 warning (0.00 sec)mysql> quit;Bye6.7 zabbix-proxy文件配置
6.7.1 zabbix-proxy01配置文件修改
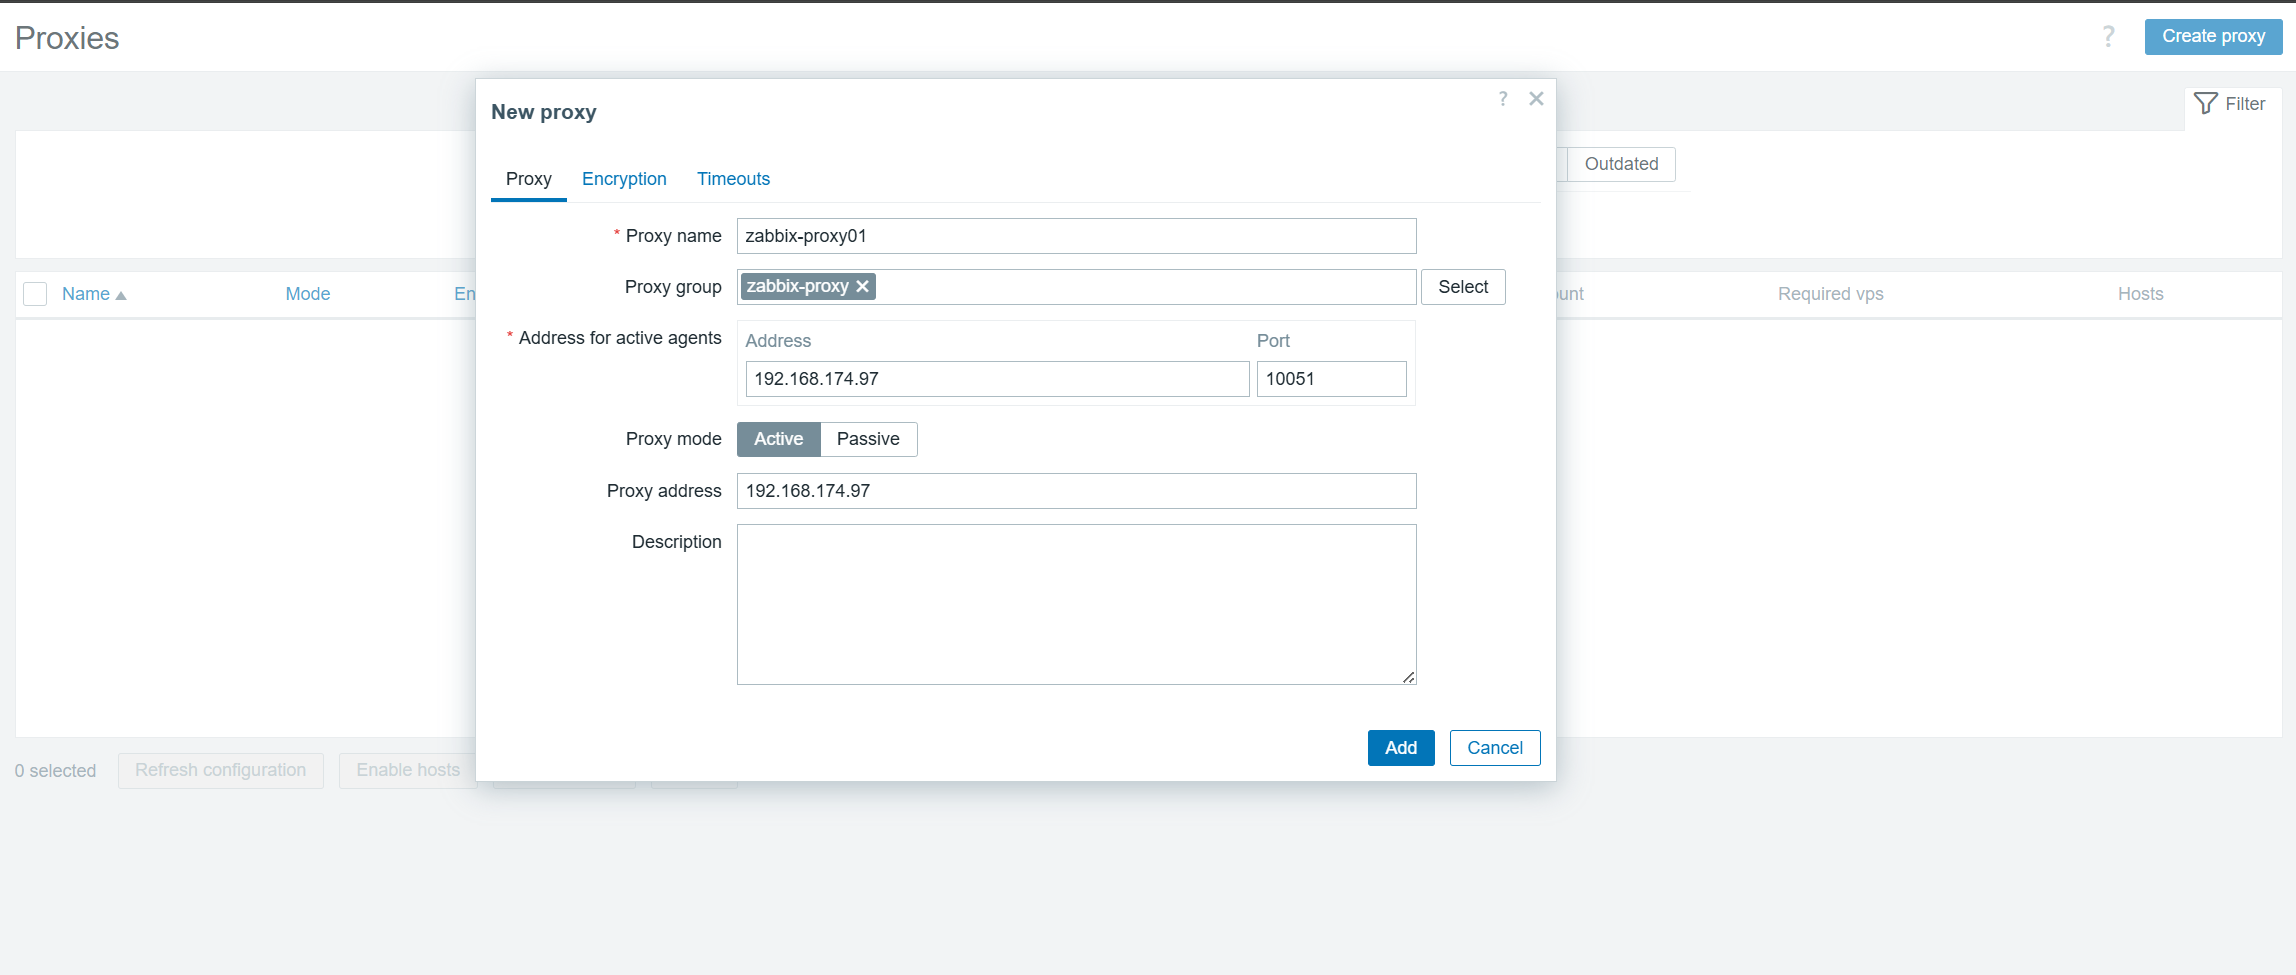
egrep -v \"^(#|$)\" /etc/zabbix/zabbix_proxy.confProxyMode=0Server=192.168.174.68;192.168.174.69 # zabbix-server地址Hostname=zabbix-proxy01 # 当前zabbix-proxy主机名LogFile=/var/log/zabbix/zabbix_proxy.logLogFileSize=0PidFile=/run/zabbix/zabbix_proxy.pidSocketDir=/run/zabbixDBHost=192.168.174.177 # MySQL VIP地址DBName=zabbix_proxy01_db # 数据库名称DBUser=zabbix_proxy01 # MySQL用户DBPassword=Zbx@123456 # MySQL用户密码DBPort=16446# MySQL haproxy端口号ProxyBufferMode=hybridProxyMemoryBufferSize=16MSNMPTrapperFile=/var/log/snmptrap/snmptrap.logTimeout=4LogSlowQueries=3000StatsAllowedIP=127.0.0.16.7.2 zabbix-proxy02配置文件修改
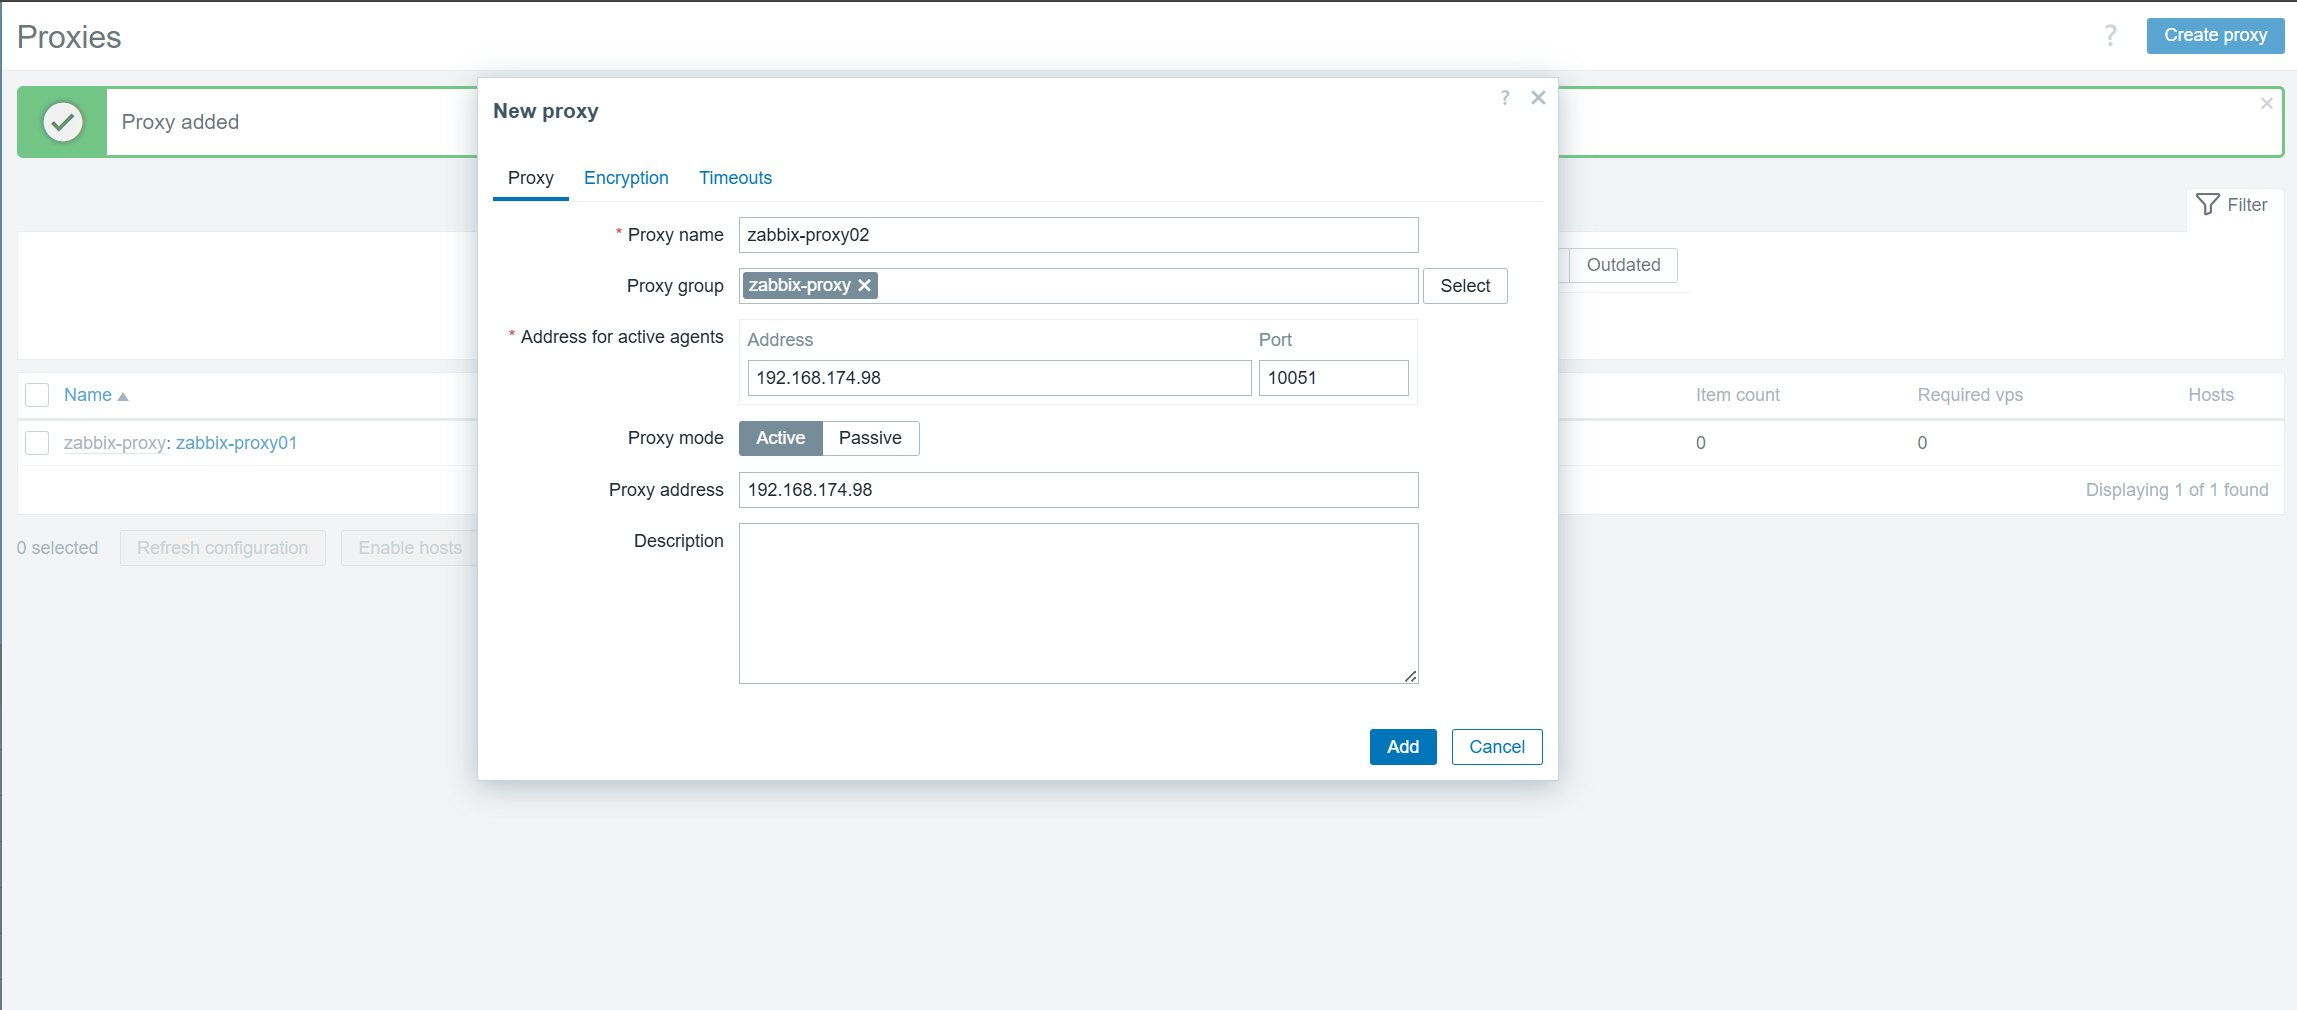
egrep -v \"^(#|$)\" /etc/zabbix/zabbix_proxy.confProxyMode=0Server=192.168.174.68;192.168.174.69 # zabbix-server地址Hostname=zabbix-proxy02 # 当前zabbix-proxy主机名LogFile=/var/log/zabbix/zabbix_proxy.logLogFileSize=0PidFile=/run/zabbix/zabbix_proxy.pidSocketDir=/run/zabbixDBHost=192.168.174.177 # MySQL VIP地址DBName=zabbix_proxy02_db # 数据库名称DBUser=zabbix_proxy02 # MySQL用户DBPassword=Zbx@123456 # MySQL用户密码DBPort=16446 # MySQL haproxy端口号ProxyBufferMode=hybridProxyMemoryBufferSize=16MSNMPTrapperFile=/var/log/snmptrap/snmptrap.logTimeout=4LogSlowQueries=3000StatsAllowedIP=127.0.0.16.7.3 两台主机启动zabbix-proxy
systemctl enable --now zabbix-proxysystemctl status zabbix-proxy 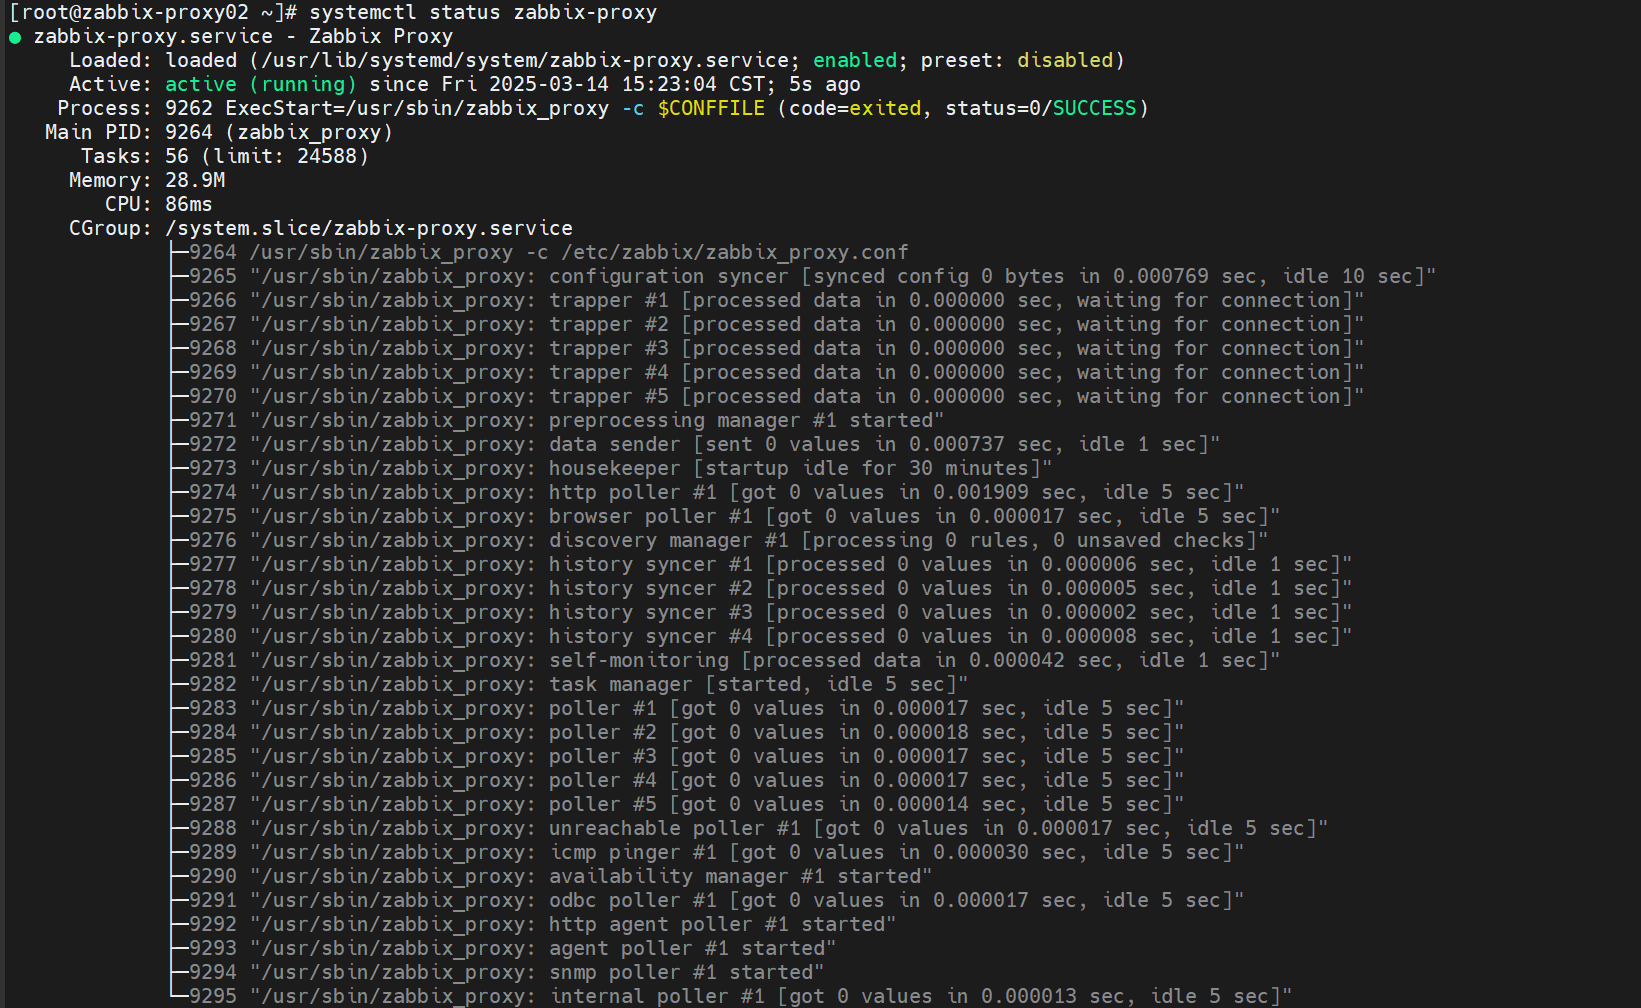
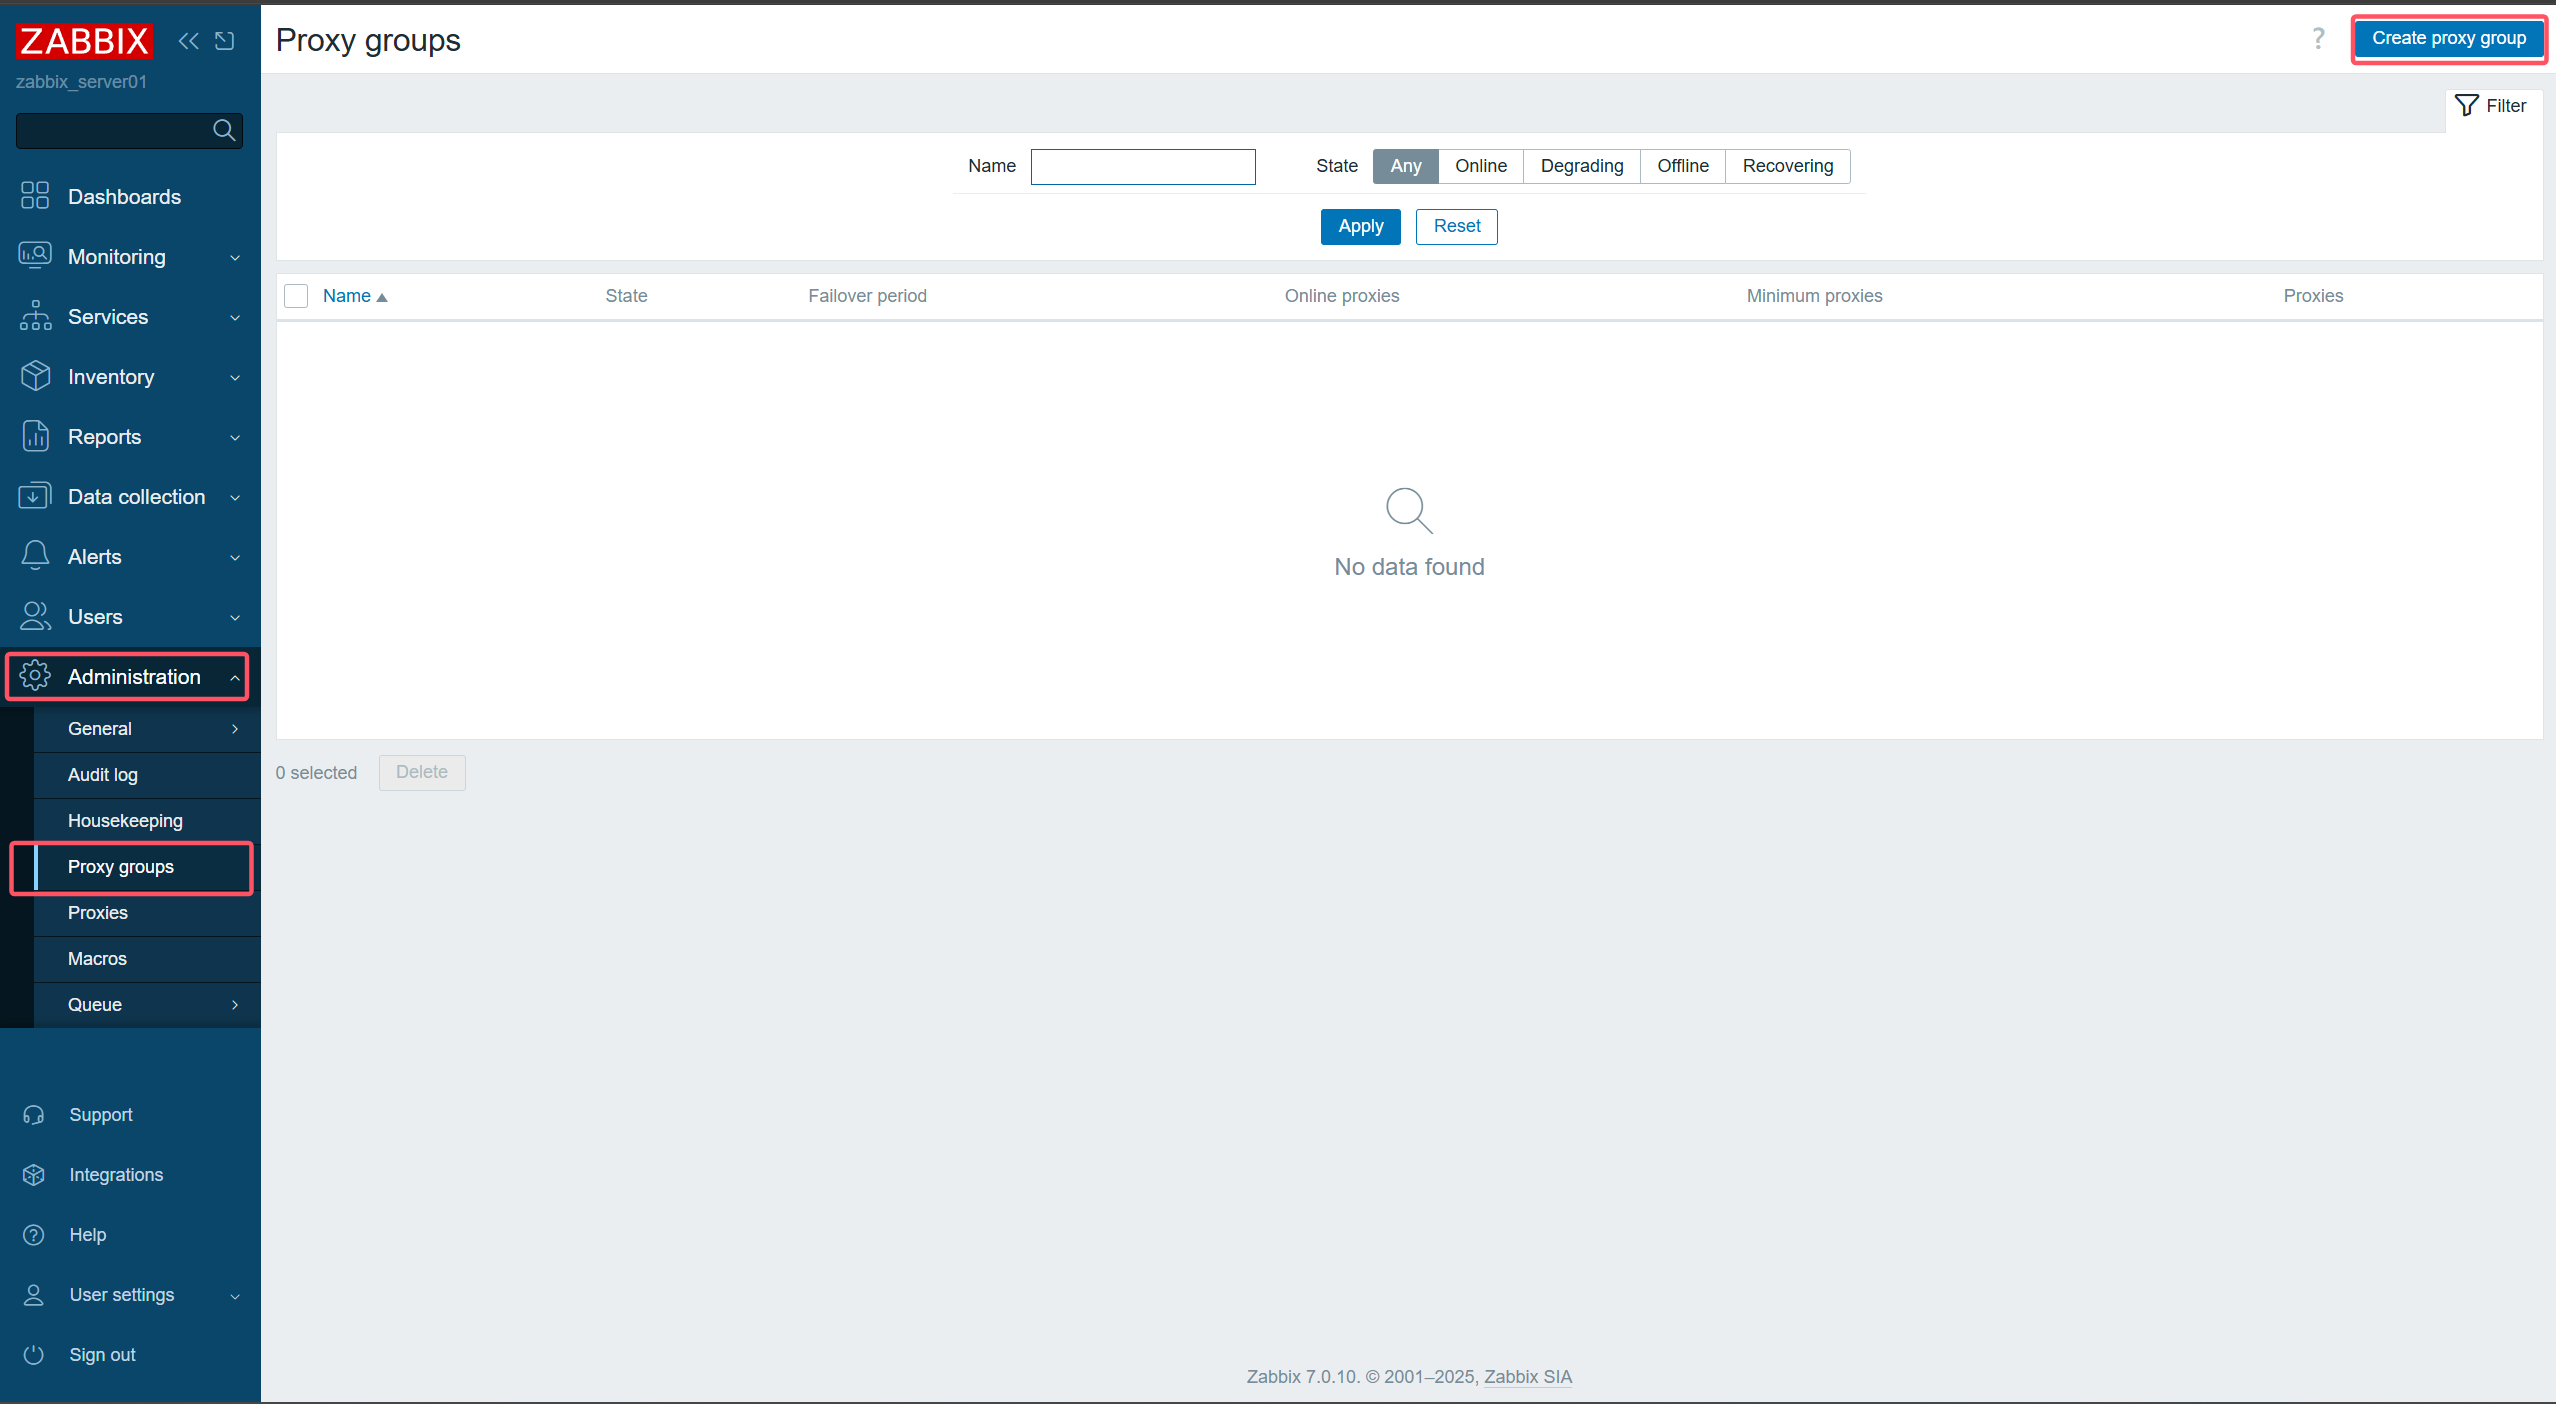
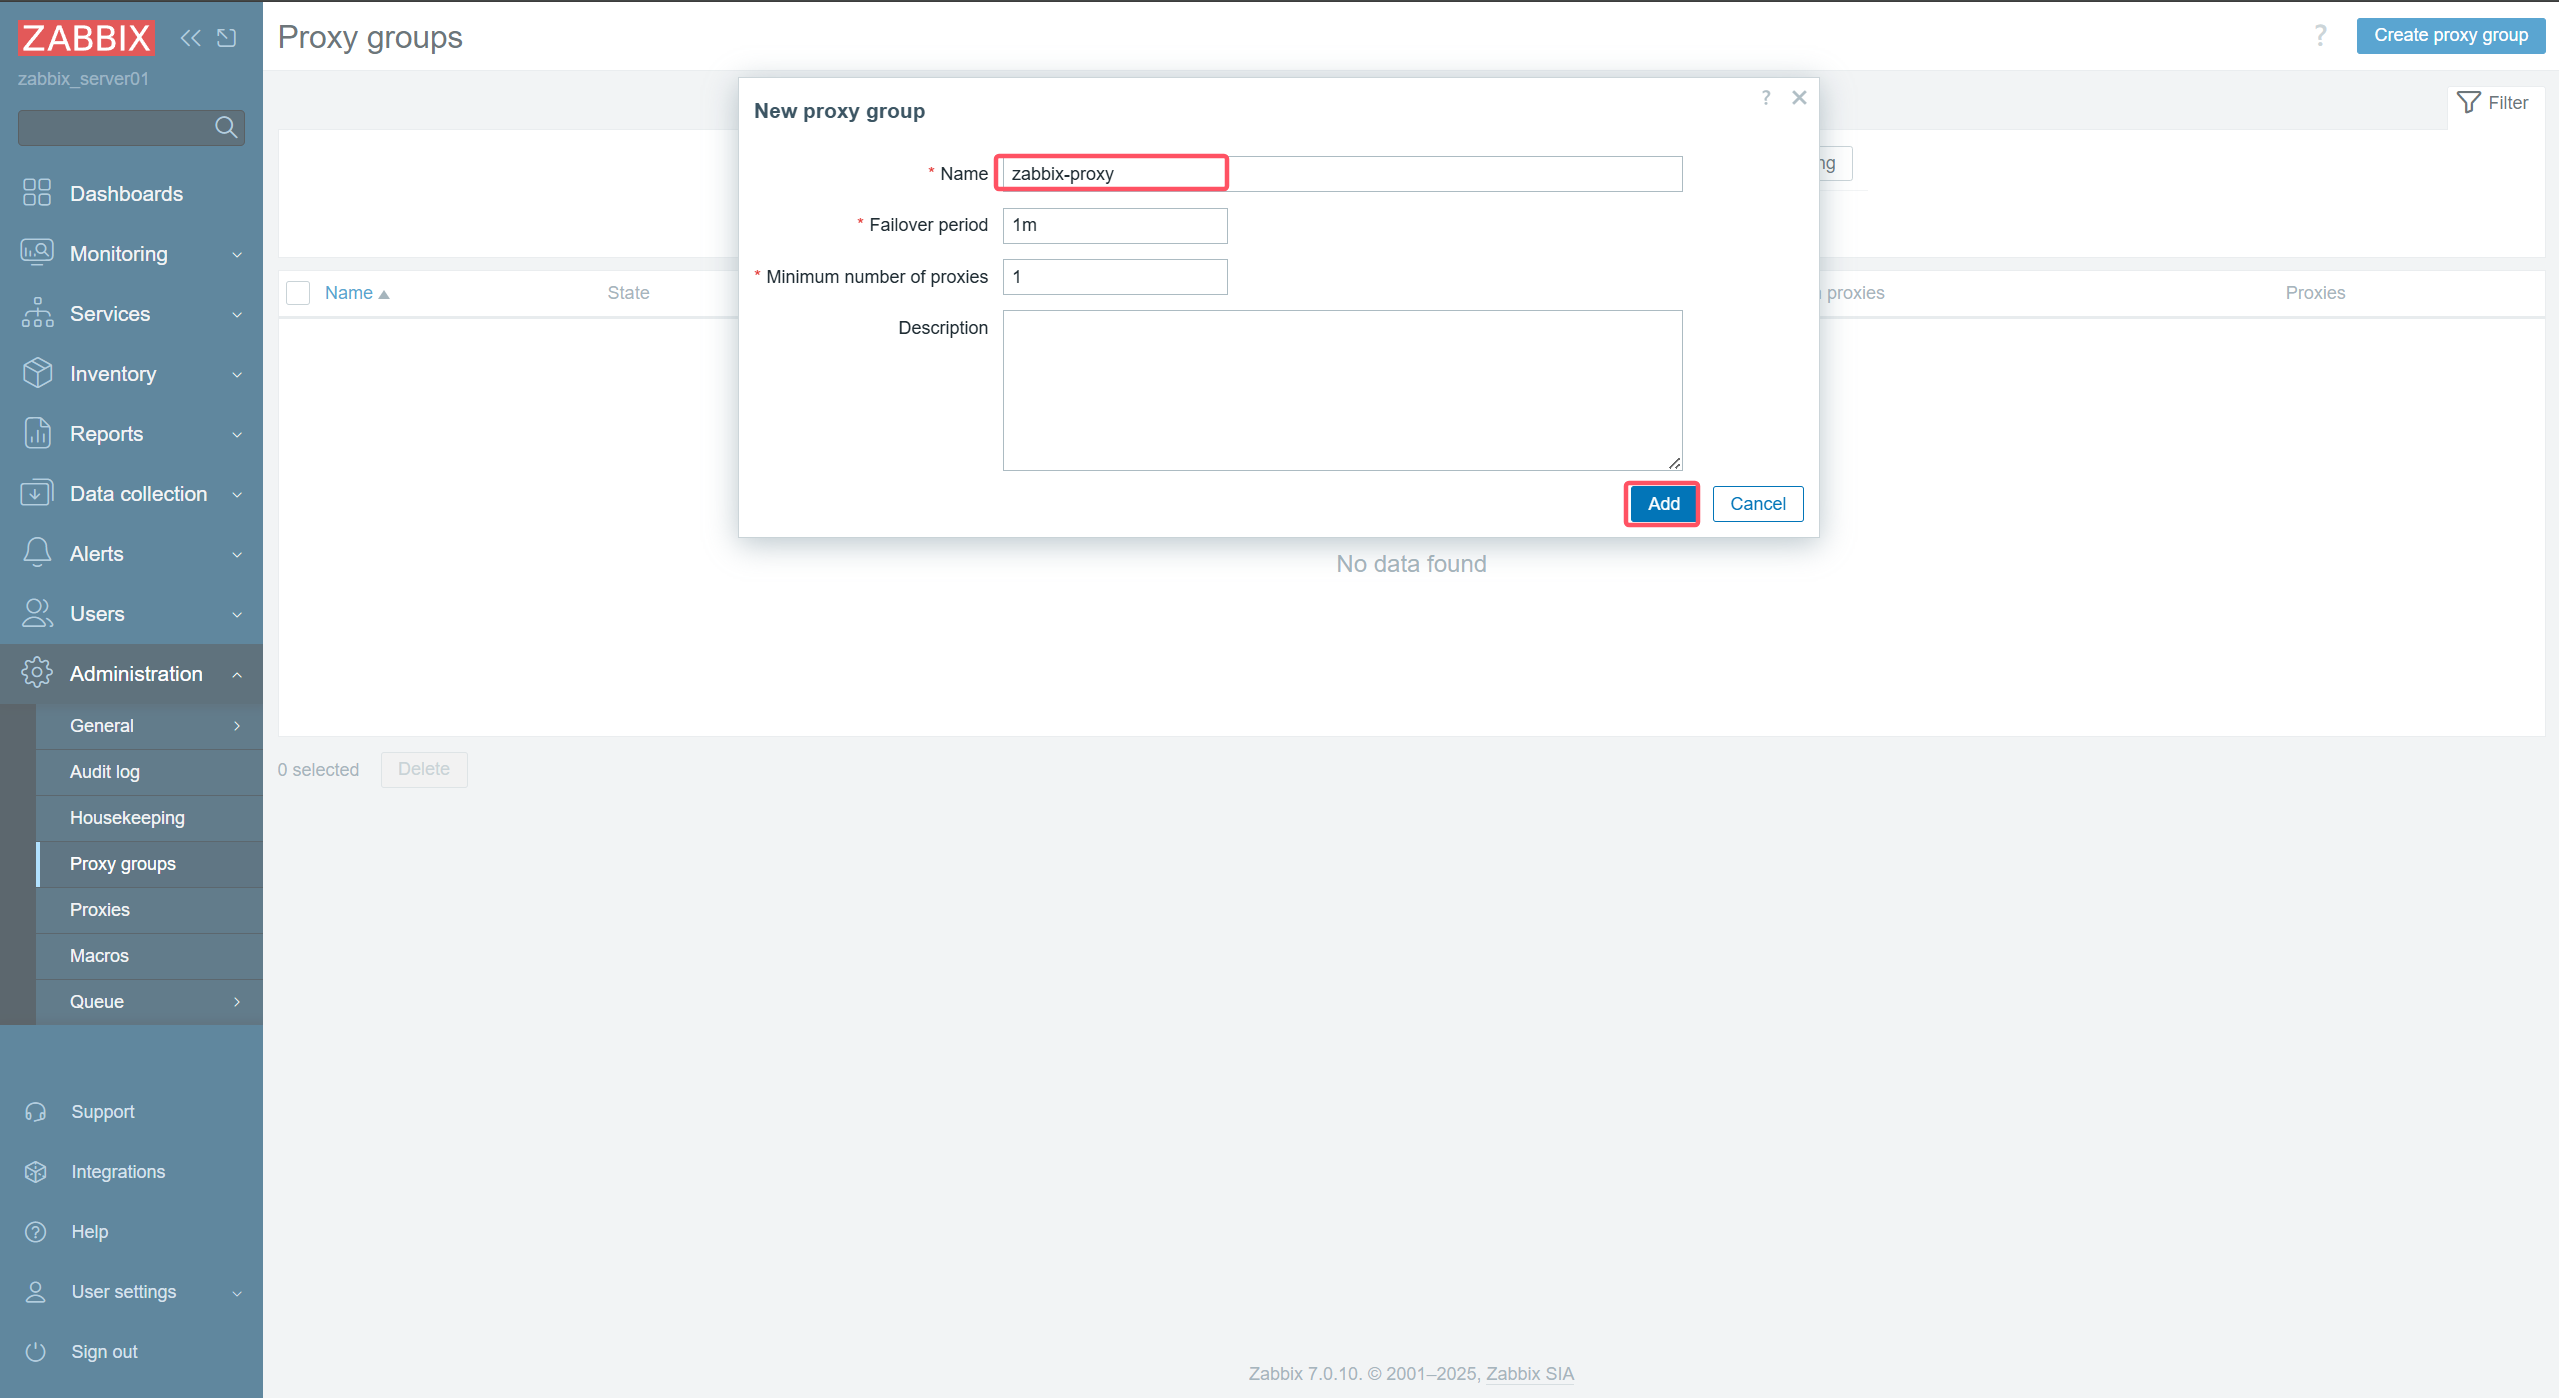
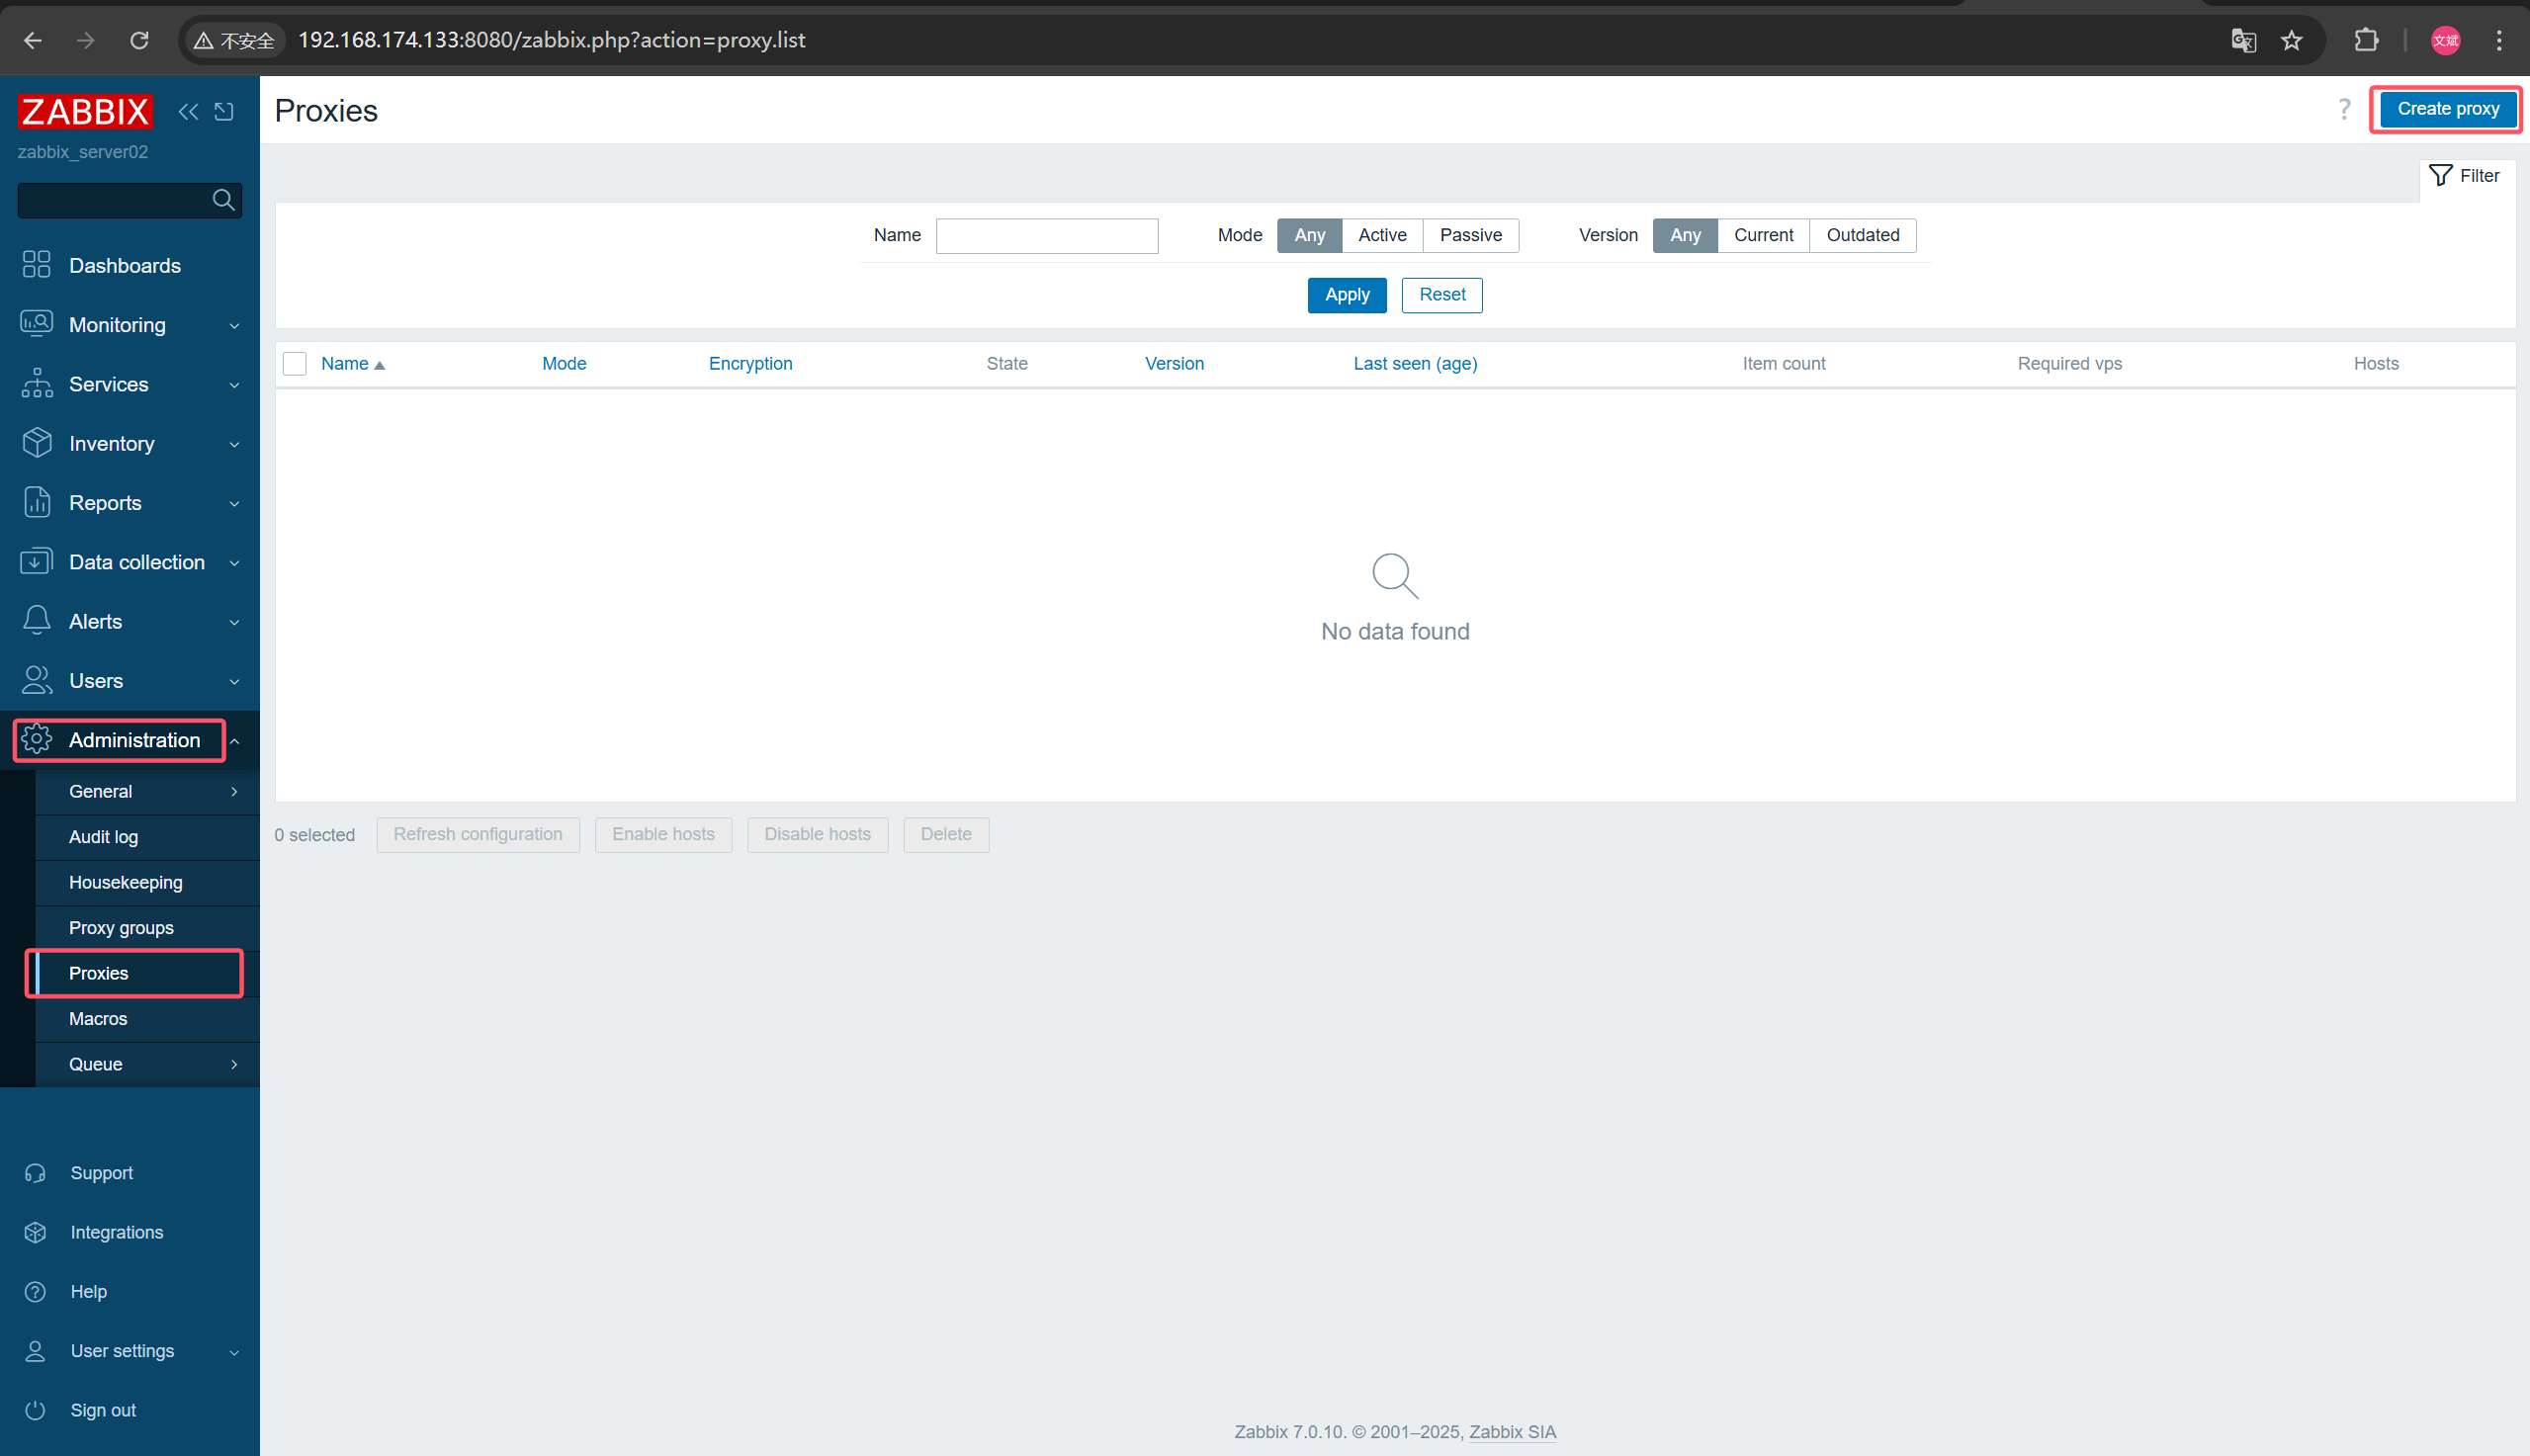
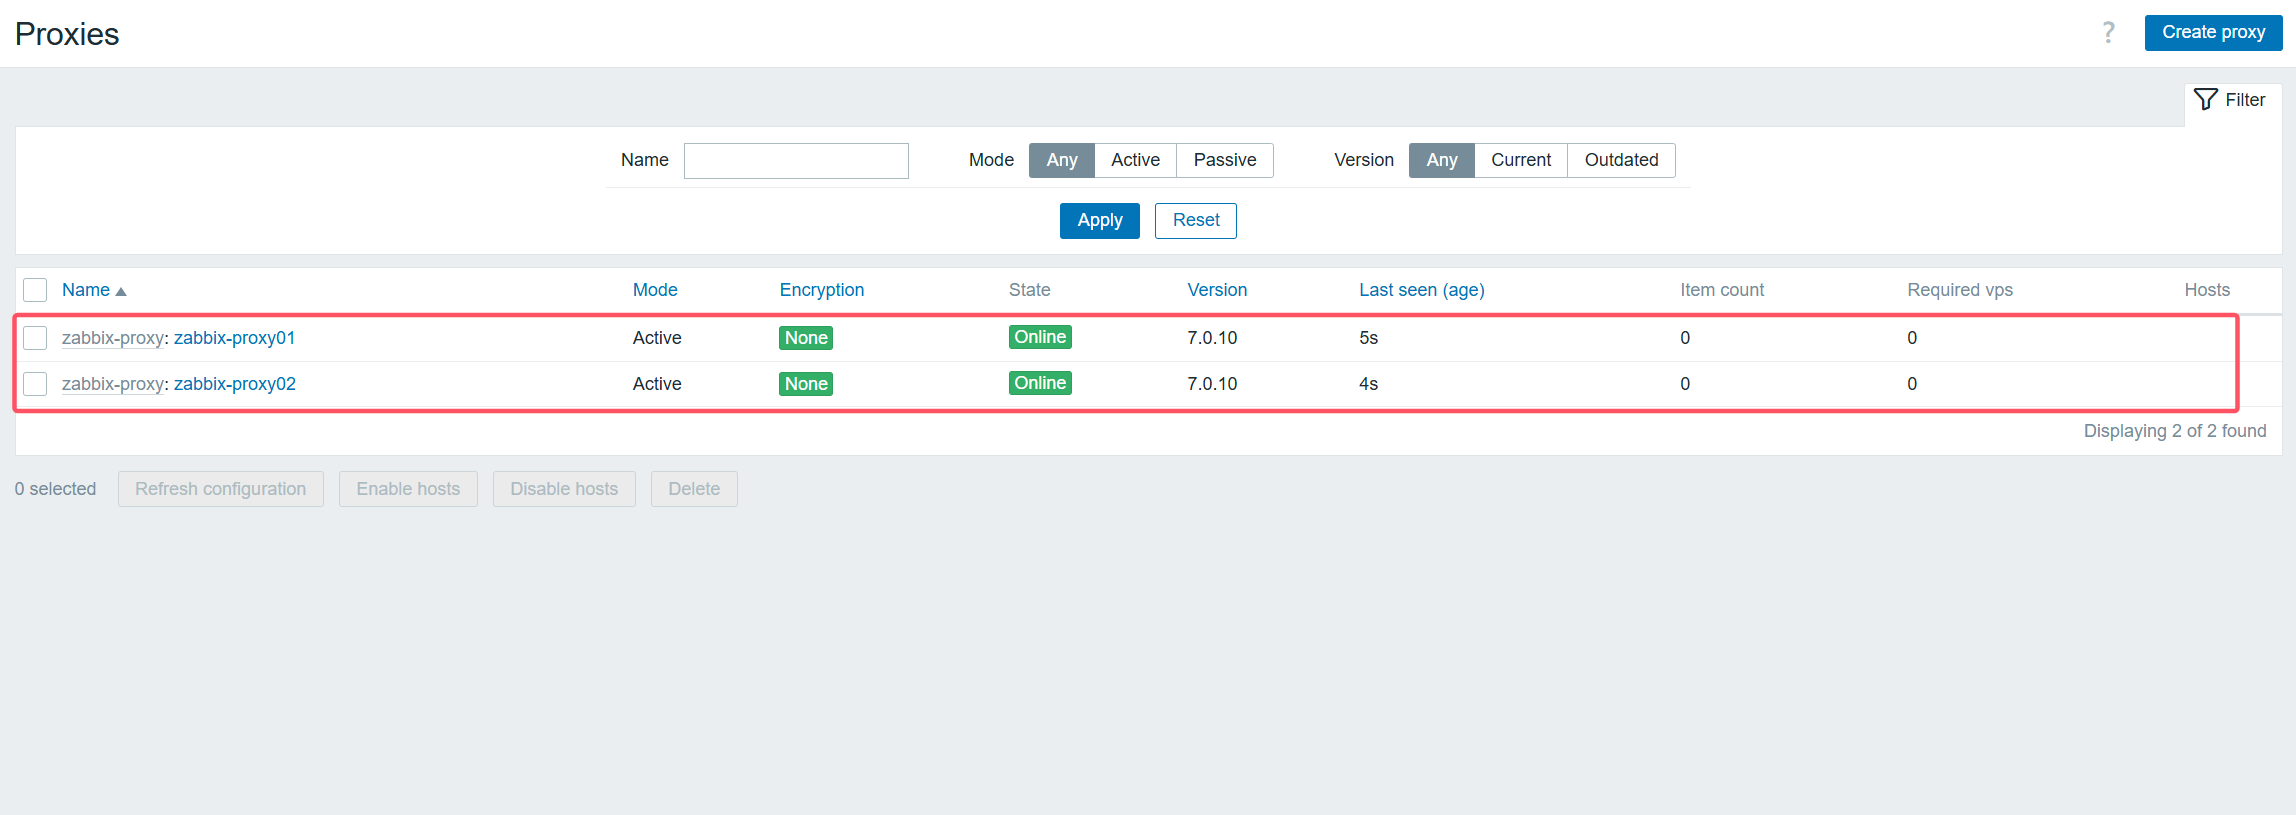
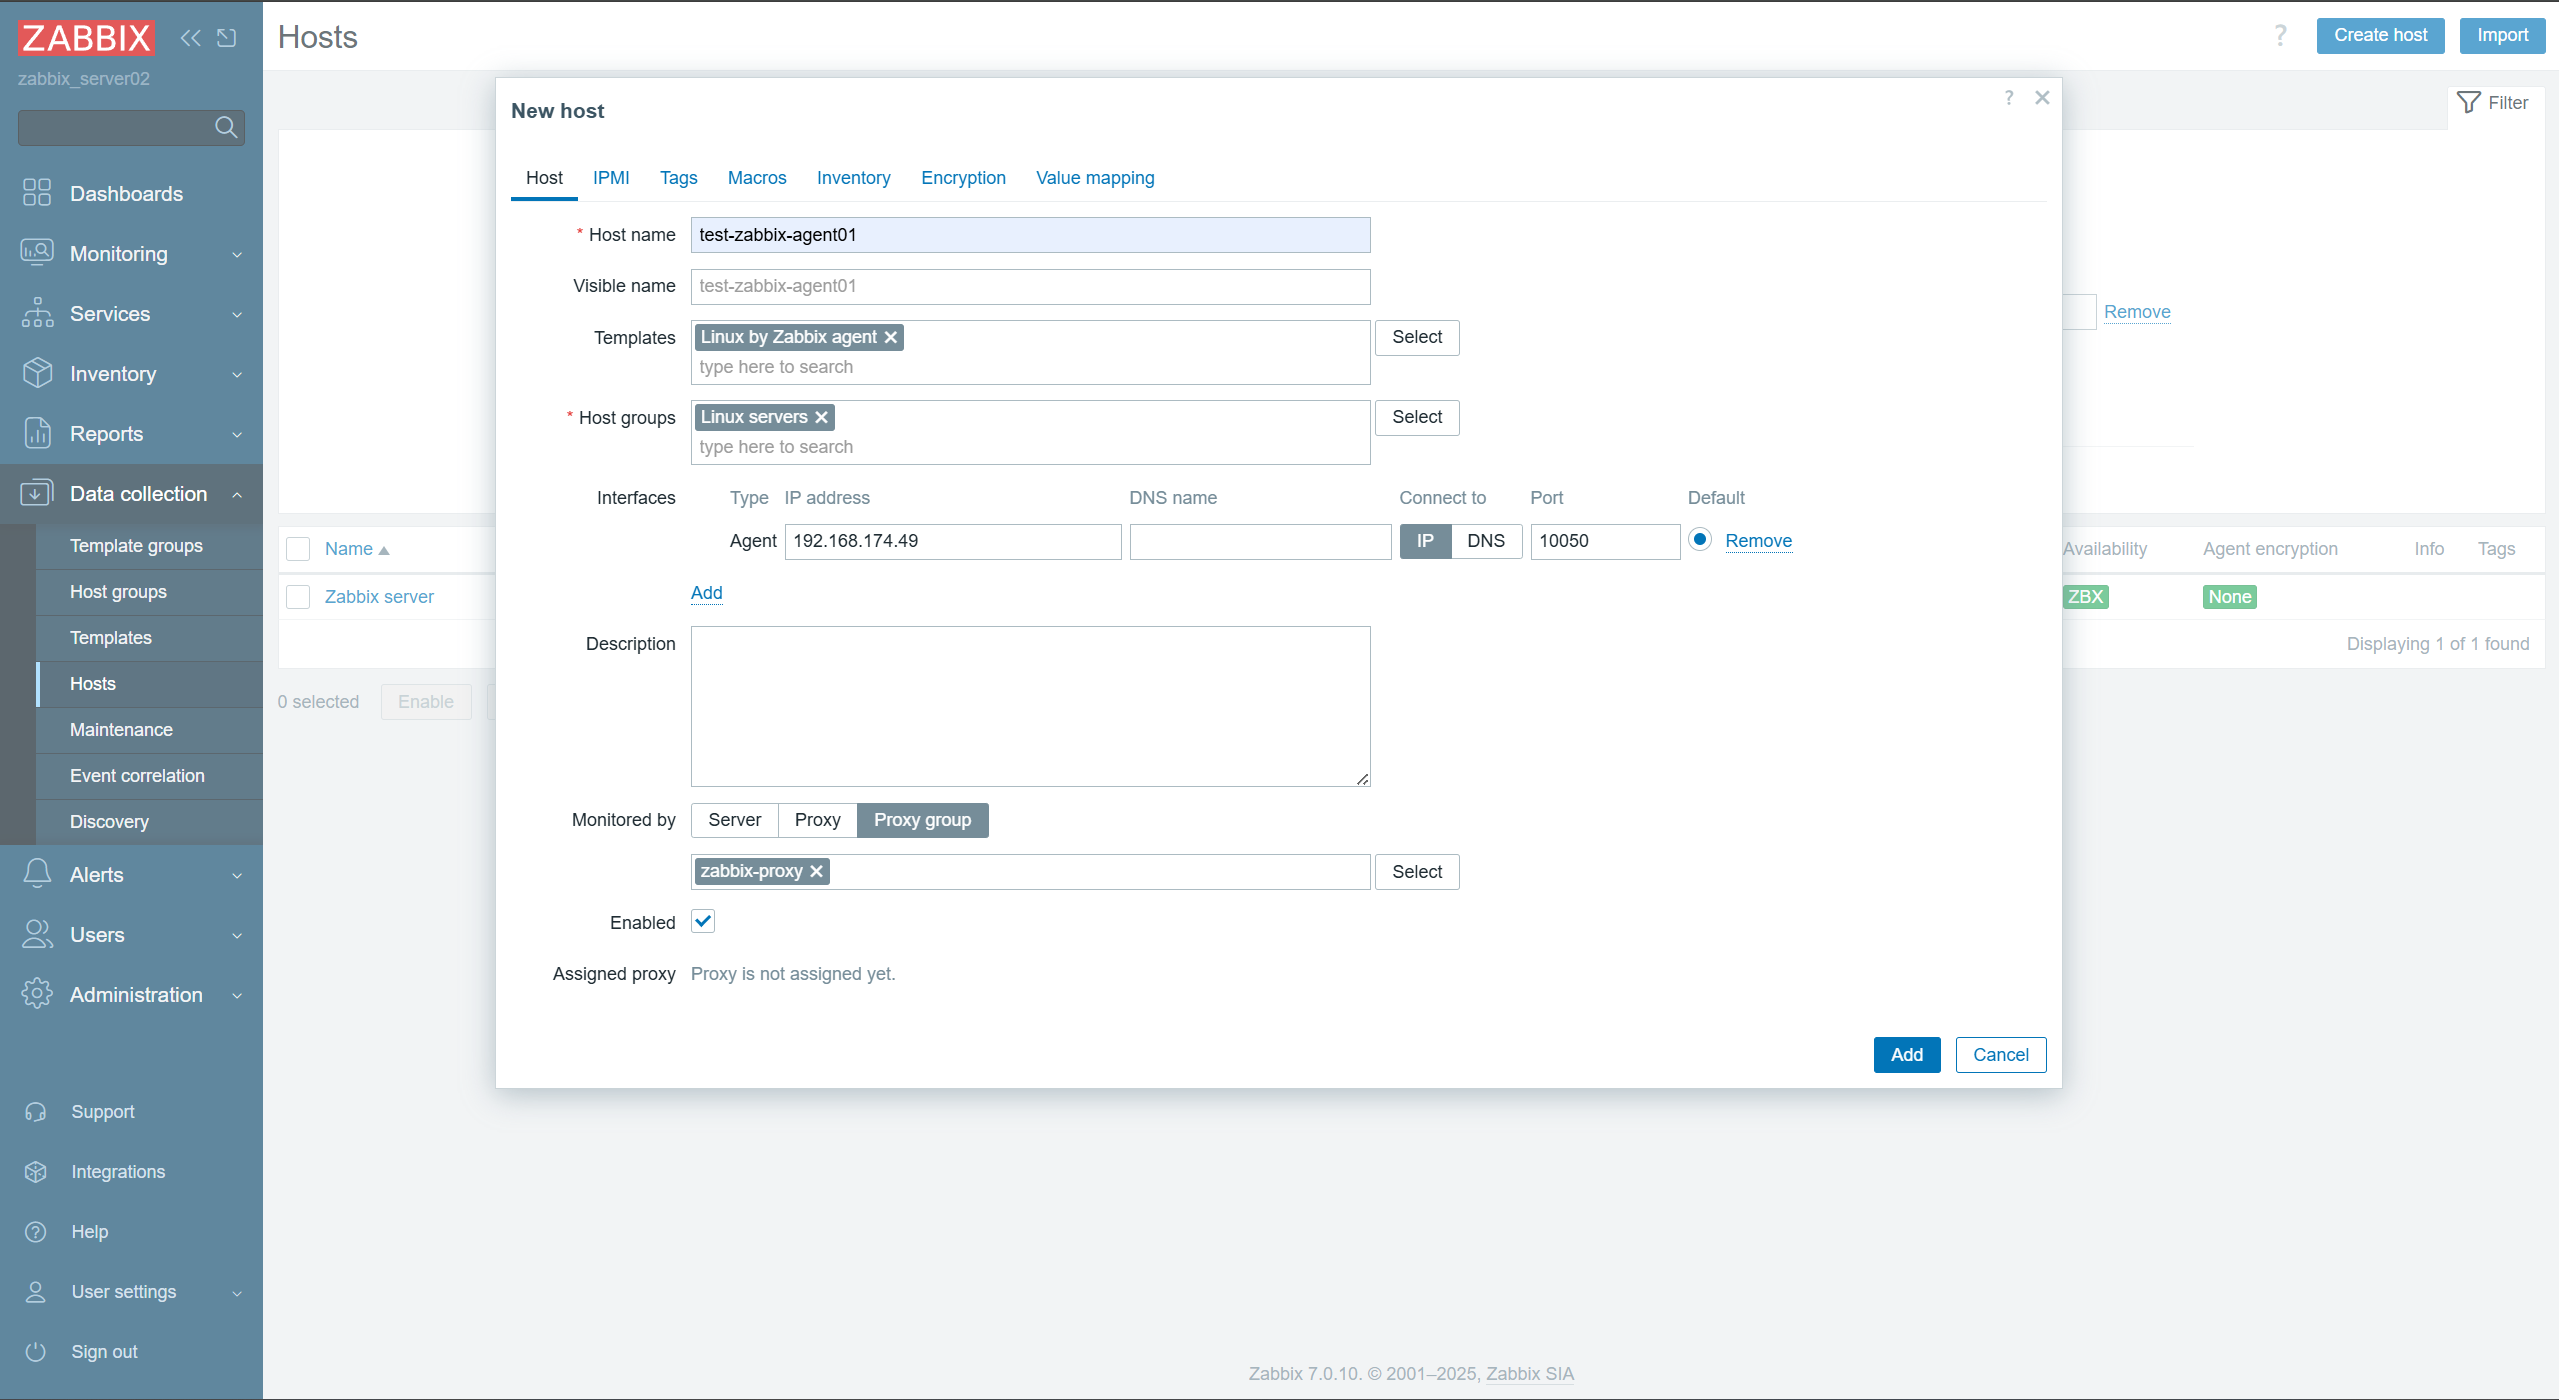
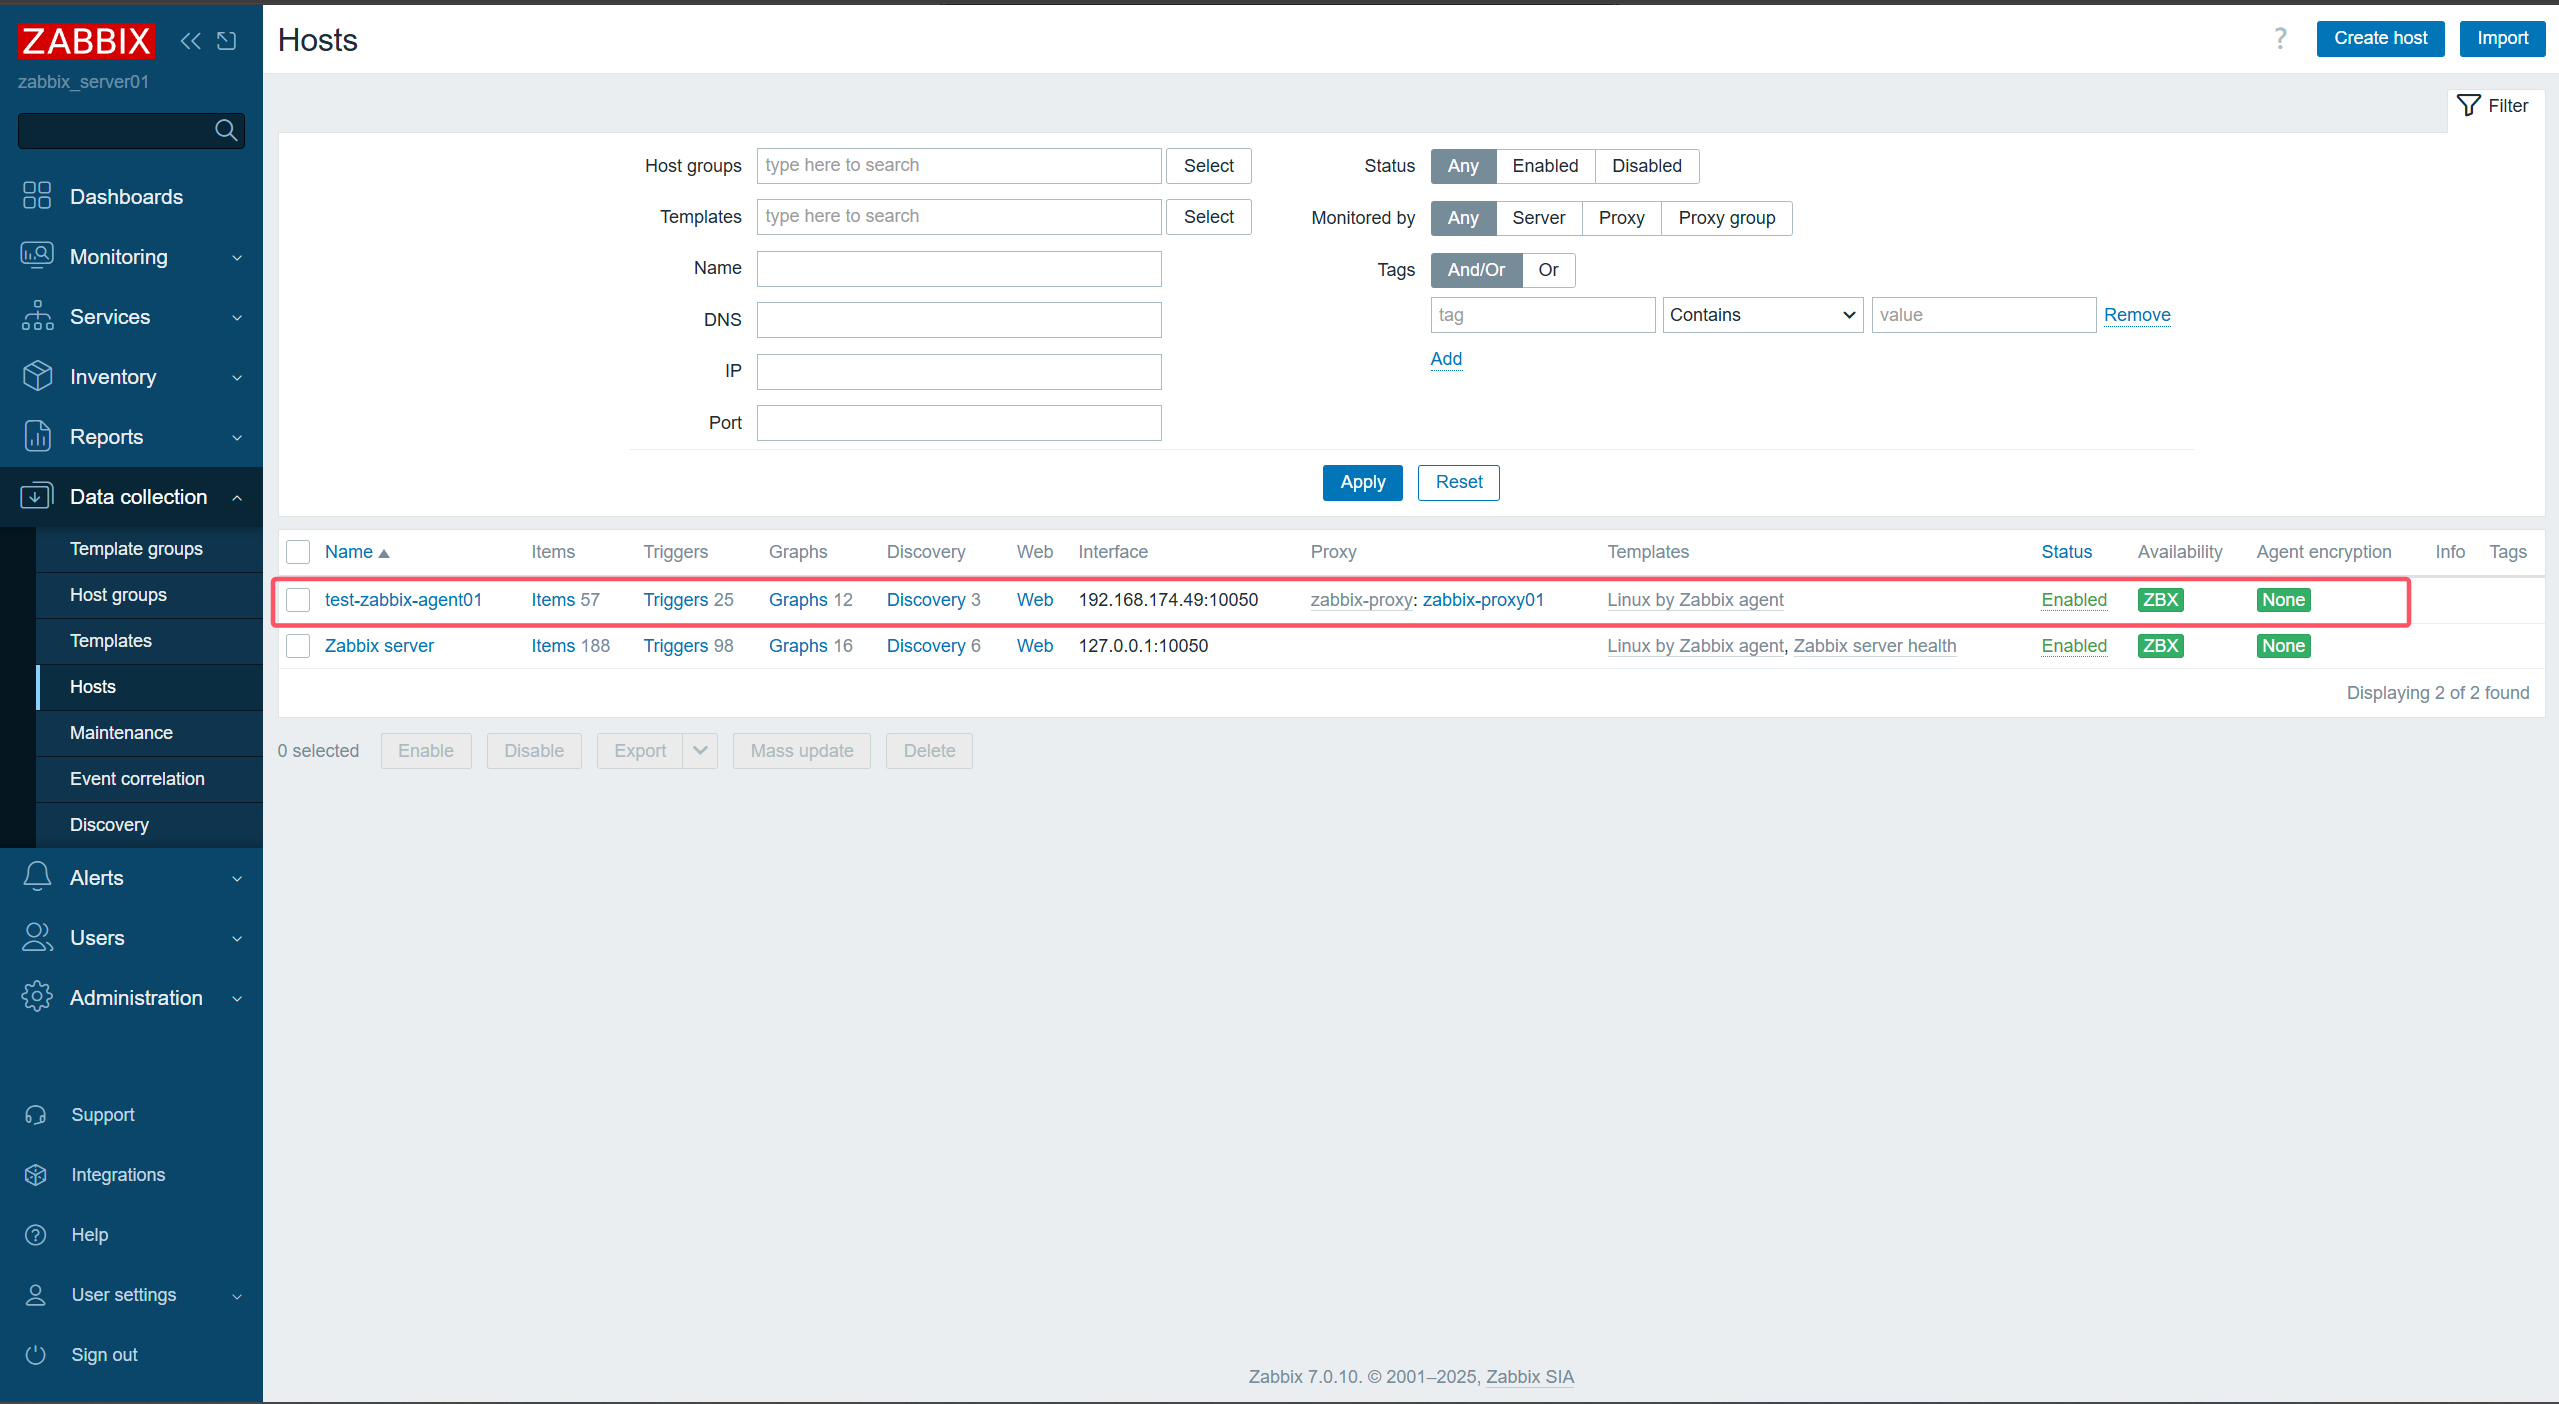
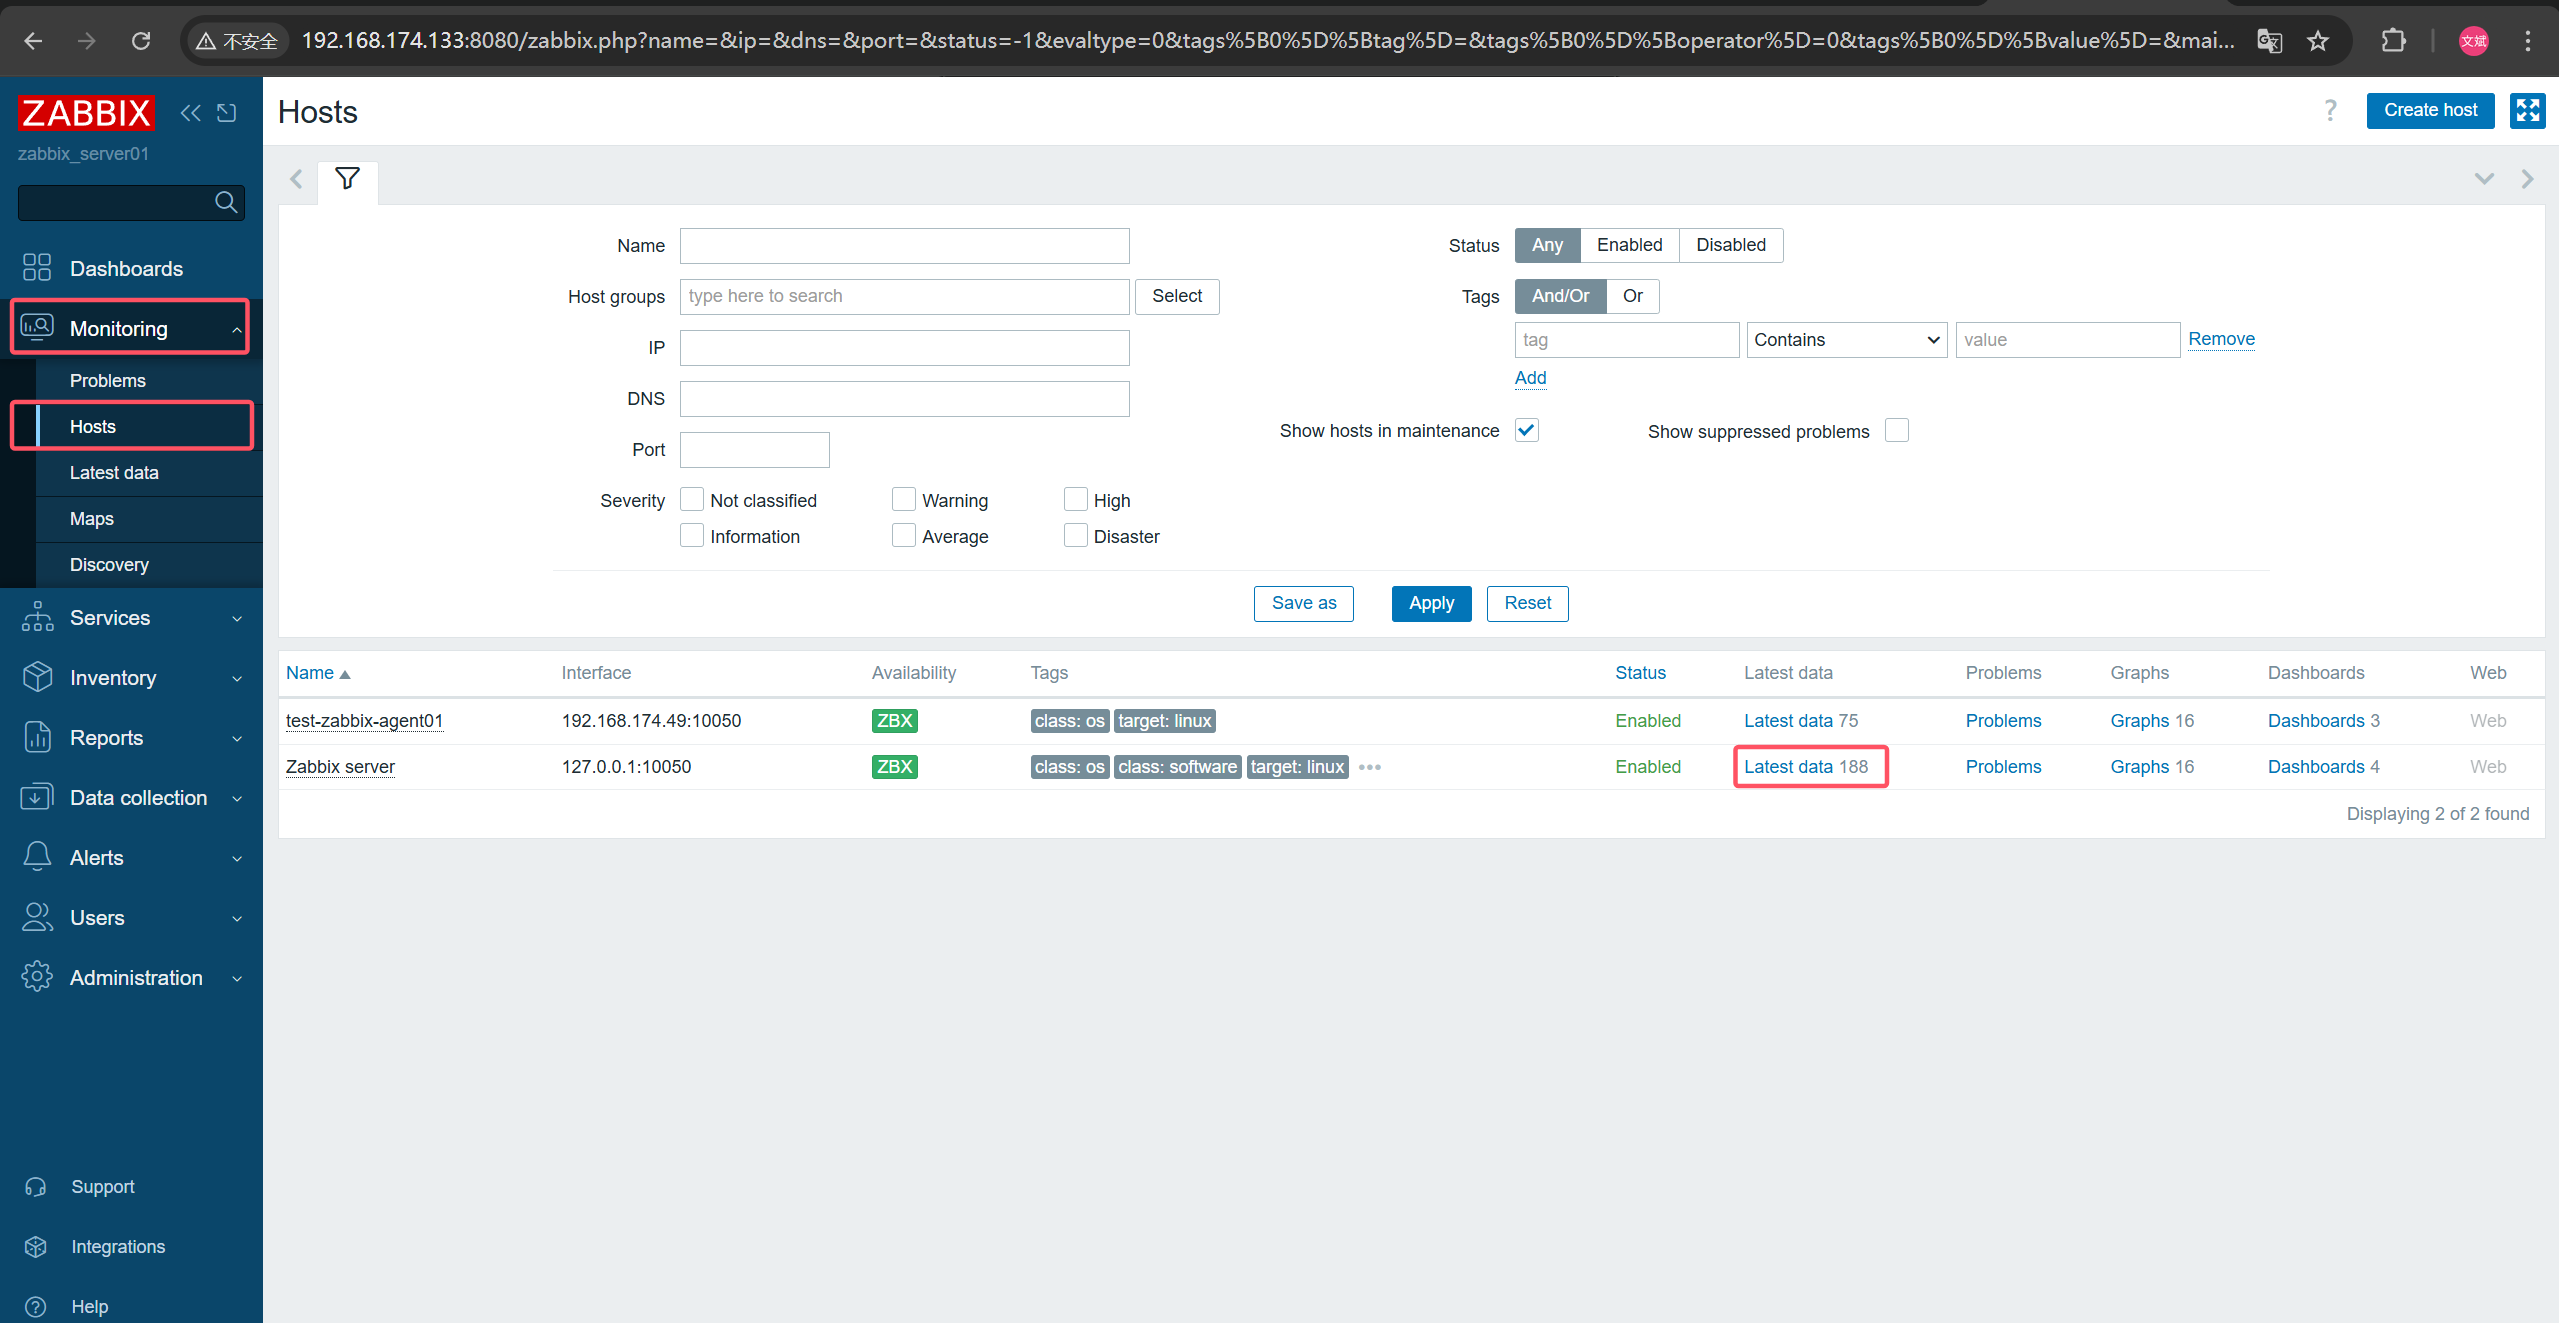
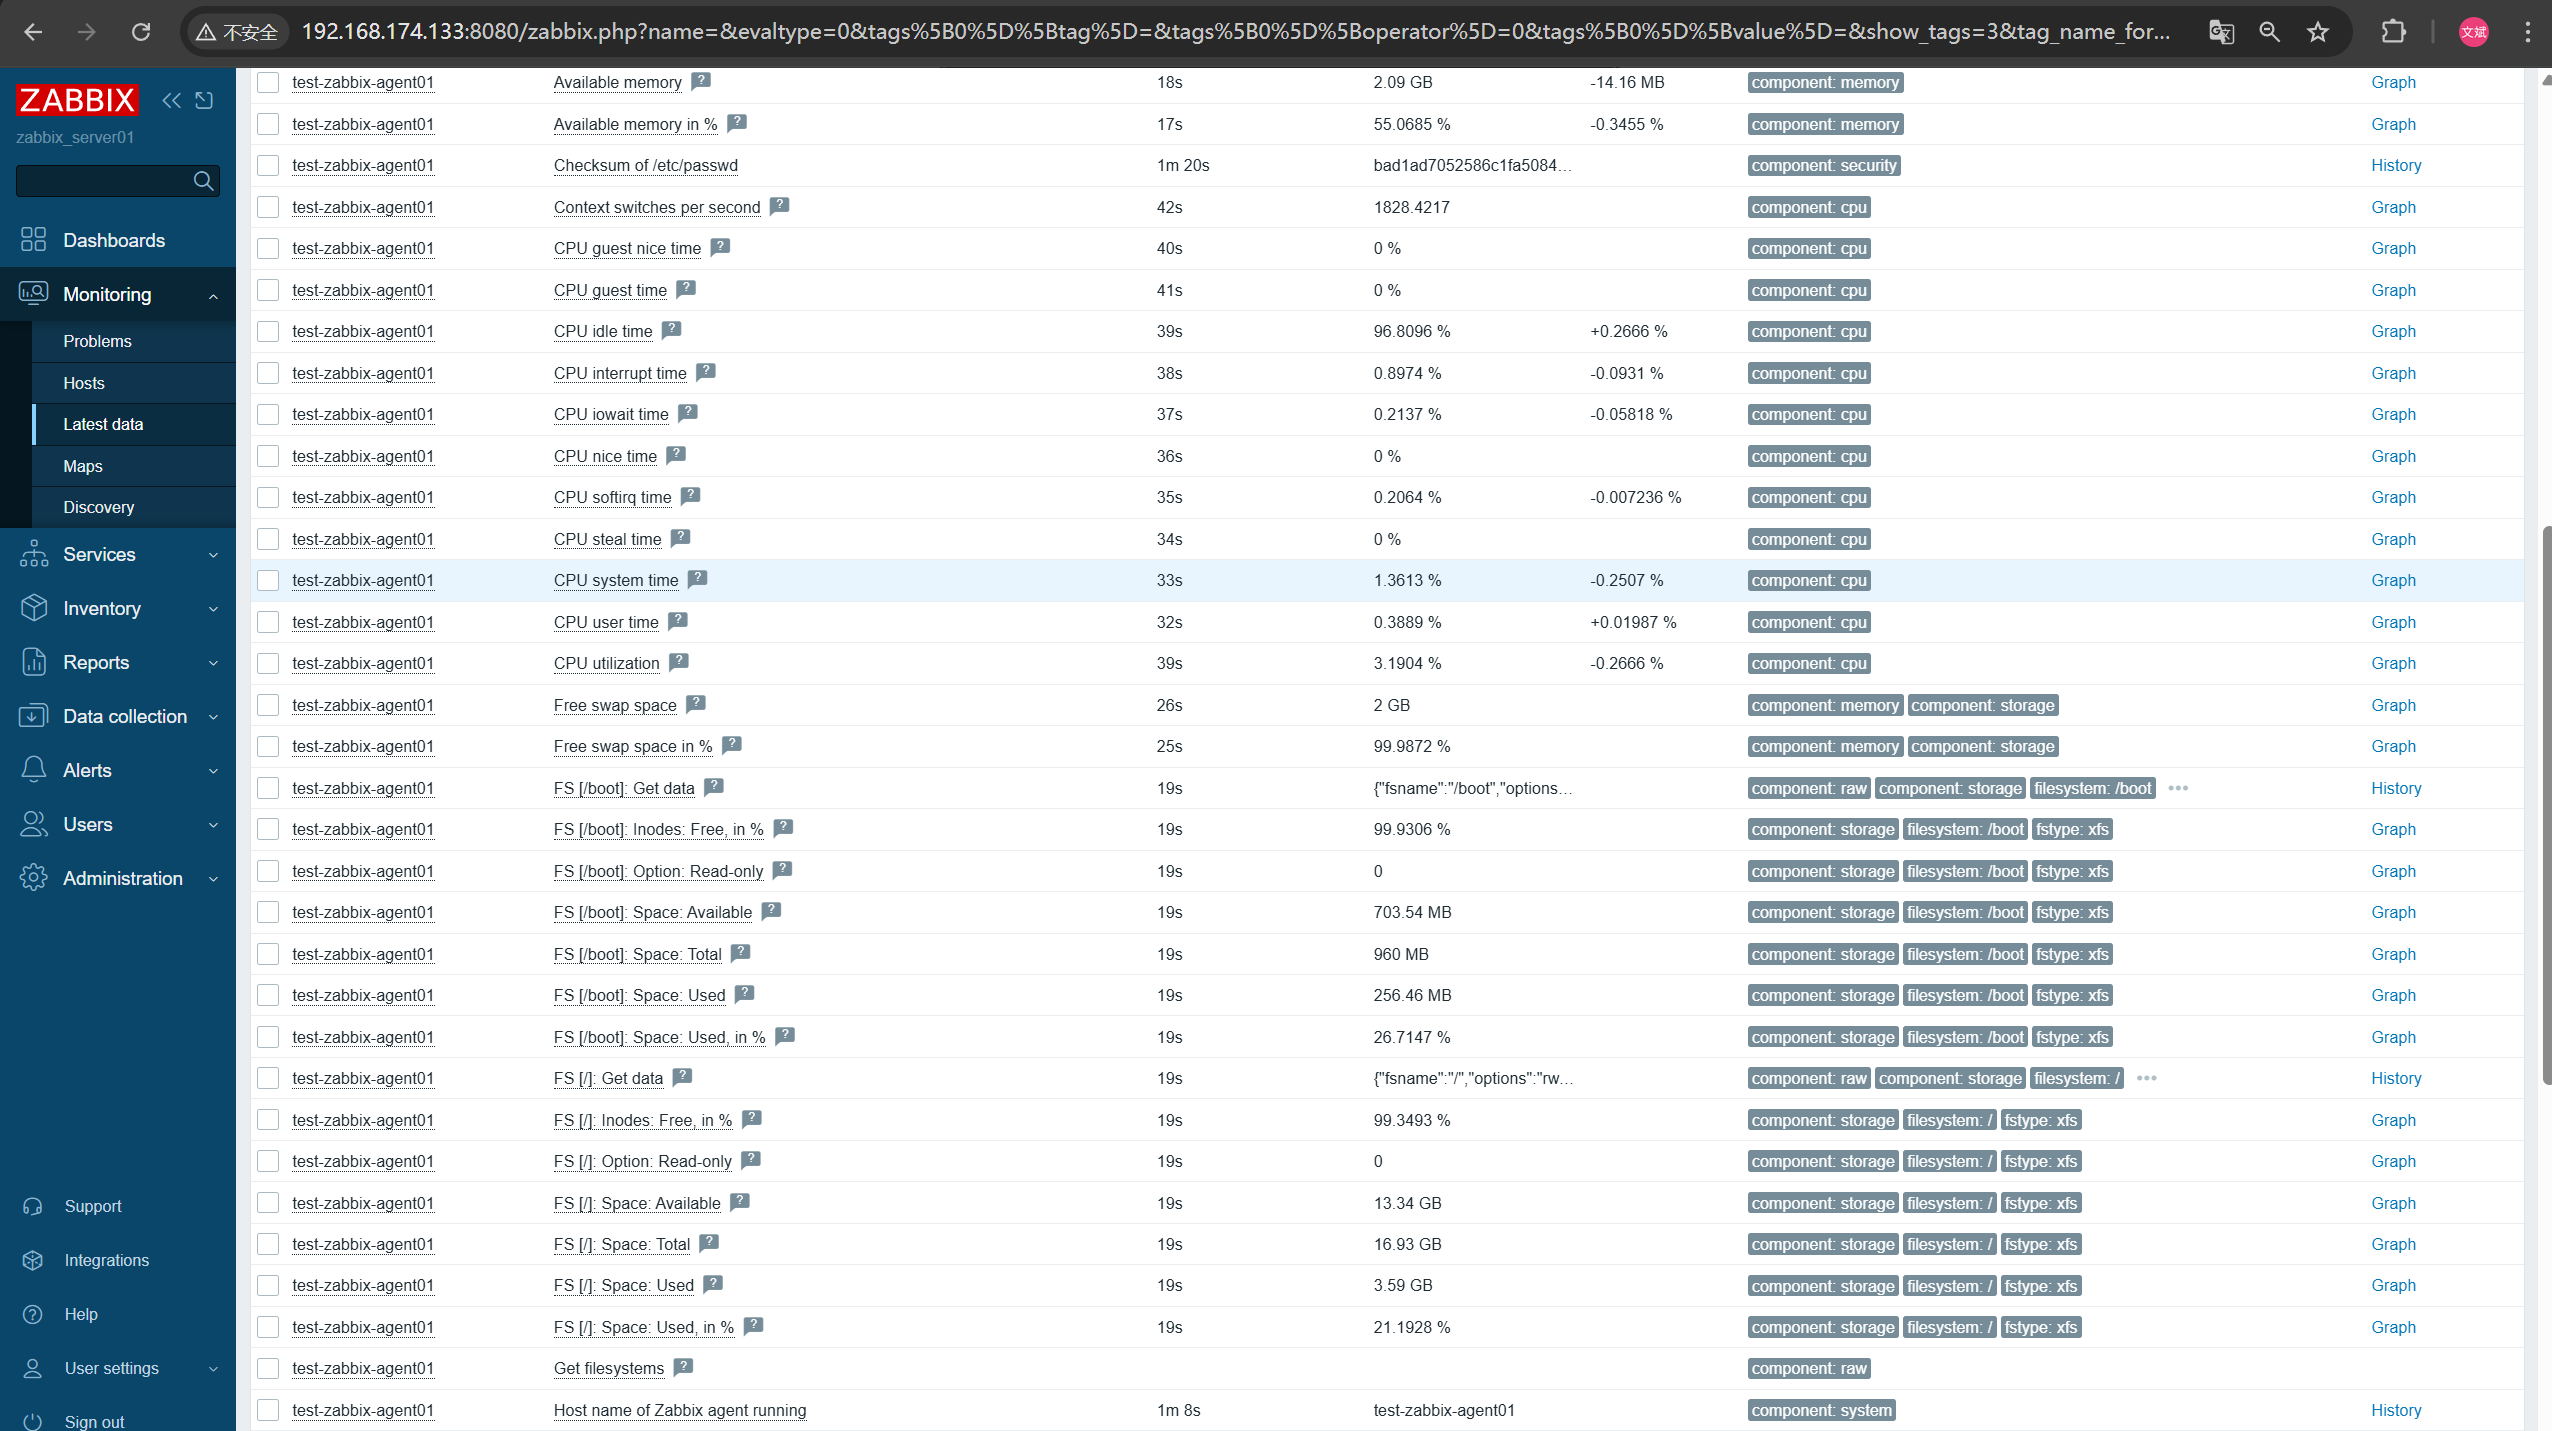
七、zabbix webUI配置zabbix-proxy
八、测试使用
# Step 1:任意一台主机配置zabbix安装源rpm -Uvh https://repo.zabbix.com/zabbix/7.0/centos/9/x86_64/zabbix-release-latest-7.0.el9.noarch.rpm# Step 2:安装zabbix-agent2yum install -y zabbix-agent2# Step 3:修改配置文件egrep -v \"^(#|$)\" /etc/zabbix/zabbix_agent2.confPidFile=/run/zabbix/zabbix_agent2.pidLogFile=/var/log/zabbix/zabbix_agent2.logLogFileSize=0Server=192.168.174.97,192.168.174.98 # zabbix-proxy两台主机地址ServerActive=192.168.174.97,192.168.174.98 # zabbix-proxy两台主机地址Hostname=test-zabbix-agent01Include=/etc/zabbix/zabbix_agent2.d/*.confPluginSocket=/run/zabbix/agent.plugin.sockControlSocket=/run/zabbix/agent.sockInclude=/etc/zabbix/zabbix_agent2.d/plugins.d/*.conf# Step 4:启动zabbix-agent2systemctl enable --now zabbix-agent2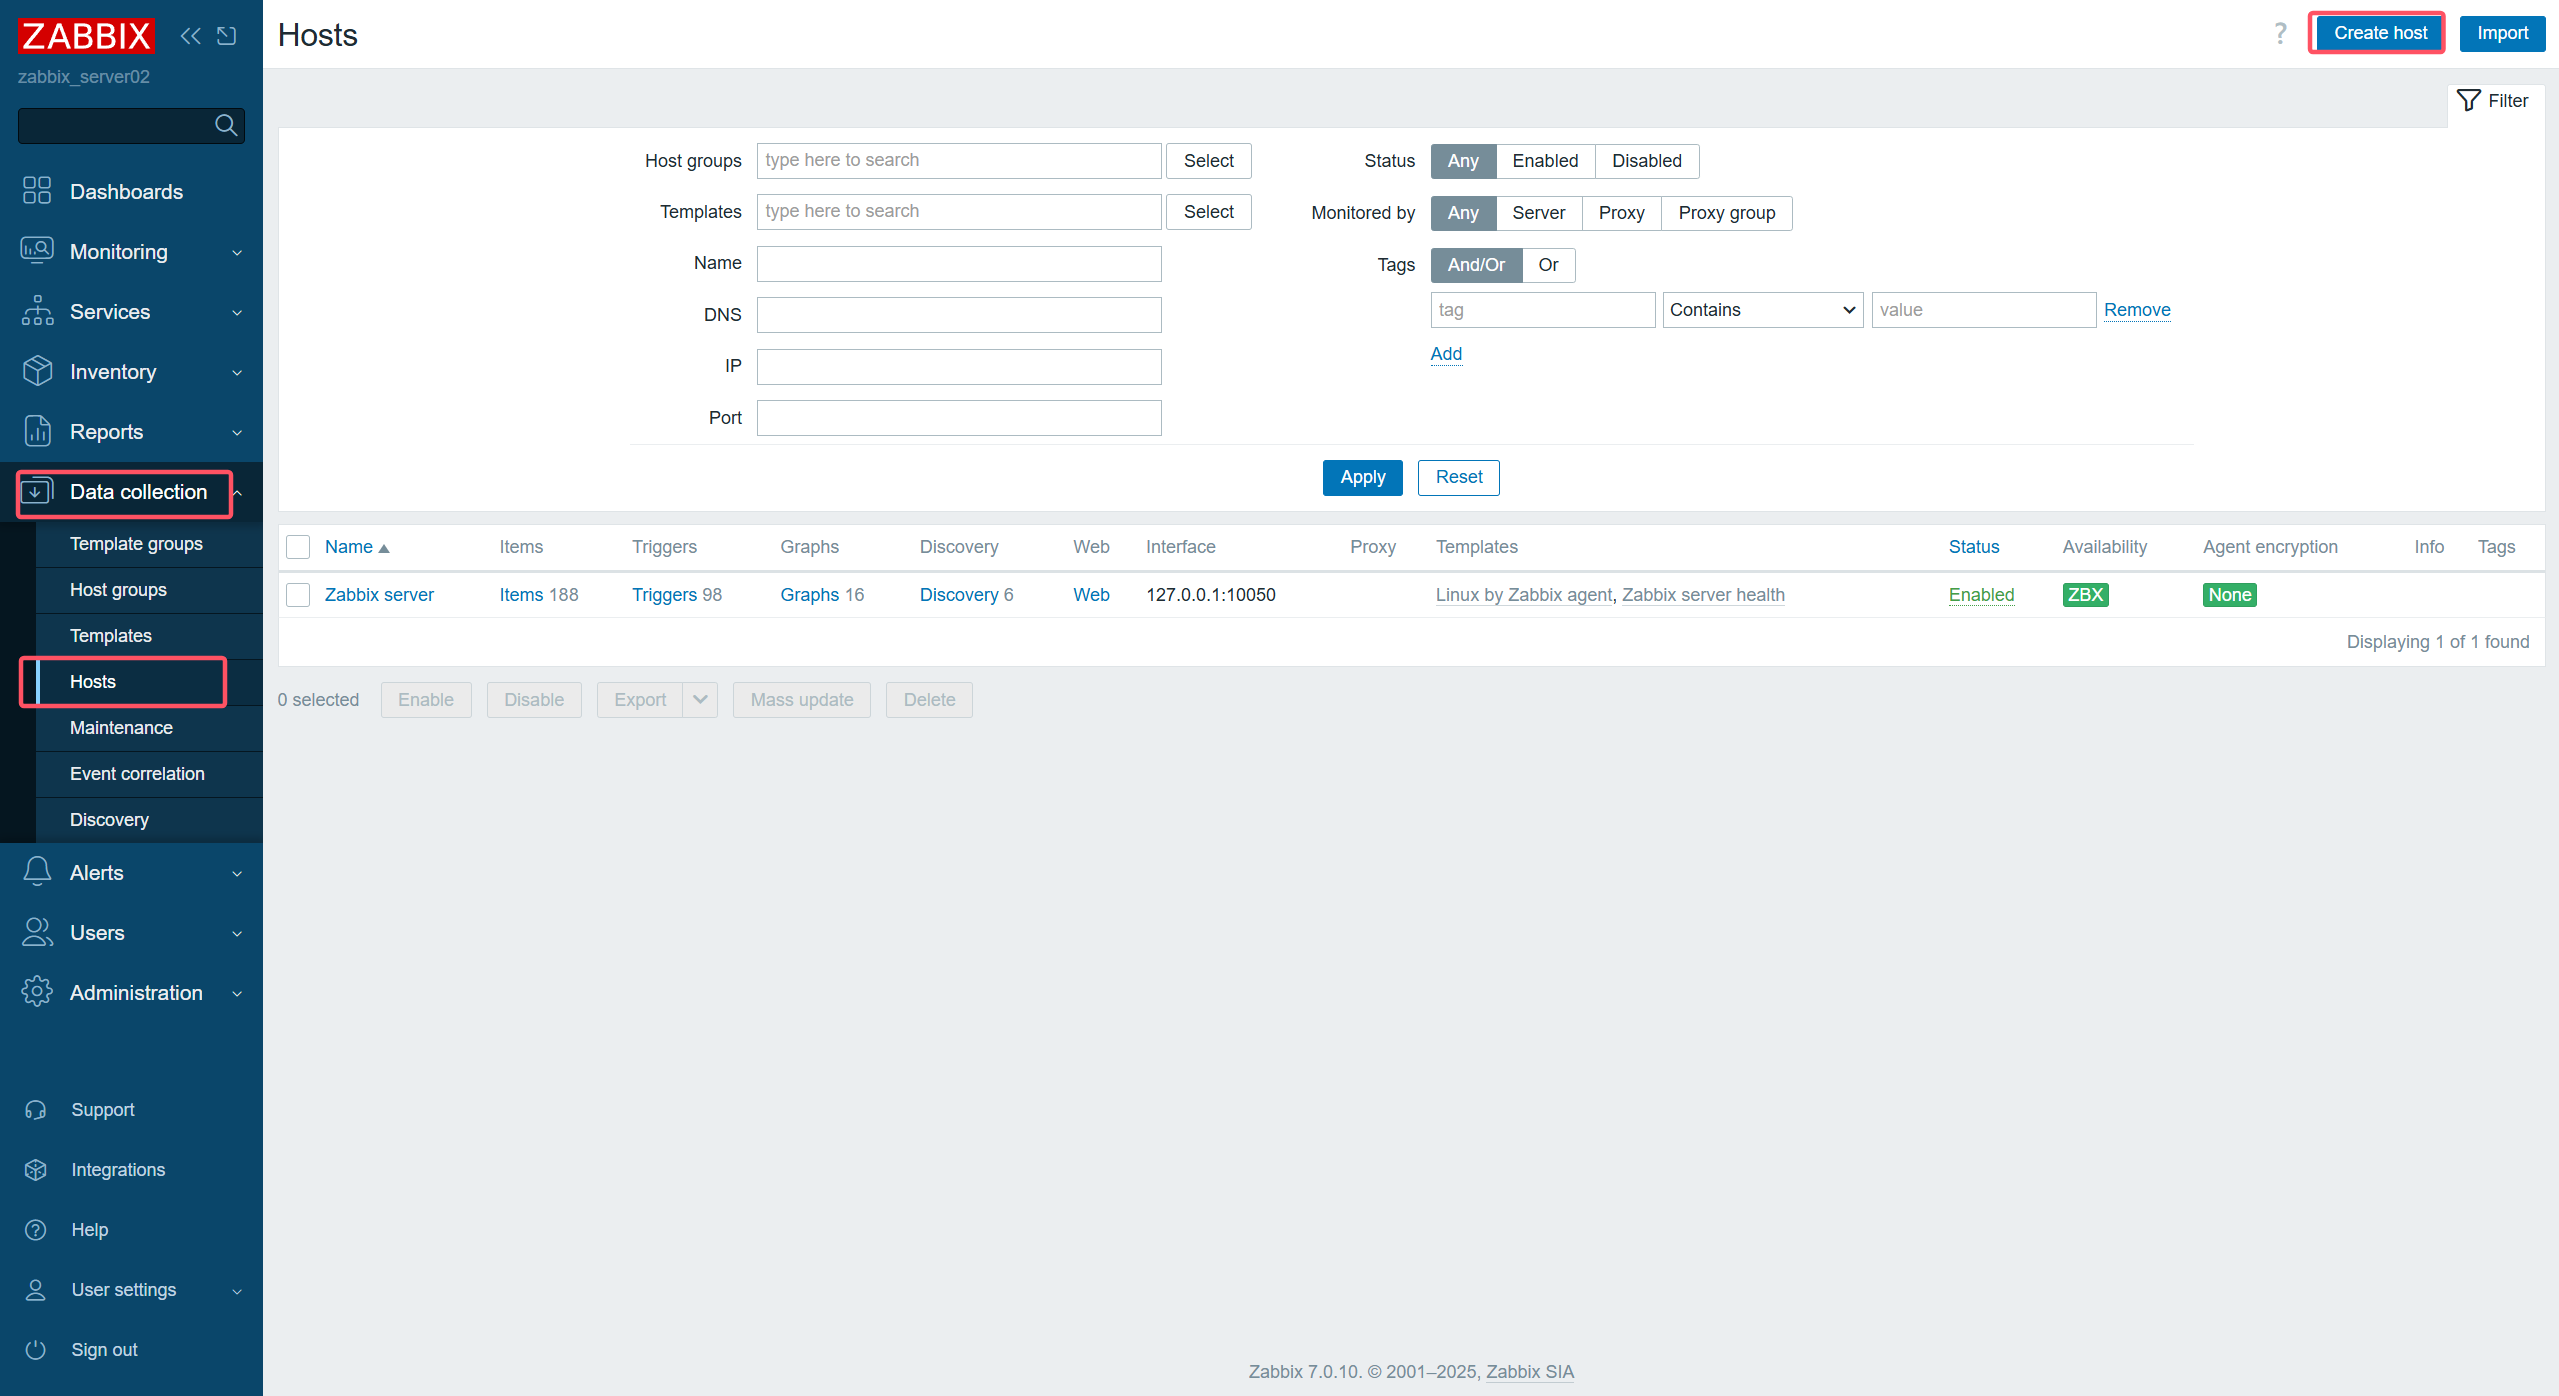
sAllowedIP=127.0.0.1
### 6.7.2 `zabbix-proxy02`配置文件修改```bashegrep -v \"^(#|$)\" /etc/zabbix/zabbix_proxy.confProxyMode=0Server=192.168.174.68;192.168.174.69 # zabbix-server地址Hostname=zabbix-proxy02 # 当前zabbix-proxy主机名LogFile=/var/log/zabbix/zabbix_proxy.logLogFileSize=0PidFile=/run/zabbix/zabbix_proxy.pidSocketDir=/run/zabbixDBHost=192.168.174.177 # MySQL VIP地址DBName=zabbix_proxy02_db # 数据库名称DBUser=zabbix_proxy02 # MySQL用户DBPassword=Zbx@123456 # MySQL用户密码DBPort=16446 # MySQL haproxy端口号ProxyBufferMode=hybridProxyMemoryBufferSize=16MSNMPTrapperFile=/var/log/snmptrap/snmptrap.logTimeout=4LogSlowQueries=3000StatsAllowedIP=127.0.0.16.7.3 两台主机启动zabbix-proxy
systemctl enable --now zabbix-proxysystemctl status zabbix-proxy
七、zabbix webUI配置zabbix-proxy
[外链图片转存中…(img-iGYfYst4-1750550920387)]
[外链图片转存中…(img-lmBcBcUN-1750550920388)]
[外链图片转存中…(img-NRFkBFuu-1750550920388)]
[外链图片转存中…(img-Ht3nXrqB-1750550920388)]
[外链图片转存中…(img-3ju2oIzN-1750550920388)]
八、测试使用
# Step 1:任意一台主机配置zabbix安装源rpm -Uvh https://repo.zabbix.com/zabbix/7.0/centos/9/x86_64/zabbix-release-latest-7.0.el9.noarch.rpm# Step 2:安装zabbix-agent2yum install -y zabbix-agent2# Step 3:修改配置文件egrep -v \"^(#|$)\" /etc/zabbix/zabbix_agent2.confPidFile=/run/zabbix/zabbix_agent2.pidLogFile=/var/log/zabbix/zabbix_agent2.logLogFileSize=0Server=192.168.174.97,192.168.174.98 # zabbix-proxy两台主机地址ServerActive=192.168.174.97,192.168.174.98 # zabbix-proxy两台主机地址Hostname=test-zabbix-agent01Include=/etc/zabbix/zabbix_agent2.d/*.confPluginSocket=/run/zabbix/agent.plugin.sockControlSocket=/run/zabbix/agent.sockInclude=/etc/zabbix/zabbix_agent2.d/plugins.d/*.conf# Step 4:启动zabbix-agent2systemctl enable --now zabbix-agent2[外链图片转存中…(img-rvYCHPw5-1750550920388)]
[外链图片转存中…(img-M0rW3U44-1750550920388)]
[外链图片转存中…(img-Cu6DpOjJ-1750550920388)]
[外链图片转存中…(img-JgFXVIc7-1750550920388)]
[外链图片转存中…(img-UgYUngef-1750550920388)]

