使用exceljs导出luckysheet表格 纯前端 支持离线使用
一.技术
exceljs,luckysheet
二.实现
参考网上博文exceljs对导出lucksheet表格的实现,发现存在一些问题并给予修复:
1.字体颜色、字号,加粗等适配的问题.
2.单元格对齐方式不生效;
3.单元格边框无法绘制;
4.单元格边框颜色及线型错乱;
5.单元格列宽处理;
6.合并单元格导出错乱;
7.其他的一些BUG
三.注意事项
1、由于luckysheet在网页端和excel分辨率无法保持完全一致,所以导出到excel中的时候,可能存在单元格大小与原表格不一致的情况,需要在setStyleAndValue中对单元格大小进行手动调整,具体可查看代码注释。后续也会逐渐进行自动适配。
2、目前仅支持表格,数据透视表的导出;不支持图片,图表的导出,后续有时间慢慢完善。
四.使用教程
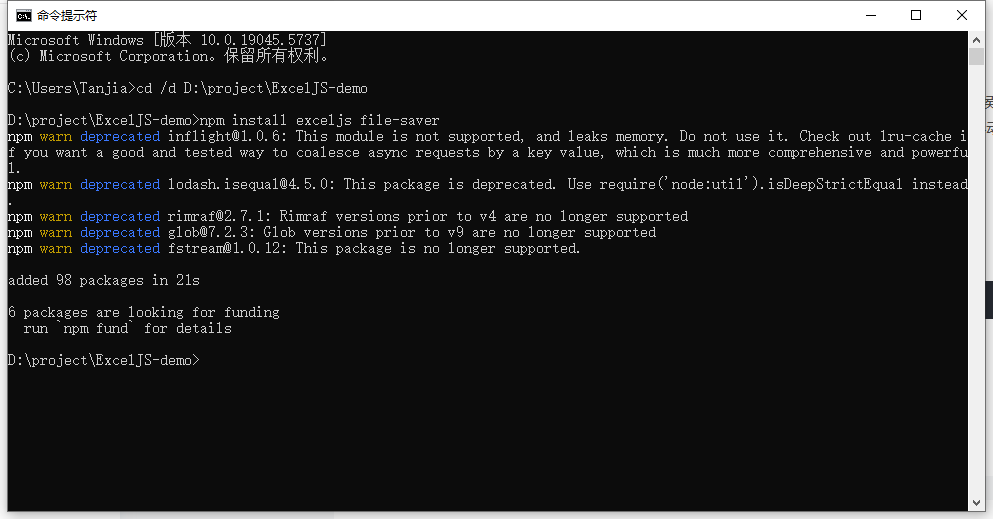
1、安装 exceljs、file-saver
使用以下命令通过 npm 安装 exceljs 和 file-saver
npm install exceljs file-saver
2、引用导出Excel文件
安装完成后把找到 exceljs.min.js 和 FileSaver.min.js 文件拷贝到自己的项目中,并添加引用
D:\\project\\ExcelJS-demo\\node_modules\\exceljs\\dist\\exceljs.min.jsD:\\project\\ExcelJS-demo\\node_modules\\file-saver\\dist\\FileSaver.min.js3、调用导出Excel函数
这个函数是我自己封装的版本
在项目里新建一个js文件,名为:exportExcel.js (可自定义),把下面这段导出的代码粘贴进去
// 导出 Luckysheet 内容为 Excel(ExcelJS)async function exportLuckysheetToExcelByExcelJS() { //创建工作簿 const workbook = new ExcelJS.Workbook(); // 启用样式支持(关键配置) workbook.useStyles = true; // 拿到当前激活页的配置对象 const activeSheet = luckysheet.getSheet(); const originalSheetIndex = activeSheet.order ?? 0; // 激活每个 sheet,确保数据初始化(特别是数据透视表) const sheets = luckysheet.getAllSheets(); for (let i = 0; i setTimeout(resolve, 1)); if (i == sheets.length - 1) { // 恢复原始激活的 sheet luckysheet.setSheetActive(originalSheetIndex); } } // 重新获取激活后的所有工作表 const initializedSheets = luckysheet.getAllSheets(); initializedSheets.forEach(sheet => { const worksheet = workbook.addWorksheet(sheet.name); // 1. 填充数据与样式 sheet.data.forEach((row, rowIndex) => { row.forEach((cell, colIndex) => { if (!cell) return; const excelCell = worksheet.getCell(rowIndex + 1, colIndex + 1); // 值或公式 excelCell.value = cell.f ? { formula: cell.f, result: cell.v } : cell.v; // 字体样式(字号、颜色、加粗、斜体、下划线、字体名) const fontSizePx = cell.fs !== undefined ? cell.fs : 10; const font = { size: fontSizePx }; if (cell.fc) font.color = { argb: hexToARGB(cell.fc) }; if (cell.bl === 1) font.bold = true; if (cell.cl === 1) font.italic = true; if (cell.ul === 1) font.underline = true; if (cell.ff) font.name = cell.ff; excelCell.font = font; // 背景色 if (cell.bg) { excelCell.fill = { type: \'pattern\', pattern: \'solid\', fgColor: { argb: hexToARGB(cell.bg) } }; } // 对齐方式 const hAlignMap = { 0: \'center\', 1: \'left\', 2: \'right\' }; const vAlignMap = { 0: \'middle\', 1: \'top\', 2: \'bottom\' }; const alignment = {}; if (cell.ht !== undefined) alignment.horizontal = hAlignMap[cell.ht]; if (cell.vt !== undefined) alignment.vertical = vAlignMap[cell.vt]; if (Object.keys(alignment).length > 0) excelCell.alignment = alignment; }); }); // 2. 合并单元格 const mergedMap = new Set(); Object.values(sheet.config?.merge || {}).forEach(merge => { const r1 = merge.r + 1, c1 = merge.c + 1; const r2 = merge.r + merge.rs, c2 = merge.c + merge.cs; const mergeKey = `${r1},${c1},${r2},${c2}`; if (mergedMap.has(mergeKey)) return; mergedMap.add(mergeKey); try { worksheet.mergeCells(r1, c1, r2, c2); } catch (e) { console.warn(`跳过已合并区域:${mergeKey}`, e); } }); // 3. 边框处理(透视表默认细边框) if (!sheet.config?.borderInfo && sheet.isPivotTable) { const { maxRow, maxCol } = getUsedRange(sheet); sheet.config = sheet.config || {}; sheet.config.borderInfo = [{ rangeType: \"range\", borderType: \"border-all\", style: \"1\", color: \"#000000\", range: [{ row: [0, maxRow - 1], column: [0, maxCol - 1] }] }]; } (sheet.config?.borderInfo || []).forEach(border => { const rawColor = border.color === \'#000\' ? \'#000000\' : border.color; const color = hexToARGB(rawColor || \'#000000\'); const borderStyleMap = { \"1\": \"thin\", // 细线 \"2\": \"dashed\",// 虚线 \"3\": \"dotted\", // 点线 \"4\": \"thick\",// 粗线 \"5\": \"thick\",// 粗线 \"6\": \"dashed\",// 虚线 \"7\": \"dotted\", // 点线 \"8\": \"medium\",// 中等 \"9\": \"dashed\",// 虚线 \"10\": \"thick\"// 粗线 }; const styleName = borderStyleMap[border.style] || \'thin\'; const style = { style: styleName, color: { argb: color } }; (border.range || []).forEach(range => { const r1 = range.row[0], r2 = range.row[1]; const c1 = range.column[0], c2 = range.column[1]; for (let r = r1; r <= r2; r++) { for (let c = c1; c <= c2; c++) { const cell = worksheet.getCell(r + 1, c + 1); const oldBorder = cell.border || {}; let newBorder = { ...oldBorder }; switch (border.borderType) { case \'left\': newBorder.left = style; break; case \'right\': newBorder.right = style; break; case \'top\': newBorder.top = style; break; case \'bottom\': newBorder.bottom = style; break; case \'border-all\': case \'all\': newBorder = { top: style, bottom: style, left: style, right: style }; break; } cell.border = newBorder; } } }); }); // 4. 列宽设置 const colConfig = sheet.config?.columnlen || {}; const colCount = sheet.data?.[0]?.length || 0; for (let c = 0; c { if (row) { row.forEach((cell, colIndex) => { if (cell && cell.v !== undefined && cell.v !== null && cell.v !== \'\') { maxRow = Math.max(maxRow, rowIndex); maxCol = Math.max(maxCol, colIndex); } }); } }); return { maxRow: maxRow + 1, maxCol: maxCol + 1 };}在页面里引用 exportExcel.js 文件
调用 exportLuckysheetToExcelByExcelJS() 方法实现导出
导出Xlsx历时3天的劳动成果终于结束,收官,撒花 ✿✿ヽ(°▽°)ノ✿
五.源码下载
luckysheet demo 完整代码,包括以下功能:
1、Luckysheet 本地引入方式,已解决断网报错,字体图标不显示的问题
2、使用SheetJS实现导入到luckysheet中,纯前端,支持离线使用
3、使用ExcelJS实现导出luckysheet表格,纯前端,支持离线使用
点击 下载demo


