【Selenium】【爬虫】学习总结_install path of the chromedriver executable, defau
简介
基于浏览器自动化的一个模块。
需要下载浏览器的驱动程序,并添加到path中
然后就可以:
from selenium import webdriverbrowser = webdriver.Firefox()#火狐,启动!(返回了一个WebDriver对象用于执行操作)browser.qiut()#火狐,关闭!不过建议使用谷歌浏览器
创建浏览器
需要使用 webdriver.浏览器类来创建
from selenium import webdriverbrowser = WebDriver.浏览器名( options: Options = None, service: Service = None, keep_alive: bool = True, )Options
使用Options类对象来指定,每个浏览器的Options有所不同
from selenium.webdriver.chrome.options import Options#更改浏览器来查看不同浏览器的options功能所有浏览器通用的options可查于webdriver>common>options.py中的 BaseOptions、ArgOptions类
各个浏览器专用的查于webdriver>浏览器名>options的中Options类,以及它的父类(内核options类)
常用表
options.binary_location(value: str) -> None#设置要启动的浏览器的exe路径options.add_argument(\'lang=zh_CN.UTF-8\') # 设置中文options.add_argument(\'--headless\') # 无头参数,浏览器隐藏在后台运行options.add_argument(\'--disable-gpu\') # 禁用GPU加速options.add_argument(\'--start-maximized\') # 浏览器最大化options.add_argument(\'--window-size=1920x1024\') # 设置浏览器分辨率(窗口大小)options.add_argument(\'--user-agent=\"\"\') # 设置请求头的User-Agentoptions.add_argument(\'--incognito\') # 隐身模式(无痕模式)options.add_argument(\'--user-agent={}\'.format(str(user_agent))) #修改Ua标识options.add_argument(f\'--proxy-server={proxy}\') # 添加IP代理 proxy=f\"http://{ip}:{port}\"# 关闭\'Chrome正受到,自动测试软件的控制\'的提示options.add_experimental_option(\'useAutomationExtension\', False)options.add_experimental_option(\'excludeSwitches\', [\'enable-automation\'])# 禁用图片加载options.add_experimental_option(\'prefs\', {\'profile.managed_default_content_settings.images\': 2}) # 设置连接超时20秒driver.set_page_load_timeout(20) # 不自动关闭浏览器options.add_experimental_option(\'detach\', True) Service
和上面Options的模块位置放置相同
from selenium.webdriver.chrome.service import Service\"\"\"A Service class that is responsible for the starting and stopping of `chromedriver`. :executable_path: install path of the chromedriver executable, defaults to `chromedriver`. :port: Port for the service to run on, defaults to 0 where the operating system will decide. :service_args: (Optional) List of args to be passed to the subprocess when launching the executable. :log_output: (Optional) int representation of STDOUT/DEVNULL, any IO instance or String path to file. :env: (Optional) Mapping of environment variables for the new process, defaults to `os.environ`. \"\"\"ser = Service( executable_path=None, port: int = 0, service_args: typing.Optional[typing.List[str]] = None, log_output: SubprocessStdAlias = None, env: typing.Optional[typing.Mapping[str, str]] = None, **kwargs,)浏览器操作
看WebDriver.py中的WebDriver类
标签定位(focus)
#定位常要用Byfrom selenium.webdriver.common.by import Byfind element
WebDriver.find_element(by=By.ID, value: Optional[str] = None) -> WebElement# By: 有如下参数可以选择 ID = \"id\" XPATH = \"xpath\" LINK_TEXT = \"link text\" PARTIAL_LINK_TEXT = \"partial link text\" NAME = \"name\" TAG_NAME = \"tag name\" CLASS_NAME = \"class name\" CSS_SELECTOR = \"css selector\"#value:要传入的筛选语句find elements
WebDriver.find_elements(by=By.ID, value: Optional[str] = None) -> List[WebElement]#与上面的唯一区别是找出所有,返回列表相对标签定位
from selenium.webdriver.support.relative_locator import with_tag_namefrom selenium.webdriver.support.relative_locator import locate_with#with_tagname只有找相对位置的标签名,locate_with可以使用八大元素定位#Ep:ele=driver.find_element(with_tag_name(\'a\').to_right_of(link))ele = driver.find_element(locate_with(By.TAG_NAME, \'a\').to_right_of(link))JavaScript代码
execute_script
WebDriver.execute_script(script, *args)# script :以文本形式输入JS代码# *args: JavaScript的任何适用参数回退前进刷新
WebDriver.back() WebDriver.forward()WebDriver.refresh() # 刷新截图
save_screenshot 还有…好几个截图函数
窗口大小
WebDriver.maximize_window()#最大化WebDriver.set_window_size(width, height, windowHandle: str = \"current\")新窗口/标签
from selenium import webdriverfrom selenium.webdriver.common.by import Bydriver = webdriver.Chrome()driver.get(\"https://www.baidu.com\")# tab标签driver.switch_to.new_window(\'tab\')driver.get(\"https://www.bing.com/\")driver.find_element(By.ID,\'sb_form_q\').send_keys(\'软件测试\')# 新窗口driver.switch_to.new_window(\'window\')driver.get(\"https://www.bing.com/\")driver.find_element(By.ID, \'sb_form_q\').send_keys(\'软件测试\')driver.quit()更多
WebDriver.title()#当前网页标题WebDriver.current_url # 当前页面url信息元素方法
看WebElement类
截图元素
输入
找到可供输入的元素
send_keys
WebElement.send_keys(*value: str) -> None点击
找到可以点击的元素
click
WebElement.click() -> None:更多
#清除文本内容WebElement.clear()#判断该元素是否可见WebElement.is_display() -> bool#获取标签属性值。name参数是属性名WebElement.get_attribute(name) -> str | None#获取元素的给定属性。WebElement.get_property(name) -> str | bool | WebElement | dict#元素文本WebElement.text() -> str#元素标签WebElement.tag_name() -> str#元素大小。返回一个字典,键为\'height\',\'width\'WebElement.size() -> dict#元素位置。返回一个字典,键为\'x\',\'y\'WebElement.location() -> dict#判断元素是否被选中WebElement.is_selected()处理 iframe
如果定位的元素是存在iframe标签之中的,则需要将WebDriver作用域切换至iframe框架内,否则定位不到
#Ep:framex = browser.switch_to.frame(\'iframeResult\')#填入iframe的id即可switch_to
WebDriver.switch_to() -> SwitchTo#SwitchTo: an object containing all options to switch focus into而SwitchTo对象又有许多方法,一般一定搭配使用
更多方法自行阅读方法、类源文件
frame
按索引、名称或Web元素Switches focus to the specified frame
SwitchTo.frame(frame_reference: Union[str, int, WebElement]) -> None# frame_reference: The name of the window to switch to, an integer representing the index, or a webelement that is an (i)frame to switch to.\"\"\"Usage: driver.switch_to.frame(\'frame_name\') driver.switch_to.frame(1) driver.switch_to.frame(driver.find_elements(By.TAG_NAME, \"iframe\")[0])\"\"\"动作链
#动作链常用ActionChains类from selenium.webdriver import ActionChainsActionChains是一种自动化低级交互(如鼠标)的方法移动、鼠标按钮操作、按键和上下文菜单交互。这对于执行更复杂的操作非常有用,例如悬停和拖动下降。
当您调用ActionChains对象上的操作方法时,动作存储在ActionChains对象中的队列中。当您调用perform()时,事件将按其顺序触发
创建
actions = ActionChains(driver:WebDriver, duration:int=250, devices:list[AnyDevice]|None=None) -> None# driver: The WebDriver instance which performs user actions.# duration: 覆盖指针输入中默认的250毫秒的default_MOVE_DURATION(perform时间)动作
其实很多 动作 WebDriver,WebElement 也有
更多动作可以自行阅读actions_chains.py
reset_actions()
Clears actions that are already stored locally and on the remote end
ActionChains.reset_actions() -> Nonepause()
停顿
鼠标
click()
click_and_hold()
move家族
移动鼠标
#move_by_offset:根据相对坐标移动鼠标ActionChains.move_by_offset(xoffset: int, yoffset: int)#move_to_element:Moving the mouse to the middle of an elementActionChains.move_to_element(to_element: WebElement)#move_to_element_with_offset:将鼠标移动指定元素的偏移量。偏移量为相对于元件的视线中心点。ActionChains.move_to_element_with_offset(to_element: WebElement, xoffset: int, yoffset: int)xoffset与yoffset:正为右,上
context_click()
在元素上执行上下文单击(右键单击)
ActionChains.context_click(on_element: WebElement | None = None)#on_element: The element to context-click.If None, clicks on current mouse position.double_click
双击元素
ActionChains.double_click(self, on_element: WebElement | None = None)#on_element: The element to context-click.If None, clicks on current mouse position.release()
释放元素上按住的鼠标按钮。
键盘
key_down
Sends a key press only, without releasing it. Should only be used with modifier keys
ActionChains.key_down(value: str, element: WebElement | None = None)\'\'\'Args: - value: The modifier key to send. Values are defined in `Keys` class. - element: The element to send keys. If None, sends a key to current focused element.Example, pressing ctrl+c: ActionChains(driver).key_down(Keys.CONTROL).send_keys(\'c\').key_up(Keys.CONTROL).perform()\'\'\'send_keys()
Sends keys to current focused element.
ActionChains.send_keys(*keys_to_send: str)# keys_to_send : The keys to send. Modifier keys constants can be found in the \'Keys\' class滚轮(谷歌内核专属)
#If the element is outside the viewport, scrolls the bottom of the element to the bottom of the viewportActionChains.scroll_to_element(element: WebElement)#Scrolls by provided amounts with the origin in the top left corner of the viewport.ActionChains.scroll_by_amount(self, delta_x: int, delta_y: int)# delta_x: 默认正为左# delta_y: 默认正为上两种写法
#队列menu = driver.find_element(By.CSS_SELECTOR, \".nav\")hidden_submenu = driver.find_element(By.CSS_SELECTOR, \".nav #submenu1\")actions = ActionChains(driver)actions.move_to_element(menu)actions.click(hidden_submenu)actions.perform()#链式menu = driver.find_element(By.CSS_SELECTOR, \".nav\")hidden_submenu = driver.find_element(By.CSS_SELECTOR, \".nav #submenu1\")ActionChains(driver).move_to_element(menu).click(hidden_submenu).perform()modifier key
from selenium.webdriver.common.keys import Keys自行看看Keys.py
无头浏览器
即无可视化界面,不会跳出窗口
操作有点像pyecharts啊
from selenium import webdriverfrom selenium.webdriver.firefox.options import Optionsfirefox_options = Options()firefox_options.add_argument(\'--headless\')firefox_options.add_argument(\'--disable-gpu\')browser = webdriver.Firefox(options=firefox_options)关于phantomJS(停止维护,别用):是selenuim中封装好的一个无头浏览器
规避检测(反反爬)
谷歌内核独有
参考链接
法1:Option设置
from selenium.webdriver import ChromeOptionsoptions = ChromeOptions()options.add_experimental_option(\'useAutomationExtension\', False)#已失效options.add_experimental_option(\'excludeSwitches\', [\'enable-automation\'])#已失效,但要加opt.add_experimental_option(\'useAutomationExtension\', False)法2:CDP
WebDriver.execute_cdp_cmd(\"Page.addScriptToEvaluateOnNewDocument\", { \"source\": \"\"\" Object.defineProperty(navigator, \'webdriver\', { get: () => undefined }) \"\"\"})最后,还是两个一起用。但方法仍有局限性会被识别
法3:stealth.min.js(Best)
项目地址:https://github.com/berstend/puppeteer-extra/tree/stealth-js
from selenium import webdriver from selenium.webdriver.chrome.options import Options from selenium.webdriver.chrome.service import Service from selenium.webdriver.common.by import By import time chrome_options = Options() # 无头模式 # chrome_options.add_argument(\"--headless\") # 添加请求头 chrome_options.add_argument( \'user-agent=Mozilla/5.0 (Windows NT 10.0; Win64; x64) AppleWebKit/537.36 (KHTML, like Gecko) Chrome/109.0.0.0 Safari/537.36\') s = Service(r\"chromedriver.exe路径\") driver = webdriver.Chrome(service=s, options=chrome_options) # 利用stealth.min.js隐藏浏览器指纹特征 # stealth.min.js下载地址:https://github.com/berstend/puppeteer-extra/tree/stealth-js with open(\'./stealth.min.js\') as f: driver.execute_cdp_cmd(\"Page.addScriptToEvaluateOnNewDocument\", { \"source\": f.read() }) driver.get(url=\'URL\') # driver.get(url=\'https://bot.sannysoft.com/\') # 保存图片 driver.save_screenshot(\'result.png\') time.sleep(200)处理Cookie
可以使用自动化脚本
刷票,刷播放量,刷评论,刷粉丝,刷收藏
但是现在好像很多网站可以检测到cookie是否被另存,然后对cookie进行标记,导致cookie失效
提取Cookie
可以打开页面之后进行手动登录后
# Returns a set of dictionaries, corresponding to cookies visible in the current session.WebDriver.get_cookies() -> List[dict]:# Get a single cookie by name. Returns the cookie if found, None if not.WebDriver.get_cookie(name) -> typing.Optional[typing.Dict]WebDriver.delete_cookie(name) -> None# Delete all cookies in the scope of the session.WebDriver.delete_all_cookies() -> None:json本地化保存
cookie是个字典,可以用json保存
使用本地cookie登录
# Adds a cookie to your current session.WebDriver.add_cookie(cookie_dict) -> None:#Args:- cookie_dict: A dictionary object, with required keys - \"name\" and \"value\"; optional keys - \"path\", \"domain\", \"secure\", \"httpOnly\", \"expiry\", \"sameSite\" #Usage: driver.add_cookie({\'name\' : \'foo\', \'value\' : \'bar\'}) driver.add_cookie({\'name\' : \'foo\', \'value\' : \'bar\', \'path\' : \'/\'}) driver.add_cookie({\'name\' : \'foo\', \'value\' : \'bar\', \'path\' : \'/\', \'secure\' : True}) driver.add_cookie({\'name\' : \'foo\', \'value\' : \'bar\', \'sameSite\' : \'Strict\'})Ep:
import jsonwith open(\"cookies.txt\",\'r\',encoding=\"utf-8\") as file:cookies_str = file.read()cookies = json.loads(cookies_str)#get到登录页面WebDriver.get(\"\")#注入Cookiesfor cookie in cookies:try: WebDriver.add_cookie(cookie_dict) except: pass处理Token
一般存储于sessionStorage & localStorage
原文链接
浏览器自动化登录操作需要获取sessionStorage或者localStorage下的登录token
具体看token存在sessionStorage里还是localStorage里
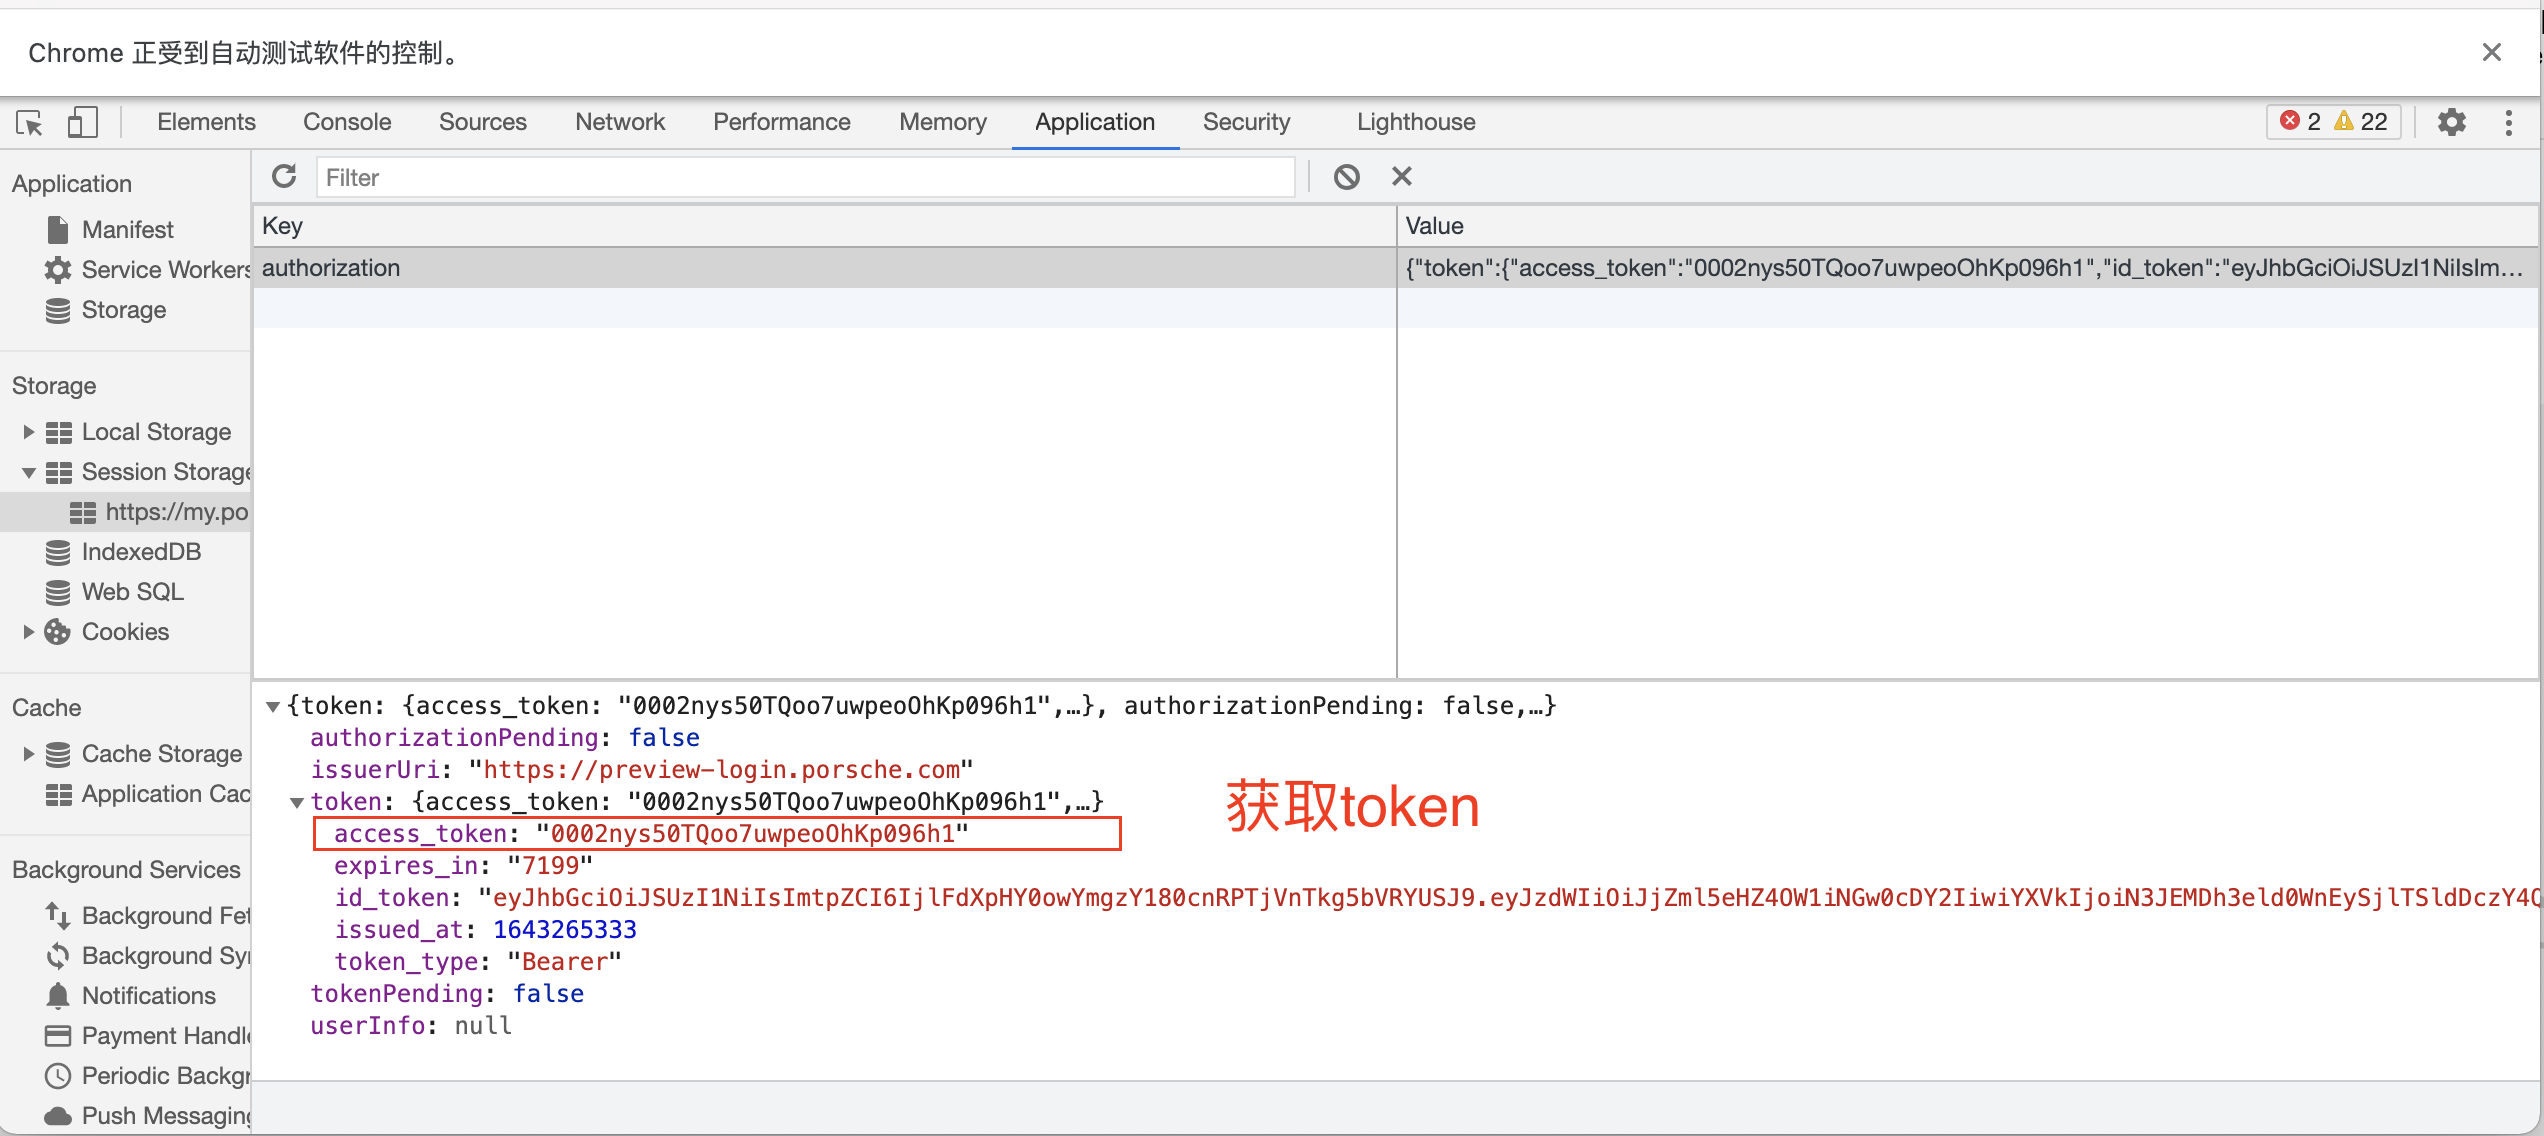
上代码
\'\'\' 1、要从Local Storage中获取还是要从Session Storage中获取,具体看目标系统存到哪个中-----开发者模式查看2、window.SessionStorage和直接写SessionStorage是等效的3、一定要使用return,不然获取到的一直是None4、get的Item不一定就叫token,得具体看目标系统把token存到哪个变量中\'\'\'sessionStorage_data = driver.execute_script(\'return localStorage.getItem(\"authorization\");\')token = sessionStorage_data[\'token\'][\'access_token\']读取数据
使用getItem或者属性形式
sessionStorage.getItem(\'a\')orsessionStorage[\'a\']存储数据
用setItem或者属性形式
sessionStorage.setItem(\'a\',\'111\');sessionStorage.setItem[\'a\'] = \'111\';删除数据
使用removeItem移除指定的数据
sessionStorage.removeItem(\'a\');删除所有数据
sessionStorage.clear();模拟登录最后杀器
直接使用chrome的本地缓存,也就是你正在使用的浏览器的缓存
原文链接
我们每次打开浏览器做相应操作时,对应的缓存和 cookie 会保存到浏览器默认的路径下,我们先查看个人资料路径,以 chrome 为例,我们在地址栏输入chrome://version/
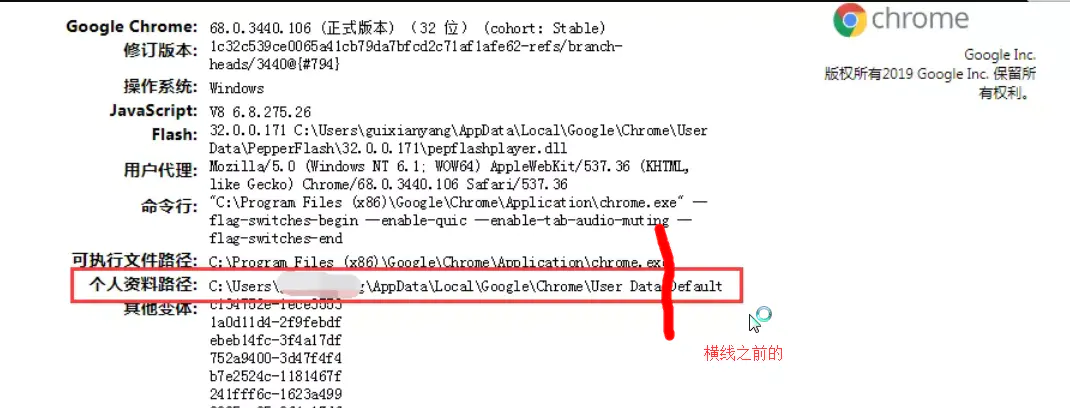
图中的个人资料路径就是我们需要的,我们去掉后面的 \\Default,然后在路径前加上「–user-data-dir=」就拼接出我们要的路径了。
profile_directory = r\'--user-data-dir=C:\\Users\\xxx\\AppData\\Local\\Google\\Chrome\\User Data\'接下来,我们启动浏览器的时候采用带选项时的启动,这种方式启动浏览器需要注意,运行代码前需要关闭所有的正在运行 chrome 程序,不然会报错。 全部代码如下。 from selenium import webdriverimport timeimport os,platformif platform.system() ==\"Windows\": os.system(\"taskkill -im chrome* -f\") # 把chrome开头的进程都杀掉else: os.system(\"killall -9 chrome*\")# 获取用户目录my_dir = os.path.expanduser(\"~\")profile_directory = r\'--user-data-dir={}\\AppData\\Local\\Google\\Chrome\\User Data\'.format(my_dir)print(profile_directory)option = webdriver.ChromeOptions()option.add_argument(profile_directory)driver = webdriver.Chrome(chrome_options=option)driver.get(\"https://www.baidu.com/\")time.sleep(2)Blurred 注:其实可以直接安装两个谷歌浏览器就可以保证在使用谷歌浏览器的同时实现自动化
CDP协议(谷歌内核)
谷歌开发者工具的命令
WebDriver.execute_cdp_cmd(cmd: str, cmd_args: dict)手机版
from selenium import webdriverdriver = webdriver.Chrome()driver.execute_cdp_cmd( \"Emulation.setDeviceMetricsOverride\", { \"width\": 720, \"height\": 1280, \"mobile\": True, \"deviceScaleFactor\": 1.0 })driver.get(\'https://www.baidu.com\')input(\"...\")driver.quit()修改Ua
chrome.execute_cdp_cmd(\"Network.setExtraHTTPHeaders\", {\"headers\": {\"User-Agent\": new_ua}})附:检测爬虫被检测性
链接

