qemu-img命令学习使用
一、qemu-img命令介绍
qemu-img 允许您离线创建、转换和修改镜像。它可以处理 QEMU 支持的所有镜像格式。
警告:切勿使用 qemu-img 修改正在由运行中的虚拟机或其他任何进程使用的镜像,这可能会破坏镜像。另外,请注意,查询正在被其他进程修改的镜像可能会遇到不一致的状态
查看qemu-img支持的所有镜像格式:
[root@kvm1 ~]# qemu-img --help | grep SupportedSupported formats: blkdebug blklogwrites blkreplay blkverify copy-on-read file ftp ftps gluster host_cdrom host_device http https iscsi iser luks nbd null-aio null-co nvme qcow2 quorum raw rbd ssh throttle vhdx vmdk vpc二、qemu-img常用子命令参数介绍
-f fmt 指定格式(qcow2/raw/vmdk…)-o opts 格式专属选项qemu-img create -f qcow2 -o cluster_size=2M disk.qcow2 20G-f fmt 源格式-O out_fmt 目标格式-c 启用 qcow2 gzip 压缩-S sparse_size 稀疏阈值qemu-img convert -f raw -O qcow2 -c old.raw new.qcow2qemu-img info disk.qcow2-f fmt 指定格式qemu-img check -f qcow2 disk.qcow2-c 创建快照-l 列出快照-d 删除快照-a 应用快照qemu-img snapshot -c snap1 disk.qcow2+/- 可增/减qemu-img resize disk.qcow2 +5G-f fmt 镜像格式-b backing_file 新 backing-u unsafe 模式qemu-img rebase -f qcow2 -b new_base.qcow2 diff.qcow2-f fmt -o optsqemu-img amend -f qcow2 -o compat=1.1 disk.qcow2-f fmt -O out_fmtqemu-img measure -f raw -O qcow2 disk.raw三、示例:
1. 创建和格式化新的映像文件
默认创建的是
raw格式
语法格式:
qemu-img create [-f format] [-o options] filename [size]
[root@kvm1 opt]# qemu-img create test1.img 512MFormatting \'test1.img\', fmt=raw size=536870912[root@kvm1 opt]# qemu-img info test1.imgimage: test1.imgfile format: raw# 默认格式是rawvirtual size: 512 MiB (536870912 bytes)disk size: 1 MiB# 映像实际大小,可以出是稀疏格式创建映像指定格式:
[root@kvm1 opt]# qemu-img create -f qcow2 test2.qcow2 512MFormatting \'test2.qcow2\', fmt=qcow2 size=536870912 cluster_size=65536 lazy_refcounts=off refcount_bits=16[root@kvm1 opt]# qemu-img info test2.qcow2image: test2.qcow2file format: qcow2# 文件格式是qcow2virtual size: 512 MiB (536870912 bytes)disk size: 196 KiBcluster_size: 65536Format specific information: compat: 1.1 lazy refcounts: false refcount bits: 16 corrupt: falseqcow2影响文件由三部分组成:元数据(Metadata)、簇的位图(Cluster Data)、和簇的数据(Cluster Data)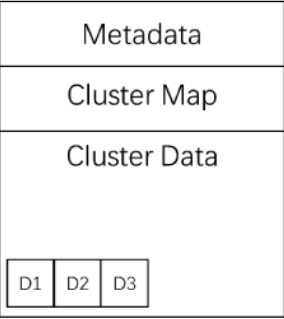
2. 使用preallocation调整 供给格式(稀疏还是预分配)
falloc是 fast allocation 的缩写。posix_fallocate() 函数分配文件块的方法是:在文件系统里预留 block,但不真正写 0,因此创建速度比 full 快,空间也立即占用。”
允许值:
- off:默认值。不进行预分配,即稀疏格式
- falloc:调用posix_falocate()函数来预分配空间,但不写0.
- full:通过将零写入底层存储来预分配空间,类似 dd if =/dev/zero
[root@kvm1 opt]# qemu-img create -f raw -o preallocation=full test.raw 50MFormatting \'test.raw\', fmt=raw size=52428800 preallocation=full[root@kvm1 opt]# qemu-img info test.rawimage: test.rawfile format: rawvirtual size: 50 MiB (52428800 bytes)disk size: 50 MiB# 实际大小50M3. 检查映像文件的一致性
不支持对raw格式的映像文件进行检查
语法格式:
qemu-img check [-f format] imgname
[root@kvm1 opt]# qemu-img check test2.qcow2No errors were found on the image.# 没有问题Image end offset: 262144-r: 会尝试修复在检查过程中发现的任何不一致之处。
4. 重新调整映像文件的大小
qemu-img可以增加或收缩raw格式的映像文件大小,但是只能增肌qcow2映像文件的大小不能收缩。
语法格式如下:
qemu-img -f [raw/qcow2…] resize filename size
[root@kvm1 opt]# qemu-img create test1.img 512MFormatting \'test1.img\', fmt=raw size=536870912[root@kvm1 opt]# qemu-img resize -f raw test1.img 1GImage resized.[root@kvm1 opt]# qemu-img info test1.imgimage: test1.imgfile format: rawvirtual size: 1 GiB (1073741824 bytes)# 调整到1G了disk size: 1 MiB可以使用[+/-]1G 来调整大小如下:
[root@kvm1 opt]# qemu-img resize -f raw test1.img +1G,支持的单位有: K M G TImage resized.[root@kvm1 opt]# qemu-img info test1.imgimage: test1.imgfile format: rawvirtual size: 2 GiB (2147483648 bytes)# 加了1Gdisk size: 1 MiB5. 使用基础映像创建派生映像
有点像docker的镜像层和容器层
概念:
┌──────────────────────┐
│ Base.qcow2 (100 GB) │ ← 只读,模板
└─────────────────────┘
▲ (backing file 指针)
┌──────────────────────┐
│ Derived.qcow2 (2 GB) │ ← 实际只存差异,可随时再派生
└─────────────────────┘
启动 VM 时,读 → 先到 Derived 找,找不到 → 回退到 Base
写 → 只写 Derived(CoW)
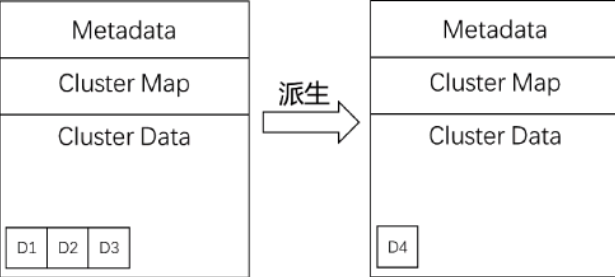
基础映像文件既可以是qcow2格式也可以是raw格式,但是派生映像文件必须是qcow2格式文件,还可以基于派生映像文件在派生出新的映像文件,从而形成链状结构。
5.1. 创建派生映像
创建基础映像
基础映像(Base Image)、父映像(Parent Image)、后备文件(Backing File)含义相同
[root@kvm1 opt]# qemu-img create -f qcow2 base.qcow2 1G创建派生映像
[root@kvm1 opt]# qemu-img create -f qcow2 -b base.qcow2 image.qcow2[root@kvm1 opt]# qemu-img info image.qcow2image: image.qcow2file format: qcow2virtual size: 1 GiB (1073741824 bytes)disk size: 196 KiBcluster_size: 65536backing file: base.qcow2基础映像Format specific information: compat: 1.1 lazy refcounts: false refcount bits: 16 corrupt: false一次性查看基础映像和派生映像的信息:
[root@kvm1 opt]# qemu-img info --backing-chain image.qcow2image: image.qcow2file format: qcow2virtual size: 1 GiB (1073741824 bytes)disk size: 196 KiBcluster_size: 65536backing file: base.qcow2Format specific information: compat: 1.1 lazy refcounts: false refcount bits: 16 corrupt: falseimage: base.qcow2file format: qcow2virtual size: 1 GiB (1073741824 bytes)disk size: 196 KiBcluster_size: 65536Format specific information: compat: 1.1 lazy refcounts: false refcount bits: 16 corrupt: false5.2. 合并派生映像和基础映像生成新的映像
[root@kvm1 opt]# qemu-img convert -O qcow2 image.qcow2 standalone.qcow2[root@kvm1 opt]# qemu-img info standalone.qcow2image: standalone.qcow2file format: qcow2virtual size: 1 GiB (1073741824 bytes)disk size: 196 KiBcluster_size: 65536Format specific information: compat: 1.1 lazy refcounts: false refcount bits: 16 corrupt: false-O qcow2:指定转换格式,也可以转换成raw
6. 比较映像文件
使用compare子命令可以对两个映像文件进行比较,其语法如下:
qemu-img compare [-f fmt] [-F fmt] [-p] [-s] [-q] imgname1 imgnam2
[root@kvm1 opt]# file old.qcow2 new.qcow2old.qcow2: QEMU QCOW Image (v3), 536870912 bytesnew.qcow2: data[root@kvm1 opt]# qemu-img compare old.qcow2 new.qcow2Images are identical.可以看出虽然格式是不同的,但是数据是相同的。
7. 更改基础映像文件
如果更改了基础映像文件或位置,则必须使用rebase子命令来修改派生文件
使用-b指定新的基础映像文件:
[root@kvm1 opt]# qemu-img info image.qcow2 --backing-chainimage: image.qcow2file format: qcow2virtual size: 1 GiB (1073741824 bytes)disk size: 196 KiBcluster_size: 65536backing file: base.qcow2# 从输出可以看出,基础镜像文件在当前目录下Format specific information: compat: 1.1 lazy refcounts: false refcount bits: 16 corrupt: falseimage: base.qcow2file format: qcow2virtual size: 1 GiB (1073741824 bytes)disk size: 196 KiBcluster_size: 65536Format specific information: compat: 1.1 lazy refcounts: false refcount bits: 16 corrupt: false将基础镜像移动到/vm目录下
rebase子命令有两种不同的工作模式:
safe和unsafe
safe:默认模式,在进行更改时,会进行一些检查,对比操作,所以要求原有的基础映像文件必须保留unsafe: 使用-u 指定为unsafe模式,可以在旧文件无法访问的时候使用它,例如:如果是使用mv的方式移动基础映像,使用rebase子命令时就必须使用-u unsafe选项了
# cp base.qcow2 /vm/newbase.qcow2# qemu-img rebase -b /vm/newbase.qcow2 image.qcow2# qemu-img info image.qcow2 --backing-chainimage: image.qcow2file format: qcow2virtual size: 1 GiB (1073741824 bytes)disk size: 196 KiBcluster_size: 65536backing file: /vm/newbase.qcow2Format specific information: compat: 1.1 lazy refcounts: false refcount bits: 16 corrupt: falseimage: /vm/newbase.qcow2# 可以看到基础镜像位置已经更新了file format: qcow2virtual size: 1 GiB (1073741824 bytes)disk size: 196 KiBcluster_size: 65536Format specific information: compat: 1.1 lazy refcounts: false refcount bits: 16 corrupt: false8. 显示映像文件布局
使用map子命令可以显示映像文件及其基础映像文件(如果有)的元数据,并且会显示映像文件中每个扇区的分配状态。其语法格式如下:
qemu-img map [-f fmt] [–output=fmt] imgname
基础镜像不能被压缩不能无法显示元数据!,就是不能被 qemu-img convert -c 或者 virt-sparsify --compress压缩过。
基于一个未压缩的基础镜像创建派生镜像
[root@kvm1 opt]# qemu-img create -f qcow2 -b /var/lib/libvirt/images/centos7.9.qcow2 centos7.9-new.qcow2[root@kvm1 opt]# qemu-img info centos7.9-new.qcow2image: centos7.9-new.qcow2file format: qcow2virtual size: 20 GiB (21474836480 bytes)disk size: 196 KiBcluster_size: 65536backing file: /var/lib/libvirt/images/centos7.9.qcow2# 基础镜像Format specific information: compat: 1.1 lazy refcounts: false refcount bits: 16 corrupt: false显示映像文件的布局
[root@kvm1 opt]# qemu-img map centos7.9-new.qcow2Offset Length Mapped to File0 0x36b0000 0x50000 /var/lib/libvirt/images/centos7.9.qcow20x4bb0000 0x3b00000 0x4c00000 /var/lib/libvirt/images/centos7.9.qcow20x96b0000 0x700000 0x9700000 /var/lib/libvirt/images/centos7.9.qcow20xe1b0000 0x300000 0xe200000 /var/lib/libvirt/images/centos7.9.qcow2... ... 字段意思解释: 从偏移量
0开始、长度是0x36b0000,对于的文件在/var/lib/libvirt/images/centos7.9.qcow2中从偏移量0x50000开始。
查看派生映像中的元数据
[root@kvm1 opt]# qemu-img map centos7.9-new.qcow2 | grep centos7.9.qcow2 |wc -l93[root@kvm1 opt]# qemu-img map centos7.9-new.qcow2 | grep centos7.9-new.qcow2 | wc -l16可以看出是由93块基础镜像和16块派生镜像连续的扇区组成了虚拟磁盘中的数据。
将派生映像中的数据提交到基础映像文件中
[root@kvm1 opt]# qemu-img commit centos7.9-new.qcow2[root@kvm1 opt]# qemu-img map centos7.9-new.qcow2 | grep centos7.9.qcow2 | wc -l79[root@kvm1 opt]# qemu-img map centos7.9-new.qcow2 | grep centos7.9-new.qcow2 | wc -l0可以看出所有非零的数据都保存到了基础映像 centos7.9.qcow2
9. 快照管理
可以使用snapshot 子命令管理qcow2格式的映像文件的快照。其语法格式如下:
qemu-img snapshot -l vm.qcow2qemu-img snapshot -c snap1 vm.qcow2qemu-img snapshot -a snap1 vm.qcow2qemu-img snapshot -d snap1 vm.qcow2qemu-img snapshot -q -c snap1 vm.qcow2qemu-img snapshot -U -l vm.qcow2为镜像创建快照:
[root@kvm1 opt]# qemu-img create -f qcow2 test.qcow2 512MFormatting \'test.qcow2\', fmt=qcow2 size=536870912 cluster_size=65536 lazy_refcounts=off refcount_bits=16[root@kvm1 opt]# qemu-img snapshot -c snapshot1 test.qcow2[root@kvm1 opt]# qemu-img snapshot -l test.qcow2Snapshot list:ID TAG VM SIZE DATE VM CLOCK1 snapshot1 0 B 2025-07-25 00:04:04 00:00:00.000[root@kvm1 opt]# qemu-img snapshot -c snapshot2 test.qcow2[root@kvm1 opt]# qemu-img snapshot -l test.qcow2Snapshot list:ID TAG VM SIZE DATE VM CLOCK1 snapshot1 0 B 2025-07-25 00:04:04 00:00:00.0002 snapshot2 0 B 2025-07-25 00:05:50 00:00:00.000使用qemu-img info 也可以查看映像快照
[root@kvm1 opt]# qemu-img info test.qcow2image: test.qcow2file format: qcow2virtual size: 512 MiB (536870912 bytes)disk size: 388 KiBcluster_size: 65536Snapshot list:ID TAG VM SIZE DATE VM CLOCK1 snapshot1 0 B 2025-07-25 00:04:04 00:00:00.0002 snapshot2 0 B 2025-07-25 00:05:50 00:00:00.000Format specific information: compat: 1.1 lazy refcounts: false refcount bits: 16 corrupt: false回滚到指定位置:
[root@kvm1 opt]# qemu-img snapshot -a 1 test.qcow2删除快照:
qemu-img snapshot -d目前只能通过快照名进行删除
[root@kvm1 opt]# qemu-img snapshot -d snapshot1 test.qcow2[root@kvm1 opt]# qemu-img snapshot -d snapshot2 test.qcow2[root@kvm1 opt]# qemu-img snapshot -l test.qcow2

