2024鸿蒙样题需要掌握的知识点
一、读取json格式文件为对象或数组,显示相应字段
-
1、创建json文件的参数一致的类
-
2、导入类、导入json文件
-
3、循环渲染
import router from \'@ohos.router\'//导入即对象import books from \'resources/rawfile/book1.json\'import { Book } from \'../model/Book\'@Entry@Componentstruct Detail { build() { Column() { //展示所有的图书-->读取book文件 ForEach(books.book, (item: Book) => { Text(item.bookName) }) } .height(\'100%\') .width(\'100%\') }}二、推送普通文本类型通知
注意:测试的时候需要在模拟器中打开通知权限
//基础文本通知import { notificationManager } from \'@kit.NotificationKit\';// 描述通知的请求let notificationRequest: notificationManager.NotificationRequest = { //id为通知的唯一标识,用于通讯的通知与取消 id: 100, content: { //notificationContentType定义通知的类型 notificationContentType: notificationManager.ContentType.NOTIFICATION_CONTENT_BASIC_TEXT, //normal定义普通文本类型通知的内容 normal: { //title定义通知内容标题 title: `通知内容标题`, //title定义通知内容详情 text: \'通知内容详情\' } }}// 发送通知notificationManager.publish(notificationRequest).then(()=>{ console.info(\'publish success\')}) .catch((err: Error) => { console.error(`publish failed,message is ${err}`);});简化版
notificationManager.publish({ id: 1, content: { notificationContentType: notificationManager.ContentType.NOTIFICATION_CONTENT_BASIC_TEXT, normal: { title: \'图书馆的通知\', text: \'这里是图书馆的通知\' } } })三、打开和关闭子窗口;鼠标拖拽子窗口;在子窗口页面中显示轮播图;点击轮播图,跳转到某图书详细信息页面。
-
1、打开和关闭窗口
①、首先定义一个类
import { window } from \'@kit.ArkUI\'class MyWindows { WindowStage: window.WindowStage | null = null SubWindow: window.Window | null = null //打开小窗 async show() { if (this.WindowStage == null) { console.log(\'testTag\', \'发生错误,无法打开小窗\') } else { this.SubWindow = await this.WindowStage.createSubWindow(\'xiejiarui\') //窗口位置 this.SubWindow.moveWindowTo(440, 550) //窗口大小 this.SubWindow.resize(800, 1500) } this.SubWindow?.setUIContent(\"pages/Small_window\", () => { (this.SubWindow as window.Window).showWindow() }) } //关闭小窗 close() { this .SubWindow?.destroyWindow((err) => { if (err) { console.log(\"testTag\", \'发生错误 无法关闭小窗\') } else { console.log(\'testTag\', \'成功关闭小窗\') } }) }}export default new MyWindows()②、在EntryAbility中初始化
export default class EntryAbility extends UIAbility { async onWindowStageCreate(windowStage: window.WindowStage): Promise { windowStage.loadContent(\'pages/Index\', (err) => { …… }); //小窗 let windowsClass = await windowStage.getMainWindow() let name: Array = [] windowsClass.setWindowSystemBarEnable(name) MyWindows.WindowStage = windowStage }
③、在需要打开小窗的地方调用
//注意:需要导入MyWindows的ets文件Button(\'点击弹出小窗\') .onClick(() => { MyWindows.ShowSubWindows()})
④、在需要关闭小窗的地方调用
//注意:需要导入MyWindows的ets文件Button(\'点击关闭窗口\') .onClick(()=>{ MyWindows.destroySubWindow() })
四、使用视频组件显示视频文件。
//视频控制器controller: VideoController = new VideoController()Video({ src: this.book.videoPath, controller: this.controller }) .width(\'85%\') .height(180) .autoPlay(true)
五、用户首选项或关系型数据库进行数据持久化存储。
1、通过用户首选项实现数据持久化
⑴封装用户首选项工具类
import { preferences } from \"@kit.ArkData\"class PreferencesUtil { //创建一个变量来保存preferences的实例 private pref: preferences.Preferences | null = null //获取Preferences实例 createPreferences(context: Context) { //获取preferences的实例【第一个参数是context(应用场下文),第二个参数是实例的名称】 preferences.getPreferences(context, \'shop_preferences\') .then((object) => { //成功时会返回preferences实例 this.pref = object console.log(\'testTag\', \'成功获取preferences实例\') }) .catch(() => { console.log(\'testTag\', \'获取preferences实例失败\') }) } //将数据写入preferences实例 async writePreferenceValue(key: string, value: preferences.ValueType) { //判断一下preferences是否实例化 if (!this.pref) { return } try { //实例化后,调用put方法来写入数据【第一个值传入要写入的string类型的Key,第二个值是要写入的数据】 await this.pref.put(key, value) //通过flash方法将preferences实例持久化 await this.pref.flush() console.log(\'testTag,写入数据成功\') } catch (e) { console.log(\'testTag,写入数据失败\') } } //读数据的操作 //获取键对应的值 async readPreferenceValue(key: string, defaultValue: T) { //判断一下preferences是否实例化 if (!this.pref) { console.log(\'testTag, preferences未实例化,返回默认值\') return defaultValue // 未实例化时返回默认值 } try { //实例化后,调用get方法获取数据【第一个值传入要获取的string类型的Key,第二个值表示默认值】 let value = await this.pref.get(key, defaultValue) as T console.log(\'testTag,读取数据成功\') return value } catch (e) { console.log(\'testTag,写入数据失败\') return defaultValue // 出错时返回默认值 } }}export default new PreferencesUtil()⑵初始化用户首选项
import PreferencesUtil from \'../utils/PreferencesUtil\'const DOMAIN = 0x0000;export default class EntryAbility extends UIAbility { async onWindowStageCreate(windowStage: window.WindowStage): Promise { …… …… //实例化preferences PreferencesUtil.createPreferences(this.context) }}
⑶使用用户首选项
Button(\'记录数据\') .onClick(()=>{ PreferencesUtil.writePreferenceValue(\"姓名\",\"RAY\") })Button(\'读取数据\') .onClick(async ()=>{ this.message=await PreferencesUtil.readPreferenceValue(\"姓名\",\"name\") })Text(`数据为:${this.message}`)
2、通过关系型数据库实现数据库持久化
①、定义类
import relationalStore from \"@ohos.data.relationalStore\";import MemoModel from \"../models/MemoModel\";class rdb { private rdbStore: relationalStore.RdbStore | null = null private tableName: string private sql: string private columns: Array constructor(tableName: string, sql: string, columns: Array) { this.tableName = tableName this.sql = sql this.columns = columns } getRdbStore(callback: Function = () => { }) { let context: Context = getContext(this) let StoreConfig: relationalStore.StoreConfig = { name: \'xie.db\', securityLevel: relationalStore.SecurityLevel.S2 } relationalStore.getRdbStore(context, StoreConfig, (err, rdb) => { if (err) { console.log(\'testTag gerRdbStore() 失败, err:\', err) } this.rdbStore = rdb this.rdbStore.executeSql(this.sql) console.log(\'testTag gerRdbStore() 成功\') callback() }) } insert(memo: MemoModel, callback: Function = () => { }) { if (this.rdbStore) { let data: relationalStore.ValuesBucket = generateBucket(memo); this.rdbStore.insert(this.tableName, data, (err, res) => { if (err) { console.log(\'testTag insertData() 失败,\', err) } console.log(\'testTag insertData() 完成\') callback(res) }) } } delete(memo: MemoModel) { if (this.rdbStore) { let Predicates: relationalStore.RdbPredicates = new relationalStore.RdbPredicates(this.tableName) Predicates.equalTo(\'id\', memo.id) this.rdbStore.delete(Predicates, (err, res) => { if (err) { console.log(\'testTag deleteData() 失败, \', err) } console.log(\'testTag deleteData() 成功 \', res) }) } } update(memo: MemoModel) { if (this.rdbStore) { let data: relationalStore.ValuesBucket = generateBucket(memo); let Predicates: relationalStore.RdbPredicates = new relationalStore.RdbPredicates(this.tableName) Predicates.equalTo(\'id\', memo.id); this.rdbStore.update(data, Predicates, (err, res) => { if (err) { console.log(\'testTag updateData() 失败,\', err) } console.log(\'testTag updateData() 成功\', res) }) } } query( callback: Function ) { if (this.rdbStore) { let Predicates: relationalStore.RdbPredicates = new relationalStore.RdbPredicates(this.tableName) this.rdbStore.query(Predicates, this.columns, (err, res) => { if (err) { console.log(\'testTag query() 失败, err:\', err) } // 创建局部变量,存储结果的行数 let count: number = res.rowCount; // 如果查询的结果为0,执行回调函数,传入空数组 if (count === 0 || typeof count === \'string\') { console.log(\'testTag\' + \'Query no results!\'); callback([]); } else { // 如果有结果,将结果集指向第一行 res.goToFirstRow(); // 创建局部变量,存储最后将返回的结果数组 const result: MemoModel[] = []; // 使用循环为结果添加内容 for (let i = 0; i < count; i++) { let tmp = new MemoModel(0, 0, \'\'); tmp.id = res.getDouble(res.getColumnIndex(\'id\')); tmp.updateTime = res.getDouble(res.getColumnIndex(\'updateTime\')); tmp.contest = res.getString(res.getColumnIndex(\'content\')); result[i] = tmp; // 转至下一行 res.goToNextRow(); } console.log(\'testTag query() 成功\', JSON.stringify(res)) callback(result) res.close() } }) } }}function generateBucket(memo: MemoModel): relationalStore.ValuesBucket { let obj: relationalStore.ValuesBucket = {}; obj.updateTime = memo.updateTime obj.content = memo.contest return obj;}export default new rdb(\'memoTable\', \'CREATE TABLE IF NOT EXISTS memoTable(id INTEGER PRIMARY KEY AUTOINCREMENT, updateTime INTEGER, content TEXT)\', [\'id\', \'updateTime\', \'content\'])②、导入类、进行调用
Button(\'创建数据库表\') .onClick(() => { rdb.getRdbStore() }) Button(\'插入数据\') .onClick(() => { rdb.insert(new MemoModel(1, 11, \'\')) }) Button(\'查询数据\') .onClick(() => { rdb.query((res: MemoModel[]) => { this.memoList = res }) }) Button(\'修改数据\') .onClick(() => { rdb.update(this.memoList[0]) }) Button(\'删除数据\') .onClick(() => { rdb.delete(this.memoList[0]) })六、在页面跳转时进行传值
-
1、字符串类型
//传值
router.pushUrl({ url:\'pages/Detail\', params:{ libraryName:\'图书馆\' }})
//接收(注意类型)
const Params: string = router.getParams()as stringconst libraryName:String=Params[\'libraryName\']
-
2、对象类型
//传值
router.pushUrl({ url: \'pages/Detail\', params: { name : \'\', book : \'\' }})
//接收
//Entry外定义类
interface library { name: String = \'\' book: String = \'\'}//build前接收值
const Params: library = router.getParams()as libraryconst name:String=Params.nameconst book:String=Params.book
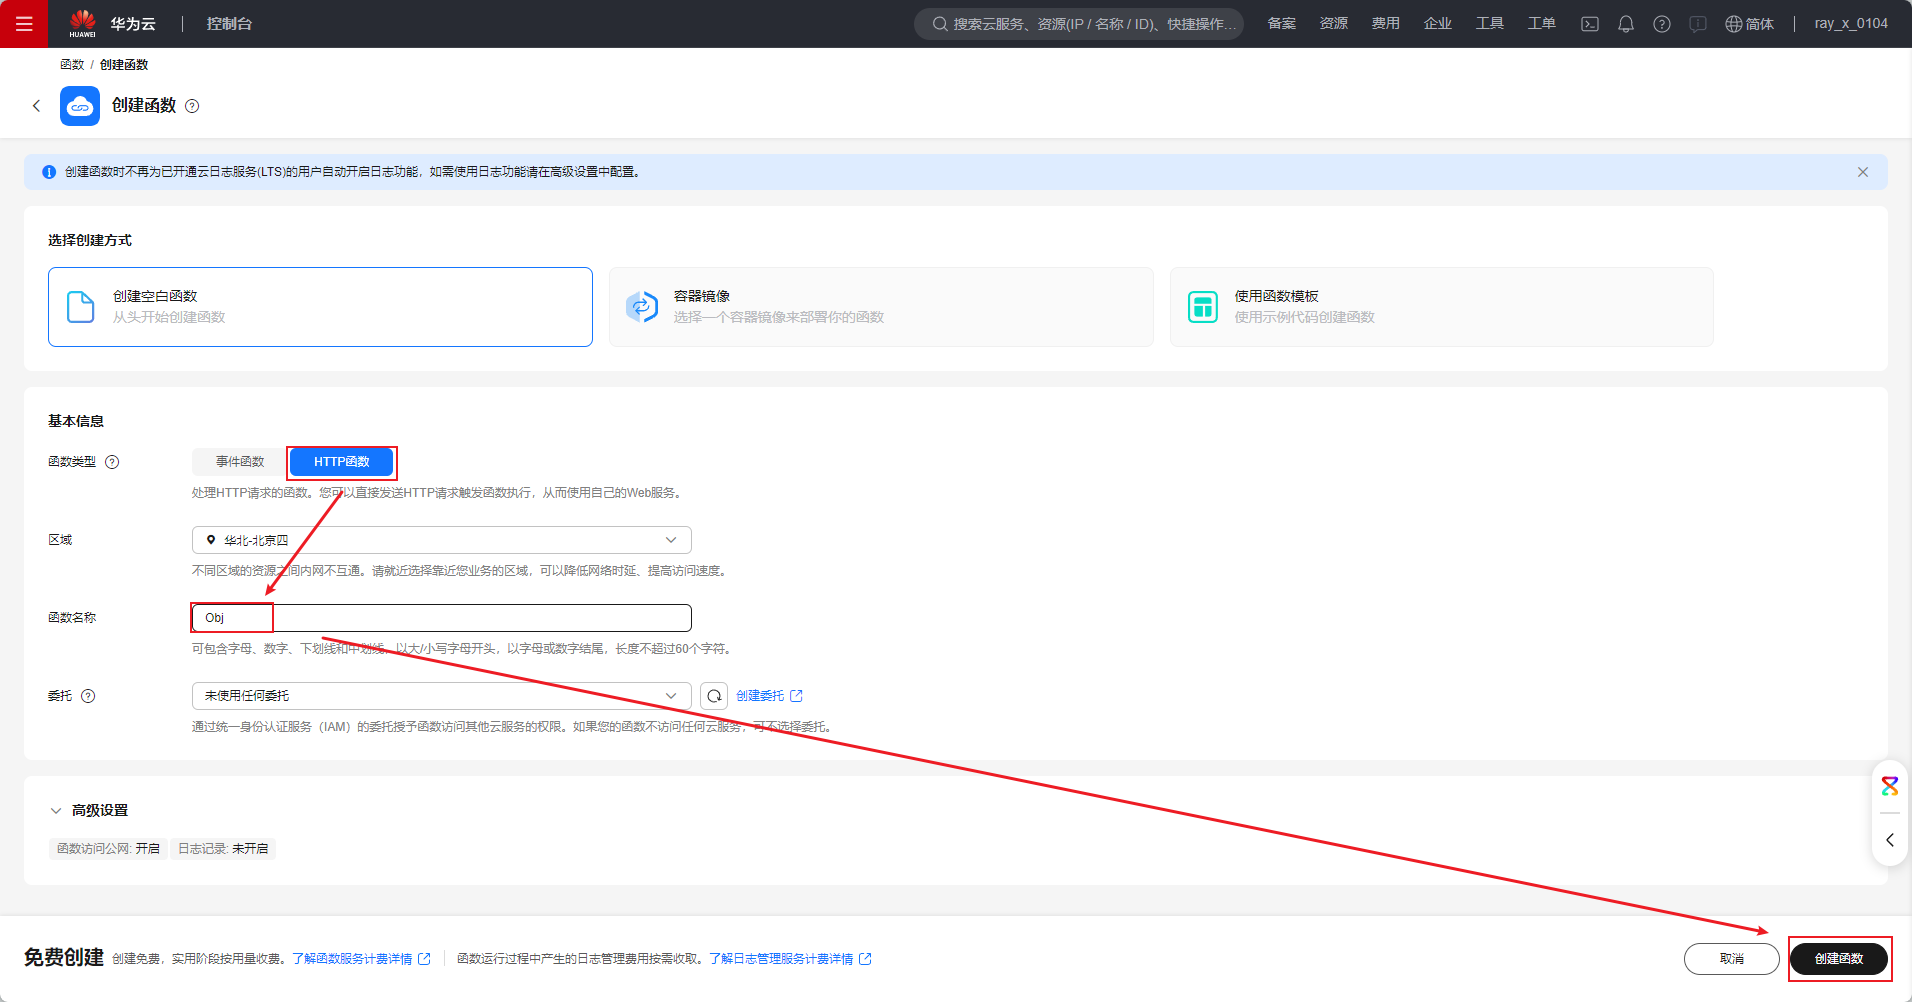
七、使用华为云,创建云函数;并根据云函数返回的接口地址,使用http进行网络数据获取。
1、创建云函数

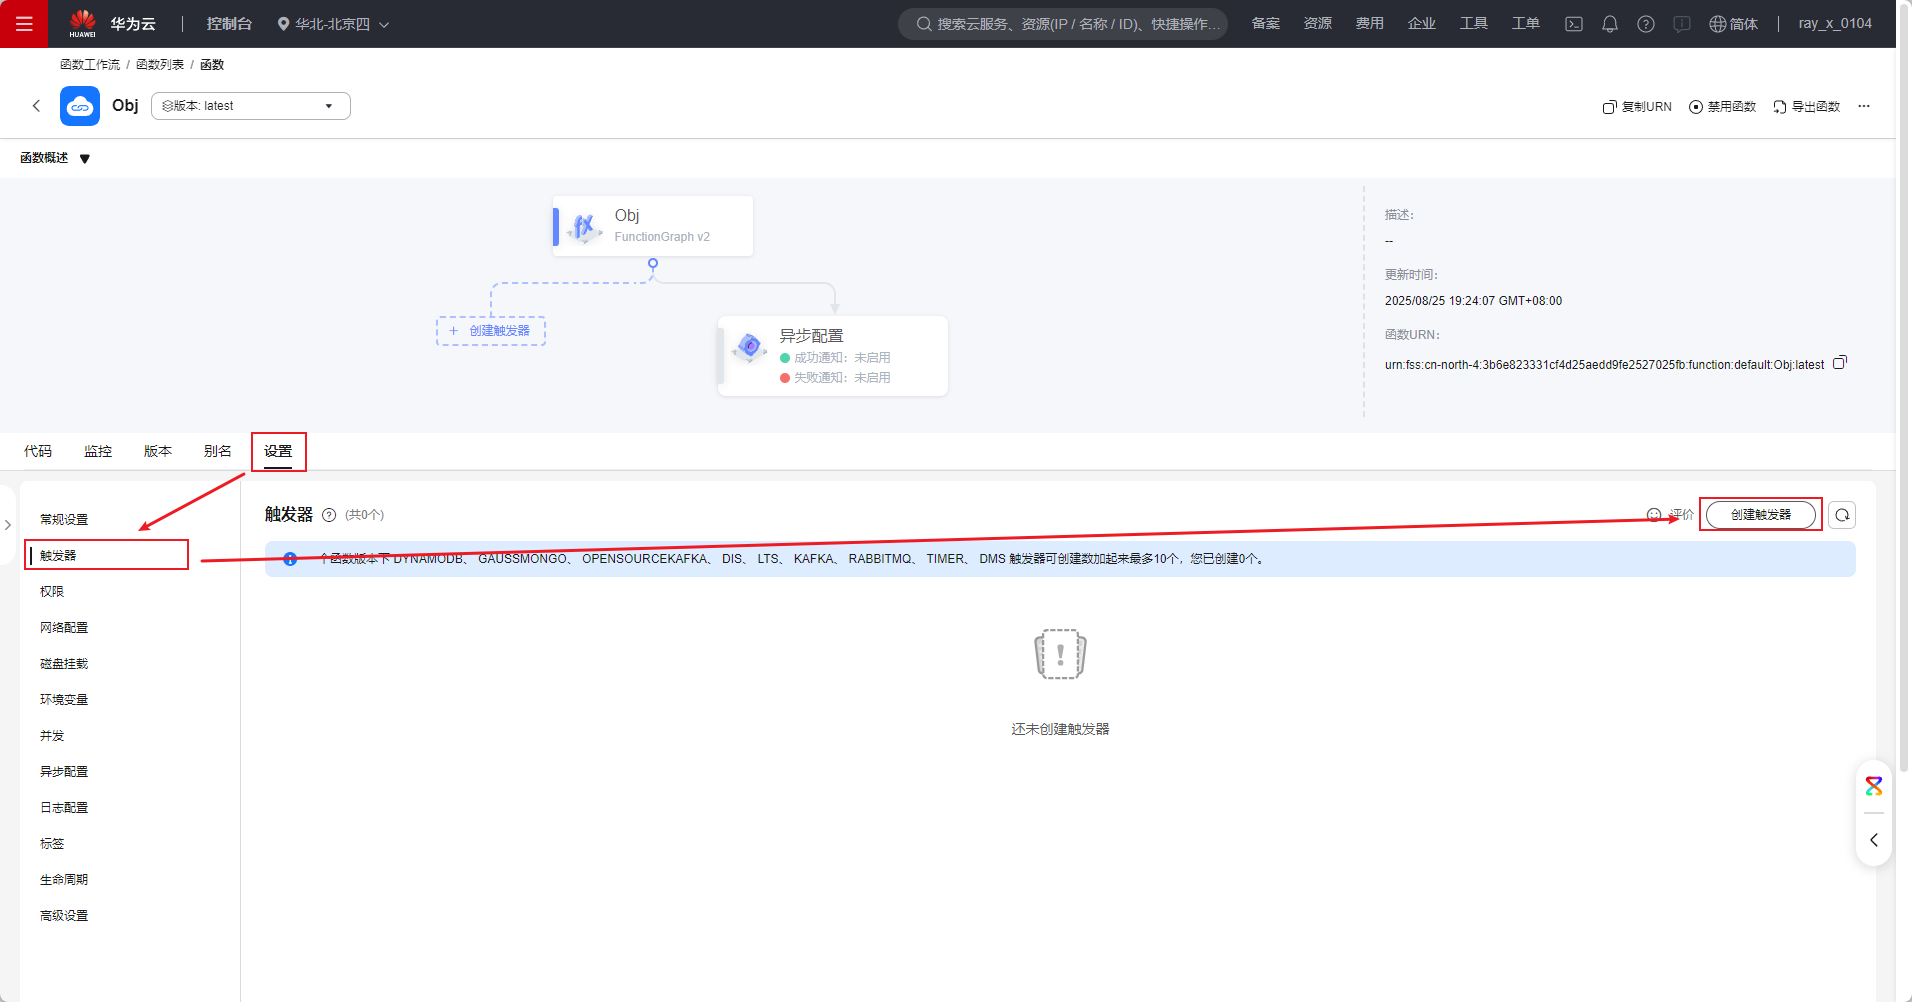
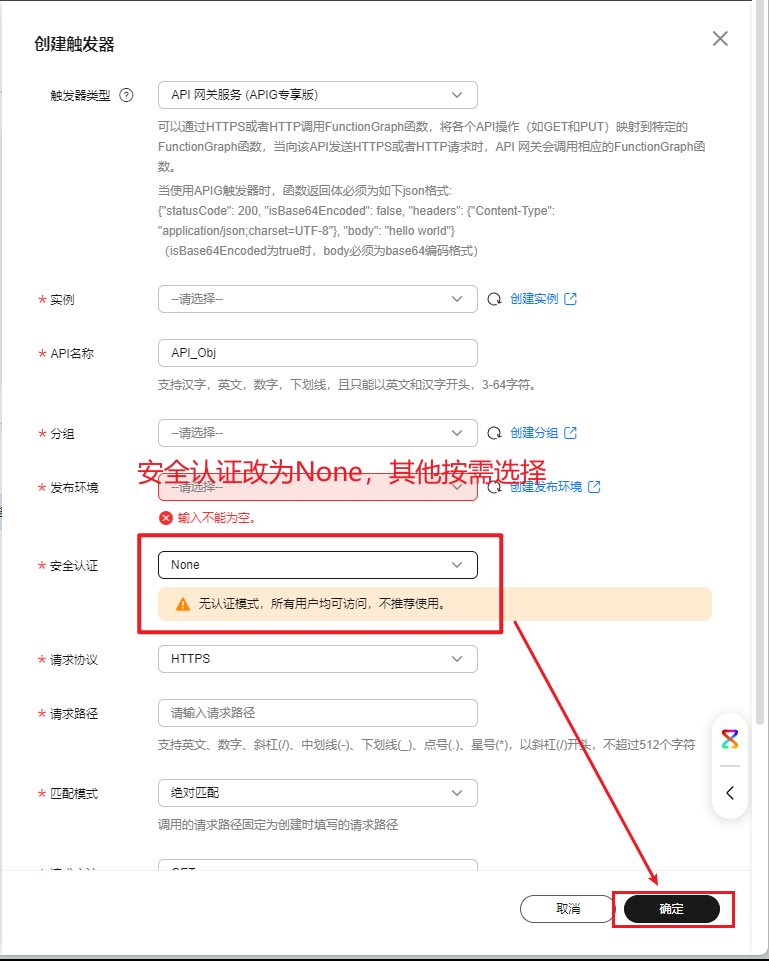
然后点击刚刚创建的触发器,点击修改,按需修改(Path等),点击修改成功
然后找到刚刚的API,在总览中复制API URL
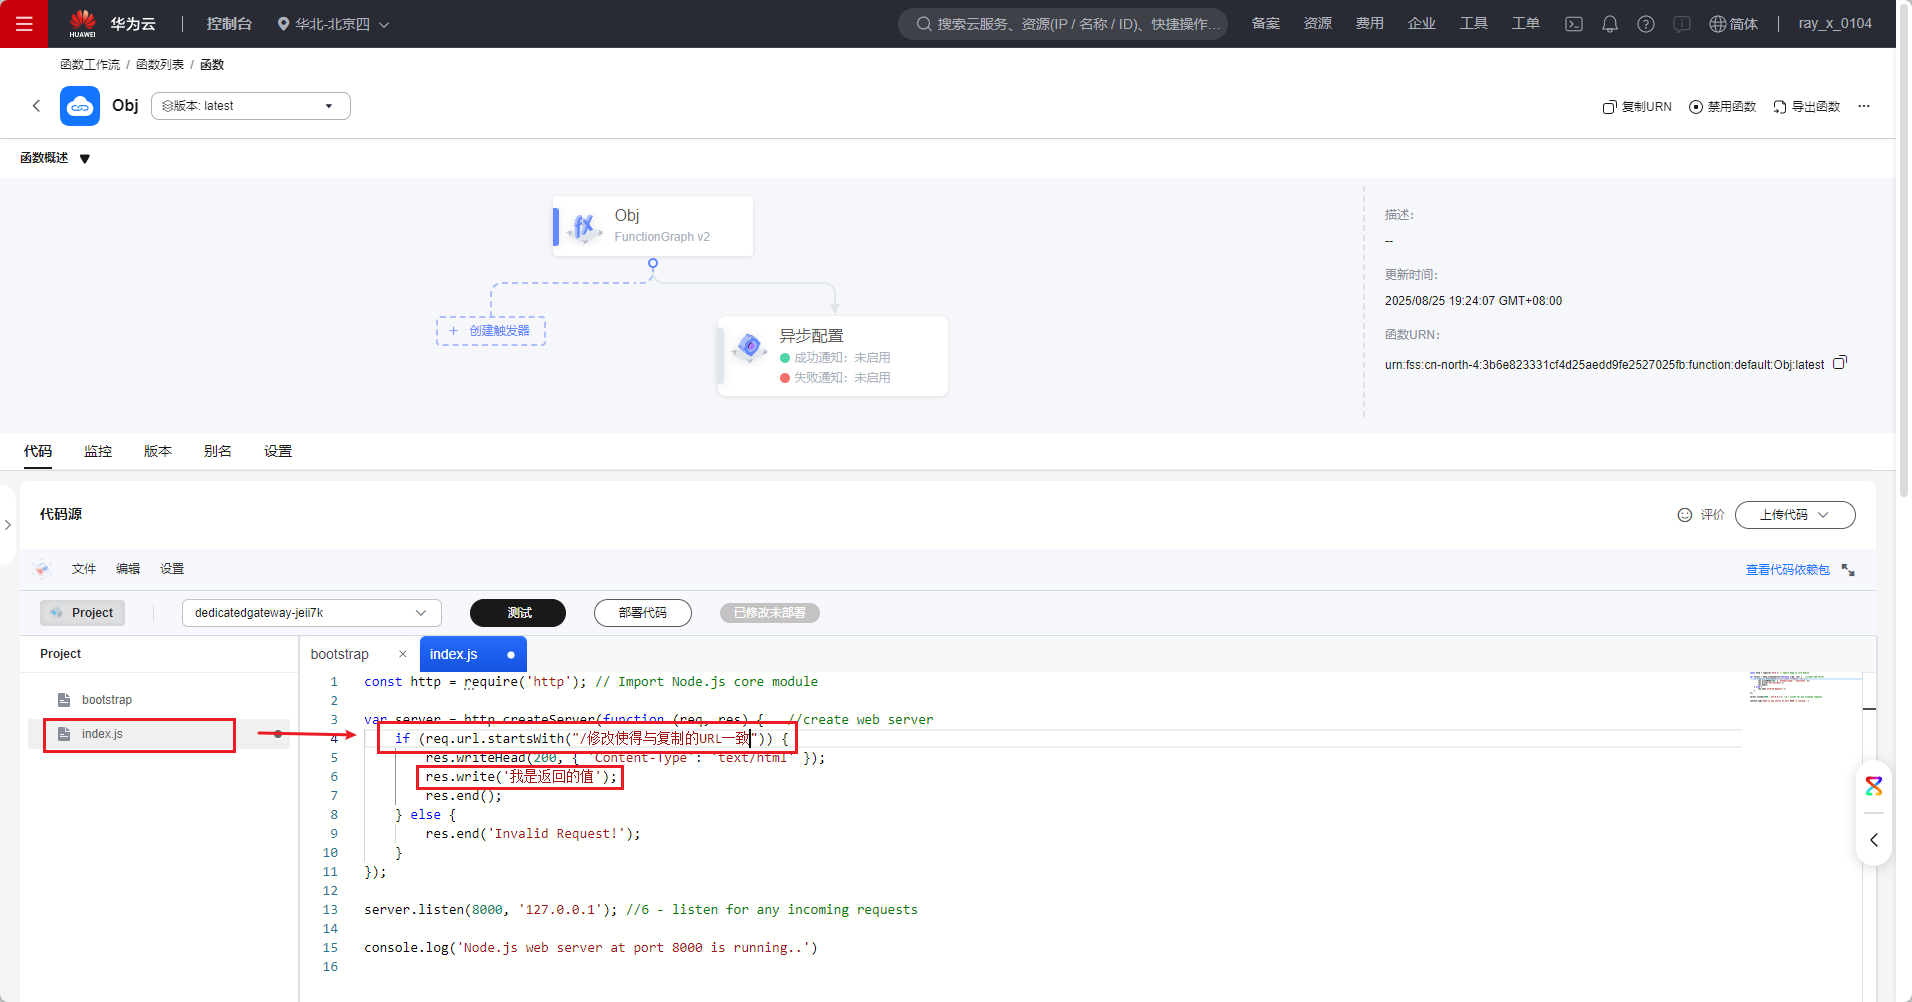
2、调用云函数
//注意:需要导入http包(import http from \'@ohos.net.http\')let data=await http.createHttp().request(\'刚刚复制的API URL\')console.log(\"testTag\",\"调用华为云的云函数,返回的值是\",`${data.result}`)
八、打开手机拨号界面。
//调用查询能力接口let isSupport = call.hasVoiceCapability()//如果有能力拨打电话if (isSupport) { //向10086拨打电话 call.makeCall(\"10086\",(err)=>{ if (err) { //拨打电话的时候发生错误,打印日志 console.log(\'testTag\',\"拨打电话失败\") }else { //拨打电话成功,打印日志 console.log(\'testTag\',\"拨打电话成功\") } })}
简化版
call.makeCall(\"10086\")

