【Python】Python之pytest接口自动化教程+从0到1demo:提升自动化代码能力_python接口自动化从0到1
文章目录
-
- pytest是什么?
-
- Pytest 概念
- Pytest 特点
- 如何安装pytest?
-
- 安装
- 验证安装
- pytest官方文档
- pytest的基本用法
-
- 测试用例的规则
- 测试用例的断言
- 读懂测试用例结果
- pytest的运行方式
- pytest的配置文件
-
- `pytest.ini` 示例
- `tox.ini` 示例
- `setup.cfg` 示例
- pytest的高阶用法
-
- 1.mark
-
- 用户自己的标记
- 框架内置的标记
-
- **`@pytest.mark.parametrize`**:
- **`@pytest.mark.skip`**:
- **`@pytest.mark.skipif`**:
- **`@pytest.mark.xfail`**:
- **`@pytest.mark.usefixtures`**:
- **`@pytest.mark.filterwarnings`**:
- **`@pytest.mark.timeout`**:
- **`@pytest.mark.django_db`**(Django专用):
- **`@pytest.mark.asyncio`**:
- **`@pytest.mark.parametrize`与多个参数化**:
- 2.fixture
-
- @pytest.fixture()
- @pytest.mark.usefixtures(\'fix\')
- @pytest.fixture(scope=\"module\")
- 配置全局fixtrue之conftest.py文件
- pytest的相关框架封装demo
-
- log日志封装demo
- 数据库封装demo
- redis封装demo
- 生成测试报告
-
- allure生成测试报告
- 内置测试报告html
- pytest和unittest的区别
-
- unittest
- pytest
pytest是什么?
Pytest 概念
Pytest 是 Python 的一种单元测试框架,与 Python 自带的 unittest 测试框架类似,但 Pytest 使用起来更简洁,效率更高。
Pytest 特点
Pytest 是一个非常成熟的 Python 测试框架,主要特点有以下几点:
- 易上手:入门简单,文档丰富,文档中有很多实例可以参考。
- 支持多种测试:能够支持简单的单元测试和复杂的功能测试。
- 参数化:支持参数化测试。
- 跳过测试:在执行测试过程中可以将某些测试用例跳过(skip),或者对某些预期失败的 case 标记成失败。
- 重试失败:支持重复执行 (rerun) 失败的 case。
- 兼容性:支持运行由 nose、unittest 编写的测试 case。
- 报告生成:可生成 HTML 报告。
- 持续集成:方便与 Jenkins 等持续集成工具结合使用。
- 部分用例执行:可支持执行部分用例。
- 插件支持:具有很多第三方插件,并且可以自定义扩展。

如何安装pytest?
安装
pip install pytest验证安装
pytest --version # 会展示当前已安装版本pytest官方文档
官方文档:https://docs.pytest.org/en/latest/contents.html
pytest的基本用法
测试用例的规则
- 创建
test_demo.py开头的文件 - 创建
Test开头的类 - 创建
test_开头的函数或者方法
如下:
import pytestdef test_a(): # 函数 passclass Test(object): # 类 def test_b(self): # 方法 pass简单的执行用例的命令就是 pytest,从执行结果中我们可以看到它运行了2条用例,并且全部都测试通过了。

因此我们得出一个结论:
- pytest是以每个函数或者方法作为一个用例的
- pytest主要以名字区分普通函数/方法和用例
- pytest的启动方式就是在命令行输入
pytest - pytest会自动输出用例情况,执行情况以及汇总情况
测试用例的断言
断言demo
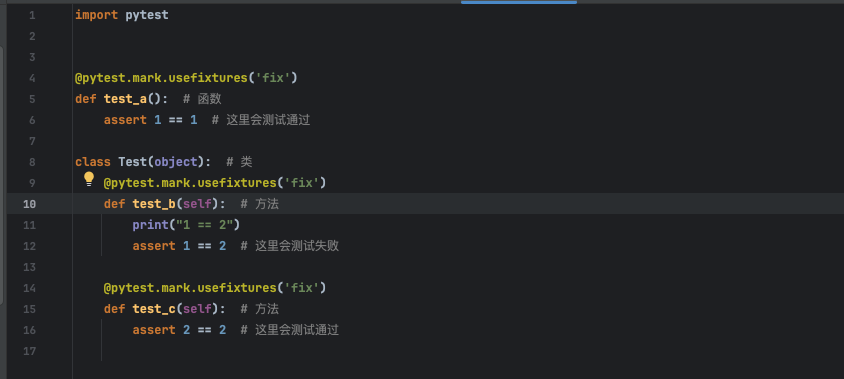
import pytestdef test_a(): # 函数 assert 1 == 1 # 这里会测试通过class Test(object): # 类 def test_b(self): # 方法 assert 1 == 2 # 这里会测试失败 def test_c(self): # 方法 assert 2 == 2 # 这里会测试通过当我们用 pytest 运行的时候,我们会得到3个结果。1个失败2个通过。并且失败的用例会以报错的形式展现出来 AssertionError,但是它不会中断测试。
如下:

读懂测试用例结果
我们通过观察pytest的测试结果,其实每行结果都是有价值的。但是对我们来讲,我们更关心的是中间这行。


pytest代码/test_1.py .F. 这代表着执行用例的情况,是否百分之百完成,并且是否通过。
这里有两个绿点,中间是一个红色的F,这代表着执行了3条用例,并且第一条和最后一条是通过的,中间一条是失败的。
具体解析的表格如下:
上面的讲解是为了更好的介绍pytest的用法。但是基础用法知识知道让我们知道了怎么用。但无法运用在真实的测试场景,因此我们自己看下面的高阶用法的讲解。
pytest的运行方式
例如在终端输入命令
#终端输入:pytest ./test_one.py --html=./report/report.html这就代表着运行pytest的test_one.py文件,并且输出测试报告

pytest的配置文件
pytest 支持多种配置文件格式,主要包括 pytest.ini、tox.ini 和 setup.cfg。这些文件可以包含不同的配置选项,如下:
pytest.ini 示例
[pytest]# 指定测试文件的搜索路径testpaths = tests# 添加默认的命令行选项addopts = -v --tb=short# 设置命令行日志的级别log_cli_level = INFO# 定义自定义标记markers = slow: mark test as slow smoke: mark test as smoke regression: mark test as regression# 指定测试文件的匹配模式python_files = test_*.py *_test.py# 指定测试类的匹配模式python_classes = Test*# 指定测试函数的匹配模式python_functions = test_*# 指定缓存目录cache_dir = .pytest_cache# 禁用警告输出disable_warnings = true# 其他配置项可以根据需要添加tox.ini 示例
[tox]# 指定要测试的环境列表envlist = py37, py38, py39[testenv]# 在每个环境中安装的依赖deps = pytest# 在每个环境中运行的命令commands = pytestsetup.cfg 示例
[metadata]name = your_package_nameversion = 0.1.0description = A sample Python package[options]packages = find:[tool:pytest]# pytest 的配置testpaths = testsaddopts = -v --tb=shortmarkers = slow: mark test as slow smoke: mark test as smoke- 将上述配置文件放置在项目根目录下。
- 根据项目的实际需求,我们可以修改相应的配置项。
- 运行
pytest时,pytest 会自动读取这些配置文件,应用相应的设置。
pytest的高阶用法
1.mark
mark标记,就是为了让用例跟用例之间都不相同。实现用例的筛选(相当于一个人的身份证号,也代表着用例代号)
用户自己的标记
- 使用标记
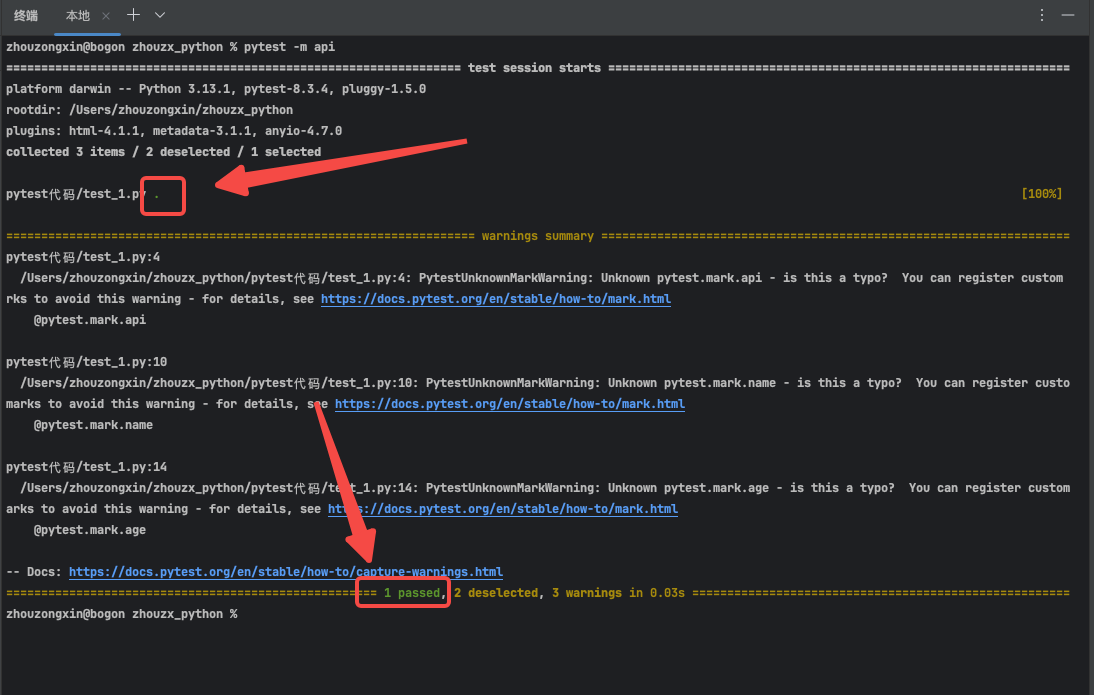
我们在刚才的测试用例上添加@pytest.mark.api1
import pytest@pytest.mark.apidef test_a(): # 函数 assert 1 == 1 # 这里会测试通过class Test(object): # 类 @pytest.mark.name def test_b(self): # 方法 assert 1 == 2 # 这里会测试失败 @pytest.mark.age def test_c(self): # 方法 assert 2 == 2 # 这里会测试通过- 选择用例
如果我们直接执行pytest,那么它仍然会全部执行。所以我们想要筛选用例,那么将会用到下面的命令
pytest -m api那么我们可以看到,他只会执行一条带有api标签的用例,剩下的是不执行的。另外两个用例属于未执行的状态
但记住,一个用例可以有多个标记,如下:
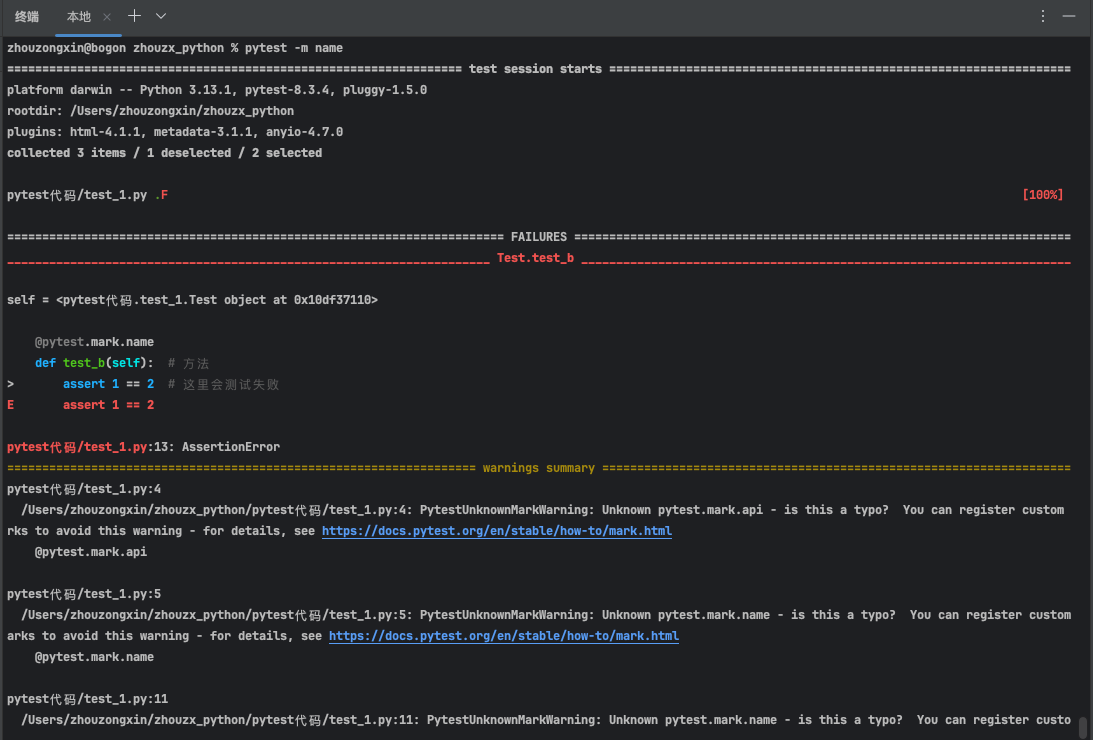
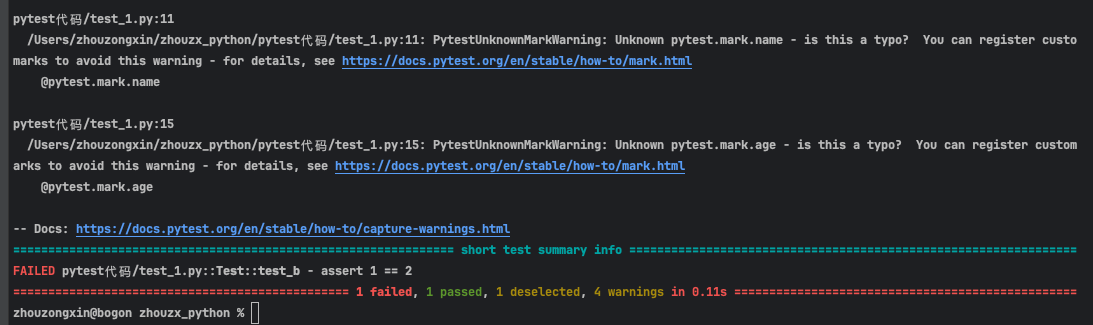
import pytest@pytest.mark.api@pytest.mark.namedef test_a(): # 函数 assert 1 == 1 # 这里会测试通过class Test(object): # 类 @pytest.mark.name def test_b(self): # 方法 assert 1 == 2 # 这里会测试失败 @pytest.mark.age def test_c(self): # 方法 assert 2 == 2 # 这里会测试通过当我们执行pytest -m name的时候,它就会执行两条用例。
框架内置的标记
pytest 提供了多个基于 @pytest.mark 的标记(markers)来控制测试的执行方式。以下是一些常用的标记:
@pytest.mark.parametrize:
- 用于参数化测试,允许为测试函数提供多个参数集。
@pytest.mark.parametrize(\"input, expected\", [(1, 2), (2, 3), (3, 4)])def test_addition(input, expected): assert input + 1 == expected@pytest.mark.skip:
- 跳过当前测试,不执行。
@pytest.mark.skip(reason=\"Skipping this test\")def test_to_be_skipped(): assert False@pytest.mark.skipif:
- 根据条件跳过测试,指定条件成立时跳过。
@pytest.mark.skipif(condition=True, reason=\"Skipping because condition is True\")def test_conditionally_skipped(): assert False@pytest.mark.xfail:
- 标记为预期失败的测试,允许失败但不算作测试失败。
@pytest.mark.xfaildef test_expected_failure(): assert False@pytest.mark.usefixtures:
- 为测试函数指定使用的 fixture。
@pytest.mark.usefixtures(\"some_fixture\")def test_using_fixture(): assert True@pytest.mark.filterwarnings:
- 用于过滤指定测试中的警告。
@pytest.mark.filterwarnings(\"ignore:Some warning\")def test_warning_filtering(): # 触发警告 pass@pytest.mark.timeout:
- 设置测试的超时时间。
@pytest.mark.timeout(10) # 设置超时为10秒def test_long_running(): pass@pytest.mark.django_db(Django专用):
- 指定测试访问数据库。
@pytest.mark.django_dbdef test_with_db_access(): pass@pytest.mark.asyncio:
- 用于标记异步测试函数,特别是与
asyncio协同工作时。
@pytest.mark.asyncioasync def test_async_code(): pass@pytest.mark.parametrize与多个参数化:
- 可以同时为多个参数进行参数化。
@pytest.mark.parametrize(\"param1\", [1, 2, 3])@pytest.mark.parametrize(\"param2\", [4, 5, 6])def test_multiple_parameters(param1, param2): print(param1 + param2) assert param1 + param2我们使用pytest -vs执行后的结果如下:

这些只是常用标记的一部分,pytest 支持更多的标记,并且通过 pytest.ini 文件可以定义自定义的标记。
你也可以通过 pytest --help 来查看完整的帮助文档和标记列表,或者查阅官方文档
2.fixture
@pytest.fixture()
它会自动在用例之前,在用例之后执行,是用于测试环境的一个构建和销毁的作用,非常重要。
也就是说我们每条用例在执行前,都会走一遍fixture, 代码如下:
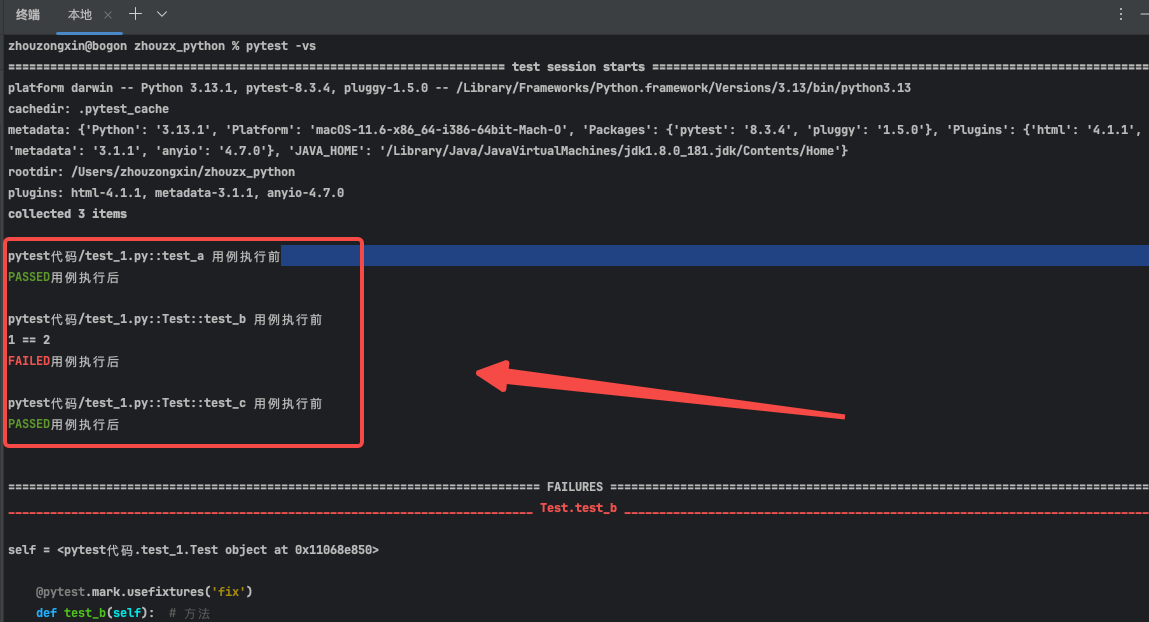
import pytest@pytest.fixture()def fix(): print(\"用例执行前\") yield print(\"用例执行后\")def test_a(fix): # 函数 assert 1 == 1 # 这里会测试通过class Test(object): # 类 def test_b(self, fix): # 方法 print(\"1 == 2\") assert 1 == 2 # 这里会测试失败 def test_c(self, fix): # 方法 assert 2 == 2 # 这里会测试通过我们在代码中可以看到,我在所有的用例上面添加了一个生成器,并且在这个生成器上面添加了一个@pytest.fixture()
@pytest.fixture()def fix(): print(\"用例执行前\") yield print(\"用例执行后\")然后再把@pytest.fixture()下面的这个方法fix全都让测试用例去调用。为了更清晰的打印出他前后执行的内容。但是运行结果正确的时候是不打印内容的,所以我们在运行结果错的地方去加一个print进行输出。
def test_a(fix): # 函数 assert 1 == 1 # 这里会测试通过class Test(object): # 类 def test_b(self, fix): # 方法 print(\"1 == 2\") assert 1 == 2 # 这里会测试失败 def test_c(self, fix): # 方法 assert 2 == 2 # 这里会测试通过在终端输入pytest我们看下面的结果。
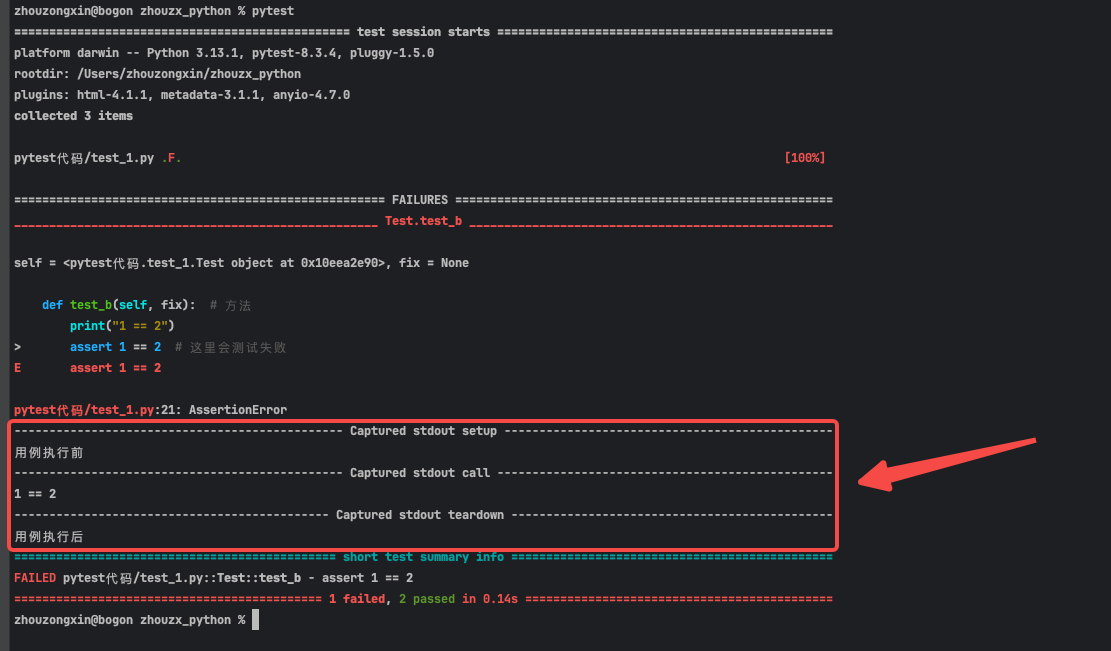
我们很清楚的看到,这条失败的用例前面和后面都执行了fix里面的代码。
如果想每个结果都看到,那么我们在终端输入:pytest -vs,那么我们在用例结果处,就可以看到所有的执行过程。如下:

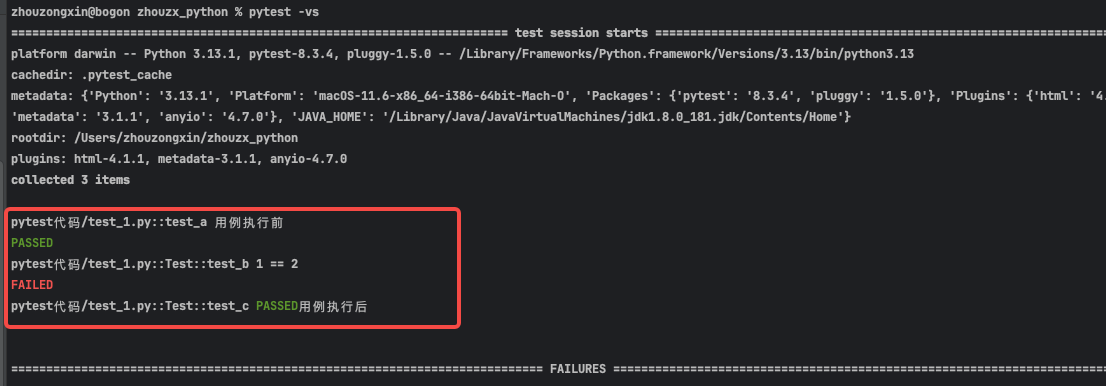
@pytest.mark.usefixtures(‘fix’)
我们除了用这个方法去使用fixtrue去进行调用,还可以用mark进行标记。如下:
import pytest@pytest.fixture()def fix(): print(\"用例执行前\") yield print(\"用例执行后\")@pytest.mark.usefixtures(\'fix\')def test_a(): # 函数 assert 1 == 1 # 这里会测试通过class Test(object): # 类 @pytest.mark.usefixtures(\'fix\') def test_b(self): # 方法 print(\"1 == 2\") assert 1 == 2 # 这里会测试失败 @pytest.mark.usefixtures(\'fix\') def test_c(self): # 方法 assert 2 == 2 # 这里会测试通过运行结果如下:
用mark标记去执行,我们仍然可以使用fixtrue功能。所以fixtrue并非是一成不变的。
@pytest.fixture(scope=“module”)
fixture的作用范围控制:如果我们在fixture()里面加上scope=\"module\",那么它将会在所有的用例前后,去执行fixtrue的内容,而不是3条用例执行3次。
import pytest@pytest.fixture(scope=\"module\") # 指定为模块,那么它会在所有用例的前面,和后面去执行。而不是一个用例执行一次def test_a(): # 函数 assert 1 == 1 # 这里会测试通过class Test(object): # 类 @pytest.mark.api def test_b(self): # 方法 assert 1 == 2 # 这里会测试失败 def test_c(self): # 方法 assert 2 == 2 # 这里会测试通过结果如下:

配置全局fixtrue之conftest.py文件
所以在正常的情况下。我们一般都是把fixtrue的功能放在conftest.py文件内,然后外面调用的时候用@pytest.fixture时候去使用。这里要记住一点,那就是conftest.py文件的名称是固定的,也就是内置的。只有设置成这个文件的名称才回去直接执行里面的内容。
示例如下:
- 创建一个
conftest.py文件,然后把fixture的代码添加到该文件内。

- 我们在测试用例里面删除
fixture配置,直接用pytest -vs去运行。
- 我们同样可以运行成功,并且
fixture也会被执行。结果如下。
看到这,fixtrue就介绍完了,如果还想深入了解可以参考官方文档。
pytest的相关框架封装demo
log日志封装demo
下面的log日志是完整的封装,想要使用直接进行调用即可
\"\"\"log格式封装\"\"\"import osimport loggingimport timeimport datetimeBASE_PATH = os.path.dirname(os.path.dirname(__file__))LOG_PATH = os.path.join(BASE_PATH, \'logs\')def del_log(folder_path): \"\"\" # 清除不是当天的文件 :param folder_path: 文件目录 :return: \"\"\" today = datetime.date.today() for file_name in os.listdir(folder_path): if file_name.endswith(\'.log\'): file_date_str = file_name.split(\'.\')[0] try: file_date = datetime.datetime.strptime(file_date_str, \'%Y%m%d\').date() if file_date != today: file_path = os.path.join(folder_path, file_name) os.remove(file_path) except ValueError: pass logger.info(f\"清理不是 {time.strftime(\'%Y%m%d\')} 时间的.log文件\")class Logger(object): def __init__(self): self.logName = os.path.join(LOG_PATH, f\"{time.strftime(\'%Y%m%d\')}.log\") # 创建记录器 self.logger = logging.getLogger(\"logs\") self.fileFormat = logging.Formatter(\"%(asctime)s-%(funcName)s [line:%(lineno)d]-> %(levelname)s: %(message)s\") # 创建控制台处理程序并设置调试级别 self.console = logging.StreamHandler() self.file = logging.FileHandler(self.logName, mode=\'a\', encoding=\"UTF-8\") # debug阈值是10,设置低于10的将忽略过滤掉 debug = logging.DEBUG self.logger.setLevel(debug) self.console.setLevel(debug) self.file.setLevel(debug) # 将格式化程序添加到控制台处理程序 self.console.setFormatter(self.fileFormat) self.file.setFormatter(self.fileFormat) # 添加到记录器 self.logger.addHandler(self.console) self.logger.addHandler(self.file)logger = Logger().loggerif __name__ == \'__main__\': logger.info(\"test start\") logger.debug(\"test stop\") # del_log(LOG_PATH)运行结果如下:
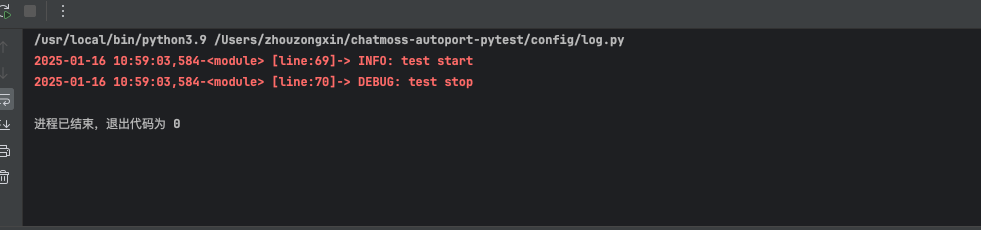
想要直接运行到pytest当中,那么直接用logger.info(\"test start\")里面添加要记录的日志。
数据库封装demo
下面是完整的封装数据库demo,但是需要注意自己替换connect里面的host和user等等
\"\"\"测试数据库连接,以及语法封装\"\"\"import pymysqlclass MysqlTest(object): \"\"\" 测试环境数据库 \"\"\" def __init__(self): pass # 数据库连接 def connect_mysql(self): try: connect = pymysql.connect(host=\'自己的\', user=\'自己的\', password=\'自己的\', database=\'bit\', port=自己的, charset=\'utf8\') except Exception as e: print(\"连接数据库失败:\", e) return connect # 查询数据库封装 def select(self, sql): con = self.connect_mysql() s_sql = sql # 建立操作游标管理员 cur = con.cursor() try: cur.execute(sql) print(\"查询sql语句:\", s_sql) select_sql = cur.fetchall() # print(select_sql) cur.close() con.close() return select_sql except Exception as e: print(\"查询sql语句执行失败\", e) print(\"查询sql语句执行失败,请检查语句是否正确:\", s_sql) con.close() cur.close() print(\"查询sql语句执行失败:关闭连接数据库、释放游标管理员\") def update(self, sql): con = self.connect_mysql() s_sql = sql # 建立操作游标管理员 cur = con.cursor() try: cur.execute(sql) print(\"更新sql语句:\", s_sql) con.commit() con.close() cur.close() print(\"sql执行成功:关闭连接数据库、释放游标管理员\") return except Exception as e: print(\"更新sql语句执行失败\", e) print(\"更新sql语句执行失败,请检查语句是否正确:\", s_sql) con.close() cur.close() print(\"更新sql语句执行失败:关闭连接数据库、释放游标管理员\") # 数据库删除封装 def delete(self, sql): d_sql = sql con = self.connect_mysql() cur = con.cursor() try: cur.execute(d_sql) con.commit() print(\"删除sql语句执行成功:\", d_sql) con.close() cur.close() print(\"sql执行成功:关闭连接数据库、释放游标管理员\") return except Exception as e: print(\"删除sql语句执行失败:\", e) print(\"删除sql语句执行失败:\", d_sql) # 发生错误时回滚 con.rollback() con.close() cur.close() print(\"删除sql语句执行失败:数据库已回滚、已关闭连接数据库、已释放游标管理员\")调用方式如下:
from db.connect_sql_test import *MysqlTest().select(\'select * from 表 ORDER BY id DESC LIMIT 1\')上面的调用方式自己替换sql语句,修改就调用修改的方法。
redis封装demo
import redisclass RedisTools(): def __init__(self, envs_type): self.envs = envs_type self.redis_dict = { \'测试环境\': \'替换环境\', } def test_redis_all(self): conn = redis.Redis(host=self.redis_dict[self.envs], port=6379, password=\'\') # 测试环境 return conn def set_data(self, key, value): redis_tools = self.test_redis_all() content = redis_tools.set(key, value) return content def get_data(self, key): redis_tools = self.test_redis_all() content = redis_tools.get(key) return content def set_hash_data(self, name, key, value): redis_tools = self.test_redis_all() content = redis_tools.hset(name, key, value) return content def get_hash_data(self, name, key): redis_tools = self.test_redis_all() content = redis_tools.hget(name, key) return content def del_data(self, key): redis_tools = self.test_redis_all() content = redis_tools.delete(key) return content def hdel_data(self, name, key): redis_tools = self.test_redis_all() content = redis_tools.hdel(name, key) return content def hmset_add(self, key_name, value): r = self.test_redis_all() data = r.hmset(key_name, mapping=value) return data def hincrby_add(self, key, value1, value2): r = self.test_redis_all() data = r.hincrby(key, value1, value2) return data def get_hash_keys(self, name): r = self.test_redis_all() data = r.hkeys(name) return data # 添加redis def z_add(self, key, value): r = self.test_redis_all() data = r.zadd(key, mapping=value) # result.z_add(\'userShareQueue\', {0: 889429895_1000286_101_0}) return data # 设置redis过期时间 def expire(self, name, time): r = self.test_redis_all() data = r.expire(name, time) return dataif __name__ == \"__main__\": redi = RedisTools(\"测试环境\")生成测试报告
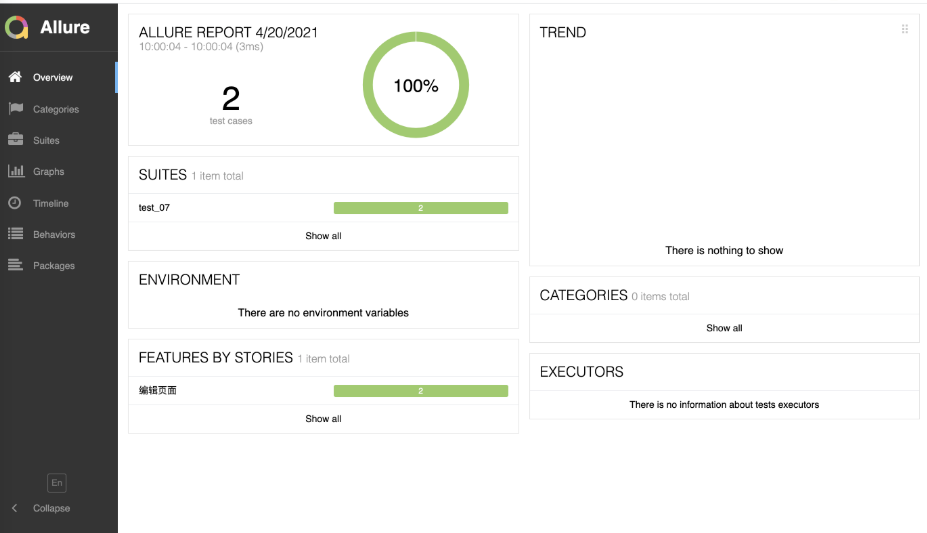
allure生成测试报告
- 官方地址:allure官方下载地址
pip install allure-pytest验证是否安装成功:allure – version
- pytest.ini文件中添加下面的命令
addopts = --alluredir=./temps --clean-alluredir- 生成测试报告
然后我们直接创建一个run.py,里面添加下列代码:
import osimport pytestpytest.main() # 执行pytest测试os.system(\'allure generate -o report temps\') # 生成Allure测试报告运行后即可展示allure的测试报告。
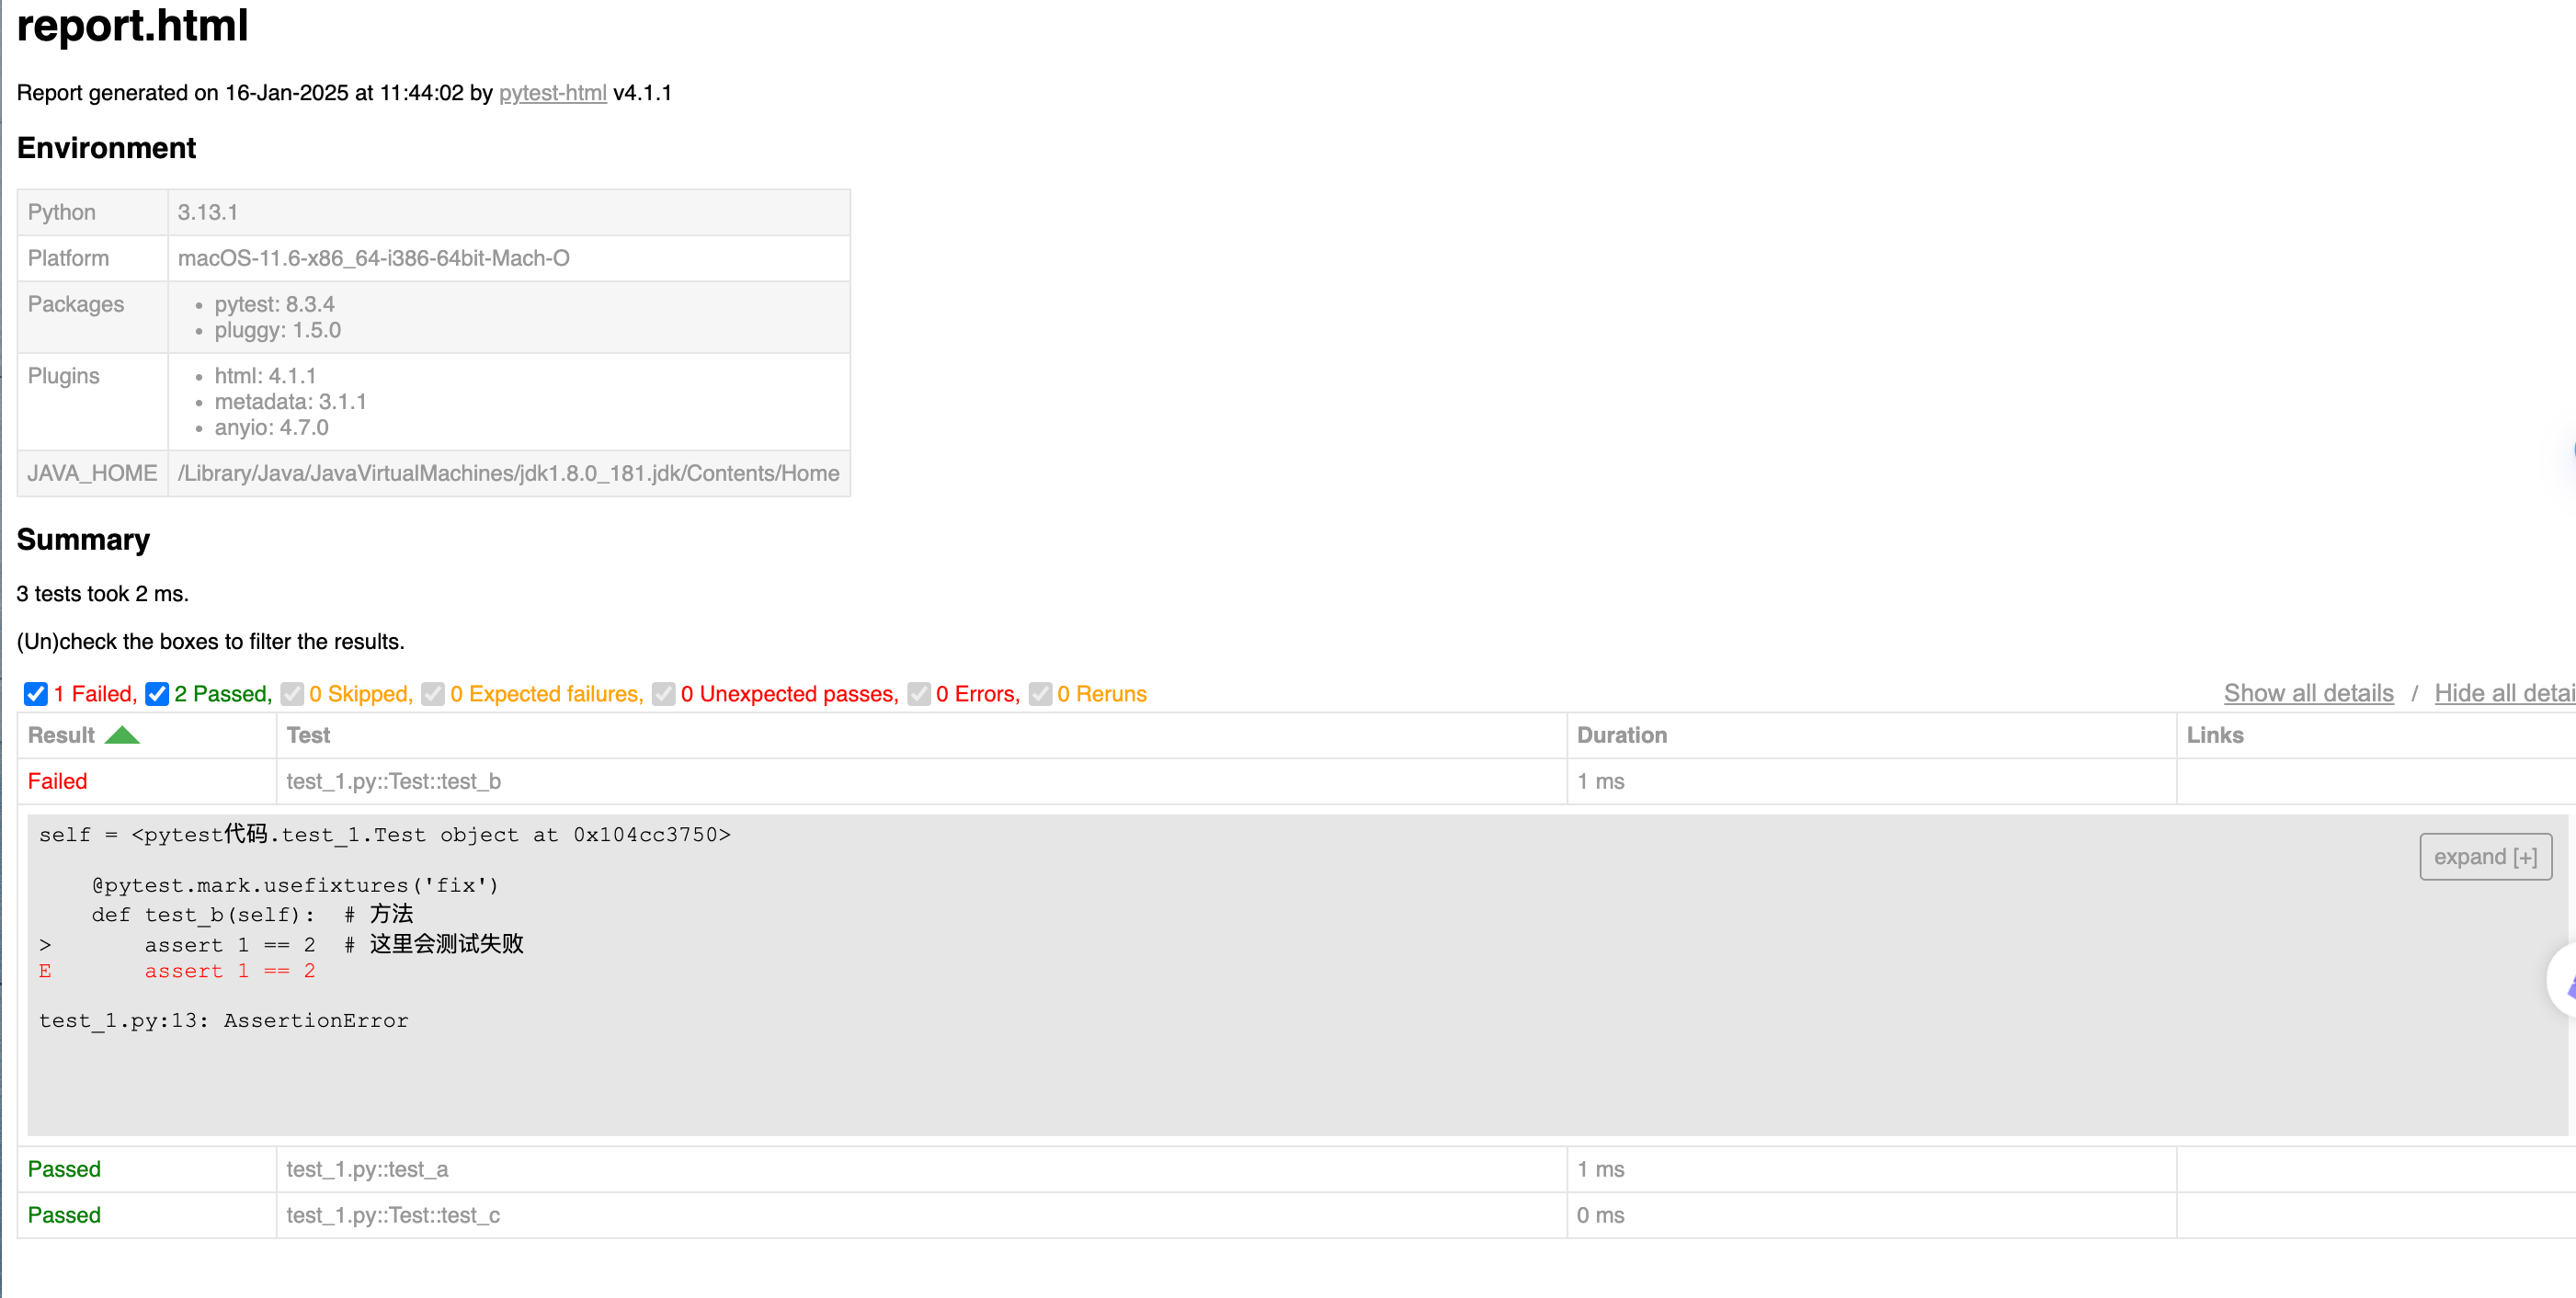
内置测试报告html
直接在终端输入下面的命令:
pytest test_1.py --html=report.html然后会生成一个report.html文件,我们选择在浏览器打开,那么他讲展示如报告。
pytest和unittest的区别
unittest
- python内置的,无需要自己安装。
- unittest最开始是pyunit,参考的是junit有一定的java风格,最后改成了unittest。
- unittest没有插件机制,在功能和使用方面是有限的。
unittest需要使用unittest.TestCase来实现参数化。代码示例如下:
import unittestclass TestMath(unittest.TestCase): def test_add(self): test_cases = [ (1, 2, 3), (-1, 1, 0), (0, 0, 0), ] for a, b, expected in test_cases: with self.subTest(a=a, b=b): self.assertEqual(add(a, b), expected)if __name__ == \'__main__\': unittest.main()pytest
- 第三方库,手动安装自由选择版本。
- pytest是python团队开发的,是专属于python风格的。
- 有丰富的第三方插件,可以按需扩展。
pytest支持参数化测试,使用@pytest.mark.parametrize装饰器。示例如下:
import pytest@pytest.mark.parametrize(\"a, b, expected\", [ (1, 2, 3), (-1, 1, 0), (0, 0, 0),])def test_add(a, b, expected): assert add(a, b) == expected
