Rust 单元测试详细教程
Rust 单元测试详细教程
- 一、Rust 单元测试详细教程
-
- 1、基本概念
- 2、核心组件
- 3、 高级技巧
- 4、测试运行控制
- 5、最佳实践
- 6、添加自定义消息
-
- 1、 `assert!` 宏添加消息
- 2、`assert_eq!` 宏添加消息
- 3、使用 `format!` 构建复杂消息
- 4、最佳实践
- 5、错误消息原理
- 7、常见问题解决
- 二、代码示例
-
- 1、正常通过
- 2、异常代码
一、Rust 单元测试详细教程
1、基本概念
在 Rust 中,单元测试直接写在源代码文件中,通常位于 #[cfg(test)] 标记的模块内。测试函数需用 #[test] 属性标记。
// 被测试函数pub fn add(a: i32, b: i32) -> i32 { a + b}// 测试模块#[cfg(test)]mod tests { use super::*; // 引入外部函数 #[test] fn test_add() { assert_eq!(add(2, 3), 5); // 断言测试 }}2、核心组件
(1) 断言宏
assert!(expr):表达式为真则通过assert_eq!(left, right):验证相等assert_ne!(left, right):验证不等#[should_panic]:测试预期 panic
#[test]#[should_panic(expected = \"除数不能为零\")]fn test_divide_by_zero() { divide(10, 0); // 预期触发 panic}(2) 测试模块组织
#[cfg(test)]mod tests { // 测试私有函数 #[test] fn test_private() { assert_eq!(internal_logic(), 42); } // 子测试模块 mod edge_cases { #[test] fn test_negative() { assert_eq!(add(-1, -1), -2); } }}3、 高级技巧
(1) 测试初始化
#[cfg(test)]mod tests { // 共享初始化代码 fn setup() -> String { String::from(\"test_data\") } #[test] fn test_data_processing() { let data = setup(); assert!(!data.is_empty()); }}(2) 忽略测试
#[test]#[ignore = \"性能测试暂不运行\"]fn heavy_computation_test() { // 耗时操作}(3) 条件编译
#[test]#[cfg(feature = \"network\")]fn network_api_test() { // 仅当启用 network 特性时编译}4、测试运行控制
(1) 运行特定测试
cargo test test_add # 运行单个测试cargo test add # 运行名称包含\"add\"的测试(2) 并行控制
cargo test -- --test-threads=1 # 单线程运行(3) 显示输出
cargo test -- --nocapture # 显示 println! 输出5、最佳实践
-
测试覆盖率:使用
tarpaulin工具cargo tarpaulin --ignore-tests -
测试私有函数:直接测试模块内部实现
-
BDD 风格:使用
speculoos库use speculoos::*;#[test]fn test_list() { let list = vec![1, 2, 3]; assert_that(&list).has_length(3);} -
Mock 对象:使用
mockall库#[automock]trait DataSource { fn fetch(&self) -> u32;}#[test]fn test_mock() { let mut mock = MockDataSource::new(); mock.expect_fetch().returning(|| 42); assert_eq!(mock.fetch(), 42);}
6、添加自定义消息
在 Rust 测试中添加自定义消息可通过断言宏的额外参数实现,以下是具体方法和示例:
1、 assert! 宏添加消息
#[test]fn test_basic() { let result = 2 + 2; assert!(result == 4, \"加法计算错误,得到 {} 但期望 4\", result);}当断言失败时输出:
thread \'test_basic\' panicked at \'加法计算错误,得到 5 但期望 4\'2、assert_eq! 宏添加消息
#[test]fn test_equality() { let actual = \"hello\".to_string(); let expected = \"world\"; assert_eq!(actual, expected, \"字符串不匹配: 实际=\'{}\', 期望=\'{}\'\", actual, expected);}失败时输出:
thread \'test_equality\' panicked at \'字符串不匹配: 实际=\'hello\', 期望=\'world\'\'3、使用 format! 构建复杂消息
#[test]fn test_complex() { let vec = vec![1, 2, 3]; assert!( vec.len() > 5, \"向量长度不足: 长度={}, 内容={:?}\", vec.len(), vec );}4、最佳实践
- 清晰说明:明确说明期望值和实际值
assert!(user.is_admin(), \"用户 {} 无管理员权限\", user.id) - 包含关键数据:在消息中输出相关变量值
- 避免敏感信息:不要在消息中包含密码等敏感数据
- 使用格式规范:
assert_eq!(result, 3.14159, \"精度不足: {:.5} vs {:.5}\", result, 3.14159)
5、错误消息原理
Rust 的断言宏本质上是:
macro_rules! assert { ($cond:expr, $($msg:tt)*) => { if !$cond { panic!($($msg)*) } }}自定义消息通过 panic! 宏的格式化能力实现,支持所有标准格式语法。
7、常见问题解决
- 测试未编译:检查
#[cfg(test)]是否遗漏 - 无法访问私有项:使用
use super::*;引入父模块 - I/O 测试失败:使用
tempfile库处理临时文件 - 异步测试:使用
#[tokio::test]属性
二、代码示例
1、正常通过
测试源码:
pub struct Counter { value: i32,}impl Counter { pub fn new() -> Self { Counter { value: 0 } } pub fn increment(&mut self) { self.value += 1; } pub fn get(&self) -> i32 { self.value } pub fn add(&mut self, n: i32) { self.value += n; }}#[cfg(test)]mod tests { use super::*; #[test] fn test_counter_initial() { let c = Counter::new(); assert_eq!(c.get(), 0); } #[test] fn test_counter_increment() { let mut c = Counter::new(); c.increment(); assert_eq!(c.get(), 1); } #[test] fn test_counter_add() { let mut c = Counter::new(); c.add(5); assert_eq!(c.get(), 5,\"test add failed! please check your code\"); } #[test] #[should_panic] fn test_overflow() { let mut c = Counter::new(); for _ in 0..(i32::MAX as u32 + 1) { c.increment(); // } }}测试结果:
PS G:\\Learning\\Rust\\unitTest> cargo test Compiling unitTest v0.1.0 (G:\\Learning\\Rust\\unitTest) Finished `test` profile [unoptimized + debuginfo] target(s) in 0.31s Running unittests src\\main.rs (target\\debug\\deps\\unitTest-cb66f5a5bbe86c70.exe)running 4 teststest tests::test_counter_add ... oktest tests::test_counter_increment ... oktest tests::test_counter_initial ... oktest tests::test_overflow - should panic ... oktest result: ok. 4 passed; 0 failed; 0 ignored; 0 measured; 0 filtered out; finished in 7.99sPS G:\\Learning\\Rust\\unitTest> 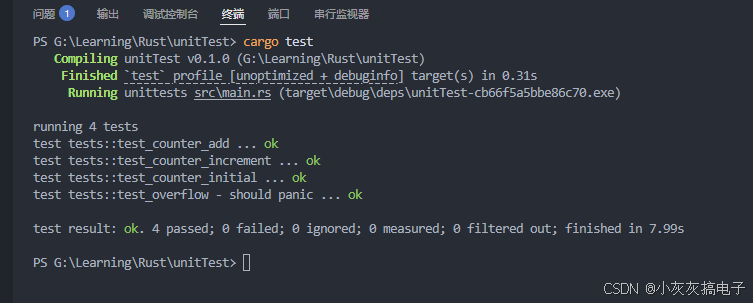
2、异常代码
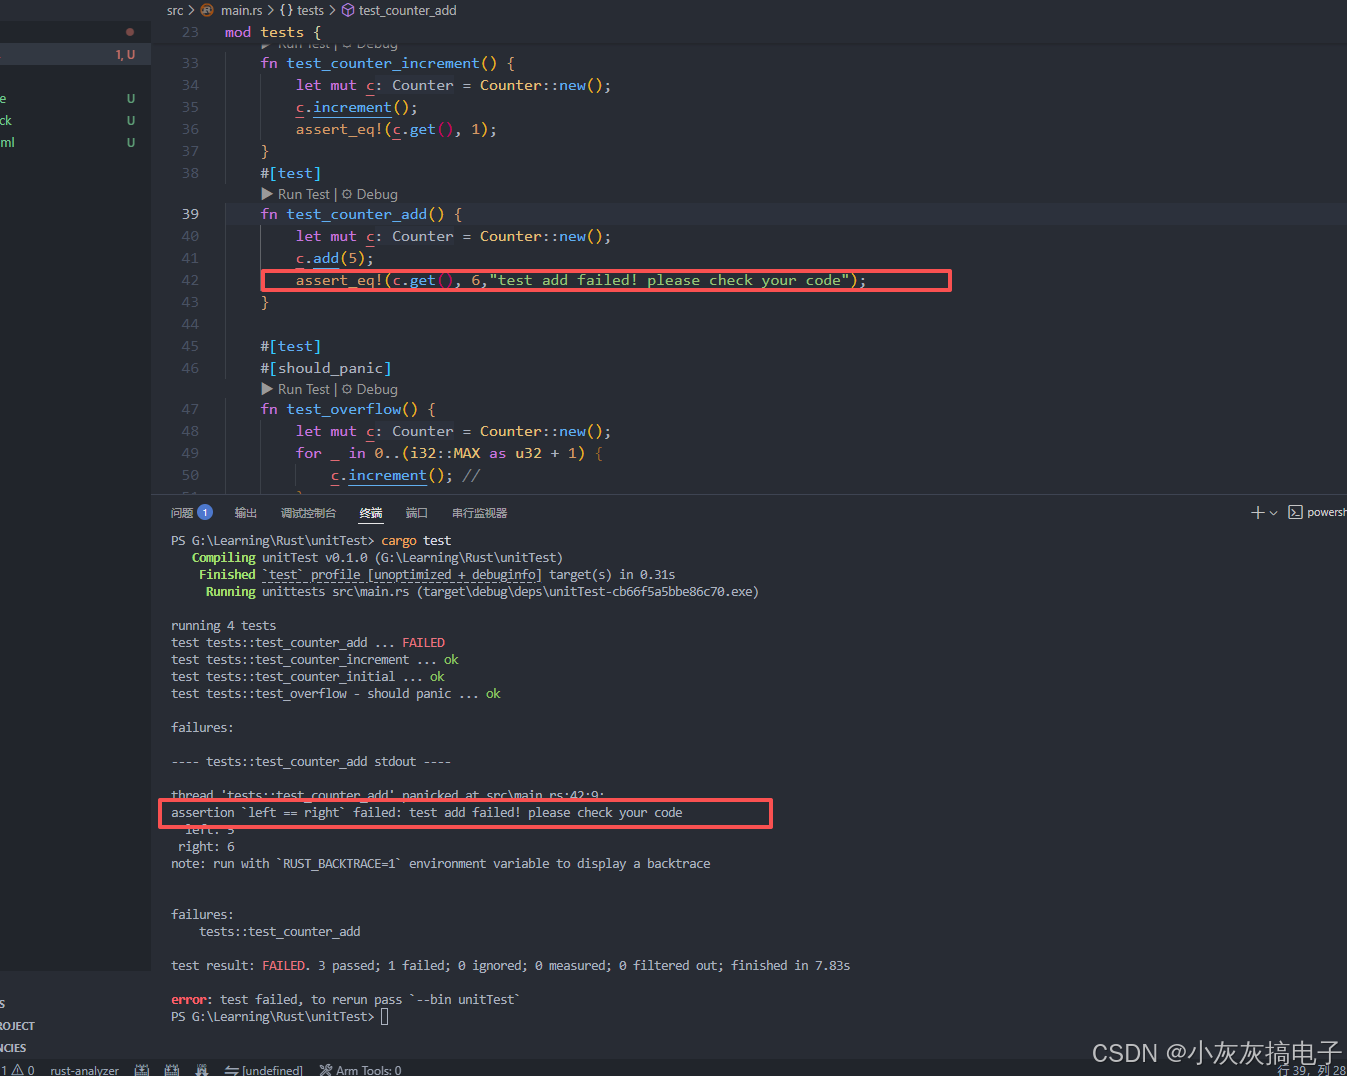
测试代码:
pub struct Counter { value: i32,}impl Counter { pub fn new() -> Self { Counter { value: 0 } } pub fn increment(&mut self) { self.value += 1; } pub fn get(&self) -> i32 { self.value } pub fn add(&mut self, n: i32) { self.value += n; }}#[cfg(test)]mod tests { use super::*; #[test] fn test_counter_initial() { let c = Counter::new(); assert_eq!(c.get(), 0); } #[test] fn test_counter_increment() { let mut c = Counter::new(); c.increment(); assert_eq!(c.get(), 1); } #[test] fn test_counter_add() { let mut c = Counter::new(); c.add(5); assert_eq!(c.get(), 6,\"test add failed! please check your code\"); } #[test] #[should_panic] fn test_overflow() { let mut c = Counter::new(); for _ in 0..(i32::MAX as u32 + 1) { c.increment(); // } }}测试结果:
PS G:\\Learning\\Rust\\unitTest> cargo test Compiling unitTest v0.1.0 (G:\\Learning\\Rust\\unitTest) Finished `test` profile [unoptimized + debuginfo] target(s) in 0.31s Running unittests src\\main.rs (target\\debug\\deps\\unitTest-cb66f5a5bbe86c70.exe)running 4 teststest tests::test_counter_add ... FAILEDtest tests::test_counter_increment ... oktest tests::test_counter_initial ... oktest tests::test_overflow - should panic ... okfailures:---- tests::test_counter_add stdout ----thread \'tests::test_counter_add\' panicked at src\\main.rs:42:9:assertion `left == right` failed: test add failed! please check your code left: 5 right: 6note: run with `RUST_BACKTRACE=1` environment variable to display a backtracefailures: tests::test_counter_addtest result: FAILED. 3 passed; 1 failed; 0 ignored; 0 measured; 0 filtered out; finished in 7.83serror: test failed, to rerun pass `--bin unitTest`PS G:\\Learning\\Rust\\unitTest>