Docker4-容器化企业级应用
容器化企业级应用
1、容器化部署企业级应用
1.1:使用docker容器化部署企业级应用必要性
- 有利于快速实现企业级应用部署
- 有利于快速实现企业级应用恢复
1.2:使用docker容器化部署企业级应用
 hub.docker.com 地址查看
2、容器实现nginx部署
2.1、运行nginx应用容器-1 不暴露端口
不在docker host 暴露端口
[root@centen7-10-hehe ~ 09:50:59]$ docker run -d --name nginx_test -v /some/content:/usr/share/nginx/html:ro nginx:latest 5d0520f4775a6a2906cc2ac289f8dffcc450ae4fde6892a0ac97cf0635a86d4a[root@centen7-10-hehe ~ 10:38:28]$ docker ps -aCONTAINER ID IMAGE COMMAND CREATED STATUS PORTS NAMES5d0520f4775a nginx:latest \"/docker-entrypoint.…\" 9 seconds ago Up 8 seconds 80/tcp nginx_test2b79aeaa77bc centos:7 \"bash\" 19 hours ago Up 50 minutes lucid_moserfcd3051c7222 nginx \"/docker-entrypoint.…\" 20 hours ago Exited (255) 2 hours ago 80/tcp clever_swirles[root@centen7-10-hehe ~ 10:38:36]$ docker inspect 5d0520f477 |grep IPAddress \"SecondaryIPAddresses\": null, \"IPAddress\": \"172.17.0.3\", \"IPAddress\": \"172.17.0.3\",[root@centen7-10-hehe ~ 10:39:22]$ curl 172.17.0.3403 Forbidden 403 Forbidden
nginx/1.29.0[root@centen7-10-hehe ~ 10:39:53]$ echo \"nginx in docker is start\" > /some/content/index.html查看容器内是否共享此文件[root@centen7-10-hehe ~ 10:44:14]$ docker exec -it nginx_test ls /usr/share/nginx/htmlindex.html[root@centen7-10-hehe ~ 10:41:01]$ curl 172.17.0.3nginx in docker is start2.2、运行nginx应用容器-2 端口暴露
在docker host暴露80端口
[root@centen7-10-hehe ~ 10:46:42]$ docker run -d --name 01nginx -p 80:80 -v /some/content-port:/usr/share/nginx/html:ro nginx:latest 177efb0eda8bc87340510d04cf997931856b8a1c175350650ea7ca6d24064a61[root@centen7-10-hehe ~ 10:48:59]$ docker ps -aCONTAINER ID IMAGE COMMAND CREATED STATUS PORTS NAMES177efb0eda8b nginx:latest \"/docker-entrypoint.…\" 11 seconds ago Up 11 seconds 0.0.0.0:80->80/tcp, :::80->80/tcp 01nginx5d0520f4775a nginx:latest \"/docker-entrypoint.…\" 10 minutes ago Up 10 minutes 80/tcp nginx_test内部访问[root@centen7-10-hehe ~ 10:51:06]$ docker inspect 177efb0eda8b |grep IPAddress \"SecondaryIPAddresses\": null, \"IPAddress\": \"172.17.0.2\", \"IPAddress\": \"172.17.0.2\",[root@centen7-10-hehe ~ 10:51:47]$ curl 172.17.0.2403 Forbidden 403 Forbidden
nginx/1.29.0[root@centen7-10-hehe ~ 10:53:04]$ echo \"test nginx port\" > /some/content-port/index.html[root@centen7-10-hehe ~ 10:53:33]$ docker exec -it 01nginx ls /usr/share/nginx/htmlindex.html[root@centen7-10-hehe ~ 10:54:32]$ curl 172.17.0.2test nginx port暴露80端口 可以在任意可以连接的地址上通过80端口访问 如下通过浏览器访问宿主机地址 端口80 即可跳转容器内部 测试端口暴露 外部连接  端口查看
端口查看
[root@centen7-10-hehe ~ 10:54:59]$ ss -anput |grep \':80\'tcp LISTEN 0 128 *:80 *:* users:((\"docker-proxy\",pid=4190,fd=4))tcp LISTEN 0 128 :::80 :::* users:((\"docker-proxy\",pid=4196,fd=4))2.3、运行nginx应用容器-3
挂载配置文件,需要创建1个nginx容器, 把配置文件复制出来修改后使用 查看容器运行的进程,work进程根据CPU的核心数量一致
查看进程[root@centen7-10-hehe ~ 11:33:15]$ docker top 01nginxUID PID PPID C STIME TTY TIME CMDroot 4230 4209 0 10:48 ? 00:00:00 nginx: master process nginx -g daemon off;101 4273 4230 0 10:48 ? 00:00:00 nginx: worker process101 4274 4230 0 10:48 ? 00:00:00 nginx: worker process创建nginx配置文件修改目录
[root@centen7-10-hehe ~ 11:34:22]$ docker cp 01nginx:/etc/nginx/nginx.conf /opt/nginx_conf/Successfully copied 0B to /opt/nginx_conf/no such directory不存在目录 重新创建目录后cp[root@centen7-10-hehe ~ 11:35:45]$ mkdir -p /opt/nginx_conf/[root@centen7-10-hehe ~ 11:36:05]$ docker cp 01nginx:/etc/nginx/nginx.conf /opt/nginx_conf/Successfully copied 2.56kB to /opt/nginx_conf/验证[root@centen7-10-hehe ~ 11:36:07]$ cd /opt/nginx_conf/[root@centen7-10-hehe nginx_conf 11:38:31]$ ll总用量 4-rw-r--r-- 1 root root 644 6月 25 01:34 nginx.conf修改配置文件,把进程数的auto,修改为4
[root@centen7-10-hehe nginx_conf 11:38:33]$ vim nginx.conf 修改worker_processes 4;重新启动容器[root@centen7-10-hehe nginx_conf 11:40:10]$ docker run -d \\> -p 82:80 --name nginx_conf \\> -v /opt/nginx_index/:/usr/share/nginx/html:ro \\> -v /opt/nginx_conf/nginx.conf:/etc/nginx/nginx.conf:ro \\> nginx269512c417688efb297132623f85a08180892d288efc4d79a8e58bb4eba58bb0查看work进程是否变成4个[root@centen7-10-hehe nginx_conf 11:44:05]$ docker ps -aCONTAINER ID IMAGE COMMAND CREATED STATUS PORTS NAMES269512c41768 nginx \"/docker-entrypoint.…\" 44 seconds ago Up 44 seconds 0.0.0.0:82->80/tcp, :::82->80/tcp nginx_conf177efb0eda8b nginx:latest \"/docker-entrypoint.…\" 55 minutes ago Up 55 minutes 0.0.0.0:80->80/tcp, :::80->80/tcp 01nginx5d0520f4775a nginx:latest \"/docker-entrypoint.…\" About an hour ago Up About an hour 80/tcp nginx_test[root@centen7-10-hehe nginx_conf 11:44:49]$ docker top nginx_conf UID PID PPID C STIME TTY TIME CMDroot 5345 5324 0 11:44 ? 00:00:00 nginx: master process nginx -g daemon off;101 5390 5345 0 11:44 ? 00:00:00 nginx: worker process101 5391 5345 0 11:44 ? 00:00:00 nginx: worker process101 5392 5345 0 11:44 ? 00:00:00 nginx: worker process101 5393 5345 0 11:44 ? 00:00:00 nginx: worker process读取容器中的配置文件
[root@centen7-10-hehe nginx_conf 11:46:42]$ docker exec -it nginx_conf cat /etc/nginx/nginx.confuser nginx;worker_processes 4;error_log /var/log/nginx/error.log notice;pid /run/nginx.pid;events { worker_connections 1024;}http { include /etc/nginx/mime.types; default_type application/octet-stream; log_format main \'$remote_addr - $remote_user [$time_local] \"$request\" \'\'$status $body_bytes_sent \"$http_referer\" \'\'\"$http_user_agent\" \"$http_x_forwarded_for\"\'; access_log /var/log/nginx/access.log main; sendfile on; #tcp_nopush on; keepalive_timeout 65; #gzip on; include /etc/nginx/conf.d/*.conf;}3、容器实现tomcat部署
3.1 不暴露端口运行
下载tomcat镜像
[root@centen7-10-hehe nginx_conf 13:36:51]$ docker pull tomcatUsing default tag: latestlatest: Pulling from library/tomcat32f112e3802c: Pull complete ea8f5ca39c1a: Pull complete a4f9b8cc7730: Pull complete 4e45d9955da7: Pull complete 59425f3d7529: Pull complete 66c77c59c8e6: Pull complete 4f4fb700ef54: Pull complete ccaa96572930: Pull complete Digest: sha256:52a7c268ce41e6717ca94a57f1afdf35cd04f6dc515e769d7b0a5424a0e1315aStatus: Downloaded newer image for tomcat:latestdocker.io/library/tomcat:latest[root@centen7-10-hehe nginx_conf 13:43:04]$ docker imagesREPOSITORY TAG IMAGE ID CREATED SIZEcentos test e06036673477 22 hours ago 204MBnginx latest 22bd15417453 8 days ago 192MBtomcat latest 9ca267cc83c7 2 weeks ago 468MBmysql 5.7 5107333e08a8 19 months ago 501MBelasticsearch 7.17.0 6fe993d6e7ed 3 years ago 612MBcentos 7 eeb6ee3f44bd 3 years ago 204MB运行容器 --rm 运行结束后删除[root@centen7-10-hehe ~ 13:58:03]$ docker run -d --rm tomcat:latest 9d8041a25a0732c8ad200fcb1312a2471dcc789cdd618607fae6e0a5462e6340查看容器[root@centen7-10-hehe ~ 14:02:04]$ docker ps -aCONTAINER ID IMAGE COMMAND CREATED STATUS PORTS NAMES9d8041a25a07 tomcat:latest \"catalina.sh run\" 13 seconds ago Up 12 seconds 8080/tcp eager_poincare查看IP[root@centen7-10-hehe ~ 14:04:20]$ docker inspect 9d8041 |grep IPAddress \"SecondaryIPAddresses\": null, \"IPAddress\": \"172.17.0.5\", \"IPAddress\": \"172.17.0.5\",验证地址访问 查看服务,运行的是Tomcat11.0版本[root@centen7-10-hehe ~ 14:04:35]$ curl 172.17.0.5:8080HTTP Status 404 – Not Found body {font-family:Tahoma,Arial,sans-serif;} h1, h2, h3, b {color:white;background-color:#525D76;} h1 {font-size:22px;} h2 {font-size:16px;} h3 {font-size:14px;} p {font-size:12px;} a {color:black;} .line {height:1px;background-color:#525D76;border:none;}HTTP Status 404 – Not Found
Type Status Report
Description The origin server did not find a current representation for the target resource or is not willing to disclose that one exists.
Apache Tomcat/11.0.9
3.2 暴露端口运行
[root@centen7-10-hehe ~ 14:06:53]$ docker run -d -p 8081:8080 tomcat:latest 8965e0c13fced48f283144114ce2894f65b59e281013fe719e5401b8e12394e6[root@centen7-10-hehe ~ 14:07:12]$ docker ps CONTAINER ID IMAGE COMMAND CREATED STATUS PORTS NAMES8965e0c13fce tomcat:latest \"catalina.sh run\" 6 seconds ago Up 6 seconds 0.0.0.0:8081->8080/tcp, :::8081->8080/tcp beautiful_sammet9d8041a25a07 tomcat:latest \"catalina.sh run\" 5 minutes ago Up 5 minutes 8080/tcp eager_poincare 在宿主机访问  站点内容为空
[root@centen7-10-hehe ~ 14:07:18]$ docker exec 8965 ls /usr/local/tomcat/webapps[root@centen7-10-hehe ~ 14:10:10]$ 3.3 暴露端口及添加网站文件
关闭上面容器后重新生成[root@centen7-10-hehe ~ 14:18:41]$ docker run -d -p 8082:8080 -v /opt/tomcat-server:/usr/local/tomcat/webapps/ROOT tomcat:latest665ba502ff3676e08977754a82f22223ec3dc75f5cb00e7b2f733c64a063ff82写入访问路径文件[root@centen7-10-hehe ~ 14:12:14]$ echo \"tomcat running\" > /opt/tomcat-server/index.html验证容器文件[root@centen7-10-hehe ~ 14:21:05]$ docker exec 665ba502f ls /usr/local/tomcat/webapps/ROOT/index.html 外部访问测试 
4、容器实现mysql部署
4.1 单节点部署
启动数据库容器[root@centen7-10-hehe ~ 14:24:16]$ docker run -p 3306:3306 \\> --name mysql_01 \\> -v /opt/mysql/log:/var/log/mysql \\> -v /opt/mysql/data:/var/lib/mysql \\> -v /opt/mysql/conf:/etc/mysql/conf.d \\> -e MYSQL_ROOT_PASSWORD=root \\> -d \\> mysql:5.79878211291c3446e2ce69fffa00f8001f4f90ac7ff412f7993f9f91bc57a5b35[root@centen7-10-hehe ~ 14:26:05]$ docker ps CONTAINER ID IMAGE COMMAND CREATED STATUS PORTS NAMES9878211291c3 mysql:5.7 \"docker-entrypoint.s…\" 13 seconds ago Up 11 seconds 0.0.0.0:3306->3306/tcp, :::3306->3306/tcp, 33060/tcp mysql_01665ba502ff36 tomcat:latest \"catalina.sh run\" 6 minutes ago Up 6 minutes 0.0.0.0:8082->8080/tcp, :::8082->8080/tcp dazzling_curie通过容器中客户端直接访问[root@centen7-10-hehe ~ 14:26:17]$ docker exec -it mysql_01 mysql -uroot -prootmysql: [Warning] Using a password on the command line interface can be insecure.Welcome to the MySQL monitor. Commands end with ; or \\g.Your MySQL connection id is 2Server version: 5.7.44 MySQL Community Server (GPL)Copyright (c) 2000, 2023, Oracle and/or its affiliates.Oracle is a registered trademark of Oracle Corporation and/or itsaffiliates. Other names may be trademarks of their respectiveowners.Type \'help;\' or \'\\h\' for help. Type \'\\c\' to clear the current input statement.mysql> show databases;+--------------------+| Database |+--------------------+| information_schema || mysql || performance_schema || sys |+--------------------+4 rows in set (0.01 sec)在宿主机上访问
新开窗口 下载mariadb[root@centen7-10-hehe ~ 14:27:47]$ yum install -y mariadb然后通过3306端口访问跳转到容器mysql[root@centen7-10-hehe ~ 14:28:25]$ mysql -h 10.1.8.10 -uroot -proot -P 3306Welcome to the MariaDB monitor. Commands end with ; or \\g.Your MySQL connection id is 3Server version: 5.7.44 MySQL Community Server (GPL)Copyright (c) 2000, 2018, Oracle, MariaDB Corporation Ab and others.Type \'help;\' or \'\\h\' for help. Type \'\\c\' to clear the current input statement.MySQL [(none)]> show databases;+--------------------+| Database |+--------------------+| information_schema || mysql || performance_schema || sys |+--------------------+4 rows in set (0.00 sec)MySQL [(none)]> 验证连接
验证是否是同一连接[root@centen7-10-hehe ~ 14:26:17]$ docker exec -it mysql_01 mysql -uroot -proot......容器连接创建dbmysql> create database testdb;Query OK, 1 row affected (0.00 sec)宿主机连接验证是否有创建testdb[root@centen7-10-hehe ~ 14:28:25]$ mysql -h 10.1.8.10 -uroot -proot -P 3306......MySQL [(none)]> show databases;\\+--------------------+| Database |+--------------------+| information_schema || mysql || performance_schema || sys || testdb |+--------------------+5 rows in set (0.00 sec)可以直接查看到有刚刚添加的school数据库。
4.2 主从复制集群部署
4.2.1主节点部署
清理容器[root@centen7-10-hehe ~ 14:52:29]$ docker ps -aCONTAINER ID IMAGE COMMAND CREATED STATUS PORTS NAMES9878211291c3 mysql:5.7 \"docker-entrypoint.s…\" 43 minutes ago Up 43 minutes 0.0.0.0:3306->3306/tcp, :::3306->3306/tcp, 33060/tcp mysql_01665ba502ff36 tomcat:latest \"catalina.sh run\" 50 minutes ago Up 50 minutes 0.0.0.0:8082->8080/tcp, :::8082->8080/tcp dazzling_curie[root@centen7-10-hehe ~ 15:09:41]$ docker stop 665ba502ff36 9878211291c3665ba502ff369878211291c3[root@centen7-10-hehe ~ 15:09:57]$ docker rm 9878211291c3 665ba502ff369878211291c3665ba502ff36[root@centen7-10-hehe ~ 15:10:09]$ docker ps -aCONTAINER ID IMAGE COMMAND CREATED STATUS PORTS NAMES创建容器docker run -p 3306:3306 \\--name mysql_master \\-v /opt/mysql_master/log:/var/log/mysql \\-v /opt/mysql_master/data:/var/lib/mysql \\-v /opt/mysql_master/conf:/etc/mysql/conf.d \\-e MYSQL_ROOT_PASSWORD=root \\-d \\mysql:5.7验证[root@centen7-10-hehe ~ 15:16:53]$ docker ps -aCONTAINER ID IMAGE COMMAND CREATED STATUS PORTS NAMES8eb73148954c mysql:5.7 \"docker-entrypoint.s…\" 53 seconds ago Up 52 seconds 0.0.0.0:3306->3306/tcp, :::3306->3306/tcp, 33060/tcp mysql_master验证登录[root@centen7-10-hehe ~ 15:16:54]$ mysql -h 10.1.8.10 -uroot -proot -P 3306Welcome to the MariaDB monitor. Commands end with ; or \\g.Your MySQL connection id is 2Server version: 5.7.44 MySQL Community Server (GPL)Copyright (c) 2000, 2018, Oracle, MariaDB Corporation Ab and others.Type \'help;\' or \'\\h\' for help. Type \'\\c\' to clear the current input statement.MySQL [(none)]> 主节点配置
[root@centen7-10-hehe ~ 15:18:16]$ vim /opt/mysql_master/conf/my.cnf[client]default-character-set=utf8[mysql]default-character-set=utf8[mysqld]init_connect=\'SET collation_connection = utf8_unicode_ci\'init_connect=\'SET NAMES utf8\'character-set-server=utf8collation-server=utf8_unicode_ciskip-character-set-client-handshakeskip-name-resolveserver_id=1log-bin=mysql-binread-only=0binlog-do-db=schoolreplicate-ignore-db=mysqlreplicate-ignore-db=sysreplicate-ignore-db=information_schemareplicate-ignore-db=performance_schema从节点部署
link用法 主机名:别名
[root@centen7-10-hehe ~ 15:18:42]$ docker run -d -p 3307:3306 \\> --name mysql_slave \\> -v /opt/mysql_slave/log:/var/log/mysql \\> -v /opt/mysql_slave/data:/var/lib/mysql \\> -v /opt/mysql_slave/conf:/etc/mysql/conf.d \\> -e MYSQL_ROOT_PASSWORD=root \\> --link mysql_master:mysql_master \\> mysql:5.742d0c962f24bf49d780edbc81ecf91abeb1b4a506ac19ec4a3001992b152187e[root@centen7-10-hehe ~ 15:23:28]$ docker ps -aCONTAINER ID IMAGE COMMAND CREATED STATUS PORTS NAMES42d0c962f24b mysql:5.7 \"docker-entrypoint.s…\" 6 seconds ago Up 5 seconds 33060/tcp, 0.0.0.0:3307->3306/tcp, :::3307->3306/tcp mysql_slave8eb73148954c mysql:5.7 \"docker-entrypoint.s…\" 7 minutes ago Up 7 minutes 0.0.0.0:3306->3306/tcp, :::3306->3306/tcp, 33060/tcp mysql_master从节点配置
[root@centen7-10-hehe ~ 15:24:56]$ vim /opt/mysql_slave/conf/my.cnf[client]default-character-set=utf8[mysql]default-character-set=utf8[mysqld]init_connect=\'SET collation_connection = utf8_unicode_ci\'init_connect=\'SET NAMES utf8\'character-set-server=utf8collation-server=utf8_unicode_ciskip-character-set-client-handshakeskip-name-resolveserver_id=2log-bin=mysql-binread-only=1binlog-do-db=schoolreplicate-ignore-db=mysqlreplicate-ignore-db=sysreplicate-ignore-db=information_schemareplicate-ignore-db=performance_schemamaster节点配置
主节点登录[root@centen7-10-hehe ~ 15:28:19]$ mysql -h 10.1.8.10 -uroot -proot -P 3306Welcome to the MariaDB monitor. Commands ......创建权限 并刷新权限MySQL [(none)]> grant replication slave on *.* to \'baackup\'@\'%\' identified by \'123456\';Query OK, 0 rows affected, 1 warning (0.00 sec)MySQL [(none)]> flush privileges;Query OK, 0 rows affected (0.00 sec)MySQL [(none)]> 重启服务[root@centen7-10-hehe nginx_conf 15:31:50]$ docker restart mysql_master mysql_master查看状态[root@centen7-10-hehe nginx_conf 15:32:14]$ docker ps -aCONTAINER ID IMAGE COMMAND CREATED STATUS PORTS NAMES42d0c962f24b mysql:5.7 \"docker-entrypoint.s…\" 9 minutes ago Up 9 minutes 33060/tcp, 0.0.0.0:3307->3306/tcp, :::3307->3306/tcp mysql_slave8eb73148954c mysql:5.7 \"docker-entrypoint.s…\" 16 minutes ago Up 32 seconds 0.0.0.0:3306->3306/tcp, :::3306->3306/tcp, 33060/tcp mysql_master重新登录查看[root@centen7-10-hehe nginx_conf 15:32:47]$ mysql -h 10.1.8.10 -uroot -proot -P 3306Welcome to the MariaDB monitor. Commands end with ; or \\g.Your MySQL connection id is 2Server version: 5.7.44-log MySQL Community Server (GPL)Copyright (c) 2000, 2018, Oracle, MariaDB Corporation Ab and others.Type \'help;\' or \'\\h\' for help. Type \'\\c\' to clear the current input statement.MySQL [(none)]> show databases;+--------------------+| Database |+--------------------+| information_schema || mysql || performance_schema || sys |+--------------------+5 rows in set (0.00 sec)MySQL [(none)]> show master status\\G*************************** 1. row *************************** File: mysql-bin.000005 Position: 306 Binlog_Do_DB: school Binlog_Ignore_DB: Executed_Gtid_Set: 1 row in set (0.00 sec)ERROR: No query specifiedslave节点配置
[root@centen7-10-hehe ~ 15:34:14]$ docker restart mysql_slave mysql_slave[root@centen7-10-hehe ~ 15:34:47]$ docker ps -aCONTAINER ID IMAGE COMMAND CREATED STATUS PORTS NAMES42d0c962f24b mysql:5.7 \"docker-entrypoint.s…\" 11 minutes ago Up 11 seconds 33060/tcp, 0.0.0.0:3307->3306/tcp, :::3307->3306/tcp mysql_slave8eb73148954c mysql:5.7 \"docker-entrypoint.s…\" 18 minutes ago Up 2 minutes 0.0.0.0:3306->3306/tcp, :::3306->3306/tcp, 33060/tcp mysql_master登录从数据库[root@centen7-10-hehe ~ 15:57:41]$ mysql -h 10.1.8.10 -uroot -proot -P3307Welcome to the MariaDB monitor. Commands end with ; or \\g.Your MySQL connection id is 4Server version: 5.7.44-log MySQL Community Server (GPL)Copyright (c) 2000, 2018, Oracle, MariaDB Corporation Ab and others.Type \'help;\' or \'\\h\' for help. Type \'\\c\' to clear the current input statement.MySQL [(none)]> show databases;+--------------------+| Database |+--------------------+| information_schema || mysql || performance_schema || sys |+--------------------+4 rows in set (0.00 sec)MySQL [(none)]> stop slave;Query OK, 0 rows affected (0.00 sec)MySQL [(none)]> change master to master_host=\'mysql_master\',master_user=\'baackup\',master_password=\'123456\',master_log_file=\'mysql-bin.000005\',master_log_pos=306,master_port=3306;Query OK, 0 rows affected, 2 warnings (0.00 sec)MySQL [(none)]> start slave;Query OK, 0 rows affected (0.00 sec)MySQL [(none)]> show slave status\\G;*************************** 1. row *************************** Slave_IO_State: Waiting for master to send event Master_Host: mysql_master Master_User: baackup Master_Port: 3306 Connect_Retry: 60 Master_Log_File: mysql-bin.000005 Read_Master_Log_Pos: 306 Relay_Log_File: 42d0c962f24b-relay-bin.000002 Relay_Log_Pos: 320 Relay_Master_Log_File: mysql-bin.000005 Slave_IO_Running: Yes Slave_SQL_Running: Yes Replicate_Do_DB: Replicate_Ignore_DB: mysql,sys,information_schema,performance_schema Replicate_Do_Table: .....验证MySQL集群可用性
[root@centen7-10-hehe nginx_conf 15:56:54]$ mysql -h 10.1.8.10 -uroot -proot -P 3306......主库创建school同步数据库 设置只能同步此库 所以需要创建此库MySQL [(none)]> create database school;Query OK, 1 row affected (0.00 sec)MySQL [(none)]> 从库登录验证是否存在[root@centen7-10-hehe nginx_conf 15:56:54]$ mysql -h 10.1.8.10 -uroot -proot -P 3307.......MySQL [(none)]> show databases;+--------------------+| Database |+--------------------+| information_schema || mysql || performance_schema || school || sys |+--------------------+5 rows in set (0.00 sec)如果同步失败
1 登录从数据库 关闭同步 退出后 重启主从数据库容器[root@centen7-10-hehe ~ 15:46:42]$ mysql -h 10.1.8.10 -uroot -proot -P3307Welcome to the MariaDB monitor. Commands end with ; or \\g.Your MySQL connection id is 5Server version: 5.7.44-log MySQL Community Server (GPL)Copyright (c) 2000, 2018, Oracle, MariaDB Corporation Ab and others.Type \'help;\' or \'\\h\' for help. Type \'\\c\' to clear the current input statement.MySQL [(none)]> stop slave;Query OK, 0 rows affected (0.00 sec)MySQL [(none)]> exitBye主从都重启 恢复初始状态 如果增加数据记得删除后重启[root@centen7-10-hehe ~ 15:46:56]$ docker restart mysql_slave 重新配置从库即可2 账号密码错误 导致io同步连接失败查看账号密码是否输入错误导致5、容器实现ElasticSearch+Kibana
ElasticSearch
下载es镜像[root@centen7-10-hehe ~ 16:15:18]$ docker pull elasticsearch:7.17.07.17.0: Pulling from library/elasticsearchDigest: sha256:332c6d416808f6e9a2cbcbe0170d9a9bb14bfe772180d37de5084c223dd8948bStatus: Image is up to date for elasticsearch:7.17.0docker.io/library/elasticsearch:7.17.0创建配置文件目录[root@centen7-10-hehe ~ 16:18:25]$ mkdir -p /opt/es/config创建数据文件目录[root@centen7-10-hehe ~ 16:19:02]$ mkdir -p /opt/es/data创建监听端口资源[root@centen7-10-hehe ~ 16:19:07]$ echo \"http.host: 0.0.0.0\" >> /opt/es/config/elasticsearch.yml开启权限[root@centen7-10-hehe ~ 16:19:16]$ chmod -R 777 /opt/es/启动容器[root@centen7-10-hehe ~ 16:19:23]$ docker run -d -p 9200:9200 -p 9300:9300 --name elasticsearch \\> -e \"discovery.type=single-node\" \\> -e ES_JAVA_OPTS=\"-Xms64m -Xmx512m\" \\> -v /opt/es/config/elasticsearch.yml:/usr/share/elasticsearch/config/elasticsearch.yml \\> -v /opt/es/data:/usr/share/elasticsearch/data \\> -v /opt/es/plugins:/usr/share/elasticseach/plugins \\> elasticsearch:7.17.0844c7d3e249d9ee8dab9960c6727851327718bad417228991e8ac10c25b821f6查看容器[root@centen7-10-hehe ~ 16:30:35]$ docker ps -aCONTAINER ID IMAGE COMMAND CREATED STATUS PORTS NAMES844c7d3e249d elasticsearch:7.17.0 \"/bin/tini -- /usr/l…\" 4 minutes ago Up 4 minutes 0.0.0.0:9200->9200/tcp, :::9200->9200/tcp, 0.0.0.0:9300->9300/tcp, :::9300->9300/tcp elasticsearch 访问验证 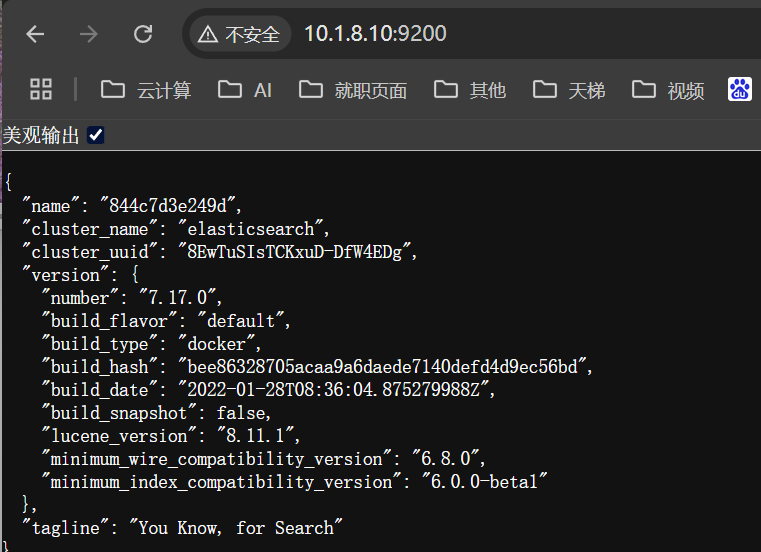
Kibana
下载镜像docker pull kibana:7.17.0启动容器 对应监听elasticserach 端口地址[root@centen7-10-hehe ~ 09:46:22]$ docker run --name kibana -d -e ELASTICSEARCH_HOSTS=http://10.1.8.10:9200 -p 5601:5601 kibana:7.17.0 96e23745c5c76f446b89263bd77c6bdba9d1a43155b42646827546931ab8a6e3 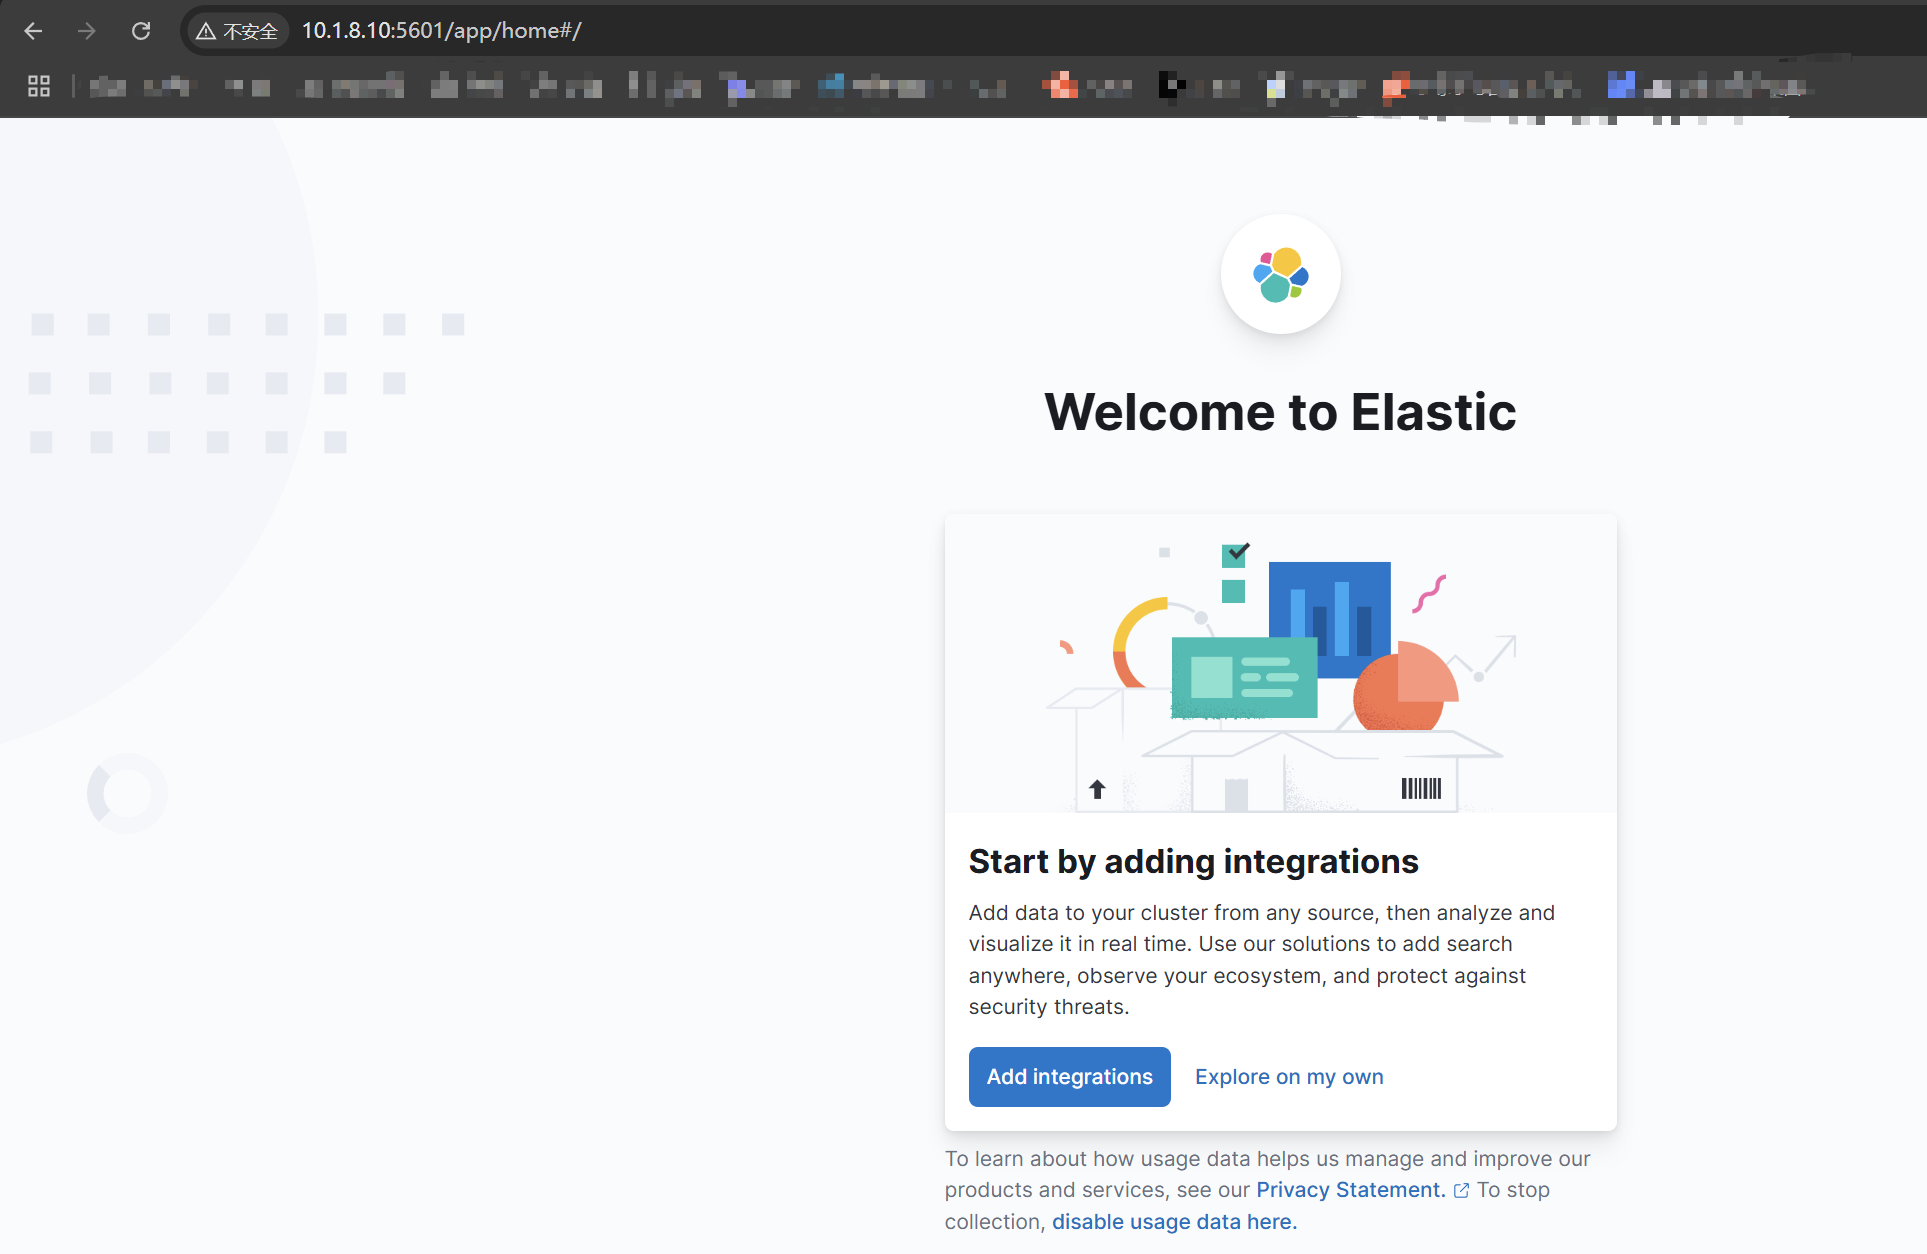
6、容器实现Redis部署
运行redis容器
创建配置文件目录[root@centen7-10-hehe ~ 10:14:59]$ mkdir -p /opt/redis/conf创建配置文件[root@centen7-10-hehe ~ 10:15:17]$ touch /opt/redis/conf/redis.conf下载镜像并运行容器 redis-server 启动redis /etc/redis/redis.conf 加载redis配置文件[root@centen7-10-hehe ~ 10:16:09]$ docker run -p 6379:6379 --name redis -v /opt/redis/data:/data -v /opt/redis/conf/:/etc/redis -d redis redis-server /etc/redis/redis.confUnable to find image \'redis:latest\' locallylatest: Pulling from library/redis59e22667830b: Pull complete 563069fa03b4: Pull complete 49031c033a72: Pull complete c645e9c24a26: Pull complete ab52a92c7961: Pull complete 4f4fb700ef54: Pull complete 550e4087f9e6: Pull complete Digest: sha256:f957ce918b51f3ac10414244bedd0043c47db44a819f98b9902af1bd9d0afceaStatus: Downloaded newer image for redis:latest168c64aac25056552f2af7d98217cb7e91abee0e344bf10bca9f61d3e20d4d7f查看容器[root@centen7-10-hehe ~ 10:23:55]$ docker ps CONTAINER ID IMAGE COMMAND CREATED STATUS PORTS NAMES168c64aac250 redis \"docker-entrypoint.s…\" 27 seconds ago Up 26 seconds 0.0.0.0:6379->6379/tcp, :::6379->6379/tcp 验证,使用客户端进行连接首先获取ip地址[root@centen7-10-hehe ~ 10:24:21]$ docker inspect 168c64aac250 |grep IPAddress \"SecondaryIPAddresses\": null, \"IPAddress\": \"172.17.0.4\", \"IPAddress\": \"172.17.0.4\",使用redis-cli连接测试[root@centen7-10-hehe ~ 10:27:05]$ docker run -it redis:latest redis-cli -h 172.17.0.4172.17.0.4:6379> set name zhangsanOK172.17.0.4:6379> get name\"zhangsan\"172.17.0.4:6379> Redis集群
方式:三主,三从 三主:实现数据分片 三从:实现数据备份
确保环境 删除当前redis镜像[root@centen7-10-hehe ~ 10:35:23]$ docker ps -aCONTAINER ID IMAGE COMMAND CREATED STATUSPORTS NAMES3974ceb39f91 redis:latest \"docker-entrypoint.s…\" 23 minutes ago Exited (0) 16 minutes ago laughing_davinci168c64aac250 redis \"docker-entrypoint.s…\" 27 minutes ago Up 27 minutes 0.0.0.0:6379->6379/tcp, :::6379->6379/tcp redis96e23745c5c7 kibana:7.17.0 \"/bin/tini -- /usr/l…\" About an hour ago Up About an hour 0.0.0.0:5601->5601/tcp, :::5601->5601/tcp kibana844c7d3e249d elasticsearch:7.17.0 \"/bin/tini -- /usr/l…\" 18 hours ago Up About an hour 0.0.0.0:9200->9200/tcp, :::9200->9200/tcp, 0.0.0.0:9300->9300/tcp, :::9300->9300/tcp elasticsearch[root@centen7-10-hehe ~ 10:51:11]$ docker ps -a |awk \'{print \"docker stop \" $1}\' |bashError response from daemon: No such container: CONTAINER3974ceb39f91168c64aac25096e23745c5c7844c7d3e249d[root@centen7-10-hehe ~ 10:51:47]$ docker ps -a |awk \'{print \"docker rm \" $1}\' |bashError response from daemon: No such container: CONTAINER3974ceb39f91168c64aac25096e23745c5c7844c7d3e249d[root@centen7-10-hehe ~ 10:51:51]$ docker ps -aCONTAINER ID IMAGE COMMAND CREATED STATUS PORTS NAMES创建集群脚本 rdis版本为5.7.0 可以更改其他版本
[root@centen7-10-hehe ~ 10:55:43]$ vim redis-cluster1.shfor port in $(seq 8001 8006); \\do \\mkdir -p /mydata/redis/node-${port}/conftouch /mydata/redis/node-${port}/conf/redis.confcat </mydata/redis/node-${port}/conf/redis.confport ${port}cluster-enabled yescluster-config-file nodes.confcluster-node-timeout 5000cluster-announce-ip 10.1.8.10cluster-announce-port ${port}cluster-announce-bus-port 1${port}appendonly yesEOFdocker run -p ${port}:${port} -p 1${port}:1${port} --name redis-${port} \\-v /mydata/redis/node-${port}/data:/data \\-v /mydata/redis/node-${port}/conf/redis.conf:/etc/redis/redis.conf \\-d redis:5.0.7 redis-server /etc/redis/redis.conf; \\done 解释 cluster-config-file nodes.conf 指定配置文件位置是自带的 但是需要指定 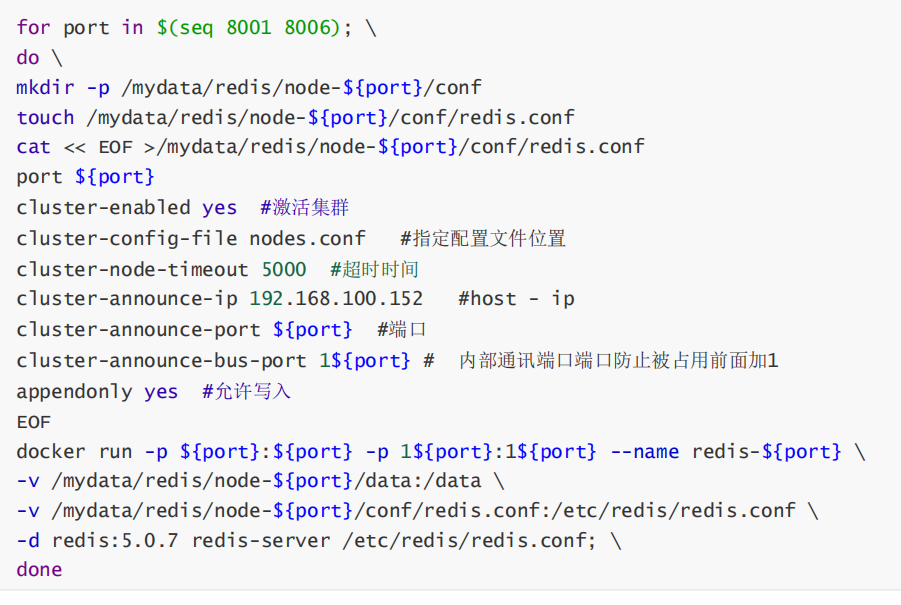 执行脚本
执行脚本
[root@centen7-10-hehe ~ 10:57:34]$ sh redis-cluster1.sh Unable to find image \'redis:5.0.7\' locally5.0.7: Pulling from library/redis68ced04f60ab: Pull complete 7ecc253967df: Pull complete 765957bf98d4: Pull complete 52f16772e1ca: Pull complete 2e43ba99c3f3: Pull complete d95576c71392: Pull complete Digest: sha256:938ee5bfba605cc85f9f52ff95024e9a24cf5511ba6f1cbc68ec9d91a0432125Status: Downloaded newer image for redis:5.0.7a32806667bd455a7438b1b7c0623e8dbab0f160689afaf023544641045519e4464a06b5b15abb10b37e0971e56f12bc406a9a11ef93d683b7eed43bbece885d1934d72893ad6bd1175b78b430d1de890c12aca3758d9c9724d77cdc37f296c7984c6d65949123377056d7ae34009fb668fae763cf1075aee4d482b61da173ddd8811ad8ab0cc4fcf3be67794cd4e510f219a300856ea564708b0cbbb9242283d4ee55c351fee0318b51d45db47cae1026708a976ea27b46f13bb0b3be14763bf验证容器情况 6个容器启动
[root@centen7-10-hehe ~ 10:59:54]$ docker ps -aCONTAINER ID IMAGE COMMAND CREATED STATUS PORTS NAMES4ee55c351fee redis:5.0.7 \"docker-entrypoint.s…\" 35 seconds ago Up 34 seconds 0.0.0.0:8006->8006/tcp, :::8006->8006/tcp, 6379/tcp, 0.0.0.0:18006->18006/tcp, :::18006->18006/tcp redis-80068811ad8ab0cc redis:5.0.7 \"docker-entrypoint.s…\" 35 seconds ago Up 34 seconds 0.0.0.0:8005->8005/tcp, :::8005->8005/tcp, 6379/tcp, 0.0.0.0:18005->18005/tcp, :::18005->18005/tcp redis-800584c6d6594912 redis:5.0.7 \"docker-entrypoint.s…\" 36 seconds ago Up 35 seconds 0.0.0.0:8004->8004/tcp, :::8004->8004/tcp, 6379/tcp, 0.0.0.0:18004->18004/tcp, :::18004->18004/tcp redis-8004934d72893ad6 redis:5.0.7 \"docker-entrypoint.s…\" 37 seconds ago Up 36 seconds 0.0.0.0:8003->8003/tcp, :::8003->8003/tcp, 6379/tcp, 0.0.0.0:18003->18003/tcp, :::18003->18003/tcp redis-800364a06b5b15ab redis:5.0.7 \"docker-entrypoint.s…\" 37 seconds ago Up 36 seconds 0.0.0.0:8002->8002/tcp, :::8002->8002/tcp, 6379/tcp, 0.0.0.0:18002->18002/tcp, :::18002->18002/tcp redis-8002a32806667bd4 redis:5.0.7 \"docker-entrypoint.s…\" 38 seconds ago Up 37 seconds 0.0.0.0:8001->8001/tcp, :::8001->8001/tcp, 6379/tcp, 0.0.0.0:18001->18001/tcp, :::18001->18001/tcp redis-8001 进入任意1个容器 --cluster-replicas 1 表示一个副本 有一个主就有一个从 --cluster-replicas 2 每个主节点配置2个副本节点 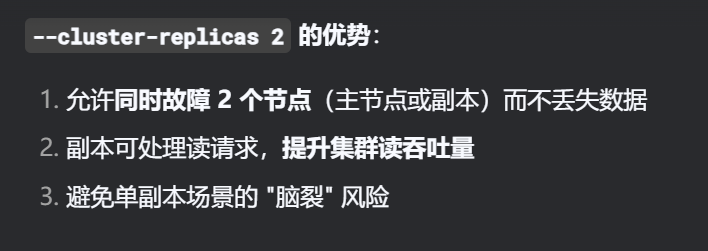
[root@centen7-10-hehe ~ 11:38:53]$ docker exec -it redis-8001 bashroot@a32806667bd4:/data# redis-cli --cluster create 10.1.8.10:8001 10.1.8.10:8002 10.1.8.10:8003 10.1.8.10:8004 10.1.8.10:8005 10.1.8.10:8006 --cluster-replicas 1>>> Performing hash slots allocation on 6 nodes...Master[0] -> Slots 0 - 5460Master[1] -> Slots 5461 - 10922Master[2] -> Slots 10923 - 16383Adding replica 10.1.8.10:8005 to 10.1.8.10:8001Adding replica 10.1.8.10:8006 to 10.1.8.10:8002Adding replica 10.1.8.10:8004 to 10.1.8.10:8003>>> Trying to optimize slaves allocation for anti-affinity[WARNING] Some slaves are in the same host as their masterM: 7c8ae10703ee40a787a971a4eedabfafe7424bb5 10.1.8.10:8001 slots:[0-5460] (5461 slots) masterM: 570b32730b28a060406298e018b0e9ed807d39d2 10.1.8.10:8002 slots:[5461-10922] (5462 slots) masterM: 1bd73934d072f6b525e2d2659751822553d915a7 10.1.8.10:8003 slots:[10923-16383] (5461 slots) masterS: 76f054a0c91820dc78f61ea1de353928d8d17d61 10.1.8.10:8004 replicates 570b32730b28a060406298e018b0e9ed807d39d2S: c91e6ceebf9d00ac21c2f89f4a5c9427578a3278 10.1.8.10:8005 replicates 1bd73934d072f6b525e2d2659751822553d915a7S: 89c508b3e66fca3feef3088dd4b566a6d8ceca75 10.1.8.10:8006 replicates 7c8ae10703ee40a787a971a4eedabfafe7424bb5Can I set the above configuration? (type \'yes\' to accept): yes>>> Nodes configuration updated>>> Assign a different config epoch to each node>>> Sending CLUSTER MEET messages to join the clusterWaiting for the cluster to join...>>> Performing Cluster Check (using node 10.1.8.10:8001)M: 7c8ae10703ee40a787a971a4eedabfafe7424bb5 10.1.8.10:8001 slots:[0-5460] (5461 slots) master 1 additional replica(s)S: 89c508b3e66fca3feef3088dd4b566a6d8ceca75 10.1.8.10:8006 slots: (0 slots) slave replicates 7c8ae10703ee40a787a971a4eedabfafe7424bb5M: 1bd73934d072f6b525e2d2659751822553d915a7 10.1.8.10:8003 slots:[10923-16383] (5461 slots) master 1 additional replica(s)S: c91e6ceebf9d00ac21c2f89f4a5c9427578a3278 10.1.8.10:8005 slots: (0 slots) slave replicates 1bd73934d072f6b525e2d2659751822553d915a7M: 570b32730b28a060406298e018b0e9ed807d39d2 10.1.8.10:8002 slots:[5461-10922] (5462 slots) master 1 additional replica(s)S: 76f054a0c91820dc78f61ea1de353928d8d17d61 10.1.8.10:8004 slots: (0 slots) slave replicates 570b32730b28a060406298e018b0e9ed807d39d2[OK] All nodes agree about slots configuration.>>> Check for open slots...>>> Check slots coverage...[OK] All 16384 slots covered.7、容器的镜像构建
容器镜像获取的方法
主要有以下几种: 1:在DockerHub直接下载 2:把操作系统中文件系统打包为容器镜像 3:把正在运行的容器打包为容器镜像,即docker commit 4:通过Dockerfile实现容器镜像的自定义及生成
获取镜像方法应用
1:在DockerHub直接下载
docker pull centos:latestdocker pull nginx:latest2:把操作系统中文件系统打包为容器镜像
安装最小化操作系统 
 把操作系统中文件系统进行打包 在新安装的主机操作
[root@localhost-hehe ~ 13:58:44]$ tar --numeric-owner --exclude=/proc --exclude=/sys -cvf centos7.tar /传给另个虚拟机 存在docker环境的虚拟机[root@localhost-hehe ~ 14:02:16]$ ll总用量 2096772-rw-------. 1 root root 1243 7月 24 13:52 anaconda-ks.cfg-rw-r--r--. 1 root root 1416560640 7月 24 14:02 centos7.tar[root@localhost-hehe ~ 14:02:19]$ scp centos7.tar root@10.1.8.10:/root/The authenticity of host \'10.1.8.10 (10.1.8.10)\' can\'t be established.ECDSA key fingerprint is SHA256:XHgrRYQiZ0YIK3Tb9nE7otVwaEWYcw+YQh8eCnwgBgo.ECDSA key fingerprint is MD5:74:47:43:11:93:48:6b:e1:7f:fe:22:bc:f8:ce:a1:ac.Are you sure you want to continue connecting (yes/no)? yesWarning: Permanently added \'10.1.8.10\' (ECDSA) to the list of known hosts.root@10.1.8.10\'s password: centos7.tar 100% 1351MB 195.9MB/s 00:06 [root@localhost-hehe ~ 14:03:42]$ docker环境主机 操作
[root@centen7-10-hehe ~ 13:38:58]$ ll总用量 2766424-rw-------. 1 root root 1930 7月 17 14:14 anaconda-ks.cfg-rw-r--r-- 1 root root 1416560640 7月 24 14:03 centos7.tar-rw------- 1 root root 211688448 7月 23 09:49 centos_new.tar-rw------- 1 root root 211703296 7月 23 09:33 centos_test.tar-rwxr-xr-x. 1 root root 48 7月 21 12:00 cpu.sh-rw-r--r--. 1 root root 1961 7月 17 14:19 initial-setup-ks.cfg-rw-r--r-- 1 root root 519596032 7月 23 14:21 mysql_5.7.tar-rw-r--r-- 1 root root 631 7月 24 10:56 redis-cluster1.sh-rw------- 1 root root 473244160 7月 23 13:54 tomcat.tardrwxr-xr-x. 2 root root 6 7月 17 14:23 公共drwxr-xr-x. 2 root root 6 7月 17 14:23 模板drwxr-xr-x. 2 root root 6 7月 17 14:23 视频drwxr-xr-x. 2 root root 6 7月 17 14:23 图片drwxr-xr-x. 2 root root 6 7月 17 14:23 文档drwxr-xr-x. 2 root root 6 7月 17 14:23 下载drwxr-xr-x. 2 root root 6 7月 17 14:23 音乐drwxr-xr-x. 2 root root 6 7月 17 14:23 桌面[root@centen7-10-hehe ~ 14:04:58]$ docker import centos7.tar centos7:v1.0sha256:8e46deb7cd99aadc6231f78af8ad01efddf0b43c86eba0606a35250f9cbcb5f1[root@centen7-10-hehe ~ 14:05:38]$ docker imagesREPOSITORY TAG IMAGE ID CREATED SIZEcentos7 v1.0 8e46deb7cd99 10 seconds ago 1.37GB运行容器并进入输入命令测试[root@centen7-10-hehe ~ 14:05:48]$ docker run -it centos7:v1.0 bash自动进入容器[root@78a81d2dae5f-hehe / 14:07:03]$ ip a s1: lo: mtu 65536 qdisc noqueue state UNKNOWN qlen 1 link/loopback 00:00:00:00:00:00 brd 00:00:00:00:00:00 inet 127.0.0.1/8 scope host lo valid_lft forever preferred_lft forever inet6 ::1/128 scope host valid_lft forever preferred_lft forever26: eth0@if27: mtu 1500 qdisc noqueue state UP link/ether 02:42:ac:11:00:02 brd ff:ff:ff:ff:ff:ff link-netnsid 0 inet 172.17.0.2/16 brd 172.17.255.255 scope global eth0 valid_lft forever preferred_lft forever[root@78a81d2dae5f-hehe / 14:07:12]$ 3:把正在运行的容器打包为容器镜像,即docker commit
进入centos7 容器 配置镜像源 并安装 成功后退出容器[root@centen7-10-hehe ~ 14:35:00]$ docker attach centosError response from daemon: No such container: centos[root@centen7-10-hehe ~ 14:36:20]$ docker ps -aCONTAINER ID IMAGE COMMAND CREATED STATUS PORTS NAMES78a81d2dae5f centos7:v1.0 \"bash\" 29 minutes ago Exited (0) About a minute ago musing_dirac[root@centen7-10-hehe ~ 14:36:26]$ docker attach 78a81d2dae5fYou cannot attach to a stopped container, start it first[root@centen7-10-hehe ~ 14:36:34]$ docker start 78a81d2dae5f78a81d2dae5f[root@centen7-10-hehe ~ 14:36:57]$ docker attach 78a81d2dae5f[root@78a81d2dae5f-hehe / 14:36:57]$ mv /etc/yum.repos.d/CentOS-Base.repo /etc/yum.repos.d/CentOS-Base.repo.backup[root@78a81d2dae5f-hehe / 14:38:11]$ curl -o /etc/yum.repos.d/CentOS-Base.repo https://mirrors.aliyun.com/repo/Centos-7.repo % Total % Received % Xferd Average Speed Time Time Time Current Dload Upload Total Spent Left Speed100 2523 100 2523 0 0 3229 0 --:--:-- --:--:-- --:--:-- 3226[root@78a81d2dae5f-hehe / 14:38:18]$ yum install -y httpd退出容器[root@78a81d2dae5f-hehe / 14:38:18]$ ctrl + p + q正在运行的容器打包为容器镜像
[root@centen7-10-hehe ~ 14:40:54]$ docker ps -aCONTAINER ID IMAGE COMMAND CREATED STATUS PORTS NAMES78a81d2dae5f centos7:v1.0 \"bash\" 33 minutes ago Up 4 minutes musing_dirac[root@centen7-10-hehe ~ 14:41:00]$ docker commit 78a81d2dae5f centos7-httpd:v1sha256:f22e949ee912852202634a30b98fb7bd7be563f0de2cea31999320e1ff44f2e5[root@centen7-10-hehe ~ 14:41:24]$ docker imagesREPOSITORY TAG IMAGE ID CREATED SIZEcentos7-httpd v1 f22e949ee912 4 seconds ago 1.67GB测试容器运行
[root@centen7-10-hehe ~ 14:41:28]$ docker run -it centos7-httpd:v1 bash[root@6d5447e5b323-hehe / 14:42:23]$ rpm -qa |grep httpdhttpd-2.4.6-99.el7.centos.1.x86_64httpd-tools-2.4.6-99.el7.centos.1.x86_64查看首页面
[root@6d5447e5b323-hehe / 14:43:28]$ httpd -k startAH00558: httpd: Could not reliably determine the server\'s fully qualified domain name, using 172.17.0.3. Set the \'ServerName\' directive globally to suppress this message\'[root@6d5447e5b323-hehe / 14:44:44]$ curl http://localhost Apache HTTP Server Test Page powered by CentOS Testing 123..
This page is used to test the proper operation of the Apache HTTP server after it has been installed. If you can read this page it means that this site is working properly. This server is powered by CentOS.
Just visiting?
The website you just visited is either experiencing problems or is undergoing routine maintenance.
If you would like to let the administrators of this website know that you\'ve seen this page instead of the page you expected, you should send them e-mail. In general, mail sent to the name \"webmaster\" and directed to the website\'s domain should reach the appropriate person.
For example, if you experienced problems while visiting www.example.com, you should send e-mail to \"webmaster@example.com\".
Are you the Administrator?
You should add your website content to the directory /var/www/html/.
To prevent this page from ever being used, follow the instructions in the file /etc/httpd/conf.d/welcome.conf.
Promoting Apache and CentOS
You are free to use the images below on Apache and CentOS Linux powered HTTP servers. Thanks for using Apache and CentOS!


4:通过Dockerfile实现容器镜像的自定义及生成
Dockerfile介绍
Dockerfile是一种能够被Docker程序解释的剧本。Dockerfile由一条一条的指令组成,并且有自己的书 写格式和支持的命令。当我们需要在容器镜像中指定自己额外的需求时,只需在Dockerfile上添加或修 改指令,然后通过docker build生成我们自定义的容器镜像(image)。 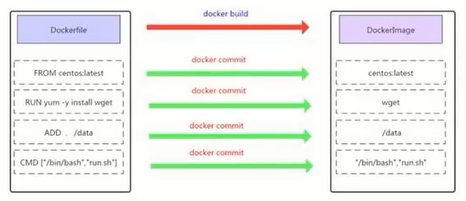
Dockerfile指令
- 构建类指令
- 用于构建image
- 其指定的操作不会在运行image的容器上执行(FROM、MAINTAINER、RUN、ENV、ADD、COPY)
- 设置类指令
- 用于设置image的属性
- 其指定的操作将在运行image的容器中执行(CMD、ENTRYPOINT、USER、EXPOSE、VOLUME、WORKDIR、ONBUILD)
- 指令说明

案例应用
构建SSH镜像
环境准备
[root@centen7-10-hehe ~ 15:21:11]$ mkdir -p /docker_work/sshd[root@centen7-10-hehe ~ 15:21:19]$ cd /docker_work/sshd 编写dockerfile文件 名称Dockerfile 会再当前位置自动识别 命令 -D 作用 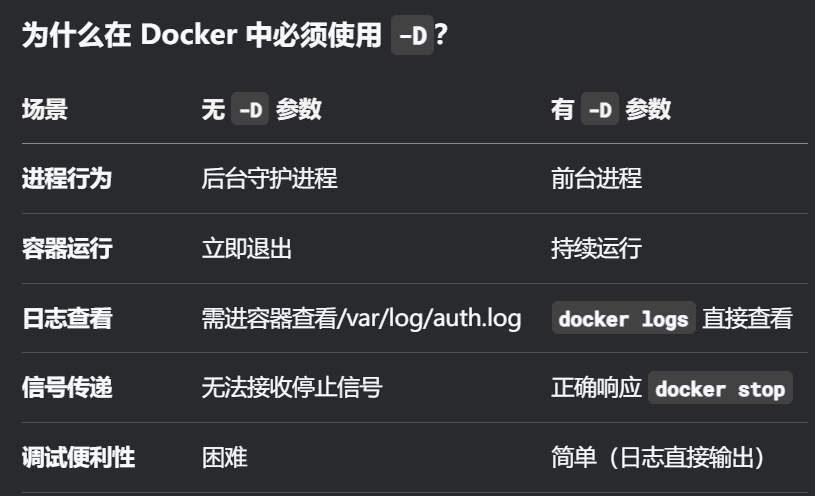 具体功能解析
- 前台运行模式 (Foreground Mode)
- 默认情况下,sshd 会作为守护进程在后台运行
- -D 强制 SSH 服务器在前台运行
- 容器必要性:Docker 要求主进程在前台运行,否则容器会立即退出
- 禁止进程分离 (No Daemonization)
- 正常情况:sshd 会创建子进程并退出父进程
- 使用 -D:保持单个进程,不进行进程分叉
- 容器优势:使 Docker 能正确监控 SSH 服务状态
- 日志输出到标准错误 (Log to stderr)
- 所有日志直接输出到 stderr(标准错误)
- 容器优势:可通过 docker logs 直接查看 SSH 日志
docker logs Dockerflie编写
[root@centen7-10-hehe sshd 15:21:23]$ vim Dockerfile# 基础镜像 FROM必须是第一层FROM centos:7# 描述性信息MAINTAINERMAINTAINER This is project # 配置阿里云镜像源 方便使用yum 安装软件RUN mv /etc/yum.repos.d/CentOS-Base.repo /etc/yum.repos.d/CentOS-Base.repo.backupRUN curl -o /etc/yum.repos.d/CentOS-Base.repo https://mirrors.aliyun.com/repo/Centos-7.repo# 使用yum安装指令 升级yum 环境源RUN yum update -yRUN yum -y install openssh* net-tools lsof telnet passwd# 只要是命令 都写RUNRUN echo \'123456\' | passwd --stdin rootRUN sed -i \'s/UsePAM yes/UsePAM no/g\' /etc/ssh/sshd_configRUN ssh-keygen -t rsa -f /etc/ssh/ssh_host_rsa_keyRUN sed -i \'/^session\\s\\+required\\s\\+pam_loginuid.so/s/^/#/\' /etc/pam.d/sshdRUN mkdir -p /root/.ssh && chown root.root /root && chmod 700 /root/.ssh# 暴露端口EXPOSE 22# -D 以守护进程启动CMD [\"/usr/sbin/sshd\" , \"-D\"]构建镜像 点 【 . 】 自动识别当前目录下的Dockerfile
[root@centen7-10-hehe sshd 15:48:22]$ docker build -t centos_sshd:v1 .[+] Building 1.9s (14/14) FINISHED docker:default => [internal] load build definition from Dockerfile 0.0s => => transferring dockerfile: 914B 0.0s => [internal] load metadata for docker.io/library/centos:7 0.0s => [internal] load .dockerignore 0.0s => => transferring context: 2B 0.0s => [ 1/10] FROM docker.io/library/centos:7 0.0s => CACHED [ 2/10] RUN mv /etc/yum.repos.d/CentOS-Base.repo /etc/yum.repos.d/CentOS-Base.repo.backu 0.0s => CACHED [ 3/10] RUN curl -o /etc/yum.repos.d/CentOS-Base.repo https://mirrors.aliyun.com/repo/Ce 0.0s => CACHED [ 4/10] RUN yum update -y 0.0s => CACHED [ 5/10] RUN yum -y install openssh* net-tools lsof telnet passwd 0.0s => CACHED [ 6/10] RUN echo \'123456\' | passwd --stdin root 0.0s => CACHED [ 7/10] RUN sed -i \'s/UsePAM yes/UsePAM no/g\' /etc/ssh/sshd_config 0.0s => CACHED [ 8/10] RUN ssh-keygen -t rsa -f /etc/ssh/ssh_host_rsa_key 0.0s => CACHED [ 9/10] RUN sed -i \'/^session\\s\\+required\\s\\+pam_loginuid.so/s/^/#/\' /etc/pam.d/sshd 0.0s => [10/10] RUN mkdir -p /root/.ssh && chown root.root /root && chmod 700 /root/.ssh 0.7s => exporting to image 1.0s => => exporting layers 1.0s => => writing image sha256:370824e86bf457d54967e8fee60f067c757aa220c177af52b3c973fd85cf8b10 0.0s => => naming to docker.io/library/centos_sshd:v1 验证 [root@centen7-10-hehe ~ 15:48:50]$ docker imagesREPOSITORY TAG IMAGE ID CREATED SIZEcentos_sshd v1 370824e86bf4 About a minute ago 916MB启动容器 -P 随机端口 通过查看为32768
[root@centen7-10-hehe ~ 15:50:12]$ docker run -d -P centos_sshd:v1ccdf4b5604eeedb0333582287e34509cbed0459c28d55c79bed3014fb8cee113[root@centen7-10-hehe ~ 16:09:07]$ docker ps -aCONTAINER ID IMAGE COMMAND CREATED STATUSPORTS NAMESccdf4b5604ee centos_sshd:v1 \"/usr/sbin/sshd -D\" 13 seconds ago Up 12 seconds 0.0.0.0:32768->22/tcp, :::32768->22/tcp loving_kare验证 通过32768端口登录到容器[root@centen7-10-hehe ~ 16:10:06]$ ssh localhost -p 32768The authenticity of host \'[localhost]:32768 ([::1]:32768)\' can\'t be established.RSA key fingerprint is SHA256:DaDOtzlz0lrX6We5yUVi3fcDG7wHnxsyRhsCabY0/7g.RSA key fingerprint is MD5:69:fd:a8:c0:1d:9a:50:df:76:a8:a5:bc:26:72:bf:e2.Are you sure you want to continue connecting (yes/no)? \'yes\'Warning: Permanently added \'[localhost]:32768\' (RSA) to the list of known hosts.root@localhost\'s password: \'123456\'#脚本设置的密码[root@ccdf4b5604ee ~]# ifconfigeth0: flags=4163 mtu 1500 inet 172.17.0.3 netmask 255.255.0.0 broadcast 172.17.255.255 ether 02:42:ac:11:00:03 txqueuelen 0 (Ethernet) RX packets 60 bytes 7089 (6.9 KiB) RX errors 0 dropped 0 overruns 0 frame 0 TX packets 37 bytes 5587 (5.4 KiB) TX errors 0 dropped 0 overruns 0 carrier 0 collisions 0lo: flags=73 mtu 65536 inet 127.0.0.1 netmask 255.0.0.0 inet6 ::1 prefixlen 128 scopeid 0x10 loop txqueuelen 1 (Local Loopback) RX packets 0 bytes 0 (0.0 B) RX errors 0 dropped 0 overruns 0 frame 0 TX packets 0 bytes 0 (0.0 B) TX errors 0 dropped 0 overruns 0 carrier 0 collisions 0[root@ccdf4b5604ee ~]# exitlogoutConnection to localhost closed.验证ip[root@centen7-10-hehe ~ 16:11:40]$ docker inspect ccdf4b5604ee |grep IPAddress \"SecondaryIPAddresses\": null, \"IPAddress\": \"172.17.0.3\", \"IPAddress\": \"172.17.0.3\",构建nginx镜像
环境准备
[root@centen7-10-hehe ~ 16:18:27]$ mkdir /docker_work/nginx[root@centen7-10-hehe ~ 16:18:37]$ cd /docker_work/nginx[root@centen7-10-hehe nginx 16:18:39]$ yum install tree -ynginx源码包放入/docker_work/nginx/目录中 上传源码包
源码包上传到此位置[root@centen7-10-hehe nginx 16:22:35]$ pwd/docker_work/nginx[root@centen7-10-hehe nginx 16:22:38]$ rz -Erz waiting to receive.[root@centen7-10-hehe nginx 16:22:41]$ ll-rw-r--r-- 1 root root 1280111 7月 16 17:19 nginx-1.28.0.tar.gz编写 Dockerfile内容
[root@centen7-10-hehe nginx 16:39:17]$ vim Dockerfile#基于基础镜像FROM centos:7#用户信息MAINTAINER This is nginx # 添加环境包# 配置阿里云镜像源 方便使用yum 安装软件RUN mv /etc/yum.repos.d/CentOS-Base.repo /etc/yum.repos.d/CentOS-Base.repo.backupRUN curl -o /etc/yum.repos.d/CentOS-Base.repo https://mirrors.aliyun.com/repo/Centos-7.repo# 使用yum安装指令 升级yum 环境源RUN yum update -y# 安装依赖包RUN yum -y install pcre-devel zlib-devel gcc gcc-c++ make# 创建用户nginxRUN useradd -M -s /sbin/nologin nginx# 添加源码包并完成解压缩 后面是解压位置ADD nginx-1.28.0.tar.gz /usr/local/src# 指定WORKDIR工作路径 压缩路径+文件名称WORKDIR /usr/local/src/nginx-1.28.0# 编译位置RUN ./configure \\--prefix=/usr/local/nginx \\--user=nginx \\--group=nginx \\--with-http_stub_status_module && make && make install# 指定环境路径ENV PATH /usr/local/nginx/sbin:$PATH# 指定暴露端口EXPOSE 80EXPOSE 443# 在配置文件中关闭守护进程 因为容器的守护进程端口会冲突RUN echo \"daemon off;\" >> /usr/local/nginx/conf/nginx.conf# 添加脚本文件run.sh的方式启动ADD run.sh /run.shRUN chmod 755 /run.shCMD [\"/run.sh\"]编写启动脚本
[root@centen7-10-hehe nginx 16:39:15]$ cat run.sh #!/bin/bash/usr/local/nginx/sbin/nginx查看nginx目录结构
[root@centen7-10-hehe nginx 16:36:22]$ tree ././├── Dockerfile├── nginx-1.28.0.tar.gz└── run.sh0 directories, 3 files构建镜像
[root@centen7-10-hehe nginx 16:37:50]$ docker build -t nginx:file .[+] Building 85.5s (17/17) FINISHED docker:default => [internal] load build definition from Dockerfile 0.0s => => transferring dockerfile: 1.24kB 0.0s => [internal] load metadata for docker.io/library/centos:7 0.0s => [internal] load .dockerignore 0.0s => => transferring context: 2B 0.0s => [ 1/12] FROM docker.io/library/centos:7 0.0s => [internal] load build context 0.0s => => transferring context: 1.28MB0.0s => CACHED [ 2/12] RUN mv /etc/yum.repos.d/CentOS-Base.repo /etc/yum.repos.d/CentOS-Base.repo.backu 0.0s => CACHED [ 3/12] RUN curl -o /etc/yum.repos.d/CentOS-Base.repo https://mirrors.aliyun.com/repo/Ce 0.0s => CACHED [ 4/12] RUN yum update -y 0.0s => [ 5/12] RUN yum -y install pcre-devel zlib-devel gcc gcc-c++ make 71.5s => [ 6/12] RUN useradd -M -s /sbin/nologin nginx 0.9s => [ 7/12] ADD nginx-1.28.0.tar.gz /usr/local/src 0.2s => [ 8/12] WORKDIR /usr/local/src/nginx-1.28.0 0.0s => [ 9/12] RUN ./configure --prefix=/usr/local/nginx --user=nginx --group=nginx --with-http_stub_ 10.9s => [10/12] RUN echo \"daemon off;\" >> /usr/local/nginx/conf/nginx.conf 0.9s => [11/12] ADD run.sh /run.sh 0.1s => [12/12] RUN chmod 755 /run.sh 0.5s => exporting to image 0.5s => => exporting layers 0.4s => => writing image sha256:09b6f9b72841ee63dfab9a8b954527759b2f80253ea895a73376c8e14db3a789 0.0s => => naming to docker.io/library/nginx:file 运行容器
查看镜像[root@centen7-10-hehe nginx 16:42:18]$ docker imagesREPOSITORY TAG IMAGE ID CREATED SIZEnginx file 09b6f9b72841 3 minutes ago 916MB运行容器[root@centen7-10-hehe nginx 16:42:22]$ docker run -d -P nginx:file a7b8b722e3abff3f26546c4c173c50fd0c005eba9d9e316aa08b388620ce9a4a查看容器状态
[root@centen7-10-hehe nginx 16:43:11]$ docker ps -aCONTAINER ID IMAGE COMMAND CREATED STATUS PORTS NAMESa7b8b722e3ab nginx:file \"/run.sh\" 15 seconds ago Up 14 seconds 0.0.0.0:32770->80/tcp, :::32770->80/tcp, 0.0.0.0:32769->443/tcp, :::32769->443/tcp strange_easley 访问32770端口 跳转容器访问 http://10.1.8.10:32770/ 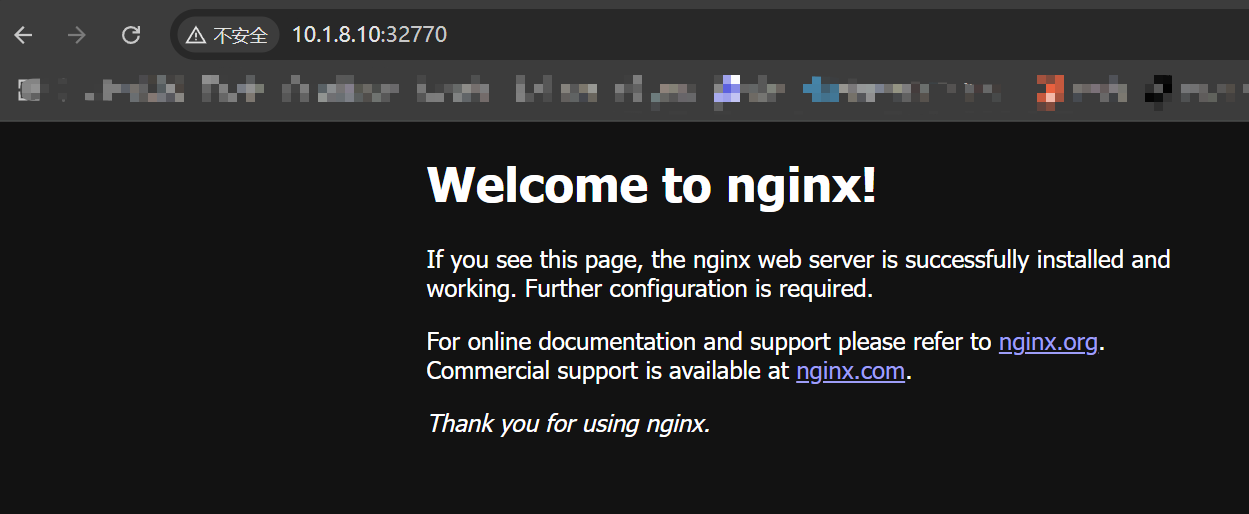
构建Tomcat镜像
环境准备
[root@centen7-10-hehe nginx 17:08:00]$ mkdir /docker_work/tomcat[root@centen7-10-hehe nginx 17:08:17]$ cd /docker_work/tomcat把jdk-8u91-linux-x64.tar.gz 、apache-tomcat-8.5.16.tar.gz放入/docker_work/tomcat目录中 编写dockerfile文件
[root@centen7-10-hehe tomcat 17:13:46]$ rz -Erz waiting to receive.[root@centen7-10-hehe tomcat 17:13:48]$ rz -Erz waiting to receive.[root@centen7-10-hehe tomcat 17:16:43]$ lsapache-tomcat-8.5.16.tar.gz Dockerfile jdk-8u91-linux-x64.tar.gz[root@centen7-10-hehe tomcat 17:17:25]$ vim DockerfileFROM centos:7MAINTAINER This is tomcat # 添加源码包并完成解压缩 后面是解压位置ADD jdk-8u91-linux-x64.tar.gz /usr/local# # 指定WORKDIR工作路径 压缩路径+文件名称WORKDIR /usr/local/RUN mv jdk1.8.0_91 /usr/local/java# 部署java环境变量ENV JAVA_HOME /usr/local/javaENV JAVA_BIN /usr/local/java/binENV JRE_HOME /usr/local/java/jreENV PATH $PATH:/usr/local/java/bin:/usr/local/java/jre/binENV CLASSPATH /usr/local/java/jre/bin:/usr/local/java/lib:/usr/local/java/jre/lib/charsets.jarADD apache-tomcat-8.5.16.tar.gz /usr/localWORKDIR /usr/local/RUN mv apache-tomcat-8.5.16 /usr/local/tomcat8EXPOSE 8080#CMD [\"/usr/local/tomcat8/bin/catalina.sh\",\"run\"]ENTRYPOINT [\"/usr/local/tomcat8/bin/catalina.sh\",\"run\"]构建镜像
[root@centen7-10-hehe tomcat 17:28:00]$ docker build -t tomcat:file .[+] Building 8.7s (12/12) FINISHED docker:default => [internal] load build definition from Dockerfile 0.0s => => transferring dockerfile: 800B 0.0s => [internal] load metadata for docker.io/library/centos:7 0.0s => [internal] load .dockerignore 0.0s => => transferring context: 2B 0.0s => CACHED [1/7] FROM docker.io/library/centos:7 0.0s => [internal] load build context 0.6s => => transferring context: 190.83MB 0.6s => [2/7] ADD jdk-8u91-linux-x64.tar.gz /usr/local 1.9s => [3/7] WORKDIR /usr/local/ 0.0s => [4/7] RUN mv jdk1.8.0_91 /usr/local/java 3.2s => [5/7] ADD apache-tomcat-8.5.16.tar.gz /usr/local 1.1s => [6/7] WORKDIR /usr/local/ 0.1s => [7/7] RUN mv apache-tomcat-8.5.16 /usr/local/tomcat8 0.8s => exporting to image 0.8s => => exporting layers 0.8s => => writing image sha256:43bc4d1e4e466ca936a390db74e2d8acb793a945392ae422d60e5ffa1993c7eb 0.0s => => naming to docker.io/library/tomcat:file 查看镜像
[root@centen7-10-hehe tomcat 17:29:33]$ docker imagesREPOSITORY TAG IMAGE ID CREATED SIZEtomcat file 43bc4d1e4e46 About a minute ago 960MB运行容器
[root@centen7-10-hehe tomcat 17:30:06]$ docker run -d --name web1 -p 1111:8080 tomcat:file4b0fa8e7c5601000b4ded43c7745ca26b455930ca4f8cbc493dfcb0416ae8e45查看容器
[root@centen7-10-hehe tomcat 17:31:00]$ docker ps -aCONTAINER ID IMAGE COMMAND CREATED STATUS PORTS NAMES4b0fa8e7c560 tomcat:file \"/usr/local/tomcat8/…\" 10 seconds ago Up 9 seconds 0.0.0.0:1111->8080/tcp, :::1111->8080/tcp web1 验证 http://10.1.8.10:1111/ 


