RHCA - CL260 | Day02:部署 RHCS 集群
一、部署 RHCS 集群
LAB: 部署 RedHat Ceph Storage
配置Ceph集群的要求:
- Python 3
- Systemd
- Podman or Docker for running containers,运行容器的Podman或Docker
- Time synchronization (such as chrony or NTP),时间同步(如:chrony、NTP)
- LVM2 for provisioning storage devices,使用LVM2方式发放存储设备
1、使用 ansible 初始化节点环境
[root@foundation0 ~]# ssh student@workstation //ssh远程workstation主机[student@workstation ~]$ lab start deploy-deploy //清理、删除现有的ceph集群Starting lab. · Checking lab systems ........................... SUCCESS · Destroy the existing cluster ................... SUCCESS · Remove /var/log/ceph folder .................... SUCCESS · Remove cluster folder .......................... SUCCESS · Stop ceph target ............................... SUCCESS · Disable ceph target ............................ SUCCESS · Remove ceph target ............................. SUCCESS · Restart systemctl daemon ....................... SUCCESS · Kill all \'admin\' processes ..................... SUCCESS[警告]: 耐心等待,一定等等这个步骤完成后再做后续的操作!
重要提示:环境有bug,需要执行如下操作修复bug

Debug环境补丁,在 foundation0 主机执行如下命令:
[kiosk@foundation0 ~]$ su - root //密码 Asimov[root@foundation0 ~]# mkdir /content/rhel8.4/x86_64/rhel8-additional[root@foundation0 ~]# vim /etc/fstab/content/rhcs5.0/x86_64/isos/rhel-8.4-x86_64-additional-202110061700.iso /content/rhel8.4/x86_64/rhel8-additional iso9660 loop,ro 0 0[root@foundation0 ~]# mount -a[root@foundation0 ~]# for i in 172.25.250.{10..16}; do ssh root@$i \"sudo date -s \'2023-10-25 13:25:00\'\"; done1)Log in to serverc as the root user. 以root用户登录“serverc”
[root@foundation0 ~]# ssh root@serverc2)Install the cephadm-ansible package. 安装cephadm-ansible包
[root@serverc ~]# yum -y install cephadm-ansible3)Create the hosts inventory in the /usr/share/cephadm-ansible directory. 在/usr/share/cephadm-ansible目录中创建主机目录。
[root@serverc ~]# cd /usr/share/cephadm-ansible/ [root@serverc cephadm-ansible]# vim hostsclienta.lab.example.comserverc.lab.example.comserverd.lab.example.comservere.lab.example.com[root@serverc cephadm-ansible]# lsansible.cfg cephadm-preflight.yml cephadm-purge-cluster.yml ceph-defaults hostscephadm-preflight.yml 用于配置和管理 Ceph 存储集群的软件仓库和依赖包。
导入角色:
- 导入 ceph-defaults 角色,该角色可能包含一些默认配置和变量。
配置 Red Hat Storage Tools 仓库:
- 当 ceph_origin 为 rhcs 时,启用 Red Hat Storage Tools 仓库。
配置 Ceph 社区稳定仓库:
- 当 ceph_origin 为 community 时,配置 Ceph 社区稳定仓库,包括导入 GPG 密钥和添加仓库。
配置 Ceph 开发仓库:
- 当 ceph_origin 为 shaman 时,从 Shaman API 获取开发仓库的配置文件,并将其保存到 /etc/yum.repos.d/ceph-dev.repo。同时移除现有的稳定仓库。
安装 epel-release 包:
- 仅在 CentOS 系统上安装 epel-release 包。
安装依赖包:
- 根据主机的组(clients 或其他)安装必要的软件包。如果主机属于 clients 组,则安装 chrony 和 ceph-common;否则,安装 ceph_pkgs 变量中定义的软件包。
- 如果 upgrade_ceph_packages 为 true,则将这些软件包升级到最新版本。
管理 chronyd 服务:
- 确保 chronyd 服务正在运行并设置为开机自启动,以确保时间同步。
cephadm-purge-cluster.yml 用于清理和代码删除 Ceph 存储集群。
确认用户意图:
- 检查 fsid 参数:
- 如果 fsid 未提供,则失败并提示用户必须提供 fsid。
检查 [admin] 组:
- 如果 [admin] 组未定义或为空,则失败并提示用户必须在库存文件中定义 [admin] 组,并添加包含 /etc/ceph/admin.client.keyring 文件的节点。
- 检查和暂停 Ceph 管理:
检查 admin.client.keyring 文件:
- 在 [admin] 组中的第一个节点上检查 /etc/ceph/admin.client.keyring 文件是否存在。
- 如果文件不存在,则失败并提示用户必须在该节点上有该文件。
暂停 Ceph 管理:
- 使用 cephadm shell -- ceph orch pause 命令暂停 Ceph 管理器,以确保在删除集群时不会进行任何编排操作。
删除 Ceph 集群:
- 在所有节点上执行 cephadm rm-cluster --force --zap-osds --fsid {{ fsid }} 命令,强制删除集群并清除 OSD。
- 该任务仅在非 clients 组的节点上执行。
4)Run the cephadm-preflight.yml playbook. 运行 cephadm-preflight.yml 剧本
[root@serverc cephadm-ansible]# ansible-playbook -i hosts cephadm-preflight.yml --extra-vars \"ceph_origin=\"## ceph_origin变量设置为空,可以让剧本中的有些任务跳过执行
## 在教室环境,他们通过本地yum源安装软件(ceph-common,podman,lvm2,cephadm,chrony等)
## 在生产环境可以设置 ceph_origin=rhcs 调用红帽的订阅安装软件
2、Cephadm 创建Ceph集群
Review the initial-config-primary-cluster.yaml file in the /root/ceph directory. 查看 /root/ceph目录下的 initial-config-primary-cluster.yaml文件
[root@serverc ~]# cat /root/ceph/initial-config-primary-cluster.yamlservice_type: host ##1)addr: 172.25.250.10hostname: clienta.lab.example.com---service_type: hostaddr: 172.25.250.12hostname: serverc.lab.example.com---service_type: hostaddr: 172.25.250.13hostname: serverd.lab.example.com---service_type: hostaddr: 172.25.250.14hostname: servere.lab.example.com---service_type: mon ##2)placement: hosts: - clienta.lab.example.com - serverc.lab.example.com - serverd.lab.example.com - servere.lab.example.com---service_type: rgw ##3)service_id: realm.zoneplacement: hosts: - serverc.lab.example.com - serverd.lab.example.com---service_type: mgr ##4)placement: hosts: - clienta.lab.example.com - serverc.lab.example.com - serverd.lab.example.com - servere.lab.example.com---service_type: osd ##5)service_id: default_drive_groupplacement: host_pattern: \'server*\'data_devices: paths: - /dev/vdb - /dev/vdc - /dev/vdd1.The service_type: host defines the nodes to add after the cephadm bootstrap completes. Host clienta will be configured as an admin node.
service_type: host 定义了在cephadm引导完成后要添加的节点。主机客户端将被配置为管理节点。
2.The service_type: mon deploys a Ceph monitor daemon in the listed hosts.
service_type: mon 在列出的主机中部署Ceph监视器守护进程。
3.The service_type: rgw deploys a Ceph Object Gateway daemon in the listed hosts.
service_type: rgw 在列出的主机中部署Ceph Object Gateway守护进程。
4.The service_type: mgr deploys a Ceph Manager daemon in the listed hosts.
service_type: mgr 在列出的主机中部署Ceph Manager守护进程。
5.The service_type: osd deploys a ceph-osd daemon in the listed hosts backed by the /dev/vdb device.
service_type: osd 在/dev/vdb设备支持的主机列表中部署ceph-osd守护进程。
Cephadm 管理Ceph集群的整个生命周期。这个生命周期从引导过程开始,在cephadm单个节点上创建一个微型Ceph 集群。该集群由一个监视器和一个管理器组成。cephadm然后扩展集群,添加所有主机并配置所有 Ceph 守护进程和服务。可以通过 Ceph 命令行界面 (CLI) 或仪表板 (GUI) 执行此生命周期的管理。
- 创建新 Ceph 集群的第一步是在 Ceph 集群的第一台主机上运行cephadm bootstrap命令。
- 创建Ceph集群的第一个MON进程,该进程需要一个IP地址,我们必须将第一个主机的IP地址通过--mon-ip 传递给cephadm bootstrap命令。
As the root user on the serverc node, run the cephadm bootstrap command to create the Ceph cluster.
作为serverc节点上的root用户,运行cephadm bootstrap命令创建Ceph集群。
Use the service specification file located at initial-config-primary-cluster.yaml.
使用位于 initial-config-primary-cluster.yaml 的服务规范文件。
[root@serverc ~]# cd /root/ceph/[root@serverc ceph]# cephadm bootstrap --mon-ip=172.25.250.12 \\--apply-spec=initial-config-primary-cluster.yaml \\--initial-dashboard-password=redhat \\--dashboard-password-noupdate \\--allow-fqdn-hostname \\--registry-url=registry.lab.example.com \\--registry-username=registry \\--registry-password=redhat引导 Ceph 集群:
- 使用 cephadm bootstrap 命令引导一个新的 Ceph 集群。
- 指定监控节点的 IP 地址(--mon-ip=172.25.250.12)。
应用初始配置文件:
- 使用 --apply-spec=initial-config-primary-cluster.yaml 选项应用初始配置文件,该文件定义了集群的初始配置,包括节点角色、存储池等。
设置仪表板密码:
- 设置初始的仪表板密码为 redhat(--initial-dashboard-password=redhat)。
- 禁止在后续操作中更新仪表板密码(--dashboard-password-noupdate)。
允许使用 FQDN 主机名:
- 允许使用完全限定域名(FQDN)作为主机名(--allow-fqdn-hostname)。
配置容器镜像注册表:
- 指定容器镜像注册表的 URL 为 registry.lab.example.com(--registry-url=registry.lab.example.com)。
- 提供注册表的用户名和密码(--registry-username=registry 和 --registry-password=redhat),以便 cephadm 可以从该注册表拉取所需的容器镜像。
## cephadm bootstrap --help (查看命令的帮助文档)
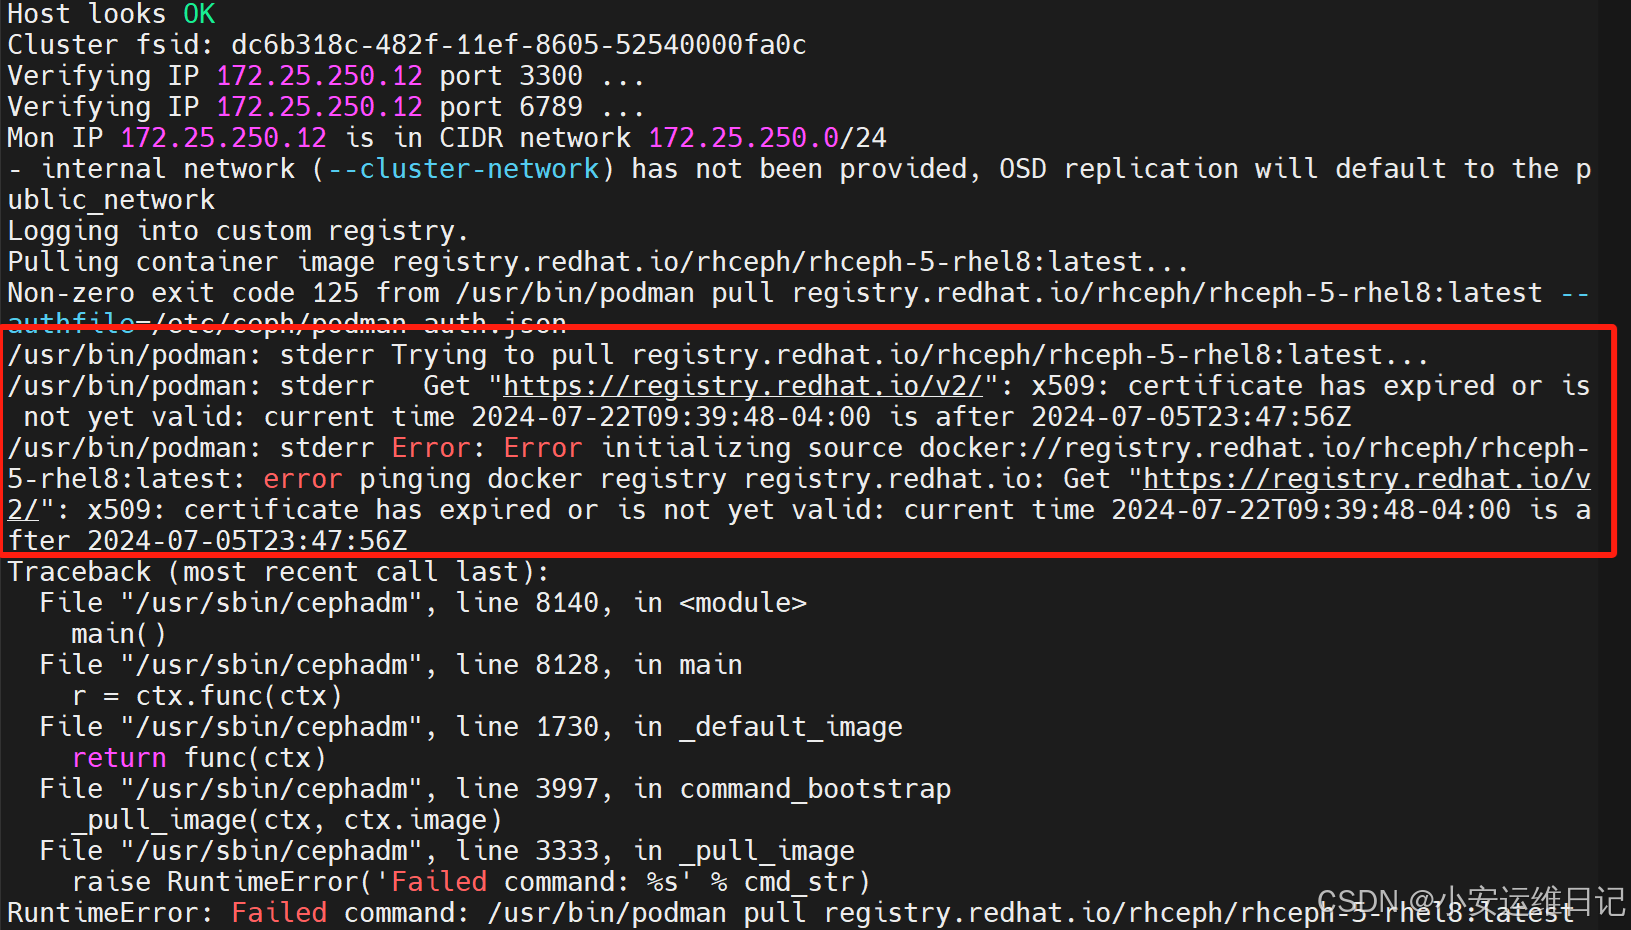
如果执行命令出现如下图错误:certificate has expired or is not valid. 则需要将系统时间修改为2023年即可(date -s 2023-10-25)。
## 上面命令完成了如下工作:
- 在本地主机上启动 mon 和 mgr 进程;
- 为ceph集群在/root/.ssh目录创建一个SSH密钥对,并将公钥写入 /etc/ceph/ceph.pub 文件;
- 将最小配置文件写入 /etc/ceph/ceph.conf 文件;
- 将cephadm管理员密钥写入 /etc/ceph/ceph.client.admin.keyring 文件;
- 给bootstrap主机添加_admin标签(有该标签的主机会复制一份 /etc/ceph/ceph.conf 和 /etc/ceph/ceph.client.admin.keyring 文件)
正常输出示例:
You can pass any initial Ceph configuration options to the new cluster by putting them in a standard ini-style configuration file and using the --config ** option. For example:$ cat initial-ceph.conf[global]osd crush chooseleaf type = 0$ ./cephadm bootstrap --config initial-ceph.conf ...使用--ssh-user 可用指定cephadm使用哪个用户远程其他主机--registry-json 可以将镜像信息传递给命令,json文件格式如下:{\"url\":\"REGISTRY_URL\", \"username\":\"REGISTRY_USERNAME\", \"password\":\"REGISTRY_PASSWORD\"}Verifying podman|docker is present...Verifying lvm2 is present...Verifying time synchronization is in place...Unit chronyd.service is enabled and runningRepeating the final host check...podman|docker (/usr/bin/podman) is presentsystemctl is presentlvcreate is presentUnit chronyd.service is enabled and runningHost looks OKCluster fsid: b1ae4c08-38dd-11ed-a3b9-52540000fa0cVerifying IP 172.25.250.12 port 3300 ...Verifying IP 172.25.250.12 port 6789 ...Mon IP 172.25.250.12 is in CIDR network 172.25.250.0/24- internal network (--cluster-network) has not been provided, OSD replication will default to the public_networkLogging into custom registry.Pulling container image registry.redhat.io/rhceph/rhceph-5-rhel8:latest...Ceph version: ceph version 16.2.0-117.el8cp (0e34bb74700060ebfaa22d99b7d2cdc037b28a57) pacific (stable)Extracting ceph user uid/gid from container image...Creating initial keys...Creating initial monmap...Creating mon...firewalld readyWaiting for mon to start...Waiting for mon...mon is availableAssimilating anything we can from ceph.conf...Generating new minimal ceph.conf...Restarting the monitor...Setting mon public_network to 172.25.250.0/24Wrote config to /etc/ceph/ceph.confWrote keyring to /etc/ceph/ceph.client.admin.keyringCreating mgr...Verifying port 9283 ...firewalld readyfirewalld readyWaiting for mgr to start...Waiting for mgr...mgr not available, waiting (1/15)...mgr not available, waiting (2/15)...mgr not available, waiting (3/15)...mgr is availableEnabling cephadm module...Waiting for the mgr to restart...Waiting for mgr epoch 5...mgr epoch 5 is availableSetting orchestrator backend to cephadm...Generating ssh key...Wrote public SSH key to /etc/ceph/ceph.pubAdding key to root@localhost authorized_keys...Adding host serverc.lab.example.com...Deploying mon service with default placement...Deploying mgr service with default placement...Deploying crash service with default placement...Enabling mgr prometheus module...Deploying prometheus service with default placement...Deploying grafana service with default placement...Deploying node-exporter service with default placement...Deploying alertmanager service with default placement...Enabling the dashboard module...Waiting for the mgr to restart...Waiting for mgr epoch 13...mgr epoch 13 is availableGenerating a dashboard self-signed certificate...Creating initial admin user...Fetching dashboard port number...firewalld readyCeph Dashboard is now available at: URL: https://serverc.lab.example.com:8443/ User: admin Password: redhatApplying initial-config-primary-cluster.yaml to clusterAdding ssh key to clienta.lab.example.comAdding ssh key to serverd.lab.example.comAdding ssh key to servere.lab.example.comAdded host \'clienta.lab.example.com\' with addr \'172.25.250.10\'Added host \'serverc.lab.example.com\' with addr \'172.25.250.12\'Added host \'serverd.lab.example.com\' with addr \'172.25.250.13\'Added host \'servere.lab.example.com\' with addr \'172.25.250.14\'Scheduled mon update...Scheduled rgw.realm.zone update...Scheduled mgr update...Scheduled osd.default_drive_group update...You can access the Ceph CLI with: sudo /usr/sbin/cephadm shell --fsid b1ae4c08-38dd-11ed-a3b9-52540000fa0c -c /etc/ceph/ceph.conf -k /etc/ceph/ceph.client.admin.keyringPlease consider enabling telemetry to help improve Ceph: ceph telemetry onFor more information see: https://docs.ceph.com/docs/pacific/mgr/telemetry/附加:通过如下命令可以重置dashbord密码:
// 提前将密码写入pass文件[root@serverc ~]# ceph dashboard ac-user-set-password admin -i pass3、验证Ceph存储集群状态
1)Verify the status of the Ceph storage cluster. 验证Ceph存储集群状态
[root@serverc ~]# cephadm shell- 执行cephadmin shell会临时自动启动一个新容器(容器中已经安装了ceph软件)
- 默认容器会读取宿主机 /etc/ceph 目录下的配置文件和密钥文件
- 如果执行cephadm shell时指定了--mount选项,还可用指定将宿主机的某个目录挂载到容器特定的/mnt目录下
// 在容器中查看集群状态[ceph: root@serverc /]# ceph -s// 在容器中查看主机节点标签[ceph: root@serverc /]# ceph orch host ls2)Label clienta as the admin node. 将clienta标记为管理节点。
- 命令:ceph orch host label add
- 命令:ceph orch host ls
[ceph: root@serverc /]# ceph orch host label add clienta.lab.example.com _admin[ceph: root@serverc /]# ceph orch host ls[ceph: root@serverc /]# exit3)Manually copy the ceph.conf and ceph.client.admin.keyring files from serverc to clienta. These files are located in /etc/ceph. 手动将ceph.conf和ceph.client.admin.keyring文件从serverc拷贝到clienta。这些文件位于/etc/ceph中。
[root@serverc ~]# cd /etc/ceph/[root@serverc ceph]# scp {ceph.conf,ceph.client.admin.keyring} root@clienta:/etc/cephVerify that you can execute cephadm commands from clienta. 验证您可以从客户机执行cephadm命令
Open another terminal and log in to clienta as root user. 打开另一台终端,以root用户登录clienta。
[root@foundation0 ~]# ssh root@clienta[root@clienta ~]# ls /etc/ceph/ceph.client.admin.keyring ceph.conf podman-auth.json rbdmap[root@clienta ~]# cephadm shell -- ceph -s## 退出终端
[ceph: root@clienta /]# exit4、总结步骤流程
1)安装 cephadm-ansible(执行剧本安装 cephadm,chrony,lvm2,podman等)
2)cephadm bootstrap 读取初始化配置文件 initial-config-primary-cluster.yaml,部署集群
3)cephadm shell 管理集群
扩容:scaling out(横向扩展)、scaling up(纵向扩展)
Add additional OSD nodes to the cluster, referred to as scaling out.
Add additional storage space to the existing OSD nodes, referred to as scaling up.
二、配置新增OSD服务器
添加新主机前,需要确保新主机满足如下要求:
- Python 3
- Systemd
- Podman or Docker for running containers
- Time synchronization (such as chrony or NTP)
- LVM2 for provisioning storage devices
操作流程:
As the root user, add the Ceph storage cluster public SSH key to the root user\'s authorized_keys file on the new host. 作为root用户,将Ceph存储集群公共SSH密钥添加到新主机上root用户的authorized_keys文件中。

在bootstrap主机执行如下命令,将集群公钥拷贝给新主机
[root@adm ~]# ssh-copy-id -f -i /etc/ceph/ceph.pub root@new-osd-1[root@adm ~]# ansible-playbook -i /usr/share/cephadm-ansible/hosts \\/usr/share/cephadm-ansible/cephadm-preflight.yml \\--extra-vars \"ceph_origin=\" \\--limit new-osd-1提前修改好ansible主机清单文件,将新主机加入主机清单
--limit 限制仅对清单文件中的某一些主机执行剧本(准备ceph环境,让主机满足集群需求,podman,lvm2,ntp等)
在Ceph集群中添加主机(确保主机之间网络可达)
- 命令:ceph orch host add --labels
[root@adm ~]# cephadm shell[ceph: root@adm /]# ceph orch host add new-osd-1 --labels=mon,osd,mgr或者,也可用不指定labels:
- 命令:ceph orch host add
[ceph: root@adm /]# ceph orch host add host2 10.10.0.102[ceph: root@adm /]# ceph orch host add host3 10.10.0.103## 最好明确提供主机IP地址。如果未提供IP,则主机名将通过DNS解析并使用该IP。
如果需要添加多台主机,可用提前创建一个YAML文件,通过YAML文件添加主机
[ceph: root@adm /]# vim host.ymlservice_type: host addr: IP hostname: new-osd-1 labels: - mon - osd - mgrservice_type: host addr: IP hostname: new-osd-2 labels: - mon - osd有了YAML文件后执行ceph orch apply命令添加主机
[ceph: root@adm /]# ceph orch apply -i host.yml[ceph: root@adm /]# ceph orch host ls删除主机标签:
- 命令:ceph orch host label rm
删除主机:
- 命令:ceph orch host rm
LAB: 新增OSD服务器
1、在bootstrap主机执行如下命令,将集群公钥拷贝给新主机
[root@foundation0 ~]# ssh root@serverc[root@serverc ~]# ssh-copy-id -f -i /etc/ceph/ceph.pub root@serverg.lab.example.comssh-copy-id:用于将本地 SSH 公钥复制到远程主机的 authorized_keys 文件中,实现免密登录。
-f 强制模式:覆盖远程主机上已存在的同名公钥(若已配置过相同公钥则直接替换)。
-i 指定公钥路径:使用 /etc/ceph/ceph.pub 文件中的公钥(而非默认的 ~/.ssh/id_rsa.pub)。
// 验证:[root@serverg ~]# cat ~/.ssh/authorized_keys2、修改好ansible主机清单文件,将新主机加入主机清单
[root@serverc ~]# echo serverg.lab.example.com >> /usr/share/cephadm-ansible/hosts[root@serverc ~]# cat /usr/share/cephadm-ansible/hostsclienta.lab.example.comserverc.lab.example.comserverd.lab.example.comservere.lab.example.comserverg.lab.example.com3、使用ansible初始化节点环境,仅限serverg.lab.example.com
[root@serverc ~]# cephadm shell[ceph: root@serverc /]# ceph orch host add serverg.lab.example.com --labels=mon,osd,mgr[ceph: root@serverc /]# ceph orch host ls4、在集群中添加主机
[root@serverc ~]# cephadm shell[ceph: root@serverc /]# ceph orch host add serverg.lab.example.com --labels=mon,osd,mgr[ceph: root@serverc /]# ceph orch host ls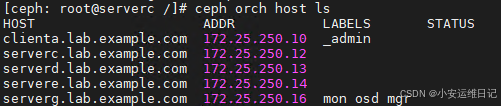
5、验证
[root@foundation0 ~]# ssh root@serverg[root@serverg ~]# podman login registry.redhat.io# Username: registry# Password:# Login Succeeded![root@serverg ~]# podman pull registry.redhat.io/rhceph/rhceph-5-rhel8[root@serverg ~]# podman pull registry.redhat.io/openshift4/ose-prometheus-node-exporter:v4.5三、配置额外OSD存储块设备
添加新存储设备的要求:
- The device must have no partitions.(设备没有分区)
- The device must not have any LVM state.(设备没有LVM)
- The device must not be mounted.(设备没有挂载)
- The device must not contain a file system.(设备没有文件系统)
- The device must not contain a Ceph BlueStore OSD.(设备不包含OSD信息)
- The device must be larger than 5 GB.(设备容量大于5G)
## 查看所有可用设备
- 命令:ceph orch device ls
## 给主机添加OSD设备2个方案:
方案1:手动添加
1)手动指定添加特定的硬盘:
- 命令:ceph orch daemon add osd **:**
[ceph: root@adm /]# ceph orch daemon add osd osd-1:/dev/vdb2)使用满足条件的所有设备部署OSD daemon:
- 命令:ceph orch apply osd --all-available-devices
[ceph: root@adm /]# ceph orch apply osd --all-available-devices运行上述命令后,如果将新磁盘添加到集群,它们将自动用于创建新的OSD
使用 unmanaged参数 关闭在可用设备上自动创建OSD的功能: 如果您想避免这种行为(禁止在可用设备上自动创建OSD)
方案2:YAML添加
我们也可通过YAML文件指定给特定的主机添加特定的设备,下面的示例为 default_drive_group 组中所有主机添加/dev/vdc和/dev/vdd设备。
service_type: osdservice-id: default_drive_groupplacement: hosts: - osd-1 - osd-2data_devices: paths: - /dev/vdc - /dev/vdd然后运行ceph orch apply命令应用YAML配置文件
[ceph: root@adm /]# ceph orch apply -i YAML文件LAB: 扩容RHCS存储集群容量
1、拷贝创建集群yaml文件,在service_type: osd的data_devices添加磁盘
[root@foundation0 ~]# ssh root@serverc[root@serverc ~]# cd /root/ceph/[root@serverc ceph]# cp initial-config-primary-cluster.yaml osd.yml[root@serverc ceph]# vim osd.ymlservice_type: osdservice_id: default_drive_groupplacement: host_pattern: \'server*\'data_devices: paths: - /dev/vdb - /dev/vdc - /dev/vdd - /dev/vde ## 添加/dev/vde2、启动容器,并将宿主机osd.yml文件挂载到容器的/mnt目录
[root@serverc ceph]# cephadm shell --mount /root/ceph/osd.yml## man cephadm,搜索--mount,mount a file or directory under /mnt in the container.
备注:宿主机挂在文件目录一般存放在容器的/mnt目录下。
部署 osd_spec.yml 文件,然后运行 ceph orch apply 命令来实现配置。
[ceph: root@serverc /]# ceph orch apply -i /mnt/osd.yml...Scheduled osd.default_drive_group update...注意:根据主机性能不同,可能需要等待较长时间
验证:
// 查看device设备[ceph: root@serverc /]# ceph orch device ls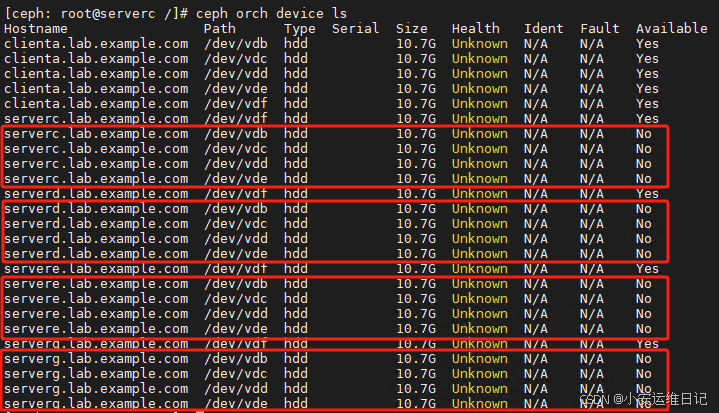
// 查看osd tree[ceph: root@serverc /]# ceph osd tree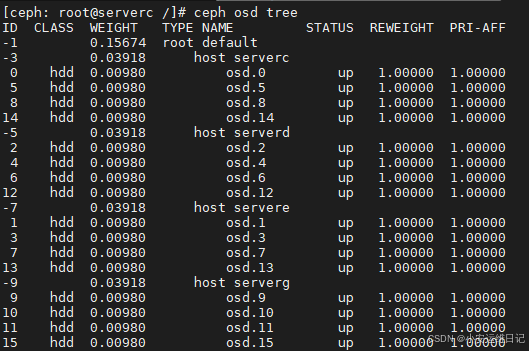
## 退出集群管理容器
[ceph: root@serverc /]# exit3、通过orch命令为服务器添加OSD(/dev/vde、/dev/vdf)
- 命令:ceph orch device ls --hostname=
[ceph: root@serverc /]# ceph orch device ls --hostname=servere.lab.example.comHostname Path Type Serial Size Health Ident Fault Availableservere.lab.example.com /dev/vdf hdd 10.7G Unknown N/A N/A Yesservere.lab.example.com /dev/vdb hdd 10.7G Unknown N/A N/A Noservere.lab.example.com /dev/vdc hdd 10.7G Unknown N/A N/A Noservere.lab.example.com /dev/vdd hdd 10.7G Unknown N/A N/A Noservere.lab.example.com /dev/vde hdd 10.7G Unknown N/A N/A No## 通过命令行,一次添加一个主机设备
- 命令:ceph orch daemon add osd
[ceph: root@serverc /]# ceph orch daemon add osd serverd.lab.example.com:/dev/vdfCreated osd(s) 16 on host \'serverd.lab.example.com\'[ceph: root@serverc /]# ceph orch daemon add osd servere.lab.example.com:/dev/vdfCreated osd(s) 17 on host \'servere.lab.example.com\'验证:
Verity that the cluster is in a healthy state and that the OSDs were successfully added.
集群是否处于健康状态,是否成功添加了osd。
[ceph: root@serverc /]# ceph -s//显示OSD的树状结构,包括OSD的分组情况、权重、状态等信息[ceph: root@serverc /]# ceph osd tree//显示OSD的磁盘使用情况,包括每个OSD容量、已用空间和剩余空间[ceph: root@serverc /]# ceph osd df //显示Ceph集群中所有主机的可用设备(磁盘)信息,包括是否已用于 OSD、是否有 LVM、是否有分区等[ceph: root@serverc /]# ceph orch device ls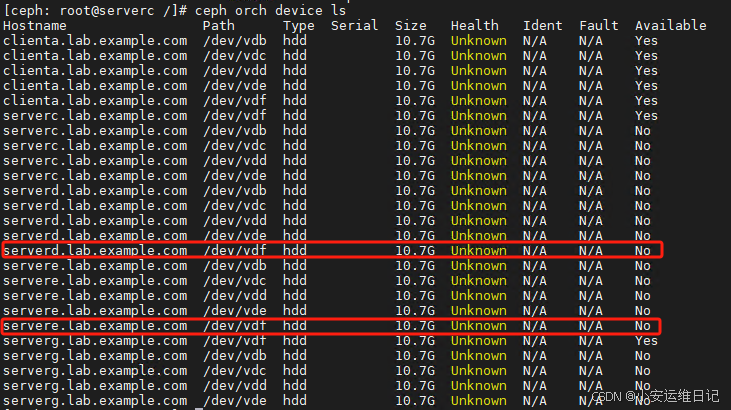
四、常用命令整理
1)查看主机列表
- 命令:ceph orch host ls
2)查看设备列表
- 命令:ceph orch device ls
3)添加主机
- 命令:ceph orch host add --labels=mon,osd,mgr
4)添加标签
- 命令:ceph orch host label add
5)添加设备
- 命令:ceph orch daemon add osd :/dev/vdc
- 6)删除主机
- 命令:ceph orch host rm
7)查看所有集群服务
- 命令:ceph orch ls
NAME是服务名称,RUNNING是运行的数量,PLACEMENT是服务器位置的策略
服务运行在哪里,策略方案有:
- 明确指定匹配,让服务进程运行在特定的主机
- 标签匹配,让服务进程运行在特定label标签的主机
- 模式匹配,使用通配符,如server*匹配
- 指定数量匹配,通过count=3,仅指定数量,不关心位置,cephadm自己决定位置
常见服务类型:mon,mgr
8)指定主机运行服务进程(仅为语法示例):
## 指定主机运行服务进程,将bootstrap主机放在第一位置
- 命令:ceph orch apply mon --placement=\"HOST_1 HOST_2 HOST_3\"
注意下列方法,最终mon仅运行在host03主机(这里仅为语法示例)
ceph orch apply mon host01
ceph orch apply mon host02
ceph orch apply mon host03
9)根据label运行服务进程(仅语法示例):
## 给serverc主机添加一个mon标签,让mon服务进程运行在有mon标签的主机上
- 命令:ceph orch host label add mon
- 命令:ceph orch apply mon --placement=\"label:mon\"
10)运行特定数量的服务进程(指定数量):
## 在存储集群所有主机中随机运行3个mon进程(也可以是其他进程)
- 命令:ceph orch apply mon --placement=3
## 在特定的主机中随机运行3个mon进程(也可以是其他进程)
- 命令:ceph orch apply mon --placement=\"3 host1 host2 host3\"
11)模式匹配:
- 命令:ceph orch apply mon --placement=\"server[c-d]\"
- 命令:ceph orch apply mon --placement=\"host[1-3]\"
- 命令:ceph orch apply mon --placement=\"server*\"
YAML文件的格式示例:
// 特定主机service_type: monplacement: hosts: - host1 - host2 - host3// 根据标签匹配service_type: monplacement: label: \"my_label\"// 指定数量(集群所有主机随机)service_type: monplacement: count: 3// 指定数量(集群中特定主机随机)service_type: monplacement: count: 2 hosts: - host1 - host2 - host3// 模式匹配service_type: monplacement: host_pattern: \"host[1-3]\" 12)重启服务:
## 查看所有进程信息
-
命令:ceph orch ps
## 重启某个服务进程(用ceph orch ps查看的进程名称)
-
命令:ceph orch daemon restart rgw.rgw.ceph3.sfepof
## 查看所有服务信息
-
命令:ceph orch ls
## 重启集群所有mon进程(重启整个服务,用ceph orch ls查看的服务名称)
-
命令:ceph orch restart mon
13)清空某个主机中的所有守护进程(不是每个版本都支持该命令):
- 命令:ceph orch host drain HOSTNAME
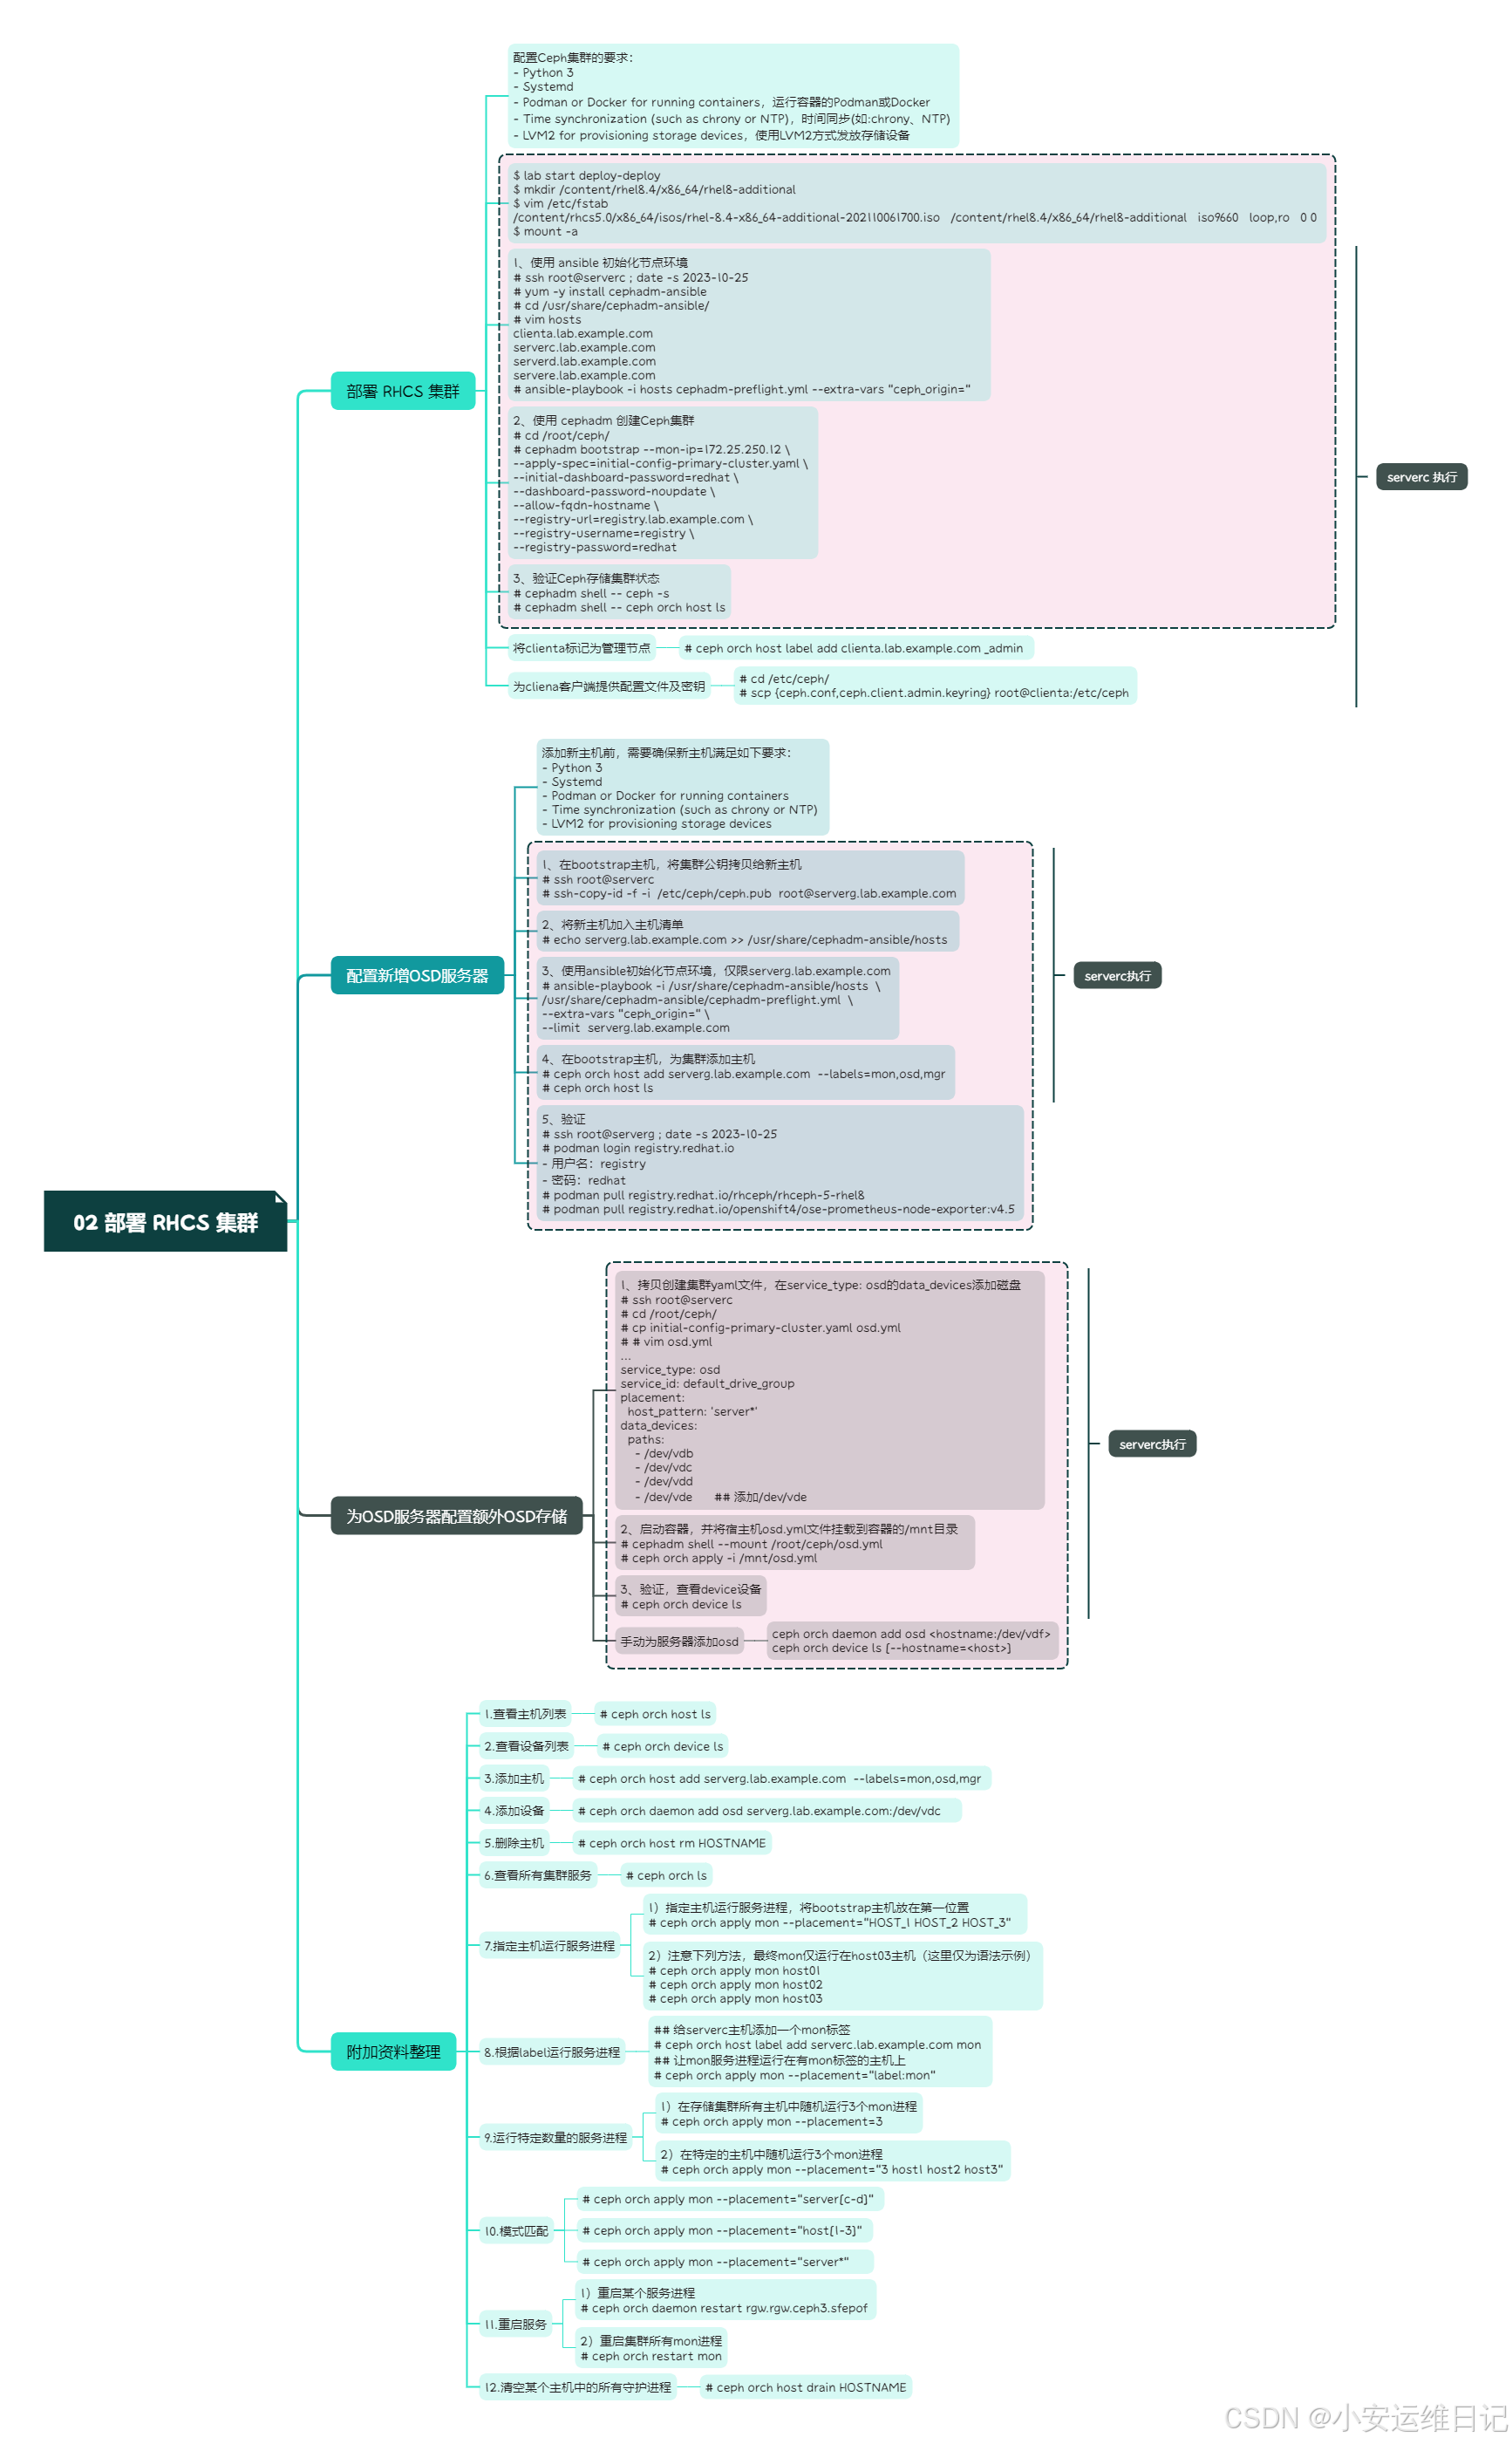
思维导图:
小结:
本篇为 【RHCA认证 - CL260 | Day02:部署 RHCS 集群】的开篇学习笔记,希望这篇笔记可以让您初步了解到 如何部署 RedHat Ceph Storage、如何配置新增OSD服务器、如何配置额外OSD存储块设备,不妨跟着我的笔记步伐亲自实践一下吧!
Tip:毕竟两个人的智慧大于一个人的智慧,如果你不理解本章节的内容或需要相关环境、视频,可评论666并私信小安,请放下你的羞涩,花点时间直到你真正的理解。

