02-netty基础-java四种IO模型
1 阻塞IO(Blocking IO)
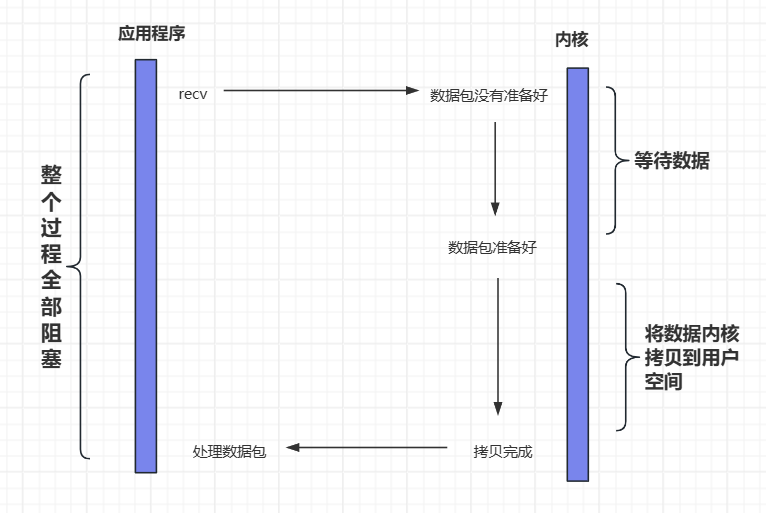
1.1 工作机制
从应用程序发起调用到内核空间准备好数据、拷贝数据到用户空间,然后将数据返回给应用程序,这期间应用程序这块都是阻塞的,无法响应其他请求。
- 工作机制:在进行 IO 操作时(如读取数据),线程会被挂起,进入等待状态,直到数据准备好并读取完成后才会继续执行后续代码。
- 特点:实现简单,但在等待期间线程无法处理其他任务,导致资源浪费,适用于连接数少且 IO 操作耗时短的场景。
- 示例场景:传统的 Java IO 操作,如
InputStream.read()方法调用时,如果没有数据可读,线程会一直阻塞。
socket交互的流程可以查看上一篇文章: 01-netty基础-socket-CSDN博客
1.2 代码实现
1.2.1 服务端代码
1.2.1.1 方式一单线程
处理完一个客户端请求,然后在处理下一个客户端请求
package com.bonnie.bio;import java.io.*;import java.net.ServerSocket;import java.net.Socket;/** * 阻塞io服务端 * 当一个客户端连接上来后,未处理完成,那么其他客户端是无法连接上来的; * 相当于串行执行,前一个执行完成才能轮到下一个执行 */public class BlockingServer { public static void main(String[] args) throws IOException { // 第一步:首先通过ServerSocket来监听端口,我们知道,每个进程都有一个唯一的端口 ServerSocket serverSocket = new ServerSocket(8080); while (true) { try { // 通过accept方法阻塞调用,直到有客户端的连接过来,就会返回Socket Socket socket = serverSocket.accept(); // 获取socket的输入流 BufferedReader bufferedReader = new BufferedReader(new InputStreamReader(socket.getInputStream())); int port = socket.getPort(); System.out.println(\"客户端的端口号:\"+ port); // 获取客户端的数据,这个地方是一个阻塞的io,阻塞到直到数据读取完成 String cliStr = bufferedReader.readLine(); System.out.println(\"收到客户端的数据:\"+ cliStr); // 获取socket的输出流 BufferedWriter bufferedWriter = new BufferedWriter(new OutputStreamWriter(socket.getOutputStream())); // 给客户端会写数据 这块结尾一定要使用\\n,结束标志 bufferedWriter.write(\"ok\\n\"); // 刷新 bufferedWriter.flush(); } catch (Exception e) { e.printStackTrace(); } } }}1.2.1.2 方式二线程池
来一个客户端的请求,开启一个新线程,从而可以达到同时处理多个请求;
因为accept方法会阻塞等待客户端的连接,导致一个线程只能处理一个连接;如果想要处理多个连接,就要使用线程池来处理连接,但是这个是非常消耗线程的,线程是非常宝贵的资源,除非是机器性能很好,一般不建议采用
package com.bonnie.bio;import java.io.*;import java.net.ServerSocket;import java.net.Socket;import java.util.concurrent.ExecutorService;import java.util.concurrent.Executors;/** * 阻塞io服务端 * 当一个客户端连接上来后,未处理完成,那么其他客户端是无法连接上来的; * 使用多线程,将接收到的客户端请求放入都到线程池中,进而看到多个客户端可以同时连接和处理的现象 */public class ThreadBlockingServer { static ExecutorService executorService = Executors.newCachedThreadPool(); public static void main(String[] args) throws IOException { // 第一步:首先通过ServerSocket来监听端口,我们知道,每个进程都有一个唯一的端口 ServerSocket serverSocket = new ServerSocket(8080); while (true) { // 通过accept方法阻塞调用,直到有客户端的连接过来,就会返回Socket Socket socket = serverSocket.accept(); // 接收到客户端的请求,将请求放到线程池中,一个客户端一个线程,【创建线程消耗资源消耗时间、线程资源也比较珍贵】 executorService.execute(()-> { try { // 获取socket的输入流 BufferedReader bufferedReader = new BufferedReader(new InputStreamReader(socket.getInputStream())); int port = socket.getPort(); System.out.println(\"客户端的端口号:\"+ port); // 获取客户端的数据,这个地方是一个阻塞的io,阻塞到直到数据读取完成 String cliStr = bufferedReader.readLine(); System.out.println(\"收到客户端的数据:\"+ cliStr); // 获取socket的输出流 BufferedWriter bufferedWriter = new BufferedWriter(new OutputStreamWriter(socket.getOutputStream())); // 给客户端会写数据 bufferedWriter.write(\"ok\\n\"); // 刷新 bufferedWriter.flush(); } catch (Exception e) { e.printStackTrace(); } }); } }}12.2 客户端代码
package com.bonnie.bio;import java.io.*;import java.net.Socket;/** * 阻塞io客户端 */public class BlockingClient { public static void main(String[] args) throws IOException { Socket socket = new Socket(\"127.0.0.1\", 8080); BufferedWriter bufferedWriter = new BufferedWriter(new OutputStreamWriter(socket.getOutputStream())); // 这块结尾一定要使用\\n,结束标志 bufferedWriter.write(\"你好我是客户端 \\n\"); bufferedWriter.flush(); BufferedReader bufferedReader = new BufferedReader(new InputStreamReader(socket.getInputStream())); String s = bufferedReader.readLine(); System.out.println(\"服务端写回的数据: \" + s); }}1.2.3 码云位置
git地址: https://gitee.com/huyanqiu6666/netty.git 分支: 250721-io
2 非阻塞IO(No Blocking IO)
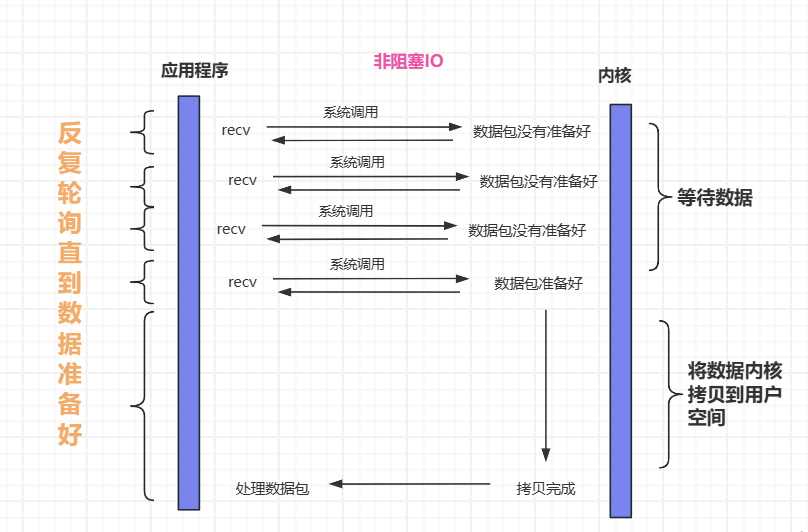
2.1 工作机制
阻塞IO:发起系统调用后,直到内核有数据才会返回数据,在这个期间,线程一直阻塞。
非阻塞IO:发起系统调用后,无论内核中数据是否准备好,都不再阻塞应用线程,而是反复轮询直到数据准备好。下图就是描述了非阻塞IO的流程
- 工作机制:线程在发起 IO 操作后会立即返回一个状态值(如
-1表示数据未准备好),线程不会被阻塞,可以继续执行其他任务。之后线程需要不断轮询检查 IO 操作的状态,直到数据准备好。 - 特点:线程在等待期间可以处理其他任务,提高了资源利用率,但频繁的轮询会消耗 CPU 资源。
- 示例场景:在 Java 中,可以通过设置
socket.setSoTimeout(1000)将 Socket 设置为非阻塞模式,然后循环调用read()方法检查数据是否就绪
2.2 代码实现
2.2.1 服务端代码
package com.bonnie.noblocking;import org.apache.commons.compress.utils.Lists;import java.io.IOException;import java.net.InetSocketAddress;import java.nio.ByteBuffer;import java.nio.channels.ServerSocketChannel;import java.nio.channels.SocketChannel;import java.nio.charset.StandardCharsets;import java.util.List;/** * 非阻塞IO: 一个线程可以处理多个连接 * 定时轮询:询问客户端是否有数据进来,每次都要询问,消耗时间,消耗资源, */public class NoBlockingServer { static List clients = Lists.newArrayList(); public static void main(String[] args) throws IOException { // 得到一个serverSocketChannel管道,这个就等同于serverSocket,只不过这个是支持异步并且可以同时读写 ServerSocketChannel serverSocketChannel = ServerSocketChannel.open(); // 我们想要socket为非阻塞,通过设置该值为false就是为非阻塞 serverSocketChannel.configureBlocking(Boolean.FALSE); // 绑定端口 serverSocketChannel.socket().bind(new InetSocketAddress(8080)); while (true) { try { // 接收客户端的请求,调用accept,由于设置成非阻塞了,所以accept将不会阻塞在这里等客户端的连接过来 SocketChannel socketChannel = serverSocketChannel.accept(); if (socketChannel != null) { // 同时也设置socketChannel为非阻塞,因为原来我们读取数据read方法也是阻塞的 socketChannel.configureBlocking(Boolean.FALSE); clients.add(socketChannel); System.out.println(\"客户端端口:\" + socketChannel.socket().getPort()); } else { Thread.sleep(3 * 1000); System.out.println(\"没有连接,请等待!!!\"); } // 主线程处理多个客户端的连接 假设有10个客户端 for (SocketChannel client : clients) { // channel中的数据都是先读取到buffer中,也都先写入到buffer中,所以定义一个ByteBuffer ByteBuffer byteBuffer = ByteBuffer.allocate(1024); // 数据读取到缓冲区,由于上面设置了非阻塞,此时的read将不会阻塞 // 一直循环调用read,看是否有数据存在===> 调用10次read===>就是一次系统调用,10次系统调用, 消耗时间消耗资源 int num = client.read(byteBuffer); if (num>0) { System.out.println(\"收到客户端数据:\" + new String(byteBuffer.array(), StandardCharsets.UTF_8)); socketChannel.write(ByteBuffer.wrap(\"你好我是服务端\\n\".getBytes(StandardCharsets.UTF_8))); } else { System.out.println(\"等待客户端写数据!!!\"); } } } catch (Exception e) { e.printStackTrace(); } } }}2.2.2 客户端代码
package com.bonnie.noblocking;import java.io.IOException;import java.net.InetSocketAddress;import java.nio.ByteBuffer;import java.nio.channels.SocketChannel;import java.nio.charset.StandardCharsets;public class NoBlockingClient { public static void main(String[] args) throws IOException, InterruptedException { SocketChannel socketChannel = SocketChannel.open(); // 连接服务器 socketChannel.connect(new InetSocketAddress(\"127.0.0.1\",8080)); // 发送消息到服务端 socketChannel.write(ByteBuffer.wrap(\"你好我是客户端\\n\".getBytes(StandardCharsets.UTF_8))); // 接收服务端消息 ByteBuffer byteBuffer = ByteBuffer.allocate(1024); int num = socketChannel.read(byteBuffer); if (num>0) { // 设置读取到末尾,并且重置位置 byteBuffer.flip(); System.out.println(\"服务端写回的数据: \" + new String(byteBuffer.array(), StandardCharsets.UTF_8)); } }}2.3 码云位置
git地址: https://gitee.com/huyanqiu6666/netty.git 分支: 250721-io
2.4 存在的问题
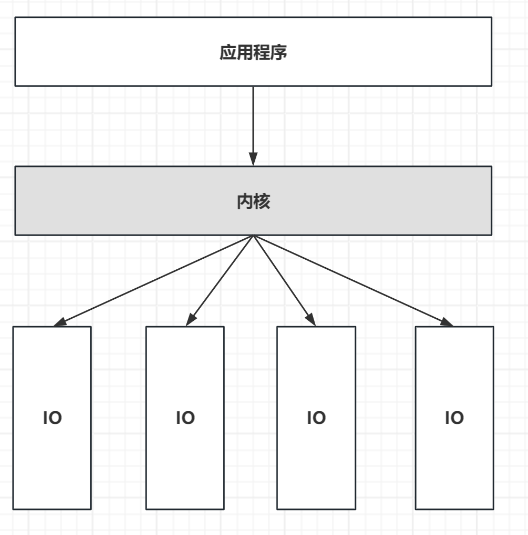
如下图:多个客户端访问服务端,就看到一个服务端的一个线程可以同时处理多个请求,,由于是非阻塞的,所以每个客户端都会去调用read,看数据是否准备好,进而会导致很多无用的系统调用,非常的浪费资源;如果有1W个客户端只有1个客户端准备好了,资源会造成极大的浪费。
2.5 如何解决
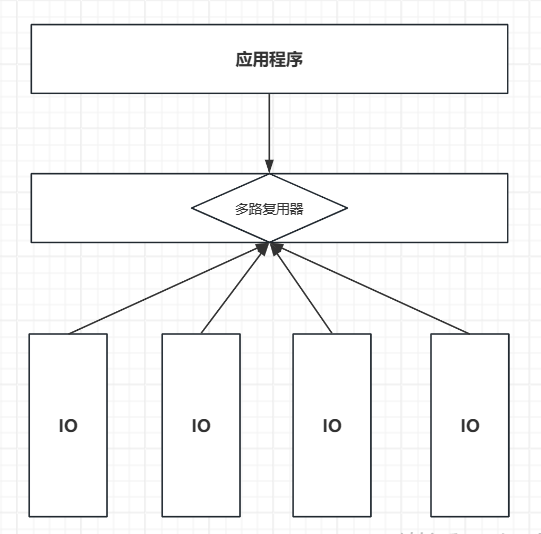
可以采用如下图的方式,使用多路复用器,这种方式可以监听到有数据到来的IO,然后触发下一个请求;由原来的轮询所有找出有数据的IO,变成了只监听有数据的IO,性能得到了大大的提升。
多路复用(Multiplexing)是一种让单个实体能同时管理多个资源的技术方案。在 IO 编程的范畴内,多路复用指的是由单个线程借助 Selector(选择器)来监管多个 IO 通道(像网络连接这类),一旦某个通道有 IO 事件(例如数据可读)发生,就能及时对其进行处理。
工作原理
多路复用的运行机制主要包含以下几个步骤:
- 注册通道:把所有需要监控的 IO 通道都注册到 Selector 上,并且为每个通道指定想要监控的事件类型,比如读事件或者写事件。
- 阻塞等待:Selector 会进入阻塞状态,一直等到至少有一个注册的通道发生了 IO 事件。
- 事件分发:当有 IO 事件出现时,Selector 会返回发生事件的通道集合,随后线程会对这些事件进行处理。
应用场景
多路复用技术在以下场景中尤为适用:
- 高并发连接:在需要处理大量并发连接的场景下,比如聊天服务器、Web 服务器等,多路复用技术能够充分发挥其优势。
- 连接活跃度低:当大量连接处于空闲状态,只是偶尔有 IO 操作时,多路复用技术可以高效地管理这些连接。
- 资源受限环境:在系统资源有限的情况下,无法为每个连接都分配一个独立的线程,此时多路复用技术就成为了理想的选择。
3 NIO(New IO)
- 工作机制:基于 Selector(选择器)和 Channel(通道)实现。多个 Channel 可以注册到一个 Selector 上,Selector 会不断轮询这些 Channel,当某个 Channel 有数据就绪时,会通知线程进行处理。
- 特点:单线程可以处理多个连接,避免了频繁创建和销毁线程的开销,适用于连接数多但 IO 操作轻量的场景(如聊天服务器)。
- 示例场景:Java NIO 包中的
Selector、SocketChannel和ServerSocketChannel的组合使用。
3.1 工作机制
3.2 代码实现
3.2.1 服务端代码
package com.bonnie.newio;import java.io.IOException;import java.net.InetSocketAddress;import java.nio.ByteBuffer;import java.nio.channels.SelectionKey;import java.nio.channels.Selector;import java.nio.channels.ServerSocketChannel;import java.nio.channels.SocketChannel;import java.util.Iterator;import java.util.Set;/** * 多路复用 */public class NewIoServer { static Selector selector; public static void main(String[] args) throws IOException { // 得到一个多路复用器 selector = Selector.open(); // 获取一个管道 ServerSocketChannel serverSocketChannel = ServerSocketChannel.open(); // 设置为非阻塞 serverSocketChannel.configureBlocking(Boolean.FALSE); serverSocketChannel.socket().bind(new InetSocketAddress(8080)); /** * 把连接事件注册到多路复用器上,通过注册不同事件处理不同的任务, * 把serverSocketChannel注册到selector上,主要是当连接到来的时候, * 由于一个Accpet事件 */ serverSocketChannel.register(selector, SelectionKey.OP_ACCEPT); while (true) { // 该方法阻塞,只有当有事件到来时就不会阻塞了 === 底层:多路复用 selector.select(); // 获取所有事件,事件都被封装成SelectionKey Set selectionKeys = selector.selectedKeys(); Iterator iterator = selectionKeys.iterator(); while (iterator.hasNext()) { // 获取到相应的事件key SelectionKey key = iterator.next(); // 拿到后要删除,防止再次调用 iterator.remove(); // 连接事件 if (key.isAcceptable()) { handleAccept(key); } // 读的就绪事件 else if (key.isReadable()) { handlesRead(key); } } } } private static void handleAccept(SelectionKey selectionKey) throws IOException { // 从selector中获取serverSocketChannel,因为当初把serverSocketChannel注册到selector上,并且注册的accept事件 ServerSocketChannel serverSocketChannel = (ServerSocketChannel) selectionKey.channel(); // 能到这里,一定有客户端连接过来,所以一定会连接 SocketChannel socketChannel = serverSocketChannel.accept(); // 设置为非阻塞 socketChannel.configureBlocking(Boolean.FALSE); // 给客户端会写数据 socketChannel.write(ByteBuffer.wrap(\"hello client. newio Server\".getBytes())); // 注册read事件,等while循环再次获取read事件,然后读取socketChannel中的数据 socketChannel.register(selector, SelectionKey.OP_READ); } private static void handlesRead(SelectionKey selectionKey) throws IOException { // 从selector中获取serverSocketChannel SocketChannel socketChannel = (SocketChannel) selectionKey.channel(); ByteBuffer byteBuffer = ByteBuffer.allocate(1024); socketChannel.read(byteBuffer); System.out.println(\"server receive msg:\"+new String(byteBuffer.array())); }}3.2.1 客户端代码
package com.bonnie.newio;import java.io.IOException;import java.net.InetSocketAddress;import java.nio.ByteBuffer;import java.nio.channels.SelectionKey;import java.nio.channels.Selector;import java.nio.channels.SocketChannel;import java.util.Iterator;import java.util.Set;/** * 多路复用 */public class NewIoClient { static Selector selector; public static void main(String[] args) throws IOException { selector = Selector.open(); SocketChannel socketChannel = SocketChannel.open(); socketChannel.configureBlocking(Boolean.FALSE); socketChannel.connect(new InetSocketAddress(\"localhost\", 8080)); // 连接事件 socketChannel.register(selector, SelectionKey.OP_CONNECT); while (true) { selector.select(); Set selectionKeys = selector.selectedKeys(); Iterator iterator = selectionKeys.iterator(); while (iterator.hasNext()) { SelectionKey selectionKey = iterator.next(); iterator.remove(); // 连接事件 if (selectionKey.isConnectable()) { handleConnect(selectionKey); } // 读的就绪事件 else if (selectionKey.isReadable()) { handleReadable(selectionKey); } } } } private static void handleConnect(SelectionKey selectionKey) throws IOException { SocketChannel socketChannel = (SocketChannel) selectionKey.channel(); // 是否完成了连接,没有则建立连接 if (socketChannel.isConnectionPending()) { // 建立连接 socketChannel.finishConnect(); } // 设置为非阻塞 socketChannel.configureBlocking(Boolean.FALSE); // 给服务端写数据 socketChannel.write(ByteBuffer.wrap(\"hello server. I am newio client\".getBytes())); socketChannel.register(selector, SelectionKey.OP_READ); } private static void handleReadable(SelectionKey selectionKey) throws IOException { SocketChannel socketChannel = (SocketChannel) selectionKey.channel(); ByteBuffer byteBuffer = ByteBuffer.allocate(1024); socketChannel.read(byteBuffer); System.out.println(\"client receive msg:\"+new String(byteBuffer.array())); }}3.3 码云位置
git地址: https://gitee.com/huyanqiu6666/netty.git 分支: 250721-io
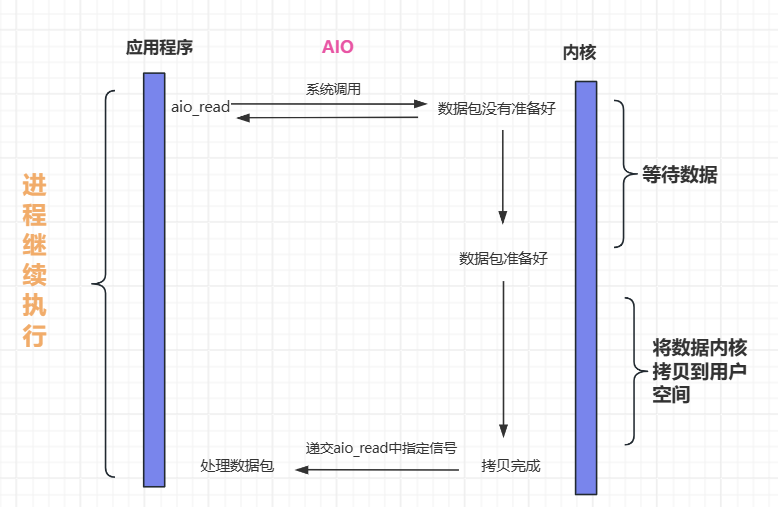
4 AIO
无论是否准备好数据,都直接返回,然后可以执行其他的任务,当数据准备完毕后,主动推送数据到应用程序。
- 工作机制:基于事件和回调机制。当发起 IO 操作时,线程会继续执行后续代码,IO 操作完成后会通过回调函数通知线程处理结果。
- 特点:真正的异步 IO,线程不需要关注 IO 操作的过程,只需处理结果,效率最高,适用于连接数多且 IO 操作耗时长的场景(如文件传输)。
- 示例场景:Java 7 引入的
AsynchronousFileChannel和AsynchronousSocketChannel。
3.2 代码实现
3.2.1 服务端代码
package com.bonnie.aio;import java.net.InetSocketAddress;import java.nio.ByteBuffer;import java.nio.channels.AsynchronousServerSocketChannel;import java.nio.channels.AsynchronousSocketChannel;import java.nio.channels.CompletionHandler;/** * 异步IO-服务端 */public class AIOServer { public static void main(String[] args) throws Exception { // 创建一个serverChannel并绑定8080端口 AsynchronousServerSocketChannel serverChannel = AsynchronousServerSocketChannel.open() .bind(new InetSocketAddress(8080)); serverChannel.accept(null, new CompletionHandler() { @Override public void completed(AsynchronousSocketChannel socketChannel, Object attachment) { try { // 打印线程的名字 System.out.println(\"2--\"+ Thread.currentThread().getName()); System.out.println(socketChannel.getRemoteAddress()); ByteBuffer buffer = ByteBuffer.allocate(1024); // socketChannel异步的读取数据到buffer中 socketChannel.read(buffer, buffer, new CompletionHandler() { @Override public void completed(Integer result, ByteBuffer buffer) { // 打印线程的名字 System.out.println(\"3--\"+ Thread.currentThread().getName()); buffer.flip(); System.out.println(new String(buffer.array(), 0, result)); socketChannel.write(ByteBuffer.wrap(\"helloClient\".getBytes())); } @Override public void failed(Throwable exc, ByteBuffer attachment) { exc.printStackTrace();; } }); } catch (Exception e) { e.printStackTrace(); } } @Override public void failed(Throwable exc, Object attachment) { exc.printStackTrace(); } }); System.out.println(\"1--\"+ Thread.currentThread().getName()); Thread.sleep(Integer.MAX_VALUE); }}3.2.1 客户端代码
package com.bonnie.aio;import java.io.IOException;import java.net.InetSocketAddress;import java.nio.ByteBuffer;import java.nio.channels.AsynchronousSocketChannel;import java.nio.channels.CompletionHandler;public class AIOClient { private final AsynchronousSocketChannel client; public AIOClient() throws IOException { client = AsynchronousSocketChannel.open(); } public static void main(String[] args) throws Exception{ new AIOClient().connect(\"localhost\", 8080); } private void connect(String host, int port) { // 客户端向服务端发起连接 client.connect(new InetSocketAddress(host, port), null, new CompletionHandler() { @Override public void completed(Void result, Object attachment) { try { client.write(ByteBuffer.wrap(\"这是一条测试数据\".getBytes())).get(); System.out.println(\"已发送到服务端\"); } catch (Exception e) { throw new RuntimeException(e); } } @Override public void failed(Throwable exc, Object attachment) { exc.printStackTrace(); } }); final ByteBuffer bb = ByteBuffer.allocate(1024); // 客户端接收服务端的数据,获取的数据写入到bb中 client.read(bb, null, new CompletionHandler() { @Override public void completed(Integer result, Object attachment) { // 服务端返回数据的长度result System.out.println(\"I/O操作完成:\"+result); System.out.println(\"获取反馈:\"+ new String(bb.array())); } @Override public void failed(Throwable exc, Object attachment) { exc.printStackTrace(); } }); try { Thread.sleep(Integer.MAX_VALUE); } catch (InterruptedException e) { throw new RuntimeException(e); } }}3.3 码云位置
git地址: https://gitee.com/huyanqiu6666/netty.git 分支: 250721-io