【接口自动化】pytest的基本使用
目录
一.安装
二.用例匹配规则
三.pytest命令参数
3.1 pytest配置文件
3.2 配置前后置
四.断言
五.参数化
六.fixture
1.单独使用
2.fixture嵌套
3.调用多个fixture
4.yield fixture
5.带参数的fixture
pytest 是⼀个非常流行且⾼效的Python测试框架,它提供了丰富的功能和灵活的法用,使得编写和运行测试用例变得简单而高效,被广泛用于单元测试、集成测试、功能测试等场景。
一.安装
1.pytest需要python3.8版本以上

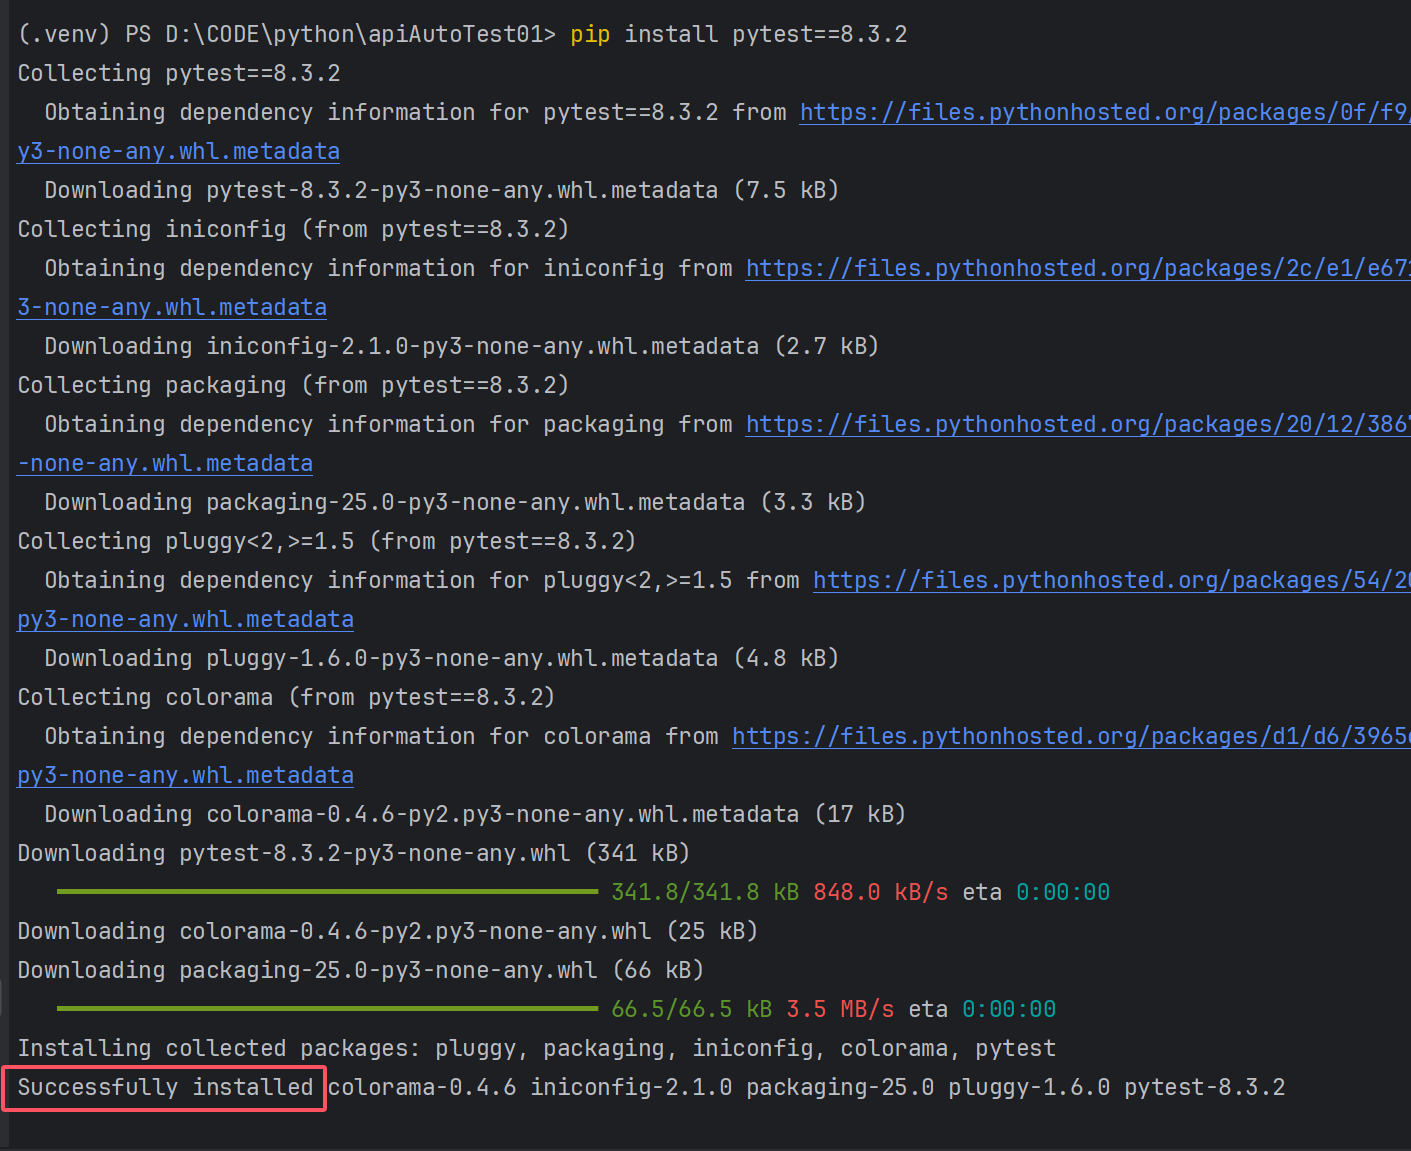
一般显示这种情况就按照成功
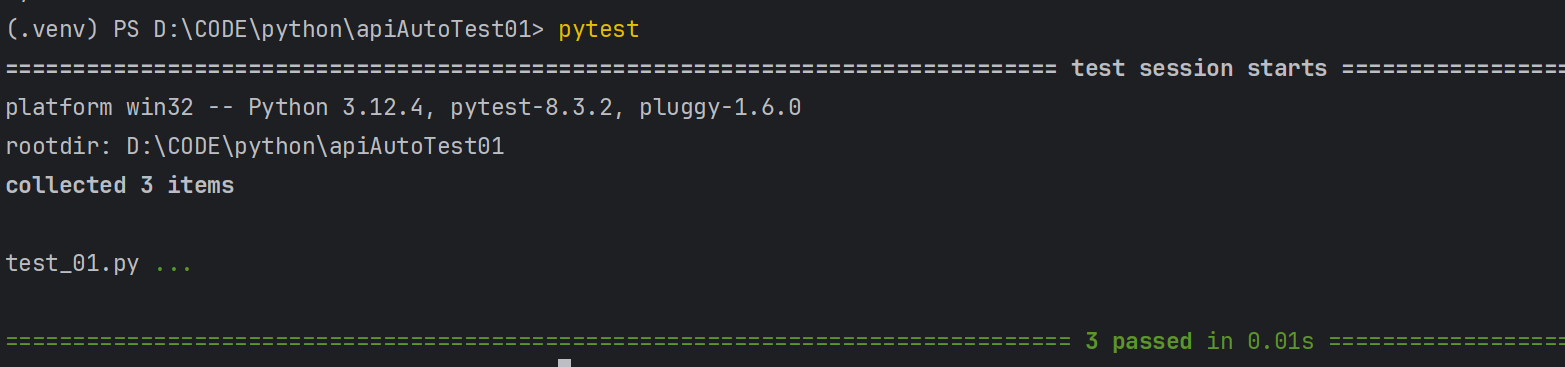
遵循一定的规则,pytest会自动检测你的测试用例
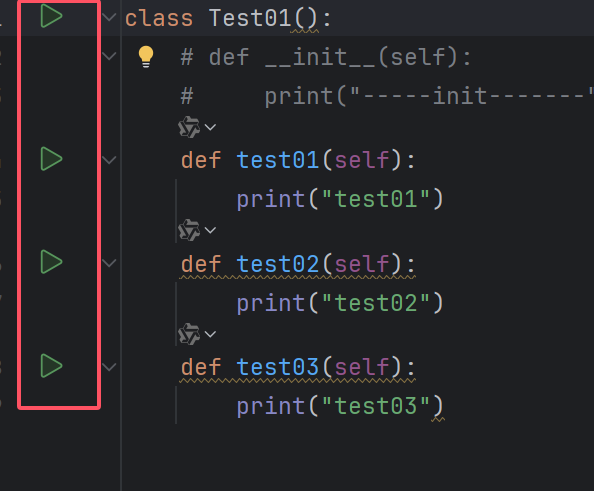
直接在控制台中输入pytest就会执行所有的测试用例
二.用例匹配规则
默认的匹配规则
1. 文件名必须以 test_ 开头或者 _test 结尾
2. 测试类必须以 Test 开头,并且不能有 __init__ 方法。
3. 测试方法必须以 test 开头
一旦写了初始化规则,pytest就会报错
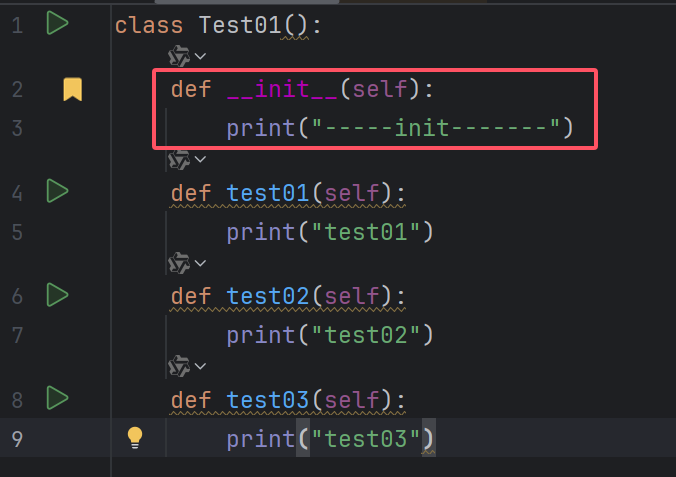

如果在测试类中新增__init__方法,当pytest执行测试用例的话,会__init__方法可能会被调用,这可能会掩盖测试类的实际测试逻辑,可能会添加副作用,那么就会影响测试的准确性~
当然pytest会使用其他的替换方案来代替,例如setUp方法和tearDown方法,以及fixture函数初始化等等~
三.pytest命令参数
pytest 提供了丰富的命令⾏行来控制测试的执行。以下是⼀些常用的 pytest 命令行参数及其
使用说明。
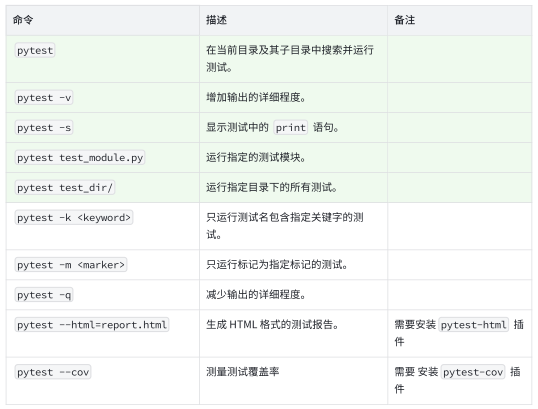
还可以指定路径去执行测试用例~
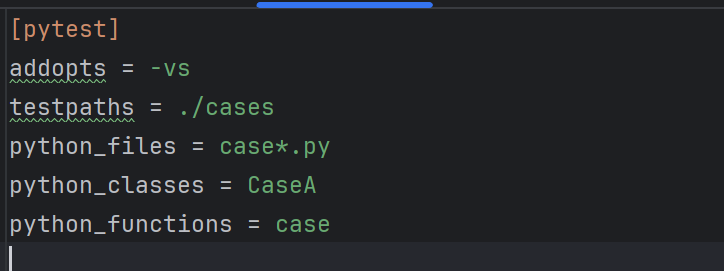
3.1 pytest配置文件
可以在项目中创建pytest.ini 文件,就可以指定匹配规则~
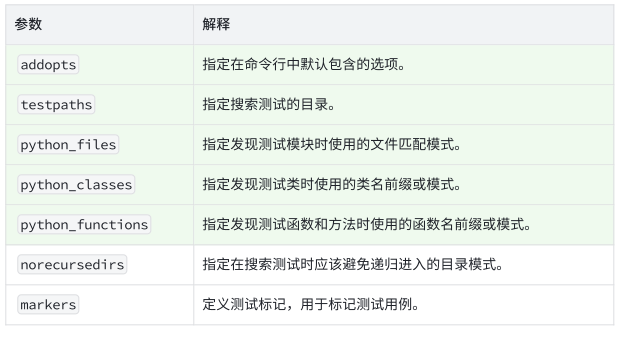
addopts: 可以配置命令行参数
addopts = -vs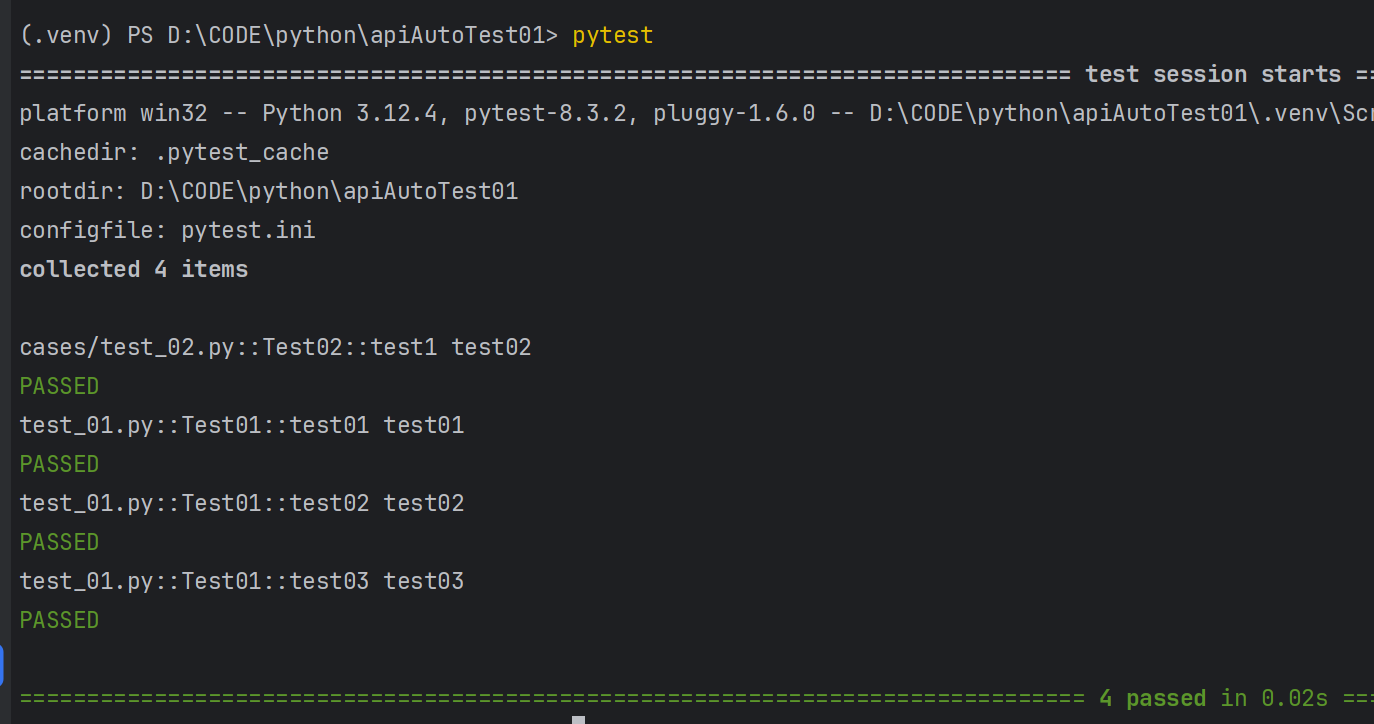
testpaths:指定 pytest 搜索测试的目录,可减少不必要的搜索:
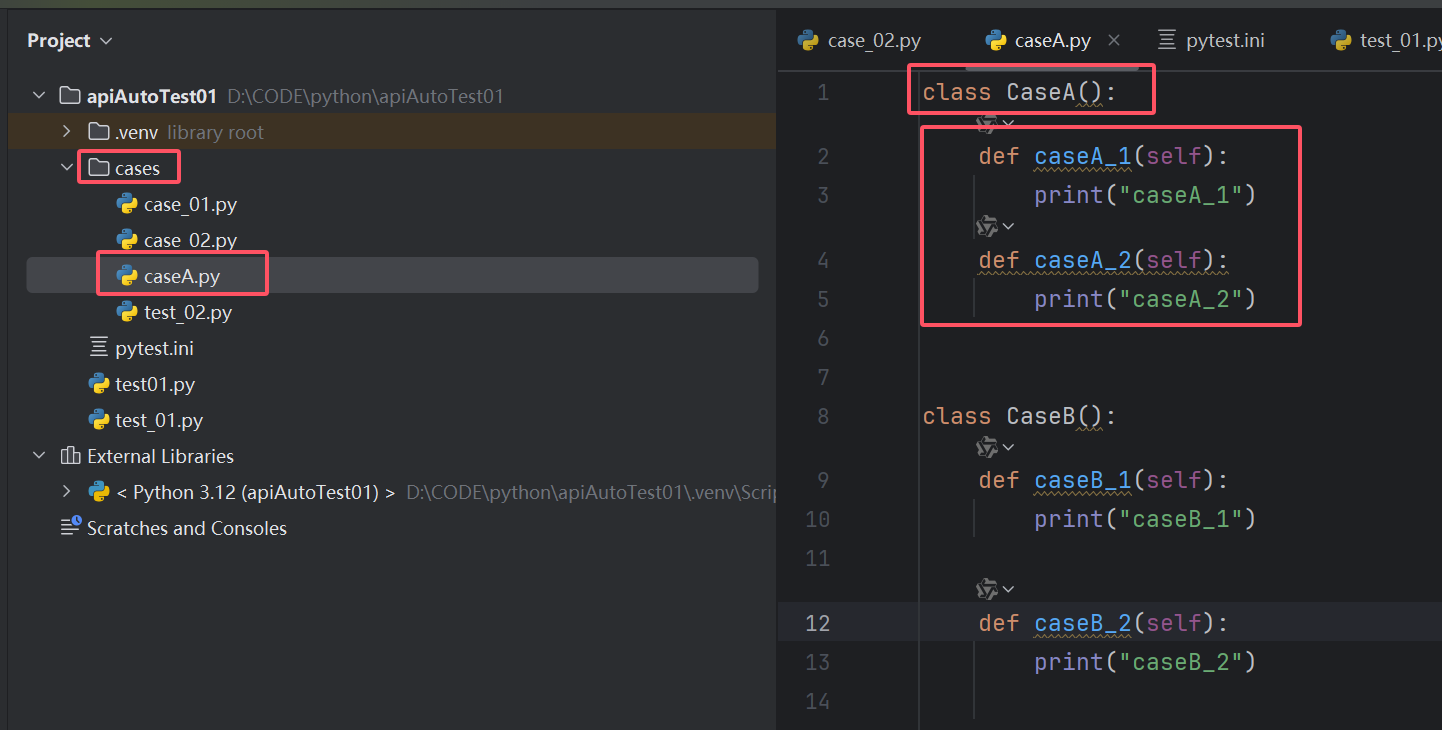
标记了在cases目录下,以case开头的文件,以CaseA开头的类,以case开头的方法的测试用例

3.2 配置前后置
在使用pytest框架时,测试类中不能使用__init__方法,所以pytest提供了别的方法去设置前后置操作~
setup_method 和 teardown_method :这两个方法用于类中的每个测试方法的前置和后置操
作。
setup_class 和 teardown_class :这两个方法用于整个测试类的前置和后置操作。
class Test02(): def setup_class(self): print(\"setup_class\") def teardown_class(self): print(\"teardown_class\") def setup_method(self): print(\"setup_method\") def teardown_method(self): print(\"teardown_method\") def test02_1(self): print(\"test02_1\") def test02_2(self): print(\"test02_2\")class Test03(): def test03_1(self): print(\"test03_1\") def test03_2(self): print(\"test03_2\")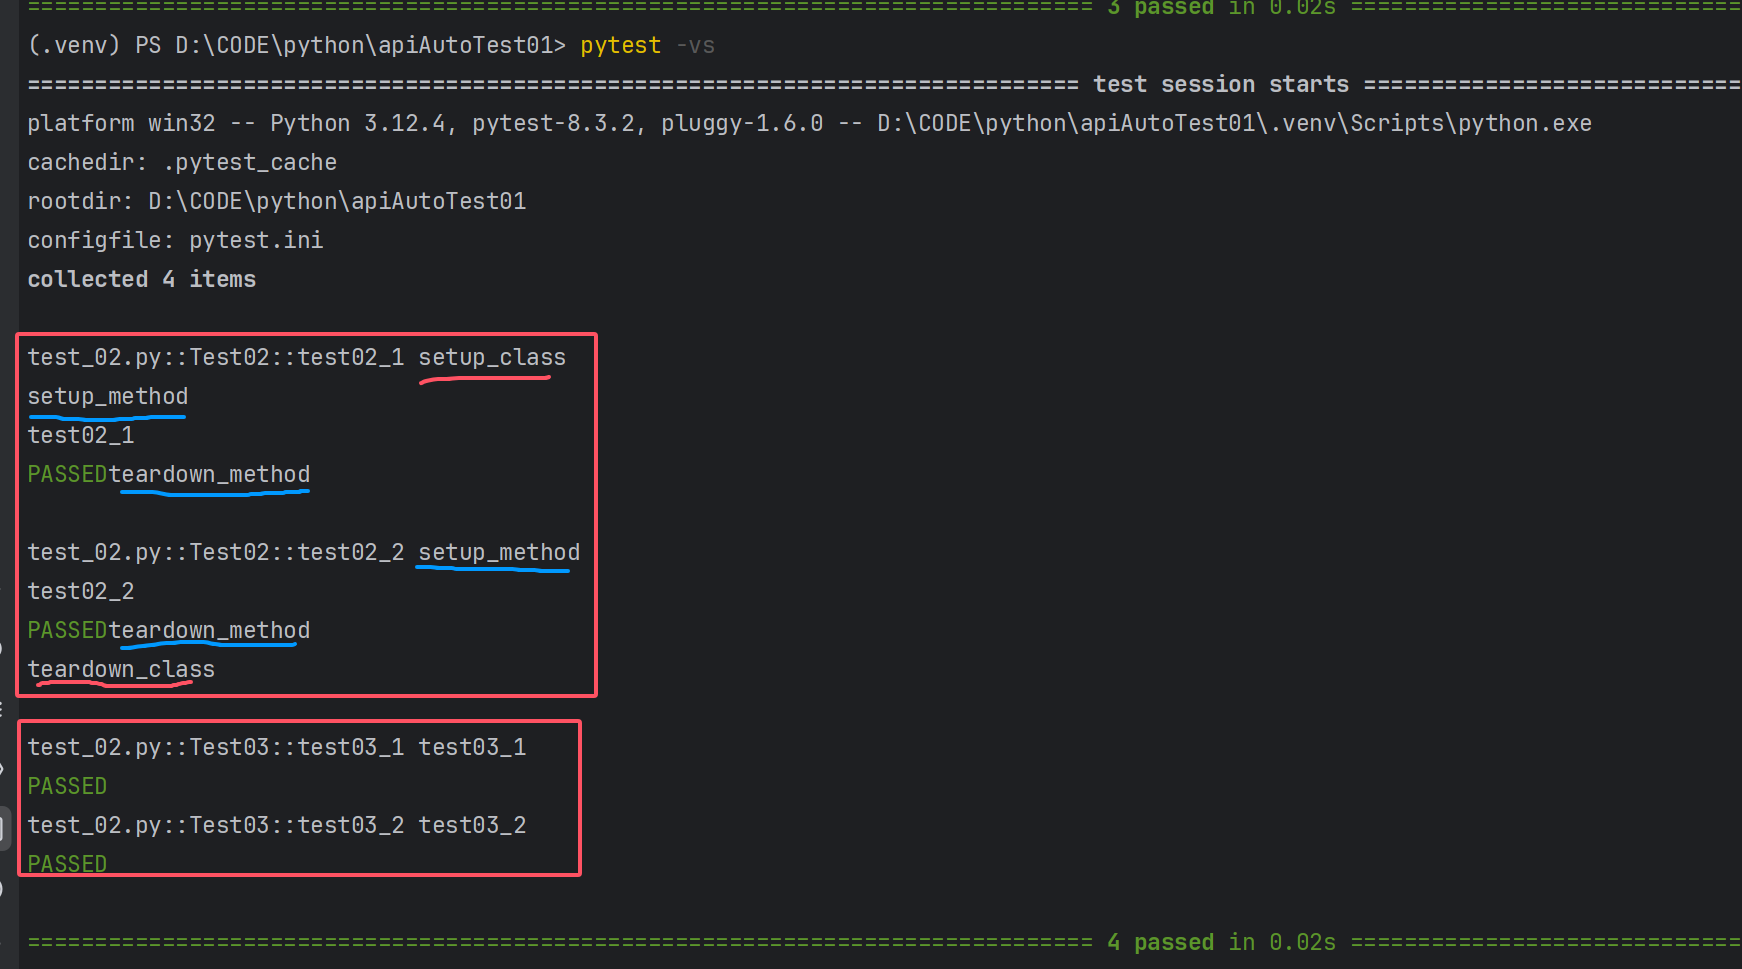
fixture :这是 pytest 推荐的方式来实现测试⽤用例的前置和后置操作。 fixture 提供了更
灵活的控制和更强大的功能。
四.断言
断言是一种用于调试辅助的工具,用于检查程序的状态是否符合预期;如果断言失败,那么python将会抛出AssertionError异常;
pytest允许在python测试中使用assert来预期和值;
断言数据结构:
# 断⾔列表 except_list = [1,2,3,4,5.00] actual_list = [1,2,3,4,5.00] assert except_list == actual_list # 断⾔元组 except_tuple = (\"hi\",2,3,4,5) actual_tumple = (\"hi\",2,3,4,5) assert except_tuple == actual_tumple # 断⾔字典 expect_dict = {\'name\': \'Alice\', \'age\': 25} actual_dict = {\'name\': \'Alice\', \'age\': 25} assert expect_dict == actual_dict # 断⾔集合 expect_set = {1, 2, 3, \'apple\'} actual_set = {1, 2, 3, \'apple\'} assert expect_set == actual_set断言接口返回值:
返回结果参数很多的话,就不适合使用复制准确返回值来对比预期返回值,可以拿到主要几个值去比对
如果返回值参数少的情况下,可以直接跟返回值进行比对;
五.参数化
参数化可以定义参数和规则,使得设计自动化更加灵活和可控;
pytest中内置的 pytest.mark.parametrize 装饰器允许对测试函数的参数进行参数化;
1.用例上参数化
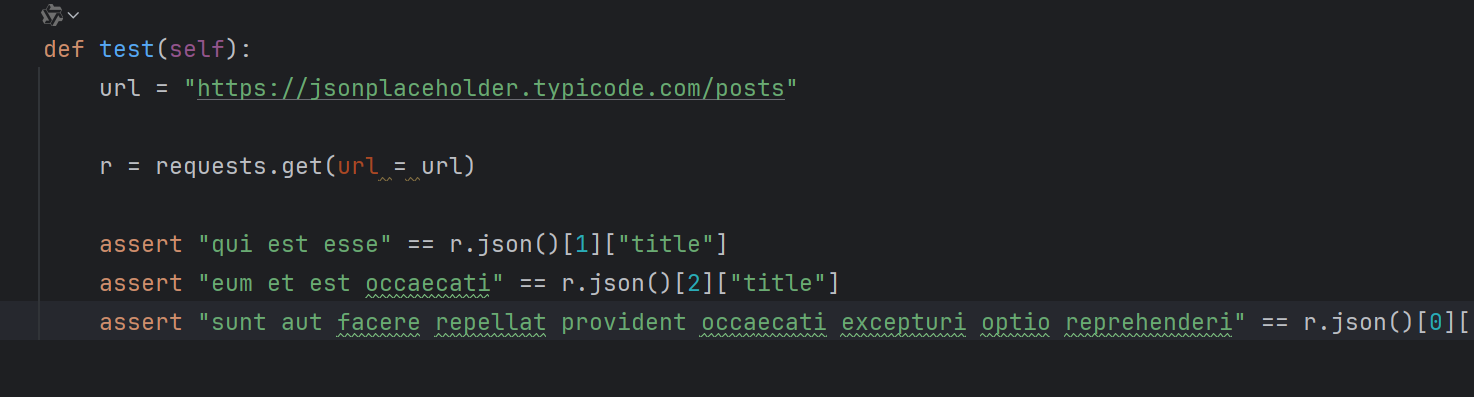
class Test(): @pytest.mark.parametrize(\"x\", [1, 2, 3]) def test_1(self,x): assert x == x @pytest.mark.parametrize(\"n,expected\", [(1, 1), (2, 4), (3, 9)]) def test_2(self,n, expected): assert n*n == expected2.类上参数化
@pytest.mark.parametrize(\"n,expected\", [(1, 1), (2, 4), (3, 9)])class Test(): def test_1(self,n,expected): assert n*n*1 == expected def test_2(self,n, expected): assert n*n == expected3. 模块上的参数化
并且必须 命名为pytestmark
pytestmark = pytest.mark.parametrize(\"n,expected\", [(1, 1), (2, 4), (3, 9)])class Test(): def test_1(self,n,expected): assert n*n*1 == expected def test_2(self,n, expected): assert n*n == expectedclass Test02(): def test_1(self,n,expected): assert n*4 != expected4.自定义参数化数据源
六.fixture
pytest 中的 fixture 是⼀种强大的机制,用于提供测试函数所需的资源或上下文。它可以用于
设置测试环境、准备数据等。以下是 fixture 的⼀些核心概念和使用场景;
1.单独使用
@pytest.fixturedef fixture_01(): print(\"第⼀个fixture标记的⽅法\")def test_1(fixture_01): print(\"test_1\")def test_2(fixture_01): print(\"test_2\")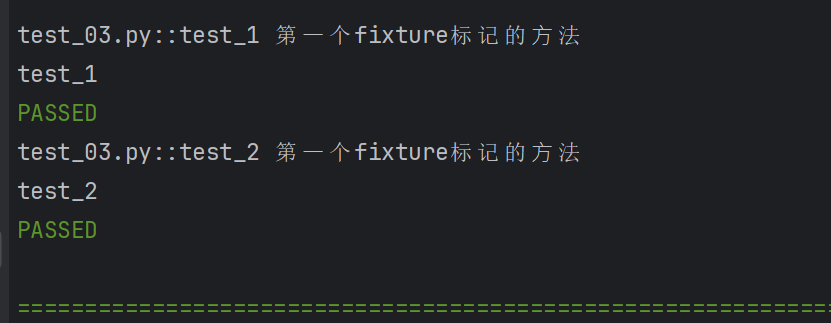
会在每个方法前面提前调用,可以将函数名作为参数传参;
2.fixture嵌套
# 安排@pytest.fixturedef first_entry(): return \"a\"# 安排@pytest.fixturedef order(first_entry): return [first_entry]def test_string(order): # ⾏动 order.append(\"b\") # 断⾔ assert order == [\"a\", \"b\"]3.调用多个fixture
class Fruit: def __init__(self, name,color): self.name = name self.color = color def __eq__(self, other): return self.color == other.color@pytest.fixturedef my_fruit(): return Fruit(\"a\",\"red\")@pytest.fixturedef your_fruit(): return [Fruit(\"apple\",\"red\"),Fruit(\"banana\",\"yellow\")]#你的水果里是否包含我的水果def test_fruit(my_fruit,your_fruit): assert my_fruit in your_fruit4.yield fixture
在 pytest 中,yield fixture是一种用于实现测试资源的初始化和清理的机制,它结合了fixture装饰器和yield关键字,让开发者能够在测试前准备好必要的资源(如数据库连接、文件句柄、网络连接等),并在测试结束后正确释放或清理这些资源;
并且yield fixture 使用的是yield,而不是return;并且可以将运行的代码结果返回给请求的fixture/test;
示例1:
@pytest.fixturedef fixture_01(): print(\"初始化fixture\") yield [1,2,3] print(\"清理fixture\")def test(fixture_01): assert fixture_01 == [1,2,3] print(fixture_01) 
示例2:打开文件,关闭文件
@pytest.fixturedef file_read(): print(\"打开 文件\") file = open(\"text.txt\", \"r\") yield file print(\"关闭 文件\") file.close()@pytest.fixture()def file_write(): print(\"打开 文件\") file = open(\"text.txt\", \"w\",encoding=\"utf-8\") return filedef test(file_read,file_write): w = file_write w.write(\"hello python!\") w.close() r = file_read.read() print(r)5.带参数的fixture
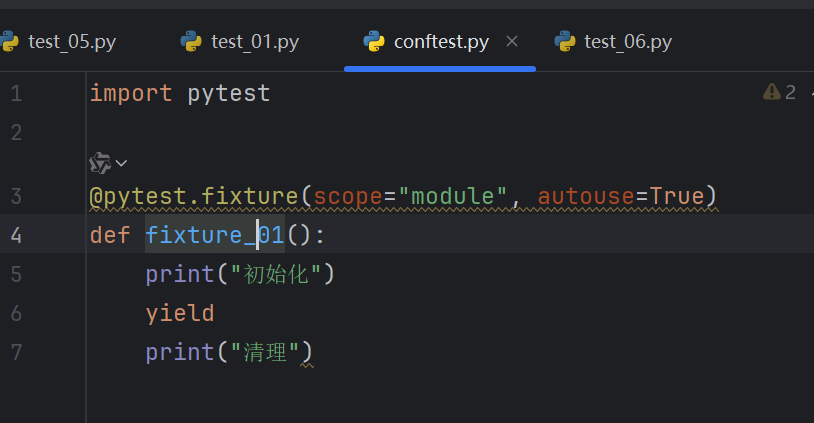
pytest.fixture(scope=\'\', params=\'\', autouse=\'\', ids=\'\', name=\'\')
• scope 参数用于控制fixture的作用范围,决定了fixture的生命周期。可选值有:
- function(默认):每个测试函数都会调用fixture。
- class :在同⼀个测试类中共享这个fixture。
- module :在同⼀个测试模块中共享这个fixture。(一个文件里)
- session :整个测试会话中共享这个fixture。
• autouse 参数默认为 False 。如果设置为 True ,则每个测试函数都会自动调用该fixture,
无需显式传⼊
function 示例:所有测试函数都会调用fixture
import pytest@pytest.fixture(scope=\"function\")def fixture_01(): print(\"初始化。。。\") yield print(\"清理。。。\")class Test01(): def test01_1(self,fixture_01): print(\"测试用例1\") def test01_2(self,fixture_01): print(\"测试用例2\")class Test02(): def test02_1(self,fixture_01): print(\"测试用例1\") def test02_2(self,fixture_01): print(\"测试用例2\")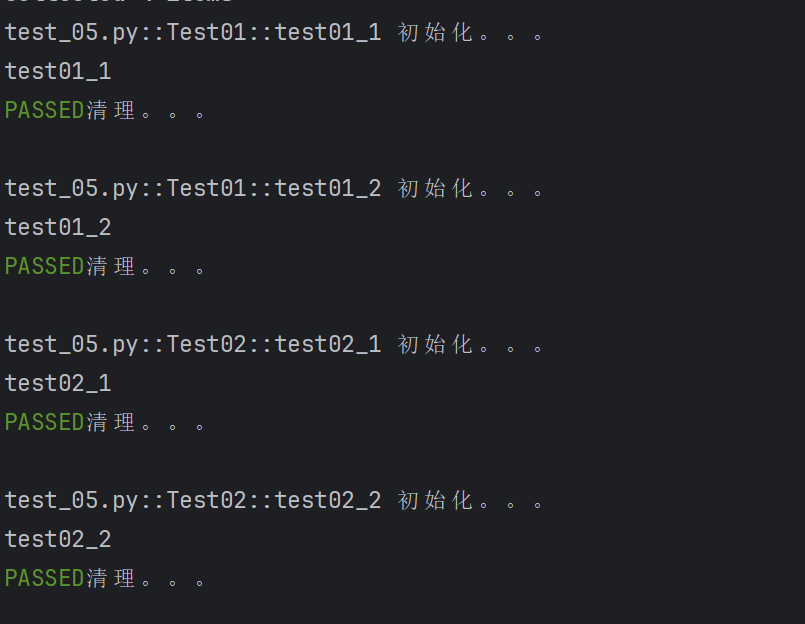
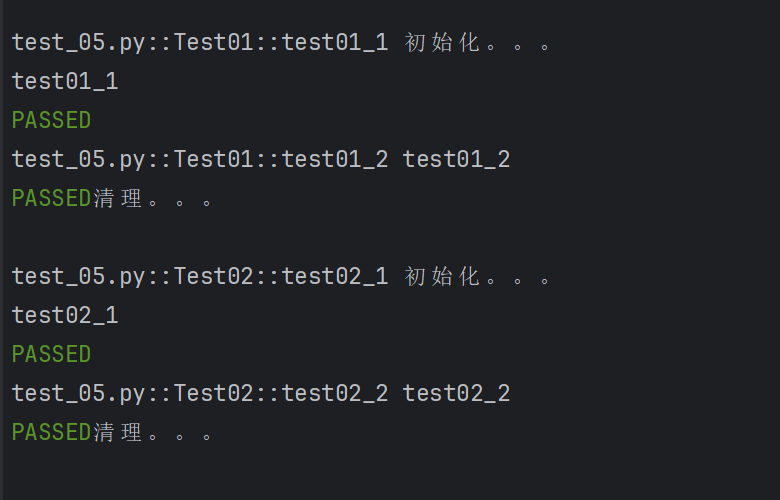
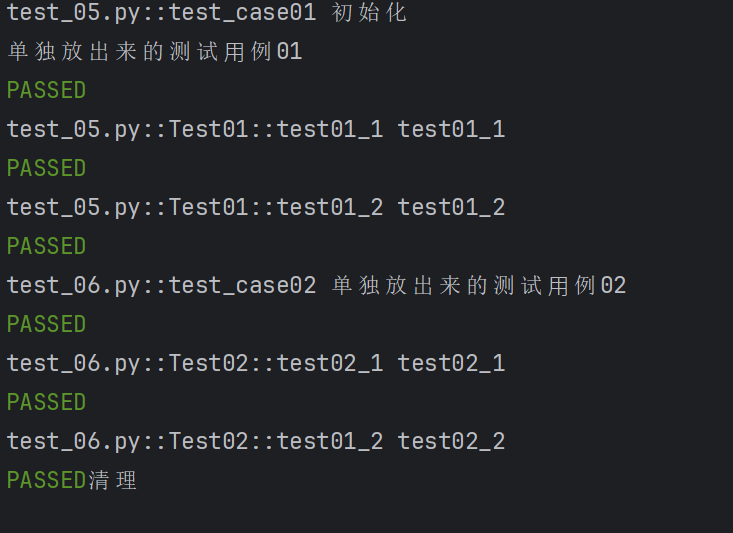
class 示例: 每个类中使用一个fixture
moudle和session是实现全局的前后置操作;
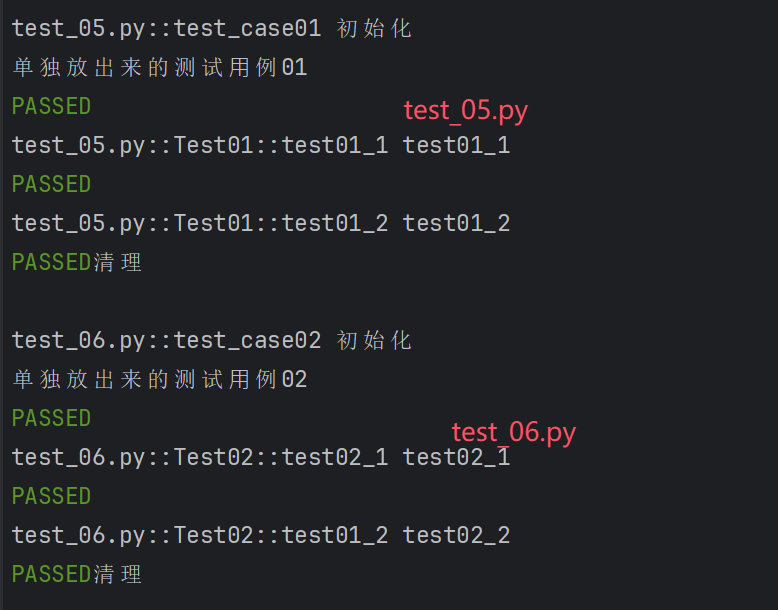
一般搭配conftest.py文件配合使用
module:
session:
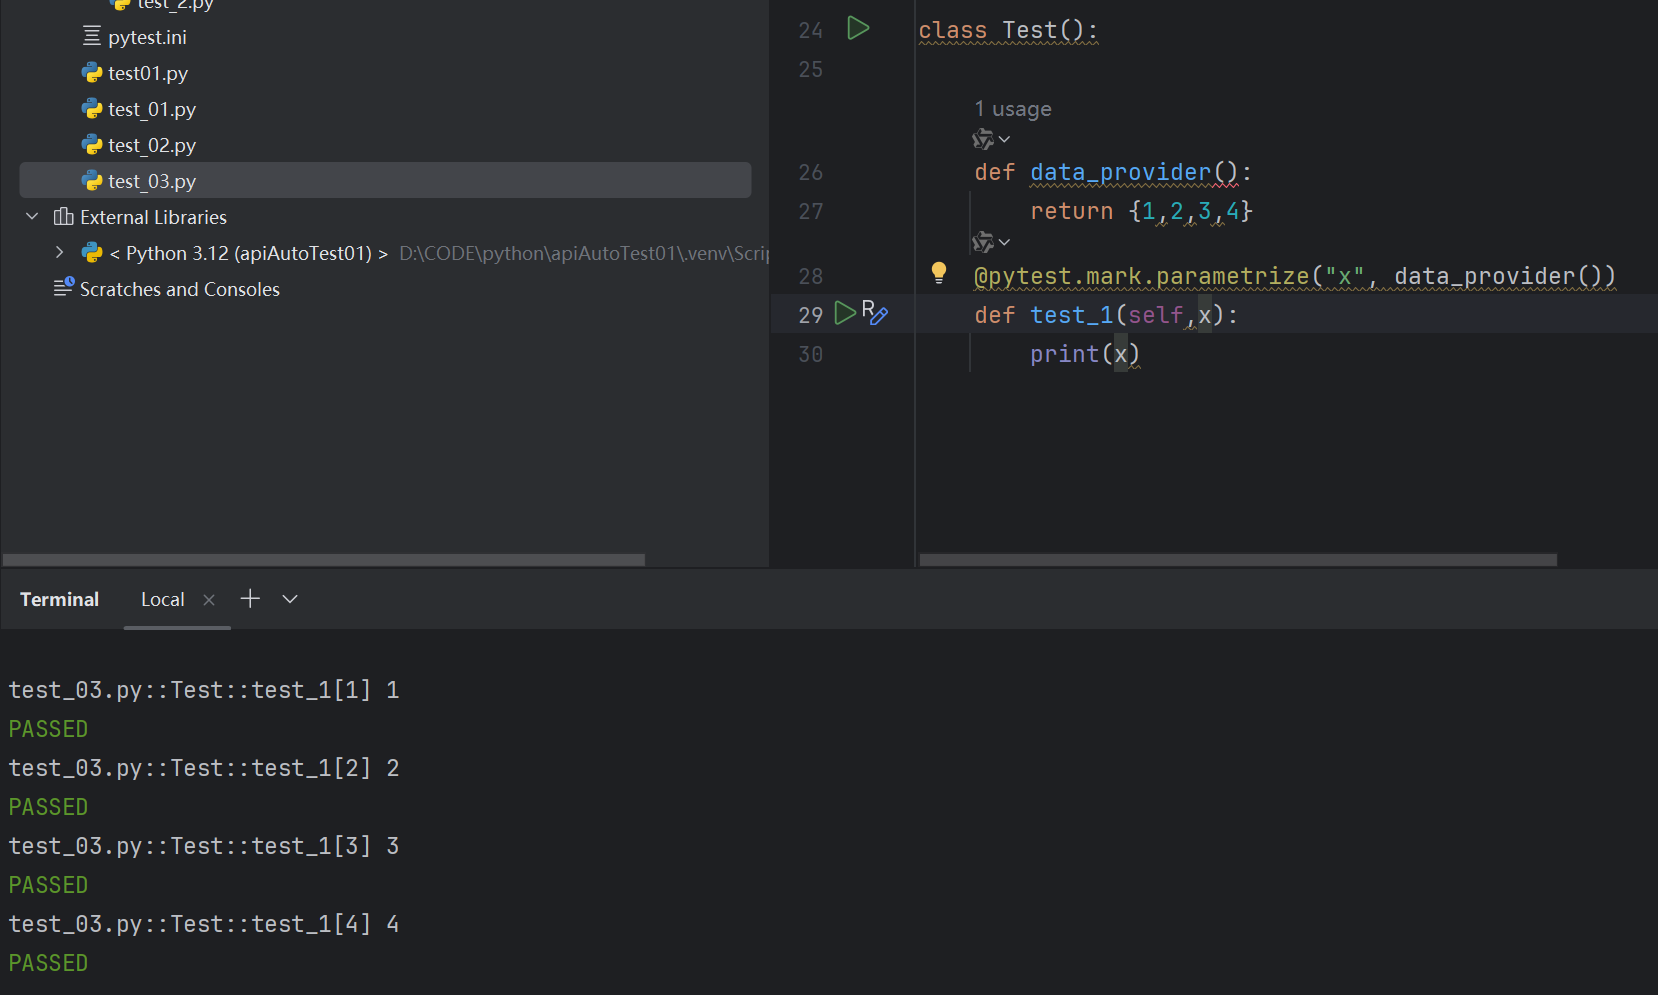
通过 params 实现参数化
@pytest.fixture(params=[1,2,3])def data_provider(request): return request.paramdef test_data(data_provider): print(data_provider)
parametrize 更适合简单场景,而 fixture 更适合需要动态数据和资源管理的复
杂场景。


