[已解决] Linux 安装 CUDA 成功实践(指定版本-添加环境变量-无管理员权限)-Command ‘nvcc‘ not found-CUDA_HOME environment variable_linux安装nvcc
目录
背景:
本帖可解决的问题1:
本帖可解决的问题2:
原因分析:
核心思路
步骤 2:以非管理员权限安装 CUDA 工具包
2.1 运行安装包并跳过驱动安装
2.2 验证安装结果
步骤 3:配置环境变量(关键)
3.1 临时配置(当前终端生效)
3.2 永久配置(所有终端生效)
步骤 4:验证 nvcc 是否可用
背景:
- 在将AutoDL上的环境迁移到学校slurm集群时,会有CUDA报错
- 之前被AutoDL照顾的太好了,AutoDL都是预装CUDA,学校的服务器环境是没有CUDA的
本帖可解决的问题1:
- 安装mmdet3d需要显卡+CUDA,但是只有cudatoolkit没有CUDA,安装报错:
(sparseocc) schen744@gpu3-11:~/code/sparseocc/mmdetection3d$ pip install -v -e .Using pip 22.3.1 from /hpc2hdd/home/schen744/.conda/envs/sparseocc/lib/python3.7/site-packages/pip (python 3.7)Looking in indexes: https://pypi.tuna.tsinghua.edu.cn/simpleObtaining file:///hpc2hdd/home/schen744/code/sparseocc/mmdetection3d Running command python setup.py egg_info Traceback (most recent call last): File \"/hpc2hdd/home/schen744/.conda/envs/sparseocc/lib/python3.7/site-packages/torch/utils/cpp_extension.py\", line 2035, in _join_cuda_home raise EnvironmentError(\'CUDA_HOME environment variable is not set. \' OSError: CUDA_HOME environment variable is not set. Please set it to your CUDA install root. error: subprocess-exited-with-error × python setup.py egg_info did not run successfully. │ exit code: 1 ╰─> See above for output. note: This error originates from a subprocess, and is likely not a problem with pip. full command: /hpc2hdd/home/schen744/.conda/envs/sparseocc/bin/python -c \' exec(compile(\'\"\'\"\'\'\"\'\"\'\'\"\'\"\' # This is -- a caller that pip uses to run setup.py # # - It imports setuptools before invoking setup.py, to enable projects that directly # import from `distutils.core` to work with newer packaging standards. # - It provides a clear error message when setuptools is not installed. # - It sets `sys.argv[0]` to the underlying `setup.py`, when invoking `setup.py` so # setuptools doesn\'\"\'\"\'t think the script is `-c`. This avoids the following warning: # manifest_maker: standard file \'\"\'\"\'-c\'\"\'\"\' not found\". # - It generates a shim setup.py, for handling setup.cfg-only projects. import os, sys, tokenize try: import setuptools except ImportError as error: print( \"ERROR: Can not execute `setup.py` since setuptools is not available in \" \"the build environment.\", file=sys.stderr, ) sys.exit(1) __file__ = %r sys.argv[0] = __file__ if os.path.exists(__file__): filename = __file__ with tokenize.open(__file__) as f: setup_py_code = f.read() else: filename = \"\" setup_py_code = \"from setuptools import setup; setup()\" exec(compile(setup_py_code, filename, \"exec\")) \'\"\'\"\'\'\"\'\"\'\'\"\'\"\' % (\'\"\'\"\'/hpc2hdd/home/schen744/code/sparseocc/mmdetection3d/setup.py\'\"\'\"\',), \"\", \"exec\"))\' egg_info --egg-base /tmp/pip-pip-egg-info-xinq3w4l cwd: /hpc2hdd/home/schen744/code/sparseocc/mmdetection3d/ Preparing metadata (setup.py) ... errorerror: metadata-generation-failed× Encountered error while generating package metadata.╰─> See above for output.note: This is an issue with the package mentioned above, not pip.hint: See above for details.(sparseocc) schen744@gpu3-11:~/code/sparseocc/mmdetection3d$ nvcc -VCommand \'nvcc\' not found, but can be installed with:apt install nvidia-cuda-toolkitPlease ask your administrator.(sparseocc) schen744@gpu3-11:~/code/sparseocc/mmdetection3d$在此之后,我重装了环境,还是会有问题
本帖可解决的问题2:
(sparseocc) schen744@gpu3-9:~/code/sparseocc$ nvidia-smiSun Jun 1 17:11:56 2025 +---------------------------------------------------------------------------------------+| NVIDIA-SMI 535.54.03 Driver Version: 535.54.03 CUDA Version: 12.2 ||-----------------------------------------+----------------------+----------------------+| GPU Name Persistence-M | Bus-Id Disp.A | Volatile Uncorr. ECC || Fan Temp Perf Pwr:Usage/Cap | Memory-Usage | GPU-Util Compute M. || || MIG M. ||=========================================+======================+======================|| 0 NVIDIA A40 Off | 00000000:35:00.0 Off | 0 || 0% 29C P8 33W / 300W | 11MiB / 46068MiB | 0% Default || || N/A |+-----------------------------------------+----------------------+----------------------+ +---------------------------------------------------------------------------------------+| Processes: || GPU GI CI PID Type Process name GPU Memory || ID ID Usage ||=======================================================================================|| No running processes found |+---------------------------------------------------------------------------------------+(sparseocc) schen744@gpu3-9:~/code/sparseocc$ conda list cudatoolkit# packages in environment at /hpc2hdd/home/schen744/.conda/envs/sparseocc:## Name Version Build Channelcudatoolkit 11.3.1 hb98b00a_13 conda-forge(sparseocc) schen744@gpu3-9:~/code/sparseocc$ nvcc --versionCommand \'nvcc\' not found, but can be installed with:apt install nvidia-cuda-toolkitPlease ask your administrator.(sparseocc) schen744@gpu3-9:~/code/sparseocc$原因分析:
nvcc(CUDA 编译器)是 CUDA 工具包的核心组件,我们当前的环境中未安装完整的 CUDA 工具包。虽然通过conda list看到了cudatoolkit=11.3.1,但 Conda 的cudatoolkit通常仅包含运行时库(如libcudart.so),不包含编译器nvcc及开发工具
nvidia-smi显示我们的显卡驱动支持 CUDA 12.2(CUDA Version: 12.2),而 Conda 安装的cudatoolkit=11.3.1是兼容的(NVIDIA 驱动支持向下兼容旧版本 CUDA 工具包),因此版本冲突不是当前问题的主因
写在前面:(本人的踩坑)
本人已经按照以下正文全部方法手动把nvcc给装好了,但是复现论文,开始训练模型的时候还是不行,用自己手动下载的nvcc去编译的神经网络,会在train的时候报错,说cuda找不到,是环境变量的问题
究其原因是这个nvcc最好是用学校slurm集群自带的cuda,或者用conda来管理(这个本人没尝试),以下来演示载入学校的nvcc
(关于slurm集群怎么导入conda模块,以及一些基础使用方法,可参考:HPC (GPU)集群常用命令 - slurm作业调度方法 - ssh登录集群独占GPU(VS Code) - .sh/.py脚本的运行(持续更新))
(1)执行 nvcc --version
nvcc --version返回:
(sparseocc-2) schen744@mgmt-4:~$ nvcc --versionCommand \'nvcc\' not found, but can be installed with:apt install nvidia-cuda-toolkitPlease ask your administrator.(sparseocc-2) schen744@mgmt-4:~$说明没装nvcc或者安装了但是环境变量里没有导致找不到,我们就不管我们自己手动装的cuda了(也就是按照以下内容手动安装的cuda,手动安装nvcc编译的模型大概率train不起来),我们用学校slurm集群自带的cuda
(2)查看slurm集群预装的模块
执行命令:
module avail返回:
(sparseocc-2) schen744@mgmt-4:~$ module avail------------------------------------------ /usr/local/Modules/modulefiles ------------------------------------------3v cuda/11.7 ImageMagick-7.1.1 onetbb 3v_v2 cuda/11.8 intelmpi-2021.9.0 openbabel anaconda3 cuda/12.0 lammps/2022-parallel pdsh-2.29 azcopy_10.26.0 cuda/12.1 lammps/2022-serial plumed_2.9.0 biological/crisprcasfinder cuda/12.2 lammps/mace R/4.3.1 biological/mmseqs cuda/12.4 MaterialsStudio23.1 R/4.4.3 biological/prodigal cuda/12.6 matlab/2023b relion-5.0 biological/sratoolkit DDEC/parallel maxit samtools/1.9 CASTEP-23.1 DDEC/serial module-git siesta-5.2.0 cmake/3.27.0 dot module-info singularity-ce-4.1.3 compilers/gcc-11.1.0 ffmpeg modules slurm compilers/gcc-12.2.0 GAUSS/g16 mpi/mpich-4.1.2 stata-se/18 compilers/gcc-13.1.0 genesis-2.1.2 mpi/mpich-4.1.2_icc-2023.1.0 tcsh compilers/icc-2023.1.0 git-lfs mpi/mvapich-3.0b use.own compilers/icc32-2023.1.0 glibc/2.34 mpi/mvapich-3.0b_icc-2023.1.0 vasp/6.3.2 compilers/mkl-2023.1.0 gnuplot-5.0.5 mpi/mvapich2-2.3.7-1 vasp/6.3.2-vtst :乍一看没有我们想要的cuda113(当时担心是不是显卡的驱动版本过高),但是注意看这里有个冒号“:”,这个冒号 (
:) 是一个命令行分页器(通常是less或more程序)的提示符。因为module avail的输出内容太长,一个屏幕显示不完,系统就自动用这个分页器来让你一页一页地看。
我们可以按 空格键 (Space) 来翻到下一页
我们可以按 q 键 来退出查看,回到命令行提示符
我这里演示空格键,看看还有哪些模块:
(sparseocc-2) schen744@mgmt-4:~$ module avail------------------------------------------ /usr/local/Modules/modulefiles ------------------------------------------3v cuda/11.7 ImageMagick-7.1.1 onetbb 3v_v2 cuda/11.8 intelmpi-2021.9.0 openbabel anaconda3 cuda/12.0 lammps/2022-parallel pdsh-2.29 azcopy_10.26.0 cuda/12.1 lammps/2022-serial plumed_2.9.0 biological/crisprcasfinder cuda/12.2 lammps/mace R/4.3.1 biological/mmseqs cuda/12.4 MaterialsStudio23.1 R/4.4.3 biological/prodigal cuda/12.6 matlab/2023b relion-5.0 biological/sratoolkit DDEC/parallel maxit samtools/1.9 CASTEP-23.1 DDEC/serial module-git siesta-5.2.0 cmake/3.27.0 dot module-info singularity-ce-4.1.3 compilers/gcc-11.1.0 ffmpeg modules slurm compilers/gcc-12.2.0 GAUSS/g16 mpi/mpich-4.1.2 stata-se/18 compilers/gcc-13.1.0 genesis-2.1.2 mpi/mpich-4.1.2_icc-2023.1.0 tcsh compilers/icc-2023.1.0 git-lfs mpi/mvapich-3.0b use.own compilers/icc32-2023.1.0 glibc/2.34 mpi/mvapich-3.0b_icc-2023.1.0 vasp/6.3.2 compilers/mkl-2023.1.0 gnuplot-5.0.5 mpi/mvapich2-2.3.7-1 vasp/6.3.2-vtst comsol/6.2 gnuplot-5.4 mpi/mvapich2-2.3.7-1_icc-2023.1.0 vasp/6.3.2-wannier90 cp2k/2023.2 gromacs/2022.2 mpi/openmpi-4.1.5 vasp/6.4.2 cuda/11.0 gromacs/2023.2 mpi/openmpi-4.1.5_icc-2023.1.0 vasp_amd/6.3.2 cuda/11.1 gromacs/2023.2_gpu Multiwfn/3.8 vaspmo cuda/11.2 hdf5 null Wolfram-Engine/14.1 cuda/11.3 ImageMagick-6.9.13 nvhpc/23.7 Key:loaded modulepath (END)非常惊喜的是slurm集群预装了cuda113,咱们导入这个模块试试:
(3)加载学校的 CUDA 11.7 模块 并验证 nvcc
执行命令:
module load cuda/11.3nvcc --version # 验证是否显示 11.3看看效果:
(sparseocc-2) schen744@mgmt-4:~$ module load cuda/11.3(sparseocc-2) schen744@mgmt-4:~$ nvcc --versionnvcc: NVIDIA (R) Cuda compiler driverCopyright (c) 2005-2021 NVIDIA CorporationBuilt on Mon_May__3_19:15:13_PDT_2021Cuda compilation tools, release 11.3, V11.3.109Build cuda_11.3.r11.3/compiler.29920130_0(sparseocc-2) schen744@mgmt-4:~$成功导入!
如果你也成功导入了,就可以不用操作以下内容啦!
如果你也成功导入了,就可以不用操作以下内容啦!
步骤 1:手动下载 NVIDIA 官方 CUDA 工具包
如果没有管理员权限,可从 NVIDIA CUDA Toolkit 存档 下载与你驱动兼容的 CUDA 版本(如 11.3 或 12.2)。以 CUDA 11.3 为例:
- 访问 CUDA Toolkit 11.3 下载页,或者最新的(CUDA Toolkit 12.9 Downloads | NVIDIA Developer)选择对应系统(如 Linux → x86_64 → Ubuntu → 20.04 → runfile)
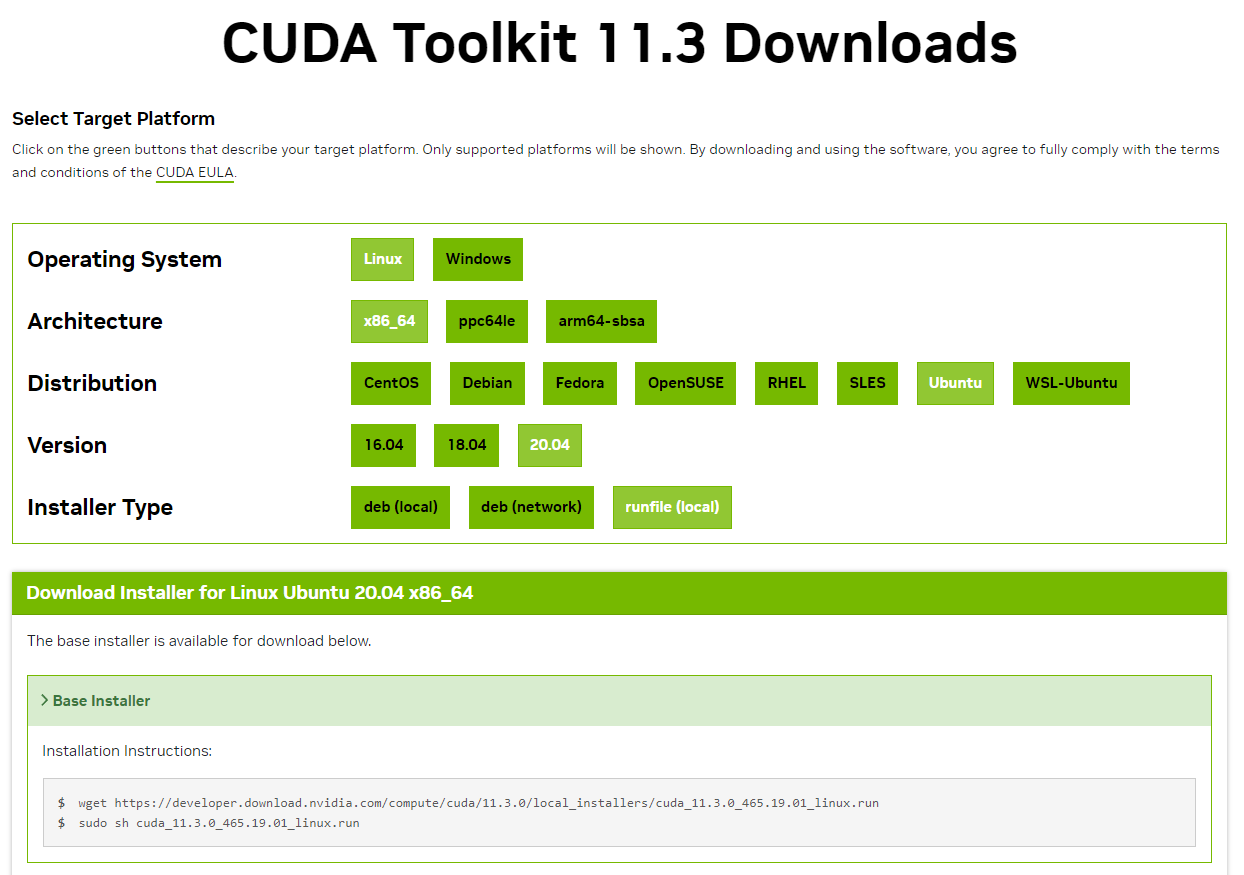
- 按页面提示下载安装包并运行:
wget https://developer.download.nvidia.com/compute/cuda/11.3.0/local_installers/cuda_11.3.0_465.19.01_linux.run
检查:
md5sum cuda_11.3.0_465.19.01_linux.run输出:
(sparseocc) schen744@gpu3-9:~/code/test$ md5sum cuda_11.3.0_465.19.01_linux.run406cecd830bb369fa4d3bd6f50a39a7a cuda_11.3.0_465.19.01_linux.run(sparseocc) schen744@gpu3-9:~/code/test$和官网比对一下:(developer.download.nvidia.cn/compute/cuda/11.3.0/docs/sidebar/md5sum.txt)
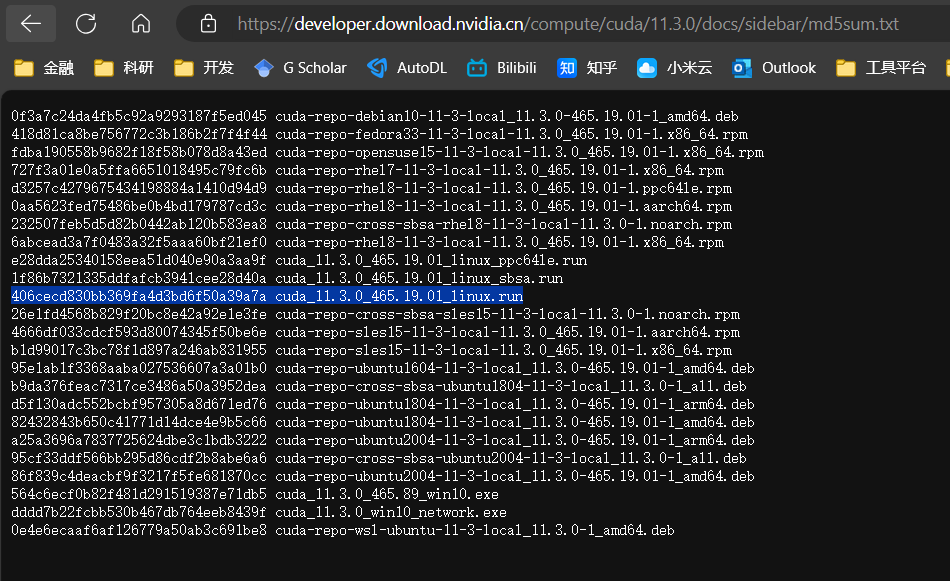
是一样的,没有问题
安装 CUDA 无需 sudo (管理员权限)
这里很可能会出现没有sudo(管理员)权限的情况,因此可参考以下方案:
“sudo sh cuda_11.3.0_465.19.01_linux.run”这个官方的安装命令很可能因没管理员权限会报错:
在没有管理员权限的情况下,可以通过自定义路径安装 CUDA 工具包来解决 nvcc 缺失的问题。以下是具体步骤:
核心思路
CUDA 的 runfile 安装包支持非系统路径安装(即安装到用户可写的目录,如 ~/cuda),无需 sudo 权限。安装时仅选择安装工具包(Toolkit),不安装驱动(Driver)和系统级组件(如 cuda 软链接到 /usr/local)
步骤 2:以非管理员权限安装 CUDA 工具包
我们已下载了 cuda_11.3.0_465.19.01_linux.run 安装包,直接运行并选择自定义路径即可
2.1 运行安装包并跳过驱动安装
执行以下命令启动安装(无需 sudo):
sh cuda_11.3.0_465.19.01_linux.run \\ --toolkit \\ --toolkitpath=/hpc2hdd/home/schen744/code/test/cuda-11.3 \\ --silent参数说明:
这些参数来自于nvidia的安装包本身,具体解释可通过以下
sh cuda_11.3.0_465.19.01_linux.run -help命令调出:
--toolkit:仅安装 CUDA 工具包(含nvcc)--toolkitpath=/hpc2hdd/home/schen744/code/test/cuda-11.3:将工具包安装到/hpc2hdd/home/schen744/code/test/目录下的cuda-11.3目录(可自定义路径,需确保有写入权限)(路径是最容易出错的地方,非常推荐使用绝对路径)(通过pwd命令获得当前位置的绝对路径)--silent:静默安装(避免交互式选择)
2.2 验证安装结果
安装完成后,检查 ~/cuda-11.3 目录是否存在 bin/nvcc 文件:
ls /hpc2hdd/home/schen744/code/test/cuda-11.3/bin/nvcc若输出路径![]()
则工具包已成功安装
步骤 3:配置环境变量(关键)
需要将 CUDA 工具包的 bin(含 nvcc)和 lib64(含运行时库)路径添加到环境变量中,否则系统无法识别 nvcc
3.1 临时配置(当前终端生效)
export PATH=$HOME/cuda-11.3/bin:$PATHexport LD_LIBRARY_PATH=/hpc2hdd/home/schen744/code/test/cuda-11.3/lib64:$LD_LIBRARY_PATH3.2 永久配置(所有终端生效)
将上述环境变量添加到 ~/.bashrc(或 ~/.zshrc,根据你使用的 shell):
echo \'export PATH=/hpc2hdd/home/schen744/code/test/cuda-11.3/bin:$PATH\' >> ~/.bashrcecho \'export LD_LIBRARY_PATH=/hpc2hdd/home/schen744/code/test/cuda-11.3/lib64:$LD_LIBRARY_PATH\' >> ~/.bashrc保存后生效配置:
source ~/.bashrc步骤 4:验证 nvcc 是否可用
运行以下命令检查 nvcc 版本:
nvcc --version若输出类似以下信息,则安装成功:
nvcc: NVIDIA (R) Cuda compiler driverCopyright (c) 2005-2021 NVIDIA CorporationBuilt on Mon_May__3_19:15:13_PDT_2021Cuda compilation tools, release 11.3, V11.3.109Build cuda_11.3.r11.3/compiler.29920130_0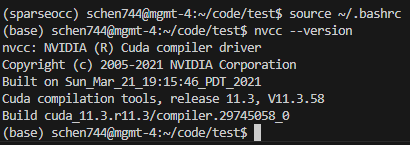
问题成功解决!


