嵌入式Linux--项目--基于I.MX6ULL的智能家居系统(驱动开发、mqtt、qt、JsonRPC)_嵌入式linux项目
一、项目概述
学了俩月嵌入式Linux却感觉什么都不会做,看到韦东山老师的《嵌入式Linux应用开发实验班(快速入门)》课程做一个最简单的产品:
① 在屏幕上点击图标控制 LED
② 在屏幕上显示温湿度的值
③ 使用OneNet物联网云平台远程控制这个产品
花了5天做完项目,在此仅是个人学习记录、错误不少,请各位指正
以这个功能为例,抛弃暂时没必要深究的知识,把产品做出来。然后在它的基础上扩展功能:该补什么知识就去补 !!!
干中学!!!
干中学!!!
干中学!!!
韦东山老师课程链接(后续课程收费,但腾讯云平台收费了,后续也没法跟着课程做了,这部分我查阅大佬的教程使用OneNet平台做的):百问网韦东山嵌入式Linux应用开发入门实验班(快!做出产品!而不是学一堆知识点!!)哔哩哔哩bilibili
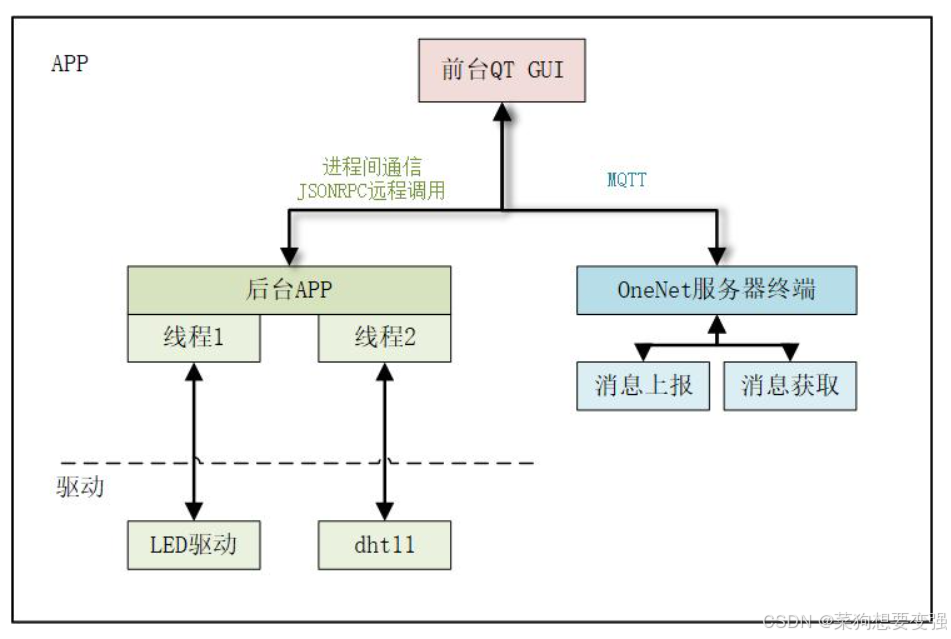
1、硬件框架

2、软件框架
3、开发环境配置
开发环境:ubuntu18.04、Linux4.9.88、Qt5.12.9
使用100ask imx6ULLPro开发板;
使用rfs从ubuntu传输文件到单板;
连接OneNet平台需要单板连接到外网,这里使用的WIFI连接,需要插上天线;
具体配置流程参考韦东山老师文档《嵌入式Linux应用开发实验班(快速入门)》
二、使用文件IO操作
1、操作LED

在 Linux 系统里,我们可以使用 2 种方法去操作上面的 LED:
① 使用 GPIO SYSFS 系统:
这需要一定的硬件知识,需要设置引脚的方向、数值
IMX6ULL 使用的 GPIO5_3 引脚编号是 131,可以如下操作:
写GPIO:
echo 131 > /sys/class/gpio/exportecho out > /sys/class/gpio/gpio131/direction echo 1 > /sys/class/gpio/gpio131/valueecho 131 > /sys/class/gpio/unexport 读GPIO:
echo 131 > /sys/class/gpio/exportecho in > /sys/class/gpio/gpio131/direction cat /sys/class/gpio/gpio131/valueecho 131 > /sys/class/gpio/unexport② 使用驱动程序:
无需硬件知识,使用 open/read/write 接口调用驱动即可
把驱动程序 led_drv.ko、 led_test 通过 ADB 上传到开发板,然后执行如下命令可以看到灯亮、灭:
移除QT程序,否则它占用LED引脚导致无法安装驱动
mv /etc/init.d/S99myqt /rootreboot重启后执行如下命令insmod /root/led_drv.ko ls /dev/100ask_led /root/led_test 0 on /root/led_test 0 off最简单的驱动程序:led_drc.c
#include \"asm-generic/errno-base.h\"#include \"asm-generic/gpio.h\"#include \"asm/uaccess.h\"#include #include #include #include #include #include #include #include #include #include #include #include #include #include #include #include #include #include #include #include #include #include #include #include #include struct gpio_desc{int gpio;int irq; char *name; int key;struct timer_list key_timer;} ;static struct gpio_desc gpios[2] = { {131, 0, \"led0\", }, //{132, 0, \"led1\", },};/* 主设备号 */static int major = 0;static struct class *gpio_class;/* 实现对应的open/read/write等函数,填入file_operations结构体 */static ssize_t gpio_drv_read (struct file *file, char __user *buf, size_t size, loff_t *offset){char tmp_buf[2];int err; int count = sizeof(gpios)/sizeof(gpios[0]);if (size != 2)return -EINVAL;err = copy_from_user(tmp_buf, buf, 1);if (tmp_buf[0] >= count)return -EINVAL;tmp_buf[1] = gpio_get_value(gpios[tmp_buf[0]].gpio);err = copy_to_user(buf, tmp_buf, 2);return 2;}static ssize_t gpio_drv_write(struct file *file, const char __user *buf, size_t size, loff_t *offset){ unsigned char ker_buf[2]; int err; if (size != 2) return -EINVAL; err = copy_from_user(ker_buf, buf, size); if (ker_buf[0] >= sizeof(gpios)/sizeof(gpios[0])) return -EINVAL; gpio_set_value(gpios[ker_buf[0]].gpio, ker_buf[1]); return 2; }/* 定义自己的file_operations结构体 */static struct file_operations gpio_key_drv = {.owner = THIS_MODULE,.read = gpio_drv_read,.write = gpio_drv_write,};/* 在入口函数 */static int __init gpio_drv_init(void){ int err; int i; int count = sizeof(gpios)/sizeof(gpios[0]); printk(\"%s %s line %d\\n\", __FILE__, __FUNCTION__, __LINE__);for (i = 0; i < count; i++){/* set pin as output */err = gpio_request(gpios[i].gpio, gpios[i].name);if (err < 0) {printk(\"can not request gpio %s %d\\n\", gpios[i].name, gpios[i].gpio);return -ENODEV;}gpio_direction_output(gpios[i].gpio, 1);}/* 注册file_operations */major = register_chrdev(0, \"100ask_led\", &gpio_key_drv); /* /dev/gpio_desc */gpio_class = class_create(THIS_MODULE, \"100ask_led_class\");if (IS_ERR(gpio_class)) {printk(\"%s %s line %d\\n\", __FILE__, __FUNCTION__, __LINE__);unregister_chrdev(major, \"100ask_led_class\");return PTR_ERR(gpio_class);}device_create(gpio_class, NULL, MKDEV(major, 0), NULL, \"100ask_led\"); /* /dev/100ask_gpio */return err;}/* 有入口函数就应该有出口函数:卸载驱动程序时,就会去调用这个出口函数 */static void __exit gpio_drv_exit(void){ int i; int count = sizeof(gpios)/sizeof(gpios[0]); printk(\"%s %s line %d\\n\", __FILE__, __FUNCTION__, __LINE__);device_destroy(gpio_class, MKDEV(major, 0));class_destroy(gpio_class);unregister_chrdev(major, \"100ask_led\");for (i = 0; i < count; i++){gpio_free(gpios[i].gpio);}}/* 7. 其他完善:提供设备信息,自动创建设备节点 */module_init(gpio_drv_init);module_exit(gpio_drv_exit);MODULE_LICENSE(\"GPL\");测试文件
#include #include #include #include #include #include #include #include #include static int fd;//int led_on(int which);//int led_off(int which);//int led_status(int which);/* * ./led_test on * ./led_test off * ./led_test */int main(int argc, char **argv){int ret;char buf[2];int i;/* 1. 判断参数 */if (argc < 2) {printf(\"Usage: %s [on | off]\\n\", argv[0]);return -1;}/* 2. 打开文件 */fd = open(\"/dev/100ask_led\", O_RDWR);if (fd == -1){printf(\"can not open file /dev/100ask_led\\n\");return -1;}if (argc == 3){/* write */buf[0] = strtol(argv[1], NULL, 0);if (strcmp(argv[2], \"on\") == 0)buf[1] = 0;elsebuf[1] = 1;ret = write(fd, buf, 2);}else{buf[0] = strtol(argv[1], NULL, 0);ret = read(fd, buf, 2);if (ret == 2){printf(\"led %d status is %s\\n\", buf[0], buf[1] == 0 ? \"on\" : \"off\");}}close(fd);return 0;}知识补充:
Linux 的 sysfs 文件系统用于管理和控制多种硬件设备和系统资源。sysfs 是一个虚拟文件系统,它将内核中的设备和驱动信息以文件的形式暴露给用户空间,允许用户通过文件操作来配置和控制硬件;
优缺点对比
无需编译内核:直接在用户空间操作,无需修改内核代码
功能有限:仅支持基本的 GPIO 操作,无法实现复杂的硬件特性
功能强大:可以实现复杂的硬件特性(如定时触发、亮度控制等)。
系统集成:更适合嵌入式系统和需要高性能的场景
需要编译内核:每次修改驱动都需要重新编译内核
2、操作dht11
把驱动程序 dht11_drv.ko、 dht11_test 通过rfs上传到开发板,然后执行如下命令可以看到不断打印温湿度的值:
执行如下命令
insmod /root/dht11_drv.ko ls /dev/mydht11 /root/dht11_test /dev/mydht11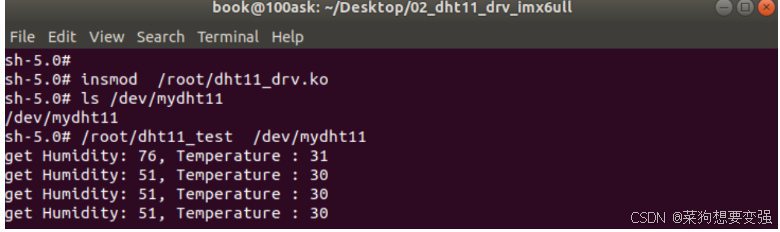
dht11_drv.c:
#include \"asm-generic/errno-base.h\"#include \"asm-generic/gpio.h\"#include \"linux/jiffies.h\"#include #include #include #include #include #include #include #include #include #include #include #include #include #include #include #include #include #include #include #include #include #include #include #include #include #include struct gpio_desc{int gpio;int irq; char *name; int key;struct timer_list key_timer;} ;static struct gpio_desc gpios[] = { {115, 0, \"dht11\", },};/* 主设备号 */static int major = 0;static struct class *gpio_class;static u64 g_dht11_irq_time[84];static int g_dht11_irq_cnt = 0;/* 环形缓冲区 */#define BUF_LEN 128static char g_keys[BUF_LEN];static int r, w;struct fasync_struct *button_fasync;static irqreturn_t dht11_isr(int irq, void *dev_id);static void parse_dht11_datas(void);#define NEXT_POS(x) ((x+1) % BUF_LEN)static int is_key_buf_empty(void){return (r == w);}static int is_key_buf_full(void){return (r == NEXT_POS(w));}static void put_key(char key){if (!is_key_buf_full()){g_keys[w] = key;w = NEXT_POS(w);}}static char get_key(void){char key = 0;if (!is_key_buf_empty()){key = g_keys[r];r = NEXT_POS(r);}return key;}static DECLARE_WAIT_QUEUE_HEAD(gpio_wait);// static void key_timer_expire(struct timer_list *t)static void key_timer_expire(unsigned long data){// 解析数据, 放入环形buffer, 唤醒APPparse_dht11_datas();}/* 实现对应的open/read/write等函数,填入file_operations结构体 */static ssize_t dht11_read (struct file *file, char __user *buf, size_t size, loff_t *offset){int err;char kern_buf[2];if (size != 2)return -EINVAL;g_dht11_irq_cnt = 0;/* 1. 发送18ms的低脉冲 */err = gpio_request(gpios[0].gpio, gpios[0].name);gpio_direction_output(gpios[0].gpio, 0);gpio_free(gpios[0].gpio);mdelay(18);gpio_direction_input(gpios[0].gpio); /* 引脚变为输入方向, 由上拉电阻拉为1 *//* 2. 注册中断 */err = request_irq(gpios[0].irq, dht11_isr, IRQF_TRIGGER_RISING | IRQF_TRIGGER_FALLING, gpios[0].name, &gpios[0]);mod_timer(&gpios[0].key_timer, jiffies + 20);/* 3. 休眠等待数据 */wait_event_interruptible(gpio_wait, !is_key_buf_empty());free_irq(gpios[0].irq, &gpios[0]);//printk(\"%s %s %d\\n\", __FILE__, __FUNCTION__, __LINE__);/* 设置DHT11 GPIO引脚的初始状态: output 1 */err = gpio_request(gpios[0].gpio, gpios[0].name);if (err){printk(\"%s %s %d, gpio_request err\\n\", __FILE__, __FUNCTION__, __LINE__);}gpio_direction_output(gpios[0].gpio, 1);gpio_free(gpios[0].gpio);/* 4. copy_to_user */kern_buf[0] = get_key();kern_buf[1] = get_key();printk(\"get val : 0x%x, 0x%x\\n\", kern_buf[0], kern_buf[1]);if ((kern_buf[0] == (char)-1) && (kern_buf[1] == (char)-1)){printk(\"get err val\\n\");return -EIO;}err = copy_to_user(buf, kern_buf, 2);return 2;}static int dht11_release (struct inode *inode, struct file *filp){return 0;}/* 定义自己的file_operations结构体 */static struct file_operations dht11_drv = {.owner = THIS_MODULE,.read = dht11_read,.release = dht11_release,};static void parse_dht11_datas(void){int i;u64 high_time;unsigned char data = 0;int bits = 0;unsigned char datas[5];int byte = 0;unsigned char crc;printk(\"g_dht11_irq_cnt = %d\\n\", g_dht11_irq_cnt);/* 数据个数: 可能是81、82、83、84 */if (g_dht11_irq_cnt < 81){/* 出错 */put_key(-1);put_key(-1);// 唤醒APPwake_up_interruptible(&gpio_wait);g_dht11_irq_cnt = 0;return;}// 解析数据for (i = g_dht11_irq_cnt - 80; i < g_dht11_irq_cnt; i+=2){high_time = g_dht11_irq_time[i] - g_dht11_irq_time[i-1];data <<= 1;if (high_time > 50000) /* data 1 */{data |= 1;}bits++;if (bits == 8){datas[byte] = data;data = 0;bits = 0;byte++;}}// 放入环形buffercrc = datas[0] + datas[1] + datas[2] + datas[3];if (crc == datas[4]){put_key(datas[0]);put_key(datas[2]);}else{printk(\"dht11 crc err\\n\");put_key(-1);put_key(-1);}g_dht11_irq_cnt = 0;// 唤醒APPwake_up_interruptible(&gpio_wait);}static irqreturn_t dht11_isr(int irq, void *dev_id){struct gpio_desc *gpio_desc = dev_id;u64 time;/* 1. 记录中断发生的时间 */time = ktime_get_ns();g_dht11_irq_time[g_dht11_irq_cnt] = time;/* 2. 累计次数 */g_dht11_irq_cnt++;/* 3. 次数足够: 解析数据, 放入环形buffer, 唤醒APP */if (g_dht11_irq_cnt == 84){del_timer(&gpio_desc->key_timer);parse_dht11_datas();}return IRQ_HANDLED;}/* 在入口函数 */static int __init dht11_init(void){ int err; int i; int count = sizeof(gpios)/sizeof(gpios[0]); printk(\"%s %s line %d\\n\", __FILE__, __FUNCTION__, __LINE__);for (i = 0; i < count; i++){gpios[i].irq = gpio_to_irq(gpios[i].gpio);/* 设置DHT11 GPIO引脚的初始状态: output 1 */err = gpio_request(gpios[i].gpio, gpios[i].name);gpio_direction_output(gpios[i].gpio, 1);gpio_free(gpios[i].gpio);setup_timer(&gpios[i].key_timer, key_timer_expire, (unsigned long)&gpios[i]); //timer_setup(&gpios[i].key_timer, key_timer_expire, 0);//gpios[i].key_timer.expires = ~0;//add_timer(&gpios[i].key_timer);//err = request_irq(gpios[i].irq, dht11_isr, IRQF_TRIGGER_RISING | IRQF_TRIGGER_FALLING, \"100ask_gpio_key\", &gpios[i]);}/* 注册file_operations */major = register_chrdev(0, \"100ask_dht11\", &dht11_drv); /* /dev/gpio_desc */gpio_class = class_create(THIS_MODULE, \"100ask_dht11_class\");if (IS_ERR(gpio_class)) {printk(\"%s %s line %d\\n\", __FILE__, __FUNCTION__, __LINE__);unregister_chrdev(major, \"100ask_dht11\");return PTR_ERR(gpio_class);}device_create(gpio_class, NULL, MKDEV(major, 0), NULL, \"mydht11\"); /* /dev/mydht11 */return err;}/* 有入口函数就应该有出口函数:卸载驱动程序时,就会去调用这个出口函数 */static void __exit dht11_exit(void){ int i; int count = sizeof(gpios)/sizeof(gpios[0]); printk(\"%s %s line %d\\n\", __FILE__, __FUNCTION__, __LINE__);device_destroy(gpio_class, MKDEV(major, 0));class_destroy(gpio_class);unregister_chrdev(major, \"100ask_dht11\");for (i = 0; i < count; i++){//free_irq(gpios[i].irq, &gpios[i]);//del_timer(&gpios[i].key_timer);}}/* 7. 其他完善:提供设备信息,自动创建设备节点 */module_init(dht11_init);module_exit(dht11_exit);MODULE_LICENSE(\"GPL\");dht11_test.c
#include #include #include #include #include #include #include #include static int fd;/* * ./button_test /dev/mydht11 * */int main(int argc, char **argv){char buf[2];int ret;int i;/* 1. 判断参数 */if (argc != 2) {printf(\"Usage: %s \\n\", argv[0]);return -1;}/* 2. 打开文件 */fd = open(argv[1], O_RDWR | O_NONBLOCK);if (fd == -1){printf(\"can not open file %s\\n\", argv[1]);return -1;}while (1){if (read(fd, buf, 2) == 2){printf(\"get Humidity: %d, Temperature : %d\\n\", buf[0], buf[1]);sleep(1);}}//sleep(30);close(fd);return 0;}三、使用JsonRPC实现前后台分离
对于比较复杂的程序,前台界面显示、后台程序由不同的团队进行开发,双方定义好交互的接口即可。这样,前台、后台程序可以分别独立开发,降低相互之间的依赖。比如:
① 当更改硬件,比如更换LED引脚时,前台程序无需改变,只需要修改后台程序
② 想调整界面时,只需要修改前台程序,无需修改后台程序
前台程序、后台程序分别属于不同的“进程”,它们之间的交互需要通过“进程间通信”来实现,比如:网络通信、管道、共享内存等等。
本课程使用基于网络通信的“JsonRPC远程调用”来实现前后台程序的交互:

详细内容见具体配置流程参考韦东山老师文档《嵌入式Linux应用开发实验班(快速入门)》,这里只做知识性总结归纳
知识补充:
1、RPC介绍
RPC(远程过程调用)是一种用于实现分布式系统中不同进程或不同计算机之间通信的技术。RPC 的核心思想是允许我们像调用本地函数一样调用远程计算机上的函数,使得分布式系统的开发变得更加简单和高效。
JsonRPC是一种基于JSON(JavaScript Object Notation)的轻量级远程过程调用协议。与其他RPC协议相比,JsonRPC使用简单的文本格式进行通信,易于阅读和编写,广泛应用于Web服务和分布式系统中。除了JsonRPC,还有其他一些常见的RPC协议,例如:
- XML-RPC:使用XML作为通信格式的RPC协议。
- SOAP:基于XML的通信协议,支持多种传输协议。
- gRPC:由Google开发的高性能、开源的RPC框架,支持多种编程语言和传输协议。
JsonRPC协议定义了一种简单的请求-响应模型,通信双方通过发送和接收JSON格式的消息进行交互。
2、JSON格式
JSON(JavaScript Object Notation, JavaScript 对象表示法)是基于 ECMAScript 的一个子集设计的,是一种开放标准的文件格式和数据交换格式,它易于人阅读和编写,同时也易于机器解析和生成。 JSON 独立于语言设计,很多编程语言都支持 JSON 格式的数据交换。 JSON 是一种常用的数据格式,在电子数据交换中有多种用途,包括与服务器之间的Web 应用程序的数据交换。其简洁和清晰的层次结构有效地提升了网络传输效率,使其成为理想的数据交换语言。其文件通常使用扩展名.json 。
例子:JSON解析:\"{\\\"method\\\": \\\"add\\\", \\\"params\\\": [2,4], \\\"id\\\": \\\"2\\\" }\"或者{ \"title\":\"JSON Example\", \"author\": { \"name\":\"John Doe\", \"age\": 35, \"isVerified\":true }, \"tags\":[\"json\", \"syntax\", \"example\"], \"rating\": 4.5, \"isPublished\":false, \"comments\": null}3、JsonRPC请求响应示例
请求示例
一个JsonRPC请求由以下几个部分组成:
{ \"jsonrpc\": \"2.0\", \"method\": \"methodName\", \"params\": [param1, param2, ...], \"id\": 1}jsonrpc:指定JsonRPC版本,通常为\"2.0\"。method:指定要调用的远程方法名。params:包含要传递给远程方法的参数列表。id:请求的唯一标识符,用于将请求和响应进行匹配。
响应示例
一个JsonRPC响应由以下几个部分组成:
{ \"jsonrpc\": \"2.0\", \"result\": \"resultValue\", \"error\": { \"code\": 100, \"message\": \"errorMessage\"}, \"id\": 1}jsonrpc:指定JsonRPC版本,通常为\"2.0\"。result:包含远程方法调用的结果值。error:包含错误信息,如果请求执行过程中发生错误。id:与请求中的标识符相匹配,用于将响应与请求进行匹配。
成功和失败响应示例
成功的JsonRPC响应示例:
{ \"jsonrpc\": \"2.0\", \"result\": \"Hello, world!\", \"id\": 1}失败的JsonRPC响应示例:
{ \"jsonrpc\": \"2.0\", \"error\": { \"code\": -32601, \"message\": \"Method not found\"}, \"id\": 1}参数的数据类型
JsonRPC支持以下基本数据类型作为参数和结果值:
- 字符串(String)
- 数字(Number)
- 布尔值(Boolean)
- 数组(Array)
- 对象(Object)
- 空值(Null)
当参数或者返回结果中包含字节数组的时候需要注意,由于JSON是一种文本格式,所以在序列化和反序列化字节数组时,会将其转换为Base64编码的字符串。这种转换会增加数据存储的大小和处理时间。因此,对于大型字节数组,传递原始二进制数据的方式可能会更高效,而不是通过JSON进行编码和解码。在这种情况下,其他二进制传输协议(如gRPC或自定义的二进制协议)可能更适合处理字节数组的传递。
4、 基于JsonRPC分离前后端
cJSON 是由 Dave Gamble 创建的开源 JSON 处理库,适用于需要轻量级 JSON 解析和生成的场景。这里我们使用开源的cJOSN,需要编译 libev 库、编译 jsonrpc 库 ,并且将其添加到交叉编译链 。
这里主要讲后端服务器操作硬件,通过JsonRPC通信,向前端qtAPP提供服务(控制LED、读取温湿度的值)。
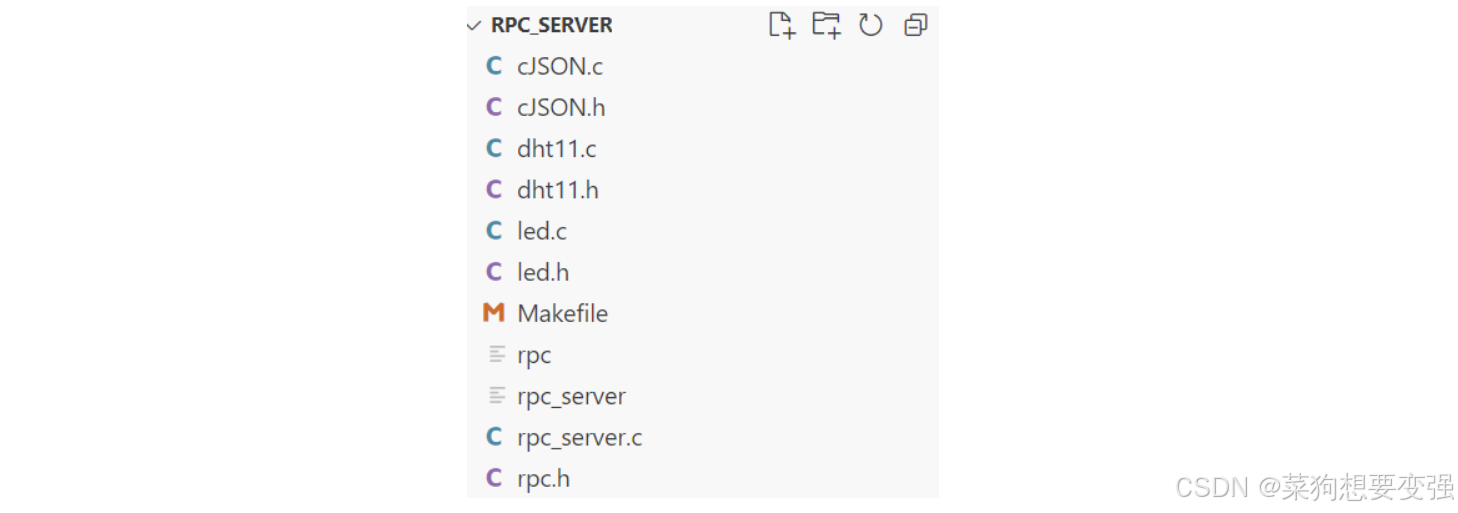
rpc_server.c:
#include #include #include #include #include #include #include #include #include #include #include #include #include \"rpc.h\"#include \"led.h\"#include \"dht11.h\"static struct jrpc_server my_server;/* 参数: {\"params\" : [0|1]} */cJSON * server_led_control(jrpc_context * ctx, cJSON * params, cJSON *id) { cJSON * status = cJSON_GetArrayItem(params,0); led_control(status->valueint); return cJSON_CreateNumber(0);}/* 参数: {\"params\" : null} */cJSON * server_dht11_read(jrpc_context * ctx, cJSON * params, cJSON *id) { int array[2]; array[0] = array[1] = 0; while (0 != dht11_read((char *)&array[0], (char *)&array[1])); return cJSON_CreateIntArray(array, 2);}int RPC_Server_Init(void) { int err; err = jrpc_server_init(&my_server, PORT); if (err) { printf(\"jrpc_server_init err : %d\\n\", err); } jrpc_register_procedure(&my_server, server_led_control, \"led_control\", NULL ); jrpc_register_procedure(&my_server, server_dht11_read, \"dht11_read\", NULL ); jrpc_server_run(&my_server); jrpc_server_destroy(&my_server); return 0;}int main(int argc, char **argv){ //初始化硬件(open设备节点) led_init(); dht11_init(); //启动服务端 RPC_Server_Init(); return 0;}前端qt客户端调用:rpc_client.cpp
#include #include #include #include #include #include #include #include #include #include #include #include \"cJSON.h\"#include \"rpc.h\"static int g_iSocketClient;//发送消息以使用客户端的“led_control”int rpc_led_control(int on){ char buf[100]; int iLen; int ret = -1; int iSocketClient = g_iSocketClient; sprintf(buf, \"{\\\"method\\\": \\\"led_control\\\", \\\"params\\\": [%d], \\\"id\\\": \\\"2\\\" }\", on); iLen = send(iSocketClient, buf, strlen(buf), 0); if (iLen == strlen(buf)) { while (1) { iLen = read(iSocketClient, buf, sizeof(buf)); buf[iLen] = 0; if (iLen == 1 && (buf[0] == \'\\r\' || buf[0] == \'\\n\')) continue; else break; } if (iLen > 0) { cJSON *root = cJSON_Parse(buf); cJSON *result = cJSON_GetObjectItem(root, \"result\"); ret = result->valueint; cJSON_Delete(root); return ret; } else { printf(\"read rpc reply err : %d\\n\", iLen); return -1; } } else { printf(\"send rpc request err : %d, %s\\n\", iLen, strerror(errno)); return -1; }}//发送消息以使用客户端的“dht11_read”int rpc_dht11_read(char *humi, char *temp){ char buf[300]; int iLen; int iSocketClient = g_iSocketClient; sprintf(buf, \"{\\\"method\\\": \\\"dht11_read\\\",\" \\ \"\\\"params\\\": [0], \\\"id\\\": \\\"2\\\" }\"); iLen = send(iSocketClient, buf, strlen(buf), 0); if (iLen == strlen(buf)) { while (1) { iLen = read(iSocketClient, buf, sizeof(buf)); buf[iLen] = 0; if (iLen == 1 && (buf[0] == \'\\r\' || buf[0] == \'\\n\')) continue; else break; } if (iLen > 0) { cJSON *root = cJSON_Parse(buf); cJSON *result = cJSON_GetObjectItem(root, \"result\"); if (result) { cJSON * a = cJSON_GetArrayItem(result,0); cJSON * b = cJSON_GetArrayItem(result,1); *humi = a->valueint; *temp = b->valueint; cJSON_Delete(root); return 0; } else { cJSON_Delete(root); return -1; } } else { printf(\"read rpc reply err : %d\\n\", iLen); return -1; } } else { printf(\"send rpc request err : %d, %s\\n\", iLen, strerror(errno)); return -1; }}/* 连接RPC Server * 返回值: (>0)socket, (-1)失败 */int RPC_Client_Init(void){ int iSocketClient; struct sockaddr_in tSocketServerAddr; int iRet; iSocketClient = socket(AF_INET, SOCK_STREAM, 0); tSocketServerAddr.sin_family = AF_INET; tSocketServerAddr.sin_port = htons(PORT); inet_aton(\"127.0.0.1\", &tSocketServerAddr.sin_addr); memset(tSocketServerAddr.sin_zero, 0, 8); iRet = connect(iSocketClient, (const struct sockaddr *)&tSocketServerAddr, sizeof(struct sockaddr)); if (-1 == iRet) { printf(\"connect error!\\n\"); return -1; } g_iSocketClient = iSocketClient; return iSocketClient;}四、使用MQTT协议连接OneNet实现远程控制
这部分参考:【嵌入式linux开发】智能家居入门6:最新ONENET,物联网开放平台(QT、微信小程序、MQTT协议、ONENET云平台、旭日x3派)_onenet云端-CSDN博客
ONENET云平台创建产品与设备参考下方视频:
https://player.youku.com/embed/XNjQxNTE0OTAyNA==
需要注意的点:
①数据协议:这里选择的是OneJson,当然也可以选择数据流,但是它们对应的发送数据和接收数据的topic是不一样的,所以如果想省事直接使用本文代码,那就选择OneJson。

②新版三元组:
按照视频创建完毕后,进入设备管理的详情中,可以看到后续会用到的三个参数:
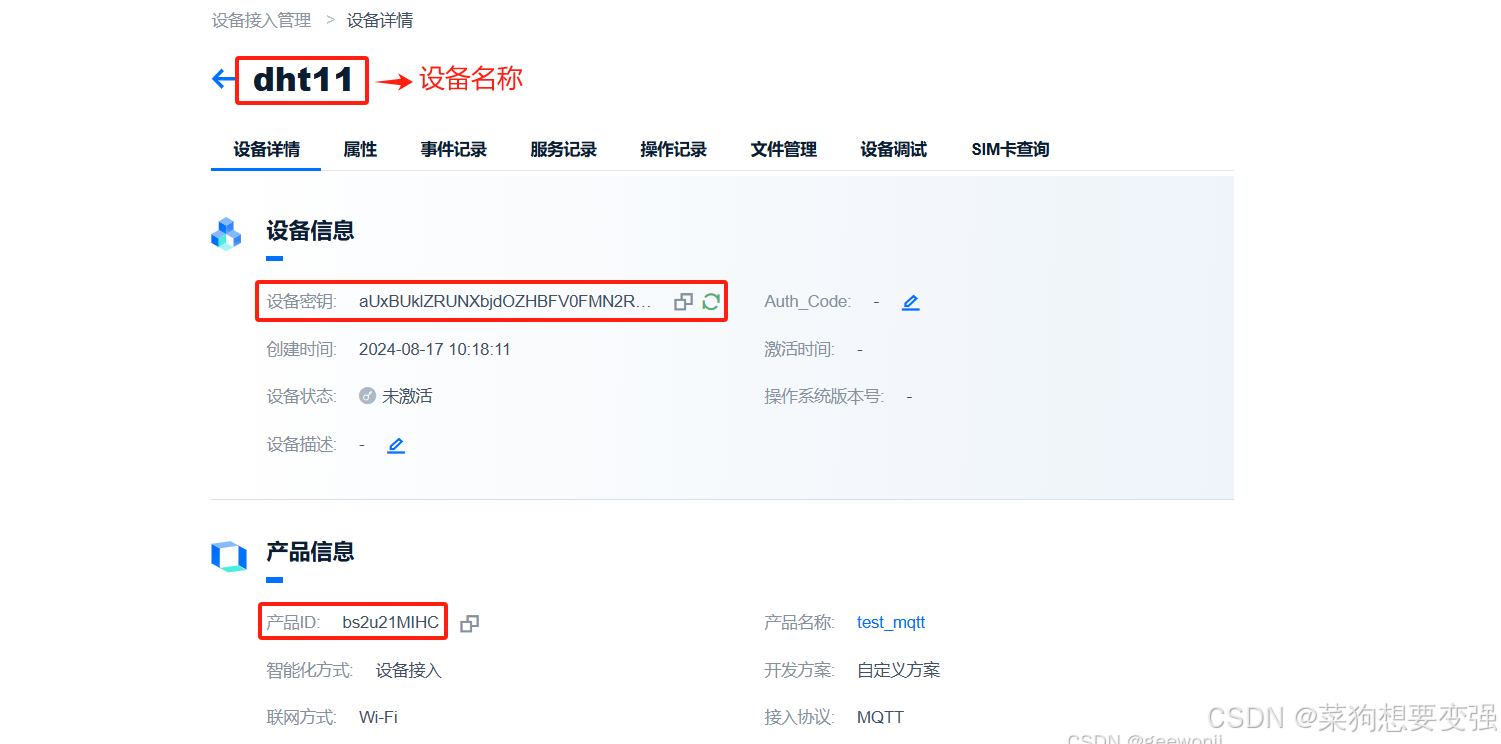
1、测试前的准备
①token:
产品与设备创建完成之后,按照文档指示,需要计算token,在连接时会用到:
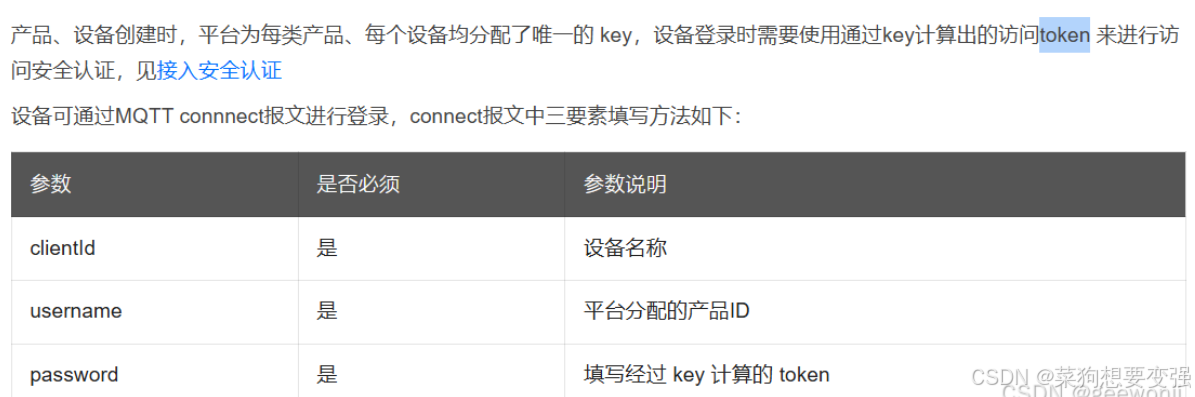
这里的clienid和username就是前面截图中包含的两个参数:设备名称、产品ID,这里的password就是使用官方软件计算生成的token。接下来视频演示如何计算token:
重点如下:
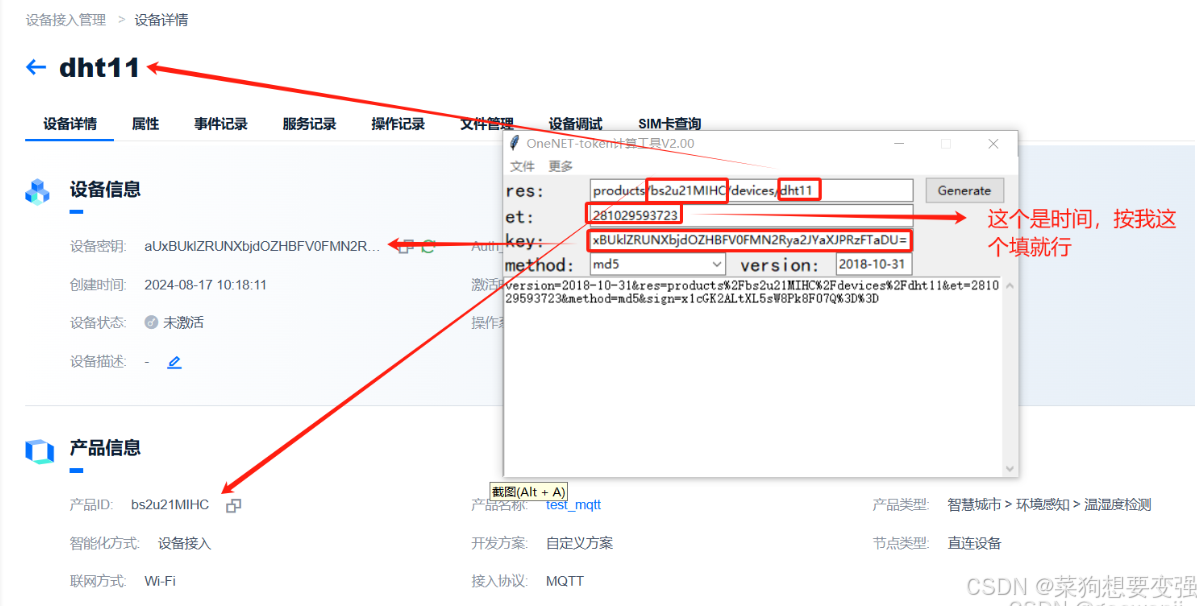
纠错:上图中的时间过小,在后面多加随便一个数字既可:2810295937232。
②OneJson数据协议对应的发布、订阅topic:
文档中有明确给出OneJson数据协议(物模型)的发布和订阅topic,如果数据协议选择数据流的小伙伴,在文档的这个界面往后翻翻就可以看到对应的。
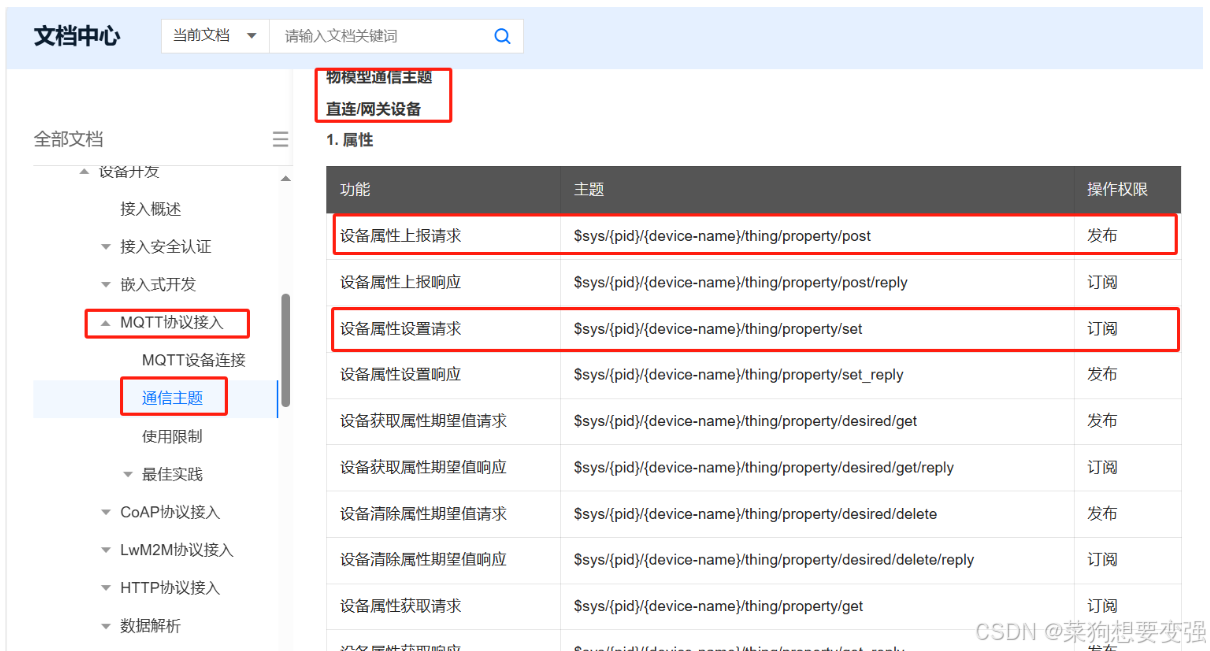
在连上服务器之后,对这两个topic操作就可以上传和接收数据啦!
2、测试
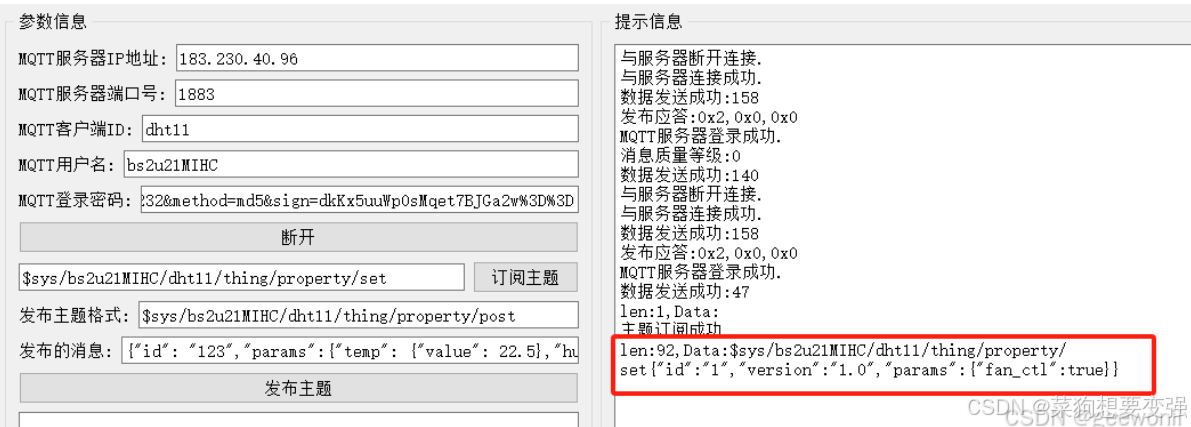
下载客户端软件,提取码:q1a1,这是DS小龙哥开源的,填入自己的信息:

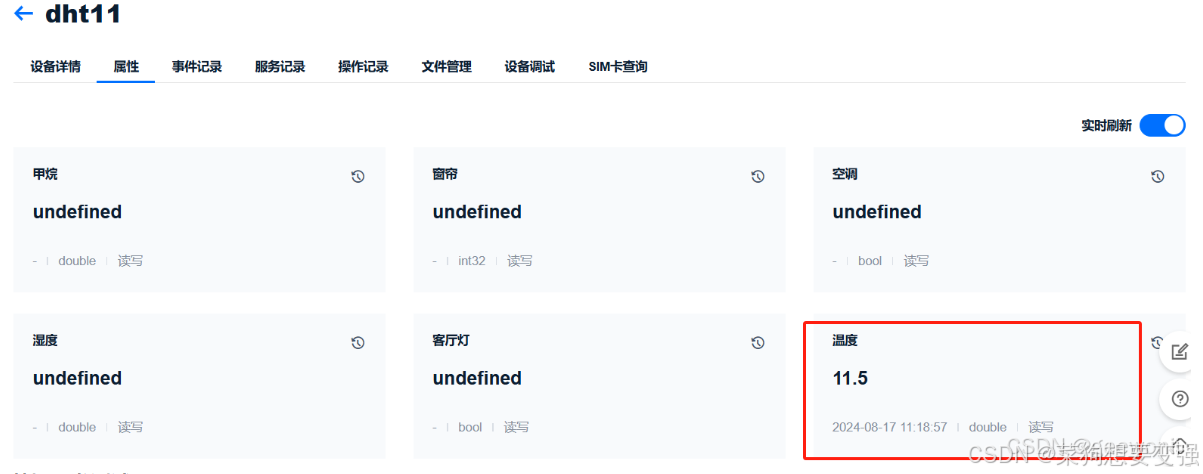
①数据上传测试:
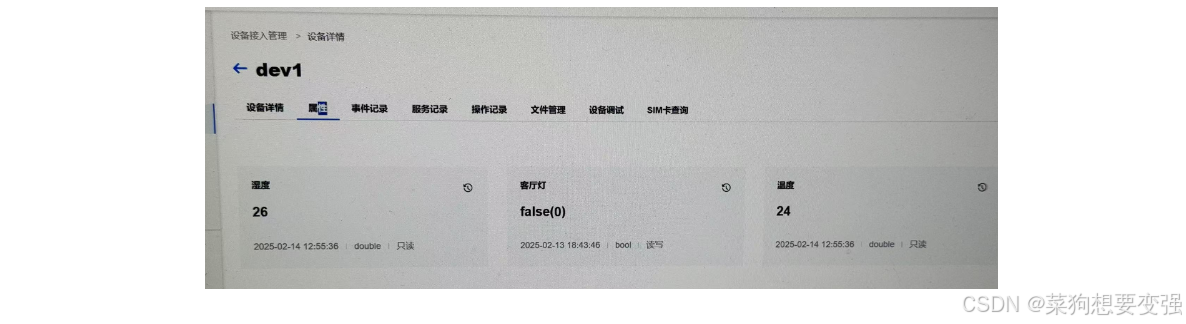
点击登录即可连接上服务器,然后点击发布主题就可以把数据发布到特定的物模型中,可以在onenet云平台中观察是否成功:
②数据下发测试:
onenet中进入设备调试界面,将fan_ctl设置为true,然后点击属性期望值设置。客户端软件同样连接服务器之后,点击订阅主题,观察是否收到服务器下发的消息:
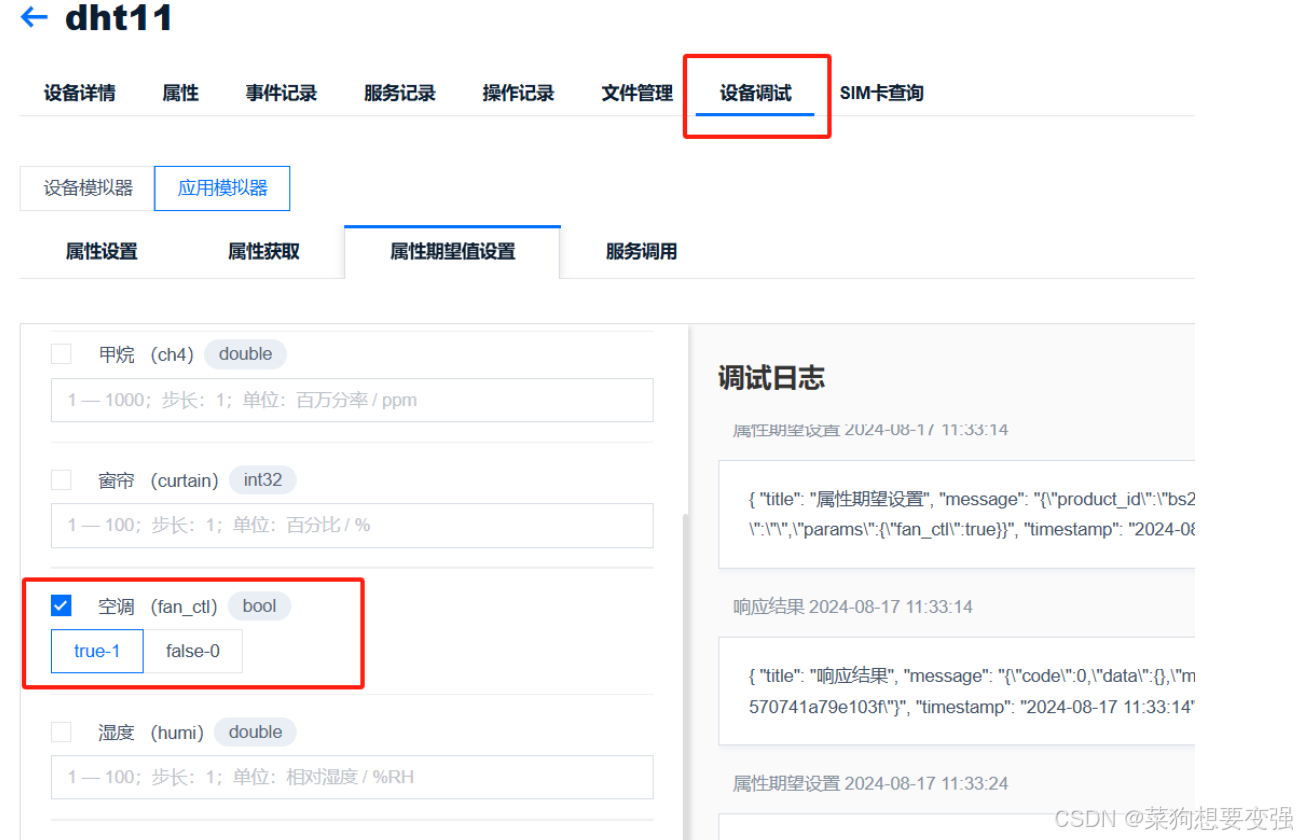
这样双向测试就算完成了,接下来就是下位机与上位机的代码简介。
使用的库函数代码,代码放在工程中,后续调用里面的函数实现mqtt通讯:
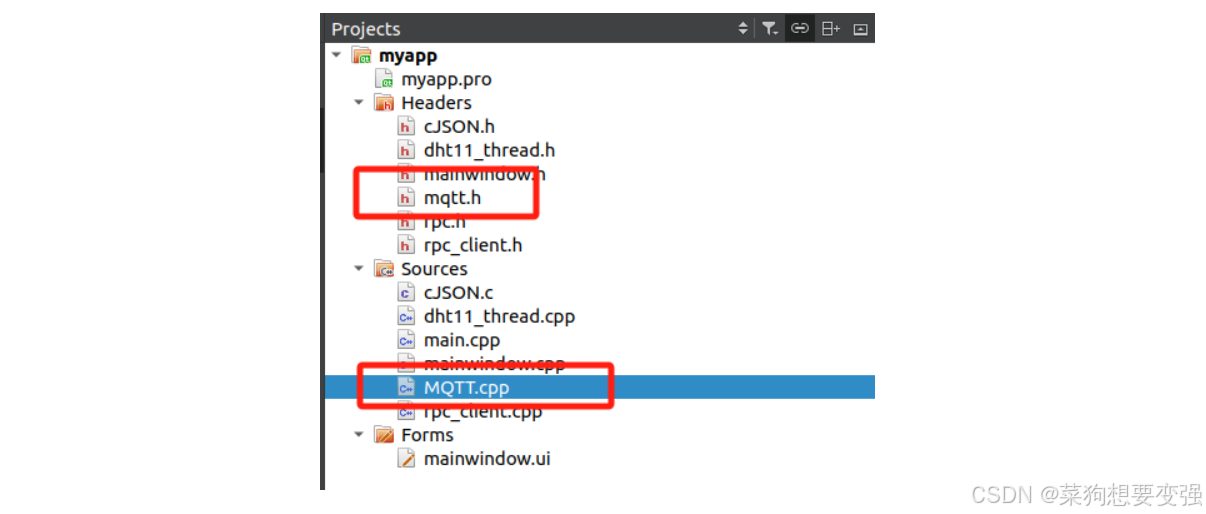
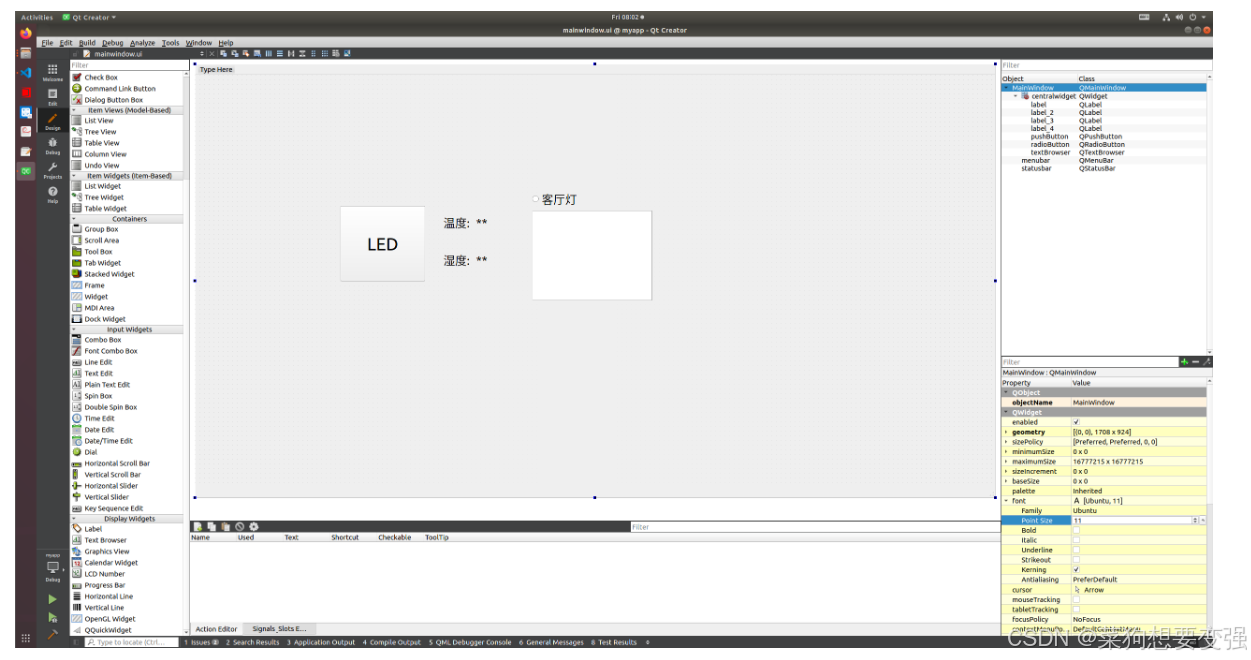
五、QT APP编写
使用QtCreater工具简单设计UI,重点是Qt的信号与槽函数的设计!!!
学到这里,可以去补充一下从c过渡到c++的基本语法,以及C++面向对象设计语法;
参考教程:
【正点原子】嵌入式Qt5 C++开发视频_哔哩哔哩_bilibili
C语言 转 C++ 简单教程_哔哩哔哩_bilibili
1、代码
mainwindow.h
#ifndef MAINWINDOW_H#define MAINWINDOW_H#include #include #include #include //日期时间#include #include #include //tcp客户端通过http协议连接云服务器#include #include #include #include #include #include \"dht11_thread.h\"#include QT_BEGIN_NAMESPACEnamespace Ui { class MainWindow; }QT_END_NAMESPACEclass MainWindow : public QMainWindow{ Q_OBJECTpublic: MainWindow(QWidget *parent = nullptr); ~MainWindow(); QString serverIp = \"183.230.40.96\"; // 替换为服务器IP quint16 serverPort = 1883; // 替换为服务器端口 QString clientId = \"dev1\"; // 替换为设备名称 QString username = \"2Vx5G6or93\"; // 替换为产品ID QString password = \"version=2018-10-31&res=products%2F2Vx5G6or93%2Fdevices%2Fdev1&et=21025937232&method=md5&sign=GdHTauIRt2Twis6BZgoIaA%3D%3D\"; // 替换为token QString topicToSubscribe = \"$sys/2Vx5G6or93/dev1/thing/property/set\"; // 替换为要订阅的主题 QString topicToPublish = \"$sys/2Vx5G6or93/dev1/thing/property/post\"; // 替换为要发布消息的主题 //三个处理函数 QString convertObjectToJsonString(const QJsonObject& object); QJsonObject createJsonObj(const QMap<QString, double>& dataMap); void parseJsonAndAction(const QByteArray& jsonData);private: Ui::MainWindow *ui; QDateTimeEdit *dateTimeEdit; QTimer *timer; MQTT_WorkClass *mqttClient; QLabel *labelHumi; QLabel *labelTemp;private slots: void on_pushButton_clicked();//led开关 // 槽函数用于上报温湿度信息 void onUpdateData(char humidity, char temperature); //断线重连 void reconnect(bool); //接收服务器下发的数据 void receiveWechatData(QByteArray);};#endif // MAINWINDOW_Hmainwindow.cpp
#include \"mainwindow.h\"#include \"ui_mainwindow.h\"#include #include \"rpc_client.h\"#include \"mqtt.h\"#include \"dht11_thread.h\"MainWindow::MainWindow(QWidget *parent) : QMainWindow(parent) , ui(new Ui::MainWindow){ ui->setupUi(this); labelHumi = this->findChild<QLabel*>(\"label_4\");//湿度 labelTemp = this->findChild<QLabel*>(\"label_3\");//温度 //温湿度线程 // 创建线程对象并连接信号槽// connect(dhtThread, SIGNAL(updateData(char,char)),this,SLOT(onUpdateData(char,char))); /****************************** 连接服务器 ******************************************/ mqttClient = new MQTT_WorkClass(); // 设置MQTT服务器的地址和其他参数 mqttClient->Set_MQTT_Addr(serverIp, serverPort, clientId, username, password); // 连接到MQTT服务器 mqttClient->run(); /******************************* 订阅主题 *******************************************/ mqttClient->slot_SubscribeTopic(topicToSubscribe); /****************************** 信号与槽连接 *****************************************/ //断线重连槽函数 connect(mqttClient,SIGNAL(MQTT_ConnectState(bool)),this,SLOT(reconnect(bool))); //接收到服务器下发数据的重写槽函数 connect(mqttClient,SIGNAL(ReceiveWechatData(QByteArray)),this,SLOT(receiveWechatData(QByteArray)));}/************************************槽函数**********************************************///上报温湿度void MainWindow::onUpdateData(char humidity, char temperature){ qDebug() << \"Humidity:\" << humidity << \"Temperature:\" << temperature<<endl; labelHumi->setText(QString(\"%1%\").arg((int)humidity)); labelTemp->setText(QString(\"%1°C\").arg((int)temperature)); /**** 发布消息到主题 ****/ QMap<QString, double> dataMap; dataMap[\"temp\"] = (double)temperature; // 温度 dataMap[\"humi\"] = (double)humidity; //湿度 // 调用函数创建JSON对象 QJsonObject rootObject = createJsonObj(dataMap); //将QJsonObject转换为QString QString jsonString = convertObjectToJsonString(rootObject); mqttClient->slot_PublishData(topicToPublish, jsonString); qDebug() << \"数据上传成功\" << endl;}//断线重连槽函数void MainWindow::reconnect(bool){ mqttClient = new MQTT_WorkClass(); // 设置MQTT服务器的地址和其他参数 mqttClient->Set_MQTT_Addr(serverIp, serverPort, clientId, username, password); // 连接到MQTT服务器 mqttClient->run(); // 订阅主题 mqttClient->slot_SubscribeTopic(topicToSubscribe);}//解析服务器下发数据,槽函数void MainWindow::receiveWechatData(QByteArray data){ //qDebug()<<\"读取服务器发过来的数据:\"<< data; // 找到JSON对象的起始位置(第一个\'{\'符号) int startPos = data.indexOf(\'{\'); if (startPos != -1) { // 删除起始位置之前的所有字符 data = data.mid(startPos); } else { qDebug() << \"未找到JSON对象的起始位置\"; //return -1; // 如果找不到起始位置,返回错误代码 } parseJsonAndAction(data);}//将QJsonObject转换为QString,函数QString MainWindow::convertObjectToJsonString(const QJsonObject& object) { // 将QJsonObject转换为QJsonDocument QJsonDocument jsonDoc(object); // 将QJsonDocument转换为QString,使用Compact模式 return jsonDoc.toJson(QJsonDocument::Compact);}//组织上传数据,函数QJsonObject MainWindow::createJsonObj(const QMap<QString, double>& dataMap) { QJsonObject rootObject; // 设置id字段 rootObject[\"id\"] = \"123\"; // 创建params对象 QJsonObject paramsObject; // 遍历数据映射,添加每个数据字段 for (auto it = dataMap.constBegin(); it != dataMap.constEnd(); ++it) { QJsonObject valueObj; valueObj[\"value\"] = it.value(); // 设置数值 paramsObject[it.key()] = valueObj; // 添加到params对象 } // 将params对象添加到rootObject rootObject[\"params\"] = paramsObject; return rootObject;}//解析服务器下发指令并动作函数void MainWindow::parseJsonAndAction(const QByteArray& jsonData) { // 将QByteArray转换为QJsonDocument QJsonDocument jsonDoc = QJsonDocument::fromJson(jsonData); if (jsonDoc.isNull()) { qDebug() << \"JSON解析失败\"; return; } // 确保这是一个对象 if (!jsonDoc.isObject()) { qDebug() << \"JSON不是一个对象\"; return; } // 获取JSON对象 QJsonObject jsonObject = jsonDoc.object(); // 进入params对象 if (jsonObject.contains(\"params\")) { QJsonObject paramsObject = jsonObject[\"params\"].toObject(); QDateTime currentDateTime = QDateTime::currentDateTime(); // 格式化日期时间为字符串,例如:\"2024-08-16 18:32:10\" QString dateTimeStr = currentDateTime.toString(\"yyyy-MM-dd HH:mm:ss\"); // 提取led_ctl的值 if (paramsObject.contains(\"led_ctl\")) { bool ledCtlValue = paramsObject[\"led_ctl\"].toBool(); qDebug() << \"led_ctl的值:\" << ledCtlValue; if(ledCtlValue == 0) { QString message = dateTimeStr + \" - 手机控制关闭客厅灯\"; ui->textBrowser->append(message); ui->radioButton->setText(\"客厅灯|离线\"); ui->radioButton->setChecked(0); rpc_led_control(0); } else if(ledCtlValue == 1) { QString message = dateTimeStr + \" - 手机控制打开客厅灯\"; ui->textBrowser->append(message); ui->radioButton->setText(\"客厅灯|在线\"); ui->radioButton->setChecked(1); rpc_led_control(1); } } else { qDebug() << \"params中不包含led_ctl\"; } } else { qDebug() << \"JSON对象中不包含params\"; }}MainWindow::~MainWindow(){ delete ui;}void MainWindow::on_pushButton_clicked(){ static int status = 1; if (status) qDebug()<<\"LED clicked on\"; else qDebug()<<\"LED clicked off\"; rpc_led_control(status); status = !status;}dht11_thread.h
#ifndef DHT11_THREAD_H#define DHT11_THREAD_H#include #include #include class MainWindow;// 1. 创建继承自QThread的子类class DHT11Thread : public QThread { Q_OBJECTpublic: explicit DHT11Thread(QObject *parent = nullptr) : QThread(parent){} void run() override ;signals: void updateData(char humidity, char temperature);};#endif // DHT11_THREAD_Hdht11_thread.c
#include #include #include \"dht11_thread.h\"#include \"rpc_client.h\"#include \"stdio.h\"// 2. 重写run()函数,这里是线程要执行的代码void DHT11Thread::run(){ char humi; char temp; while(1) { if (0 == rpc_dht11_read(&humi, &temp)) { emit updateData(humi, temp); msleep(2000); // 线程休眠2秒 } }}main.cpp
#include \"mainwindow.h\"#include \"rpc_client.h\"#include #include \"dht11_thread.h\"int main(int argc, char *argv[]){ RPC_Client_Init(); DHT11Thread *dhtThread = new DHT11Thread(); dhtThread->start(); QApplication a(argc, argv); MainWindow w; QObject::connect(dhtThread, SIGNAL(updateData(char, char)), &w, SLOT(onUpdateData(char, char))); w.show(); return a.exec();}记得在.pro文件里面添加交叉编译工具链的include、lib等信息;以及添加使用的Qt模块;
QT += core gui network widgets concurrentSOURCES += \\ MQTT.cpp \\ cJSON.c \\ dht11_thread.cpp \\ main.cpp \\ mainwindow.cpp \\ rpc_client.cppHEADERS += \\ cJSON.h \\ dht11_thread.h \\ mainwindow.h \\ mqtt.h \\ rpc.h \\ rpc_client.hFORMS += \\ mainwindow.uiINCLUDEPATH += /home/book/100ask_imx6ull-sdk/ToolChain/arm-buildroot-linux-gnueabihf_sdkbuildroot/arm-buildroot-linux-gnueabihf/sysroot/usr/include2、APP开机自启动相关设置
这一部分如果想深入,需要学习一下Linux下 Shell脚本语言:这可能是B站讲的最好的Linux Shell脚本教程,3h打通Linux-shell全套教程,从入门到精通完整版_哔哩哔哩_bilibili
创建一个文件: /etc/init.d/rCS;这个文件是一个初始化脚本,用于在系统启动时加载内核模块并执行其他初始化脚本。
#!/bin/sh #(\"是一个 shebang 行,用于指定脚本文件的解释器。它告诉系统使用 /bin/sh 来执行脚本中的命令。\")#加载驱动insmod /root/led_drv.koinsmod /root/dht11_drv.ko# Start all init scripts in /etc/init.d# executing them in numerical order.# 是一个启动画面程序,通常用于显示启动进度psplash -n &# 遍历 /etc/init.d/ 目录下所有以 S 开头的文件(通常是初始化脚本)。# 根据文件扩展名(如 .sh)或文件类型,执行这些脚本的 start 方法。# 如果脚本是 shell 脚本(以 .sh 结尾),则直接在当前 shell 中执行。# 如果是其他类型的脚本,则在子进程中执行。for i in /etc/init.d/S??* ;do # Ignore dangling symlinks (if any). [ ! -f \"$i\" ] && continue case \"$i\" in *.sh) # Source shell script for speed. ( trap - INT QUIT TSTP set start . $i ) ;; *) # No sh extension, so fork subprocess. $i start ;; esacdone# 这行代码的作用是根据 /etc/hostname 文件的内容设置系统的主机名。/bin/hostname -F /etc/hostname创建一个文件: /etc/init.d/S99myqt ,这个文件是一个具体的初始化脚本,用于启动你的应用程序 myapp 和 rpc_server。
#!/bin/shstart() {#禁止LCD黑屏echo -e \"\\033[9;0]\" > /dev/tty0#设置QT运行环境export QT_QPA_GENERIC_PLUGINS=tslib:/dev/input/event1export QT_QPA_PLATFORM=linuxfb:fb=/dev/fb0export QT_QPA_FONTDIR=/usr/lib/fonts/psplash-write \"PROGRESS 95\"psplash-write \"QUIT\"/root/rpc_server &sleep 5/root/myapp &}stop() { killall myapp}case \"$1\" in start) start ;; stop) stop ;; *) echo \"Usage: $0 {start| stop|restart}\" exit 1esacexit $?看到这里有几个疑问:为什么开发板会开机启动自动运行你的程序
System V(缩写为 SysV)在大多数 Linux 发行版中使用最广泛,在 systemv中,在内核加载后运行的第 1 个程序被称为 init 程序。 Init 做一些事情,其中之一就是加载一系列脚本来启动各种系统服务,例如网络, ssh 守护程序等。 systemv 的问题在于它需要仔细调整。假设您有一个要在启动时运行的网络文件系统( NFS)客户端。在网络正常工作之前运行 NFS 没有任何意义。因此,您必须等待网络已经正常工作,才能启动 systemv。 Systemv init 这样做的方法是为服务启动设置严格的顺序。每个服务都分配有一个优先级编号, init 会按优先级顺序启动服务。
在基于 SysVinit 的 Linux 系统中,所有 System V 初始化脚本都存储在/etc/rc.d/init.d/或/etc/init.d目录中。这些脚本用于控制系统的启动和关闭 。这些脚本在系统启动时按顺序执行,以完成系统的初始化工作。
脚本名称以 S 开头,表示这是一个启动脚本。脚本名称中的数字(如 S99)决定了执行顺序。数字越大,执行越靠后。例如:
S01script会在S02script之前执行。S99myqt是最后执行的脚本之一。
/etc/init.d/rCS 脚本负责执行 /etc/init.d/ 目录下所有以 S 开头的脚本。它会按顺序执行这些脚本,完成系统的初始化。上面提到按照顺序执行脚本的这个工作就是由rCS脚本来完成。
**注意:**从ubuntu通过rfs将文件传输到单板以后,记得讲个文件添加可执行权限
chmod +x /root/rpc_serverchmod +x /root/myappchmod +x /etc/init.d/rcSchmod +x /etc/init.d/S99myqt3、单板连接WIFI
参考韦东山教程,在目录:/home/book/100ask_imx6ull-sdk/Linux-4.9.88/drivers/net/wireless/rtl8723BU ,获得适合当前Linux系统,适合当前开发板上板载网卡型号的网卡驱动文件(你没有的话需要自己去搜索资料弄到合适的网卡驱动文件)。编译驱动文件,获得xxx.ko文件,复制该文件到开发板,然后在开发板安装驱动。经过开发板的wifi连接工具相关配置以后,就可以连接上WiFi了。
①、编译驱动要修改Makefile文件
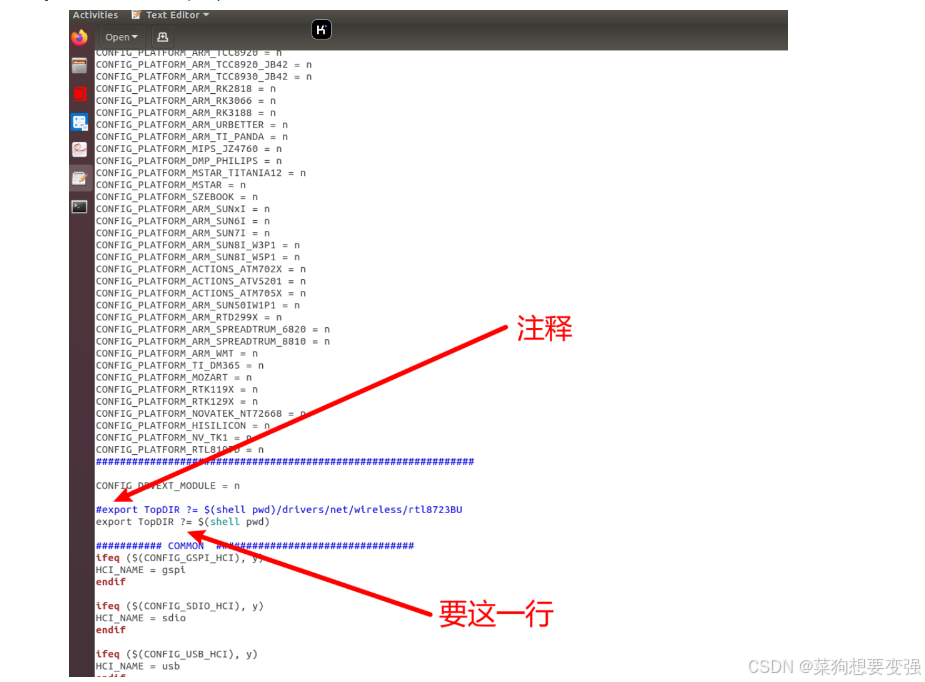
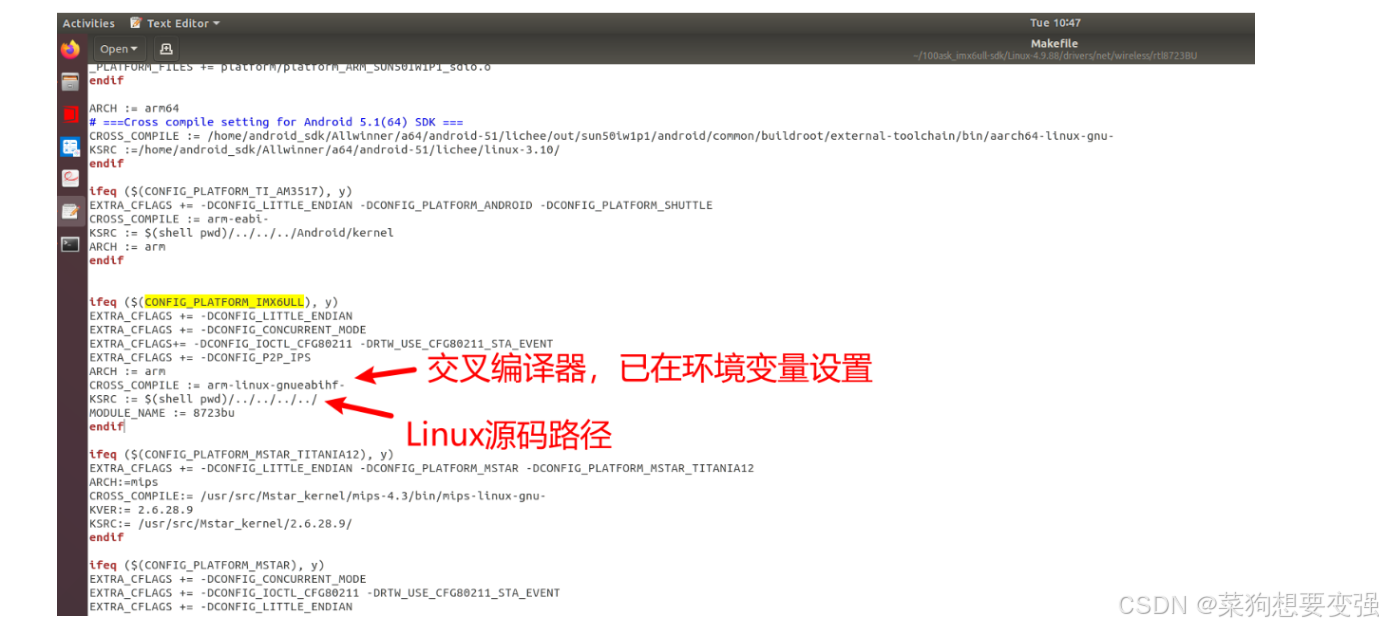
我们现在在.ko的路径下,由于已经改好了Makefile文件了,那就直接输入 make 编译,得到.ko文件。然后通过你自己的方式将.ko文件发送到开发板,并在开发板装insmod 装载 .ko驱动文件。
//进入开发板//刷新一下系统环境变量source /etc/profile //关闭有线网卡ifconfig eth0 down //打开无线网卡也就是rtl8723buifconfig wlan0 up //WiFi连接配置设置,路径不可改vi /etc/wpa_supplicant.conf //修改wpa_supplicant.conf的内容如下:ctrl_interface=/var/run/wpa_supplicantap_scan=1network={ ssid=\"Play_434_2.4G\" //wifi名称 ,这一行前面用tab代替空格 psk=\"434434434\" //wifi密码 ,这一行前面用tab代替空格} //配置udhcpc使其分配到动态ip后并配置到rtl8723bu网卡上//在Ubuntu上,使用本系统的busybox的udhcpc配置文件cd /home/book/100ask_imx6ull-sdk/Busybox_1.30.0/examples/udhcpcp simple.script /home/book/nfs_rootfs //Ubuntu挂载在开发板上的nfs路径 //在开发板上将simple.script更改名称并放在特定路径mv /mnt/simple.script /usr/share/udhcpc/default.scriptchmod 755 /usr/share/udhcpc/default.script //启动wpa_supplicant应用 // 1 较新Linux系统使用以下这行wpa_supplicant -Dnl80211 -c /etc/wpa_supplicant.conf -i wlan0 & // 2 较老Linux系统使用以下这行wpa_supplicant -D wext -c /etc/wpa_supplicant.conf -i wlan0 & //搜索wifi并根据刚才的配置进行wifi连接udhcpc -i wlan0 //使系统支持域名解析echo \"nameserver 8.8.8.8\" >> /etc/resolv.conf开发板开机自动连接WiFi,看到了嘛,我们还是修改rCS,来设置开机启动时的工作。
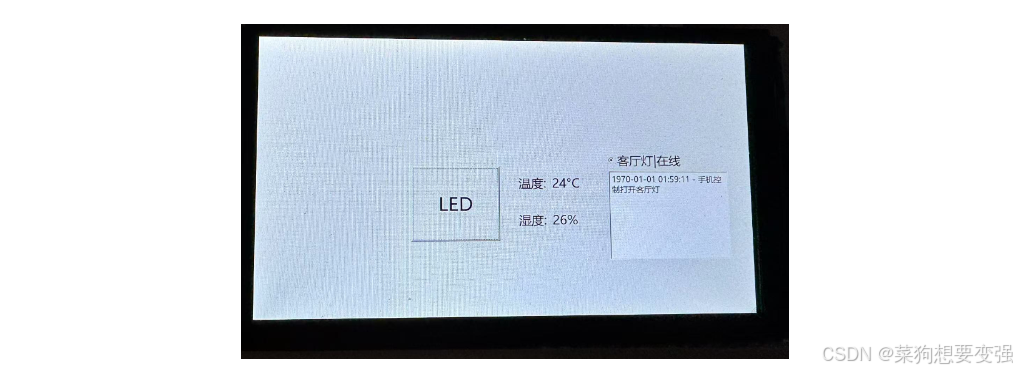
//在开发板上vi /etc/init.d/rcS //在该文件中的文末输入的代码效果相当于在shell中输入命令一样//输入以下命令source /etc/profile //刷新环境变量insmod /opt/gpio_driver.koinsmod /opt/8723bu.ko //安装网卡驱动ifconfig eth0 down //关闭有线网卡ifconfig wlan0 up //打开无线网卡wpa_supplicant -Dnl80211 -c /etc/wpa_supplicant.conf -i wlan0 & //打开wifi工具udhcpc -i wlan0 //连接wifiecho \"nameserver 8.8.8.8\" >> /etc/resolv.conf //解析域名功能配置cd /opt //进入我的Qt目录/opt/1armQtProject & //执行QT程序六、项目结果
项目较为简单,为期5天即可完成。但从理论走向实践,学了那么多东西,用不到很快就忘记了。
“嵌入式开发中,基础知识太多了,学完 ABCDEFG,你都没办法做出一个最简单的产品” --韦东山老师
一次项目作为入门,作为框架,开启新阶段的学习。
继续沉淀。
注:参考资料均已备注,如有侵权,立即删除。

