【Linux】线程池

目录
- 一、线程的封装
- 二、锁的封装
- 三、日志的实现
- 四、任务的实现
- 五、线程池的实现
-
- 5.1 线程池的实现及测试
- 5.2 使用懒汉模式实现线程池及测试
- 结尾
一、线程的封装
这里模仿C++中的线程,将Linux中的线程封装了一下,具体实现请看下面的代码。
// Thread.hpp#pragma once#include #include #include #include using namespace std;// typedef function func_t;template<class T>using func_t = function<void(T&)>;template<class T>class Thread{public: Thread(const string &threadname, func_t<T> func ,const T& data) : _pid(0), _threadname(threadname), _func(func), isrunning(false) , _data(data) { } // 线程需要执行的函数 static void *ThreadRoutine(void *arg) { Thread *pt = (Thread *)arg; pt->_func(pt->_data); return nullptr; } // 线程开创建并执行 bool Start() { int n = pthread_create(&_pid, nullptr, ThreadRoutine, this); if (n == 0) { isrunning = true; // cout << \"is strat , is running : \" << isrunning << endl; return true; } else { return false; } } // 线程等待 bool Join() { if(!isrunning) return false; return pthread_join(_pid, nullptr); } bool IsRunning() { return isrunning; } string ThreadName() { return _threadname; } ~Thread() { }private: pthread_t _pid; string _threadname; bool isrunning; func_t<T> _func; T _data;};二、锁的封装
为了方便后面锁的申请和释放,这里将锁进行了简单的封装,创建对象时,就申请锁,当出了作用域以后,析构对象时就将锁释放,也可以减少死锁出现的情况。
// LockGuard.hpp#pragma once#include class Mutex{public: Mutex(pthread_mutex_t* lock) :pmutex(lock) {} void Lock() { pthread_mutex_lock(pmutex); } void Unlock() { pthread_mutex_unlock(pmutex); } ~Mutex() {}public: pthread_mutex_t* pmutex;};class LockGuard{public: LockGuard(pthread_mutex_t* lock) :mutex(lock) { mutex.Lock(); } ~LockGuard() { mutex.Unlock(); }public: Mutex mutex;};三、日志的实现
为了后面输出信息更加方便编写和阅读,这里简单的实现了一个日志的功能,它可以在线程要输出内容的前面加上日志等级、输出时间、线程ID等信息,信息可以根据选择输出到显示屏上、一个文件中和根据日志等级输出到多个文件中,具体实现请看下面的代码。
// Log.hpp#pragma once#include \"LockGuard.hpp\"#include #include #include #include #include #include #include #include #include #include using namespace std;// 日志等级enum{ Debug = 0, // 调试 Info, // 正常 Warning, // 警告 Error, // 错误,但程序并未直接退出 Fatal // 程序直接挂掉};enum{ Screen = 10, // 打印到显示器上 OneFile, // 打印到一个文件中 ClassFile // 按照日志等级打印到不同的文件中};string LevelToString(int level){ switch (level) { case Debug: return \"Debug\"; case Info: return \"Info\"; case Warning: return \"Warning\"; case Error: return \"Error\"; case Fatal: return \"Fatal\"; default: return \"Unknow\"; }}const char *default_filename = \"log.\";const int default_style = Screen;const char *defaultdir = \"log\";class Log{public: Log() : style(default_style), filename(default_filename) { // mkdir(defaultdir,0775); pthread_mutex_init(&_log_mutex, nullptr); } void SwitchStyle(int sty) { style = sty; } void WriteLogToOneFile(const string &logname, const string &logmessage) { int fd = open(logname.c_str(), O_CREAT | O_WRONLY | O_APPEND, 0666); if (fd == -1) return; { LockGuard lockguard(&_log_mutex); write(fd, logmessage.c_str(), logmessage.size()); } close(fd); } void WriteLogToClassFile(const string &levelstr, const string &logmessage) { mkdir(defaultdir, 0775); string name = defaultdir; name += \"/\"; name += filename; name += levelstr; WriteLogToOneFile(name, logmessage); } void WriteLog(int level, const string &logmessage) { switch (style) { case Screen: { LockGuard lockguard(&_log_mutex); cout << logmessage; } break; case OneFile: WriteLogToClassFile(\"All\", logmessage); break; case ClassFile: WriteLogToClassFile(LevelToString(level), logmessage); break; default: break; } } string GetTime() { time_t CurrentTime = time(nullptr); struct tm *curtime = localtime(&CurrentTime); char time[128]; // localtime 的年是从1900开始的,所以要加1900, 月是从0开始的所以加1 snprintf(time, sizeof(time), \"%d-%d-%d %d:%d:%d\", curtime->tm_year + 1900, curtime->tm_mon + 1, curtime->tm_mday, curtime->tm_hour, curtime->tm_min, curtime->tm_sec); return time; return \"\"; } void LogMessage(int level, const char *format, ...) { char left[1024]; string Levelstr = LevelToString(level).c_str(); string Timestr = GetTime().c_str(); string Idstr = to_string(getpid()); snprintf(left, sizeof(left), \"[%s][%s][%s] \", Levelstr.c_str(), Timestr.c_str(), Idstr.c_str()); va_list args; va_start(args, format); char right[1024]; vsnprintf(right, sizeof(right), format, args); string logmessage = left; logmessage += right; WriteLog(level, logmessage); va_end(args); } ~Log() { pthread_mutex_destroy(&_log_mutex); };private: int style; string filename; pthread_mutex_t _log_mutex;};Log log;class Conf{public: Conf() { log.SwitchStyle(Screen); } ~Conf() { }};Conf conf;四、任务的实现
可能大家没有学习过网络,这里就设计一个简单的运算类,作为线程需要传递和执行的任务,具体实现请看下面的代码。
// Task.hpp#pragma once#include using namespace std;const int defaultreslut = 0;enum{ ok = 0, div_zero, mod_zero, unknow};string ops = \"+-*/%\";class Task{public: Task() {} Task(int x, int y, char op) : data_x(x), data_y(y), _op(op), result(defaultreslut), code(ok) {} void Run() { switch (_op) { case \'+\': result = data_x + data_y; break; case \'-\': result = data_x - data_y; break; case \'*\': break; result = data_x * data_y; case \'/\': { if (data_y == 0) code = div_zero; else result = data_x / data_y; } break; case \'%\': { if (data_y == 0) code = mod_zero; else result = data_x % data_y; } break; default: code = unknow; break; } } void operator()() { Run(); } string PrintTask() { string s; s += to_string(data_x); s += _op; s += to_string(data_y); s += \" = ?\"; return s; } string PrintResult() { string s; s += to_string(data_x); s += _op; s += to_string(data_y); s += \" = \"; s += to_string(result); s += \" [\"; s += to_string(code); s += \"]\"; return s; } ~Task() { }private: int data_x; int data_y; char _op; int result; int code; // 为0代表答案有效};五、线程池的实现
5.1 线程池的实现及测试
// ThreadPool.hpp#pragma once#include #include #include #include #include #include \"Thread.hpp\"#include \"Log.hpp\"#include \"LockGuard.hpp\"using namespace std;const int default_threadnum = 3;class ThreadDate{public: ThreadDate(const string &name) : threadname(name) { } ~ThreadDate() { }public: string threadname;};template <class T>class ThreadPool{public: ThreadPool(int num = default_threadnum) : _threadnum(num) { // 初始化锁和条件变量 pthread_mutex_init(&_mutex, nullptr); pthread_cond_init(&_cond, nullptr); // 创建线程 for (int i = 0; i < _threadnum; i++) { string threadname = \"thread-\" + to_string(i + 1); ThreadDate td(threadname); // 由于Thread执行的是线程池的类内函数,而Thread调用的函数中并没有this指针 // 所以这里就使用bind函数,调整一下Thread调用函数的参数,使函数可以多接收一个参数 _threads.push_back(Thread<ThreadDate>(threadname, bind(&ThreadPool<T>::ThreadRun, this, placeholders::_1), td)); log.LogMessage(Info, \"%s is create\\n\", threadname.c_str()); } } // 启动所有线程 bool Start() { for (auto &t : _threads) { t.Start(); log.LogMessage(Info, \"%s , is running...\\n\", t.ThreadName().c_str()); } return true; }// 等待所有线程终止 void Join() { for (auto &t : _threads) { t.Join(); } }// 线程等待当前条件变量 void Thread_Wait(const ThreadDate &td) { pthread_cond_wait(&_cond, &_mutex); log.LogMessage(Debug, \"no task , %s is sleeping...\\n\", td.threadname.c_str()); }// 唤醒当前条件变量下的某个线程 void Thread_Wakeup() { pthread_cond_signal(&_cond); }// 添加任务 bool Push(T &in) { LockGuard lockguard(&_mutex); _q.push(in); Thread_Wakeup(); log.LogMessage(Debug, \"other thread push a task , task is %s\\n\", in.PrintTask().c_str()); return true; }// 线程需要执行的回调函数 void ThreadRun(const ThreadDate &td) { while (1) { T t; // 取任务 { LockGuard lockguard(&_mutex); while (_q.empty()) { Thread_Wait(td); log.LogMessage(Debug, \"haven task , %s is wakeup\\n\", td.threadname.c_str()); } t = _q.front(); _q.pop(); } // 执行任务 t.Run(); log.LogMessage(Debug, \"%s handler task %s done , result is %s\\n\", td.threadname.c_str(), t.PrintTask().c_str(), t.PrintResult().c_str()); } }// 销毁锁和条件变量 ~ThreadPool() { pthread_mutex_destroy(&_mutex); pthread_cond_destroy(&_cond); }private: queue<T> _q; vector<Thread<ThreadDate>> _threads; int _threadnum; pthread_mutex_t _mutex; pthread_cond_t _cond;};// Main.cpp#include #include #include #include \"ThreadPool.hpp\"#include \"Task.hpp\"using namespace std;int main(){ unique_ptr<ThreadPool<Task>> tp(new ThreadPool<Task>()); tp->Start(); srand((uint64_t)time(nullptr) ^ getpid()); while (1) { int data1 = rand() % 100; usleep(10000); int data2 = rand() % 100; usleep(10000); char op = ops[rand() % ops.size()]; Task t(data1, data2, op); tp->Push(t); sleep(1); } tp->Join(); return 0;}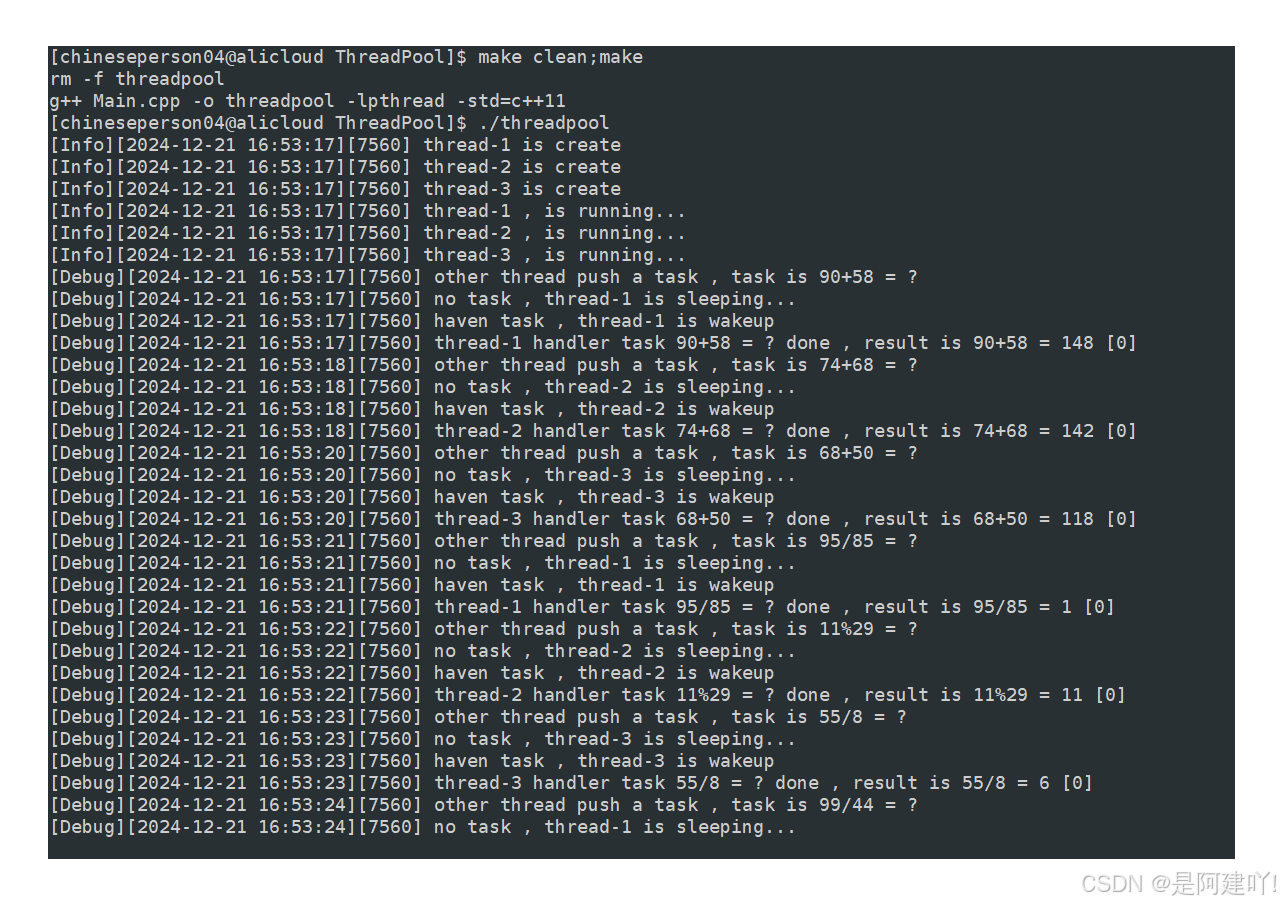
5.2 使用懒汉模式实现线程池及测试
懒汉模式实现了延迟初始化,即只有在第一次需要使用实例对象时才进行创建。这种方式可以避免在类加载时就创建实例对象,从而节省系统资源。
// ThreadPool.hpp#pragma once#include #include #include #include #include #include \"Thread.hpp\"#include \"Log.hpp\"#include \"LockGuard.hpp\"using namespace std;const int default_threadnum = 3;class ThreadDate{public: ThreadDate(const string &name) : threadname(name) { } ~ThreadDate() { }public: string threadname;};template <class T>class ThreadPool{private: ThreadPool(int num = default_threadnum) : _threadnum(num) { // 初始化锁和条件变量 pthread_mutex_init(&_mutex, nullptr); pthread_cond_init(&_cond, nullptr); // 创建线程 for (int i = 0; i < _threadnum; i++) { string threadname = \"thread-\" + to_string(i + 1); ThreadDate td(threadname); // 由于Thread执行的是线程池的类内函数,而Thread调用的函数中并没有this指针 // 所以这里就使用bind函数,调整一下Thread调用函数的参数,使函数可以多接收一个参数 _threads.push_back(Thread<ThreadDate>(threadname, bind(&ThreadPool<T>::ThreadRun, this, placeholders::_1), td)); log.LogMessage(Info, \"%s is create\\n\", threadname.c_str()); } } ThreadPool(const ThreadPool<T>& tp) = delete; ThreadPool<T>& operator=(const ThreadPool<T>& tp) = delete;public: static ThreadPool<T>* GetInstance(int num = default_threadnum) {// 只有第一次调用GetInstance函数才可以进入,防止线程浪费锁资源 if(instance == nullptr) { LockGuard lockguard(&_instance_mutex); // 只有第一次调用GetInstance函数时,才会创建线程池 if(instance == nullptr) { instance = new ThreadPool<T>(); } } return instance; } // 启动所有线程 bool Start() { for (auto &t : _threads) { t.Start(); log.LogMessage(Info, \"%s , is running...\\n\", t.ThreadName().c_str()); } return true; } // 等待所有线程终止 void Join() { for (auto &t : _threads) { t.Join(); } }// 线程等待当前条件变量 void Thread_Wait(const ThreadDate &td) { pthread_cond_wait(&_cond, &_mutex); log.LogMessage(Debug, \"no task , %s is sleeping...\\n\", td.threadname.c_str()); }// 唤醒当前条件变量下的某个线程 void Thread_Wakeup() { pthread_cond_signal(&_cond); }// 添加任务 bool Push(T &in) { LockGuard lockguard(&_mutex); _q.push(in); Thread_Wakeup(); log.LogMessage(Debug, \"other thread push a task , task is %s\\n\", in.PrintTask().c_str()); return true; }// 线程需要执行的回调函数 void ThreadRun(const ThreadDate &td) { while (1) { T t; // 取任务 { LockGuard lockguard(&_mutex); while (_q.empty()) { Thread_Wait(td); log.LogMessage(Debug, \"haven task , %s is wakeup\\n\", td.threadname.c_str()); } t = _q.front(); _q.pop(); } // 执行任务 t.Run(); log.LogMessage(Debug, \"%s handler task %s done , result is %s\\n\", td.threadname.c_str(), t.PrintTask().c_str(), t.PrintResult().c_str()); } }// 销毁锁和条件变量 ~ThreadPool() { pthread_mutex_destroy(&_mutex); pthread_cond_destroy(&_cond); }private: queue<T> _q; vector<Thread<ThreadDate>> _threads; int _threadnum; pthread_mutex_t _mutex; pthread_cond_t _cond; static ThreadPool<T>* instance; static pthread_mutex_t _instance_mutex;};template<class T>ThreadPool<T>* ThreadPool<T>::instance = nullptr;template<class T>pthread_mutex_t ThreadPool<T>::_instance_mutex = PTHREAD_MUTEX_INITIALIZER;// Main.cpp#include #include #include #include \"ThreadPool.hpp\"#include \"Task.hpp\"using namespace std;int main(){ ThreadPool<Task>::GetInstance()->Start(); srand((uint64_t)time(nullptr) ^ getpid()); while (1) { // int data1 = rand() % 100; usleep(10000); int data2 = rand() % 100; usleep(10000); char op = ops[rand() % ops.size()]; Task t(data1, data2, op); ThreadPool<Task>::GetInstance()->Push(t); sleep(1); } ThreadPool<Task>::GetInstance()->Join(); return 0;}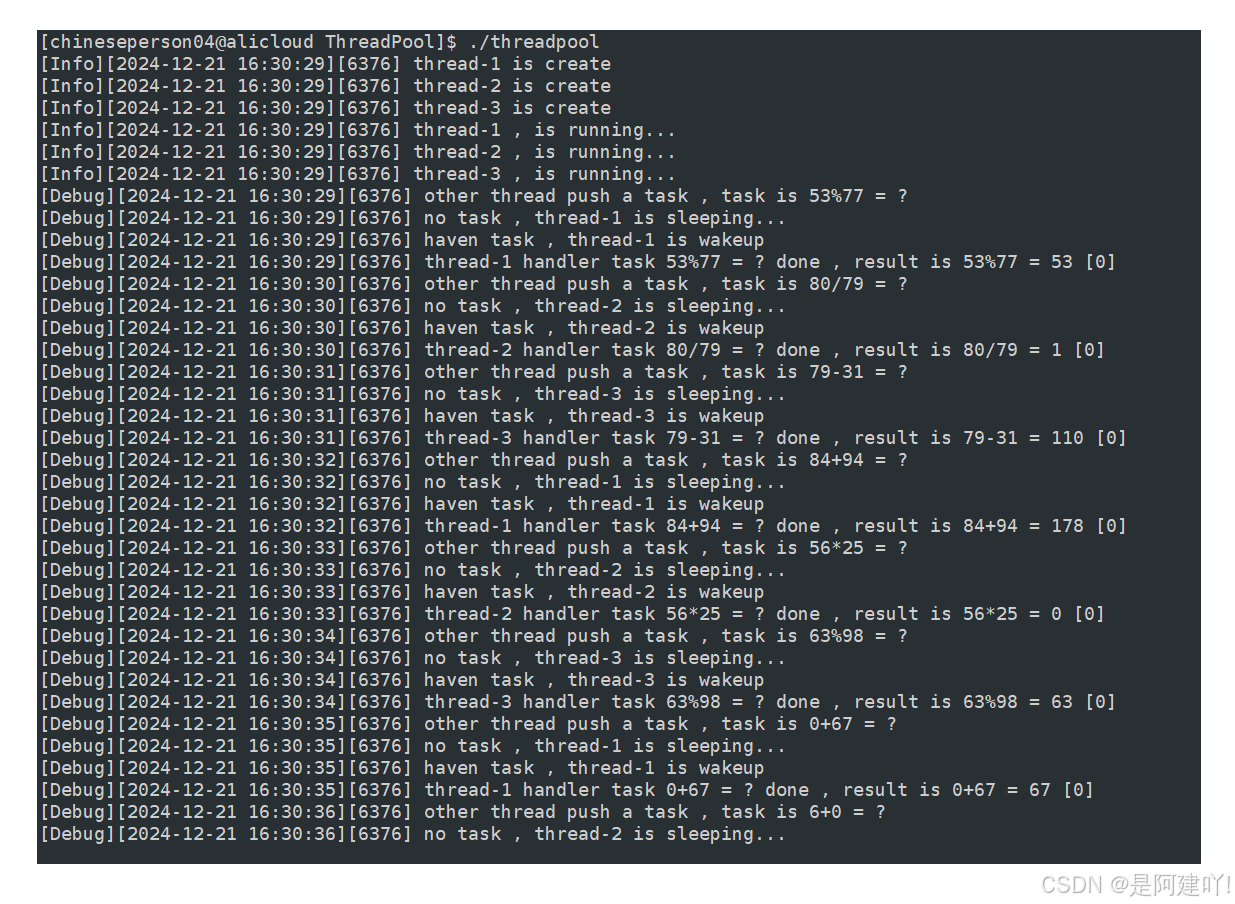
结尾
如果有什么建议和疑问,或是有什么错误,大家可以在评论区中提出。
希望大家以后也能和我一起进步!!🌹🌹
如果这篇文章对你有用的话,希望大家给一个三连支持一下!!🌹🌹


