C# 使用 OpenCV 基础_c# opencv
一、C#安装OpenCV
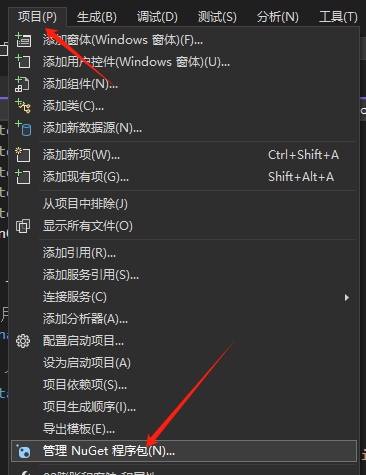
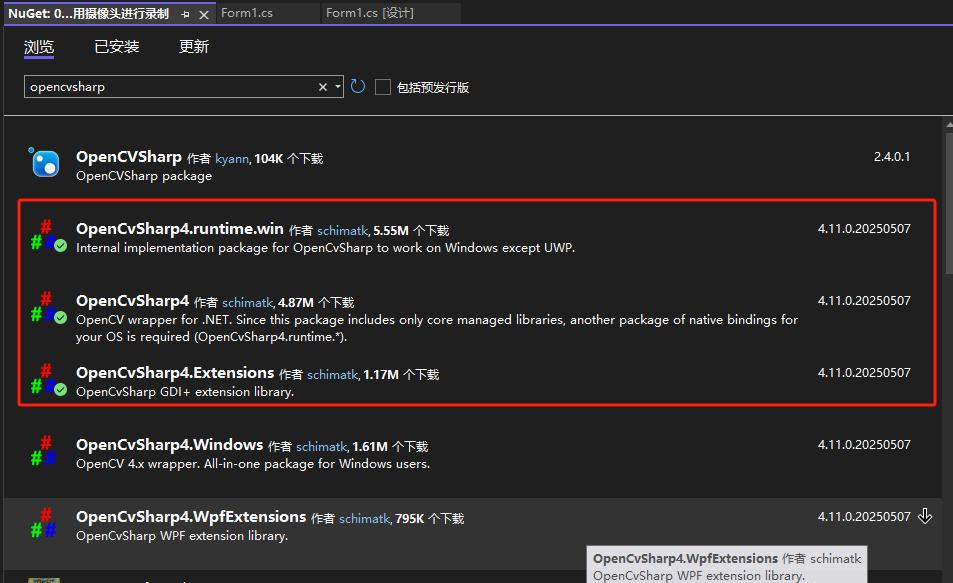 安装上面三个模块
二、加载图片
- 导入
using OpenCvSharp;- 加载图片
// 导入图片Mat image = Cv2.ImRead(@\"C:\\x5.bmp\");// 拷贝Mat image2 = image.Clone();// 打开窗口Cv2.NamedWindow(\"image\", WindowFlags.AutoSize);// 显示图片Cv2.ImShow(\"image\", image);// 如果闪退写入下方代码Cv2.WaitKey(0);三、图片预处理
- 腐蚀
Mat dstimage = new Mat();Cv2.NamedWindow(\"dstimage\", WindowFlags.AutoSize);// 腐蚀Mat elem = Cv2.GetStructuringElement(MorphShapes.Cross, new Size() { Width = 10, Height = 10 });Cv2.Erode(image, dstimage, elem);Cv2.ImShow(\"dstimage\", dstimage);- 膨胀
Cv2.Dilate(image, dstimage, elem);Cv2.ImShow(\"dstimage\", dstimage);- 开运算
Cv2.MorphologyEx(image, dstimage, MorphTypes.Close, elem);Cv2.ImShow(\"dstimage\", dstimage);- 闭运算
Cv2.MorphologyEx(image, dstimage, MorphTypes.Open, elem);Cv2.ImShow(\"dstimage\", dstimage);- 进行均值滤波处理
Cv2.NamedWindow(\"dstimage\", WindowFlags.AutoSize);Cv2.Blur(image, dstimage, new Size() { Width = 10, Height = 10 });Cv2.ImShow(\"dstimage\", dstimage);四、保存图片
Cv2.ImWrite(@\"C:\\001.bmp\", image);五、关闭窗口释放资源
Cv2.DestroyAllWindows();六、边缘化
- 处理x方向的梯度
Mat gart_x = new Mat();Mat abs_gart_x = new Mat();// 输入图片, 输出图片, 处理的格式 16位有符号, 1.0 x方向的处理倒数Cv2.Sobel(image, gart_x, MatType.CV_165, 1, 0);// 对图片进行高亮处理Cv2.ConvertScaleAbs(gart_x, abs_gart_x);Cv2.ImShow(\"x方向\", abs_gart_x);- 处理y方向
Mat gart_y = new Mat();Mat abs_gart_y = new Mat();Cv2.Sobel(image, gart_y, MatType.CV_165, 0, 1);// 对图片进行高亮处理Cv2.ConvertScaleAbs(gart_y, abs_gart_y);Cv2.ImShow(\"x方向\", abs_gart_y);- 合并 x 和 y
Mat dst = new Mat();// x的图像, x图像的权重, y的图像, y图像的权重Cv2.AddWeighted(abs_gart_x, 0.5, abs_gart_y, 0.5, 0, dst);Cv2.ImShow(\"合并\", dst);七、图片转换
- 灰度图
Mat grayImage = new Mat();Cv2.CvtColor(image, grayImage, ColorConversionCodes.BGR2GRAY);Cv2.ImShow(\"灰度图\", grayImage);八、调用摄像头进行录制
- 框架搭建
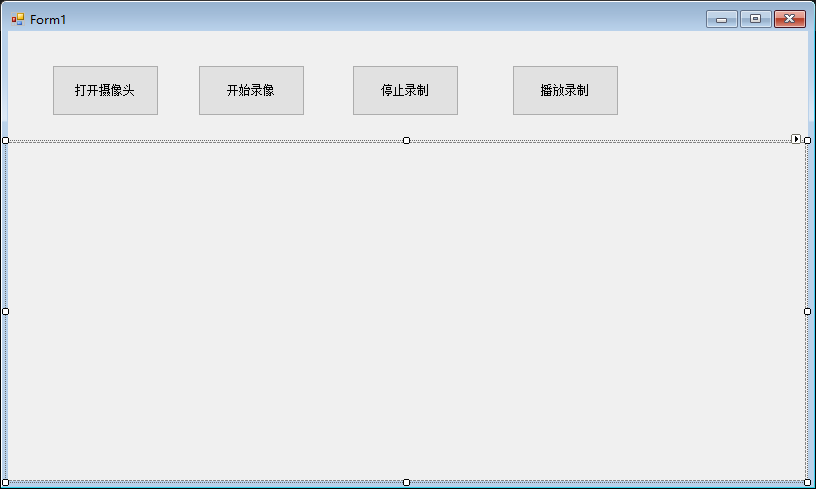
- 完整代码
using System;using System.Collections.Generic;using System.ComponentModel;using System.Data;using System.Drawing;using System.Linq;using System.Text;using System.Threading.Tasks;using System.Windows.Forms;//using引入using OpenCvSharp;using OpenCvSharp.Extensions;namespace 摄像头的录像与播放{ public partial class Form1 : Form { public Form1() { InitializeComponent(); } //定义一个视频操作的类 public VideoCapture cap = new VideoCapture(); //定义一个储存视频的类 public VideoWriter myAvi; //开关 用来控制摄像头的状态 bool videoBool = false; private void button1_Click(object sender, EventArgs e) { //打开摄像头 cap.Open(0); if (!cap.IsOpened()) { MessageBox.Show(\"摄像头打开失败\"); return; } //设置摄像头的采集参数 cap.Set(VideoCaptureProperties.FrameWidth,640); cap.Set(VideoCaptureProperties.FrameHeight,480); cap.Set(VideoCaptureProperties.Brightness,4);//亮度 cap.Set(VideoCaptureProperties.Hue,5);//色调 cap.Set(VideoCaptureProperties.Exposure,20);//曝光 //定义一个图片 Mat image = new Mat(); //定义一个窗口 Window window = new Window(\"capavi\"); int end = 0; while (end < 2) { if (cap.Read(image))//判断图片是否读取成功 { if (videoBool)//保存视频的开关 { end = 1; //录像本地保存 myAvi.Write(image); } else if (end == 1) { end = 2; //释放资源 myAvi.Release(); } } //播放视频 window.ShowImage(image);//在打开的窗口显示图片 //在picbox 显示 pictureBox1.Image = BitmapConverter.ToBitmap(image); Cv2.WaitKey(10); } } private void button2_Click(object sender, EventArgs e) { //开始录像的时候定义 录像的保存设置 //点开始录像储存录下来的视频 //路径名字,保存文件格式,帧率,分辨率,彩色图 myAvi = new VideoWriter(\"a.avi\",FourCC.MJPG,1,new OpenCvSharp.Size() { Width = 640,Height= 480},true); videoBool = true; } private void button3_Click(object sender, EventArgs e) { videoBool = false; } }}九、拟合设计
1. 脚本绘制
- 画圆
//封装一个画圆的方法 public static void DraeCircle(Mat image,Point center){ //画圆 Cv2.Circle(image,center.X,center.Y,600/32,new Scalar(0,0,255),-1,LineTypes.Link8);}// 创建图片句柄Mat atoImage= new Mat(600,600,MatType.CV_8UC3);DraeCircle(atoImage,new Point(600/2,600/2)); // 调用方法//显示 Cv2.ImShow(\"atoImage\", atoImage);- 画椭圆
//封装画椭圆的方法 public static void DraeEillipes(Mat image,double angle){ //绘制椭圆 Cv2.Ellipse(image, new Point(600/2,600/2), new Size(600/2,600/16), angle,0,360, new Scalar(255,129,0), 2,LineTypes.Link8 );}DraeEillipes(atoImage,90);- 画矩形
// 封装矩形public static void DraeRectangle(Mat image, Rect box){ Cv2.Rectangle(image, box, new Scalar(0, 0, 200), 2);}DraeRectangle(rookImage, new Rect(300, 300, 200, 200)); // (x, y, width, height)- 画线
//封装一个画线的方法 public static void DraeLine(Mat image,Point start,Point end) { Cv2.Line(image,start.X,start.Y,end.X,end.Y,new Scalar(0,0,200),2,LineTypes.Link8);}DraeLine(rookImage,new Point(0,0),new Point(600,600));2. 手动绘画
完整代码
using System;using System.Collections.Generic;using System.Linq;using System.Text;using System.Threading.Tasks;using OpenCvSharp;namespace _10绘制矩形{ internal class Program { //准备工作 public static string window_name = \"程序窗口\";//窗口的名字 public static Mat srcImage = new Mat(600,800,MatType.CV_8UC3,Scalar.All(0));//创建一张图片 public static Rect g_rect;//矩形空的没赋值 public static bool g_bDrbox = false;//是否开始绘制矩形 public static Random random = new Random(); static void Main(string[] args) { //1.准备参数 g_rect = new Rect(-1,-1,0,0); Mat temImage = new Mat(); //2.设置一个鼠标操作事件 Cv2.NamedWindow(window_name);//打开窗口窗口名字是 window_name //做一个委托 MouseCallback GetMouse = new MouseCallback(On_mous); //绑定事件到窗口上 Cv2.SetMouseCallback(window_name, GetMouse); //监听 while (true) { //赋值图像 srcImage.CopyTo(temImage); if (g_bDrbox)//判断是否开始绘制 { DrowRect(ref temImage, g_rect); } Cv2.ImShow(window_name, temImage); //结束循环 当用户按下 esc 键 if (Cv2.WaitKey(10) == 27) { break; } } } //生成了一个委托函数 // @event 事件对象 , 里面包含了事件的一系列参数 , 比如鼠标按下的位置, 移动的位置 private static void On_mous(MouseEventTypes @event, int x, int y, MouseEventFlags flags, IntPtr userData) { //MouseEventTypes 委托类型 // MouseEventTypes.MouseMove; 鼠标移动 //MouseEventTypes.LButtonDown; 鼠标按下 //MouseEventTypes.LButtonUp; 鼠标抬起 //移动 if (MouseEventTypes.MouseMove == @event)//判断鼠标有没有移动 { if (g_bDrbox)//鼠标移动的时候是否是按下的 { g_rect.Width = x - g_rect.X; g_rect.Height = y - g_rect.Y; } } //按下 if (MouseEventTypes.LButtonDown == @event)//判断按下 { g_bDrbox = true; //记录鼠标按下的位置 g_rect = new Rect(x,y,0,0);//矩形的起使点 } //松开 if (MouseEventTypes.LButtonUp == @event)//判断松开 { //松开的时候需要记录坐标 g_bDrbox = false; //判断坐标宽度小于零 if (g_rect.Width < 0) { g_rect.X += g_rect.Width; g_rect.Width *= -1; } if (g_rect.Height <0) { g_rect.Y += g_rect.Height; g_rect.Height *= -1; } //绘制图形 DrowRect(ref srcImage, g_rect); } } //绘制图形的方法 public static void DrowRect(ref Mat image,Rect box) { //判断是否满足画矩形的条件 if (box.BottomRight.X > box.TopLeft.X && box.BottomRight.Y > box.TopLeft.Y) { //画矩形 Cv2.Rectangle(image,box.TopLeft,box.BottomRight,new Scalar(random.Next(255), random.Next(255), random.Next(255)),2); //画圆 //Cv2.Circle(image, box.TopLeft.X, box.TopLeft.Y, Math.Abs(box.BottomRight.X - box.TopLeft.X), new Scalar(0, 0, 255), 1, LineTypes.Link8); } } }}十、图片缩放
- 方法1
// 缩小Mat dst1 = new Mat();Cv2.Resize(srcImage, dst1, new Size(srcImage.Cols / 2, srcImage.Rows / 2));Cv2.ImShow(\"缩小\", dst1);// 放大Mat dst2 = new Mat();Cv2.Resize(srcImage, dst2, new Size(srcImage.Cols * 2, srcImage.Rows * 2));Cv2.ImShow(\"放大\", dst2);- 方法1(推荐)
// 上采样放大但是上采样会尽量多的保留图像特征Mat dst3 = new Mat();// 通常是123倍Cv2.PyrUp(srcImage, dst3, new Size(srcImage.Cols * 2, srcImage.Rows * 2));Cv2.ImShow(\"上采样\", dst3);// 下采样缩小先要保存更多的特征Mat dst4 = new Mat();// 通常是1以下0.5,0.25Cv2.PyrDown(srcImage, dst4, new Size(srcImage.Cols * 0.5, srcImage.Rows * 0.5));Cv2.ImShow(\"下采样\", dst4);十一、加载视频
//加载视频定义视频变量 VideoCapture cap = new VideoCapture(@\"D:\\lol.avi\");if (!cap.IsOpened()){ Console.WriteLine(\"视频加载失败\"); return;//打断程序下面的程序不在运行}//设置帧率 每秒播放的帧数 cap.Fps 获取视频帧率 进行计算 int sleep = (int)Math.Round(1000 / cap.Fps); //创建一个视频播放窗口 Window window = new Window();//需要去提取视频中的每一帧 Mat image = new Mat();while (true){ cap.Read(image); //判断一下 还有没有帧数 还有没有视频图像 if (image.Empty())//判断当前的图片为空没有视频图片了 { //停止读取 break; } //播放视频 //一 : window窗口播放 window.ShowImage(image); //二: 通过 opcv 来播放 Cv2.ImShow(\"avi\", image); Cv2.WaitKey(sleep);}十二、斑点查找
using System;using System.Collections.Generic;using System.Linq;using System.Text;using System.Threading.Tasks;using OpenCvSharp;namespace _斑点查找{ internal class Program { static void Main(string[] args) { Mat imag = Cv2.ImRead(@\"C:\\blob.jpg\"); Cv2.ImShow(\"原图\", imag); //创建一个斑点查找的对象 var deteParms = new SimpleBlobDetector.Params { FilterByColor = false,//不根据颜色查找 FilterByArea = true,//开启面积赛选 MinArea = 100,//最小面积 MaxArea = 10000,//最大面积 FilterByCircularity = false,//圆度不开启 FilterByConvexity = false,//凹凸特征不开启 FilterByInertia = false,//延展性不开启 }; //利用上面设置设置好的 参数进行斑点查找 SimpleBlobDetector dete = SimpleBlobDetector.Create(deteParms); //找到的参数接收一下 var KeyPoin = dete.Detect(imag); //绘制斑点 //用来储存绘制了斑点之后的图像 Mat image_key = new Mat(); //调用方法 把找到的斑点 给画出来 Cv2.DrawKeypoints( image:imag, keypoints: KeyPoin, outImage: image_key, color:Scalar.FromRgb(255,0,0), flags:DrawMatchesFlags.DrawRichKeypoints ); Console.WriteLine($\"斑点个数{KeyPoin.Length}\"); Cv2.ImShow(\"斑点\", image_key); Cv2.WaitKey(0); } }}十三、点到多边形的距离
using System;using System.Collections.Generic;using System.Linq;using System.Text;using System.Threading.Tasks;using OpenCvSharp;namespace _点到多边形的距离{ internal class Program { static void Main(string[] args) { Mat im = Cv2.ImRead(@\"C:\\lightning.png\"); Cv2.ImShow(\"原图\",im); //进行二值化处理 Cv2.CvtColor(im,im,ColorConversionCodes.BGR2GRAY);//彩色图转换成灰度图 //阈值处理 Mat threshold = new Mat();//阈值处理过后的图片 //127,255 阈值的范围 Cv2.Threshold(im,threshold,127,255,ThresholdTypes.Binary); Cv2.ImShow(\"二值化处理的图\",threshold); //对处理完的图片进行轮廓检测 //定义一个储存轮廓点的坐标 Point[][] countours = new Point[][] { }; //储存轮廓乘次信息 HierarchyIndex[] hier; //轮廓查找 Cv2.FindContours(threshold,out countours,out hier,RetrievalModes.Tree,ContourApproximationModes.ApproxSimple,null); //Console.WriteLine($\"轮廓数{countours.Length}\"); //把第一个轮廓拿出来 Point[] cnt = countours[0]; //画一个圆 Point point = new Point(250,250); //画圆 Cv2.Circle(im,point,5,new Scalar(255,255,255),-1); Cv2.ImShow(\"画圆图片\", im); //测量点到轮廓的距离 double dist = Cv2.PointPolygonTest(cnt,point,true); Console.WriteLine($\"点到轮廓的距离{dist}\"); Cv2.WaitKey(0); } }}十四、基础轮廓查找
using System;using System.Collections.Generic;using System.Linq;using System.Text;using System.Threading.Tasks;using OpenCvSharp;namespace _基础轮廓查找{ internal class Program { static void Main(string[] args) { Mat srcImage = Cv2.ImRead(@\"C:\\flowers.jpg\", ImreadModes.Grayscale); Cv2.ImShow(\"原图\",srcImage); //定义一个图片放处理过后的图 王里面画轮廓 Mat dstImage = new Mat(srcImage.Size(),MatType.CV_8SC3); //像素值大于 190 的 设置为 255 Cv2.Threshold(srcImage,srcImage,190,255,ThresholdTypes.Binary); Cv2.ImShow(\"处理完毕的图像\", srcImage); //测量轮廓 需要两个 数组来储存数据 //定义二维数组储存坐标信息 Point[][] contours = new Point[][] { }; //储存轮廓的信息 HierarchyIndex[] hier; //输入图片,输出坐标信息,输出轮廓信息,输出的层次最外层,轮廓的检索模式,null Cv2.FindContours(srcImage,out contours,out hier,RetrievalModes.External,ContourApproximationModes.ApproxSimple,null); for (int i = 0; i < contours.Length;i++) { Console.WriteLine($\"{i}\"); //绘制轮廓 Cv2.DrawContours(dstImage, contours,i,new Scalar(0,255,0),1,LineTypes.Link8, hier); } Cv2.ImShow(\"效果图\",dstImage); Cv2.WaitKey(0); } }}十五、模版匹配
using System;using System.Collections.Generic;using System.Linq;using System.Text;using System.Threading.Tasks;using OpenCvSharp;namespace _29模版匹配{ internal class Program { //加载图片 static Mat srcimage = Cv2.ImRead(@\"D:\\39班opcvshap\\images\\girl6.jpg\");//原始图片 static Mat tempImage = Cv2.ImRead(@\"D:\\39班opcvshap\\images\\girl6_roi.jpg\");//模版图片 static Mat restimage = new Mat();//处理用的图片 static int min = 0; static int max = 5; static void Main(string[] args) { Cv2.NamedWindow(\"原始图片\", WindowFlags.AutoSize); Cv2.NamedWindow(\"匹配窗口\", WindowFlags.AutoSize); Cv2.ImShow(\"原始图片\", srcimage); //Cv2.ImShow(\"模版图片\", tempImage); //创建一个滚动条 并且绑定事件 On_Mat 当滚动条变化的时候 int v = Cv2.CreateTrackbar(\"方法\", \"原始图片\", ref min, max, On_Mat); //在初始的时候调用一下函数 On_Mat(0, IntPtr.Zero); Cv2.WaitKey(0); } //滚动条的事件 private static void On_Mat(int pos, IntPtr userData) { //Console.WriteLine(\"滚动条改变事件\");//滚动条改变的时候 会触发的事件 //滚动条改变的时候开始检测 //[1]定义一个局部变量 图片 Mat r_srciamge = new Mat(); srcimage.CopyTo(r_srciamge); //Cv2.ImShow(\"图\", r_srciamge);//验证赋值成功没有 //[2]通过原图和模版计算矩阵 int resImage_row = srcimage.Rows - tempImage.Rows + 1; int resImage_cols = srcimage.Cols - tempImage.Cols + 1; restimage = new Mat(new Size(resImage_row, resImage_cols),MatType.CV_32FC1); restimage.SetIdentity(new Scalar(0));//初始化图片为 0 方便之后操作 // Cv2.ImShow(\"chulitu\",restimage);//验证 // [3] 进行模版匹配 和标准化操作 //原图, 模版图 , 矩阵图 , 匹配参数 Cv2.MatchTemplate(srcimage,tempImage,restimage,(TemplateMatchModes)min); //把匹配结果的矩阵进行 标准化处理 Cv2.Normalize(restimage,restimage,0,1,NormTypes.MinMax,-1); //[4] 通过函数定位最佳匹配位置 double minValue = 0; double maxValue = 0; Point minLocan = new Point(); Point maxLocan = new Point(); Point matLocan = new Point(); Cv2.MinMaxLoc(restimage,out minValue,out maxValue,out minLocan,out maxLocan); //确定一下最佳匹配位置 //TemplateMatchModes.SqDiff 平方差的匹配方法 //TemplateMatchModes.SqDiffNormed 归一平方差 匹配方法 if ((TemplateMatchModes)min == TemplateMatchModes.SqDiff || (TemplateMatchModes)min == TemplateMatchModes.SqDiffNormed) { matLocan = minLocan; } else { matLocan = maxLocan; } //[6]绘制矩形显示 Cv2.Rectangle(srcimage, matLocan, new Point(matLocan.X + tempImage.Cols, matLocan.Y + tempImage.Rows), new Scalar(0,0,255),2,LineTypes.Link8,0 ) ; Cv2.Rectangle(restimage, matLocan, new Point(matLocan.X + tempImage.Cols, matLocan.Y + tempImage.Rows), new Scalar(0, 0, 255), 2, LineTypes.Link8, 0 ); Cv2.ImShow(\"匹配结果图\",srcimage); Cv2.ImShow(\"处理结果图\", restimage); } }}

