详解RabbitMQ多机多节点搭建集群

目录
安装RabbitMQ
配置hosts文件
配置Erlang Cookie
构建集群
查看集群状态
常见问题
RabbitMQ多机多节点搭建集群
安装RabbitMQ
安装RabbitMQ的步骤可参考之前的博客文章。
安装好RabbitMQ之后,使用如下命令确定节点状态:
rabbitmqctl status #确认节点状态
可以查看到节点名称
root@iZ2vc7a1n9gvhfp589oav7Z:~# rabbitmqctl status #确认节点状态
Status of node rabbit@iZ2vc7a1n9gvhfp589oav7Z ... #节点名称.........
以三台服务器为例:
配置hosts文件
配置每个节点的hosts⽂件, 让各个节点都能互相识别对⽅。
vim /etc/hosts
格式为: IP 主机名称
以三台服务器为例:
#rabbitmq
10.0.0.232 iZ2vc7a1n9gvhfp589oav8Z
10.0.0.233 iZ2vc7a1n9gvhfp589oav6Z
10.0.0.234 iZ2vc7a1n9gvhfp589oav7Z
注意, 这⾥的主机名称不是随便写的, 需要查看3台服务器的主机名是什么。
使用如下命令进行查看
more /etc/hostname

配置Erlang Cookie
RabbitMQ 节点和 CLI ⼯具(如rabbitmqctl) 使⽤Cookie来进⾏⾝份验证, 确认它们之间是否被允许相互通信. 为了使两个节点可以通信, 它们必须具有相同的共享密钥, 称为 Erlang Cookie . Cookie是⼀个字符串, 通常存储在本地⽂件中. 每个集群节点必须具有相同的Cookie.
Cookie ⽂件的位置:
RabbitMQ启动时, erlang 虚拟机会⾃动创建该⽂件, 通常位于 /var/lib/rabbitmq/.erlang.cookie 和 $HOME/.erlang.cookie .
首先停止所有节点的服务
systemctl stop rabbitmq-server
配置Erlang Cookie
只需将⼀个节点上的 .erlang.cookie ⽂件分别拷⻉到另外两个节点上就可以.
⽐如把node3节点的⽂件, 分别拷⻉到node1和node2对应的机器上.
在node3上进⾏如下操作:
#拷⻉ node3 节点的⽂件到 node1 scp /var/lib/rabbitmq/.erlang.cookie root@iZ2vc7a1n9gvhfp589oav8Z:/var/lib/rabbitmq/ #拷⻉node3 节点的⽂件到 node2 scp /var/lib/rabbitmq/.erlang.cookie root@iZ2vc7a1n9gvhfp589oav6Z:/var/lib/rabbitmq/
启动节点
以后端的⽅式启动三台RabbitMQ, 启动命令:
rabbitmq-server -detached
rabbitmq-server 是启动RabbitMQ服务的命令。
-detached 或者 --detached 参数表⽰在后台作为服务运⾏
构建集群
为了将集群中的三个节点连接起来, 需要告诉另外两个节点加⼊另⼀个节点, ⽐如node1和node2加⼊node3节点.
加⼊node3之前, 必须重置两个新加⼊的成员, 也就是node1和node2
分别在要加⼊的两个机器上, 执⾏下⾯的操作命令:
#1. 关闭RabbitMQ服务
rabbitmqctl stop_app#2. 重置当前节点
rabbitmqctl reset#3.加⼊节点 后⾯跟的是node3节点
rabbitmqctl join_cluster rabbit@iZ2vc7a1n9gvhfp589oav7Z#4. 启动服务
rabbitmqctl start_app
重置节点会删除该节点上以前存在的所有资源和数据!!!
查看集群状态
rabbitmqctl cluster_status
查看到的结果:
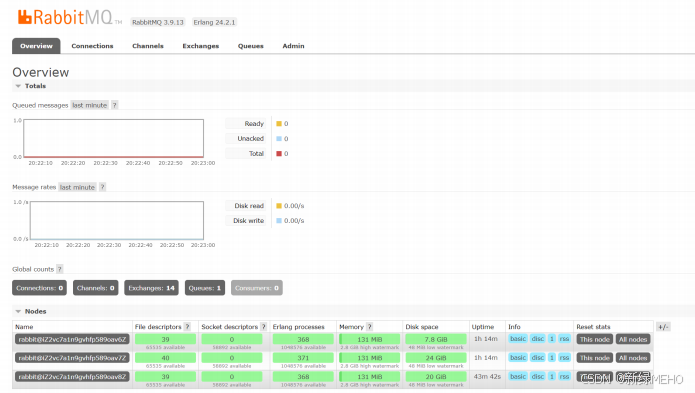
root@iZ2vc7a1n9gvhfp589oav7Z:~# rabbitmqctl cluster_status #查看集群状态Cluster status of node rabbit@iZ2vc7a1n9gvhfp589oav7Z ...BasicsCluster name: rabbit@iZ2vc7a1n9gvhfp589oav7ZDisk Nodesrabbit@iZ2vc7a1n9gvhfp589oav6Zrabbit@iZ2vc7a1n9gvhfp589oav7Zrabbit@iZ2vc7a1n9gvhfp589oav8ZRunning Nodesrabbit@iZ2vc7a1n9gvhfp589oav6Zrabbit@iZ2vc7a1n9gvhfp589oav7Zrabbit@iZ2vc7a1n9gvhfp589oav8ZVersionsrabbit@iZ2vc7a1n9gvhfp589oav6Z: RabbitMQ 3.9.13 on Erlang 24.2.1rabbit@iZ2vc7a1n9gvhfp589oav7Z: RabbitMQ 3.9.13 on Erlang 24.2.1rabbit@iZ2vc7a1n9gvhfp589oav8Z: RabbitMQ 3.9.13 on Erlang 24.2.1Maintenance statusNode: rabbit@iZ2vc7a1n9gvhfp589oav6Z, status: not under maintenanceNode: rabbit@iZ2vc7a1n9gvhfp589oav7Z, status: not under maintenanceNode: rabbit@iZ2vc7a1n9gvhfp589oav8Z, status: not under maintenanceAlarms(none)Network Partitions(none)ListenersNode: rabbit@iZ2vc7a1n9gvhfp589oav6Z, interface: [::], port: 25672, protocol: clustering, purpose: inter-node and CLI tool communicationNode: rabbit@iZ2vc7a1n9gvhfp589oav6Z, interface: [::], port: 5672, protocol: amqp, purpose: AMQP 0-9-1 and AMQP 1.0Node: rabbit@iZ2vc7a1n9gvhfp589oav7Z, interface: [::], port: 15672, protocol: http, purpose: HTTP APINode: rabbit@iZ2vc7a1n9gvhfp589oav7Z, interface: [::], port: 25672, protocol: clustering, purpose: inter-node and CLI tool communicationNode: rabbit@iZ2vc7a1n9gvhfp589oav7Z, interface: [::], port: 5672, protocol: amqp, purpose: AMQP 0-9-1 and AMQP 1.0Node: rabbit@iZ2vc7a1n9gvhfp589oav8Z, interface: [::], port: 25672, protocol: clustering, purpose: inter-node and CLI tool communicationNode: rabbit@iZ2vc7a1n9gvhfp589oav8Z, interface: [::], port: 5672, protocol: amqp, purpose: AMQP 0-9-1 and AMQP 1.0Feature flagsFlag: drop_unroutable_metric, state: enabledFlag: empty_basic_get_metric, state: enabledFlag: implicit_default_bindings, state: enabledFlag: maintenance_mode_status, state: enabledFlag: quorum_queue, state: enabledFlag: stream_queue, state: enabledFlag: user_limits, state: enabledFlag: virtual_host_metadata, state: enabledroot@iZ2vc7a1n9gvhfp589oav7Z:~#也可以在管理界面查看到集群状态:

常见问题
cluster搭建起来后, 如果在管理界⾯中, Nodes部分看到\"Node statistics not available\", 说明在该节点上web管理插件还未启⽤.
界⾯如下所示:

解决办法:
启动 rabbitmq_management 插件即可
在显⽰提⽰信息的节点上运⾏ rabbitmq-plugins enable rabbitmq_management
rabbitmq-plugins enable rabbitmq_management


