HarmonyOS 实战:用 List 与 AlphabetIndexer 打造高效城市选择功能
HarmonyOS 实战:用 List 与 AlphabetIndexer 打造高效城市选择功能
在移动应用开发中,城市选择功能是很多 App 的必备模块。想象一下,当用户需要从数百个城市中找到自己所在的城市时,如果没有高效的导航方式,体验会有多糟糕。今天我将带大家实现一个 HarmonyOS 平台上的城市选择器,通过 List 与 AlphabetIndexer 的联动,让用户轻松找到目标城市。
功能需求分析
我们需要实现的城市选择功能应该包含这些核心特性:
这种交互模式在通讯录、词典等应用中也非常常见,掌握了这个技巧可以举一反三。
核心组件介绍
实现这个功能我们主要依赖 HarmonyOS 的两个核心组件:
List 组件:作为容器展示大量数据,支持分组展示和滚动控制,通过 Scroller 可以精确控制滚动位置。
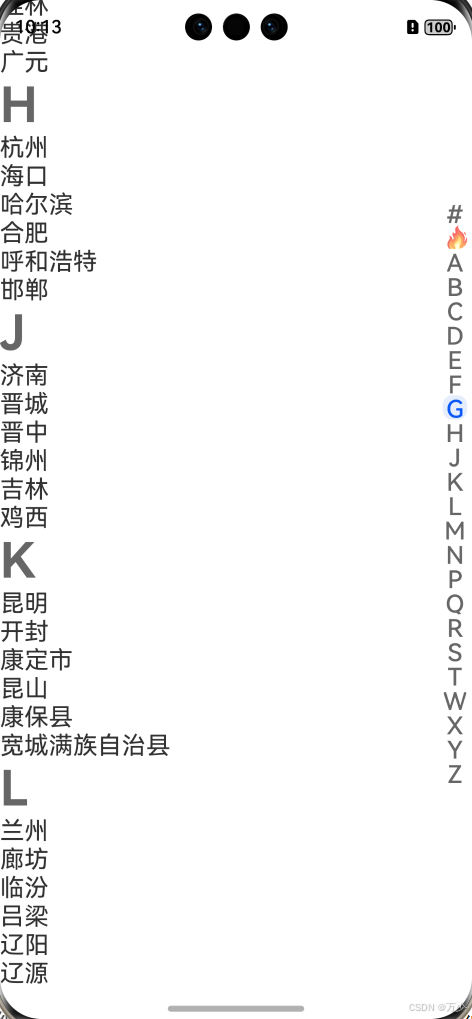
AlphabetIndexer 组件:字母索引条,支持自定义字母数组和选中样式,通过 onSelect 事件可以监听用户选择的索引位置。
这两个组件的联动是实现功能的关键,也是最容易出现问题的地方。
实现步骤详解
1. 数据结构定义
首先我们需要定义城市数据的结构,以及存储各类城市数据:
// 定义城市分组数据结构interface BKCityContent { initial: string // 字母首字母 cityNameList: string\\[] // 该字母下的城市列表}// 组件内部数据定义@State hotCitys: string\\[] = \\[\'北京\', \'上海\', \'广州\', \'深圳\', \'天津\', ...]@State historyCitys: string\\[] = \\[\'北京\', \'上海\', \'广州\', ...]@State cityContentList: BKCityContent\\[] = \\[ { initial: \'A\', cityNameList: \\[\'阿拉善\', \'鞍山\', \'安庆\', ...] }, { initial: \'B\', cityNameList: \\[\'北京\', \'保定\', \'包头\', ...] }, // 其他字母分组...]2. 索引数组构建
索引数组需要包含特殊分组(历史、热门)和所有城市首字母,我们在页面加载时动态生成:
@State arr: string\\[] = \\[]scroller: Scroller = new Scroller()aboutToAppear() { // 先添加特殊分组标识 this.arr.push(\"#\", \"🔥\") // #代表历史,🔥代表热门 // 再添加所有城市首字母 for (let index = 0; index < this.cityContentList.length; index++) { const element = this.cityContentList\\[index]; this.arr.push(element.initial) }}3. 列表 UI 构建
使用 List 组件构建主内容区,包含历史城市、热门城市和按字母分组的城市列表:
List({ scroller: this.scroller }) { // 历史城市分组 ListItemGroup({ header: this.header(\"历史\") }) { ListItem() { Flex({ wrap: FlexWrap.Wrap }) { ForEach(this.historyCitys, (item: string) => { Text(item) .width(\"33.33%\") .margin({ top: 20, bottom: 20 }) .textAlign(TextAlign.Center) }) } } } // 热门城市分组 ListItemGroup({ header: this.header(\"热门\") }) { // 结构类似历史城市... } // 字母分组城市 ForEach(this.cityContentList, (item: BKCityContent) => { ListItemGroup({ header: this.header(item.initial) }) { ForEach(item.cityNameList, (item2: string) => { ListItem() { Text(item2) .fontSize(20) } }) } })}.width(\"100%\").backgroundColor(Color.White)4. 索引器 UI 构建
在列表右侧添加 AlphabetIndexer 组件作为索引条:
AlphabetIndexer({ arrayValue: this.arr, selected: this.current }) .itemSize(20) .font({ size: \"20vp\" }) .selectedFont({ size: \"20vp\" }) .height(\"100%\") .autoCollapse(false) .onSelect(index => { this.current = index // 点击索引时滚动列表 this.scroller.scrollToIndex(index) })解决联动核心问题
很多开发者在实现时会遇到一个问题:索引器与列表位置不匹配。这是因为 List 的分组索引和 AlphabetIndexer 的索引需要正确映射。
原代码中的问题在于滚动回调处理不正确,我们需要修正这个逻辑:
// 正确的列表滚动回调处理.onScrollIndex((start) => { // 计算当前滚动到的分组对应的索引器位置 if (start === 0) { this.current = 0; // 历史分组对应索引0 } else if (start === 1) { this.current = 1; // 热门分组对应索引1 } else { // 字母分组从索引2开始 this.current = start - 2 + 2; }})更好的解决方案是创建一个映射数组,明确记录每个索引器项对应的列表分组索引:
// 定义映射关系数组private listIndexMap: number\\[] = \\[]aboutToAppear() { // 构建索引映射:索引器索引 -> 列表分组索引 this.listIndexMap = \\[0, 1] // 历史在列表第0组,热门在列表第1组 this.cityContentList.forEach((item, index) => { this.listIndexMap.push(index + 2) // 字母分组从列表第2组开始 })}// 使用映射数组处理滚动.onScrollIndex((start) => { const index = this.listIndexMap.indexOf(start) if (index !== -1) { this.current = index }})// 索引器选择时也使用映射数组.onSelect((index: number) => { this.current = index const listIndex = this.listIndexMap\\[index] if (listIndex !== undefined) { this.scroller.scrollToIndex(listIndex, true) }})这种映射方式更灵活,即使后续添加新的分组类型也不容易出错。
完整优化代码
结合以上优化点,我们的完整代码应该是这样的(包含 UI 美化和交互优化):
interface BKCityContent { initial: string cityNameList: string\\[]}@Component@Entrystruct CitySelector { @State isShow: boolean = true @State selectedCity: string = \"\" @State currentIndex: number = 0 // 城市数据定义... hotCitys: string\\[] = \\[\'北京\', \'上海\', \'广州\', ...] historyCitys: string\\[] = \\[\'北京\', \'上海\', ...] cityContentList: BKCityContent\\[] = \\[/\\* 城市数据 \\*/] @State indexArray: string\\[] = \\[] scroller: Scroller = new Scroller() private listIndexMap: number\\[] = \\[] aboutToAppear() { // 构建索引数组和映射关系 this.indexArray = \\[\"#\", \"🔥\"] this.listIndexMap = \\[0, 1] this.cityContentList.forEach((item, index) => { this.indexArray.push(item.initial) this.listIndexMap.push(index + 2) }) } // 标题构建器 @Builder header(title: string) { Text(title) .fontWeight(FontWeight.Bold) .fontColor(\"#666666\") .fontSize(16) .padding({ left: 16, top: 12, bottom: 8 }) } // 城市网格构建器(用于历史和热门城市) @Builder cityGrid(cities: string\\[]) { Flex({ wrap: FlexWrap.Wrap }) { ForEach(cities, (item: string) => { Text(item) .padding(12) .margin(6) .backgroundColor(\"#F5F5F5\") .borderRadius(6) .onClick(() => { this.selectedCity = item }) }) } .padding(10) } build() { Column() { // 顶部标题栏 Row() { Text(this.selectedCity ? \\`已选: \\${this.selectedCity}\\` : \"选择城市\") .fontSize(18) .fontWeight(FontWeight.Bold) } .padding(16) .width(\"100%\") // 主内容区 Stack({ alignContent: Alignment.End }) { // 城市列表 List({ scroller: this.scroller }) { // 历史城市分组 ListItemGroup({ header: this.header(\"历史\") }) { ListItem() { this.cityGrid(this.historyCitys) } } // 热门城市分组 ListItemGroup({ header: this.header(\"热门\") }) { ListItem() { this.cityGrid(this.hotCitys) } } // 字母分组城市 ForEach(this.cityContentList, (item: BKCityContent) => { ListItemGroup({ header: this.header(item.initial) }) { ForEach(item.cityNameList, (city: string) => { ListItem() { Text(city) .padding(16) .width(\"100%\") .onClick(() => { this.selectedCity = city }) } }) } }) } .onScrollIndex((start) => { const index = this.listIndexMap.indexOf(start) if (index !== -1) { this.currentIndex = index } }) // 字母索引器 AlphabetIndexer({ arrayValue: this.indexArray, selected: this.currentIndex }) .itemSize(24) .selectedFont({ color: \"#007AFF\" }) .height(\"90%\") .autoCollapse(false) .onSelect((index: number) => { this.currentIndex = index const listIndex = this.listIndexMap\\[index] if (listIndex !== undefined) { this.scroller.scrollToIndex(listIndex, true) } }) .padding({ right: 8 }) } .flexGrow(1) } .width(\"100%\") .height(\"100%\") .backgroundColor(\"#F9F9F9\") }}功能扩展建议
基于这个基础功能,你还可以扩展更多实用特性:
-
城市搜索功能:添加搜索框,实时过滤城市列表
-
选择动画:为城市选择添加过渡动画,提升体验
-
定位功能:调用定位 API,自动推荐当前城市
-
数据持久化:保存用户的历史选择,下次打开时恢复
-
样式主题:支持深色 / 浅色模式切换
总结
通过本文的讲解,我们学习了如何使用 HarmonyOS 的 List 和 AlphabetIndexer 组件实现高效的城市选择功能。核心要点是理解两个组件的工作原理,建立正确的索引映射关系,实现双向联动。
这种列表加索引的模式在很多场景都能应用,掌握后可以显著提升应用中大数据列表的用户体验。希望本文对你有所帮助,如果你有更好的实现方式,欢迎在评论区交流讨论!


