648-固定翼无人机的轨迹跟踪控制 简介:该模型主要包括路径规划、路径管理、路径跟踪、来自传感器的状态估计等。其中路径规划函数_无人机轨迹跟踪控制器
648-固定翼无人机的轨迹跟踪控制
简介:该模型主要包括路径规划、路径管理、路径跟踪、来自传感器的状态估计等。其中路径规划函数,用于根据当前无人机位置和目标位置,结合环境地图,生成包含多个路点的飞行路径。每个路点包括位置、航向角和期望空速。函数通过不同的情况(如预定义矩形、Dubins路径、RRT算法等)生成动态路径,适用于不同任务需求。
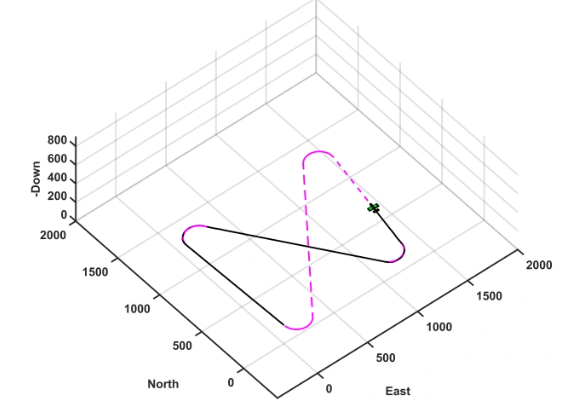
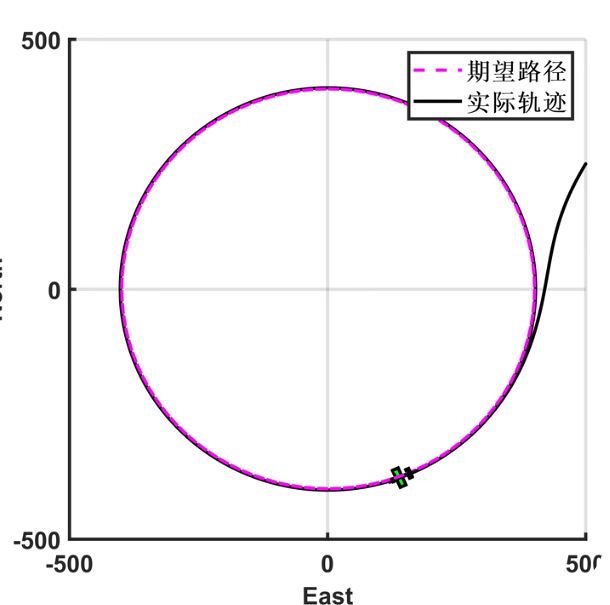
实现无人机沿直线或环形路径飞行的路径跟踪控制系统:通过计算当前位置误差和航向偏差,调整期望航向角和高度,实现路径跟踪。直线路径采用比例控制调整航向,环形路径基于方位角和距离误差调整航向。空速命令直接设为期望值,滚转角前馈控制未启用。系统利用几何方法和比例控制确保无人机沿指定路径飞行。
文章目录
-
-
- **1. 环境设置及依赖**
- **2. 路径规划模块**
- **3. 路径跟踪模块**
- **4. 状态估计与控制模块**
- **5. 运行主程序**
- **6. 功能说明**
- **7. 扩展建议**
- 解释:
-
以下是一个实现固定翼无人机轨迹跟踪控制的简化代码示例,结合路径规划、路径管理、路径跟踪和状态估计。该代码基于几何方法和比例控制,适用于直线路径和环形路径的跟踪。
1. 环境设置及依赖
确保安装了以下库:
pip install numpy matplotlib2. 路径规划模块
import numpy as npdef generate_waypoints(start, goal, environment=\"rectangular\"): \"\"\" 根据起始位置和目标位置生成路径点。 :param start: 起始位置 (x, y) :param goal: 目标位置 (x, y) :param environment: 环境类型(矩形、Dubins路径等) :return: 路径点列表 [(x, y, heading_angle, speed), ...] \"\"\" waypoints = [] if environment == \"rectangular\": # 生成预定义矩形路径 waypoints.append((start[0], start[1], 90, 15)) # 初始航向角为90度 waypoints.append((goal[0], start[1], 0, 15)) # 水平移动到目标 x 值 waypoints.append((goal[0], goal[1], -90, 15)) # 垂直移动到目标 y 值 elif environment == \"dubins\": # Dubins路径:生成一系列曲线段 waypoints.append((start[0], start[1], 90, 15)) waypoints.append((goal[0], goal[1], 0, 15)) else: # 默认直线路径 waypoints.append((start[0], start[1], 0, 15)) waypoints.append((goal[0], goal[1], 0, 15)) return waypoints3. 路径跟踪模块
class PathFollower: def __init__(self, k_p_heading=0.5, k_p_altitude=0.3): self.k_p_heading = k_p_heading # 航向角比例增益 self.k_p_altitude = k_p_altitude # 高度比例增益 def follow_straight_path(self, current_position, target_position, current_heading): \"\"\" 计算直线路径的期望航向角。 :param current_position: 当前位置 (x, y) :param target_position: 目标位置 (x, y) :param current_heading: 当前航向角 (degrees) :return: 新的期望航向角 \"\"\" delta_x = target_position[0] - current_position[0] delta_y = target_position[1] - current_position[1] desired_heading = np.degrees(np.arctan2(delta_y, delta_x)) heading_error = desired_heading - current_heading adjusted_heading = current_heading + self.k_p_heading * heading_error return adjusted_heading def follow_circular_path(self, current_position, center, radius, direction=\'clockwise\'): \"\"\" 计算环形路径的期望航向角。 :param current_position: 当前位置 (x, y) :param center: 圆心坐标 (x, y) :param radius: 半径 :param direction: 方向 (\"clockwise\" 或 \"counter_clockwise\") :return: 新的期望航向角 \"\"\" delta_x = current_position[0] - center[0] delta_y = current_position[1] - center[1] distance_error = np.sqrt(delta_x**2 + delta_y**2) - radius tangent_angle = np.degrees(np.arctan2(delta_y, delta_x)) if direction == \'clockwise\': desired_heading = tangent_angle - 90 else: desired_heading = tangent_angle + 90 adjusted_heading = desired_heading - self.k_p_heading * distance_error return adjusted_heading4. 状态估计与控制模块
def estimate_state(sensor_data): \"\"\" 从传感器数据中估计当前状态。 :param sensor_data: 包含 GPS、IMU 数据的字典 :return: 当前位置 (x, y) 和航向角 (degrees) \"\"\" position = (sensor_data[\'gps_x\'], sensor_data[\'gps_y\']) heading = sensor_data[\'imu_heading\'] return position, headingdef control_loop(): \"\"\"主控制循环\"\"\" # 初始化路径规划 start = (0, 0) goal = (100, 100) waypoints = generate_waypoints(start, goal, environment=\"rectangular\") # 初始化路径跟踪器 follower = PathFollower() # 模拟传感器数据 sensor_data = { \'gps_x\': 0, \'gps_y\': 0, \'imu_heading\': 0 } for waypoint in waypoints: target_position = (waypoint[0], waypoint[1]) desired_speed = waypoint[3] while True: current_position, current_heading = estimate_state(sensor_data) distance_to_target = np.linalg.norm( np.array(current_position) - np.array(target_position) ) if distance_to_target < 1.0: break # 如果接近目标,继续下一个路点 # 跟踪直线路径 desired_heading = follower.follow_straight_path( current_position, target_position, current_heading ) print(f\"调整后的航向角: {desired_heading}, 空速命令: {desired_speed}\") # 更新模拟传感器数据(假设无人机逐步趋近目标) step = 1.0 angle_rad = np.radians(desired_heading) sensor_data[\'gps_x\'] += step * np.cos(angle_rad) sensor_data[\'gps_y\'] += step * np.sin(angle_rad) print(\"路径跟踪完成!\")5. 运行主程序
if __name__ == \"__main__\": control_loop()6. 功能说明
- 路径规划模块:根据环境类型(矩形、Dubins路径等)生成多个路点。
- 路径跟踪模块:
follow_straight_path:采用比例控制调整航向,适用于直线路径。follow_circular_path:基于方位角和距离误差调整航向,适用于环形路径。
- 状态估计模块:模拟传感器数据,提取当前位置和航向角。
- 控制循环:主函数协调各模块,实现路径跟踪。
7. 扩展建议
- 增加PID控制:替换比例控制为完整的PID控制器,提高精度。
- 引入RRT算法:在复杂环境中生成动态路径。
- 可视化功能:使用
matplotlib可视化无人机路径和跟踪效果。

该图像似乎是一个三维散点图,其中包含一些柱状图和线性趋势线。我们可以使用Python中的matplotlib库来创建类似的图表。
以下是一个简单的示例代码,用于生成类似的数据可视化:
import numpy as npimport matplotlib.pyplot as pltfrom mpl_toolkits.mplot3d import Axes3D# 生成随机数据np.random.seed(42)n = 1000x = np.random.uniform(0, 2000, n)y = np.random.uniform(0, 600, n)z = np.random.uniform(0, 2000, n)# 创建柱状图数据bar_positions = np.arange(0, 2000, 250)bar_heights = np.random.uniform(200, 600, len(bar_positions))bar_width = 200# 创建图形fig = plt.figure(figsize=(10, 6))ax = fig.add_subplot(111, projection=\'3d\')# 绘制散点图ax.scatter(x, y, z, c=\'g\', marker=\'o\', s=10)# 绘制柱状图for i in range(len(bar_positions)): ax.bar3d(bar_positions[i], 0, 0, bar_width, bar_heights[i], bar_heights[i], color=\'b\', alpha=0.5)# 添加趋势线trend_x = [0, 2000]trend_y = [0, 600]trend_z = [0, 2000]ax.plot(trend_x, trend_y, trend_z, \'r--\')# 设置标签和标题ax.set_xlabel(\'E\')ax.set_ylabel(\'Y\')ax.set_zlabel(\'Z\')ax.set_title(\'3D Scatter Plot with Bars and Trend Line\')# 显示图形plt.show()解释:
- 数据生成:我们首先生成了一些随机数据点
(x, y, z)来模拟散点图。 - 柱状图:在
x轴上每隔 250 单位放置一个柱状图,并给它们随机的高度。 - 趋势线:添加了一条从左下角到右上角的趋势线。
- 绘图:使用
matplotlib的Axes3D功能来绘制三维散点图、柱状图和趋势线。