宇树h1_2机器人:基于unitree_sdk2_python的机械臂控制-正逆解求法以及源码复现_宇树机器人底层接口怎么调用
摘要
本文介绍了宇树H1_2双足机器人右臂控制算法的实现方法。首先通过官方文档和URDF文件了解机器人的基本结构,使用Python SDK接口进行编程控制。重点讲解了如何通过正逆运动学方法操控机械臂:(1)解析底层控制例程,实现关节复位和动作控制;(2)通过设定目标角度控制机械臂运动;(3)将7自由度简化成4自由度进行逆运动学解算。文中还提供了具体代码实现方法和注意事项,包括关节限位、角度定义等。
1 宇树h1_2机器人基本信息
(1)官方文档
链接:宇树科技 文档中心
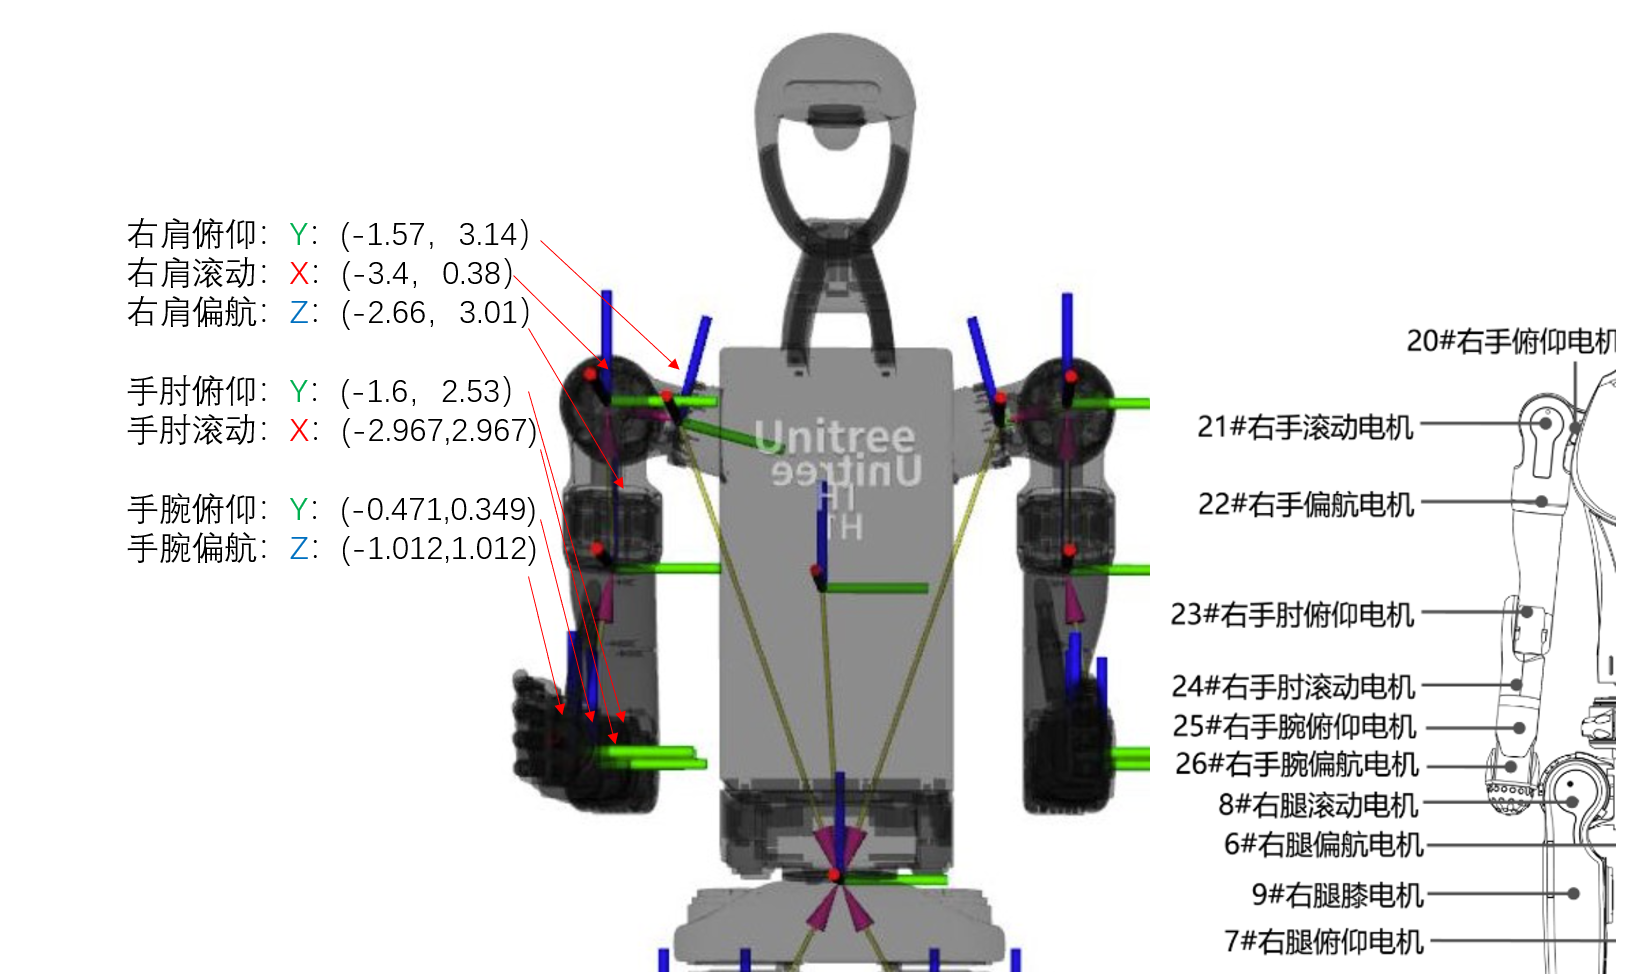
官方文档涵盖h1_2机器人的各个部件名称、自由度、基本结构、关节序号与关节限位等进本信息。由于本文做的是机器人右臂的控制算法,所以我只总结了右臂有关信息。
(2)URDF文件
链接:https://github.com/unitreerobotics/unitree_ros/tree/master/robots/h1_2_description
(2)h1_2机器人本体控制sdk2_python接口
链接:unitree_sdk2_python/example at master · unitreerobotics/unitree_sdk2_python · GitHub
unitree_sdk2_python 是一个开源项目,旨在为 Unitree 双足机器人提供 SDK 接口,以便用户可以使用 Python 语言进行编程和控制。该项目是 Unitree 机器人开发者工具集的一部分,允许开发者通过 Python 实现对机器人硬件的访问和控制。
C++与底层开发不熟练的读者可以通过python接口很方便地调用该例程进行研究。
example路径下可以找到b2、b2w、g1、go2、h1_2等不同型号机器人的控制例程。
2 控制例程实现
参考宇树官方文档的教程,链接:unitree_sdk2_python/README zh.md at master · unitreerobotics/unitree_sdk2_python · GitHub
在Ubuntu22.04(Linux电脑,右键打开)终端(依次)输入,主要功能是克隆项目到本地。
(这里需要下载git并且联网)
cd ~sudo apt install python3-pipgit clone https://github.com/unitreerobotics/unitree_sdk2_python.gitcd unitree_sdk2_pythonpip3 install -e .用网线链接电脑与机器人:宇树科技 文档中心
这里需要知道机器人网卡名称(终端输入 ifconfig 查看)与网址。
在克隆的python项目中找到h1_2的底层(low_level)控制例程,并运行,即在终端输入:
python3 ./example/h1_2/low_level/h1_2_low_level_example.py enp2s0最后的 enp2s0 改为自己查询到的网卡名称即可。
3利用正逆解操控机械臂
(1)控制例程源码解析
定义左右臂关节名称及序号:(可以对比官方文档给出的名称,对应起来)
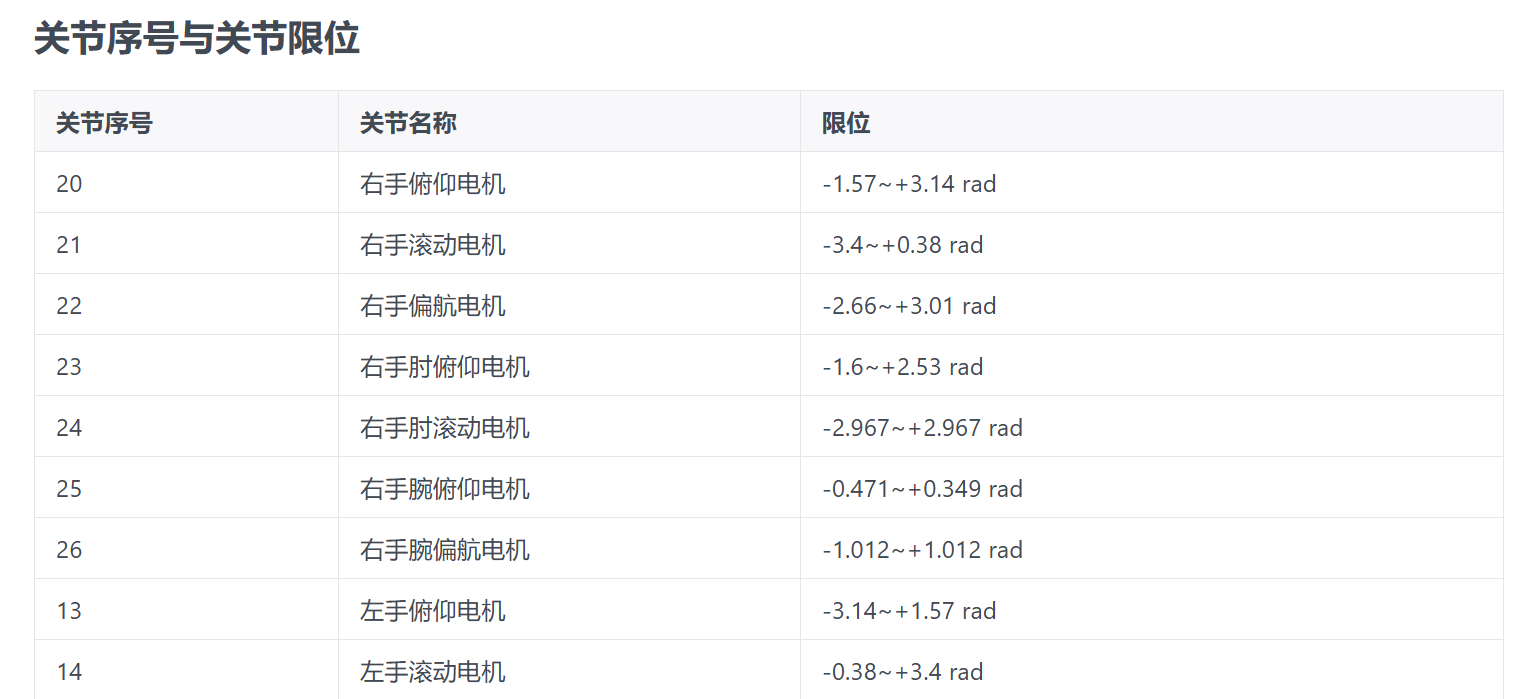

LeftShoulderPitch = 13 LeftShoulderRoll = 14 LeftShoulderYaw = 15 LeftElbow = 16 LeftWristRoll = 17 LeftWristPitch = 18 LeftWristYaw = 19 RightShoulderPitch = 20 RightShoulderRoll = 21 RightShoulderYaw = 22 RightElbow = 23 RightWristRoll = 24 RightWristPitch = 25 RightWristYaw = 26关节复位至零状态:(注意此时机器人不是双手下垂而是大小臂垂直,小臂平行于地面)
此处利用的是平滑处理,将手臂从下垂变成至大小臂垂直。
def LowCmdWrite(self): self.time_ += self.control_dt_ self.low_cmd.mode_pr = Mode.PR self.low_cmd.mode_machine = self.mode_machine_ for i in range(H1_2_NUM_MOTOR): ratio = np.clip(self.time_ / self.duration_, 0.0, 1.0) self.low_cmd.motor_cmd[i].mode = 1 # 1:Enable, 0:Disable self.low_cmd.motor_cmd[i].tau = 0.0 self.low_cmd.motor_cmd[i].q = 0.0 self.low_cmd.motor_cmd[i].dq = 0.0 self.low_cmd.motor_cmd[i].kp = 100.0 if i < 13 else 50.0 self.low_cmd.motor_cmd[i].kd = 1.0 if self.time_ < self.duration_ : # [Stage 1]: set robot to zero posture for i in range(H1_2_NUM_MOTOR): ratio = np.clip(self.time_ / self.duration_, 0.0, 1.0) self.low_cmd.mode_pr = Mode.PR self.low_cmd.mode_machine = self.mode_machine_ self.low_cmd.motor_cmd[i].mode = 1 # 1:Enable, 0:Disable self.low_cmd.motor_cmd[i].tau = 0. self.low_cmd.motor_cmd[i].q = (1.0 - ratio) * self.low_state.motor_state[i].q self.low_cmd.motor_cmd[i].dq = 0. self.low_cmd.motor_cmd[i].kp = 100.0 if i < 13 else 50.0 self.low_cmd.motor_cmd[i].kd = 1.0定义脚踝和手臂动作:
self.low_cmd.mode_pr = Mode.PR self.low_cmd.mode_machine = self.mode_machine_ self.low_cmd.motor_cmd[H1_2_JointIndex.LeftAnklePitch].q = L_P_des self.low_cmd.motor_cmd[H1_2_JointIndex.LeftAnklePitch].dq = 0 self.low_cmd.motor_cmd[H1_2_JointIndex.LeftAnklePitch].kp = Kp_Pitch self.low_cmd.motor_cmd[H1_2_JointIndex.LeftAnklePitch].kd = Kd_Pitch self.low_cmd.motor_cmd[H1_2_JointIndex.LeftAnkleRoll].q = L_R_des ... # max_wrist_roll_angle = 0.5; # [rad] # WristRoll_des = max_wrist_roll_angle * np.sin(2.0 * np.pi * t) # self.low_cmd.motor_cmd[H1_2_JointIndex.LeftWristRoll].q = WristRoll_des # self.low_cmd.motor_cmd[H1_2_JointIndex.LeftWristRoll].dq = 0 # self.low_cmd.motor_cmd[H1_2_JointIndex.LeftWristRoll].kp = 50 # self.low_cmd.motor_cmd[H1_2_JointIndex.LeftWristRoll].kd = 1 ...如果运行成功,机器人脚踝会进行旋转(这里按照sin函数的格式进行连续运动,所以不需要插值及平滑处理);同时手臂会从下垂状态变成大小臂垂直的状态,并进行腕部旋转。
(2)规定正解并测试
根据目标位置自行计算七个关节各自的旋转角度,注意不要超过官方文档给出的限位值。
有关代码可以进行如下修改:(注释掉 手腕运动的代码,添加如下关节控制代码)
将a1-7设置为自己需要的角度(注意,角度的正负是由右手螺旋定则的方式规定的,沿着右手大拇指方向,也就是电机的旋转轴方向看,四指所指方向为正,反之为负)。
right_arm_target_angles = [a1, a2, a3, a4, a5, a6, a7] ratio = np.clip((self.time_ - self.duration_) / self.duration_, 0.0, 1.0) right_arm_indices = [ H1_2_JointIndex.RightShoulderPitch, H1_2_JointIndex.RightShoulderRoll, H1_2_JointIndex.RightShoulderYaw, H1_2_JointIndex.RightElbow, H1_2_JointIndex.RightWristRoll, H1_2_JointIndex.RightWristPitch, H1_2_JointIndex.RightWristYaw, ] for idx, target_q in zip(right_arm_indices, right_arm_target_angles): current_q = self.low_state.motor_state[idx].q # 当前角度 self.low_cmd.motor_cmd[idx].q = (1 - ratio) * current_q + ratio * target_q self.low_cmd.motor_cmd[idx].dq = 0 self.low_cmd.motor_cmd[idx].kp = 50 self.low_cmd.motor_cmd[idx].kd = 1(3)求逆解
由于h1_2机器人手臂有七个自由度,较难解算,因此可以考虑将其简化到四自由度,即只保留:
20:RightShoulderPitch/ 21:RightShoulderRoll/ 23:RightElbow/ 26:RightWristYaw/四个电机,其他电机旋转角度设置为0或pi/2即可。
利用手动计算或者调库(KDL、Pinocchio、Moveit)的方式,在目标坐标的基础上进行解算,得到的不同关节的旋转角度,设为θi即可(注意角度旋转的正负,一般是根据右手螺旋定则)。
initial_guess = [0.5, 0.5, 0.5] solution = root(equations, initial_guess) if solution.success: x0_num, x1_num, x2_num = solution.x j3_num = x0_num - x2_num if -3.14 <= x0_num <= 1.57 and -0.38 <= x1_num <= 3.4 and -0.471 <= x2_num <= 0.349 and -1.012 <= j3_num <= 1.012: print(f\"解为: x0 = {x0_num}, x1 = {x1_num}, x2 = {x2_num}, x3 = {j3_num}\") else: print(\"超过关节限制\") else: print(\"方程组无解\") right_arm_target_angles = [x0_num, -x1_num, 0, x2_num, 0, np.pi/2, j3_num] ratio = np.clip((self.time_ - self.duration_) / self.duration_, 0.0, 1.0) right_arm_indices = [ H1_2_JointIndex.RightShoulderPitch, H1_2_JointIndex.RightShoulderRoll, H1_2_JointIndex.RightShoulderYaw, H1_2_JointIndex.RightElbow, H1_2_JointIndex.RightWristRoll, H1_2_JointIndex.RightWristPitch, H1_2_JointIndex.RightWristYaw, ] for idx, target_q in zip(right_arm_indices, right_arm_target_angles): current_q = self.low_state.motor_state[idx].q # 当前角度 self.low_cmd.motor_cmd[idx].q = (1 - ratio) * current_q + ratio * target_q self.low_cmd.motor_cmd[idx].dq = 0 self.low_cmd.motor_cmd[idx].kp = 50 self.low_cmd.motor_cmd[idx].kd = 1 self.low_cmd.crc = self.crc.Crc(self.low_cmd) self.lowcmd_publisher_.Write(self.low_cmd)求逆解的两种方法参见我的另一篇博客:机械臂求逆解:几何法和DH参数法——KDL库(Python版本)-CSDN博客
(4)连续动作
在底层控制代码中添加两个位置姿态target_1/target_2,将duration分为两段(这里二等分为2s)分别进行两次目标位置的线性插值。
target1 = solve_robot_angles(X, Y, Z, A1, A2, A3, G, A0)target2 = solve_robot_angles(X, Y - 0.02, Z, A1, A2, A3, G, A0) # 水平移动2cm根据比例判断所处时间段:
if ratio <= 1/2: # 第一阶段:插值到 target1 current_target = target1 stage_ratio = ratio*2else: # 第二阶段:插值到 target2 current_target = target2 stage_ratio = ratio*2-1后续代码不需要改,机器人时刻读取,也就是说LowCmdWrite 会不断更新 low_cmd 中的目标位置(motor_cmd[i].q),并通过 lowcmd_publisher_.Write(self.lowcmd) 将控制命令发送给机器人。
# 执行插值 right_arm_indices = [ H1_2_JointIndex.RightShoulderPitch, H1_2_JointIndex.RightShoulderRoll, H1_2_JointIndex.RightShoulderYaw, H1_2_JointIndex.RightElbow, H1_2_JointIndex.RightWristRoll, H1_2_JointIndex.RightWristPitch, H1_2_JointIndex.RightWristYaw, ] for idx, target_q in zip(right_arm_indices, current_target): current_q = self.low_state.motor_state[idx].q # 当前角度 self.low_cmd.motor_cmd[idx].q = (1 - stage_ratio) * current_q + stage_ratio * target_q self.low_cmd.motor_cmd[idx].dq = 0 self.low_cmd.motor_cmd[idx].kp = 50 self.low_cmd.motor_cmd[idx].kd = 1 # 发布控制命令 self.low_cmd.crc = self.crc.Crc(self.lowcmd) self.lowcmd_publisher_.Write(self.lowcmd)(5)仿真
可以利用官方给出的URDF文件在Gazebo或Mojoco上进行建模仿真,以验证动作的精度。
这里以Mojoco为例,代码需要读取h1_2.xml文件以及附带的所有STL文件,才能在虚拟空间展示出完整的机器人结构,这里需要下载官方文档的meshes文件夹中的所有内容,地址如下:
unitree_ros/robots/h1_2_description/meshes at master · unitreerobotics/unitree_ros
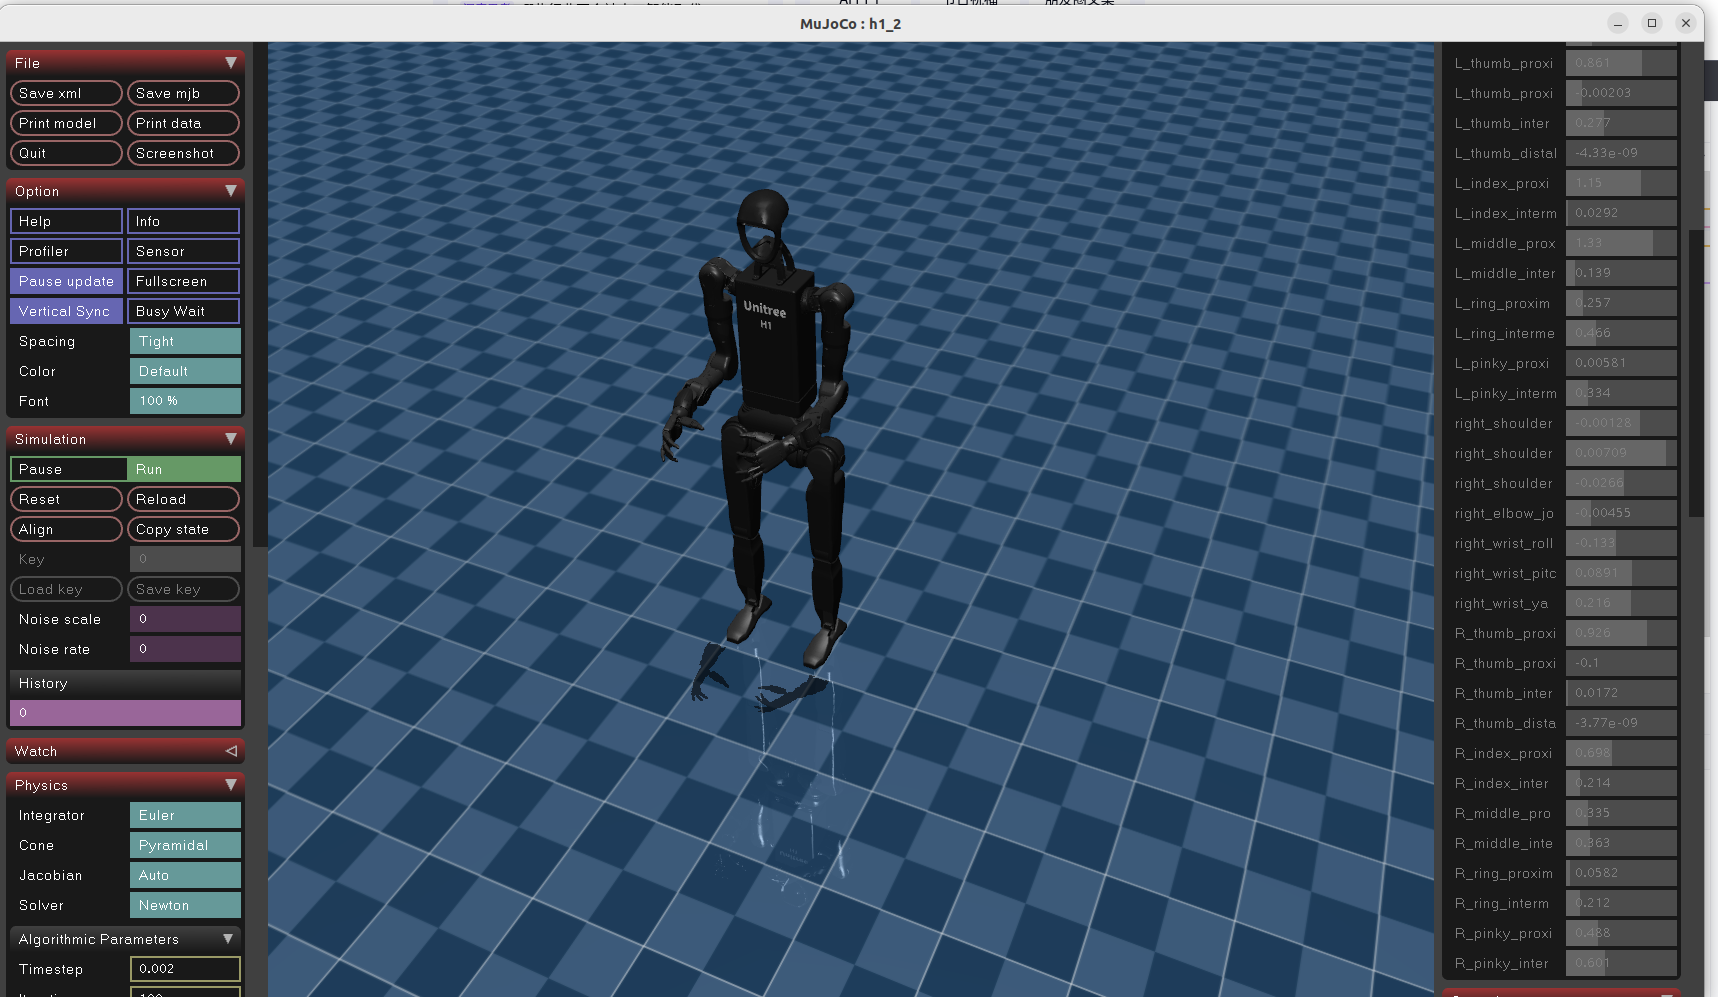
import mujocomodel_xml_path = \"./h1_2_description/robot.xml\"\"mujoco.viewer.launch_from_path(model_xml_path)这里需要将路径修改为自己的路径,运行之后效果如下(会看到一个瞬间瘫倒的机器人):
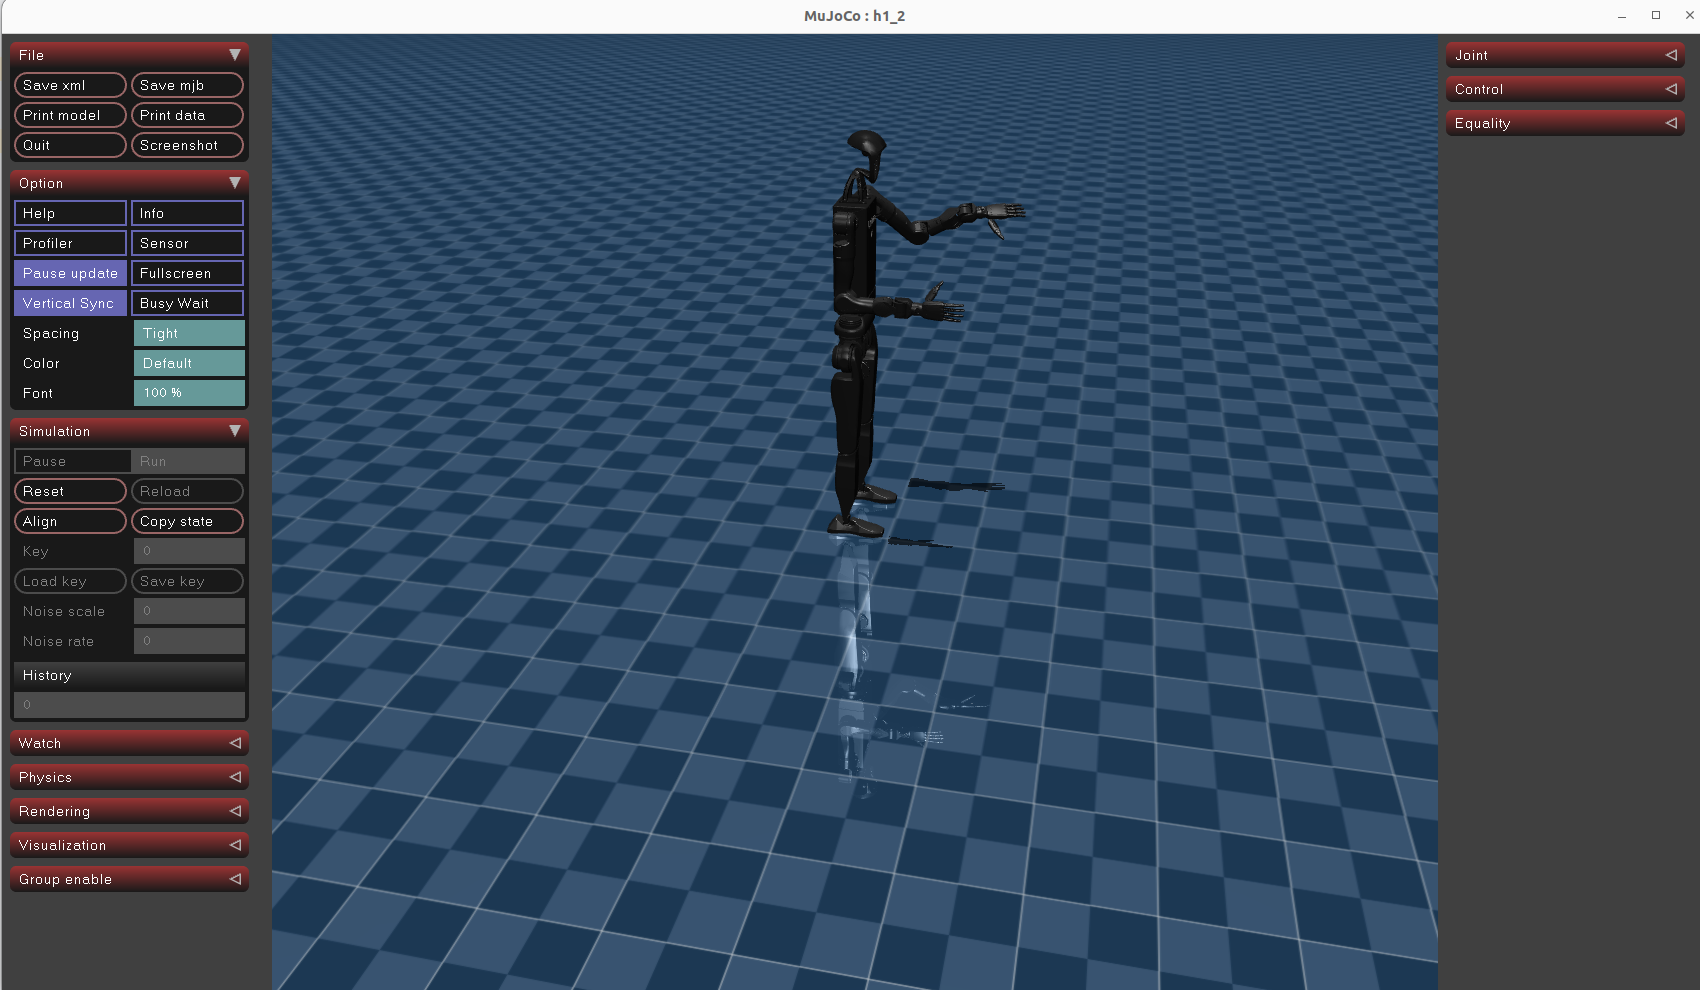
若想让机器人站立,并进行相应控制例程,还需添加控制器,利用python代码实现,参考博客:
Franka机器人Mujoco多种控制器仿真运动_mujoco力控-CSDN博客
(只需在xml文件注释掉joint name对应行,也可以可实现部件固定)
可以在xml文件的joint name行下添加site name行,以获取关节几点实时坐标信息,具体修改方式以及测试代码如下:
<!-- --> 在测试代码里通过mujoco.mj_name2id函数访问坐标信息,具体格式如下:
joint_name = \'joint_name\' # 使用 mj_name2id 将名称转换为 ID
joint_id = mujoco.mj_name2id(model, mujoco.mjtObj.mjOBJ_JOINT, joint_name)
print(f\"Joint ID: {joint_id}\")
site_name_2 = \"left_wrist_yaw_site\" # 替换为你的site名称 torso_link#site_name_2=\"L_thumb_proximal_yaw_site\"site_name_1 = \"left_shoulder_pitch_site\"#site_name_1 = \"left_wrist_roll_site\"site_id_1 = mujoco.mj_name2id(model, mujoco.mjtObj.mjOBJ_SITE, site_name_1)site_id_2 = mujoco.mj_name2id(model, mujoco.mjtObj.mjOBJ_SITE, site_name_2)with mujoco.viewer.launch_passive(model, data) as viewer: last_qvel = np.zeros(num) while viewer.is_running(): start = time.time() current_qpos = data.qpos[:num] current_qvel = data.qvel[:num] t = time.time() #desired_qpos = desired_amplitude * np.sin(2 * np.pi * frequency * t) * np.ones(num) desired_qpos =[0]*12+[-x0_num,x1_num,0,x2_num,np.pi/2,0,-j3_num] + [0]*(num-19) #desired_qpos = [0] * 12 + [0,0,0,0,0,0,0] + [0] * (num - 19) error = desired_qpos - current_qpos d_error = -current_qvel torque = Kp * error + Kd * d_error data.ctrl[:num] = torque mujoco.mj_step(model, data) # 获取site的全局坐标 site_pos_1 = data.site_xpos[site_id_1] site_pos_2 = data.site_xpos[site_id_2] print(f\"Site {site_name_1} 坐标: {site_pos_1}\") print(f\"Site {site_name_2} 坐标: {site_pos_2}\") print(error) viewer.sync()(6)测试
在Ubuntu22.04系统上与Unitree h1_2机器建立有线/无线连接,输入X、Y、Z末端位姿的值(如果使用DH参数法解算还需要旋转角),能够观察机器人关节从零位姿态逐渐旋转至目标位置。
后期可以结合视觉算法,例如深度相机的图像数据和深度数据,进行传输和可视化 。也可以利用YOLO等算法实时识别目标的位置,并解算目标的相对空间位置,以进行抓取等动作。

