CUBEAI详细使用教程(STM32运行神经网络)---以手写识别为例
系列文章目录
文章目录
- 系列文章目录
- 前言
- 一、CUBEMX配置步骤
- 二、模型结构及模型存储方式
- 三、常用API函数
-
- 1.ai_(name)_create()
- 2.ai_(name)_init
- 3.ai_(name)_create_and_init()
- 3.ai_(name)_run()
- 官方提供的示例代码
- 四、如何获取官方开发文档
- 五、手写识别案例
前言
实验效果,通过上位机上传图像到单片机识别后返回识别结果
CUBEAI(Cube Artificial Intelligence)是一种人工智能(AI)中间件,旨在为嵌入式系统提供高效、灵活的神经网络推理能力。该中间件的设计目标是在资源有限的嵌入式设备上实现深度学习推理,从而为物联网(IoT)设备、嵌入式系统和边缘计算场景提供强大的人工智能支持。
一、CUBEMX配置步骤
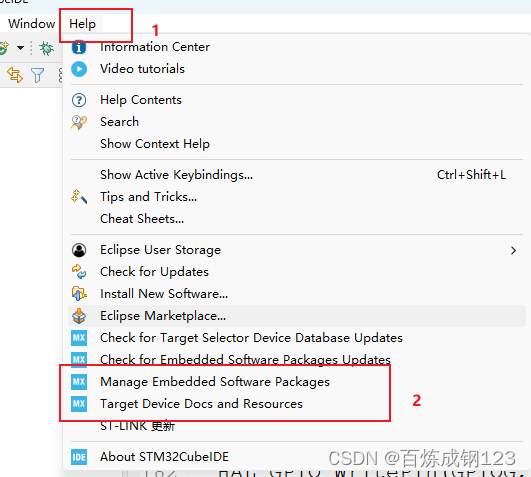
下载X-CUBE-AI工具包
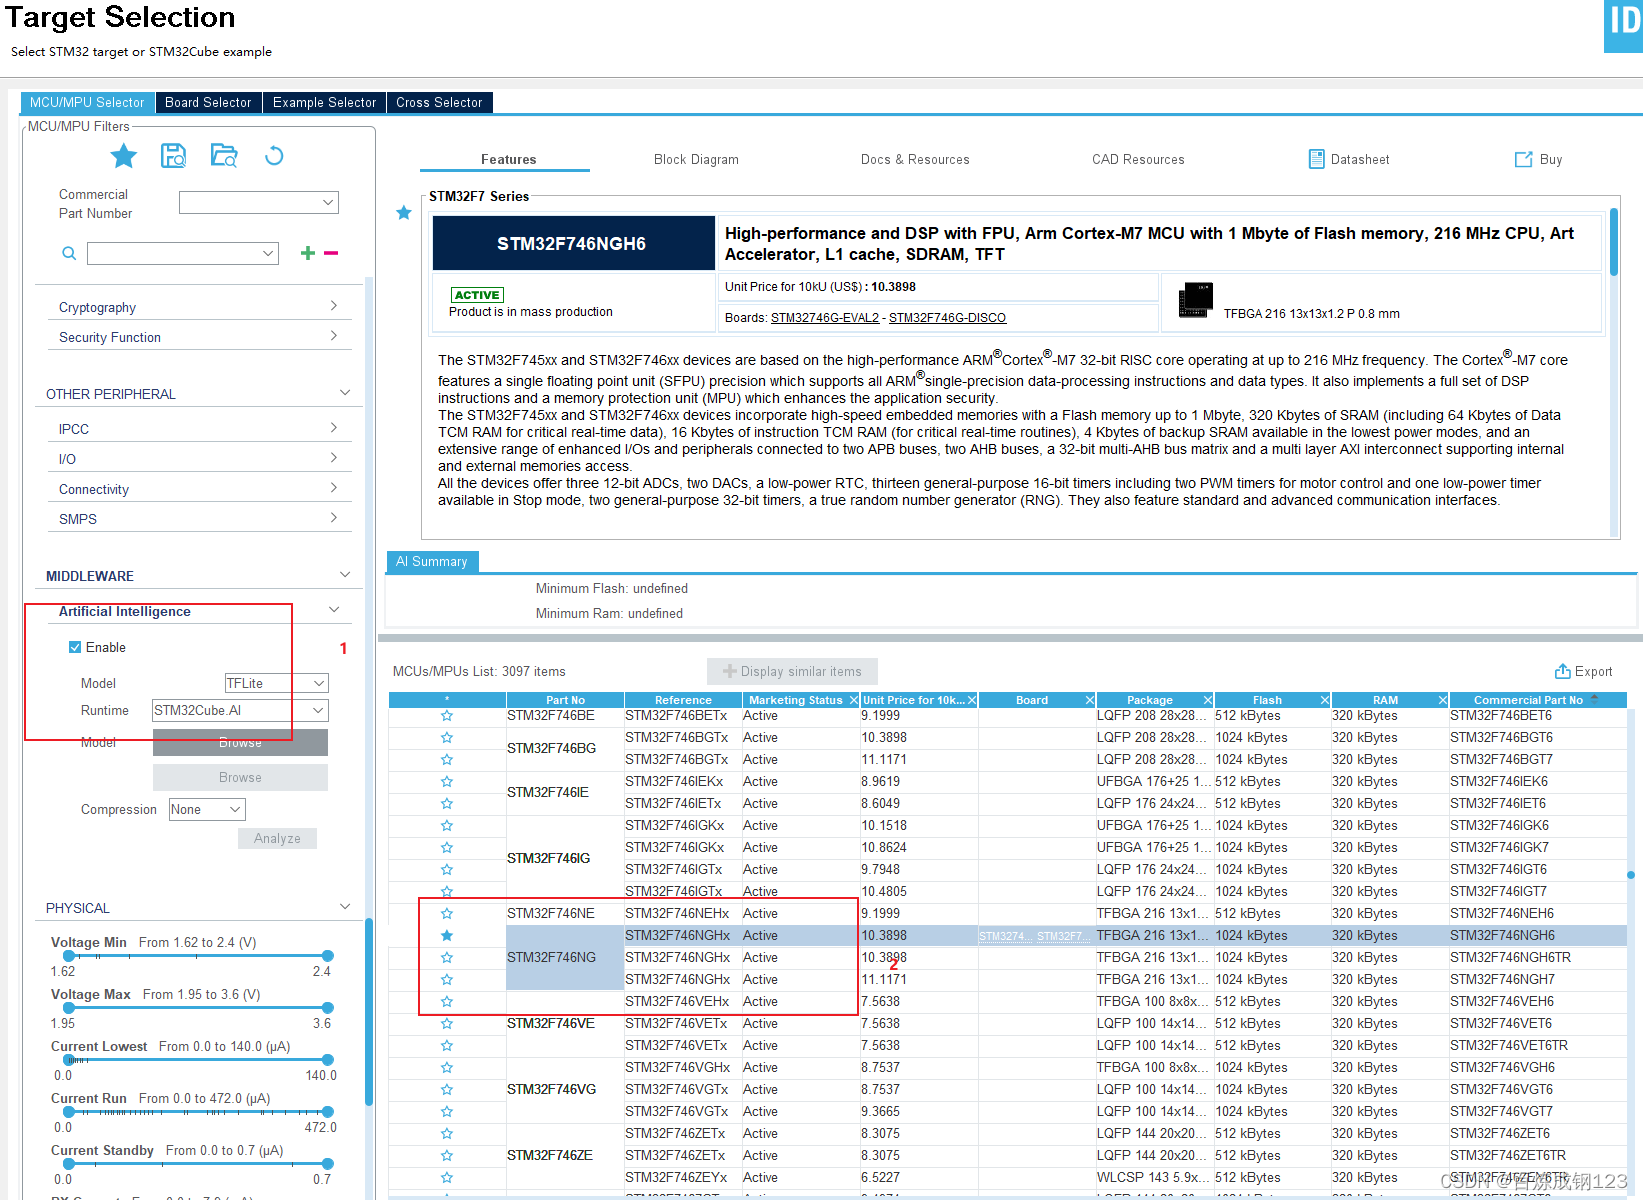
创建项目选择能运行神经网络的MCU,STM32F4以上系列的都支持部署神经网络。
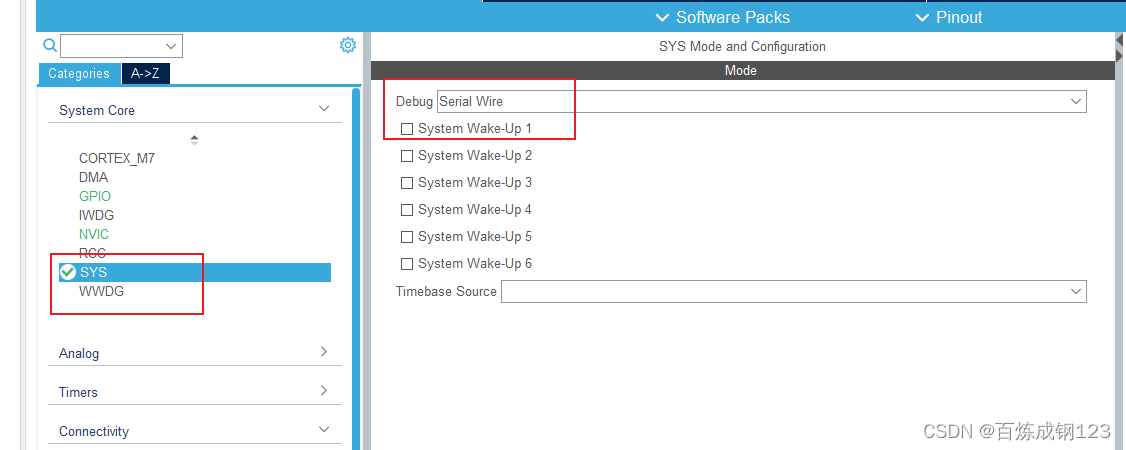
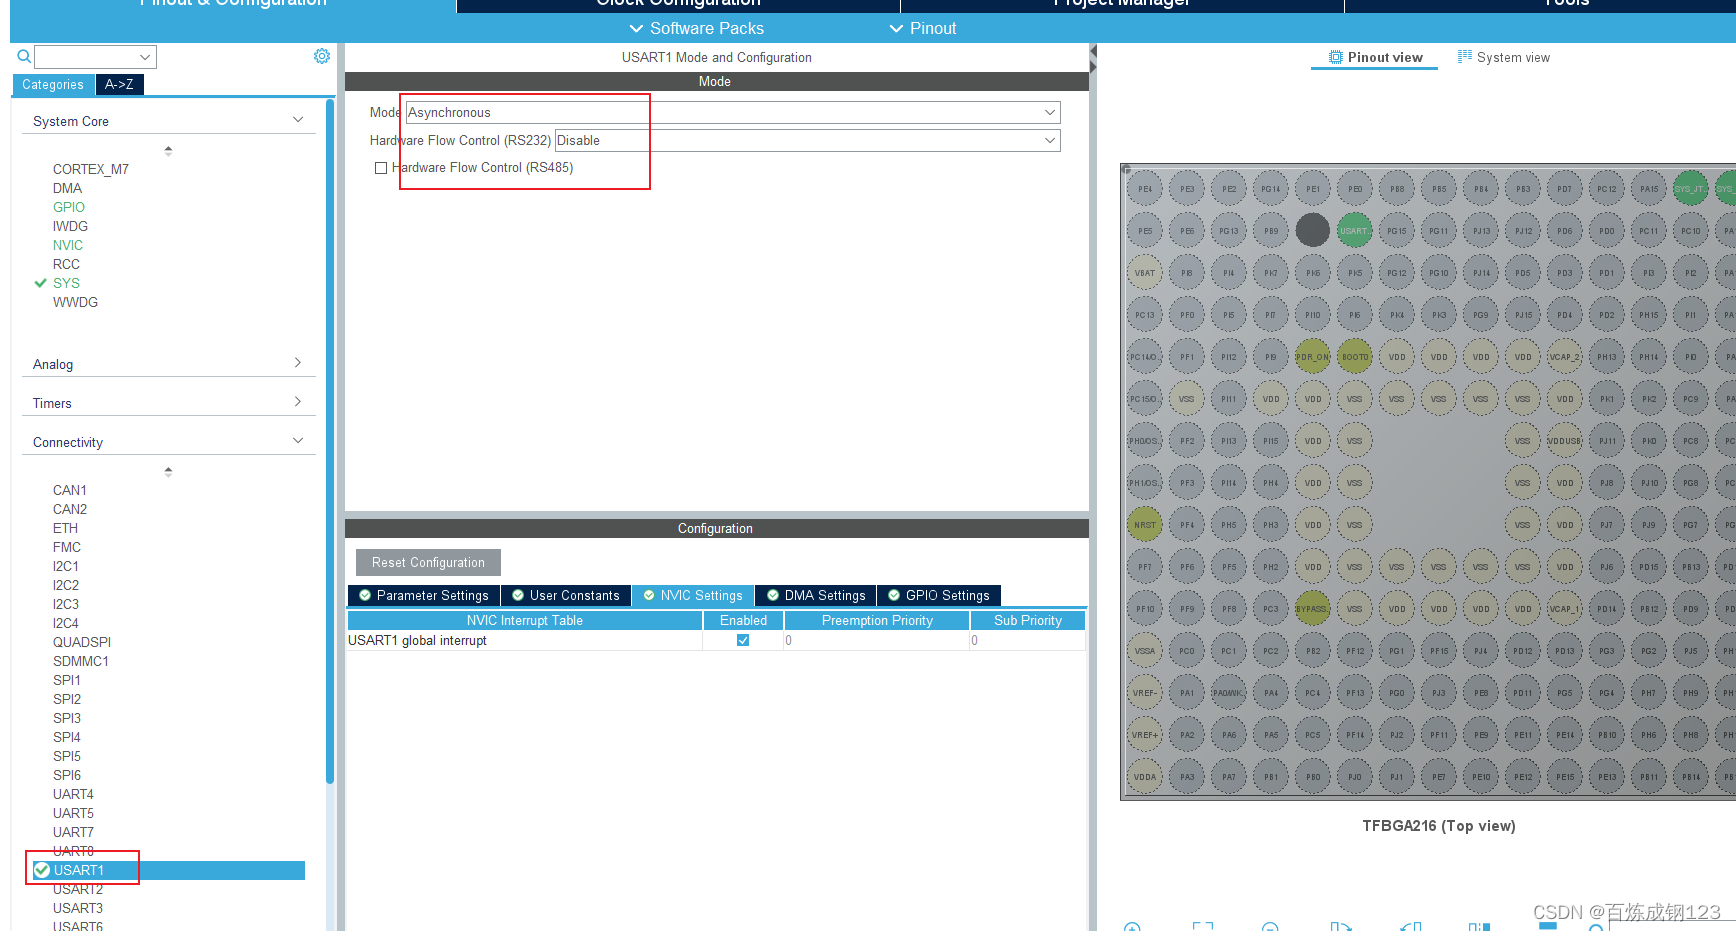
设置串口,注意一定要把串口中断打开要不然接收不到数据。
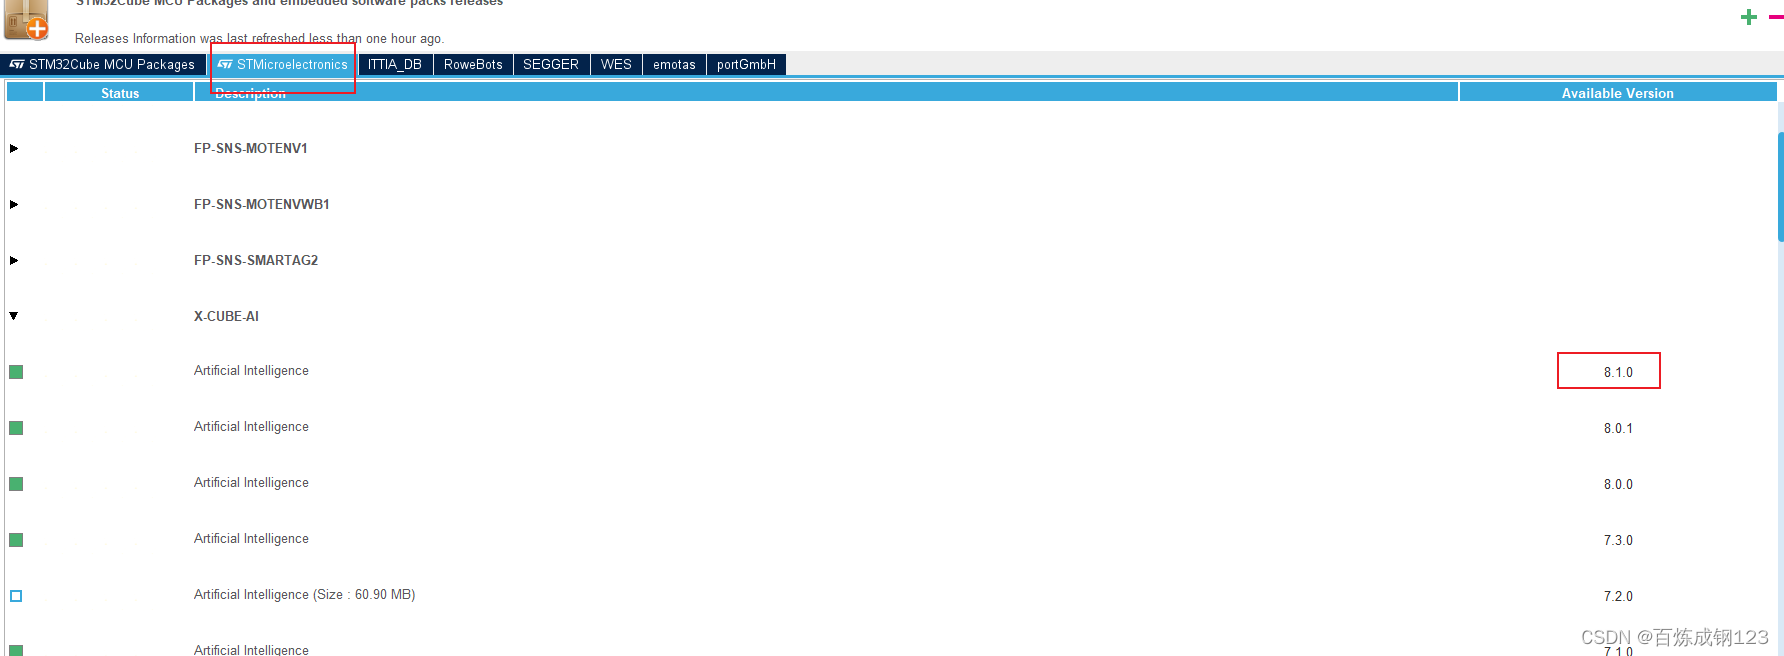
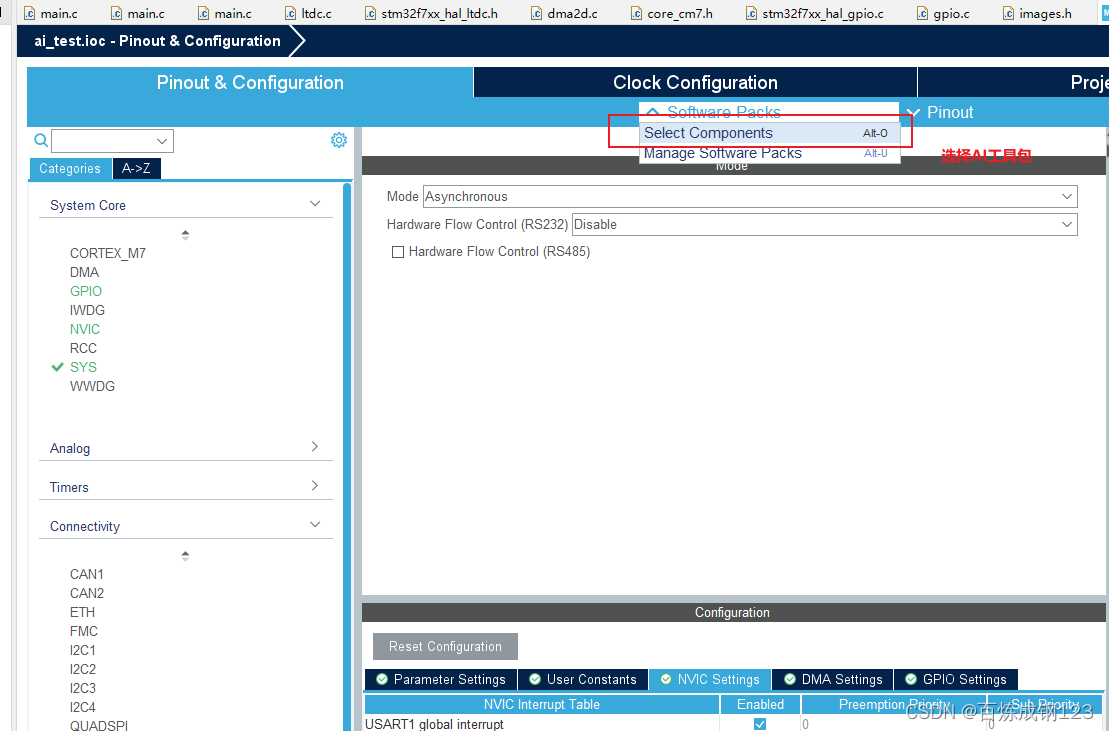
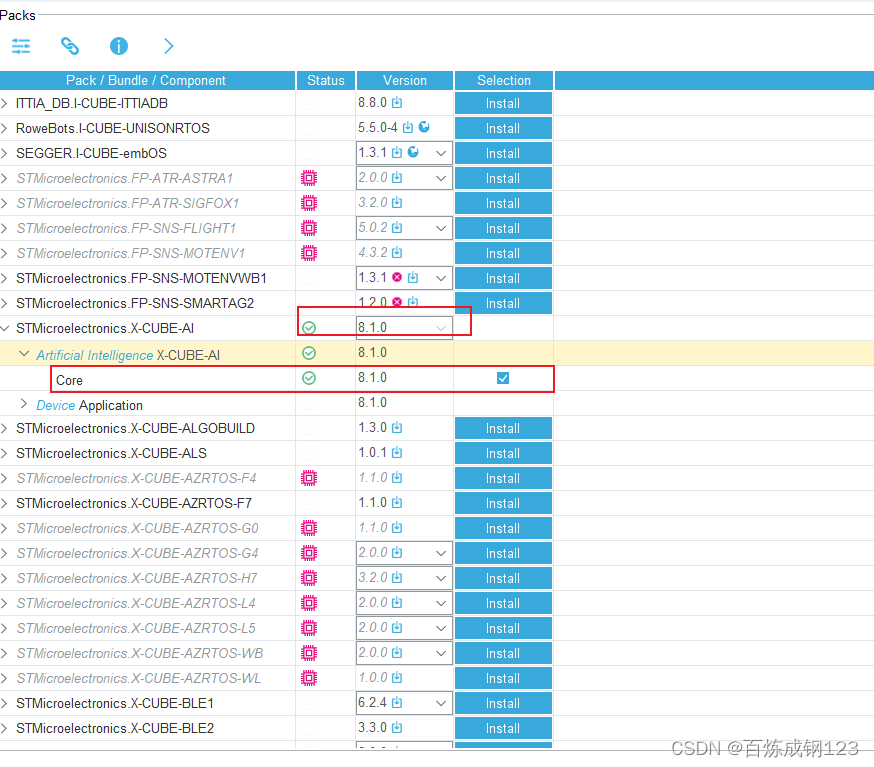
选择AI工具包,选择最近的CUBEAI工具包。最新的是8.1版本的,不同版本的生成的代码有些会不一样,有的模型老版本可以部署新版本就不行了,挺让人头疼的。
利用CUBEAI工具分析模型,这里并没有选择去优化压缩,因为模型本来就很小。CUBEAI提供的是一种无数据压缩,压缩效率并不是很高,也会损失精度。
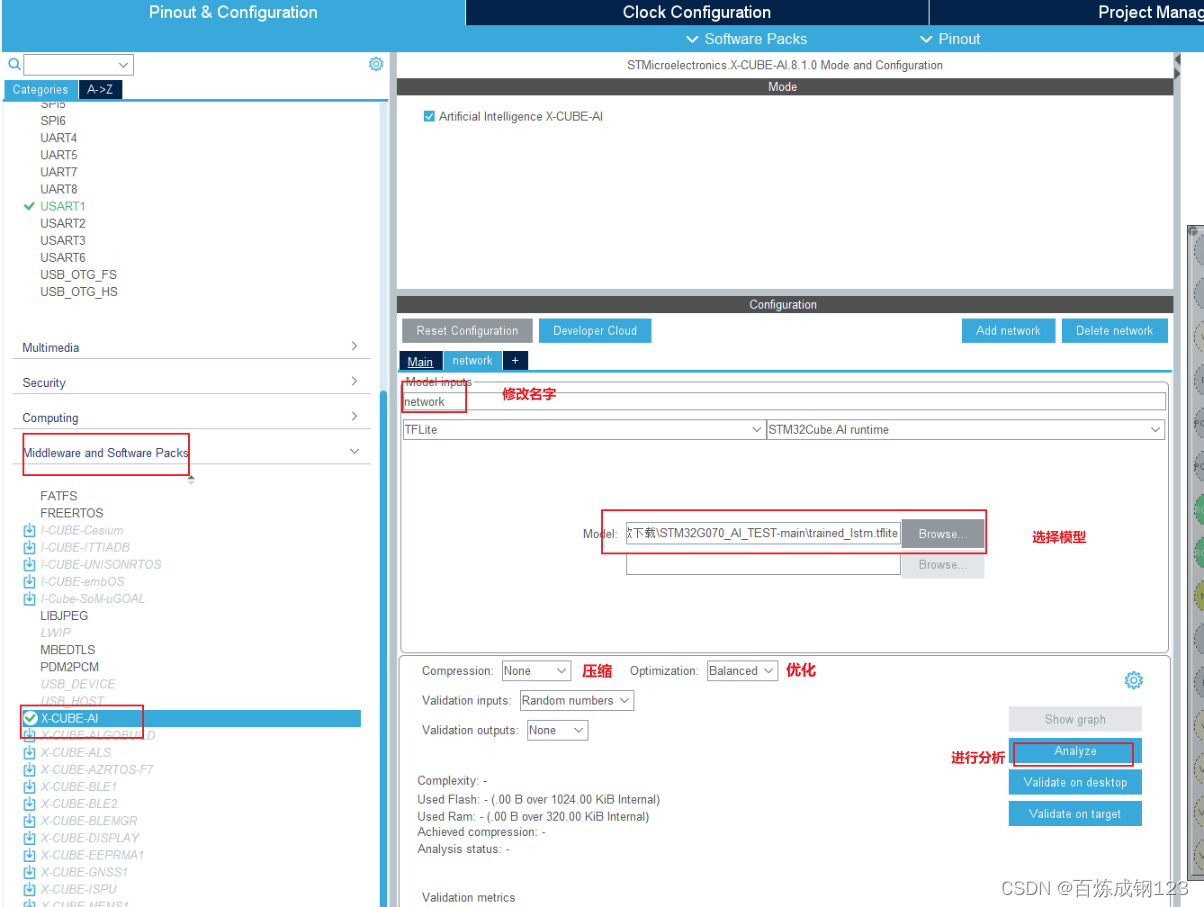
进行分析得到,模型分析后的结果。会有模型的Flash和RAM

二、模型结构及模型存储方式
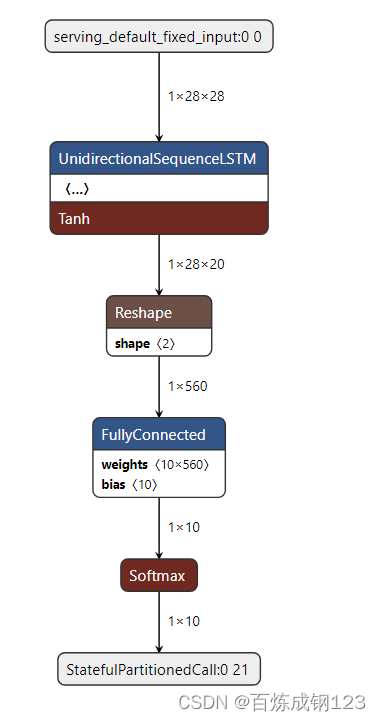
网络结构利用Netron这个网址可以将模型进行可视化。模型结构如下图所示。

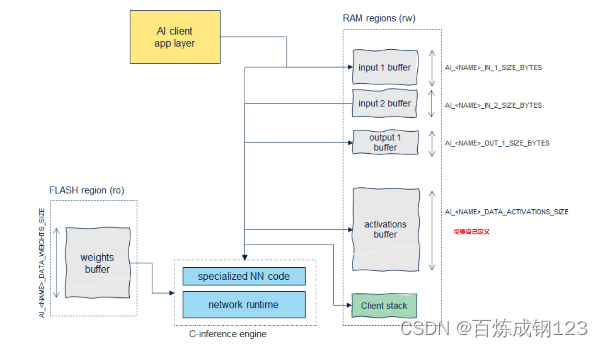
模型如何在单片机上进行存储:
- 权重参数:存放在Flash中
- 激活值:存在MCU自带的SRAM中,也可以使用外部的SD卡或者外接SRAM进行存储。需要用户自己定义。
- 输入输出数据:存放在SRAM中需要用户自己定义。如下图所示
以下是官方文档中翻译过来的
“激活”缓冲区是一个简单的连续内存映射缓冲区,放置在一个读写内存段中。它由AI客户端拥有和分配。它被传递给网络实例(参见ai_init()函数),并在执行推理期间用作私有堆(或工作缓冲区)来存储中间结果。在两次运行之间,应用程序可以使用相关的内存段。其大小AIDATA_ACTIVATIONS_SIZE是在代码生成期间定义的,对应于报告的内存度量。
Weights”缓冲区是一个简单的连续内存映射缓冲区(或多个内存映射缓冲区与——split-weights选项)。它通常放置在一个非易失和只读的内存设备中。总长度AIDATA_WEIGHTS_SIZE是在代码生成期间定义的,对应于报告的ROM度量。
“输出”和“输入”缓冲区也必须放在读写内存映射缓冲区中。默认情况下,它们由AI客户端拥有和提供。它们的大小依赖于模型,称为生成时间(AI_IN/OUT_SIZE_BYTES)。它们也可以位于“激活”缓冲区中。
三、常用API函数
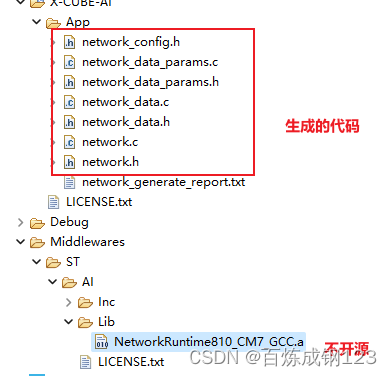
CUBEAI模型推理库不开源只开放了一些API接口,因此我们必须了解一些常用的API使用方法。

1.ai_(name)_create()
ai_error ai__create(ai_handle* network, const ai_buffer* network_config);
参数:
1.network:神经网络句柄
2.Network_config参数是一个特定的网络配置缓冲区(不透明结构),编码为ai_buffer。它是由代码生成器生成的,应用程序不应该修改它。当前,该对象总是空的,可以传递NULL,但最好传递AI_NETWORK_DATA_CONFIG(见_data.h文件)。以上是官方文档的解释,我们自己设置为NULL就可以。
功能: 这个强制函数是应用程序创建c模型实例时必须调用的早期函数。如果ai_handle对象被更新,并且它引用了一个上下文(不透明对象),该上下文应该被传递给其他函数。
2.ai_(name)_init
ai_bool ai_(name)_init(ai_handle network, const ai_network_params* params);
参数:
1.network:神经网络句柄
2.Params参数是一个结构体(ai_network_params类型),它允许传递权重和激活缓冲区的引用(数组格式)。也就是激活缓冲区的地址,官网上面的案例直接传递激活缓冲区的地址就可以,权重是自动生成的不用管。
返回值: 初始化正确还是错误
功能: 这个强制函数用于应用程序初始化内部运行时数据结构,并设置激活缓冲区和权重缓冲区。
3.ai_(name)_create_and_init()
ai_error ai__create_and_init(ai_handle* network,
const ai_handle activations[], const ai_handle weights[]);
参数:
1.network:神经网络句柄
2.const ai_handle activations[]:激活图存储地址
返回值: 初始化正确还是错误
功能: 结合了上面两个函数的功能,一般直接使用这个函数就可以
应用案例:进行创建和初始化网络模型
#include \"network.h\"#include \"network_data.h\"AI_ALIGNED(32)static ai_u8 activations[AI_NETWORK_DATA_ACTIVATIONS_SIZE];...const ai_handle acts[] = { activations };ai_network_create_and_init(&network, acts, NULL);3.ai_(name)_run()
ai_i32 ai__run(ai_handle network, const ai_buffer* input, ai_buffer* output);
> 参数:
1.network:神经网络句柄
2.ai_buffer* input:输入数据地址
3.ai_buffer* output:输出数据地址
返回值: 返回值是n_batches >= 1时处理的输入张量的数量。如果<=0,应该使用ai_network_get_error()函数来知道错误
功能: 根据输入数据,运行神经网络
官方提供的示例代码
根据示例代码可知,自己需要修改的地方主要有三点。
1、定义网络句柄、输入、输出和激活缓冲区数据buf 和管理输入和输出数据的指针。
2、获取和处理数据并进行推理。如果是图像分类任务,图像数据可能是来自摄像头模块获取。其他任务例如运动检测任务,数据可能会来自六轴加速度传感器。
3、对输出数据进行后处理。对于分类任务,模型输出结果是每个类别的概率,有时我们要输出准确率最高的类别就要写一个求最大值的函数
#include #include \"network.h\"#include \"network_data.h\"/* Global handle to reference the instantiated C-model *//*引用实例化的C-model的全局句柄*/static ai_handle network = AI_HANDLE_NULL;/* Global c-array to handle the activations buffer *//*用于处理激活缓冲区的全局c数组*/AI_ALIGNED(32)static ai_u8 activations[AI_NETWORK_DATA_ACTIVATIONS_SIZE];/* Array to store the data of the input tensor *//*用于存储输入张量数据的数组*/AI_ALIGNED(32)static ai_float in_data[AI_NETWORK_IN_1_SIZE];/* or static ai_u8 in_data[AI_NETWORK_IN_1_SIZE_BYTES]; *//*用于存储输出张量数据的c数组*//* c-array to store the data of the output tensor */AI_ALIGNED(32)static ai_float out_data[AI_NETWORK_OUT_1_SIZE];/* static ai_u8 out_data[AI_NETWORK_OUT_1_SIZE_BYTES]; *//* Array of pointer to manage the model\'s input/output tensors *//*用于管理模型输入/输出张量的指针数组*/static ai_buffer *ai_input;static ai_buffer *ai_output;/* * Bootstrap */int aiInit(void) { ai_error err; /* Create and initialize the c-model *//*创建并初始化c-model */ const ai_handle acts[] = { activations }; err = ai_network_create_and_init(&network, acts, NULL); if (err.type != AI_ERROR_NONE) { ... }; /* Reteive pointers to the model\'s input/output tensors *//*获取指向模型输入/输出张量的指针*/ ai_input = ai_network_inputs_get(network, NULL); ai_output = ai_network_outputs_get(network, NULL); return 0;}/* * Run inference */int aiRun(const void *in_data, void *out_data) { ai_i32 n_batch; ai_error err; /* 1 - Update IO handlers with the data payload *//* 1 -用数据有效载荷更新IO处理程序*/ ai_input[0].data = AI_HANDLE_PTR(in_data); ai_output[0].data = AI_HANDLE_PTR(out_data); /* 2 - Perform the inference *//* 2 -执行推理*/ n_batch = ai_network_run(network, &ai_input[0], &ai_output[0]); if (n_batch != 1) { err = ai_network_get_error(network); ... }; return 0;}/* * Example of main loop function */void main_loop() { /* The STM32 CRC IP clock should be enabled to use the network runtime library */ /*应启用STM32 CRC IP时钟,以使用网络运行时库*/ __HAL_RCC_CRC_CLK_ENABLE(); aiInit(); while (1) { /* 1 - Acquire, pre-process and fill the input buffers */ /* 1 -获取、预处理和填充输入缓冲区*/ acquire_and_process_data(in_data); /* 2 - Call inference engine */ /* 2 -调用推理引擎*/ aiRun(in_data, out_data); /* 3 - Post-process the predictions */ /* 3——对预测进行后处理*/ post_process(out_data); }}四、如何获取官方开发文档
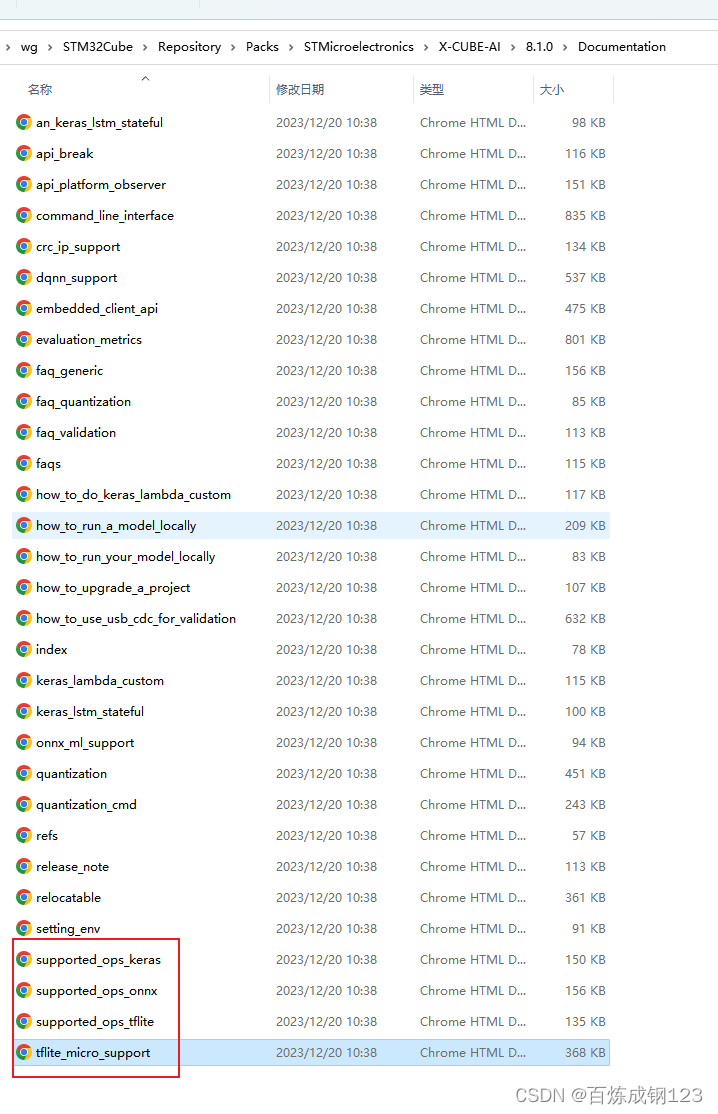
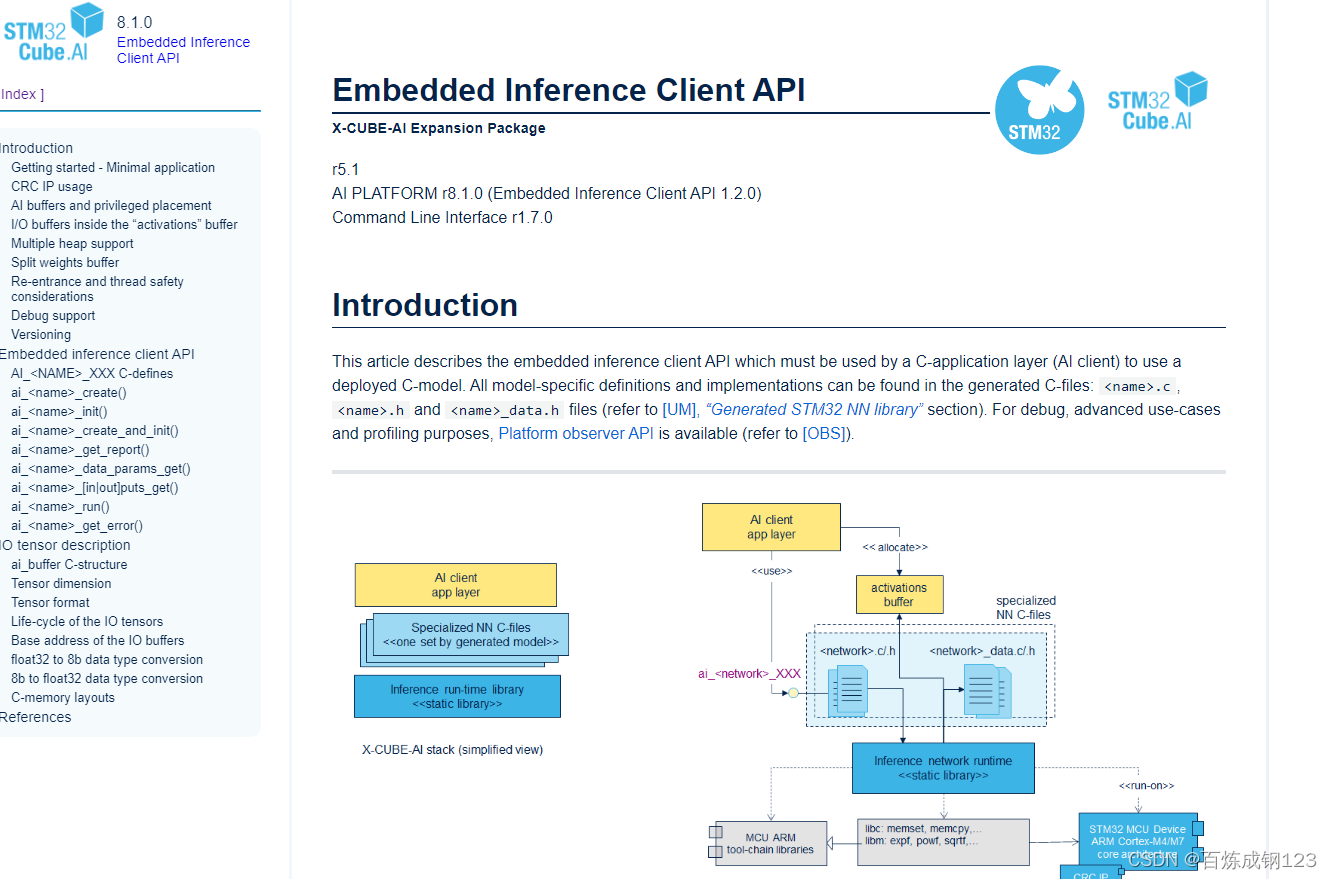
在实际应用中发现CUBEAI在每个版本会有些差别,我训练好的模型在CUBEAI7.3可以使用但是在CUBEAI8.1就无法使用,每个版本也会新增加一些算子。可以在下载安装包中找到相对应的文档说明,例如在我的电脑中的这个目录获取文档
file:///C:/Users/wg/STM32Cube/Repository/Packs/STMicroelectronics/X-CUBE-AI/8.1.0/Documentation/embedded_client_api.html
五、手写识别案例
代码来自https://github.com/colin2135/STM32G070_AI_TEST.git 大家可以去star一下。感谢作者的开源。作者使用的是STM32G0系列的单片机,我是使用的是STM32F7和正点原子的H5mini,F4系列的都可以。目前还没有尝试F1系列的单片机。
一、代码思路:1. 利用上位机将手写数据通过串口发送给单片机。2.单片机进行获取数据利用神经网络进行判断3.将输出结果发送给上位机。上位机链接https://github.com/colin2135/HandWriteApp,下载源码后,找到这个文件路径。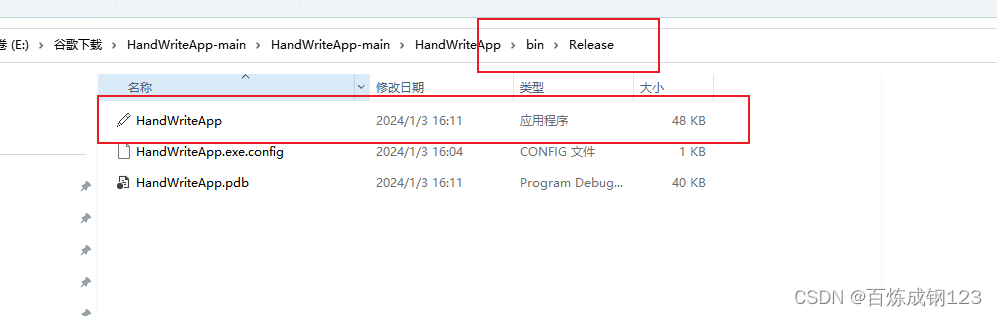
二、代码实现:
1、定义网络句柄、输入、输出和激活缓冲区数据buf 和管理输入和输出数据的指针。
ai_handle network;float aiInData[AI_NETWORK_IN_1_SIZE];float aiOutData[AI_NETWORK_OUT_1_SIZE];ai_u8 activations[AI_NETWORK_DATA_ACTIVATIONS_SIZE];ai_buffer * ai_input;ai_buffer * ai_output;2、获取和处理数据
通过串口获取数据
/* USER CODE BEGIN 4 */利用回调函数接收上位机发来的手写数字的数据void HAL_UART_RxCpltCallback(UART_HandleTypeDef *UartHandle){if(goRunning ==0){if (uart_rx_length < UART_BUFF_LEN){uart_rx_buffer[uart_rx_length] = uart_rx_byte;uart_rx_length++;if (uart_rx_byte == \'\\n\'){goRunning = 1;}}else{//rt_kprintf(\"rx len over\");uart_rx_length = 0;}}HAL_UART_Receive_IT(&huart1, (uint8_t *)&uart_rx_byte, 1);}处理数据,通过上位机发送的数据是8位数据,由于模型参数是32位浮点数因此输入数据要转换成32位浮点数
void PictureCharArrayToFloat(uint8_t *srcBuf,float *dstBuf,int len){for(int i=0;i<len;i++){dstBuf[i] = srcBuf[i];//==1?0:1;}}神经网络推理
static void AI_Run(float *pIn, float *pOut){char logStr[100];int count = 0;float max = 0; ai_i32 batch; ai_error err; /* Update IO handlers with the data payload */ ai_input[0].data = AI_HANDLE_PTR(pIn); ai_output[0].data = AI_HANDLE_PTR(pOut); batch = ai_network_run(network, ai_input, ai_output); if (batch != 1) { err = ai_network_get_error(network); printf(\"AI ai_network_run error - type=%d code=%d\\r\\n\", err.type, err.code); Error_Handler(); } for (uint32_t i = 0; i < AI_NETWORK_OUT_1_SIZE; i++) { sprintf(logStr,\"%d %8.6f\\r\\n\",i,aiOutData[i]); Uart_send(logStr); if(max<aiOutData[i]) { count = i; max= aiOutData[i]; } } sprintf(logStr,\"current number is %d\\r\\n\",count); Uart_send(logStr);}3、对输出数据进行后处理
将输出结果和最大值通过串口进行发送
for (uint32_t i = 0; i < AI_NETWORK_OUT_1_SIZE; i++) { sprintf(logStr,\"%d %8.6f\\r\\n\",i,aiOutData[i]); Uart_send(logStr); if(max<aiOutData[i]) { count = i; max= aiOutData[i]; } }3.whlie(1)代码
while (1) { /* USER CODE END WHILE */ /* USER CODE BEGIN 3 */ Uart_send(message); char str[10]; if(goRunning>0) { if(uart_rx_length == ONE_FRAME_LEN) { PictureCharArrayToFloat(uart_rx_buffer+1,aiInData,28*28); AI_Run(aiInData, aiOutData); } memset(uart_rx_buffer,0,784); goRunning = 0; uart_rx_length = 0; } } /* USER CODE END 3 */完整代码
/* USER CODE BEGIN Header *//** ****************************************************************************** * @file : main.c * @brief : Main program body ****************************************************************************** * @attention * * Copyright (c) 2024 STMicroelectronics. * All rights reserved. * * This software is licensed under terms that can be found in the LICENSE file * in the root directory of this software component. * If no LICENSE file comes with this software, it is provided AS-IS. * ****************************************************************************** *//* USER CODE END Header *//* Includes ------------------------------------------------------------------*/#include \"main.h\"/* Private includes ----------------------------------------------------------*//* USER CODE BEGIN Includes */#include \"stdio.h\"#include \"ai_platform.h\"#include \"network.h\"#include \"network_data.h\"/* USER CODE END Includes *//* Private typedef -----------------------------------------------------------*//* USER CODE BEGIN PTD *//* USER CODE END PTD *//* Private define ------------------------------------------------------------*//* USER CODE BEGIN PD *//* USER CODE END PD *//* Private macro -------------------------------------------------------------*//* USER CODE BEGIN PM *//* USER CODE END PM *//* Private variables ---------------------------------------------------------*/CRC_HandleTypeDef hcrc;UART_HandleTypeDef huart1;/* USER CODE BEGIN PV *//* USER CODE END PV *//* Private function prototypes -----------------------------------------------*/void SystemClock_Config(void);static void MX_GPIO_Init(void);static void MX_CRC_Init(void);static void MX_USART1_UART_Init(void);/* USER CODE BEGIN PFP *//* USER CODE END PFP *//* Private user code ---------------------------------------------------------*//* USER CODE BEGIN 0 */ai_handle network;float aiInData[AI_NETWORK_IN_1_SIZE];float aiOutData[AI_NETWORK_OUT_1_SIZE];ai_u8 activations[AI_NETWORK_DATA_ACTIVATIONS_SIZE];ai_buffer * ai_input;ai_buffer * ai_output;static void AI_Init(void);static void AI_Run(float *pIn, float *pOut);void PictureCharArrayToFloat(uint8_t *srcBuf,float *dstBuf,int len);void Uart_send(char * str);#define UART_BUFF_LEN 1024#define ONE_FRAME_LEN 1+784+2uint16_t uart_rx_length = 0;uint8_t uart_rx_byte = 0;uint8_t uart_rx_buffer[UART_BUFF_LEN];volatile uint8_t goRunning = 0;char message[]=\"hello\";/* USER CODE END 0 *//** * @brief The application entry point. * @retval int */int main(void){ /* USER CODE BEGIN 1 */ /* USER CODE END 1 */ /* Enable I-Cache---------------------------------------------------------*/// SCB_EnableICache();//// /* Enable D-Cache---------------------------------------------------------*/// SCB_EnableDCache(); /* MCU Configuration--------------------------------------------------------*/ /* Reset of all peripherals, Initializes the Flash interface and the Systick. */ HAL_Init(); /* USER CODE BEGIN Init */ /* USER CODE END Init */ /* Configure the system clock */ SystemClock_Config(); /* USER CODE BEGIN SysInit */ /* USER CODE END SysInit */ /* Initialize all configured peripherals */ MX_GPIO_Init(); MX_CRC_Init(); MX_USART1_UART_Init(); /* USER CODE BEGIN 2 */ AI_Init(); memset(uart_rx_buffer,0,784); HAL_UART_Receive_IT(&huart1, (uint8_t *)&uart_rx_byte, 1); /* USER CODE END 2 */ /* Infinite loop */ /* USER CODE BEGIN WHILE */ while (1) { /* USER CODE END WHILE */ /* USER CODE BEGIN 3 */ Uart_send(message); char str[10]; if(goRunning>0) { if(uart_rx_length == ONE_FRAME_LEN) { PictureCharArrayToFloat(uart_rx_buffer+1,aiInData,28*28); AI_Run(aiInData, aiOutData); } memset(uart_rx_buffer,0,784); goRunning = 0; uart_rx_length = 0; } } /* USER CODE END 3 */}/** * @brief System Clock Configuration * @retval None */void SystemClock_Config(void){ RCC_OscInitTypeDef RCC_OscInitStruct = {0}; RCC_ClkInitTypeDef RCC_ClkInitStruct = {0}; /** Configure the main internal regulator output voltage */ __HAL_RCC_PWR_CLK_ENABLE(); __HAL_PWR_VOLTAGESCALING_CONFIG(PWR_REGULATOR_VOLTAGE_SCALE1); /** Initializes the RCC Oscillators according to the specified parameters * in the RCC_OscInitTypeDef structure. */ RCC_OscInitStruct.OscillatorType = RCC_OSCILLATORTYPE_HSI; RCC_OscInitStruct.HSIState = RCC_HSI_ON; RCC_OscInitStruct.HSICalibrationValue = RCC_HSICALIBRATION_DEFAULT; RCC_OscInitStruct.PLL.PLLState = RCC_PLL_ON; RCC_OscInitStruct.PLL.PLLSource = RCC_PLLSOURCE_HSI; RCC_OscInitStruct.PLL.PLLM = 8; RCC_OscInitStruct.PLL.PLLN = 216; RCC_OscInitStruct.PLL.PLLP = RCC_PLLP_DIV2; RCC_OscInitStruct.PLL.PLLQ = 2; if (HAL_RCC_OscConfig(&RCC_OscInitStruct) != HAL_OK) { Error_Handler(); } /** Activate the Over-Drive mode */ if (HAL_PWREx_EnableOverDrive() != HAL_OK) { Error_Handler(); } /** Initializes the CPU, AHB and APB buses clocks */ RCC_ClkInitStruct.ClockType = RCC_CLOCKTYPE_HCLK|RCC_CLOCKTYPE_SYSCLK |RCC_CLOCKTYPE_PCLK1|RCC_CLOCKTYPE_PCLK2; RCC_ClkInitStruct.SYSCLKSource = RCC_SYSCLKSOURCE_PLLCLK; RCC_ClkInitStruct.AHBCLKDivider = RCC_SYSCLK_DIV1; RCC_ClkInitStruct.APB1CLKDivider = RCC_HCLK_DIV4; RCC_ClkInitStruct.APB2CLKDivider = RCC_HCLK_DIV2; if (HAL_RCC_ClockConfig(&RCC_ClkInitStruct, FLASH_LATENCY_7) != HAL_OK) { Error_Handler(); }}/** * @brief CRC Initialization Function * @param None * @retval None */static void MX_CRC_Init(void){ /* USER CODE BEGIN CRC_Init 0 */ /* USER CODE END CRC_Init 0 */ /* USER CODE BEGIN CRC_Init 1 */ /* USER CODE END CRC_Init 1 */ hcrc.Instance = CRC; hcrc.Init.DefaultPolynomialUse = DEFAULT_POLYNOMIAL_ENABLE; hcrc.Init.DefaultInitValueUse = DEFAULT_INIT_VALUE_ENABLE; hcrc.Init.InputDataInversionMode = CRC_INPUTDATA_INVERSION_NONE; hcrc.Init.OutputDataInversionMode = CRC_OUTPUTDATA_INVERSION_DISABLE; hcrc.InputDataFormat = CRC_INPUTDATA_FORMAT_BYTES; if (HAL_CRC_Init(&hcrc) != HAL_OK) { Error_Handler(); } /* USER CODE BEGIN CRC_Init 2 */ /* USER CODE END CRC_Init 2 */}/** * @brief USART1 Initialization Function * @param None * @retval None */static void MX_USART1_UART_Init(void){ /* USER CODE BEGIN USART1_Init 0 */ /* USER CODE END USART1_Init 0 */ /* USER CODE BEGIN USART1_Init 1 */ /* USER CODE END USART1_Init 1 */ huart1.Instance = USART1; huart1.Init.BaudRate = 115200; huart1.Init.WordLength = UART_WORDLENGTH_8B; huart1.Init.StopBits = UART_STOPBITS_1; huart1.Init.Parity = UART_PARITY_NONE; huart1.Init.Mode = UART_MODE_TX_RX; huart1.Init.HwFlowCtl = UART_HWCONTROL_NONE; huart1.Init.OverSampling = UART_OVERSAMPLING_16; huart1.Init.OneBitSampling = UART_ONE_BIT_SAMPLE_DISABLE; huart1.AdvancedInit.AdvFeatureInit = UART_ADVFEATURE_NO_INIT; if (HAL_UART_Init(&huart1) != HAL_OK) { Error_Handler(); } /* USER CODE BEGIN USART1_Init 2 */ /* USER CODE END USART1_Init 2 */}/** * @brief GPIO Initialization Function * @param None * @retval None */static void MX_GPIO_Init(void){/* USER CODE BEGIN MX_GPIO_Init_1 *//* USER CODE END MX_GPIO_Init_1 */ /* GPIO Ports Clock Enable */ __HAL_RCC_GPIOA_CLK_ENABLE(); __HAL_RCC_GPIOB_CLK_ENABLE(); __HAL_RCC_GPIOH_CLK_ENABLE();/* USER CODE BEGIN MX_GPIO_Init_2 *//* USER CODE END MX_GPIO_Init_2 */}/* USER CODE BEGIN 4 */void HAL_UART_RxCpltCallback(UART_HandleTypeDef *UartHandle){if(goRunning ==0){if (uart_rx_length < UART_BUFF_LEN){uart_rx_buffer[uart_rx_length] = uart_rx_byte;uart_rx_length++;if (uart_rx_byte == \'\\n\'){goRunning = 1;}}else{//rt_kprintf(\"rx len over\");uart_rx_length = 0;}}HAL_UART_Receive_IT(&huart1, (uint8_t *)&uart_rx_byte, 1);}void Uart_send(char * str){HAL_UART_Transmit(&huart1, (uint8_t *)str, strlen(str),0xffff);}static void AI_Init(void){ ai_error err; /* Create a local array with the addresses of the activations buffers */ const ai_handle act_addr[] = { activations }; /* Create an instance of the model */ err = ai_network_create_and_init(&network, act_addr, NULL); if (err.type != AI_ERROR_NONE) { printf(\"ai_network_create error - type=%d code=%d\\r\\n\", err.type, err.code); Error_Handler(); } ai_input = ai_network_inputs_get(network, NULL); ai_output = ai_network_outputs_get(network, NULL);}static void AI_Run(float *pIn, float *pOut){char logStr[100];int count = 0;float max = 0; ai_i32 batch; ai_error err; /* Update IO handlers with the data payload */ ai_input[0].data = AI_HANDLE_PTR(pIn); ai_output[0].data = AI_HANDLE_PTR(pOut); batch = ai_network_run(network, ai_input, ai_output); if (batch != 1) { err = ai_network_get_error(network); printf(\"AI ai_network_run error - type=%d code=%d\\r\\n\", err.type, err.code); Error_Handler(); } for (uint32_t i = 0; i < AI_NETWORK_OUT_1_SIZE; i++) { sprintf(logStr,\"%d %8.6f\\r\\n\",i,aiOutData[i]); Uart_send(logStr); if(max<aiOutData[i]) { count = i; max= aiOutData[i]; } } sprintf(logStr,\"current number is %d\\r\\n\",count); Uart_send(logStr);}void PictureCharArrayToFloat(uint8_t *srcBuf,float *dstBuf,int len){for(int i=0;i<len;i++){dstBuf[i] = srcBuf[i];//==1?0:1;}}/* USER CODE END 4 *//** * @brief This function is executed in case of error occurrence. * @retval None */void Error_Handler(void){ /* USER CODE BEGIN Error_Handler_Debug */ /* User can add his own implementation to report the HAL error return state */ __disable_irq(); while (1) { } /* USER CODE END Error_Handler_Debug */}#ifdef USE_FULL_ASSERT/** * @brief Reports the name of the source file and the source line number * where the assert_param error has occurred. * @param file: pointer to the source file name * @param line: assert_param error line source number * @retval None */void assert_failed(uint8_t *file, uint32_t line){ /* USER CODE BEGIN 6 */ /* User can add his own implementation to report the file name and line number, ex: printf(\"Wrong parameters value: file %s on line %d\\r\\n\", file, line) */ /* USER CODE END 6 */}#endif /* USE_FULL_ASSERT */

